


How to service these Campy front hubs?
 09-11-23, 10:26 AM
#1
Junior Member
Thread Starter
How to service these Campy front hubs?
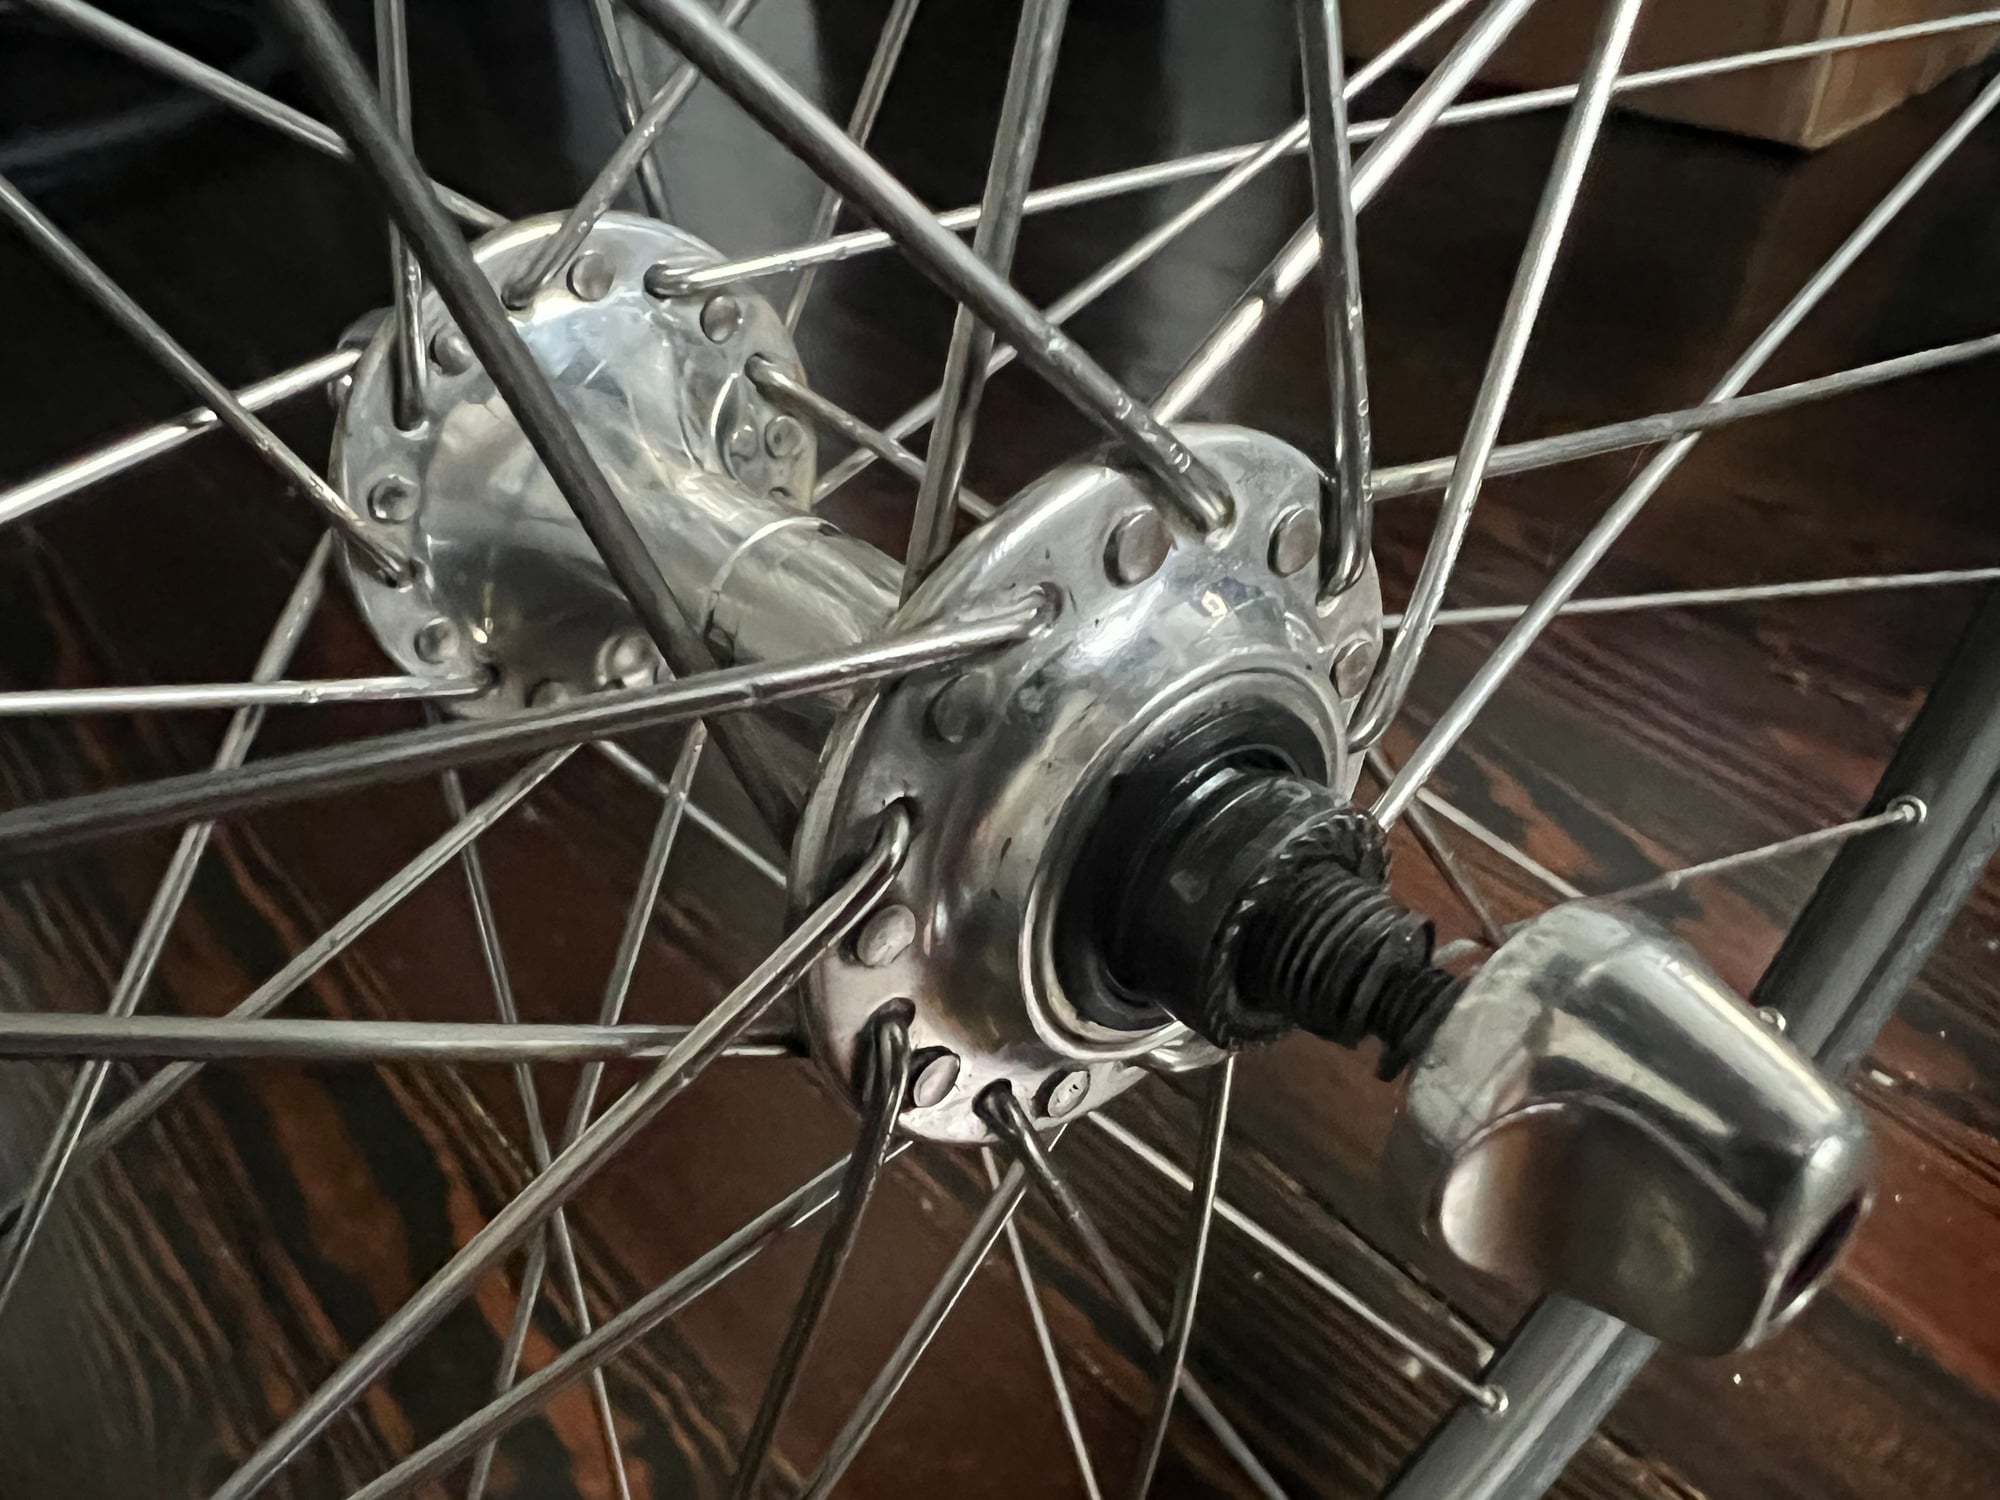
I have a campy front wheel (chorus I believe) that needs to be overhauled and adjusted (there is play). But I can’t figure out how to remove the locknut and/or cone.
On most wheels I’ve serviced the cone and locknut are both exposed with wrench flats I can get at with cone wrenches. But this only has one nut exposed with flats. It looks like maybe there are flats on the cone, but it is too buried in the hub to get at with a cone wrench. See photos.
Can anyone explain how these are supposed to be serviced? Thanks!
 09-11-23, 10:40 AM
#2
Junior Member
Join Date: Nov 2018
Location: Falmouth, ME
Posts: 147
Bikes: 2010 Cannondale CAAD 5 Potenza 66cm, 1984 Basso Gap Nuovo Record 65cm, 1989 Cannondale ST Racing Triple 27", 1974 Schwinn Paramount Nuovo Record 26", 198? Scapin MKII 66cm Victory, 1994 Havnoonian Chorus 8sp 27"
Mentioned: 8 Post(s)
Tagged: 0 Thread(s)
Quoted: 47 Post(s)
Liked 101 Times
in
44 Posts
Fairly sure I have the same set of hubs, Chorus 8 speed Exa-Drive era. I will check them when I get home tonight, but I'd think, in the meantime, you can put one wrench on the drive side and another on the other side. Not sure which one will loosen first, but it will let you get a look inside to see what's happening there. I'll post again later.
09-11-23, 10:49 AM
#3
Junior Member
Thread Starter
Fairly sure I have the same set of hubs, Chorus 8 speed Exa-Drive era. I will check them when I get home tonight, but I'd think, in the meantime, you can put one wrench on the drive side and another on the other side. Not sure which one will loosen first, but it will let you get a look inside to see what's happening there. I'll post again later.
09-11-23, 11:20 AM
#4
Junior Member
Join Date: Nov 2018
Location: Falmouth, ME
Posts: 147
Bikes: 2010 Cannondale CAAD 5 Potenza 66cm, 1984 Basso Gap Nuovo Record 65cm, 1989 Cannondale ST Racing Triple 27", 1974 Schwinn Paramount Nuovo Record 26", 198? Scapin MKII 66cm Victory, 1994 Havnoonian Chorus 8sp 27"
Mentioned: 8 Post(s)
Tagged: 0 Thread(s)
Quoted: 47 Post(s)
Liked 101 Times
in
44 Posts
I agree, it only works to get them apart. You may be missing something like another nut or have the wrong cone in there. Also, you may have the wrong size bearings, allowing the cone to screw in too far, which would hide the flat. I'll look at mine and take a picture of what I have later.
Looking more closely, are you sure that isn't a wrench flat between the inside lip of the locknut and the dust cap on the hub? It looks like it might be from the pictures... It also kinda lines up with the theory that you may have the wrong size bearings in there... You'll need some thin wrenches!
Looking more closely, are you sure that isn't a wrench flat between the inside lip of the locknut and the dust cap on the hub? It looks like it might be from the pictures... It also kinda lines up with the theory that you may have the wrong size bearings in there... You'll need some thin wrenches!
Likes For jrg1244:
09-11-23, 11:29 AM
#5
Junior Member
Thread Starter
I agree, it only works to get them apart. You may be missing something like another nut or have the wrong cone in there. Also, you may have the wrong size bearings, allowing the cone to screw in too far, which would hide the flat. I'll look at mine and take a picture of what I have later.
09-11-23, 11:54 AM
#6

Senior Member
Join Date: Jun 2006
Posts: 20,305
Mentioned: 130 Post(s)
Tagged: 0 Thread(s)
Quoted: 3464 Post(s)
Liked 2,834 Times
in
1,998 Posts
Been a long time, but I would look for 7/32” ball bearings.
Likes For repechage:
09-11-23, 12:09 PM
#7
Full Member
Join Date: Nov 2022
Location: California's capital
Posts: 485
Bikes: Litespeed Firenze, Spot Acme, Specialzed S Works Pro Race, Davidson Stiletto, Colnago Superissimo
Mentioned: 1 Post(s)
Tagged: 0 Thread(s)
Quoted: 139 Post(s)
Liked 309 Times
in
179 Posts
SWAG once you remove the dust cap you'll be able to access the cone's inner flat to lock in the proper tension. Or discover it takes "a special too." The dust cap must be replaceable last, after the rebuild is complete.
With an older Record hub, the dust cap goes in place before all that, which is possible because both flats are exposed.
I presume a wrench on each lock nut will allow you to take these apart in order to see what's really happening. Never worked on one, myself.
Good luck!
With an older Record hub, the dust cap goes in place before all that, which is possible because both flats are exposed.
I presume a wrench on each lock nut will allow you to take these apart in order to see what's really happening. Never worked on one, myself.
Good luck!
Likes For Rick_D:
09-11-23, 02:13 PM
#8
Junior Member
Thread Starter
Okay, I tracked down some more photos of what I believe to be the same hub. The dust cap and locknut situation looks the same:
https://www.pedalpedlar.co.uk/produc...0c-road-wheels
https://www.ebay.com/itm/325717850938
And what I believe to be the manual for the hub (page 38): https://www.campagnolo-sirer.cz/img/...olo%201998.pdf
Looks likw the dust caps press in, and this might happen after the hubs are assembled. So, my plan is:
- do what jrg1244 suggested, and open them via nuts on either side.
- With the dust cap still on, remove cone from side that comes loose, assuming this will be possible without a wrench grip on the flats, with the locknut removed.
- Pull axle out through the other side
- Pry out one of the dust caps
- Clean, grease, repack
- Reassemble and adjust with dust cap off
- Lastly, slip dust cap over nut and cone, and press it into the hub
09-11-23, 04:42 PM
#9
Senior Member

Join Date: Aug 2010
Location: Wurundjeri Country
Posts: 2,478
Mentioned: 32 Post(s)
Tagged: 0 Thread(s)
Quoted: 1086 Post(s)
Liked 1,909 Times
in
935 Posts
This might help: https://www.disraeligears.co.uk/site...e_page_62.html
09-12-23, 07:32 AM
#10
Junior Member
Thread Starter
Update: I did the steps I outlined above, and it worked. Hooray. The seals easily popped off with a little pry after removing the locknut. And the cone threaded off by hand. It was a little weird adjusting with the bearings and grease exposed, and putting the seal on afterward. Seems easier to get contaminated that way, and you'd have to take it all apart to make further adjustment. Perhaps there is in fact a better way I haven't thought of. Anyway, they are repacked and adjusted.
They could spin more smoothly though. Definitely rideable, but there was some wear on the cups. I seem to remember hearing it was possible to replace the cups in these hubs?

And for future people searching for this, since it wasn't super easy to track down info, here are some things google might pick up:
- This is for overhauling Campagnolo Chorus 9 speed era front hub.
- And for removing locknut and dust cap (Campy calls this the hub seal in the manual).
- From what I can tell the hub model is HB-20CH
- Here is a shot from the diagram in manual:

They could spin more smoothly though. Definitely rideable, but there was some wear on the cups. I seem to remember hearing it was possible to replace the cups in these hubs?
And for future people searching for this, since it wasn't super easy to track down info, here are some things google might pick up:
- This is for overhauling Campagnolo Chorus 9 speed era front hub.
- And for removing locknut and dust cap (Campy calls this the hub seal in the manual).
- From what I can tell the hub model is HB-20CH
- Here is a shot from the diagram in manual:
Likes For drewfio:
09-12-23, 07:38 AM
#11
Senior Member
Join Date: Jun 2006
Posts: 20,305
Mentioned: 130 Post(s)
Tagged: 0 Thread(s)
Quoted: 3464 Post(s)
Liked 2,834 Times
in
1,998 Posts
Repair parts of course were made, the question of course who might have them, know what they have and how much money to obtain them. Campagnolo cups were never
‘easy’ to exchange. Probably a complete replacement hub would be the way to go.
‘easy’ to exchange. Probably a complete replacement hub would be the way to go.
09-13-23, 12:36 PM
#12
Junior Member
Thread Starter
https://www.planetx.co.uk/products/c...g-cup-hb-ch001
Not terribly expensive either, though the shipping cost to US may be killer. I've never ordered from there before either.
I also have no idea how one removes and replaces cups in a hub.
09-13-23, 01:11 PM
#13
Senior Member
Join Date: Jun 2006
Posts: 20,305
Mentioned: 130 Post(s)
Tagged: 0 Thread(s)
Quoted: 3464 Post(s)
Liked 2,834 Times
in
1,998 Posts
These cups match the part number in the diagram, and look like they might be the right part:
https://www.planetx.co.uk/products/c...g-cup-hb-ch001
Not terribly expensive either, though the shipping cost to US may be killer. I've never ordered from there before either.
I also have no idea how one removes and replaces cups in a hub.
https://www.planetx.co.uk/products/c...g-cup-hb-ch001
Not terribly expensive either, though the shipping cost to US may be killer. I've never ordered from there before either.
I also have no idea how one removes and replaces cups in a hub.
‘no grinding of the bearing track.
‘the downmarket components really went downmarket. Disappointed.
‘if you could get a pair for $10, factor in the tools and time to remove and replace to a tolerable level…
09-13-23, 01:31 PM
#14
Junior Member
Thread Starter
What do you mean by Normandy—as in the Maillard hubs, or some other meaning I'm not familiar with? Do you think the cups shown are low quality? I would hope Campy Chorus level hubs would provide a smooth enough ride, no?
09-13-23, 01:36 PM
#15
Senior Member
Join Date: Jun 2006
Posts: 20,305
Mentioned: 130 Post(s)
Tagged: 0 Thread(s)
Quoted: 3464 Post(s)
Liked 2,834 Times
in
1,998 Posts
‘the Mighty have fallen.
Nuovo tipo hubs were basically the same, the way the hub was machined on those, races near impossible to remove. I won’t say impossible, but be ready for a brain teaser.
09-13-23, 01:53 PM
#16
Junior Member
Thread Starter
‘Normandy hub quality level, they just appear stamped and cheap, probably heat treated but not trued up after.
‘the Mighty have fallen.
Nuovo tipo hubs were basically the same, the way the hub was machined on those, races near impossible to remove. I won’t say impossible, but be ready for a brain teaser.
‘the Mighty have fallen.
Nuovo tipo hubs were basically the same, the way the hub was machined on those, races near impossible to remove. I won’t say impossible, but be ready for a brain teaser.
I know I could get a new hub, but part of the reason I enjoy working on old bikes is bringing these things back to life, and avoiding having them become trash if they are fixable, within reason.
09-13-23, 02:59 PM
#17
Senior Member
Join Date: Jun 2006
Posts: 20,305
Mentioned: 130 Post(s)
Tagged: 0 Thread(s)
Quoted: 3464 Post(s)
Liked 2,834 Times
in
1,998 Posts
Never thought of it on these. For Original Record hubs, dry Ice and a heat gun are your friend.
‘no idea if there is a way to catch an edge 3-4 places at a time to squarely drive them out.
the quantity of tools needing to be rounded up is piling up fast.
‘I suggest being sensible.
‘no idea if there is a way to catch an edge 3-4 places at a time to squarely drive them out.
the quantity of tools needing to be rounded up is piling up fast.
‘I suggest being sensible.
