


Nutted conversion for dual pivot calipers
 12-01-18, 05:21 PM
#1
Junior Member
Thread Starter
Join Date: Oct 2017
Location: Ottawa, ON, Canada
Posts: 150
Bikes: 1974 PX-10E sold, 1977 Witcomb stolen, 1980 Roberts 1 speed, 1987 Cyclops 3 x 6 friction triple crank, 2010 Masi Commuter 1 speed, 2017 Ribble 525 2 x 10 with Ergos
Mentioned: 2 Post(s)
Tagged: 0 Thread(s)
Quoted: 60 Post(s)
Likes: 0
Liked 28 Times
in
18 Posts
Nutted conversion for dual pivot calipers
News for those of you considering installing modern dual pivot brake calipers on an older road frame and reluctant to drill your frame for the Allen key fitting: I have found by measurement and actual assembly that the Jtek Engineering Tektro/Shimano pattern conversion bolt also fits Dia-Compe BRS100/101 calipers and 2015+ Campagnolo Veloce calipers. Looking at the Campagnolo parts catologs, it seems likely that the same bolt will convert current Centaur calipers too, but won't work on the high-end calipers like Chorus and Record.
Jtek sells a single bolt for the front brake, and advises swapping the calipers front to back (and flipping the pads too, don't forget!), as the Allen front bolt fits a nutted rear application. I got my Jtek bolt from SJS Cycles in the UK. Tektro's US web site offers the conversion pair only, no single bolt, but some may have reason to go that way. I haven't found other sources, but Tektro does sell nutted dual pivot calipers so maybe your LBS scrap bin will cough up a bolt. I do not suggest the threaded coupler trick, and don't even think about trying to modify an Ikea furniture bolt. You want a purpose-made cold forged chrome-moly bolt in this application, not some hack.
The conversion is easy once you figure out how to unhook and hook the main spring. I made a levering tool out of an old slot screwdriver with a round shank, by running a narrow strip tape up one side. The rim tape protects the brake arm finish as you pry, and is smooth and hard enough to slide under pressure. Other tapes cut and/or stick. Loosen the locking set screw (if present) before removing the back nut. Campagnolo and Dia-Compe use similar sliding bushings on the spring. Don't loose it, it's not available as a spare as far as I can see. In my first attempt, mine went AWOL but was found quickly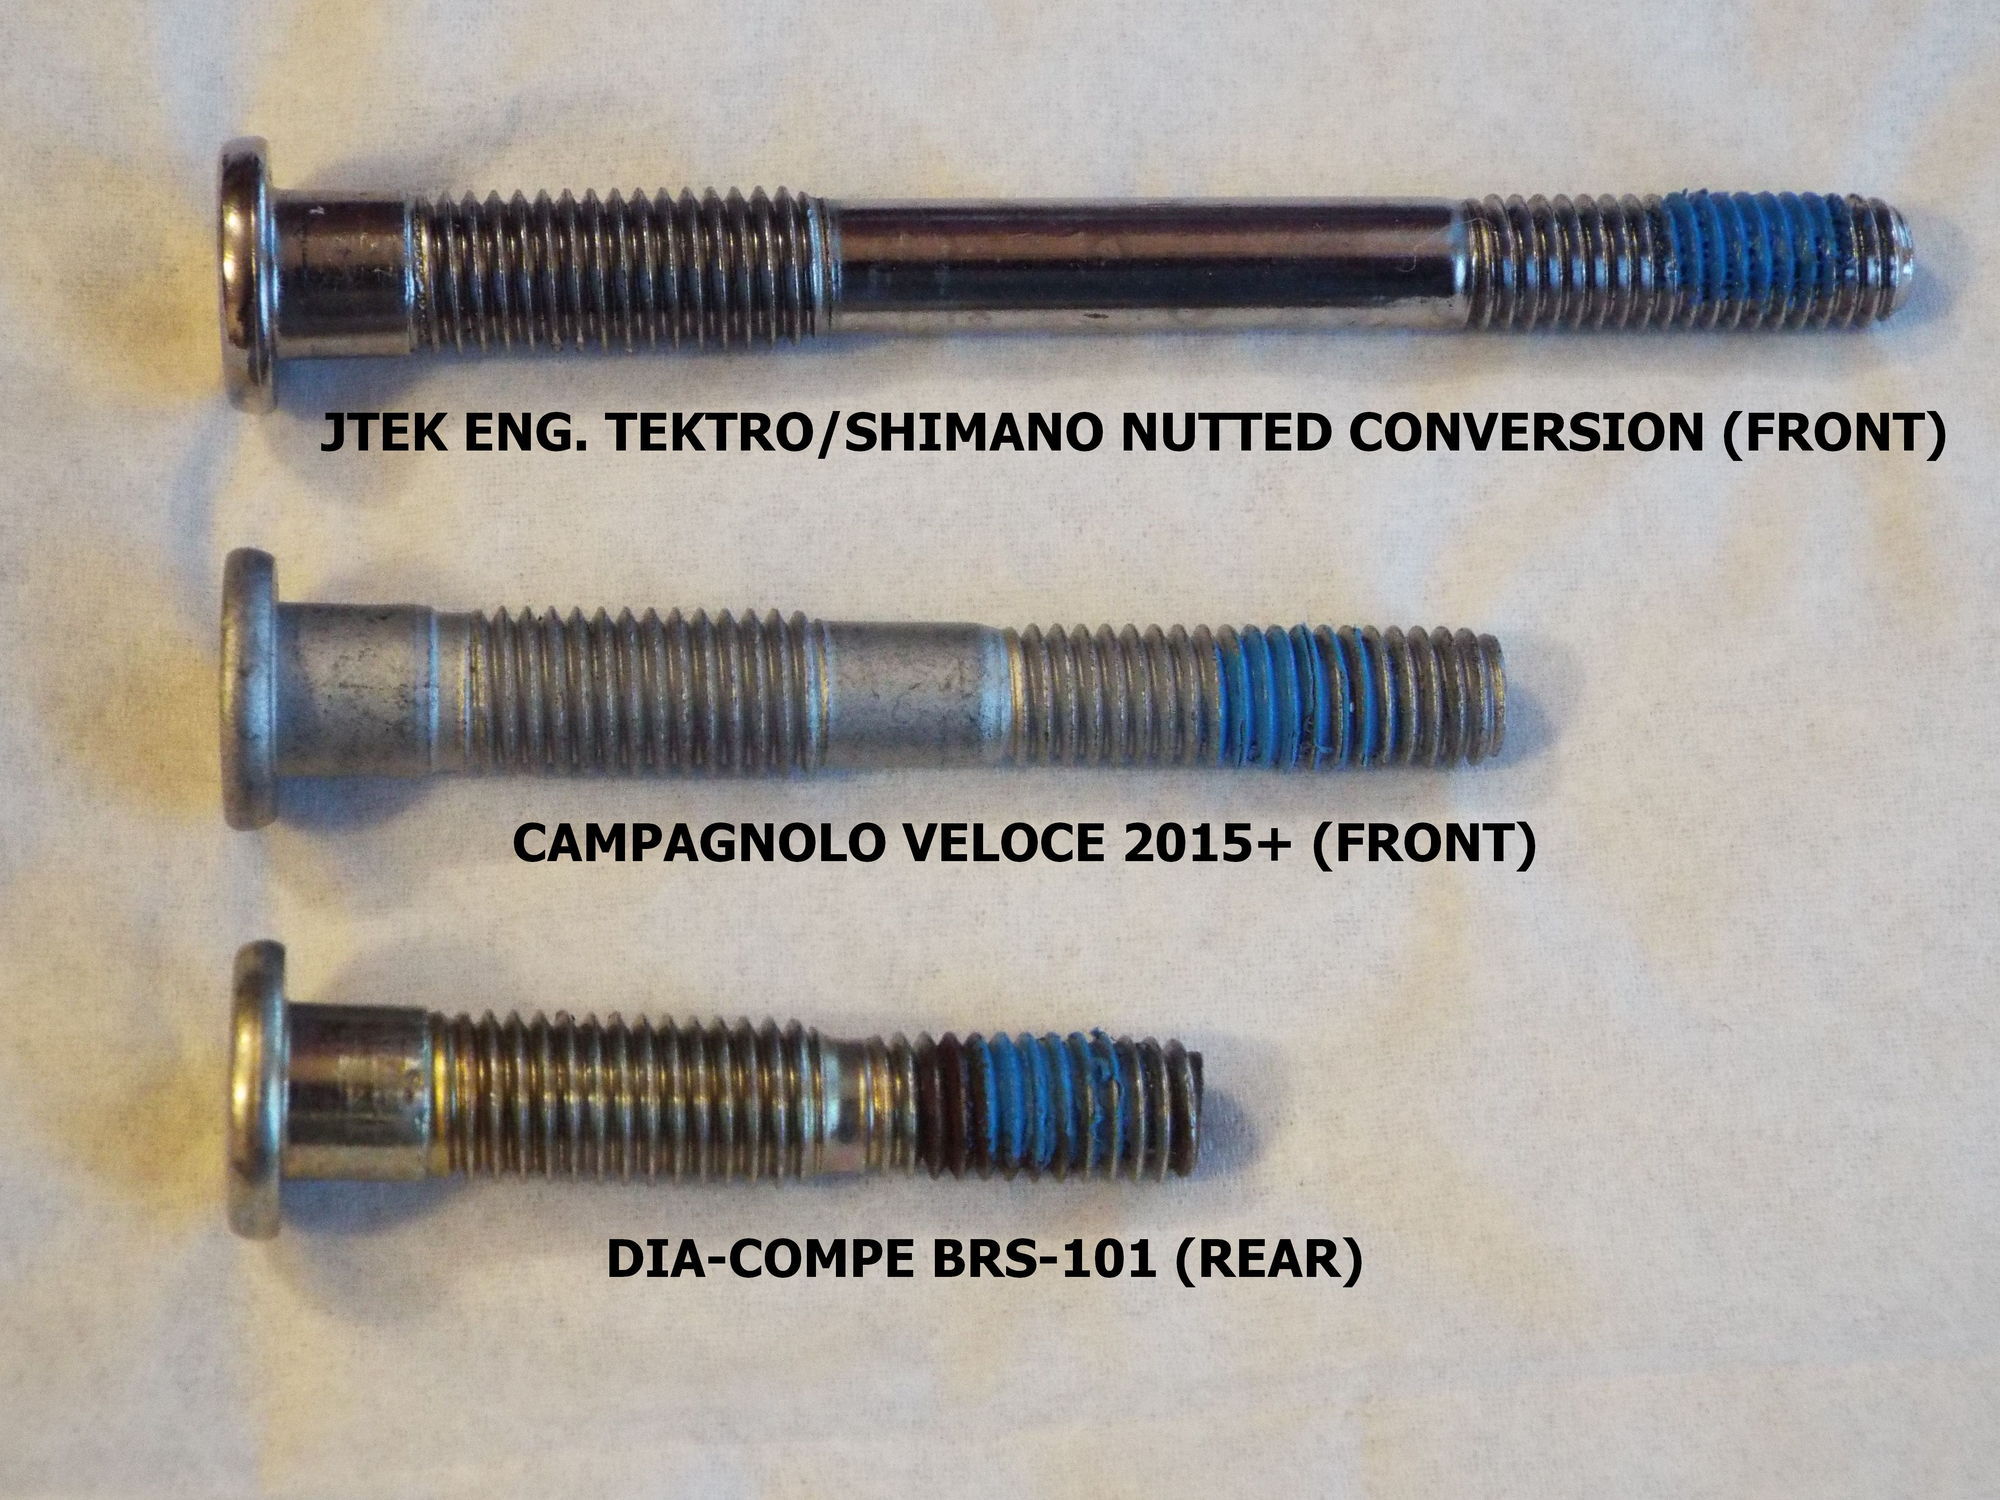
Three dual pivot centre bolts from three sources and for four applications. An Allen key front bolt fits as a rear nutted bolt. All these bolts measure the same in any way that matters, except length obviously.
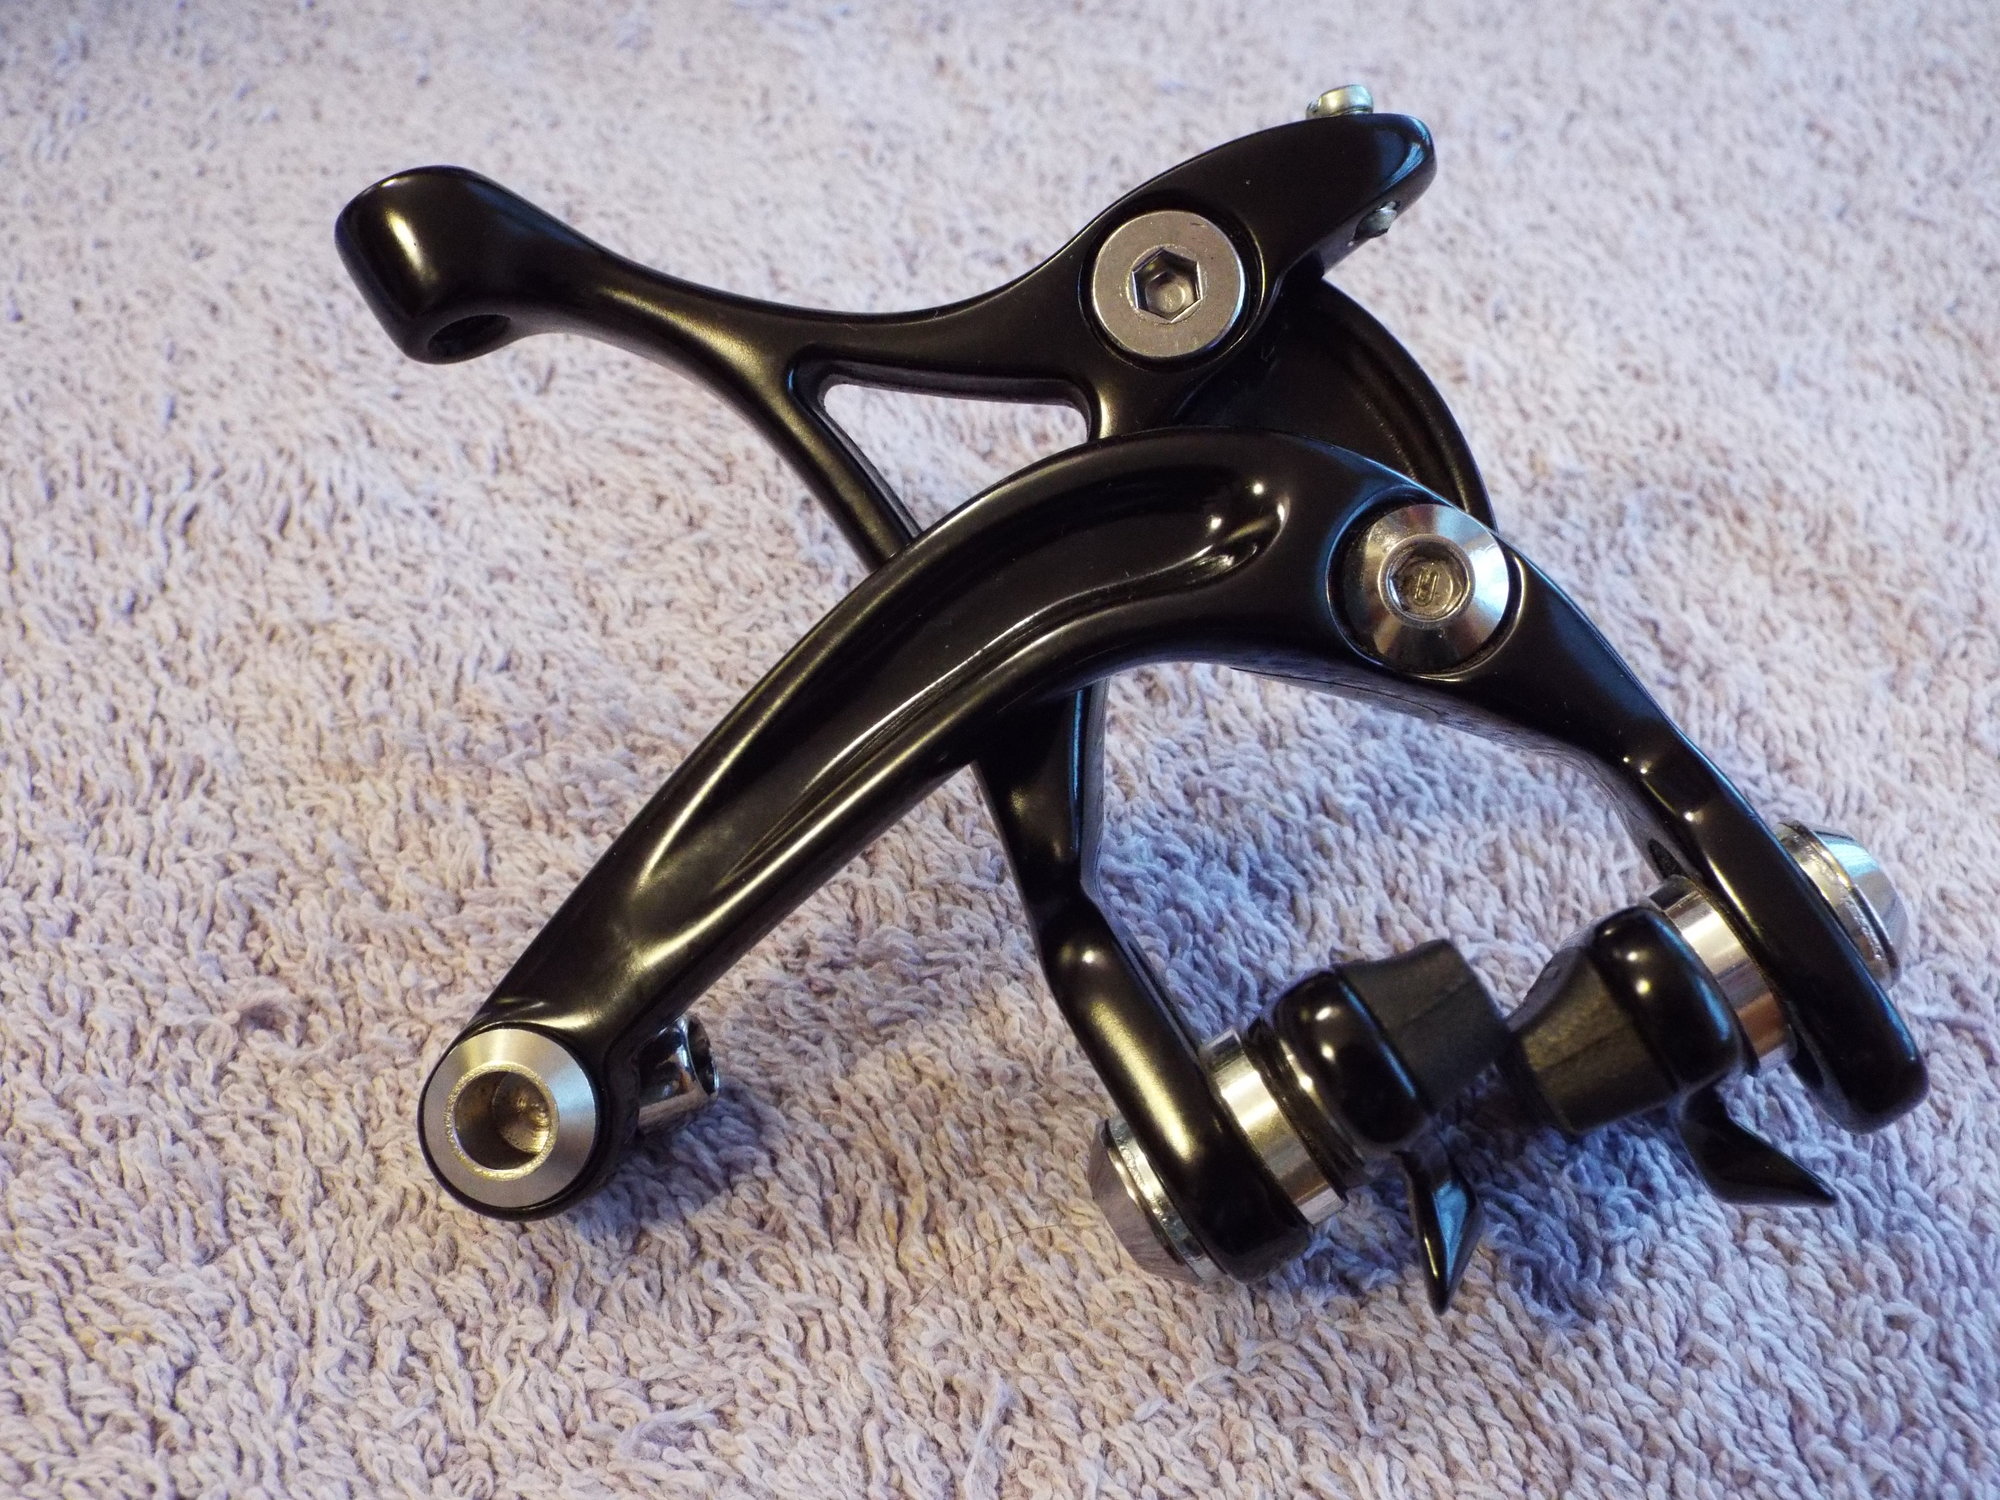
A Veloce caliper "racked" to expose the center pivot (top)
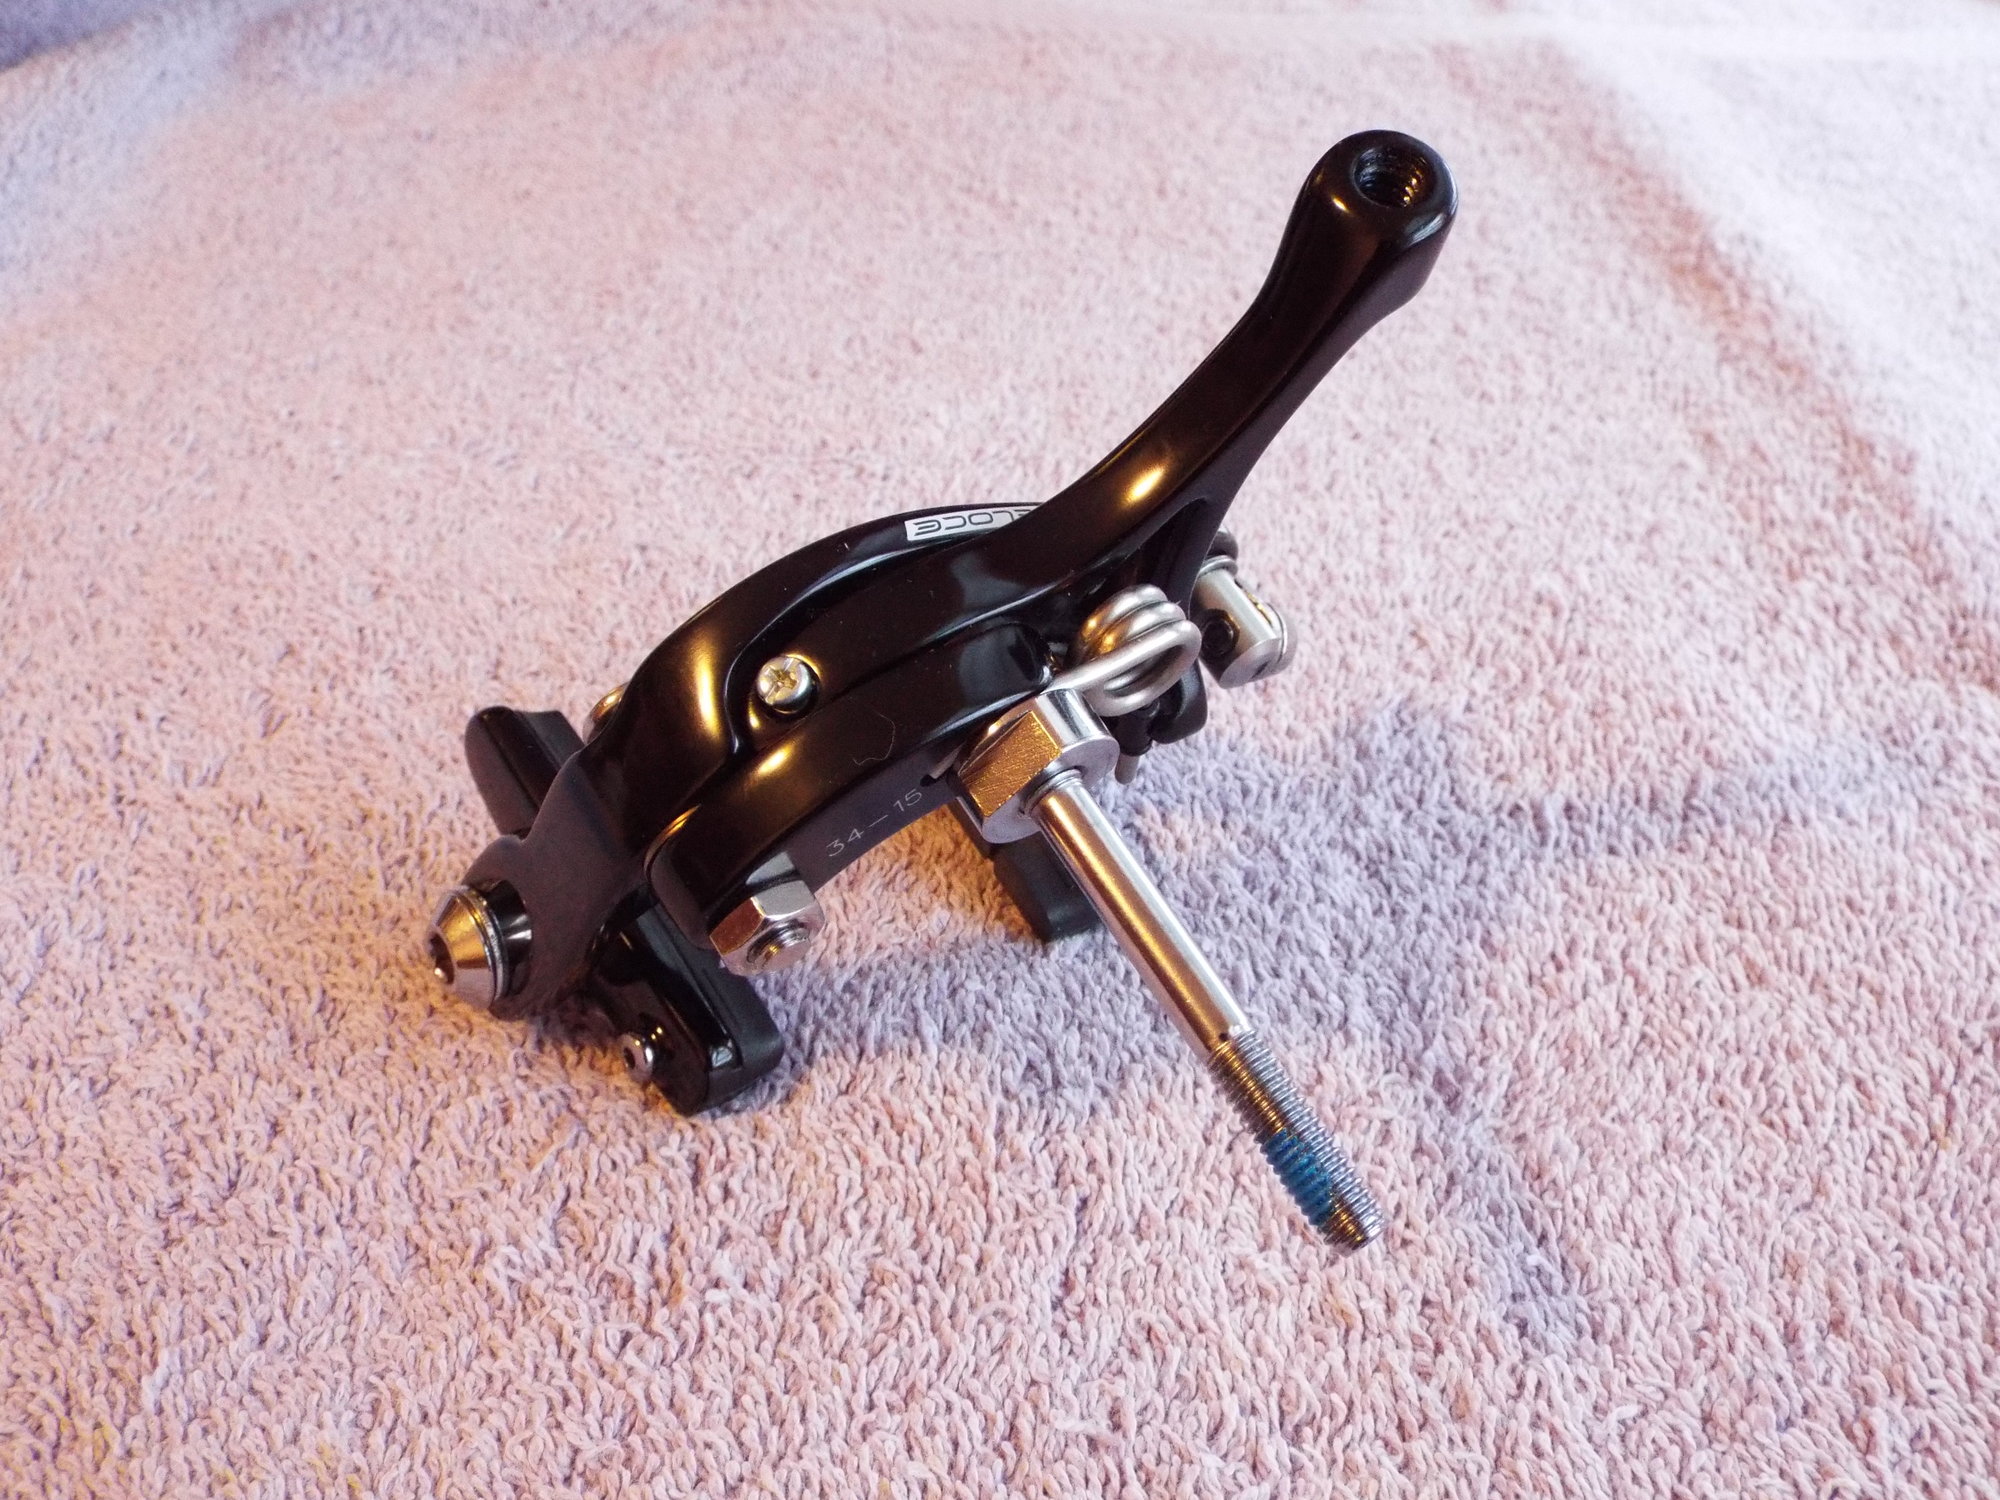
A converted Veloce BR15-VLBDP caliper.
(whew!). Once the caliper is flopping about, "rack" it (ie one arm inward and the other outward) to expose the centre pivot, and swap the bolt.
Jtek sells a single bolt for the front brake, and advises swapping the calipers front to back (and flipping the pads too, don't forget!), as the Allen front bolt fits a nutted rear application. I got my Jtek bolt from SJS Cycles in the UK. Tektro's US web site offers the conversion pair only, no single bolt, but some may have reason to go that way. I haven't found other sources, but Tektro does sell nutted dual pivot calipers so maybe your LBS scrap bin will cough up a bolt. I do not suggest the threaded coupler trick, and don't even think about trying to modify an Ikea furniture bolt. You want a purpose-made cold forged chrome-moly bolt in this application, not some hack.
The conversion is easy once you figure out how to unhook and hook the main spring. I made a levering tool out of an old slot screwdriver with a round shank, by running a narrow strip tape up one side. The rim tape protects the brake arm finish as you pry, and is smooth and hard enough to slide under pressure. Other tapes cut and/or stick. Loosen the locking set screw (if present) before removing the back nut. Campagnolo and Dia-Compe use similar sliding bushings on the spring. Don't loose it, it's not available as a spare as far as I can see. In my first attempt, mine went AWOL but was found quickly
Three dual pivot centre bolts from three sources and for four applications. An Allen key front bolt fits as a rear nutted bolt. All these bolts measure the same in any way that matters, except length obviously.
A Veloce caliper "racked" to expose the center pivot (top)
A converted Veloce BR15-VLBDP caliper.
(whew!). Once the caliper is flopping about, "rack" it (ie one arm inward and the other outward) to expose the centre pivot, and swap the bolt.

Likes For oldschoolbike:
12-01-18, 10:28 PM
#2

Senior Member
Join Date: Feb 2012
Location: Rochester, NY
Posts: 18,096
Bikes: Stewart S&S coupled sport tourer, Stewart Sunday light, Stewart Commuting, Stewart Touring, Co Motion Tandem, Stewart 3-Spd, Stewart Track, Fuji Finest, Mongoose Tomac ATB, GT Bravado ATB, JCP Folder, Stewart 650B ATB
Mentioned: 0 Post(s)
Tagged: 0 Thread(s)
Quoted: 4210 Post(s)
Liked 3,878 Times
in
2,315 Posts
Good to know. Andy
__________________
AndrewRStewart
AndrewRStewart
12-02-18, 07:26 AM
#3
Senior Member

Join Date: Feb 2004
Location: St Peters, Missouri
Posts: 30,225
Bikes: Catrike 559 I own some others but they don't get ridden very much.
Mentioned: 16 Post(s)
Tagged: 0 Thread(s)
Quoted: 1572 Post(s)
Liked 643 Times
in
364 Posts
Or, use the front brake for the rear and get a long hex nut designed for carbon fork use to install the rear brake on the front.
__________________
My greatest fear is all of my kids standing around my coffin and talking about "how sensible" dad was.
My greatest fear is all of my kids standing around my coffin and talking about "how sensible" dad was.
12-02-18, 09:13 PM
#4
Senior Member
Join Date: Jun 2017
Location: West Orange County, CA
Posts: 1,112
Bikes: '84 Peugeot PH10LE
Mentioned: 16 Post(s)
Tagged: 0 Thread(s)
Quoted: 397 Post(s)
Likes: 0
Liked 55 Times
in
39 Posts
Jon
12-02-18, 09:34 PM
#5
Junior Member
Thread Starter
Join Date: Oct 2017
Location: Ottawa, ON, Canada
Posts: 150
Bikes: 1974 PX-10E sold, 1977 Witcomb stolen, 1980 Roberts 1 speed, 1987 Cyclops 3 x 6 friction triple crank, 2010 Masi Commuter 1 speed, 2017 Ribble 525 2 x 10 with Ergos
Mentioned: 2 Post(s)
Tagged: 0 Thread(s)
Quoted: 60 Post(s)
Likes: 0
Liked 28 Times
in
18 Posts
Front brake for rear, yes. That's the smart approach and why only the one long (70mm) bolt is required to convert both brakes.
The hole in a pre-Allen key day bike's fork crown is drilled for 6mm thread clearance all the way through. An Allen brake nut of any length is 8.0 mm diameter with a 6mm thread, and will not fit into the hole to "reach" the brake bolt unless you first enlarge the hole to 8.0 mm. You only drill the back of the fork crown, not all the way through, but many of us have our reasons not to take a power drill to a treasured frame at all. Mine is that I intend to return the bike to its all original equipment some day. Hence the need to modify a modern caliper with a longer bolt, so that the bolt goes all the way through the fork crown and out the back with enough extra length for the required washers and 6mm Nylock nut to fit with 2-3 threads at least exposed.
You may be thinking of the hack (or is it a bodge?) involving stuffing a 6mm threaded coupler or Allen brake nut into the steerer tube from below and then using a 6mm bolt from the back of the crown to pull it all tight. Scary, this is your front brake!
Likes For oldschoolbike:
12-03-18, 11:48 AM
#6

Senior Member

Join Date: Jul 2006
Location: San Jose (Willow Glen) Ca
Posts: 9,847
Bikes: Kirk Custom JK Special, '84 Team Miyata,(dura ace old school) 80?? SR Semi-Pro 600 Arabesque
Mentioned: 106 Post(s)
Tagged: 0 Thread(s)
Quoted: 2338 Post(s)
Liked 2,827 Times
in
1,543 Posts
I don't get the concern about "drilling" unless the frame is an unicorn special frame, in which case it should probably have period correct parts.
I have done this multple times and put the sheldon link at the bottom
The rear hole only of the fork is "drilled" out with an 8 mm bit (5/16) but the reality is that there are only shavings, you could almost just use a file
a rear brake is then mounted on the front using a long recessed nut
The front brake is mounted on the rear using nuts..... no drilling needed
it is really simple and no hassle
https://www.sheldonbrown.com/calipers.html
__________________
Life is too short not to ride the best bike you have, as much as you can
(looking for Torpado Super light frame/fork or for Raleigh International frame fork 58cm)
Life is too short not to ride the best bike you have, as much as you can
(looking for Torpado Super light frame/fork or for Raleigh International frame fork 58cm)
12-03-18, 08:15 PM
#7
Junior Member
Thread Starter
Join Date: Oct 2017
Location: Ottawa, ON, Canada
Posts: 150
Bikes: 1974 PX-10E sold, 1977 Witcomb stolen, 1980 Roberts 1 speed, 1987 Cyclops 3 x 6 friction triple crank, 2010 Masi Commuter 1 speed, 2017 Ribble 525 2 x 10 with Ergos
Mentioned: 2 Post(s)
Tagged: 0 Thread(s)
Quoted: 60 Post(s)
Likes: 0
Liked 28 Times
in
18 Posts
Mine frame is indeed a unicorn special (a custom Mike Mulholland Cyclops) in pristine shape thanks to most excellent paint, and I will one day return it to original mid-80's Super Record spec. All the original parts, except the Selle Italia Turbo saddle I wore out, are carefully stored away for that day. In the meantime I would like to be able to shift (Racing Triple drive train), stop (Veloce calipers), and keep my feet on the pedals with comfort (Eggbeaters). I will restore it to museum specification when I am a museum piece too.
12-03-18, 08:28 PM
#8
SE Wis
Join Date: Apr 2005
Location: Milwaukee, WI
Posts: 10,517
Bikes: '68 Raleigh Sprite, '02 Raleigh C500, '84 Raleigh Gran Prix, '91 Trek 400, 2013 Novara Randonee, 1990 Trek 970
Mentioned: 40 Post(s)
Tagged: 0 Thread(s)
Quoted: 2747 Post(s)
Liked 3,401 Times
in
2,058 Posts
Or you can just buy nutted mount dual pivot calipers like Tektro R539
12-03-18, 11:31 PM
#9
Senior Member

Join Date: Dec 2009
Location: Melbourne, Oz
Posts: 9,547
Bikes: https://weightweenies.starbike.com/forum/viewtopic.php?f=10&t=152015&p=1404231
Mentioned: 15 Post(s)
Tagged: 0 Thread(s)
Quoted: 1529 Post(s)
Liked 718 Times
in
510 Posts
If you're gonna hot up an old bike with modern stuff, might as well throw a threadless carbon fork at it.
Likes For Kimmo:
12-05-18, 11:49 AM
#10
Senior Member

Join Date: Jul 2017
Location: Queens, NY for now...
Posts: 1,515
Bikes: 82 Lotus Unique, 86 Lotus Legend, 88 Basso Loto, 88 Basso PR, 89 Basso PR, 96 Bianchi CDI, 2013 Deda Aegis, 2019 Basso Diamante SV
Mentioned: 46 Post(s)
Tagged: 0 Thread(s)
Quoted: 943 Post(s)
Liked 172 Times
in
113 Posts
Mine frame is indeed a unicorn special (a custom Mike Mulholland Cyclops) in pristine shape thanks to most excellent paint, and I will one day return it to original mid-80's Super Record spec. All the original parts, except the Selle Italia Turbo saddle I wore out, are carefully stored away for that day. In the meantime I would like to be able to shift (Racing Triple drive train), stop (Veloce calipers), and keep my feet on the pedals with comfort (Eggbeaters). I will restore it to museum specification when I am a museum piece too.
12-08-18, 11:41 PM
#11
Junior Member
Thread Starter
Join Date: Oct 2017
Location: Ottawa, ON, Canada
Posts: 150
Bikes: 1974 PX-10E sold, 1977 Witcomb stolen, 1980 Roberts 1 speed, 1987 Cyclops 3 x 6 friction triple crank, 2010 Masi Commuter 1 speed, 2017 Ribble 525 2 x 10 with Ergos
Mentioned: 2 Post(s)
Tagged: 0 Thread(s)
Quoted: 60 Post(s)
Likes: 0
Liked 28 Times
in
18 Posts
I was considering Tektro nutted calipers, but something inside me wants the brakes to be sympathetic with the Campagnolo Racing Triple drive train. Here's the irony with that: Classic Super Record levers, as iconic and "heroic" as they are, cannot compare to modern Ergo levers for comfort. I don't need Ergos since I am using Dia-Compe Silver down-tube retro-friction levers, but I am putting the Super Record levers into storage in favour of a pair of Tektro RL340 levers. These are a nice brake-only knock-off of Campagnolo Ergos. I may end up switching the Cinelli bars to something with less reach, because I do tend to spend more time "on the hoods" on my all Veloce modern bike and the habit does carry back to the older bike. A subtle point: the Tektro levers have a nice Campy-style quick-release so I don't need QRs on the calipers. Why carry around redundant bits? the Camoagnolo brake calipers have no QRs.
Kimmo: I am a big fan of threadless forks and looked around a bit for a 1" carbon threadless fork for the Cyclops. I concluded they were too expensive, but now that I have ridden my new bike (steel frame with carbon forks) as well for a season, I think there is a significant handling and stability benefit to carbon forks and have re-opened that line of inquiry. Thanks for the encouragement.
Kimmo: I am a big fan of threadless forks and looked around a bit for a 1" carbon threadless fork for the Cyclops. I concluded they were too expensive, but now that I have ridden my new bike (steel frame with carbon forks) as well for a season, I think there is a significant handling and stability benefit to carbon forks and have re-opened that line of inquiry. Thanks for the encouragement.
12-14-18, 04:53 PM
#12
Old Bike Craphound

Facing this same issue with a classic Japanese frame where I needed to install new components so it can ride again for my nephew who calls DT friction shifters "suicide shifters". I did not have the longer bolt and wanted to be done, so I used the longer bolt on the back (as others have said) then I used the short bolt on the front with an M6 coupling nut inside the fork crown then an M6 bolt (from a cantilever brake post) with an M6 nut threaded on the M6 bolt. Tighten the coupling nut (inside the fork steerer tube) against the brake caliper bolt then screw the M6 bolt (with the nut already threaded on it) from the rear of the fork into the other end of the coupling nut. When it bottoms out, tighten the nut back against the back of the fork crown. Seems to work and is very solid.
-Will
-Will
01-30-20, 05:30 AM
#13
Junior Member
Hi! I'm trying to use this system on My Bianchi Rekord 848, I really don't want to drill the frame.
Would the conversion bolt work on more vintage Campy models from the late '90? Like Avanti, Chorus, Veloce or even Record? Has somebody ever tried?
Thanks a lot!
Would the conversion bolt work on more vintage Campy models from the late '90? Like Avanti, Chorus, Veloce or even Record? Has somebody ever tried?
Thanks a lot!
 10-18-23, 09:01 AM
#15
Newbie
Join Date: Oct 2023
Posts: 2
Mentioned: 0 Post(s)
Tagged: 0 Thread(s)
Quoted: 0 Post(s)
Likes: 0
Liked 0 Times
in
0 Posts
Hey oldschoolbike - thanks a lot for the thread. I am attempting this on a Dia Compe BRS 202, which seems very similar to the 101 – but I cannot get the original bolt out for the life of me. I have unscrewed grubs, and applied a lot of force with my hex key, to the point where it seems like it's going to damage the bolt of the tool. Do you know if there a trick to this with the Dia Compe brakes that is not obvious?
10-19-23, 06:03 AM
#16
Junior Member
Thread Starter
Join Date: Oct 2017
Location: Ottawa, ON, Canada
Posts: 150
Bikes: 1974 PX-10E sold, 1977 Witcomb stolen, 1980 Roberts 1 speed, 1987 Cyclops 3 x 6 friction triple crank, 2010 Masi Commuter 1 speed, 2017 Ribble 525 2 x 10 with Ergos
Mentioned: 2 Post(s)
Tagged: 0 Thread(s)
Quoted: 60 Post(s)
Likes: 0
Liked 28 Times
in
18 Posts
The back nut (trapping the spring) and the short fixed arm are both threaded, and are jammed together like hub a cone and locknut. You need to start by backing the nut off with the correct size open end wrench applied to the two flats. Look for well hidden grub screws first, but it seems you know about them. Once the nut's loose you can spin it off and thread the bolt out of the arms.
When re-assembling, you adjust the clearance of the moving middle arm so that it moves freely with minimal slop, just like a hub. Then tighten the nut and check the clearance again One all the pivots are good, put back all the grub screws.
When re-assembling, you adjust the clearance of the moving middle arm so that it moves freely with minimal slop, just like a hub. Then tighten the nut and check the clearance again One all the pivots are good, put back all the grub screws.
10-19-23, 06:25 AM
#17
Newbie
Join Date: Oct 2023
Posts: 2
Mentioned: 0 Post(s)
Tagged: 0 Thread(s)
Quoted: 0 Post(s)
Likes: 0
Liked 0 Times
in
0 Posts
The back nut (trapping the spring) and the short fixed arm are both threaded, and are jammed together like hub a cone and locknut. You need to start by backing the nut off with the correct size open end wrench applied to the two flats. Look for well hidden grub screws first, but it seems you know about them. Once the nut's loose you can spin it off and thread the bolt out of the arms.
When re-assembling, you adjust the clearance of the moving middle arm so that it moves freely with minimal slop, just like a hub. Then tighten the nut and check the clearance again One all the pivots are good, put back all the grub screws.
When re-assembling, you adjust the clearance of the moving middle arm so that it moves freely with minimal slop, just like a hub. Then tighten the nut and check the clearance again One all the pivots are good, put back all the grub screws.

Thread
Thread Starter
Forum
Replies
Last Post
icepick_trotsky
Classic & Vintage
25
02-21-18 09:45 PM
peugeot mongrel
Bicycle Mechanics
13
04-12-17 09:41 AM
MEversbergII
Bicycle Mechanics
7
11-27-13 08:10 AM
