


'83 Peugeot UO14 - bb cups, crank replacement
 01-18-21, 12:47 PM
#1
Junior Member
Thread Starter
'83 Peugeot UO14 - bb cups, crank replacement
Hello all,
I'm in the midst of reburb'ing this old Peugeot and while the races in the cups look good, I slightly damaged the outside edges of the right hand side cup trying to get it off because I thought they may have been a traditional right hand thread. Luckily I didn't damage the frame's threads, but I don't like the idea of tightening down this marred cup and having trouble getting it off in the future.
The measurements are: 68mm bb width, crank is 121mm wide with square tapers for the pedal arms. I see sealed bearing replacements that match but the majority have different splined ends to the crank and I really want to keep these pretty aluminum pedal arms. Which brand/model of replacement would you recommend? I'd like to just get a straight replacement, which I think I've found. Judging by the looks and that plastic condom it looks just like the one on my bike. I think the quality of the chrome may have contributed to my cup seizing ever so slightly in my frame (leading me to scratching my head as to the thread direction), so I'd like to avoid it if possible.
I can't post a direct link since I'm so new, but it's listed as: SUNLITE BB Cup Set Sealed 68/73mm x English Steel Bottom Bracket
Thanks for any input you might have.
 01-18-21, 04:37 PM
#2
Senior Member
You need to figure out what type of threading your frame has, sometimes the thread size is stamped on the outside of the cups. If I understand you right, the right/fixed cup is left hand threaded. Sound like it might be Swiss, if that's the case, the Sunlite BB you're looking at won't work. Peugeot started using English threading sometime during the 1980's, but think it was after 1983. How bad are the threads in the existing cup. Unless it's being replaced there's rarely a need to remove it.
01-18-21, 04:52 PM
#3
Junior Member
Thread Starter
It's like slightly rounding off two of the five lugs on a car's wheel lugs and just leaving them because it's "good enough".
01-18-21, 05:47 PM
#4

Senior Member
Join Date: Feb 2020
Posts: 2,812
Mentioned: 49 Post(s)
Tagged: 0 Thread(s)
Quoted: 1105 Post(s)
Likes: 0
Liked 1,325 Times
in
782 Posts
You need a big bolt and nut, a big vice, and a big hammer
Put both cups in the frame - tight.
Thread the bolt through the axle holes in the cup, head underneath the vice jaws, grip the shank of the bolt with the vice, and tighten the nut down on the other side to hold the frame tight against the vice; all this so you have the damaged cup held uppermost and supported.
Arrange the frame so you can get at the distorted edge of the cup.
Apply hammer.
01-18-21, 09:24 PM
#5
Senior Member
Join Date: Oct 2015
Location: PDX
Posts: 13,029
Bikes: Merz x 5 + Specialized Merz Allez x 2, Strawberry/Newlands/DiNucci/Ti x3, Gordon, Fuso/Moulton x2, Bornstein, Paisley,1958-74 Paramounts x3, 3rensho, 74 Moto TC, 73-78 Raleigh Pro's x5, Marinoni x2, 1960 Cinelli SC, 1980 Bianchi SC, PX-10 X 2
Mentioned: 267 Post(s)
Tagged: 0 Thread(s)
Quoted: 4507 Post(s)
Liked 6,373 Times
in
3,665 Posts
I have some thread guages, I can figure it out shortly.
Correct, it's left-hand threaded.
Not bad at all. The head/face of the cup itself is what concerns me. The flats are slightly deformed after my torquing on it the wrong direction and my HCW-4 wrench's edges are rolled over as a result. So it's going to make tightening properly a clumsy process and if I or someone else ever goes to take it off again I don't want to struggle with it. Plus it just feels like I'd be doing sloppy work to leave it.
It's like slightly rounding off two of the five lugs on a car's wheel lugs and just leaving them because it's "good enough".

You have it right IMO, get the cup out.

We have a lot of fun with this from time to time.
I have a foolproof method, PM coming.
01-18-21, 11:07 PM
#6
Junior Member
Thread Starter
I may have sent a mixed message, so just to be clear, I was able to get both cups out. However the left hand side cup is slightly deformed. The threads in the frame look to be perfectly fine. I can screw it back in an out, no problem. I just want to be able to be able to reinstall it, torque it properly and be able to remove it should I desire to do so without the tool slipping off when I'm done. I took some pics to better illustrate what I'm talking about but I can't post links since I have less than 10 posts.
What I'm looking for is a viable replacement cup or sealed bearing/crank assembly that will work with the pedals I have (square taper). I didn't get a chance to check those threads, I'll get to that tomorrow.
Also, I guess I can't read PMs either without 10 posts, so I'll read that asap.
What I'm looking for is a viable replacement cup or sealed bearing/crank assembly that will work with the pedals I have (square taper). I didn't get a chance to check those threads, I'll get to that tomorrow.
Also, I guess I can't read PMs either without 10 posts, so I'll read that asap.
01-19-21, 12:28 AM
#7
Senior Member
More than likely your bottom bracket is Swiss threaded, sourcing a replacement can be difficult and expensive. The rounded flats on your cup is a minor issue. In the link below Sheldon Brown describes how to make a tool to remove, or install a fixed cup.
https://www.sheldonbrown.com/tooltips/bbcups.html
https://www.sheldonbrown.com/tooltips/bbcups.html
01-19-21, 01:25 AM
#8
Senior Member
Join Date: Oct 2015
Location: PDX
Posts: 13,029
Bikes: Merz x 5 + Specialized Merz Allez x 2, Strawberry/Newlands/DiNucci/Ti x3, Gordon, Fuso/Moulton x2, Bornstein, Paisley,1958-74 Paramounts x3, 3rensho, 74 Moto TC, 73-78 Raleigh Pro's x5, Marinoni x2, 1960 Cinelli SC, 1980 Bianchi SC, PX-10 X 2
Mentioned: 267 Post(s)
Tagged: 0 Thread(s)
Quoted: 4507 Post(s)
Liked 6,373 Times
in
3,665 Posts
I may have sent a mixed message, so just to be clear, I was able to get both cups out. However the left hand side cup is slightly deformed. The threads in the frame look to be perfectly fine. I can screw it back in an out, no problem. I just want to be able to be able to reinstall it, torque it properly and be able to remove it should I desire to do so without the tool slipping off when I'm done. I took some pics to better illustrate what I'm talking about but I can't post links since I have less than 10 posts.
What I'm looking for is a viable replacement cup or sealed bearing/crank assembly that will work with the pedals I have (square taper). I didn't get a chance to check those threads, I'll get to that tomorrow.
Also, I guess I can't read PMs either without 10 posts, so I'll read that asap.
What I'm looking for is a viable replacement cup or sealed bearing/crank assembly that will work with the pedals I have (square taper). I didn't get a chance to check those threads, I'll get to that tomorrow.
Also, I guess I can't read PMs either without 10 posts, so I'll read that asap.
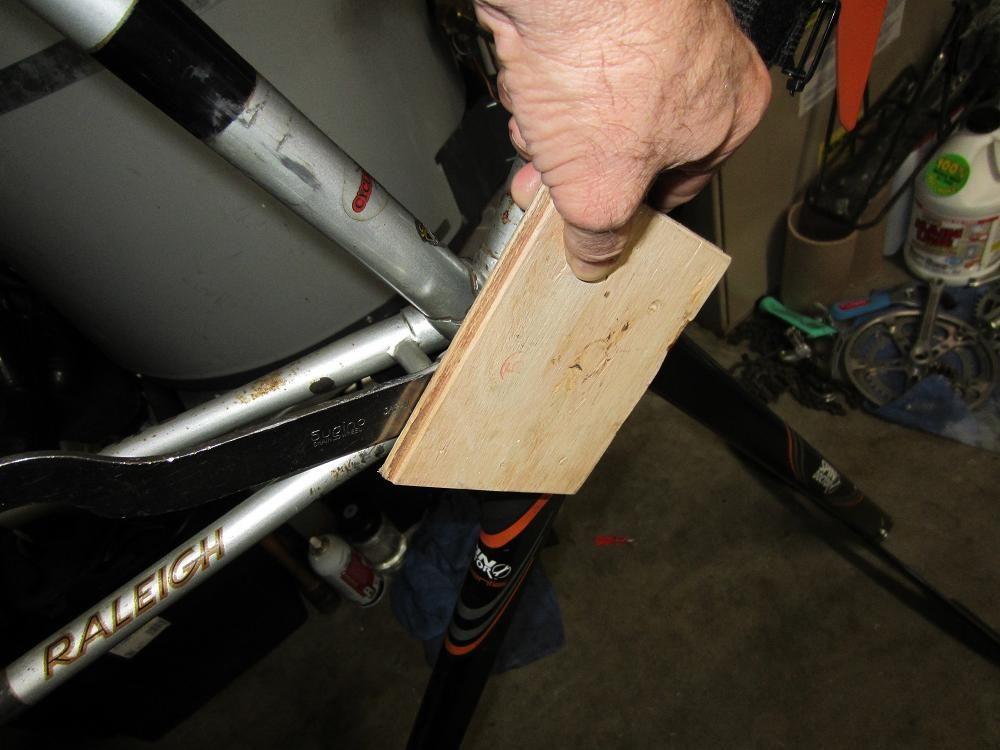
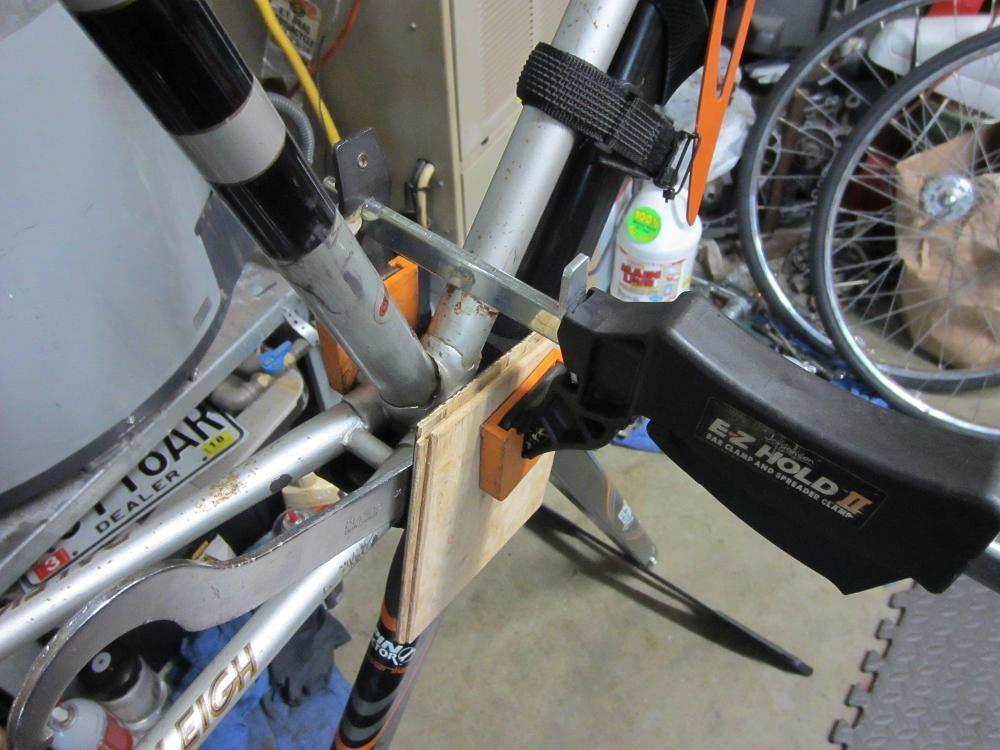
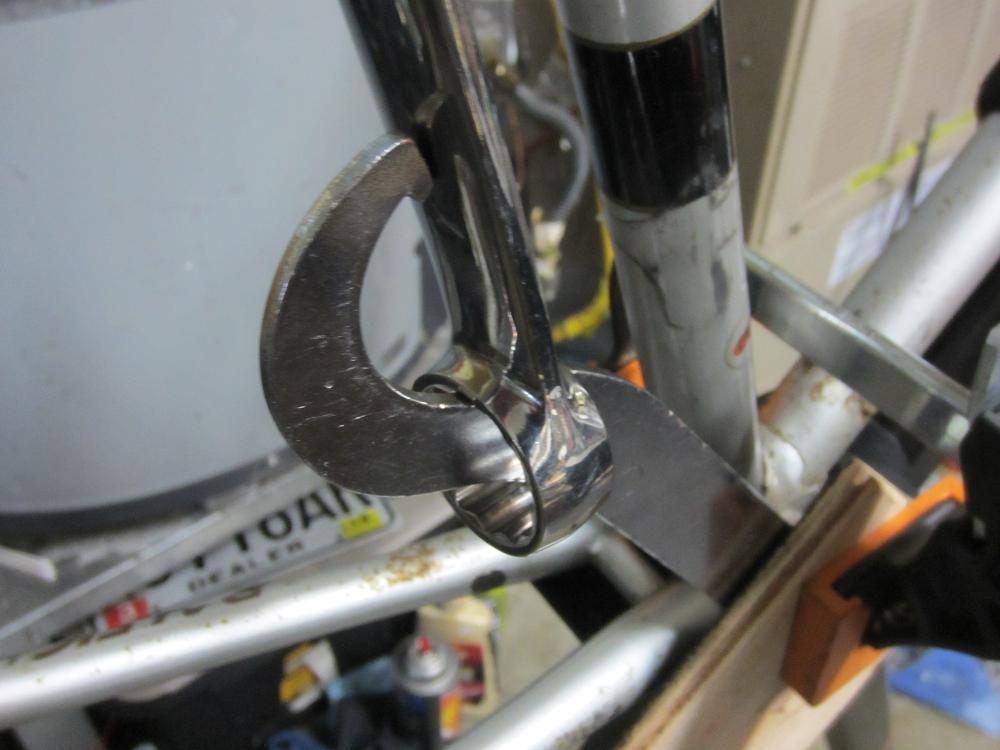
Just doesn't always go well, I'm not a fan of Sheldon's method.
Simple backstop with a clamp and piece of wood.
I also have a piece of pipe for leverage and the setup in the pics isn't going the right direction in all pics.
It's best done on the floor or in a stand that supports the BB when its really stuck.
Again, this has never failed.
Likes For fastbroshi:
01-19-21, 09:29 AM
#10
Senior Member
Join Date: Feb 2020
Posts: 2,812
Mentioned: 49 Post(s)
Tagged: 0 Thread(s)
Quoted: 1105 Post(s)
Likes: 0
Liked 1,325 Times
in
782 Posts
More than likely your bottom bracket is Swiss threaded, sourcing a replacement can be difficult and expensive. The rounded flats on your cup is a minor issue. In the link below Sheldon Brown describes how to make a tool to remove, or install a fixed cup.
https://www.sheldonbrown.com/tooltips/bbcups.html
https://www.sheldonbrown.com/tooltips/bbcups.html
01-19-21, 09:37 AM
#11
Junior Member
Thread Starter
I don't see anything like that on my bike. I see a rubber cable guide riveted to the bottom with the words "MODELE DEPOSE" formed into it, and a 7-digit number stamped into the bb.
01-19-21, 04:14 PM
#13
Junior Member
Thread Starter
I see, sorry about that. I just checked and the left side cup with the flats has no marking on it whatsoever. The drive side however has a capital B stamped on it right by one of the flats for the hex head.
01-19-21, 04:27 PM
#14
Senior Member
Join Date: Oct 2015
Location: PDX
Posts: 13,029
Bikes: Merz x 5 + Specialized Merz Allez x 2, Strawberry/Newlands/DiNucci/Ti x3, Gordon, Fuso/Moulton x2, Bornstein, Paisley,1958-74 Paramounts x3, 3rensho, 74 Moto TC, 73-78 Raleigh Pro's x5, Marinoni x2, 1960 Cinelli SC, 1980 Bianchi SC, PX-10 X 2
Mentioned: 267 Post(s)
Tagged: 0 Thread(s)
Quoted: 4507 Post(s)
Liked 6,373 Times
in
3,665 Posts
Tx!
I know you're past it now and the other methods work but this one can use as long of a cheater as is needed, you can overpower any stuck cup with very little to no drama.
Knowing that you can also install them tight and right as well.
I know you're past it now and the other methods work but this one can use as long of a cheater as is needed, you can overpower any stuck cup with very little to no drama.
Knowing that you can also install them tight and right as well.


