


First Italian build - advice needed.
 08-03-18, 02:59 PM
#1
Junior Member
Thread Starter
Join Date: Aug 2018
Posts: 11
Mentioned: 1 Post(s)
Tagged: 0 Thread(s)
Quoted: 2 Post(s)
Likes: 0
Liked 0 Times
in
0 Posts
First Italian build - advice needed.
Hello, I am new to the forum but have been reading it for quite some time.
A few years ago all of my bikes were stolen, and it has taken me until now to start replacing them. I just finished putting together a daily city bike (nashbar branded shogun steel lugged frame with a Shimano 600 groupset on it) and now I am start to build something less far less practical but very pretty and Italian.
The frame is a Barale branded ALAN aluminum (screwed and glued) lugged frame in really exceptional condition I assume is from the lat 80s. The groupset is a Campagnolo c-record with delta brakes (I know these are divisive). Wheels are Campagnolo record hubs (126 rear 100 front) with 700c Araya clinger rims and a campy compatible sun tour 6 speed freewheel/cassette.
I have believe in doing as much mechanical work as possible on your own. I do all the maintenance and some engine building on my motorcycles, and have always worked on my own bicycles, but would not call myself a bike mechanic, and am completely unfamiliar with quirks of vintage Campagnolo. That said I do want to build this bike myself, which is what leads me to these questions.
Cables / cable housing - I have read some conflicting information about this - for the c-record groupset will any modern campagnolo / campy compatible jags etc cable set work? I have read that the ferrules are non standard on some older campagnolo cables.
Chain - what would the recommended chain for this bike be? I am running it as a 6x2 12 speed.
Bottom bracket - what special tools are needed to install the bottom bracket
repacking the hubs - I want to repack the hubs before assembling - what special tools are needed for this.
I think that is about it. Thanks in advance for any help.
 08-03-18, 09:07 PM
#2

Banned.

Join Date: Jul 2009
Location: PAZ
Posts: 12,294
Mentioned: 255 Post(s)
Tagged: 0 Thread(s)
Quoted: 2588 Post(s)
Liked 4,824 Times
in
1,709 Posts
Hello, I am new to the forum but have been reading it for quite some time.
A few years ago all of my bikes were stolen, and it has taken me until now to start replacing them. I just finished putting together a daily city bike (nashbar branded shogun steel lugged frame with a Shimano 600 groupset on it) and now I am start to build something less far less practical but very pretty and Italian.
The frame is a Barale branded ALAN aluminum (screwed and glued) lugged frame in really exceptional condition I assume is from the lat 80s. The groupset is a Campagnolo c-record with delta brakes (I know these are divisive). Wheels are Campagnolo record hubs (126 rear 100 front) with 700c Araya clinger rims and a campy compatible sun tour 6 speed freewheel/cassette.
I have believe in doing as much mechanical work as possible on your own. I do all the maintenance and some engine building on my motorcycles, and have always worked on my own bicycles, but would not call myself a bike mechanic, and am completely unfamiliar with quirks of vintage Campagnolo. That said I do want to build this bike myself, which is what leads me to these questions.
Cables / cable housing - I have read some conflicting information about this - for the c-record groupset will any modern campagnolo / campy compatible jags etc cable set work? I have read that the ferrules are non standard on some older campagnolo cables.
Chain - what would the recommended chain for this bike be? I am running it as a 6x2 12 speed.
Bottom bracket - what special tools are needed to install the bottom bracket
repacking the hubs - I want to repack the hubs before assembling - what special tools are needed for this.
I think that is about it. Thanks in advance for any help.
A few years ago all of my bikes were stolen, and it has taken me until now to start replacing them. I just finished putting together a daily city bike (nashbar branded shogun steel lugged frame with a Shimano 600 groupset on it) and now I am start to build something less far less practical but very pretty and Italian.
The frame is a Barale branded ALAN aluminum (screwed and glued) lugged frame in really exceptional condition I assume is from the lat 80s. The groupset is a Campagnolo c-record with delta brakes (I know these are divisive). Wheels are Campagnolo record hubs (126 rear 100 front) with 700c Araya clinger rims and a campy compatible sun tour 6 speed freewheel/cassette.
I have believe in doing as much mechanical work as possible on your own. I do all the maintenance and some engine building on my motorcycles, and have always worked on my own bicycles, but would not call myself a bike mechanic, and am completely unfamiliar with quirks of vintage Campagnolo. That said I do want to build this bike myself, which is what leads me to these questions.
Cables / cable housing - I have read some conflicting information about this - for the c-record groupset will any modern campagnolo / campy compatible jags etc cable set work? I have read that the ferrules are non standard on some older campagnolo cables.
Chain - what would the recommended chain for this bike be? I am running it as a 6x2 12 speed.
Bottom bracket - what special tools are needed to install the bottom bracket
repacking the hubs - I want to repack the hubs before assembling - what special tools are needed for this.
I think that is about it. Thanks in advance for any help.
As for ferrules, glad you asked! This is a huge pet peeve of mine. Use the right tools for the job. You will need to use Campy-specific ferrules for them to seat properly at both the adjustment point on the caliper and the seating point on the lever body. The bottoms are chamfered vice flat, so flat ones won't seat correctly if used. You should be able to use modern housings (which are a bit smaller in diameter) as long as you use the correct ferrules.
Chain: can't beat a vintage, period-correct, silent-running and rugged Sedisport from Boulder Bicycle: Sedisport Black Chain bulk package new but no box
Before I go any further, do you have cables and such for the brakes as of now? Also, a few pics of the bottom bracket and hubs would help to assist with what tools you will need to service them. Sounds like a neat project; with some time and patience, we'll help you get where you want to go

DD
 08-03-18, 09:56 PM
#3
Senior Member

Join Date: Nov 2015
Posts: 4,485
Mentioned: 102 Post(s)
Tagged: 0 Thread(s)
Quoted: 1639 Post(s)
Likes: 0
Liked 829 Times
in
538 Posts
The Campy Delta brakes have looks that for some reason just goes with top line 80's Italian frame. Maybe because of its bold statement design, it just looks right on these flashy Italian bikes.
But be aware that they can be a PITA to install and tune up. It takes at least double the time and attention to install them correctly, compared to conventional side pull caliper brakes. Add a bit more time with having internally routed rear brake cables, as managing cable length and tension (which is a big deal with Deltas) to the rear caliper can get really fiddly with more cable casing sections and ferrule yo manage.
Also be aware of it's fragile finish. The silk screen Campy logo on the cover plates tend to fade away under exposure to the sun, plus the bottom of the caliper gets beat up from just the sandblasting effect coming from debris kicked up by the tires. Braking power-wise, it's not really that bad, if adjusted well. Maybe mediocre, at worse, if compared to other top line brakesets from that time, but I guess people expected superior braking power from then, a very seemingly tech forward design.
08-03-18, 10:15 PM
#4
Junior Member
Thread Starter
Join Date: Aug 2018
Posts: 11
Mentioned: 1 Post(s)
Tagged: 0 Thread(s)
Quoted: 2 Post(s)
Likes: 0
Liked 0 Times
in
0 Posts
Thanks for the response.
I have no cables for it. The groupset came (is coming) without any.
The cain I will definitely reach out to them, thanks for the recco.
The wheels just arrived today and I have not unboxed them, but will post pictures when I do. The group has not yet shipped, so hopefully I will have it and pictures in about a week.
For the ferrules: will a modern campagnolo cable kit include the correct ferrules?
08-03-18, 10:18 PM
#5
Junior Member
Thread Starter
Join Date: Aug 2018
Posts: 11
Mentioned: 1 Post(s)
Tagged: 0 Thread(s)
Quoted: 2 Post(s)
Likes: 0
Liked 0 Times
in
0 Posts
The Campy Delta brakes have looks that for some reason just goes with top line 80's Italian frame. Maybe because of its bold statement design, it just looks right on these flashy Italian bikes.
But be aware that they can be a PITA to install and tune up. It takes at least double the time and attention to install them correctly, compared to conventional side pull caliper brakes. Add a bit more time with having internally routed rear brake cables, as managing cable length and tension (which is a big deal with Deltas) to the rear caliper can get really fiddly with more cable casing sections and ferrule yo manage.
Also be aware of it's fragile finish. The silk screen Campy logo on the cover plates tend to fade away under exposure to the sun, plus the bottom of the caliper gets beat up from just the sandblasting effect coming from debris kicked up by the tires. Braking power-wise, it's not really that bad, if adjusted well. Maybe mediocre, at worse, if compared to other top line brakesets from that time, but I guess people expected superior braking power from then, a very seemingly tech forward design.
But be aware that they can be a PITA to install and tune up. It takes at least double the time and attention to install them correctly, compared to conventional side pull caliper brakes. Add a bit more time with having internally routed rear brake cables, as managing cable length and tension (which is a big deal with Deltas) to the rear caliper can get really fiddly with more cable casing sections and ferrule yo manage.
Also be aware of it's fragile finish. The silk screen Campy logo on the cover plates tend to fade away under exposure to the sun, plus the bottom of the caliper gets beat up from just the sandblasting effect coming from debris kicked up by the tires. Braking power-wise, it's not really that bad, if adjusted well. Maybe mediocre, at worse, if compared to other top line brakesets from that time, but I guess people expected superior braking power from then, a very seemingly tech forward design.
08-04-18, 03:19 AM
#6
Senior Member

Join Date: Sep 2005
Location: Hervey Bay, Qld, Australia.
Posts: 2,928
Bikes: Colnago (82, 85, 89, 90, 91, 96, 03), 85 Cinelli, 90 Rossin, 83 Alan, 82 Bianchi, 78 Fountain, 2 x Pinarello, Malvern Star (37), Hillman (70's), 80's Beretto Lo-Pro Track, 80's Kenevans Lo-Pro, Columbus Max (95), DeGrandi (80's) Track.
Mentioned: 12 Post(s)
Tagged: 0 Thread(s)
Quoted: 179 Post(s)
Liked 198 Times
in
124 Posts
I think the old ALAN's are great frames and give a remarkably comfortable ride. I think you have everything to give you that top of the line classic bike. As you are well aware, all it needs is a clean and grease plus those little bits and pieces to get it going. Those bright frame features clean up to a sparkling finish with a little work with some metal polish. Everyone above have provided great advice.
If you have a close look at the top of the seat tube you may find a number - I think it may be on the right hand side. This is the frame's date number (if it is there) and gives you the month and year of construction. Your frame may prove to be an earlier manufacture than the groupset but who cares, the groupset is a classic just like he frame.
The old Campy hubs are easy to pull apart but a couple of cone spanners will be needed. The hubs tend to last for years with a little care but an inspection of the bearing surfaces and balls will tell you if there is life still in your hubs. It is possible to change the bearing surfaces by easing them out with a punch but finding a replacement set may be difficult. I haven't done this on my hubs for quite a few years now so I have no real knowledge of their availability. Hopefully your hubs are fine and they will still run OK if there is a little pitting and wear and probably good enough to get you to your favourite cafe to show this old classic off.
Oh yeah, put the hub over a plastic bucket/container when you pull the axle out as the ball bearings can easily be set free to have a life of their own away from the hub- haha.
Last edited by Gary Fountain; 08-04-18 at 03:34 AM.
08-04-18, 09:28 AM
#7
Junior Member
Thread Starter
Join Date: Aug 2018
Posts: 11
Mentioned: 1 Post(s)
Tagged: 0 Thread(s)
Quoted: 2 Post(s)
Likes: 0
Liked 0 Times
in
0 Posts
I tried to post some pictures of the frame and hubs but apparently I do not have enough posts yet.
The serial number is S70316, also stamped on the bottom bracket is:
BREV. ALAN
Made in Italy
The serial number is S70316, also stamped on the bottom bracket is:
BREV. ALAN
Made in Italy
08-04-18, 04:14 PM
#8
Disciple of St. Tullio

Join Date: Jul 2008
Location: State of Jefferson
Posts: 743
Bikes: Ci�cc, Bianchi, DeRosa, Eddy Merckx, Frejus, Hampsten, Kondor, Losa, Magni, Pegoretti, Pelizzoli, Pogliaghi, Scapin
Mentioned: 38 Post(s)
Tagged: 0 Thread(s)
Quoted: 267 Post(s)
Liked 334 Times
in
140 Posts
I have used the current Campy cable sets with Deltas and everything worked fine IMO. I didn't change the ferrules.
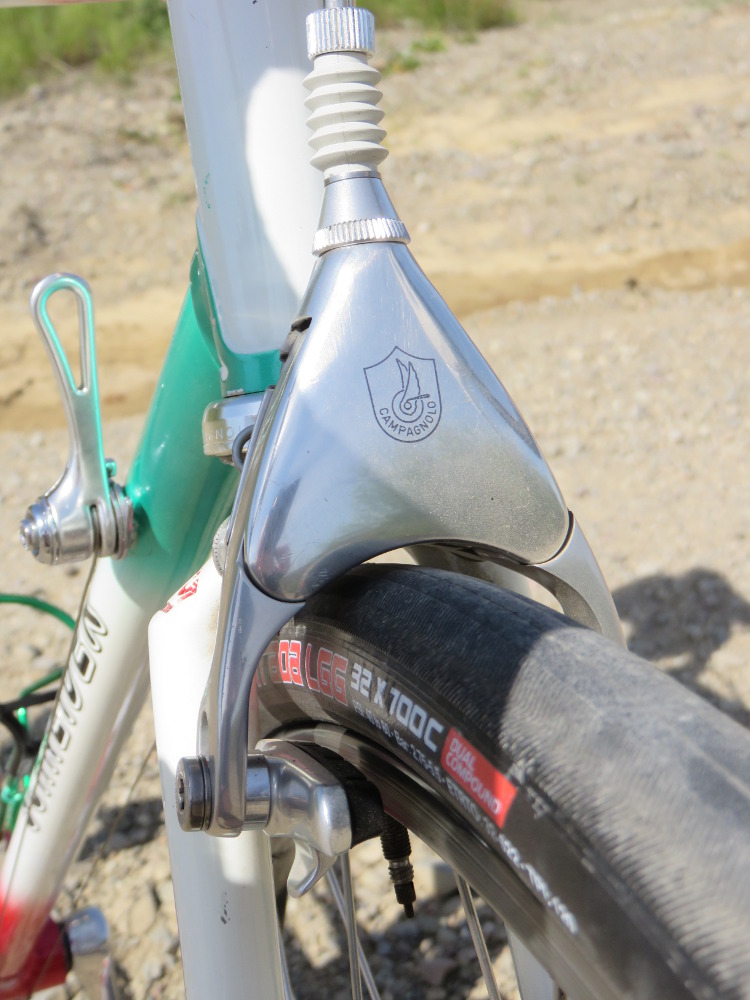
I love Deltas and think that they work great if set up properly. They are a pain in that regard but I have learned a lot over the years and I think that I have it down pretty well now. IMO Deltas work best with more clearance between the pads and rims than typical brakes....I have around 7-8mm between the pads and rim. Due to the way the cable attaches it's hard to get the length correct....I have ruined a cable or two by cutting it earlier in the process......so rather than cut the cable before tightening things down it is the last thing that I do. Be aware that once you tighten the set screw all the way down it's nearly impossible to loosen it and adjust the cable again so be sure that it's where you want it before you cut the cable.
Make sure that the cable adjuster on the brake is all the way in (I don't recall if Record Deltas have one as all my Deltas are Croce d'Aune and those definitely have one).
I remove the 3.5mm set screw completely and have it close at hand with the allen wrench inserted.
I thread the cable through the brake and run it in place....the extra length can be moved to the side of wheel. You can cut some of the excess now if you want but leave it very long.
I then squeeze the pads to the rim....it helps to have a Third Hand or a small clamp to hold the pads closed.
Once everything is lined up I start the set screw, just enough to hold it in place. Leave the allen in the set screw.
I then pull the cable tight by hand and tighten the set screw....but don't tighten the screw all the way, just enough to hold things. Pulling the cable by hand means that there is enough slack in the system that when the pads are released from whatever is holding them against the rim they should be close to the proper clearance.
I release the Third Hand and then look at the clearance. If the cable is fairly tight you can pull the brake lever lightly to see where the pads engage. At this point you may want to loosen or tighten the cable a bit if the lever isn't moving far enough or moving too far.
When you have things set to your liking put the Third Hand/clamp back on the pads to hold them against the rim and tighten down the set screw....very tight. The cable should be well compressed and flatten out some. Try to keep the linkage from moving to one side while you tighten the set screw as this may mean that one pad will move further away from the rim when the pads are released.
I then take a Dremel with a thin cutoff wheel (not the thick black one but a thin reddish colored one) and cut the cable. There isn't a huge amount of room to get in there but there is enough, just take your time. You need to cut it pretty close the bottom of the set screw assembly so the cover can go back on.
As you can see it does sound like a major pain and it is in some regards...but the more you do it the easier it becomes. The first time will be the worst and don't be surprised if you ruin a cable along the way by cutting it too short.
I find that newer pads and holders are better than the original ones. The Campy holders before the latest generation (latest have a set screw like Shimano) will fit on Deltas and you can use the original Delta bolt. In some cases you may have to add another small washer to get them to tighten down enough. If you don't want to change the holders, Kool Stop makes pads that fit the original holders. If you want the Campy holders it might be less expensive to just buy a set of used brakes and steal the holders from them. I have found that I like the SwissStop black pads the best though many people like Kool Stops.
In this pic you can see how much clearance there is between the pad and rim and the more modern holders.
08-04-18, 04:48 PM
#9
Senior Member
Join Date: Nov 2015
Posts: 4,485
Mentioned: 102 Post(s)
Tagged: 0 Thread(s)
Quoted: 1639 Post(s)
Likes: 0
Liked 829 Times
in
538 Posts
Yes the Deltas also have cable tension adjusters, right above the caliper covers.
As I noted, lots more to do, compared to installing conventional caliper brakes......
BTW, the original Campy pad holders have have small Allen grub screws that can push out the ends of the pad slightly, by means of a flex plate between the pad and holder, to provide a bit of toe-in with the pads and avoid the screechies, so it will be a good reason to retain them, as much as possible and just update the pads with more modern compound Kool Stops.....
An additional note, one has to regularly open and clean out the caliper casing, as these calipers tend to build up with a lot of road grit and debris thrown up by the tires that get through the seams of the casing. You do not want that stuff mucking up the mechanism of the calipers and cause wear at all the pivots and joints in it....
Last edited by Chombi1; 08-04-18 at 08:25 PM.
08-04-18, 05:28 PM
#10

Senior Member
Join Date: Jun 2006
Posts: 20,305
Mentioned: 130 Post(s)
Tagged: 0 Thread(s)
Quoted: 3464 Post(s)
Liked 2,829 Times
in
1,995 Posts
Yes the Deltas also have acable tension adjusters, right above theccsliper covers.
As I noted, lots more to do, compared to installing conventional caliper brakes......
BTW, the original Campy pad holders have have small Allen grub screws that can push out the ends of the pad slightly, by means of a flex plate between the pad and holder, to provide a bit of toe-in with the pads and avoid the screechies, so it will be a good reason to retain them, as much as possible and just update the pads with more modern compound Kool Stops.....
An additional note, one has to regularly open and clean out the caliper casing, as these calipers tend to build up with a lot of road grit and debris thrown up by the tires that get through the seams of the casing. You do not want that stuff mucking up the mechanism of the calipers and cause wear ar all the pivots and joints in it....
I will let others have all the fun.
08-16-18, 04:01 PM
#11
Junior Member
Thread Starter
Join Date: Aug 2018
Posts: 11
Mentioned: 1 Post(s)
Tagged: 0 Thread(s)
Quoted: 2 Post(s)
Likes: 0
Liked 0 Times
in
0 Posts
Well my group finally arrived, and it looks beautiful (maybe I can post pictures after my next few posts). I did a few test fittings and found two things interesting -
1) the rear derailleur does not swing freely. It is just barely binding mid arch right at the bottom of where the adjustable stopper screw is located. I suspect the frame has a slight dent in that part of the dropout that is just enough to mess up the clearance. I am going to file the frame slightly (it shouldn't need much at all to move freely).
2) Where the brakes screw into the frame - every other frame I have had had a larger hole to allow the Allen nut to countersink. This frame seems to just be a small hole. Maybe I just need to use a standard locknut back there? I suspect this is pretty common for older frames. Maybe this is a 70s frame?
Thanks.
08-17-18, 11:02 AM
#12
Junior Member
Thread Starter
Join Date: Aug 2018
Posts: 11
Mentioned: 1 Post(s)
Tagged: 0 Thread(s)
Quoted: 2 Post(s)
Likes: 0
Liked 0 Times
in
0 Posts
Spoke with a friend last night, and sounds like it is pretty common on older frames to need to drill out the brake mounts. Sounds easy enough, if anyone has any tips it would be much appreciated.
Thanks.
Thanks.
08-17-18, 12:52 PM
#13
Senior Member

Join Date: May 2008
Location: Fredericksburg, Va
Posts: 9,579
Bikes: '65 Frejus TDF, '73 Bottecchia Giro d'Italia, '83 Colnago Superissimo, '84 Trek 610, '84 Trek 760, '88 Pinarello Veneto, '88 De Rosa Pro, '89 Pinarello Montello, '94 Burley Duet, 97 Specialized RockHopper, 2010 Langster, Tern Link D8
Mentioned: 73 Post(s)
Tagged: 0 Thread(s)
Quoted: 1607 Post(s)
Liked 2,216 Times
in
1,103 Posts
@agent9 - Check to make sure it is the frame and not the bolt in the RD hanging up! You can't put back what you remove with a file!
Your frame is built for "Nutted" brakes. I always go with what the frame was designed for and don't modify the frame to accommodate upgrades, your choice. Keep in mind that once you increase the hole size, the tube material thickness may not be enough to hold the brake. It is curved unless it is a brake block. The older frames used a tube and not a solid or thick walled bridge. The nutted brakes had a curved washer to mate to the curvature of the tube. You should use a reverse curved surface for the inside of the tube if you drill it out.
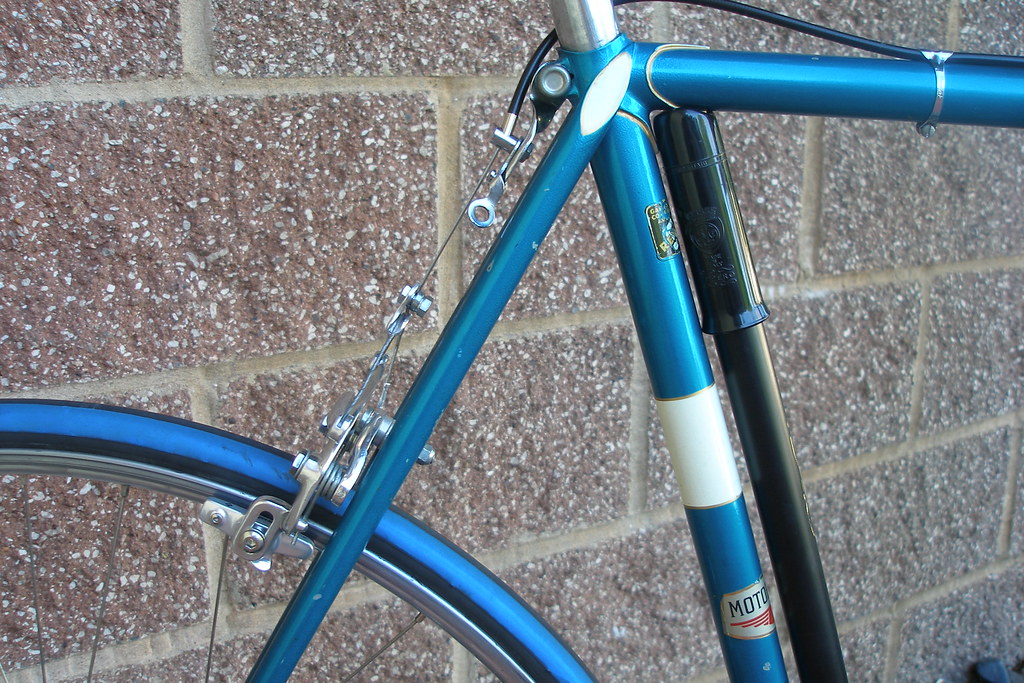
LC_StTb_00, on Flickr

P1000503, on Flickr
Your frame is built for "Nutted" brakes. I always go with what the frame was designed for and don't modify the frame to accommodate upgrades, your choice. Keep in mind that once you increase the hole size, the tube material thickness may not be enough to hold the brake. It is curved unless it is a brake block. The older frames used a tube and not a solid or thick walled bridge. The nutted brakes had a curved washer to mate to the curvature of the tube. You should use a reverse curved surface for the inside of the tube if you drill it out.
LC_StTb_00, on Flickr
P1000503, on Flickr
__________________
Bikes don't stand alone. They are two tired.
Bikes don't stand alone. They are two tired.
08-17-18, 01:01 PM
#14
Friendship is Magic

Join Date: Nov 2010
Location: Sacramento, CA
Posts: 22,984
Bikes: old ones
Mentioned: 304 Post(s)
Tagged: 0 Thread(s)
Quoted: 26415 Post(s)
Liked 10,380 Times
in
7,208 Posts
...on chains for a 6X2 12 speed.
While it was a wonderful time in my life when Sedisport came out with those bushingless chains, that worked so well and couild be purchased so cheaply in bulk rolls that I stopped cleaning them and just replaced them and threw away the old ones, those days are long ago. Sedisport chains from the used online sources command impressive prices now (especially considering the original price), and they work no better than a KMC 8.93 x plate chain that can be had brand new online for about 12 bucks. And I have used both.
My only other advice would be to use blue Loctite when installing your fixed cup (if you don't just go with a sealed unit in the BB). Sometimes I even use Loctite on the sealed unit cup on that side, if it's made from aluminum alloy or has anything else that might squeak if it loosens. This is only what I do. There are obviously other opinions. Cables and housings are all pretty good if you go with plastic lined housings and stainless, die drawn (smooth) cables. Can't say I notice a difference.
While it was a wonderful time in my life when Sedisport came out with those bushingless chains, that worked so well and couild be purchased so cheaply in bulk rolls that I stopped cleaning them and just replaced them and threw away the old ones, those days are long ago. Sedisport chains from the used online sources command impressive prices now (especially considering the original price), and they work no better than a KMC 8.93 x plate chain that can be had brand new online for about 12 bucks. And I have used both.
My only other advice would be to use blue Loctite when installing your fixed cup (if you don't just go with a sealed unit in the BB). Sometimes I even use Loctite on the sealed unit cup on that side, if it's made from aluminum alloy or has anything else that might squeak if it loosens. This is only what I do. There are obviously other opinions.
Cables and housings are all pretty good if you go with plastic lined housings and stainless, die drawn (smooth) cables. Can't say I notice a difference.
 08-17-18, 01:06 PM
#15
Junior Member
Thread Starter
Join Date: Aug 2018
Posts: 11
Mentioned: 1 Post(s)
Tagged: 0 Thread(s)
Quoted: 2 Post(s)
Likes: 0
Liked 0 Times
in
0 Posts
@agent9 - Check to make sure it is the frame and not the bolt in the RD hanging up! You can't put back what you remove with a file!
Your frame is built for "Nutted" brakes. I always go with what the frame was designed for and don't modify the frame to accommodate upgrades, your choice. Keep in mind that once you increase the hole size, the tube material thickness may not be enough to hold the brake. It is curved unless it is a brake block. The older frames used a tube and not a solid or thick walled bridge. The nutted brakes had a curved washer to mate to the curvature of the tube. You should use a reverse curved surface for the inside of the tube if you drill it out.
Your frame is built for "Nutted" brakes. I always go with what the frame was designed for and don't modify the frame to accommodate upgrades, your choice. Keep in mind that once you increase the hole size, the tube material thickness may not be enough to hold the brake. It is curved unless it is a brake block. The older frames used a tube and not a solid or thick walled bridge. The nutted brakes had a curved washer to mate to the curvature of the tube. You should use a reverse curved surface for the inside of the tube if you drill it out.
I would love to convert the brakes to nutted and not modify the frame. I see conversions are common, but does anyone have any advice for converting Campy Delta brakes to nutted? Is that crazy?
For the RD I am certain it is not the screw, its actually just a hair below the screw that is binding, but I will take it out completely to double check. One of these days I will be able to share some pictures and make all this much easier.
08-17-18, 01:12 PM
#16
Junior Member
Thread Starter
Join Date: Aug 2018
Posts: 11
Mentioned: 1 Post(s)
Tagged: 0 Thread(s)
Quoted: 2 Post(s)
Likes: 0
Liked 0 Times
in
0 Posts
...on chains for a 6X2 12 speed.
While it was a wonderful time in my life when Sedisport came out with those bushingless chains, that worked so well and couild be purchased so cheaply in bulk rolls that I stopped cleaning them and just replaced them and threw away the old ones, those days are long ago. Sedisport chains from the used online sources command impressive prices now (especially considering the original price), and they work no better than a KMC 8.93 x plate chain that can be had brand new online for about 12 bucks. And I have used both.
My only other advice would be to use blue Loctite when installing your fixed cup (if you don't just go with a sealed unit in the BB). Sometimes I even use Loctite on the sealed unit cup on that side, if it's made from aluminum alloy or has anything else that might squeak if it loosens. This is only what I do. There are obviously other opinions. Cables and housings are all pretty good if you go with plastic lined housings and stainless, die drawn (smooth) cables. Can't say I notice a difference.
While it was a wonderful time in my life when Sedisport came out with those bushingless chains, that worked so well and couild be purchased so cheaply in bulk rolls that I stopped cleaning them and just replaced them and threw away the old ones, those days are long ago. Sedisport chains from the used online sources command impressive prices now (especially considering the original price), and they work no better than a KMC 8.93 x plate chain that can be had brand new online for about 12 bucks. And I have used both.
My only other advice would be to use blue Loctite when installing your fixed cup (if you don't just go with a sealed unit in the BB). Sometimes I even use Loctite on the sealed unit cup on that side, if it's made from aluminum alloy or has anything else that might squeak if it loosens. This is only what I do. There are obviously other opinions.
Cables and housings are all pretty good if you go with plastic lined housings and stainless, die drawn (smooth) cables. Can't say I notice a difference.
08-17-18, 01:26 PM
#17
Junior Member
Thread Starter
Join Date: Aug 2018
Posts: 11
Mentioned: 1 Post(s)
Tagged: 0 Thread(s)
Quoted: 2 Post(s)
Likes: 0
Liked 0 Times
in
0 Posts
08-17-18, 02:30 PM
#18
Friendship is Magic
Join Date: Nov 2010
Location: Sacramento, CA
Posts: 22,984
Bikes: old ones
Mentioned: 304 Post(s)
Tagged: 0 Thread(s)
Quoted: 26415 Post(s)
Liked 10,380 Times
in
7,208 Posts
...brakes. They only slow you down anyway. 
08-17-18, 02:46 PM
#19
Banned
Nut Fixed Brakes is what I had on my AlAn but they were <C> single pivots .
a counterbore on inside face is going to be hard to do on a finished frame
You don't want to drill it out all the way through ..
since Italian thread is right hand, on the BB drive side you have to make sure its tight..
if it were left hand thread , like british/near universal standard, that would be less of an issue..
...
08-17-18, 02:54 PM
#20
Senior Member

Join Date: Jan 2008
Location: Beaverton, OR
Posts: 14,744
Bikes: Yes
Mentioned: 525 Post(s)
Tagged: 0 Thread(s)
Quoted: 3230 Post(s)
Liked 3,868 Times
in
1,439 Posts
https://www.bikehugger.com/posts/the...o-delta-brake/
Only 76 pieces! The mounting bolt appears to be something custom that slots into a reinforcing plate. You could probably find something suitable and file it to fit. You might even be able to access the mounting bolt without completely disassembling the brake. It would be cool if you did it.
__________________
My Bikes
My Bikes
08-18-18, 01:33 PM
#21
Junior Member
Thread Starter
Join Date: Aug 2018
Posts: 11
Mentioned: 1 Post(s)
Tagged: 0 Thread(s)
Quoted: 2 Post(s)
Likes: 0
Liked 0 Times
in
0 Posts
They are pretty complicated. I am on the fence. The brake bridge is solid, not a tube, and can actually be removed (it is held on with two Allen bolts). The fork frown is also pretty robust. I think I am going to go ahead and modify the frame. It is a look I prefer anyways.
A few more posts and I can start posting pictures
A few more posts and I can start posting pictures
08-19-18, 09:35 PM
#22
Junior Member
Thread Starter
Join Date: Aug 2018
Posts: 11
Mentioned: 1 Post(s)
Tagged: 0 Thread(s)
Quoted: 2 Post(s)
Likes: 0
Liked 0 Times
in
0 Posts
I have changed my mind. To make the brakes work I am going to need to machine longer bolts either way, so may as well make them nutted.
rear derailleur is silky smooth after a very light filing.
i test fitted the bottom bracket, and everything went together fine, but I do have about 5 threads sticking out of the beyond the lock ring on the adjustable side. Is this normal or do I have the wrong size bb?
thanks
rear derailleur is silky smooth after a very light filing.
i test fitted the bottom bracket, and everything went together fine, but I do have about 5 threads sticking out of the beyond the lock ring on the adjustable side. Is this normal or do I have the wrong size bb?
thanks

Thread
Thread Starter
Forum
Replies
Last Post
BrokeSpoke89
Classic & Vintage
2
09-14-16 10:48 PM
Rogue Leader
Bicycle Mechanics
15
07-09-15 02:47 PM
kojTL1000
Bicycle Mechanics
12
05-07-13 11:09 AM
