


Miyata 615 center pull brakes question.
 07-26-19, 12:51 PM
#1

Senior Member
Thread Starter
Join Date: Jun 2018
Location: NW Ohio
Posts: 1,142
Bikes: 1983 Univega Super Strada, 1986 Panasonic DX5000, 1984 Fuji Team 85 Univega Gran Turismo, 1984 Lotus Unique, 1987 Centurion Expert, 1987 Centurion Ironman Master,
Mentioned: 14 Post(s)
Tagged: 0 Thread(s)
Quoted: 677 Post(s)
Liked 459 Times
in
182 Posts
Miyata 615 center pull brakes question.
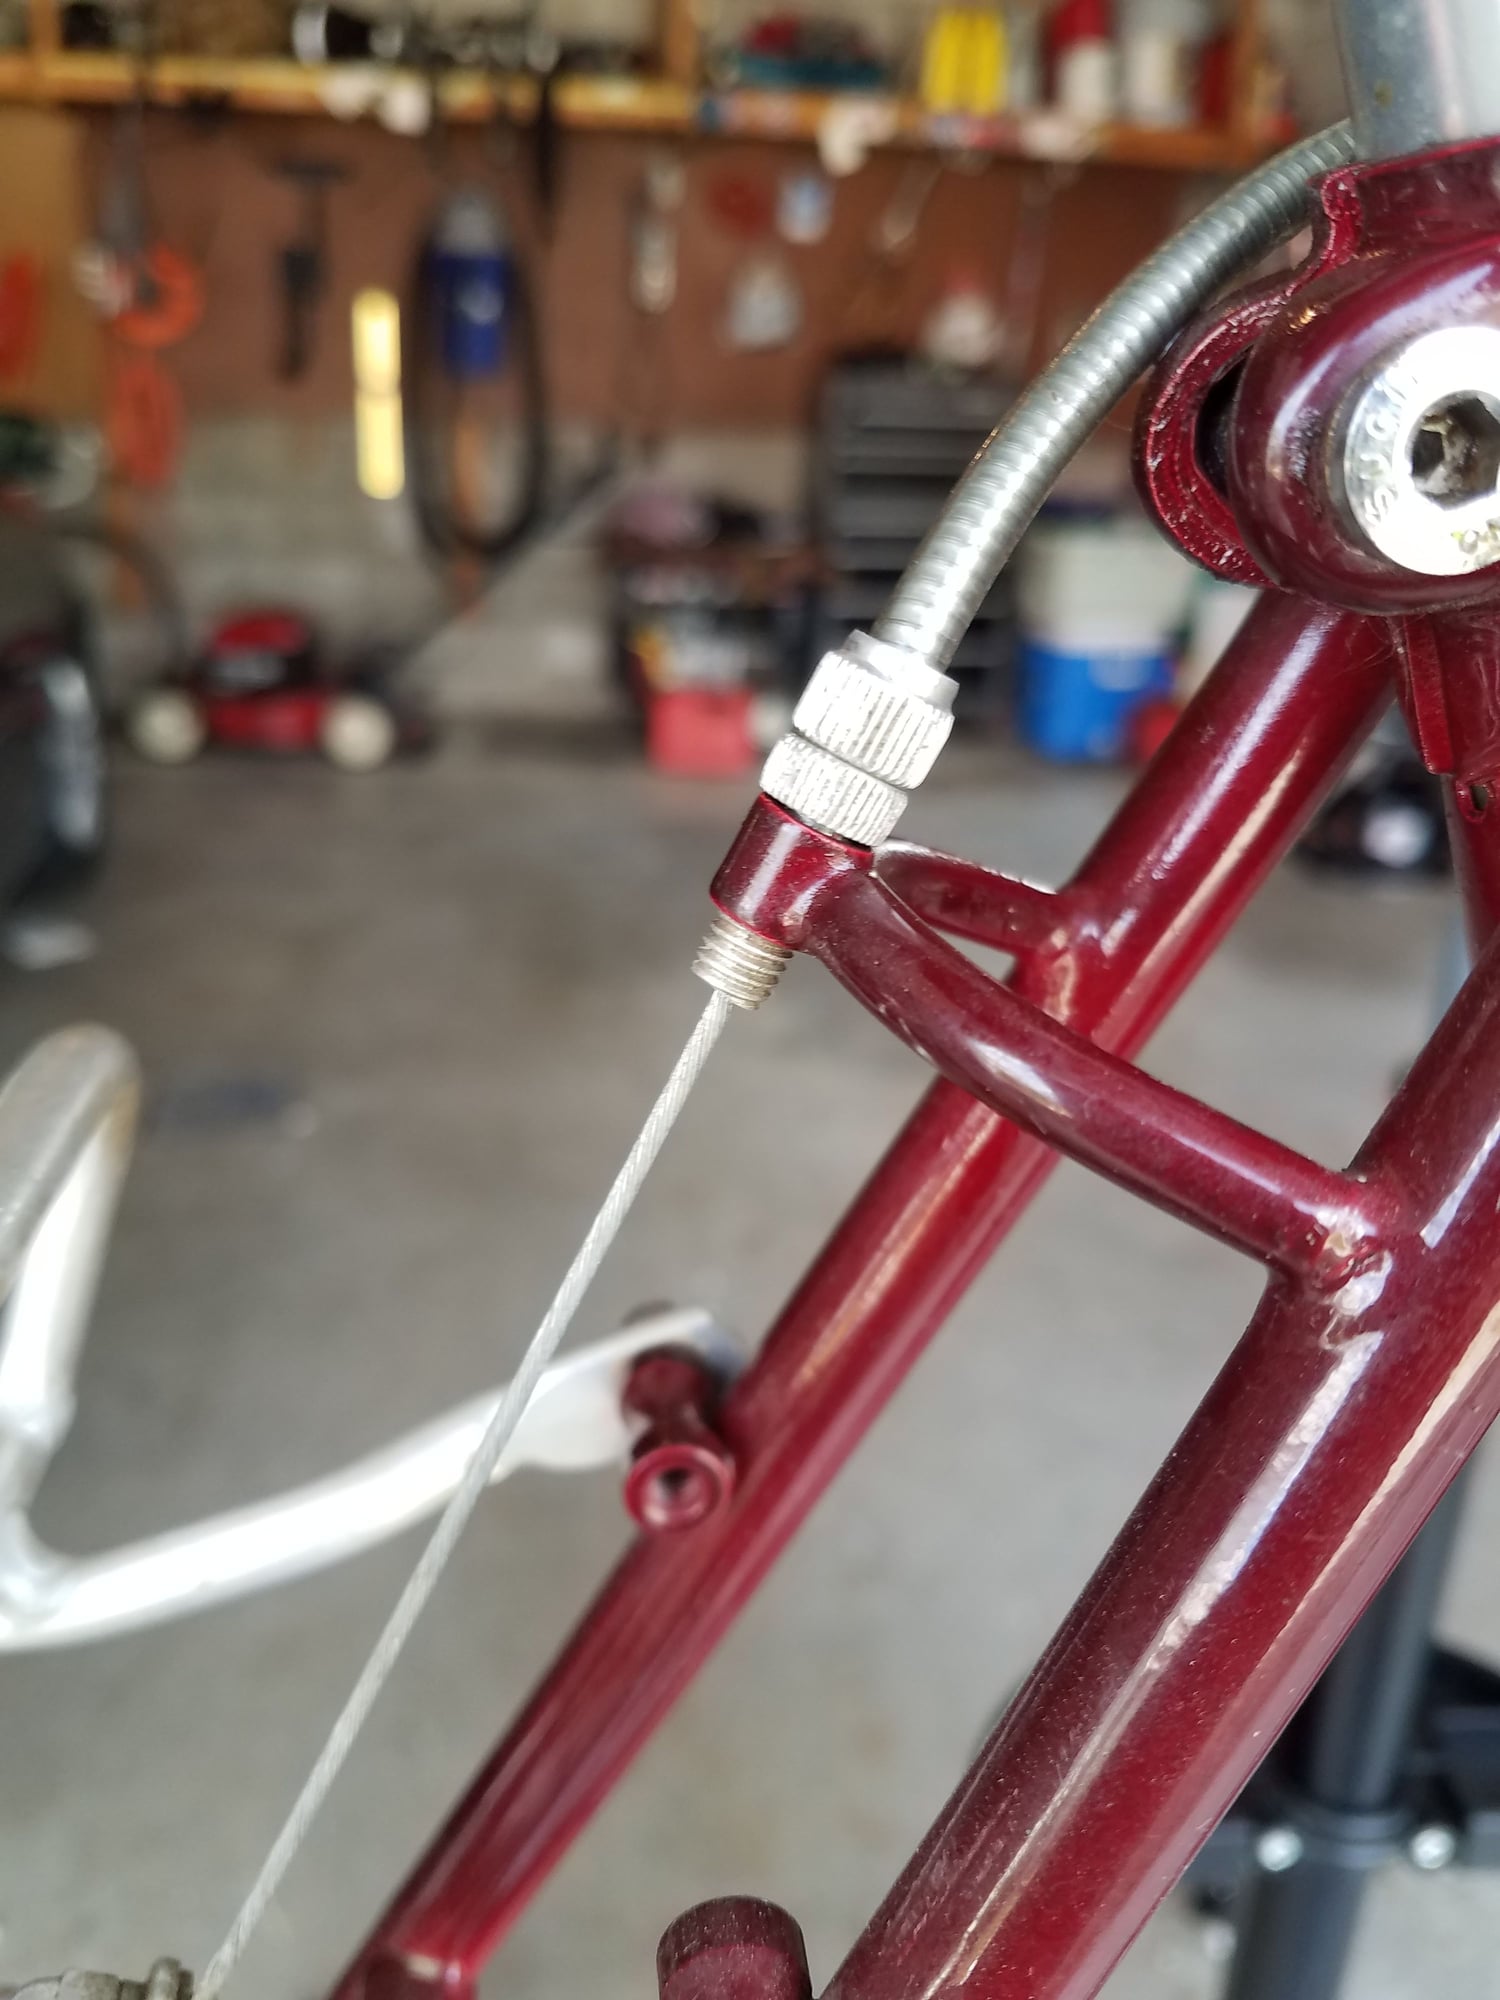
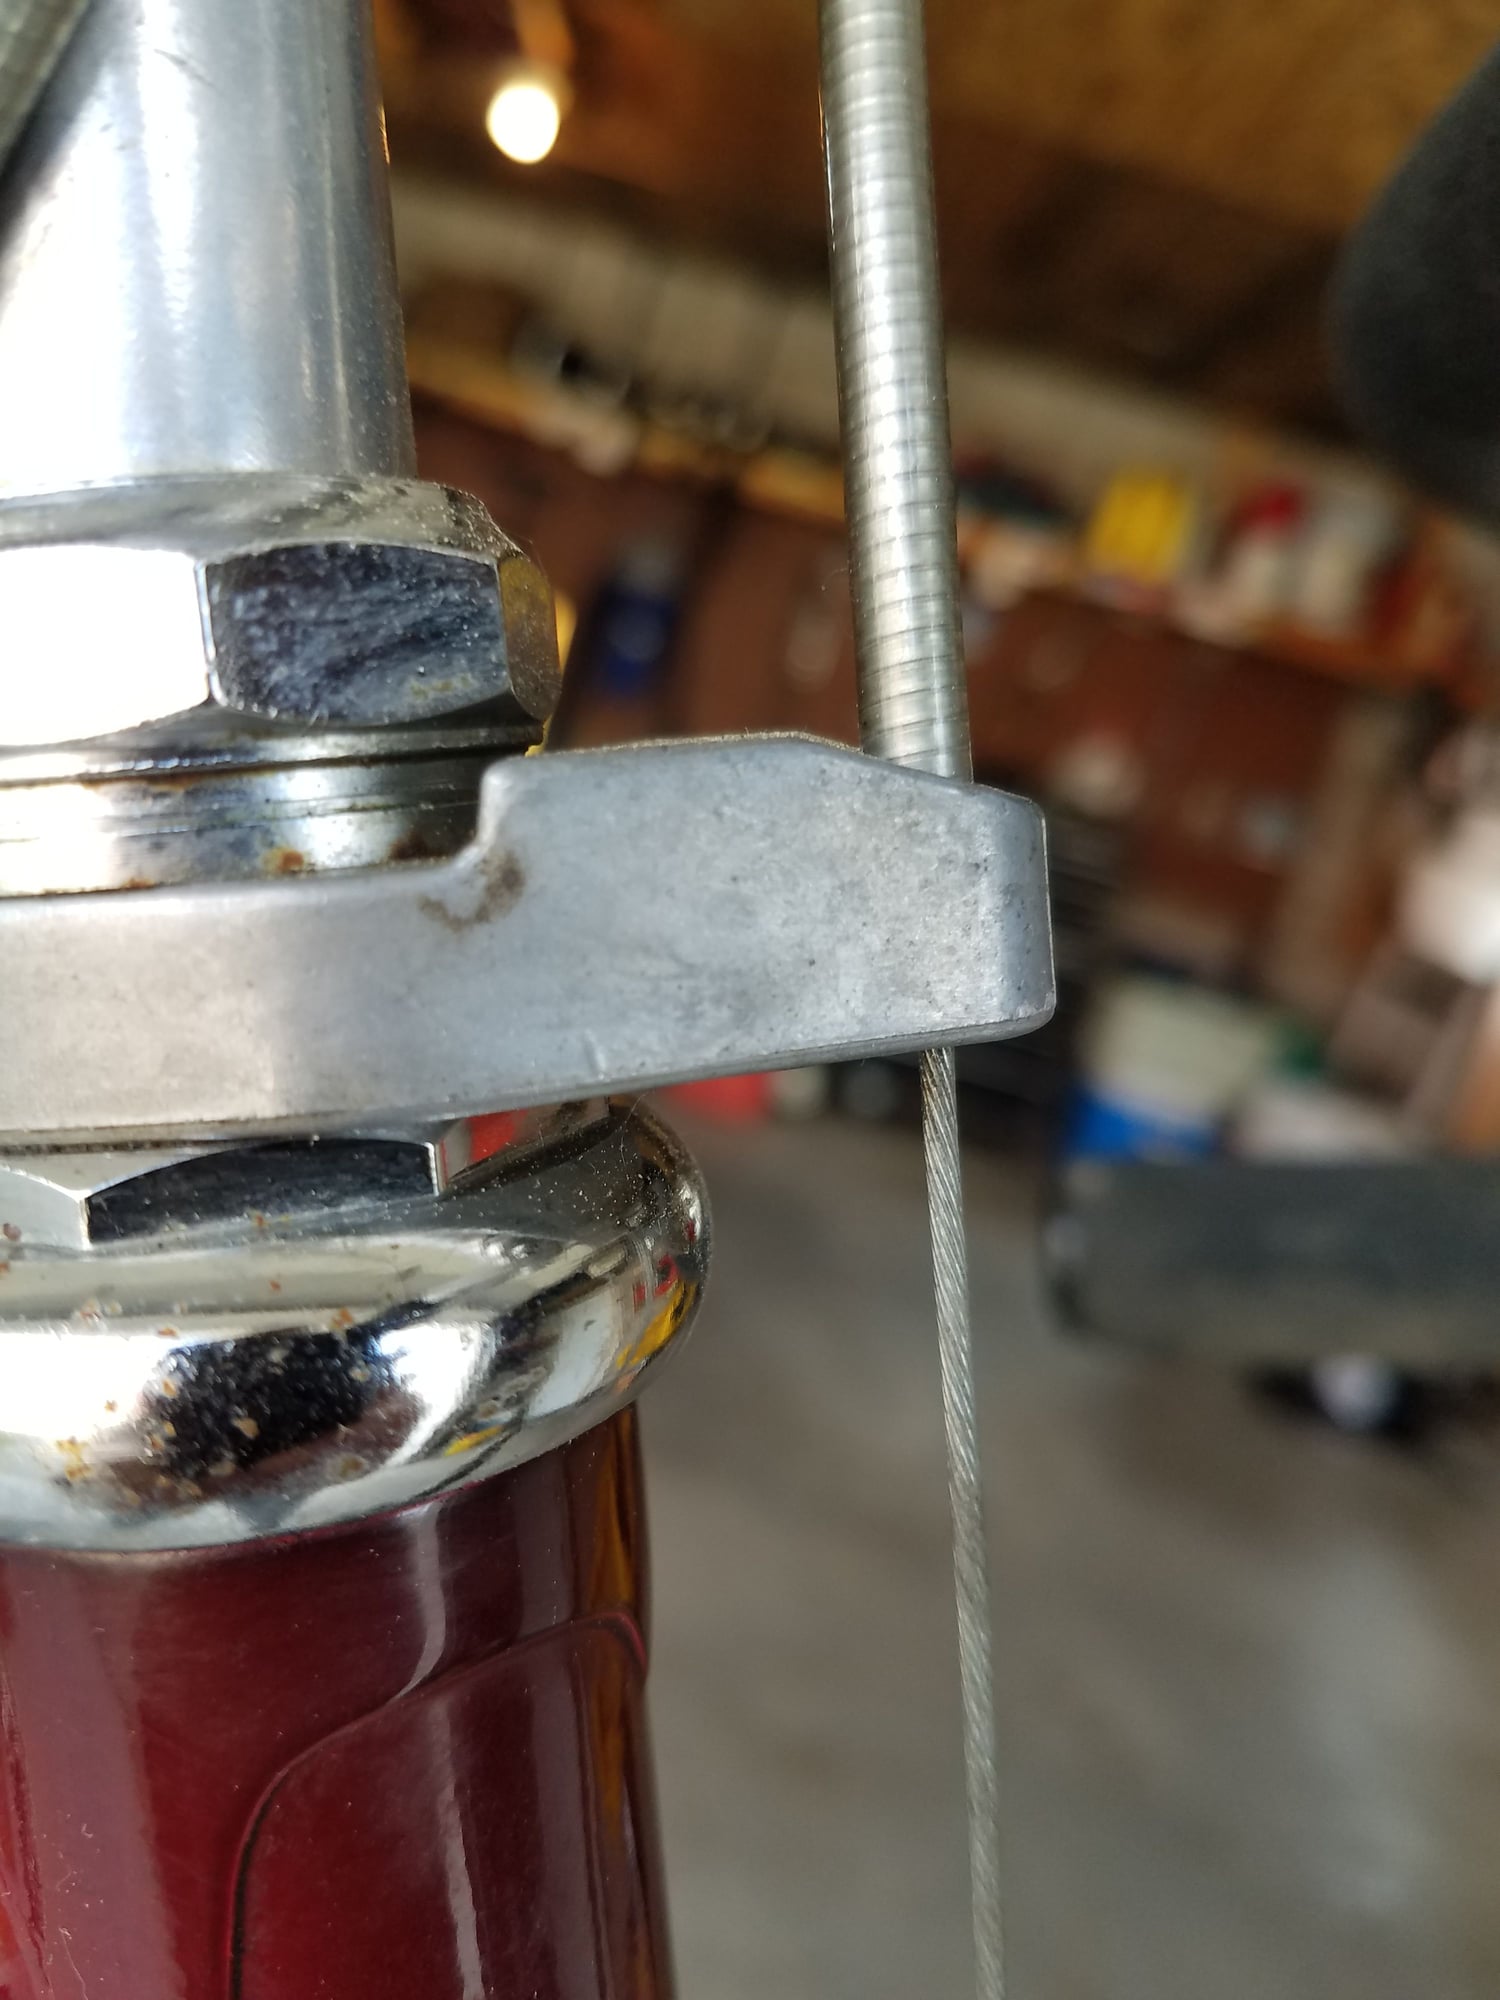
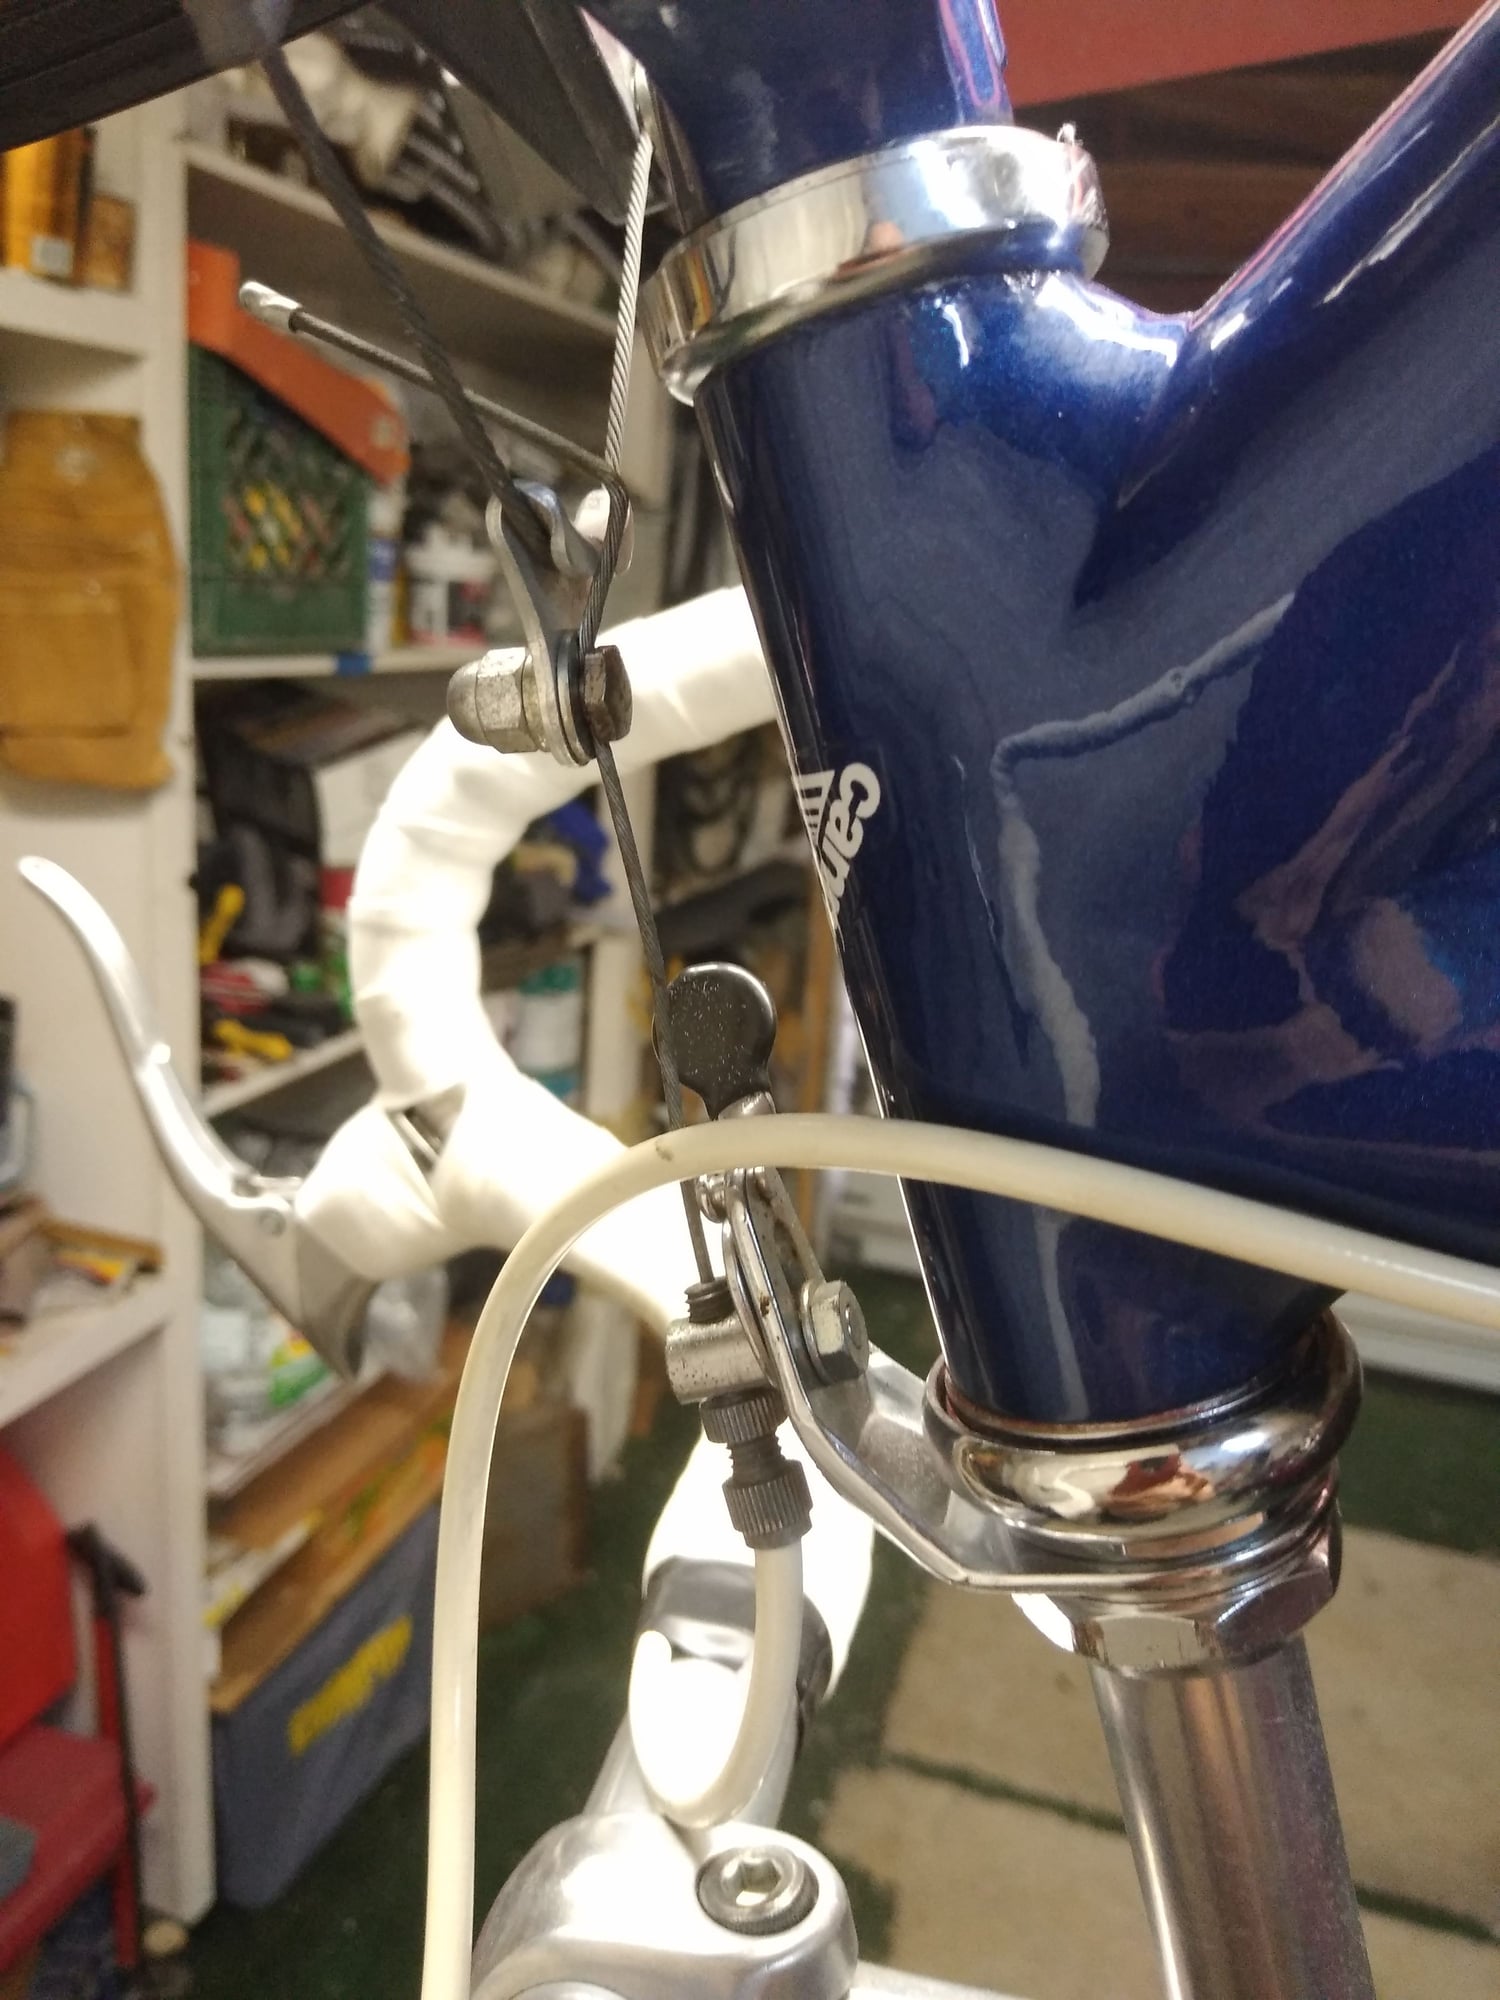
Just picked up a nice 1988 Miyata. It has poor braking. The calipers seem to work ok so I'm thinking I just need new pads. Suggestions? Here's a photo of the pads. My other question is, should there be a barrel adjuster on the front cable like is on the rear? Here are photos of the rear barrel adjuster and where I would think the front one would be. Thanks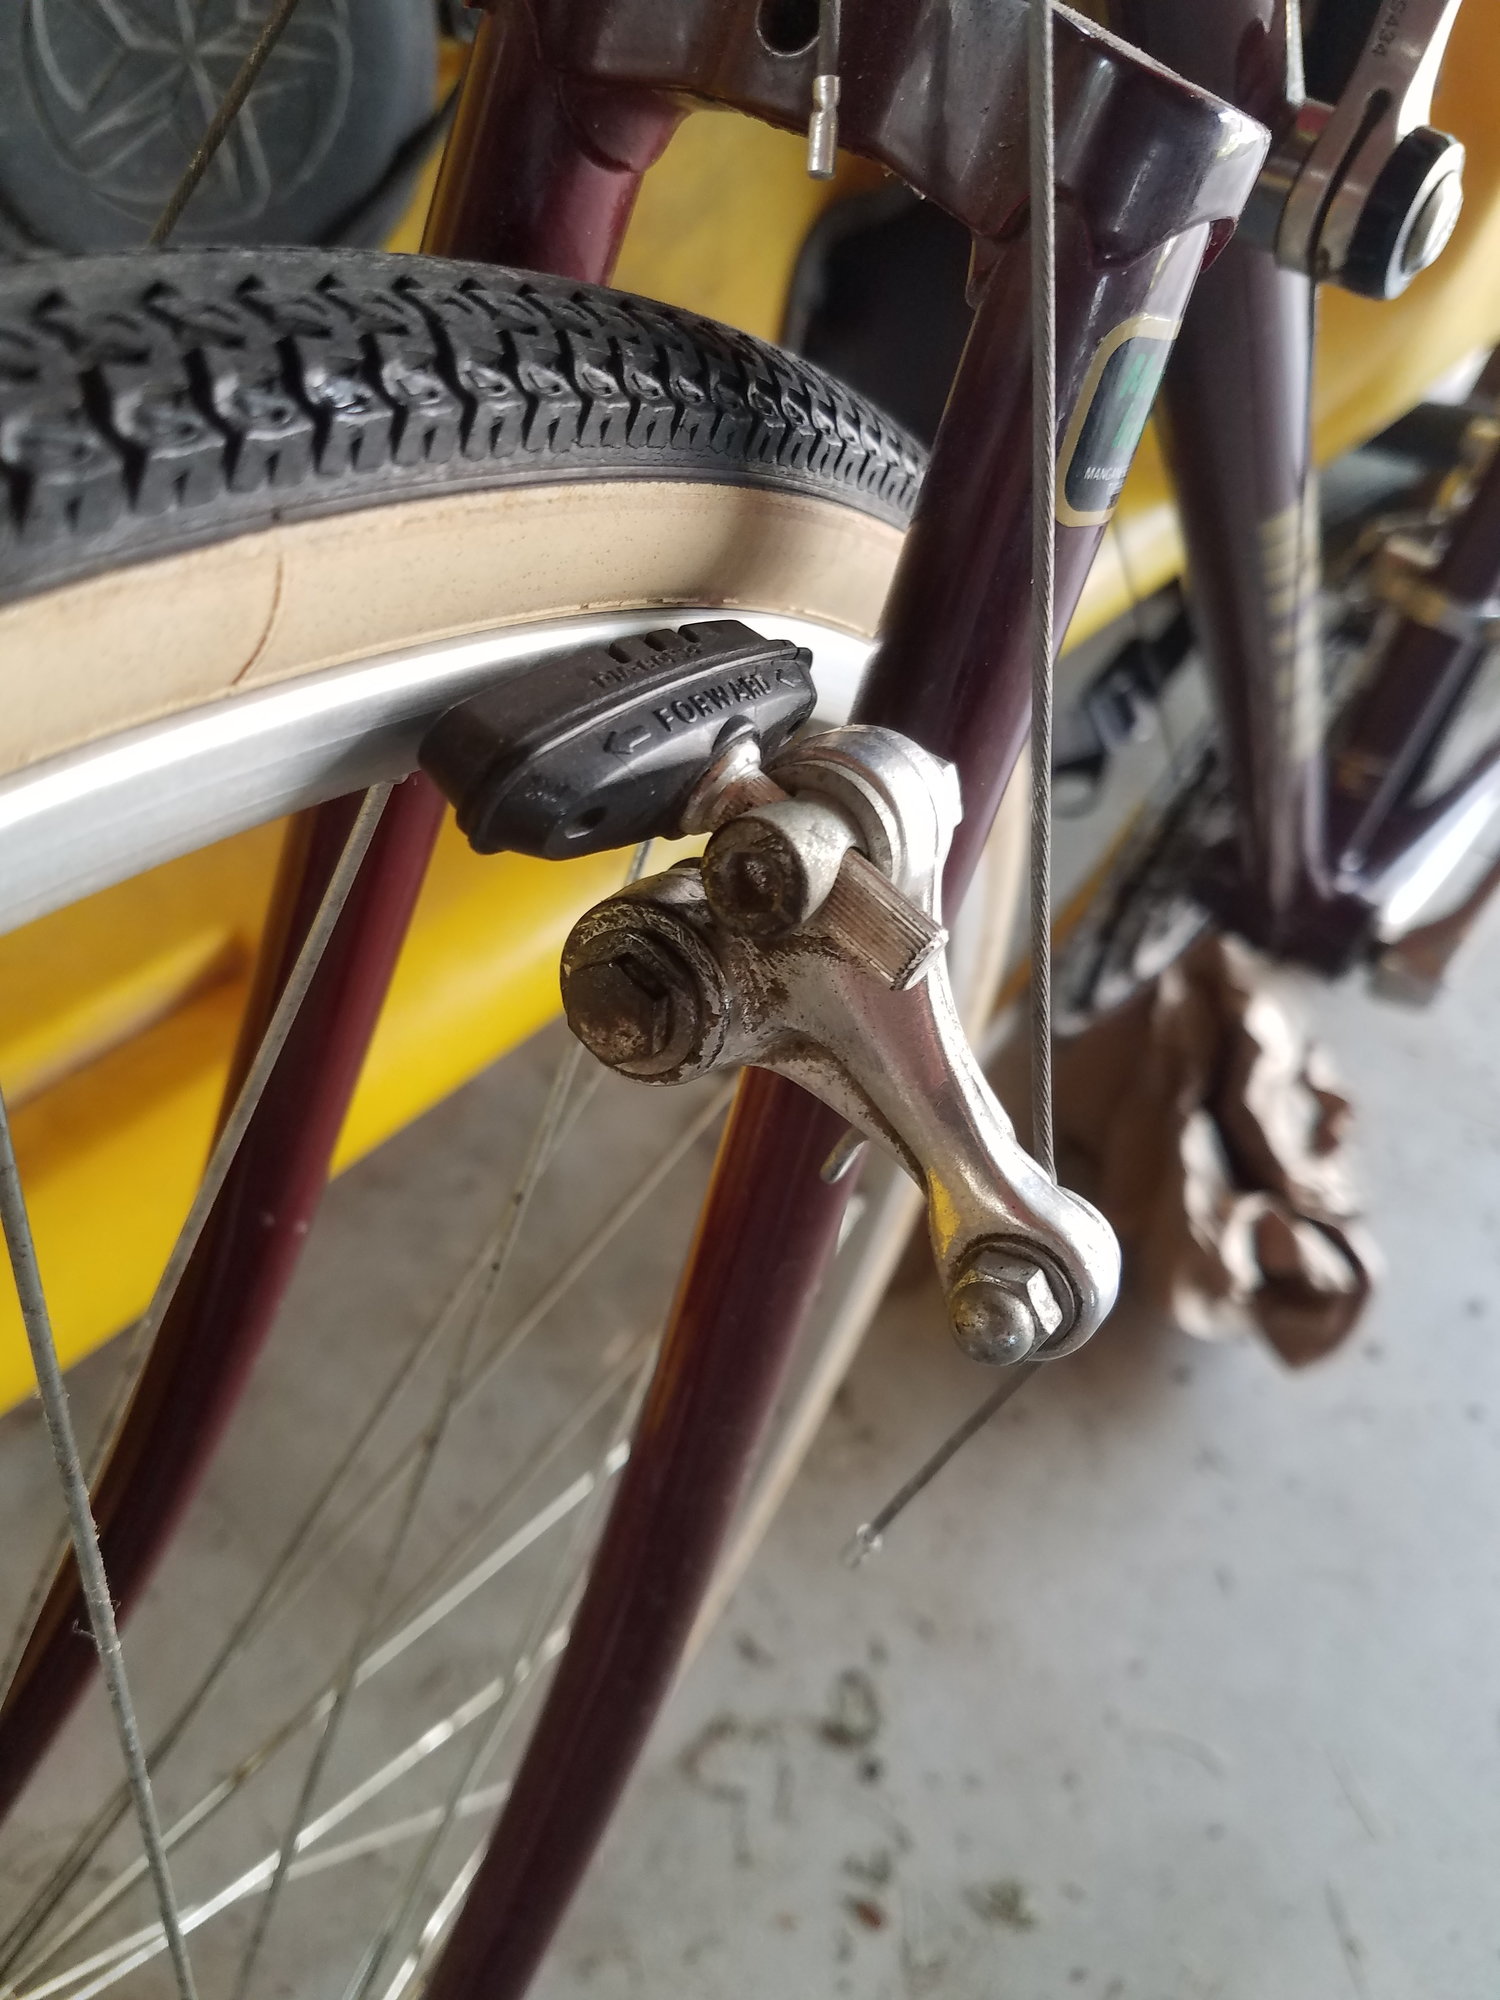
 07-26-19, 01:44 PM
#2
Senior Member

Join Date: Sep 2015
Location: Madison, WI
Posts: 2,701
Mentioned: 52 Post(s)
Tagged: 0 Thread(s)
Quoted: 1136 Post(s)
Liked 650 Times
in
336 Posts
Yes, I would replace those pads. Even though they look barely used the compound hardens over the years. Grab new post mount KoolStop pads. I would also remove, clean, and oil the brake arms to ensure the smoothest actuation.
The barrel adjuster is simply there for convenience. You can adjust the brakes by hand or with a cable puller tool (aka a third hand tool). If a standard barrel adjuster fits on your headset-mounted cable hanger, go for it. Might as well replace the housing and galvanized cable while you're at it. If a barrel adjuster doesn't work with that cable hanger, you can buy "in-line" barrel adjusters from Avid that you can mount anywhere along the housing run.
The barrel adjuster is simply there for convenience. You can adjust the brakes by hand or with a cable puller tool (aka a third hand tool). If a standard barrel adjuster fits on your headset-mounted cable hanger, go for it. Might as well replace the housing and galvanized cable while you're at it. If a barrel adjuster doesn't work with that cable hanger, you can buy "in-line" barrel adjusters from Avid that you can mount anywhere along the housing run.
Last edited by TenGrainBread; 07-26-19 at 01:53 PM.
07-26-19, 02:31 PM
#3
Senior Member

Join Date: Oct 2012
Location: Berkeley CA
Posts: 2,536
Bikes: 1981 Ron Cooper, 1974 Cinelli Speciale Corsa, 2000 Gary Fisher Sugar 1, 1986 Miyata 710, 1982 Raleigh "International"
Mentioned: 97 Post(s)
Tagged: 0 Thread(s)
Quoted: 930 Post(s)
Liked 1,291 Times
in
487 Posts
It may not just be the pads and pivots that is causing poor braking. Modern high quality teflon or plastic lined cable housings and coated cables can significantly improve braking performance by reducing friction in the braking system. The cable housings you have on there may be original unlined housings and potentially corroded or unlubricated. If the housings are unlined, you might find some improvement from simply greasing the cables where they pass through the housings. If they are teflon or plastic-lined (these should not be greased), the lining may have worn through in spots in which case they would require their replacement.
07-26-19, 02:35 PM
#4

Senior Member
Join Date: Dec 2005
Posts: 17,153
Mentioned: 481 Post(s)
Tagged: 0 Thread(s)
Quoted: 3807 Post(s)
Liked 6,676 Times
in
2,607 Posts
And just to be pedantic before @noglider chimes in, those are cantilever brakes, not center pull.
Nice bike!
Nice bike!
07-26-19, 03:44 PM
#5
aka Tom Reingold

Join Date: Jan 2009
Location: New York, NY, and High Falls, NY, USA
Posts: 40,502
Bikes: 1962 Rudge Sports, 1971 Raleigh Super Course, 1971 Raleigh Pro Track, 1974 Raleigh International, 1975 Viscount Fixie, 1982 McLean, 1996 Lemond (Ti), 2002 Burley Zydeco tandem
Mentioned: 511 Post(s)
Tagged: 0 Thread(s)
Quoted: 7348 Post(s)
Liked 2,462 Times
in
1,433 Posts
And just to be pedantic before @noglider chimes in, those are cantilever brakes, not center pull.
Nice bike!
Nice bike!
__________________
Tom Reingold, tom@noglider.com
New York City and High Falls, NY
Blogs: The Experienced Cyclist; noglider's ride blog
�When man invented the bicycle he reached the peak of his attainments.� � Elizabeth West, US author
Please email me rather than PM'ing me. Thanks.
Tom Reingold, tom@noglider.com
New York City and High Falls, NY
Blogs: The Experienced Cyclist; noglider's ride blog
�When man invented the bicycle he reached the peak of his attainments.� � Elizabeth West, US author
Please email me rather than PM'ing me. Thanks.
07-26-19, 04:03 PM
#6
Senior Member
The cantilevers in your pictures were OK, but not great. The brake pads were never even OK. Change the pads to the salmon pink Kool Stop pads. Replacing the cables and housing may not be necessary. I have an 85 Miyata 1000 with the original cables and housing and there is really no binding going on. The housing is unlined, and yours may be as well. I just lubed with a light lube about 4 years ago and they have been fine since.
07-26-19, 04:54 PM
#7
Senior Member
Join Date: Sep 2014
Location: Baton Rouge La
Posts: 1,214
Mentioned: 22 Post(s)
Tagged: 0 Thread(s)
Quoted: 394 Post(s)
Liked 346 Times
in
230 Posts
Also, be sure to adjust the pads so they contact the rim correctly. See "shoe adjustment" here: https://www.sheldonbrown.com/rim-brakes.html#shoeadj
07-26-19, 05:53 PM
#8
Senior Member

Join Date: Jan 2015
Location: Los Angeles
Posts: 4,703
Bikes: 82 Medici, 2011 Richard Sachs, 2011 Milwaukee Road
Mentioned: 55 Post(s)
Tagged: 0 Thread(s)
Quoted: 1947 Post(s)
Liked 2,009 Times
in
1,108 Posts
That Miyata is really nice and pretty well
preserved. Before you go about replacing anything related to the brakes, I would read up on setting up cantilever brakes. Enjoy that endeavor. If the levers smoothly close the brakes and the brakes smoothly return the levers, then the cables and housing are fine (lube can come later). Focus on set up. If your finger nail can depress the brake pad, don�t replace them yet. If they are hard plastic dense, first file them to investigate if the hardness is only skin deep. I bet they will work adequately without anything but fine tuning. Not just advising ways to save $$$$ but suggesting that getting those brakes working well first and then making improvements incrementally is (for me) part of the fun of learning.
preserved. Before you go about replacing anything related to the brakes, I would read up on setting up cantilever brakes. Enjoy that endeavor. If the levers smoothly close the brakes and the brakes smoothly return the levers, then the cables and housing are fine (lube can come later). Focus on set up. If your finger nail can depress the brake pad, don�t replace them yet. If they are hard plastic dense, first file them to investigate if the hardness is only skin deep. I bet they will work adequately without anything but fine tuning. Not just advising ways to save $$$$ but suggesting that getting those brakes working well first and then making improvements incrementally is (for me) part of the fun of learning.
07-26-19, 06:43 PM
#9
Senior Member
Likes For 3speedslow:
07-27-19, 12:09 PM
#10
Extraordinary Magnitude

Join Date: Aug 2009
Location: Waukesha WI
Posts: 13,646
Bikes: 1978 Trek TX700; 1978/79 Trek 736; 1984 Specialized Stumpjumper Sport; 1984 Schwinn Voyageur SP; 1985 Trek 620; 1985 Trek 720; 1986 Trek 400 Elance; 1987 Schwinn High Sierra; 1990 Miyata 1000LT
Mentioned: 84 Post(s)
Tagged: 0 Thread(s)
Quoted: 2608 Post(s)
Liked 1,699 Times
in
935 Posts
And just to be pedantic before @noglider chimes in, those are cantilever brakes, not center pull.
Nice bike!
Nice bike!
Those are cantilever brakes.
__________________
*Recipient of the 2006 Time Magazine "Person Of The Year" Award*
Commence to jigglin� huh?!?!
"But hey, always love to hear from opinionated amateurs." -says some guy to Mr. Marshall.
Commence to jigglin� huh?!?!
"But hey, always love to hear from opinionated amateurs." -says some guy to Mr. Marshall.
07-27-19, 07:18 PM
#11
Senior Member
Join Date: Jan 2017
Posts: 659
Mentioned: 5 Post(s)
Tagged: 0 Thread(s)
Quoted: 195 Post(s)
Liked 207 Times
in
126 Posts
That Miyata is really nice and pretty well
preserved. Before you go about replacing anything related to the brakes, I would read up on setting up cantilever brakes. Enjoy that endeavor. If the levers smoothly close the brakes and the brakes smoothly return the levers, then the cables and housing are fine (lube can come later). Focus on set up. If your finger nail can depress the brake pad, don�t replace them yet. If they are hard plastic dense, first file them to investigate if the hardness is only skin deep. I bet they will work adequately without anything but fine tuning. Not just advising ways to save $$$$ but suggesting that getting those brakes working well first and then making improvements incrementally is (for me) part of the fun of learning.
preserved. Before you go about replacing anything related to the brakes, I would read up on setting up cantilever brakes. Enjoy that endeavor. If the levers smoothly close the brakes and the brakes smoothly return the levers, then the cables and housing are fine (lube can come later). Focus on set up. If your finger nail can depress the brake pad, don�t replace them yet. If they are hard plastic dense, first file them to investigate if the hardness is only skin deep. I bet they will work adequately without anything but fine tuning. Not just advising ways to save $$$$ but suggesting that getting those brakes working well first and then making improvements incrementally is (for me) part of the fun of learning.
07-27-19, 07:21 PM
#12
Senior Member
Thread Starter
Join Date: Jun 2018
Location: NW Ohio
Posts: 1,142
Bikes: 1983 Univega Super Strada, 1986 Panasonic DX5000, 1984 Fuji Team 85 Univega Gran Turismo, 1984 Lotus Unique, 1987 Centurion Expert, 1987 Centurion Ironman Master,
Mentioned: 14 Post(s)
Tagged: 0 Thread(s)
Quoted: 677 Post(s)
Liked 459 Times
in
182 Posts
I'm with you. Sandpaper the shoes and adjust them correctly and see what you get. I'd lube the cables and only replace if needed or you like another color. Cable adjusters would be nice if you can find some that fit. I couldn't tell if the hole was threaded or flat. Front brakes sometimes don't have adjusters because the cable is so short it doesn't stretch and broken spokes are less common on the front. I really like the quick release adjusters for ease of changing tires and getting to the next safe location with broken spokes.
07-27-19, 08:01 PM
#14
Extraordinary Magnitude
Join Date: Aug 2009
Location: Waukesha WI
Posts: 13,646
Bikes: 1978 Trek TX700; 1978/79 Trek 736; 1984 Specialized Stumpjumper Sport; 1984 Schwinn Voyageur SP; 1985 Trek 620; 1985 Trek 720; 1986 Trek 400 Elance; 1987 Schwinn High Sierra; 1990 Miyata 1000LT
Mentioned: 84 Post(s)
Tagged: 0 Thread(s)
Quoted: 2608 Post(s)
Liked 1,699 Times
in
935 Posts
I�ll trade you a Shimano QR headset adjuster for that Miyata one. I might also have a Dia Compe one.
__________________
*Recipient of the 2006 Time Magazine "Person Of The Year" Award*
Commence to jigglin� huh?!?!
"But hey, always love to hear from opinionated amateurs." -says some guy to Mr. Marshall.
Commence to jigglin� huh?!?!
"But hey, always love to hear from opinionated amateurs." -says some guy to Mr. Marshall.
07-27-19, 08:02 PM
#15
Senior Member
Thread Starter
Join Date: Jun 2018
Location: NW Ohio
Posts: 1,142
Bikes: 1983 Univega Super Strada, 1986 Panasonic DX5000, 1984 Fuji Team 85 Univega Gran Turismo, 1984 Lotus Unique, 1987 Centurion Expert, 1987 Centurion Ironman Master,
Mentioned: 14 Post(s)
Tagged: 0 Thread(s)
Quoted: 677 Post(s)
Liked 459 Times
in
182 Posts
07-27-19, 08:43 PM
#16
Me duelen las nalgas
Join Date: Aug 2015
Location: Texas
Posts: 13,513
Bikes: Centurion Ironman, Trek 5900, Univega Via Carisma, Globe Carmel
Mentioned: 199 Post(s)
Tagged: 0 Thread(s)
Quoted: 4559 Post(s)
Liked 2,802 Times
in
1,800 Posts
Ditto the advice to adjust the brakes before replacing anything. Those pads look fine. Heck, the whole bike appears to be in excellent condition, with plenty of attention to detail, from the cable housings on up. The pads don't look old enough to be a problem. Maybe scuff 'em up with sandpaper or a file, but first go through the steps to adjust the brakes.
Most can't-deliver brakes are a PITA to set up. Check several tutorials and videos. It'll take a few tries to get 'em right, but worth the effort so you'll better understand how they work.
The main adjustments are in the cables. Helps to have a third-hand tool, but I'm too cheap. I use velcro straps, small bungee cords, paracord or even shoelaces to hold the cantilever arms and brake levers in the desired position. Non-elastic paracord or shoelaces can be easier to use for some adjustments, with a mariner's hitch to hold position temporarily, untie and retie quickly. Ordinary knots can make it more difficult. Check online for diagrams of sailor's hitches and fisherman's knots. Saves a few bucks over buying a third hand tool that we'll rarely need at home.
Watch out for brake shoes rubbing the tires. That's one of the main hassles setting up can'tdeliver brakes. With the brakes open it'll look like there's plenty of clearance. But when the brakes are closed, darned if the shoes don't develop a mind of their own and try to rub the tire sidewalls.
While you're at it, check the spring tension position of the brake arms at the frame. There are usually three positions. Most manufacturers assemble them with the stiffest position and most spring tension. Usually unnecessary.
For a couple of years I just tweaked my '92 Univega's canti brakes in bits and pieces. Finally a few months ago while recuperating from surgery, I redid the entire canti brake setup on my Univega, from cables and housings to pads, etc., including setting the spring tension to the middle position. Improved the brakes from can't-deliver to cantilever. Better feel, better braking power with better modulation.
07-27-19, 08:50 PM
#17
Me duelen las nalgas
Join Date: Aug 2015
Location: Texas
Posts: 13,513
Bikes: Centurion Ironman, Trek 5900, Univega Via Carisma, Globe Carmel
Mentioned: 199 Post(s)
Tagged: 0 Thread(s)
Quoted: 4559 Post(s)
Liked 2,802 Times
in
1,800 Posts
BTW, if you do decide to replace the brake pads, I'll recommend two that have worked well for me:
Kool Stop Eagle 2 (formerly Eagle Claw and sometimes still advertised that way). Outstanding pads, and easy to set up for toe-in to prevent squealing. I've use those on my Univega's canti brakes for about 3 years.
Unfortunately the thick Eagle 2 pads didn't permit enough clearance on the fork to drop the front tire. So I switched the front to Jagwire thinline, long, curved pads. Also excellent and inexpensive. The black pad material brakes as well as the salmon Kool Stops. Only tricky bit is the toe-in. I use zip ties to set the spacing for toe-in. After a little practice it was easy. I think Jagwire calls these pads their Mountain Sport Canti 70mm pads. They're longer than usual for more braking surface, curved to match the rims so there's no risk of the longer pads rubbing the tires, and thin enough to clear any wheel/fork.
07-27-19, 10:30 PM
#18
Extraordinary Magnitude
Join Date: Aug 2009
Location: Waukesha WI
Posts: 13,646
Bikes: 1978 Trek TX700; 1978/79 Trek 736; 1984 Specialized Stumpjumper Sport; 1984 Schwinn Voyageur SP; 1985 Trek 620; 1985 Trek 720; 1986 Trek 400 Elance; 1987 Schwinn High Sierra; 1990 Miyata 1000LT
Mentioned: 84 Post(s)
Tagged: 0 Thread(s)
Quoted: 2608 Post(s)
Liked 1,699 Times
in
935 Posts
For a couple of years I just tweaked my '92 Univega's canti brakes in bits and pieces. Finally a few months ago while recuperating from surgery, I redid the entire canti brake setup on my Univega, from cables and housings to pads, etc., including setting the spring tension to the middle position. Improved the brakes from can't-deliver to cantilever. Better feel, better braking power with better modulation.
__________________
*Recipient of the 2006 Time Magazine "Person Of The Year" Award*
Commence to jigglin� huh?!?!
"But hey, always love to hear from opinionated amateurs." -says some guy to Mr. Marshall.
Commence to jigglin� huh?!?!
"But hey, always love to hear from opinionated amateurs." -says some guy to Mr. Marshall.
07-27-19, 11:52 PM
#19
Me duelen las nalgas
Join Date: Aug 2015
Location: Texas
Posts: 13,513
Bikes: Centurion Ironman, Trek 5900, Univega Via Carisma, Globe Carmel
Mentioned: 199 Post(s)
Tagged: 0 Thread(s)
Quoted: 4559 Post(s)
Liked 2,802 Times
in
1,800 Posts
Yeah, it's how the mechanic set up the canti brakes. I rode the bike that way for awhile but got tired of the high felt resistance and poor modulation. So I read and watched a bunch of tutorials and set 'em up to my liking. Took a little longer than adjusting V-brakes but worth the effort.
07-28-19, 12:57 AM
#20
Senior Member

Join Date: Nov 2011
Location: Port Angeles, WA
Posts: 7,922
Bikes: A green one, "Ragleigh," or something.
Mentioned: 194 Post(s)
Tagged: 0 Thread(s)
Quoted: 1627 Post(s)
Liked 630 Times
in
356 Posts
I definitely don't get the canti hate. Sure, more adjustment alternatives are better than fewer, but if you're clever, you don't really need them. Just look at and consider the mechanicals here. And the pads are probably OK, too, if resurfaced with some sandpaper. Unless you're taking fully loaded touring in the Alps or Tibet.
__________________
● 1971 Grandis SL ● 1972 Lambert Grand Prix frankenbike ● 1972 Raleigh Super Course fixie ● 1973 Nishiki Semi-Pro ● 1979 Motobecane Grand Jubile ●1980 Apollo "Legnano" ● 1984 Peugeot Vagabond ● 1985 Shogun Prairie Breaker ● 1986 Merckx Super Corsa ● 1987 Schwinn Tempo ● 1988 Schwinn Voyageur ● 1989 Bottechia Team ADR replica ● 1990 Cannondale ST600 ● 1993 Technium RT600 ● 1996 Kona Lava Dome ●
● 1971 Grandis SL ● 1972 Lambert Grand Prix frankenbike ● 1972 Raleigh Super Course fixie ● 1973 Nishiki Semi-Pro ● 1979 Motobecane Grand Jubile ●1980 Apollo "Legnano" ● 1984 Peugeot Vagabond ● 1985 Shogun Prairie Breaker ● 1986 Merckx Super Corsa ● 1987 Schwinn Tempo ● 1988 Schwinn Voyageur ● 1989 Bottechia Team ADR replica ● 1990 Cannondale ST600 ● 1993 Technium RT600 ● 1996 Kona Lava Dome ●
07-28-19, 08:05 AM
#21
Senior Member
Join Date: Jan 2017
Location: Berea, KY
Posts: 1,135
Mentioned: 19 Post(s)
Tagged: 0 Thread(s)
Quoted: 360 Post(s)
Liked 323 Times
in
186 Posts
Since the OP did not post a full picture of the front brakes I can't really tell, but the straddle cable on the front looks very long to me. It may be that the levers were designed for that, but I would consider lowering the cable hanger on the cable to give a bit more modulation.
__________________
Andy
Andy
07-28-19, 09:47 AM
#22
Senior Member
Join Date: Mar 2007
Location: SF Bay Area, East bay
Posts: 7,655
Bikes: Miyata 618 GT, Marinoni, Kestral 200 2002 Trek 5200, KHS Flite, Koga Miyata, Schwinn Spitfire 5, Mondia Special, Univega Alpina, Miyata team Ti, Santa Cruz Highball
Mentioned: 52 Post(s)
Tagged: 0 Thread(s)
Quoted: 1607 Post(s)
Liked 2,584 Times
in
1,221 Posts
Looks like that pad is buried in the mount. You have a replacement rim on there?
 07-28-19, 02:45 PM
#24
Me duelen las nalgas
Join Date: Aug 2015
Location: Texas
Posts: 13,513
Bikes: Centurion Ironman, Trek 5900, Univega Via Carisma, Globe Carmel
Mentioned: 199 Post(s)
Tagged: 0 Thread(s)
Quoted: 4559 Post(s)
Liked 2,802 Times
in
1,800 Posts
Oh, I don't hate canti brakes. They're just more fussy to set up than the dirt-simple sidepulls on most older road bikes. And even more fussy to set up than V-brakes.
Once set up well canti brakes are very good. But at first it's a daunting chore when adjusting one thing affects everything else. But it's worth it to be able to ride in almost any conditions without mud jamming things, or to easily install fenders.
Once set up well canti brakes are very good. But at first it's a daunting chore when adjusting one thing affects everything else. But it's worth it to be able to ride in almost any conditions without mud jamming things, or to easily install fenders.

