


Test your wits - Suntour Symmetric reassembly challenge! With pics!
 02-26-09, 07:02 AM
#1
Senior Member
Thread Starter

Join Date: Oct 2006
Location: Madison, Wisconsin
Posts: 1,141
Bikes: 2000 Litespeed Classic, 1984 Schwinn LeTour, 1998 Gary Fisher Marlin, 1969 Hercules, 1977 Sekai 5000 Superlite, 1993 Koga-Myata TerraLiner, 2013 Trek Farley.
Mentioned: 0 Post(s)
Tagged: 0 Thread(s)
Quoted: 1 Post(s)
Likes: 0
Liked 0 Times
in
0 Posts
Test your wits - Suntour Symmetric reassembly challenge! With pics!
Are you smart enough to reverse my stupidity?
The Suntour Symmetric shifters on my '84 LeTour kept slipping, so I took them apart to clean them.
Guess what (you saw this coming a mile away): these shifters are not so easy to reassemble correctly! I should have been taking notes or pictures when I was taking them apart. There are 26 pieces (if I didn�t lose any) and �Symmetric� is a misnomer � the design is not symmetrical.
My search of old threads shows that others have found Symmetric reassembly challenging as well. And no one has found exploded-view diagrams of these.
I took my best guess at positioning the parts, and took these photos � can anyone comment, does this look right to you?
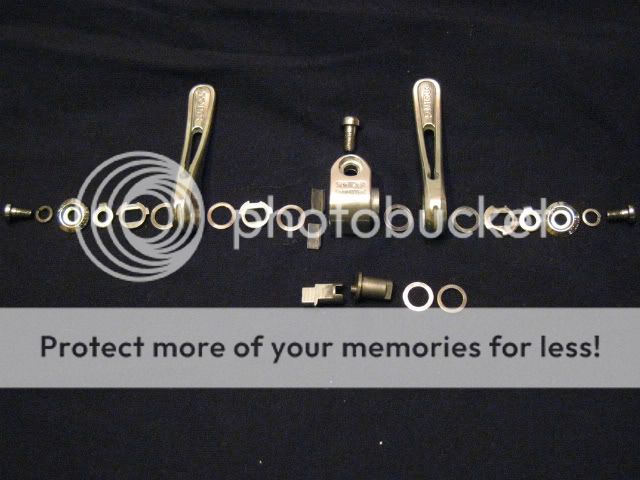
One of the asymmetrical quirks of this design is the notched spacers � there are 2 identical ones (which I've put on the left side) and a third that is different (right side).
I think they go as pictured, but I�m not sure. Can anyone comment on that?

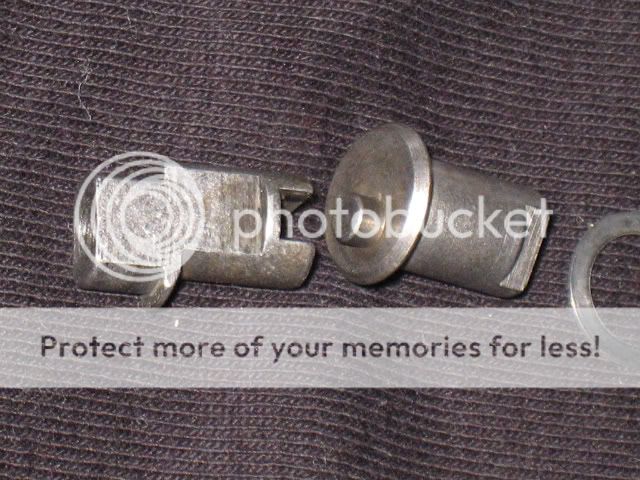
Another brainteaser is the ingenius (but flawed, per Sheldon) cam that auto-trims the FD when you shift the RD.
I think this is the correct positioning � can anyone confirm? (if you placed the cam at a 180 degree rotation from the photo, it would trim the FD in the other direction when the RD was shifted)
Thanks for your help!
The Suntour Symmetric shifters on my '84 LeTour kept slipping, so I took them apart to clean them.
Guess what (you saw this coming a mile away): these shifters are not so easy to reassemble correctly! I should have been taking notes or pictures when I was taking them apart. There are 26 pieces (if I didn�t lose any) and �Symmetric� is a misnomer � the design is not symmetrical.
My search of old threads shows that others have found Symmetric reassembly challenging as well. And no one has found exploded-view diagrams of these.
I took my best guess at positioning the parts, and took these photos � can anyone comment, does this look right to you?
One of the asymmetrical quirks of this design is the notched spacers � there are 2 identical ones (which I've put on the left side) and a third that is different (right side).
I think they go as pictured, but I�m not sure. Can anyone comment on that?
Another brainteaser is the ingenius (but flawed, per Sheldon) cam that auto-trims the FD when you shift the RD.
I think this is the correct positioning � can anyone confirm? (if you placed the cam at a 180 degree rotation from the photo, it would trim the FD in the other direction when the RD was shifted)
Thanks for your help!


 02-26-09, 11:13 AM
#3
Jet Jockey

The "auto-trim" isn't flawed at all. Sheldon had it wrong. If you observe closely, it doesn't turn the lever, it actually, in effect, movest the post or boss that the lever is attached to in order to alter cable pull. The key to making this work right is to set up the front cable tension at the relaxed/most inboard setting while the rear derailer is on the largest cog.
Sheldon argued that after enough "turns" of the lever, you had to set up again since it only trimmed one way. Unfortunately, he was in error, and if you set up like I have outlined above, your bottom trim is exactly where it should be, and there's no issue with "creep" in this system.
Reassembly? Ho ho ho.
I've tried this too. Here's how I resolved it.
1) Take apart shifters to clean. Be meticulous about laying out the parts in such a way that they can be re-assembled.
2) Attempt to re-assemble. Realize that even with your careful efforts, you can't make it work.
3) Go to C&V on bikeforums looking for help.
4) Go to e-bay and find another symmetric shifter for around $15.
__________________
Good night...and good luck
Good night...and good luck
02-26-09, 12:16 PM
#5

Senior Member

sekaijin
I was in your situation with my 1984 Le Tour about a year ago. Through trial and error I got them back together and functioning. Unfortunately I'm at work now and your pictures are blocked so I can't be of much help. I will try to look tonight and get an answer to you. It would be great if you could post a pic of your bike. Do you have a triple crank? Mine was in tough shape when I bought it and I don't think double crank it came with was original.
Banzai
I agree these are not flawed. Mine work great and thus far I haven't had to make any adjustments. I love not having to feather the left lever all of the time.
__________________
Nothing compares to the simple pleasure of a bike ride - JFK
Nothing compares to the simple pleasure of a bike ride - JFK
02-26-09, 12:37 PM
#6
Senior Member
Thread Starter
Join Date: Oct 2006
Location: Madison, Wisconsin
Posts: 1,141
Bikes: 2000 Litespeed Classic, 1984 Schwinn LeTour, 1998 Gary Fisher Marlin, 1969 Hercules, 1977 Sekai 5000 Superlite, 1993 Koga-Myata TerraLiner, 2013 Trek Farley.
Mentioned: 0 Post(s)
Tagged: 0 Thread(s)
Quoted: 1 Post(s)
Likes: 0
Liked 0 Times
in
0 Posts
The "auto-trim" isn't flawed at all. Sheldon had it wrong. If you observe closely, it doesn't turn the lever, it actually, in effect, movest the post or boss that the lever is attached to in order to alter cable pull. The key to making this work right is to set up the front cable tension at the relaxed/most inboard setting while the rear derailer is on the largest cog.
1) Take apart shifters to clean. Be meticulous about laying out the parts in such a way that they can be re-assembled.
2) Attempt to re-assemble. Realize that even with your careful efforts, you can't make it work.
3) Go to C&V on bikeforums looking for help.
4) Go to e-bay and find another symmetric shifter for around $15.
2) Attempt to re-assemble. Realize that even with your careful efforts, you can't make it work.
3) Go to C&V on bikeforums looking for help.
4) Go to e-bay and find another symmetric shifter for around $15.
02-26-09, 12:42 PM
#7
Spin Forest! Spin!

Join Date: Sep 2007
Location: Arrid Zone-a
Posts: 5,956
Bikes: I used to have many. And I Will again.
Mentioned: 2 Post(s)
Tagged: 0 Thread(s)
Quoted: 7 Post(s)
Likes: 0
Liked 11 Times
in
10 Posts
+1 on these aren't flawed technically.
I read the Sheldon Brown blog and something didn't quite add up. Reading his description twice I also realized the initial setup was wrong. Unlike standard shifters, The rear lever must be positioned at the largest cog before installing/trimming the front derailleur cable.
(When the right lever is flipped back, the left lever is cammed rearward, thus shortening the cable. When the right lever is forward and chain is in the smallest cog, the left lever is cammed forward, thus pulling the cable and the FD trims outward.)
I acquired one of these when they were first introduced. Sorry, I no longer have the factory pamphlet with exploded view.
Mine has been working fine on my Nashbar since the early 80s.
Last edited by WNG; 02-26-09 at 12:50 PM.
02-26-09, 12:43 PM
#8
Senior Member
Join Date: Jul 2004
Location: Yukon, Canada
Posts: 8,759
Mentioned: 13 Post(s)
Tagged: 0 Thread(s)
Quoted: 113 Post(s)
Likes: 0
Liked 16 Times
in
14 Posts
I swear I have seen an exploded diagram of these but can't find it ATM, doesn't help that I traded computers with my GF for the rest of the semester because she needs the faster one for school. All my book marks that might help me find some tucked away web page are on that computer.
__________________
1 Super Record bike, 1 Nuovo Record bike, 1 Pista, 1 Road, 1 Cyclocross/Allrounder, 1 MTB, 1 Touring, 1 Fixed gear
1 Super Record bike, 1 Nuovo Record bike, 1 Pista, 1 Road, 1 Cyclocross/Allrounder, 1 MTB, 1 Touring, 1 Fixed gear
02-26-09, 01:18 PM
#9
Senior Member
Thread Starter
Join Date: Oct 2006
Location: Madison, Wisconsin
Posts: 1,141
Bikes: 2000 Litespeed Classic, 1984 Schwinn LeTour, 1998 Gary Fisher Marlin, 1969 Hercules, 1977 Sekai 5000 Superlite, 1993 Koga-Myata TerraLiner, 2013 Trek Farley.
Mentioned: 0 Post(s)
Tagged: 0 Thread(s)
Quoted: 1 Post(s)
Likes: 0
Liked 0 Times
in
0 Posts
Miamijim, badger biker - if you were able to take a look at the assembly of your Symmetrics, that would be a huge help!
If you do, take care when removing the three outermost parts in my first photo. What happened with me was, I took those off and some other parts fell right off and got mixed up.
Aside from the cam, the notched spacers are my biggest brainteaser. Actually they are worse because the cam has only one right way and one wrong way to install it, but the notched spacers could fit back in lots of wrong ways - wrong order, wrong rotational orientation, wrong heads-tails orientation, tabbed washer positioned with the tab in the wrong notch.
In fact the more I think about the notched spacers, the more I think they are placed wrong in the picture. Logically, I'm thinking the middle and right-side ones should be switched. That would put the two identical notched spacers in matching outboard positions, flanked by other parts that match symmetrically.
The other notched spacer, the unique one, probably goes in the middle spot since that is the asymmetrical part of the assembly.
Here are "before" pics of the bike - it's a 52-40 double, with what I believe was the standard 1984 LeTour catalog build.
With the BF C&V forum to the rescue, maybe soon there will be before and after pics!
02-26-09, 01:37 PM
#10
Senior Member
Thread Starter
Join Date: Oct 2006
Location: Madison, Wisconsin
Posts: 1,141
Bikes: 2000 Litespeed Classic, 1984 Schwinn LeTour, 1998 Gary Fisher Marlin, 1969 Hercules, 1977 Sekai 5000 Superlite, 1993 Koga-Myata TerraLiner, 2013 Trek Farley.
Mentioned: 0 Post(s)
Tagged: 0 Thread(s)
Quoted: 1 Post(s)
Likes: 0
Liked 0 Times
in
0 Posts
I swear I have seen an exploded diagram of these but can't find it ATM, doesn't help that I traded computers with my GF for the rest of the semester because she needs the faster one for school. All my book marks that might help me find some tucked away web page are on that computer.
02-26-09, 03:18 PM
#11
Spin Forest! Spin!
Join Date: Sep 2007
Location: Arrid Zone-a
Posts: 5,956
Bikes: I used to have many. And I Will again.
Mentioned: 2 Post(s)
Tagged: 0 Thread(s)
Quoted: 7 Post(s)
Likes: 0
Liked 11 Times
in
10 Posts
2. Yes, I believe peg should be forward.
I'm not at home presently and won't be for a few weeks, otherwise I'd venture to disassemble mine for you.
Last edited by WNG; 02-26-09 at 06:29 PM.
02-26-09, 03:31 PM
#12
Jet Jockey
To set up the shifter correctly, you want to first set up the rear.
Then:
Shift the rear to the biggest cog.
Put the chain on the inner chainring in front.
Set the inner limit stop to the appropriate spot.
Pull the cable and secure.
Doing these steps sets the inner limit...and the innermost trim...with the chain at its innermost possibility. In other words, with the right arm fully pulled, the left is slid aft on the downtube, but is still laying flat. After you set up like this, after you un-pull or flatten the right arm to move the chain to successively smaller rear cogs, the left arm will move forward on the downtube and will pull cable to move the cage outboard as well.
And then vice versa.
It's really a neat system, and I'm kinda sorry they don't make them anymore.
__________________
Good night...and good luck
Good night...and good luck
02-26-09, 03:32 PM
#13
Jet Jockey
I'll never disagree with Sheldon but I get your point - that it trims the FD by sliding the post up and down the downtube. What's getting me mixed up is, when I pull the RD lever down (weirdly, I'm forgetting if that is downshifting or upshifting - it's as if I'm dyslexic) do I want the FD shifter to slide down in tandem with it, or slide in the opposite direction? It can reassemble either way depending how you position the cam. Does that question make sense? (from memory, I'm thinking you want opposite direction movement)
5) It arrives dirty and you want it clean ... go to step 1 and repeat!
5) It arrives dirty and you want it clean ... go to step 1 and repeat!
__________________
Good night...and good luck
Good night...and good luck
02-26-09, 03:36 PM
#14
Senior Member
Join Date: Jul 2004
Location: Yukon, Canada
Posts: 8,759
Mentioned: 13 Post(s)
Tagged: 0 Thread(s)
Quoted: 113 Post(s)
Likes: 0
Liked 16 Times
in
14 Posts
This 1976 Suntour catalog is a great source of exploded diagrams for their older stuff, including some shifters. There is more in some adjacent wooljersey galleries and elsewhere on the web, but I have not found a Symmetric shifters diagram.
__________________
1 Super Record bike, 1 Nuovo Record bike, 1 Pista, 1 Road, 1 Cyclocross/Allrounder, 1 MTB, 1 Touring, 1 Fixed gear
1 Super Record bike, 1 Nuovo Record bike, 1 Pista, 1 Road, 1 Cyclocross/Allrounder, 1 MTB, 1 Touring, 1 Fixed gear
02-26-09, 04:17 PM
#15
Senior Member

Join Date: Nov 2005
Location: Gold Coast, Australia
Posts: 1,485
Bikes: Casati, ,Peugot,Mitchell,Raliegh,Nishiki
Mentioned: 2 Post(s)
Tagged: 0 Thread(s)
Quoted: 2 Post(s)
Likes: 0
Liked 2 Times
in
2 Posts
The whole thing looks like a PITA, umaaaa someone said "Sheldon" was wrong--shame on you !
02-26-09, 04:29 PM
#16
low end rider

Join Date: Sep 2008
Posts: 780
Bikes: 80's. hoarder.
Mentioned: 1 Post(s)
Tagged: 0 Thread(s)
Quoted: 56 Post(s)
Liked 43 Times
in
37 Posts
There's bound to be a few things he's been wrong about in all the hundreds of pages of info and advice he's put up on his wonderful site. That doesn't take anything away from his awesomeness.
If for some reason Jim and Badge can't get at theirses, I'll take mine apart and photog it when I get a chance. As soon as I got it from Neal I threw it in the ultrasonic cleaner to avoid having to start a thread like this one!
If for some reason Jim and Badge can't get at theirses, I'll take mine apart and photog it when I get a chance. As soon as I got it from Neal I threw it in the ultrasonic cleaner to avoid having to start a thread like this one!
02-26-09, 04:53 PM
#17
Jet Jockey
Exactly what riva said...just because Sheldon happened to get one wrong in no way detracts from his immense contributions to the cycling community.
Everyone makes a mistake now and then, and Sheldon made fewer than most, particularly if you compare his mistake to work ratio with the general pool of "knowledge" one can often find being spouted on bikeforums.
Just sayin'
Everyone makes a mistake now and then, and Sheldon made fewer than most, particularly if you compare his mistake to work ratio with the general pool of "knowledge" one can often find being spouted on bikeforums.
Just sayin'
__________________
Good night...and good luck
Good night...and good luck
02-26-09, 05:17 PM
#18
Senior Member
Thread Starter
Join Date: Oct 2006
Location: Madison, Wisconsin
Posts: 1,141
Bikes: 2000 Litespeed Classic, 1984 Schwinn LeTour, 1998 Gary Fisher Marlin, 1969 Hercules, 1977 Sekai 5000 Superlite, 1993 Koga-Myata TerraLiner, 2013 Trek Farley.
Mentioned: 0 Post(s)
Tagged: 0 Thread(s)
Quoted: 1 Post(s)
Likes: 0
Liked 0 Times
in
0 Posts
To set up the shifter correctly, you want to first set up the rear.
Then:
Shift the rear to the biggest cog.
Put the chain on the inner chainring in front.
Set the inner limit stop to the appropriate spot.
Pull the cable and secure.
Doing these steps sets the inner limit...and the innermost trim...with the chain at its innermost possibility. In other words, with the right arm fully pulled, the left is slid aft on the downtube, but is still laying flat. After you set up like this, after you un-pull or flatten the right arm to move the chain to successively smaller rear cogs, the left arm will move forward on the downtube and will pull cable to move the cage outboard as well.
And then vice versa.
It's really a neat system, and I'm kinda sorry they don't make them anymore.
Then:
Shift the rear to the biggest cog.
Put the chain on the inner chainring in front.
Set the inner limit stop to the appropriate spot.
Pull the cable and secure.
Doing these steps sets the inner limit...and the innermost trim...with the chain at its innermost possibility. In other words, with the right arm fully pulled, the left is slid aft on the downtube, but is still laying flat. After you set up like this, after you un-pull or flatten the right arm to move the chain to successively smaller rear cogs, the left arm will move forward on the downtube and will pull cable to move the cage outboard as well.
And then vice versa.
It's really a neat system, and I'm kinda sorry they don't make them anymore.

I really appreciate all the help. The BF C&V community is just fantastic. A guy interviewed me today for a piece he's writing about cycling, for a local sports magazine. He asked how I got into road biking and I told the story of how I rescued an old bike, and got all the help I needed to restore it from the BF C&V forum. So we'll see if he mentions us. (I told him to spread the word that we love fly-by vintage value inquiries!
 )
02-26-09, 05:29 PM
)
02-26-09, 05:29 PM
#19
Jet Jockey
This is very helpful - I'm going to print this out and follow it closely. I also appreciate your apparent confidence that I will have working Symmetric shifters.
I really appreciate all the help. The BF C&V community is just fantastic. A guy interviewed me today for a piece he's writing about cycling, for a local sports magazine. He asked how I got into road biking and I told the story of how I rescued an old bike, and got all the help I needed to restore it from the BF C&V forum. So we'll see if he mentions us. (I told him to spread the word that we love fly-by vintage value inquiries!)
I really appreciate all the help. The BF C&V community is just fantastic. A guy interviewed me today for a piece he's writing about cycling, for a local sports magazine. He asked how I got into road biking and I told the story of how I rescued an old bike, and got all the help I needed to restore it from the BF C&V forum. So we'll see if he mentions us. (I told him to spread the word that we love fly-by vintage value inquiries!
)To clarify...
Make sure the left/front shift arm is in the down/relaxed position when setting up.
I assume you know how to set the limit screws on the FD?
I'm not trying to doubt your intelligence or know-how...I was just kinda vague with those setup tips.
__________________
Good night...and good luck
Good night...and good luck
02-26-09, 08:15 PM
#20
Senior Member
Miamijim, badger biker - if you were able to take a look at the assembly of your Symmetrics, that would be a huge help!
If you do, take care when removing the three outermost parts in my first photo. What happened with me was, I took those off and some other parts fell right off and got mixed up.
Aside from the cam, the notched spacers are my biggest brainteaser. Actually they are worse because the cam has only one right way and one wrong way to install it, but the notched spacers could fit back in lots of wrong ways - wrong order, wrong rotational orientation, wrong heads-tails orientation, tabbed washer positioned with the tab in the wrong notch.
In fact the more I think about the notched spacers, the more I think they are placed wrong in the picture. Logically, I'm thinking the middle and right-side ones should be switched. That would put the two identical notched spacers in matching outboard positions, flanked by other parts that match symmetrically.
The other notched spacer, the unique one, probably goes in the middle spot since that is the asymmetrical part of the assembly.
I apologize that I don't have time right now to do a complete disassemble. I have 7 inches of snow to clear out of the drive tonight and we are leaving town tomorrow for the weekend. But I did check the outer pieces you were interested in and you do have them in the correct order. The double notched one you have on the right side is definitely from that side. I can't vouch for exactly how the identical 2 go on the left at this point for sure but I think you have them correct also.
Here is how my right is set up. The inner spacer (right lever) has the big notch that matches the notch in the lever. Then with the lever at about mid point the other spacer with the little clip is facing about straight up with the clip fitting in the other notch of the first inner spacer. The outer Suntour ring goes next with its notch fitting slightly aft and down from the clip on the smaller outer spacer.
I remember the issue I had was getting the cam set up so that it was moving the left lever in the same direction up and down the tube as you are moving the right lever. Bigger gears in rear equate to downward slide (slack) and inner movement of front derailleur.
I also recall you need to get a fair amount of tension on the lock bolt on the right so it doesn't loosen the whole assembly after a while. I don't think mine has the little lock washers you do though.
I'll keep an eye on this thread and if you still need help the beginning of the week I can take another look and maybe get a pic. I liked the pic of your Le Tour. I thought I got a deal at $30 with crappy wheels but yours was better. Mine also has center pulls and from the pic it looks like yours may have sidepulls. Same color though although my decals except the tubing sticker were all worn off. I have it set up with front and rear racks as a grocery getter. I'll try to post a pic next week.
Good luck and lube the inside parts good since you want smooth action for the cam.
BTW I don't think Sheldon was wrong - I think he may not have had the patience at the time to see the correct adjustment through. I know when I can't get something right at first I immediately call it a POS!
__________________
Nothing compares to the simple pleasure of a bike ride - JFK
Nothing compares to the simple pleasure of a bike ride - JFK
02-27-09, 07:09 AM
#21
Senior Member
Thread Starter
Join Date: Oct 2006
Location: Madison, Wisconsin
Posts: 1,141
Bikes: 2000 Litespeed Classic, 1984 Schwinn LeTour, 1998 Gary Fisher Marlin, 1969 Hercules, 1977 Sekai 5000 Superlite, 1993 Koga-Myata TerraLiner, 2013 Trek Farley.
Mentioned: 0 Post(s)
Tagged: 0 Thread(s)
Quoted: 1 Post(s)
Likes: 0
Liked 0 Times
in
0 Posts
Hope it helps. I hope you get those working too.
To clarify...
Make sure the left/front shift arm is in the down/relaxed position when setting up.
I assume you know how to set the limit screws on the FD?
I'm not trying to doubt your intelligence or know-how...I was just kinda vague with those setup tips.
To clarify...
Make sure the left/front shift arm is in the down/relaxed position when setting up.
I assume you know how to set the limit screws on the FD?
I'm not trying to doubt your intelligence or know-how...I was just kinda vague with those setup tips.
But I did check the outer pieces you were interested in and you do have them in the correct order. The double notched one you have on the right side is definitely from that side. I can't vouch for exactly how the identical 2 go on the left at this point for sure but I think you have them correct also.
Here is how my right is set up. The inner spacer (right lever) has the big notch that matches the notch in the lever. Then with the lever at about mid point the other spacer with the little clip is facing about straight up with the clip fitting in the other notch of the first inner spacer. The outer Suntour ring goes next with its notch fitting slightly aft and down from the clip on the smaller outer spacer.
I liked the pic of your Le Tour. I thought I got a deal at $30 with crappy wheels but yours was better. Mine also has center pulls and from the pic it looks like yours may have sidepulls. Same color though although my decals except the tubing sticker were all worn off. I have it set up with front and rear racks as a grocery getter. I'll try to post a pic next week.
Post your pics ... I'll post mine as a before and after, hopefully by the Ides of March!
 03-07-09, 03:12 AM
#22
Senior Member
Thread Starter
Join Date: Oct 2006
Location: Madison, Wisconsin
Posts: 1,141
Bikes: 2000 Litespeed Classic, 1984 Schwinn LeTour, 1998 Gary Fisher Marlin, 1969 Hercules, 1977 Sekai 5000 Superlite, 1993 Koga-Myata TerraLiner, 2013 Trek Farley.
Mentioned: 0 Post(s)
Tagged: 0 Thread(s)
Quoted: 1 Post(s)
Likes: 0
Liked 0 Times
in
0 Posts
Update � greased up and rebuilt the Symmetric � making progress but not completely happy.
The whole right side shifter assembly is smooth and perfect.
The left side is loose. Or rather, the whole left shifter assembly fits together nice and tight, and shifts smoothly. (or feels like it will � have not cabled it up yet.) But there is play in its fit with the male (right) side of the cam. The whole left shifter assembly wiggles a little like a loose tooth, fore and aft in its slot in the central body shell piece.
I could take it apart again, but I don�t know what to change. Even if I have a washer that would fit, I don�t think that�s what�s needed. It�s as if the two rectangular shim pieces need to be thicker.
Wondering if I should call this good enough and cable it up. Have limited time to wrench � this bike needs to debut in a week, and it still has other work I need to get to.
03-07-09, 08:27 AM
#23
Senior Member

Join Date: Aug 2003
Location: Tampa, Florida
Posts: 13,954
Mentioned: 40 Post(s)
Tagged: 0 Thread(s)
Quoted: 413 Post(s)
Likes: 0
Liked 109 Times
in
78 Posts
My schematic breakdown is slightly different than the OP's. It appears my levers are missing 1 thin washer and the lock washers under the outer bolts. My lever are a different version of the OP's which may explain the difference. Regardless assembly is the same.

A few random notes:
1. The thin metal washers are alwayd placed against the lever handles. One on the inside, one on the outside.
2. There are 3 thick notched washers. The 2 matching washers are for the left side and the single is for the right side.
Assembly of the housing base requires 6 parts:
Base-1
Bosses-2
Thick Washer-1
Clips-2
Keep your orientation correct as the following picture is viewed from below!!!!
1. Install left boss with 2 retaining clips. The boss is offset so be sure to intall it so that the boss is offset towards the BB.
2. Place thick washer on right boss and slide down so the pin recesses into the slot on the left boss.

Begin assembly of left lever.
Nylon washer is placed first with notch towards BB shell. Place the notched chrome washer so that 'sharp' edge is on the inside and the notches are above. Place thin washer. Edge of nylon washer must be aligned with edge of notch on notched washer

Install left lever and washers. Thin metal metal first, notched washer with sharp edge to the inside

Install small notched washer followed by chrome outer cover:

Begin assembly of right lever.
Install small metal washer:

Install lever followed by small metal washer on the inside and notched washer on top. Sharp edges of notched washer go to the outside:

Placement of small washer with tang. Fllow with placement od chrome cover and bolt:

A few random notes:
1. The thin metal washers are alwayd placed against the lever handles. One on the inside, one on the outside.
2. There are 3 thick notched washers. The 2 matching washers are for the left side and the single is for the right side.
Assembly of the housing base requires 6 parts:
Base-1
Bosses-2
Thick Washer-1
Clips-2
Keep your orientation correct as the following picture is viewed from below!!!!
1. Install left boss with 2 retaining clips. The boss is offset so be sure to intall it so that the boss is offset towards the BB.
2. Place thick washer on right boss and slide down so the pin recesses into the slot on the left boss.
Begin assembly of left lever.
Nylon washer is placed first with notch towards BB shell. Place the notched chrome washer so that 'sharp' edge is on the inside and the notches are above. Place thin washer. Edge of nylon washer must be aligned with edge of notch on notched washer
Install left lever and washers. Thin metal metal first, notched washer with sharp edge to the inside
Install small notched washer followed by chrome outer cover:
Begin assembly of right lever.
Install small metal washer:
Install lever followed by small metal washer on the inside and notched washer on top. Sharp edges of notched washer go to the outside:
Placement of small washer with tang. Fllow with placement od chrome cover and bolt:
Last edited by miamijim; 03-08-09 at 03:15 PM.
Likes For miamijim:
03-07-09, 11:41 AM
#24
Jet Jockey
That is an invaluable public service you just did, miamijim.
__________________
Good night...and good luck
Good night...and good luck
03-07-09, 06:04 PM
#25
Senior Member
Thread Starter
Join Date: Oct 2006
Location: Madison, Wisconsin
Posts: 1,141
Bikes: 2000 Litespeed Classic, 1984 Schwinn LeTour, 1998 Gary Fisher Marlin, 1969 Hercules, 1977 Sekai 5000 Superlite, 1993 Koga-Myata TerraLiner, 2013 Trek Farley.
Mentioned: 0 Post(s)
Tagged: 0 Thread(s)
Quoted: 1 Post(s)
Likes: 0
Liked 0 Times
in
0 Posts
Wow miamijim, that is amazingly helpful. Even before going over everything step by step, I can see what is probably my problem causing the loose-tooth wiggle of my left lever assembly: I am missing the nylon notched washer.