


Why would my seatpost bolt be cut like this?
 04-26-22, 09:01 PM
#1
Full Member
Thread Starter
Join Date: Oct 2018
Posts: 378
Bikes: 1994 Cadex CFR3, 2006 Scott CR1 SL, Rossin aero, Bertrand GB 2000, Spec Allez Pro
Mentioned: 4 Post(s)
Tagged: 0 Thread(s)
Quoted: 134 Post(s)
Liked 68 Times
in
52 Posts
Why would my seatpost bolt be cut like this?
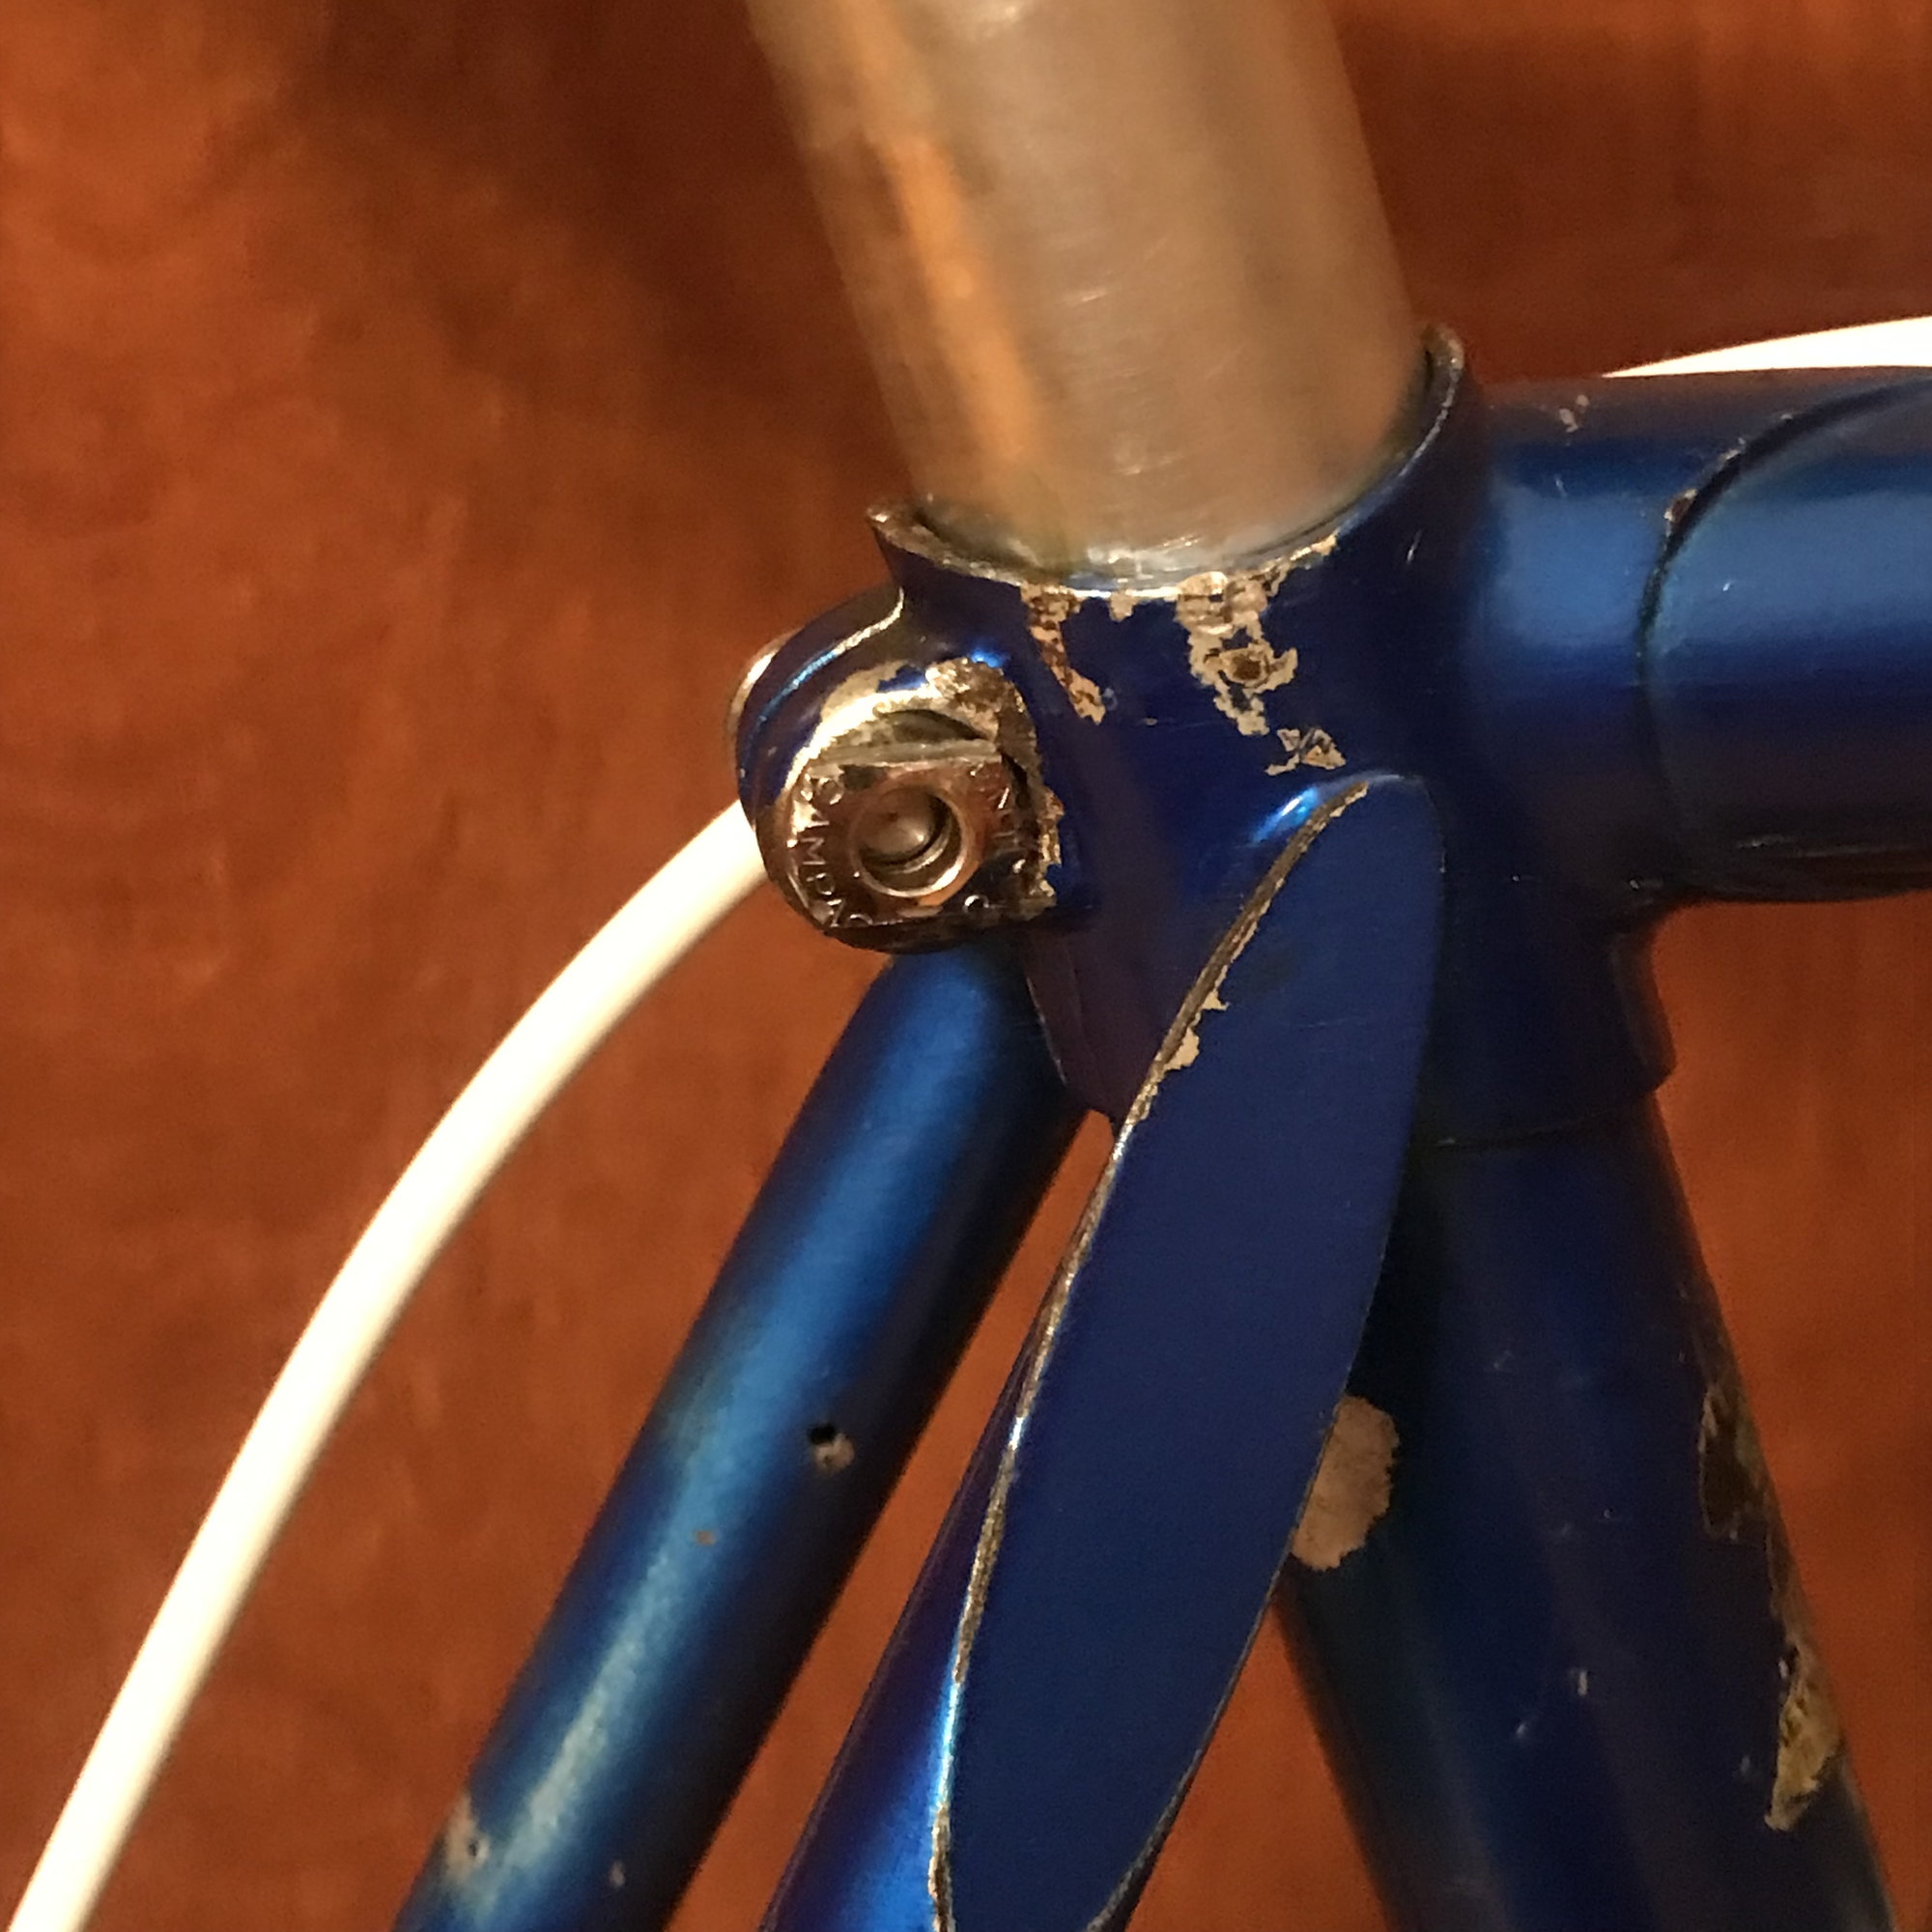
I am reassembling a very nice 531 Reynolds bike which I bought completely stripped. It it fully equipped with Campy Nuovo Record (OEM), circa 1973-4. I am putting the last touch to the bike and I just can�t seem to secure the seatpost in the seattube. It looks like I would need a 26.8 SP when I actually have a 26.6. These are however the original parts. There must be something I am missing here. The only unusual thing I am noticing is the binder bolt which seems to have been cut so as to allow someone to hold it in place with pliers. Could this hint at some kind of trick that would have been used in the past to tighten the seatbolt? Is it a mere lack of respect towards Campy hardware? What then could I do to hold the SP in place? Put a spacer at the end of the bolt? I�m guessing there must be a cheat code here since the parts used to be on this bike.
 04-26-22, 09:12 PM
#2

small ring

Join Date: Jul 2012
Location: PNW
Posts: 1,025
Mentioned: 24 Post(s)
Tagged: 0 Thread(s)
Quoted: 438 Post(s)
Liked 925 Times
in
370 Posts
someone wanted to put a wrench on it. the "teeth" were probably stripped and the bolt was spinning and couldn't be tightened.
the seatlug ears are seriously deformed, something isn't right.
the seatlug ears are seriously deformed, something isn't right.
__________________
59 Allegro Special -- 72 Bob Jackson -- 74 Motobecane Grand Jubile -- 74 Sekine SHS 271 -- 80 Nishiki International
85 Shogun 800 -- 86 Tommasini Super Prestige -- 92 Specialized Rockhopper -- 17 Colnago Arabesque
59 Allegro Special -- 72 Bob Jackson -- 74 Motobecane Grand Jubile -- 74 Sekine SHS 271 -- 80 Nishiki International
85 Shogun 800 -- 86 Tommasini Super Prestige -- 92 Specialized Rockhopper -- 17 Colnago Arabesque
Likes For droppedandlost:
04-26-22, 09:21 PM
#3
Senior Member

Join Date: Feb 2013
Location: Alta California
Posts: 14,273
Mentioned: 415 Post(s)
Tagged: 1 Thread(s)
Quoted: 3815 Post(s)
Liked 3,345 Times
in
2,182 Posts
-----
pillar clearly too small for opening
attempts to tighten binder have deformed seat lug
suggest to begin with a ream - not to enlarge opening but to get it round so it will smoothly accept the intended size pillar
next order of business is to reform seat lug
would be great if you were going to paint then you could have a framebuilder add reinforcement to the interior of the binder ears
-----
Last edited by juvela; 04-26-22 at 09:43 PM. Reason: addition


Likes For Mr. 66:
Likes For jonny7:
04-26-22, 09:56 PM
#6
Senior Member

Join Date: Aug 2009
Location: Berkeley, CA
Posts: 7,248
Bikes: '72 Cilo Pacer, '72 Gitane Gran Tourisme, '72 Peugeot PX10, '73 Speedwell Ti, '74 Peugeot UE-8, '75 Peugeot PR-10L, '80 Colnago Super, '85 De Rosa Pro, '86 Look Equipe 753, '86 Look KG86, '89 Parkpre Team, '90 Parkpre Team MTB, '90 Merlin
Mentioned: 87 Post(s)
Tagged: 0 Thread(s)
Quoted: 835 Post(s)
Liked 2,160 Times
in
559 Posts
Yeah, those seatlug ears look jacked up. The previous owner appears to have made flats for using a wrench (and damaged the paint in that area), though the grooves in the seat binder bolt were intended to keep that side fixed while adjusting the other end. Clearly bottomed out on a too-small post. I'm also struck by the apparent gap at the bottom of the vertical cutout. It looks like the seat post has been cut very short just a couple of inches below the top of the seat tube. If that's the case, such a short post is probably not safe as it may damage the frame and obviates any original limit lines on the post. Or maybe the post is just pulled up way too high in the frame?
Likes For gaucho777:
04-26-22, 10:09 PM
#8
Senior Member

Join Date: Sep 2005
Location: Oakland, CA
Posts: 3,265
Bikes: '82 Univega Competizione, '72 Motobecane Grand Record, '83 Mercian KOM Touring, '85 Univega Alpina Uno, '76 Eisentraut Limited
Mentioned: 57 Post(s)
Tagged: 0 Thread(s)
Quoted: 1088 Post(s)
Liked 1,205 Times
in
701 Posts
Yup, I think saving weight is the driver behind such, erm, behavior. The previous owner was a butcher; the bike is in better hands now...
Likes For noobinsf:
04-26-22, 10:24 PM
#9
Senior Member
Join Date: Oct 2015
Location: PDX
Posts: 13,061
Bikes: Merz x 5 + Specialized Merz Allez x 2, Strawberry/Newlands/DiNucci/Ti x3, Gordon, Fuso/Moulton x2, Bornstein, Paisley,1958-74 Paramounts x3, 3rensho, 74 Moto TC, 73-78 Raleigh Pro's x5, Marinoni x2, 1960 Cinelli SC, 1980 Bianchi SC, PX-10 X 2
Mentioned: 267 Post(s)
Tagged: 0 Thread(s)
Quoted: 4513 Post(s)
Liked 6,392 Times
in
3,676 Posts
I am reassembling a very nice 531 Reynolds bike which I bought completely stripped. It it fully equipped with Campy Nuovo Record (OEM), circa 1973-4. I am putting the last touch to the bike and I just can�t seem to secure the seatpost in the seattube. It looks like I would need a 26.8 SP when I actually have a 26.6. These are however the original parts. There must be something I am missing here. The only unusual thing I am noticing is the binder bolt which seems to have been cut so as to allow someone to hold it in place with pliers. Could this hint at some kind of trick that would have been used in the past to tighten the seatbolt? Is it a mere lack of respect towards Campy hardware? What then could I do to hold the SP in place? Put a spacer at the end of the bolt? I�m guessing there must be a cheat code here since the parts used to be on this bike.
The ears are touching so the clamp is not going to hold. That means the post is to small or the ST is too big, it is likely out of round, mangled, distorted and won't except the proper size post.
It may take a framebuilder to make it right.
Likes For merziac:
04-26-22, 10:42 PM
#11
se�or miembro

Join Date: Dec 2018
Location: Pac NW
Posts: 6,629
Bikes: '70s - '80s Campagnolo
Mentioned: 92 Post(s)
Tagged: 0 Thread(s)
Quoted: 3891 Post(s)
Liked 6,491 Times
in
3,213 Posts

Likes For SurferRosa:
04-26-22, 11:05 PM
#12
Banned.
Join Date: Jan 2022
Posts: 1,070
Mentioned: 2 Post(s)
Tagged: 0 Thread(s)
Quoted: 359 Post(s)
Liked 582 Times
in
336 Posts
The binder bolt is from a quill stem clamp, or could be in backwards.
I�m leaning towards it being a quill stem clamp bolt, as the flat edges generally fit against a lip on the back of a stem clamp.
It was likely used because the seat post binder bolt was too long, or missing.
Too long makes sense, as the seat post diameter is too small for a proper fit.
The post is also too short, which supports it being the wrong seat post altogether.
Someone tried to �make it work,� albeit on a level below the craftsmanship often evident here in C&V.
04-26-22, 11:35 PM
#14
Full Member
Thread Starter
Join Date: Oct 2018
Posts: 378
Bikes: 1994 Cadex CFR3, 2006 Scott CR1 SL, Rossin aero, Bertrand GB 2000, Spec Allez Pro
Mentioned: 4 Post(s)
Tagged: 0 Thread(s)
Quoted: 134 Post(s)
Liked 68 Times
in
52 Posts
You're actually right here, but this way around makes the binder bolt even longer. When the serrations fit in the frame, there is just no way to tighten the seatpost. Then again maybe this hints at the real problem?
04-26-22, 11:43 PM
#15
Senior Member
Join Date: Aug 2017
Location: Minneapolis
Posts: 936
Bikes: 1968 Raleigh Super Course, 1972 Raleigh Professional, 1975 Raleigh International, 1978 Raleigh Professional, 1985 Raleigh Prestige, 1972 Schwinn Paramount, 1980 Schwinn Voyageur 11.8, 1960 Carlton Franco Suisse Peugeot PX10, 1972 Motobecane Le Champ
Mentioned: 9 Post(s)
Tagged: 0 Thread(s)
Quoted: 323 Post(s)
Liked 690 Times
in
351 Posts
The half with the cut off portions is Campagnolo. No doubt the Campy bolt snapped (they are not very resilient and are easy to break even while being careful) when trying to over tighten it, now it looks like you may have an odd piece of hardware inserted that�s too long.
Last edited by Pcampeau; 04-26-22 at 11:54 PM.
04-26-22, 11:47 PM
#16
Senior Member
Join Date: Oct 2015
Location: PDX
Posts: 13,061
Bikes: Merz x 5 + Specialized Merz Allez x 2, Strawberry/Newlands/DiNucci/Ti x3, Gordon, Fuso/Moulton x2, Bornstein, Paisley,1958-74 Paramounts x3, 3rensho, 74 Moto TC, 73-78 Raleigh Pro's x5, Marinoni x2, 1960 Cinelli SC, 1980 Bianchi SC, PX-10 X 2
Mentioned: 267 Post(s)
Tagged: 0 Thread(s)
Quoted: 4513 Post(s)
Liked 6,392 Times
in
3,676 Posts
When did Campy make stem bolts? 
Likes For merziac:
04-26-22, 11:47 PM
#17
Senior Member
Join Date: Oct 2015
Location: PDX
Posts: 13,061
Bikes: Merz x 5 + Specialized Merz Allez x 2, Strawberry/Newlands/DiNucci/Ti x3, Gordon, Fuso/Moulton x2, Bornstein, Paisley,1958-74 Paramounts x3, 3rensho, 74 Moto TC, 73-78 Raleigh Pro's x5, Marinoni x2, 1960 Cinelli SC, 1980 Bianchi SC, PX-10 X 2
Mentioned: 267 Post(s)
Tagged: 0 Thread(s)
Quoted: 4513 Post(s)
Liked 6,392 Times
in
3,676 Posts
Never 
04-27-22, 07:07 AM
#18
Senior Member
Join Date: Nov 2004
Posts: 23,223
Mentioned: 654 Post(s)
Tagged: 1 Thread(s)
Quoted: 4722 Post(s)
Likes: 0
Liked 3,039 Times
in
1,877 Posts
The TdC were originally fitted with 27.0 seat pillars, as CCM spec'd the heavier (19/22 gauge) Reynolds 531, single butted, seat tube. CCM also saved a few pennies by using the shorter (13cm) Campagnolo Record seat pillar. We routinely had to replace them with the 18cm version, to achieve a proper fit for customers. However, if it is only 8cm, then it has been cut.
As previously noted, it was a fairly common practice to cut the pillar to eliminate weight. You set your saddle height, then marked the pillar at the top of the seat tube, removed it and cut it so that you only had 2" in the frame. Some aggressive cyclists would cut it even shorter, so that the bottom of the pillar extended just below the cinch slot. The latter appears to have been the case in this situation, with the slight gap probably due to a readjustment, possibly a new saddle with a slightly different height. The OEM saddle would have been a Cinelli Unicanitor.
As noted by gaucho777, the flats were filed/cut into the knurled, female end of the bolt to allow a purchase with an open end wrench and prevent it from spinning. Normally, the knurled end would be on the non-drive side. This way, when standing behind the saddle, the tighterning is performed with the dominant, right hand. However, it could be argued that this should be reversed with a Campagnolo cinch bolts, due to their low elastcity and and high failure rate. As suggested by SurferRosa, one solution is to use a shorter Allen wrench, which reduces the torque.
It's not to often that hear "fantastic" and "CCM" in the same sentence, even for the top of the line TdC. Note how they didn't bother to drill a stress relief hole at the bottom of the cinch slot. I'm also suprised to hear that it came with a full (Nuovo) Record group. Typically, they came with Universal 68 side-pull brakes, as the Campagnolo Record brakset was ridiculously expensive. Also, I suspect that it has already been the subject of a repaint. While there were some years where the colour was custom, the standard colour was purple.
Likes For T-Mar:
04-27-22, 08:07 AM
#19
Banned.
Join Date: Jan 2022
Posts: 1,070
Mentioned: 2 Post(s)
Tagged: 0 Thread(s)
Quoted: 359 Post(s)
Liked 582 Times
in
336 Posts
I missed the Campy lettering on the binder bolt, cataracts being what they are.
The serrated side is common on many stem clamp bolts, and some have the flat-sided end that tucks up behind and under the bar.
My mistake.
That being said, every Campy binder bolt I've ever tried (3) snapped at initial tightening.
I'm surprised this one didn't, as well, especially pulling on the ears like that.
04-27-22, 12:11 PM
#21

Stop reading my posts!
Join Date: Sep 2004
Posts: 12,585
Mentioned: 90 Post(s)
Tagged: 0 Thread(s)
Quoted: 1444 Post(s)
Liked 1,064 Times
in
788 Posts
I have a Gipiemme seatpost bolt that appears to have been made with the flats OEM, at least always looked like this to me, and I certainly did not grind or file any flats and there's chrome plating on those surfaces.
I assumed it was to "interlock" with some specific seat lug ear cause flats are on the female side with serrations, not the male end with the full head and the GPM Italy marking.
But sure it COULD be used with a spanner, it's exactly 10mm flat-to-flat.
If this was originally a STEM bolt: did GPM ever make stems?
Last edited by unworthy1; 04-27-22 at 12:15 PM.
04-27-22, 01:29 PM
#22
Senior Member
Join Date: Oct 2015
Location: PDX
Posts: 13,061
Bikes: Merz x 5 + Specialized Merz Allez x 2, Strawberry/Newlands/DiNucci/Ti x3, Gordon, Fuso/Moulton x2, Bornstein, Paisley,1958-74 Paramounts x3, 3rensho, 74 Moto TC, 73-78 Raleigh Pro's x5, Marinoni x2, 1960 Cinelli SC, 1980 Bianchi SC, PX-10 X 2
Mentioned: 267 Post(s)
Tagged: 0 Thread(s)
Quoted: 4513 Post(s)
Liked 6,392 Times
in
3,676 Posts
I missed the Campy lettering on the binder bolt, cataracts being what they are.
The serrated side is common on many stem clamp bolts, and some have the flat-sided end that tucks up behind and under the bar.
My mistake.
That being said, every Campy binder bolt I've ever tried (3) snapped at initial tightening.
I'm surprised this one didn't, as well, especially pulling on the ears like that.
The serrated side is common on many stem clamp bolts, and some have the flat-sided end that tucks up behind and under the bar.
My mistake.
That being said, every Campy binder bolt I've ever tried (3) snapped at initial tightening.
I'm surprised this one didn't, as well, especially pulling on the ears like that.

If they are too close to spec when a frame is made, they end up "bottoming out" when the seatlug binder clamp wears in as they usually do especially when a ham fist comes along and makes things worse.
The post starts slipping, somebody leans in and snap goes the bolt.
Several things I do are anti seize on the bolt as I have seen others snap it from binding of the threads when they are not bottomed out, clean the ST and post for a good fit and assessment whether the post may be too small, carbon paste and as a very last resort I grind the female side down to allow more tightening when all else fails.

Its not rocket surgery but it is a PITA when you have to do a deep dive on something that should have been correct from the beginning and handled correctly along the way.
 04-27-22, 04:12 PM
#23
Senior Member
Join Date: May 2019
Location: Bloomington, IN
Posts: 2,951
Bikes: Paramount, Faggin, Ochsner, Ciocc, Basso
Mentioned: 117 Post(s)
Tagged: 0 Thread(s)
Quoted: 1304 Post(s)
Liked 1,913 Times
in
1,143 Posts
Jonny7,
If you have the top parts for the two pin seat post I have an orphan Campy 27.0 post. Standard length so you might need to do a ream to clean the tube and get the fit correct. Lemme know, MH
If you have the top parts for the two pin seat post I have an orphan Campy 27.0 post. Standard length so you might need to do a ream to clean the tube and get the fit correct. Lemme know, MH
Likes For Mad Honk:
04-29-22, 04:07 PM
#24
Senior Member
Join Date: May 2019
Location: Bloomington, IN
Posts: 2,951
Bikes: Paramount, Faggin, Ochsner, Ciocc, Basso
Mentioned: 117 Post(s)
Tagged: 0 Thread(s)
Quoted: 1304 Post(s)
Liked 1,913 Times
in
1,143 Posts
Well jonny7 has replied and asked for pics; so here they are:
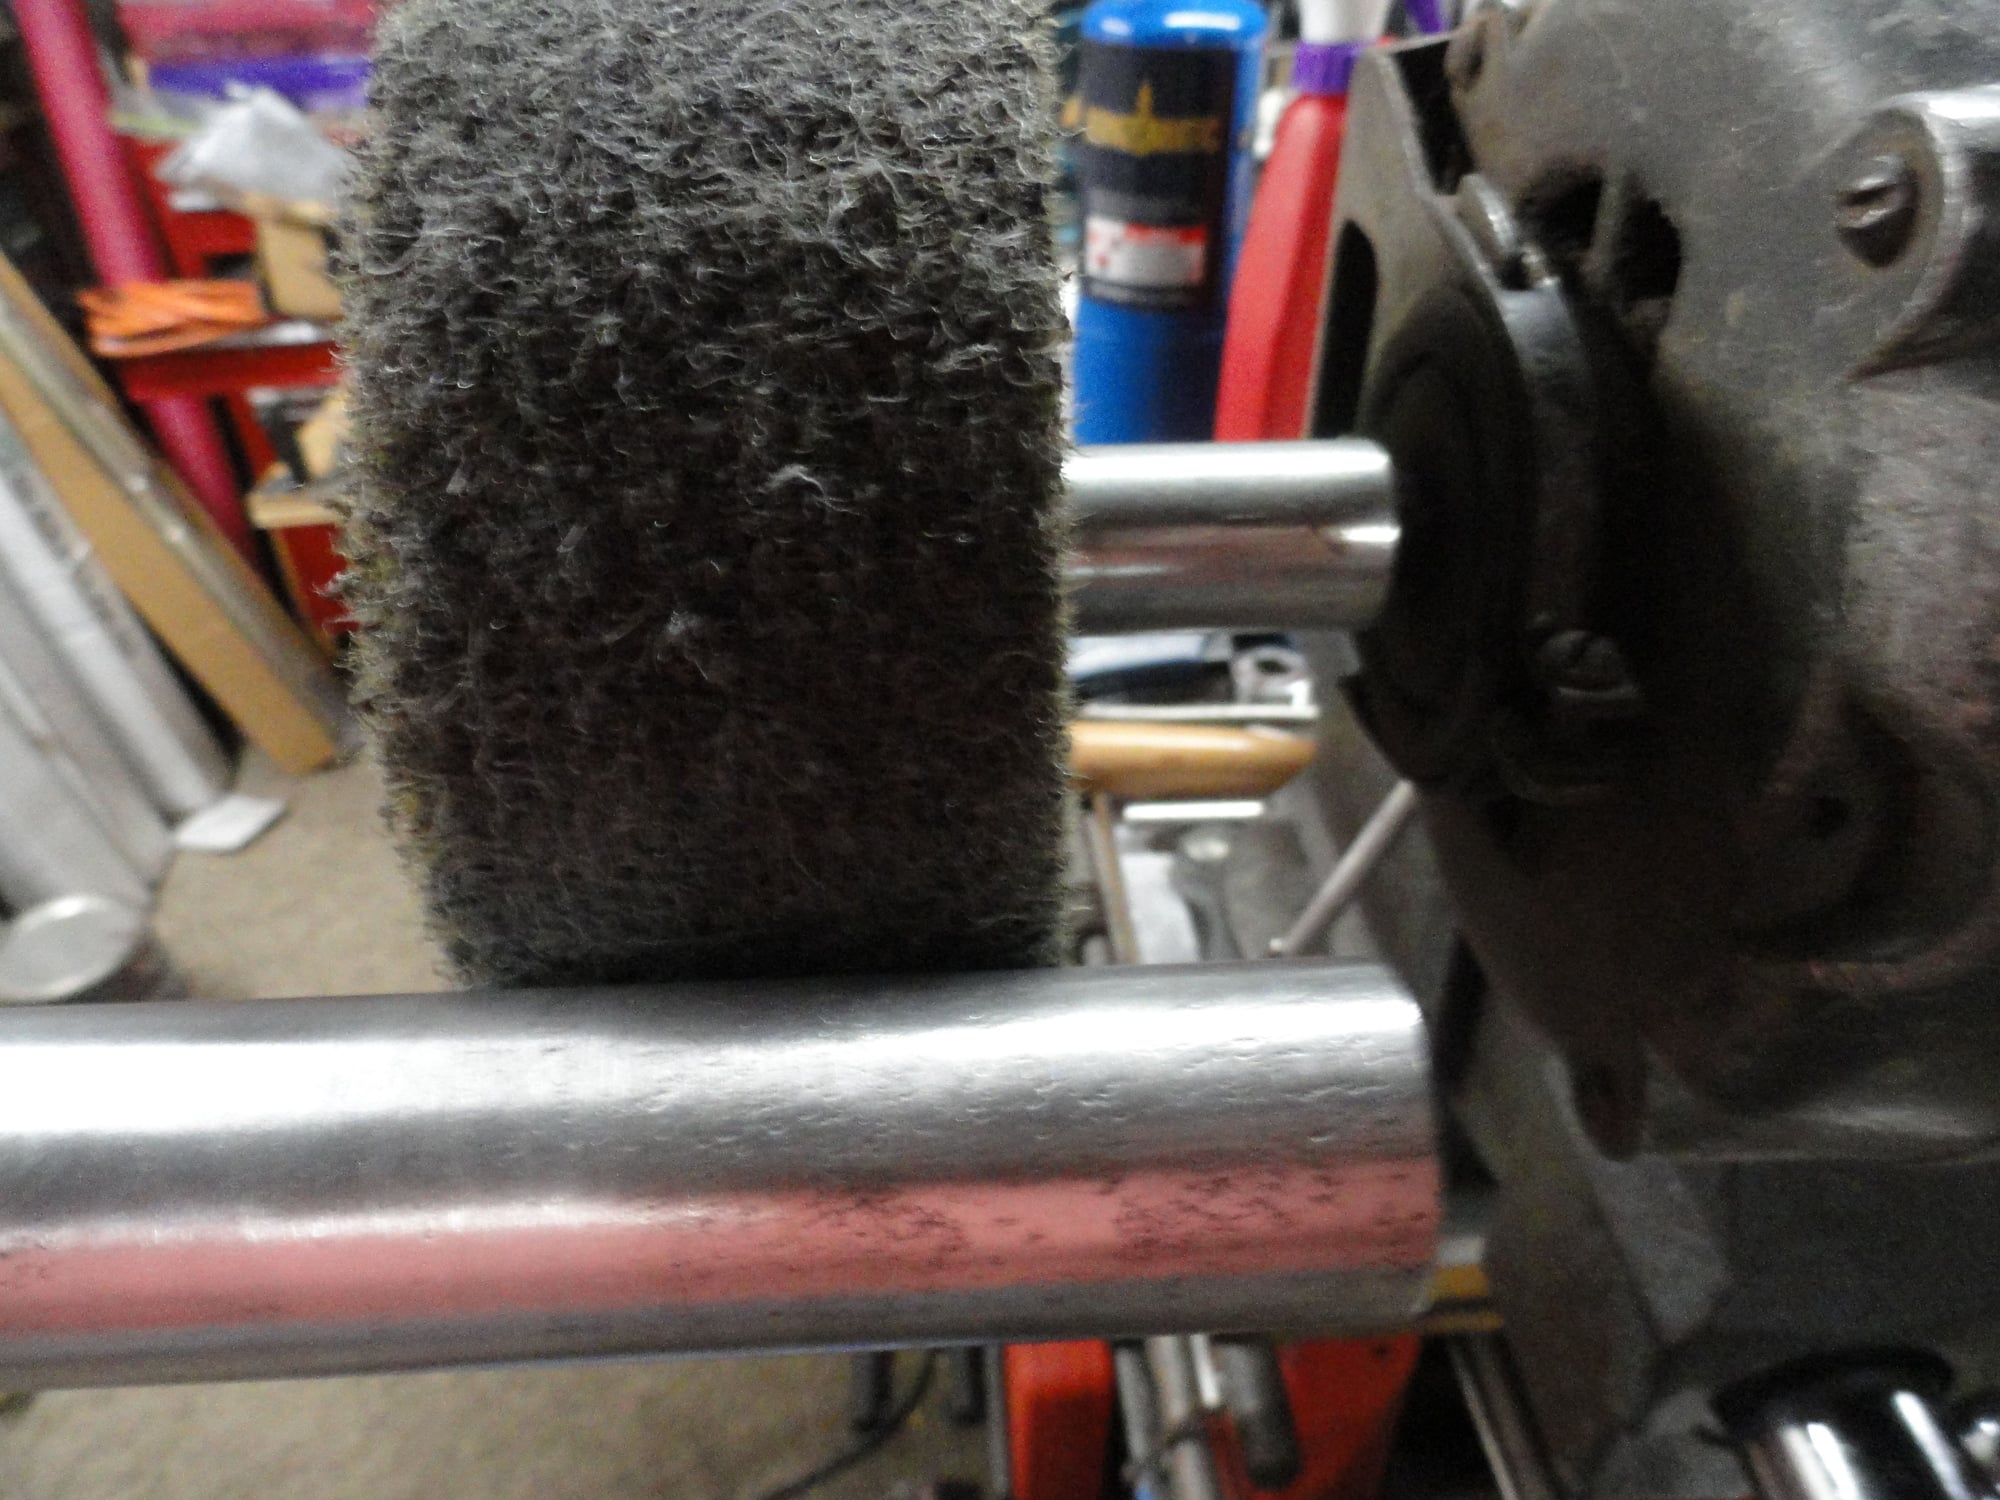
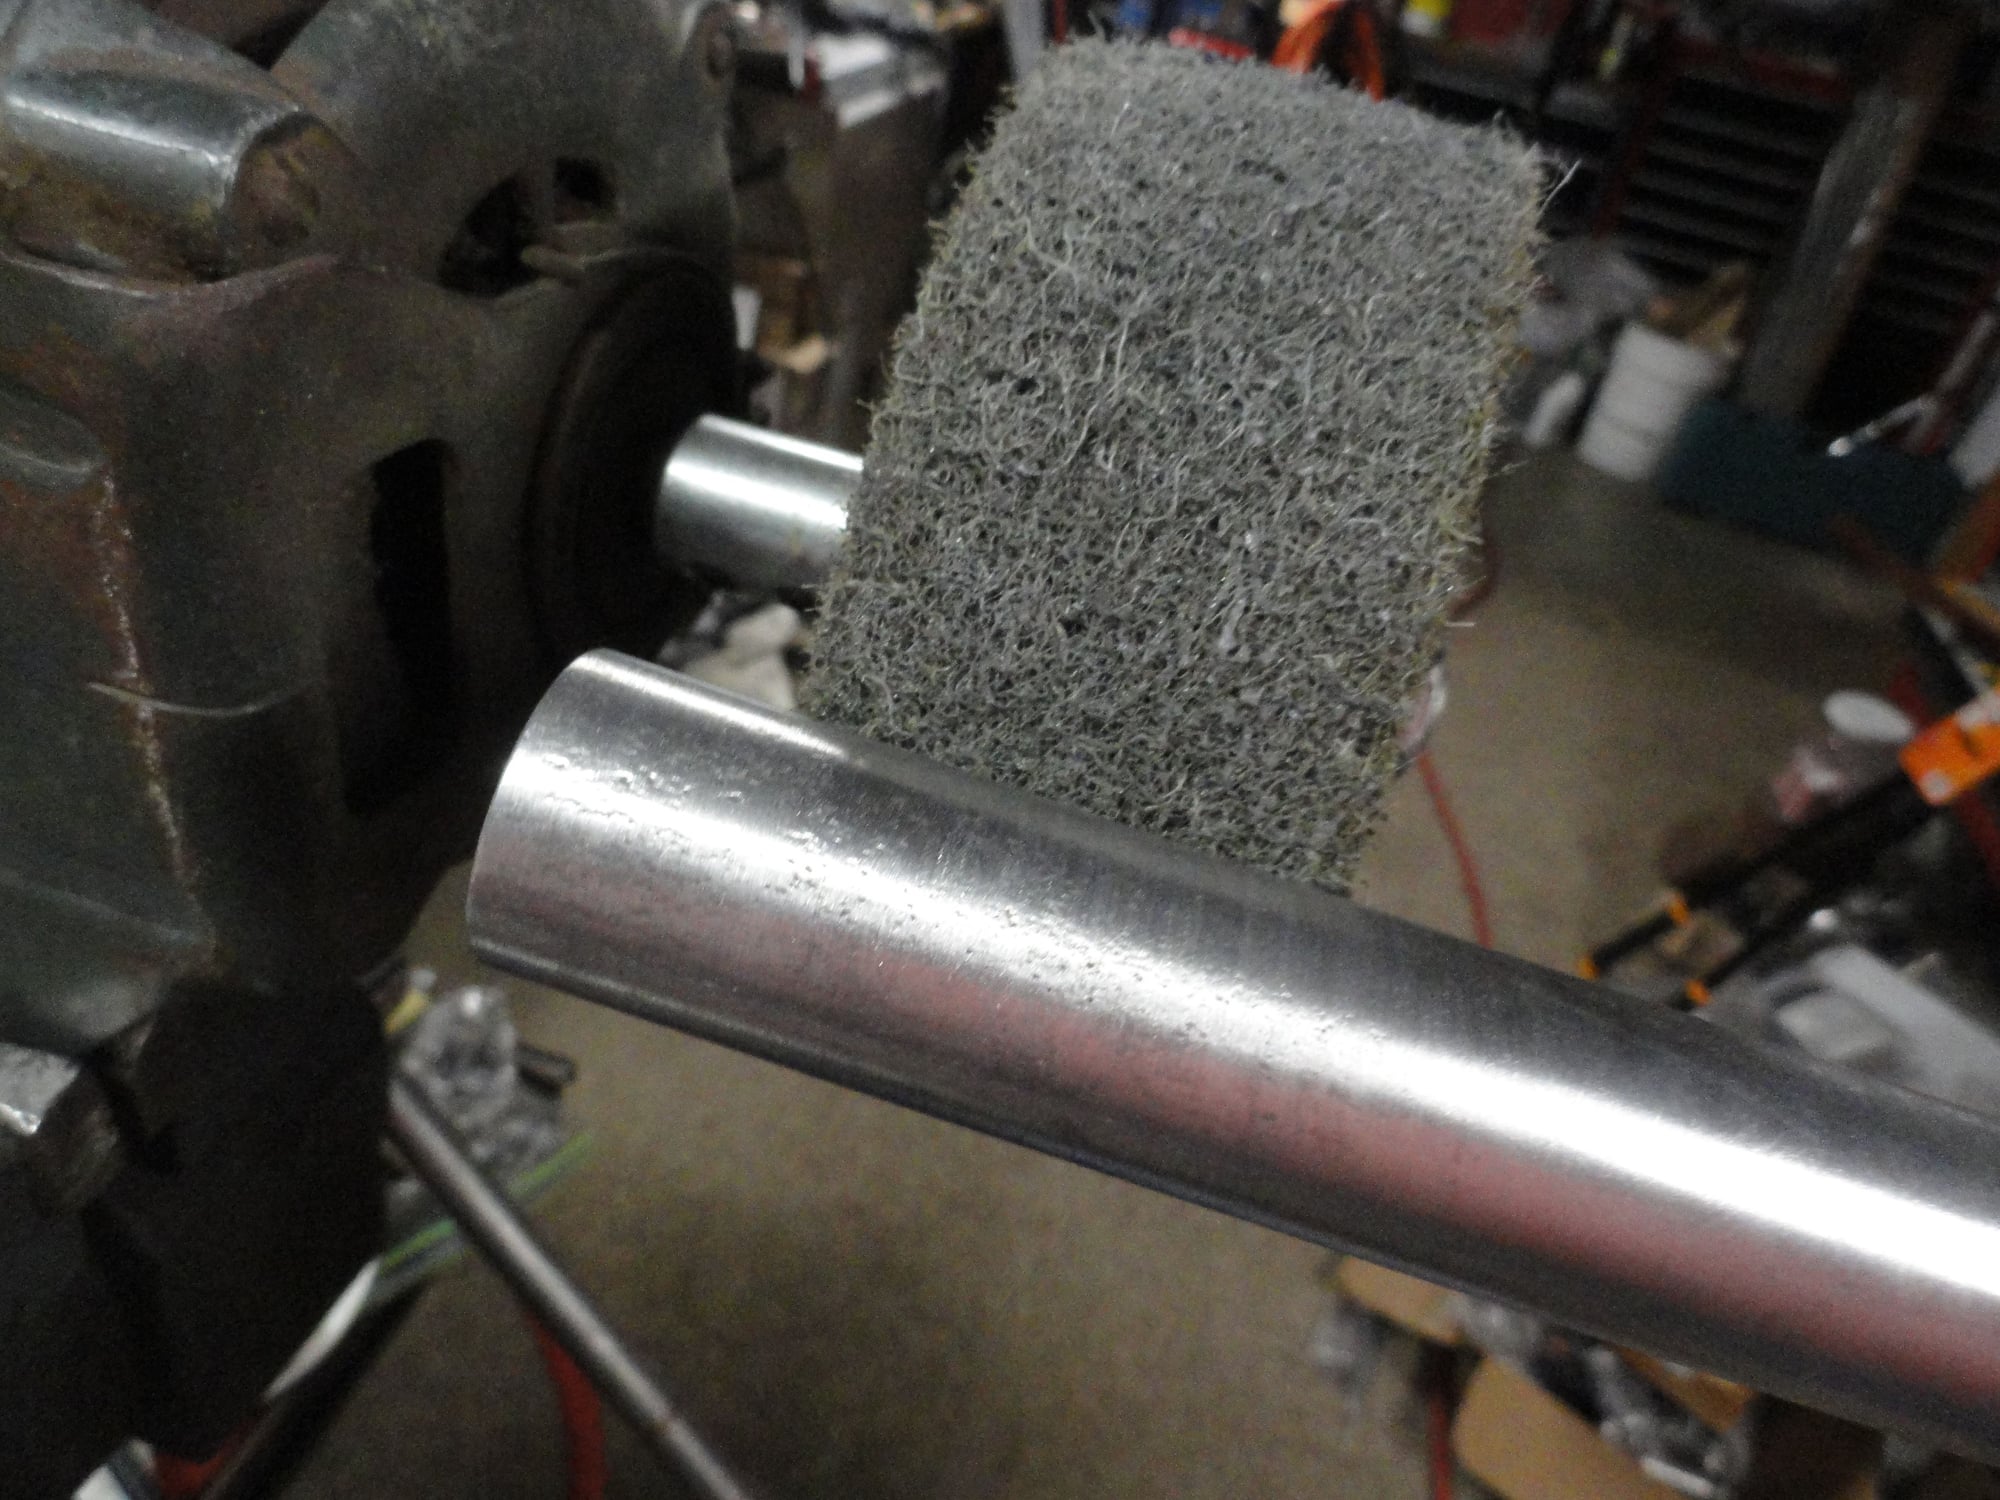
Mad Honk uses 3m wheel to remove some pitting in the post
Putting final touches on the satin finish
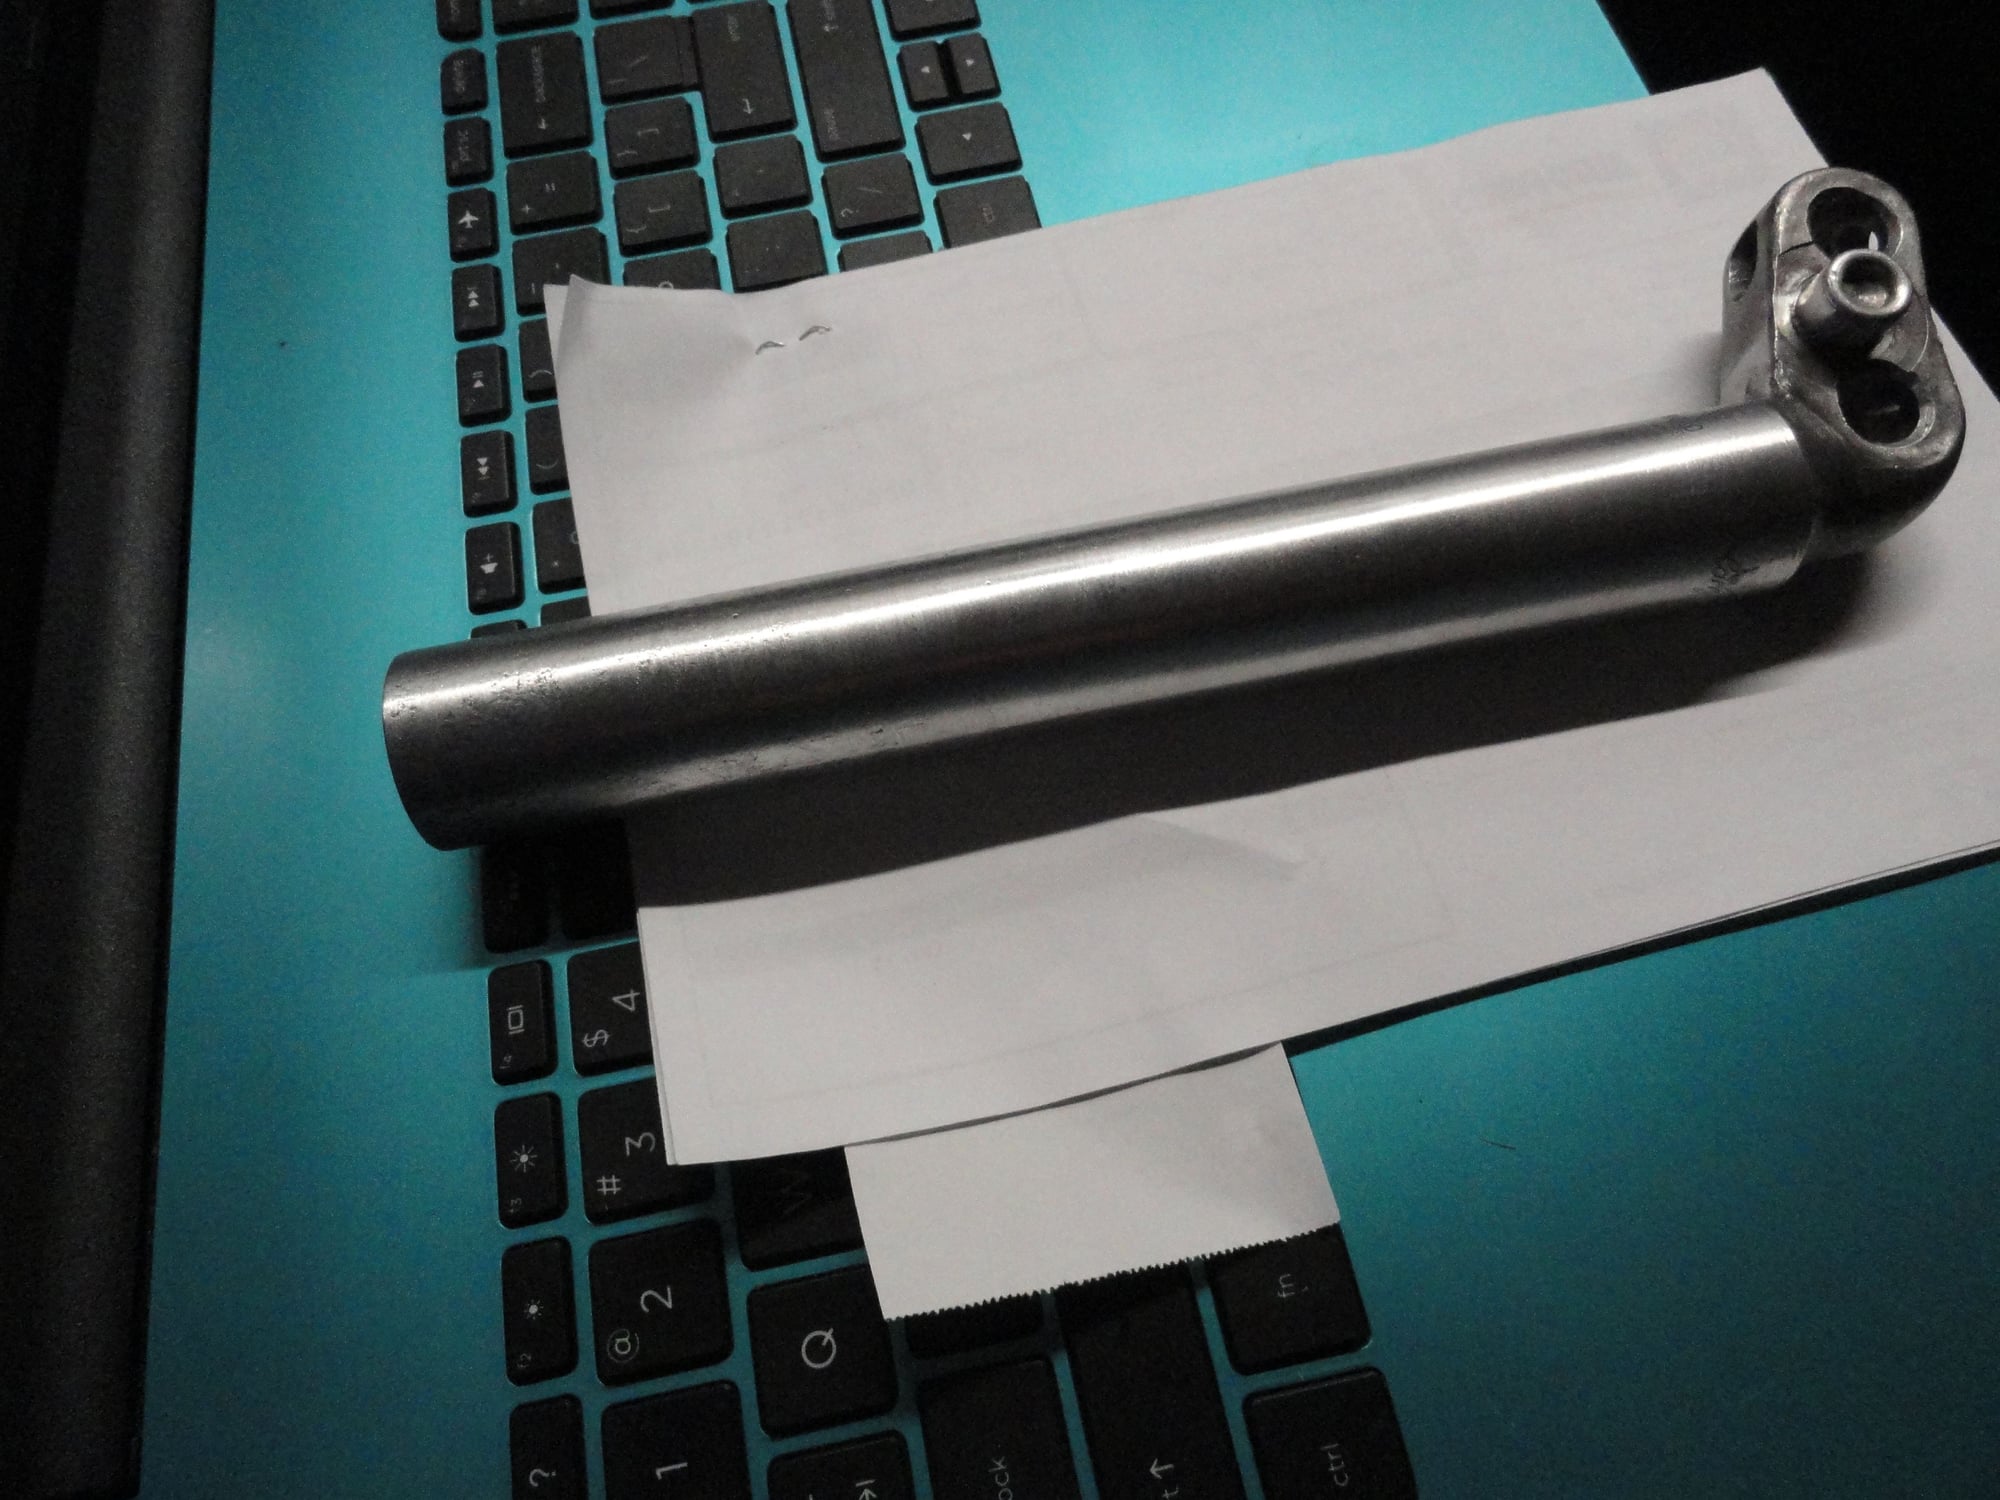
Cleaned and ready for inspection
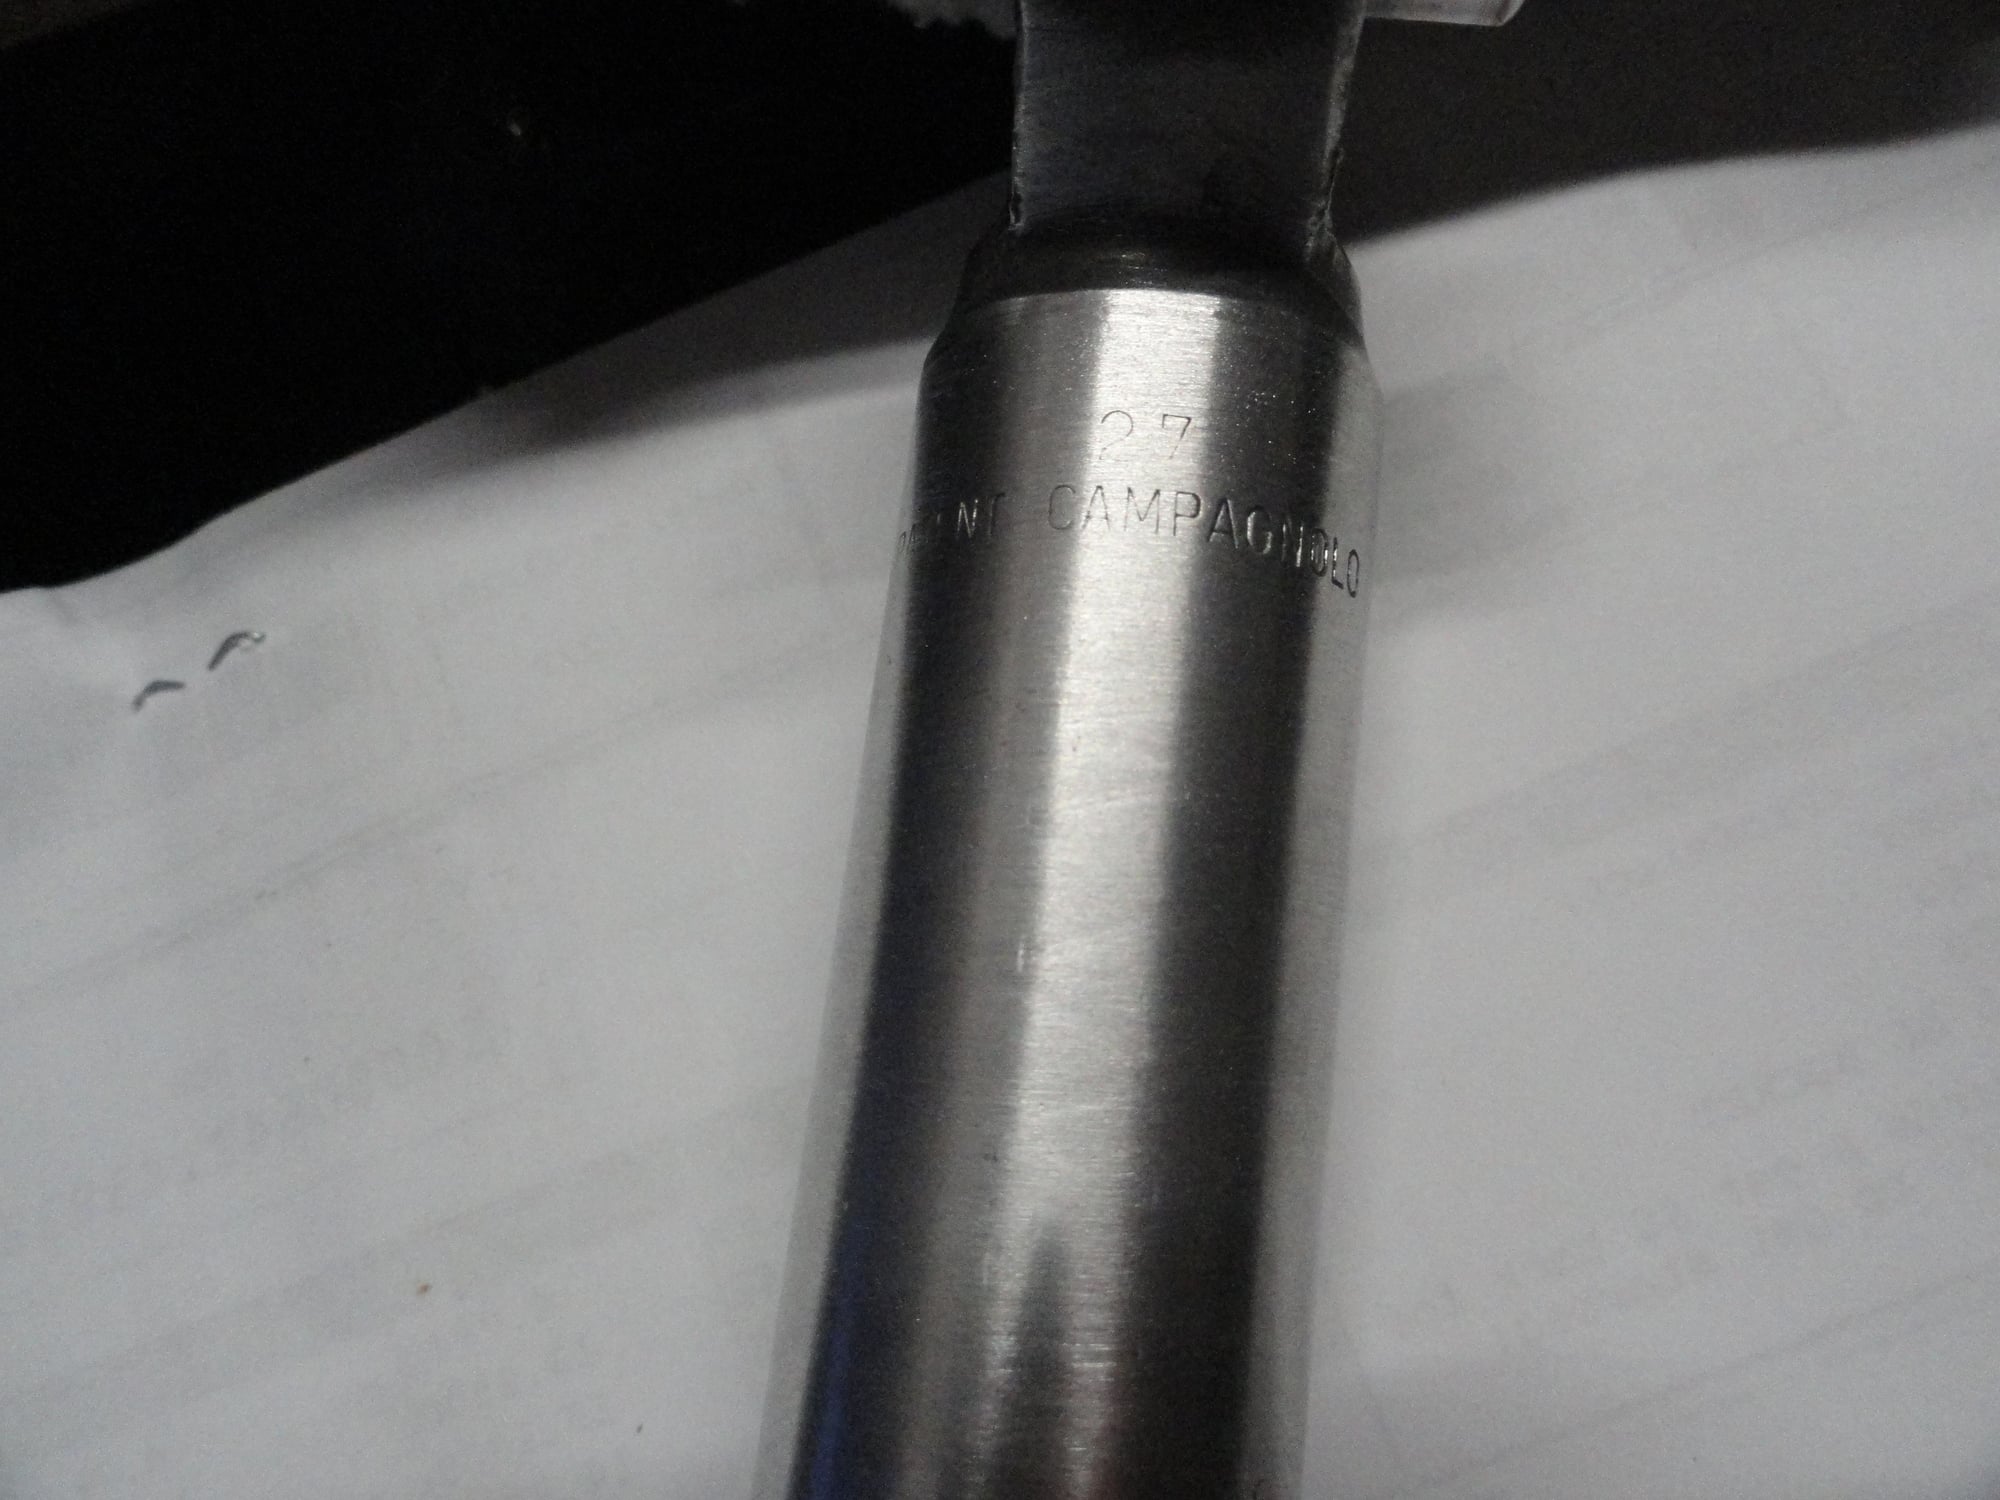
A little hard to read but it is stamped 27
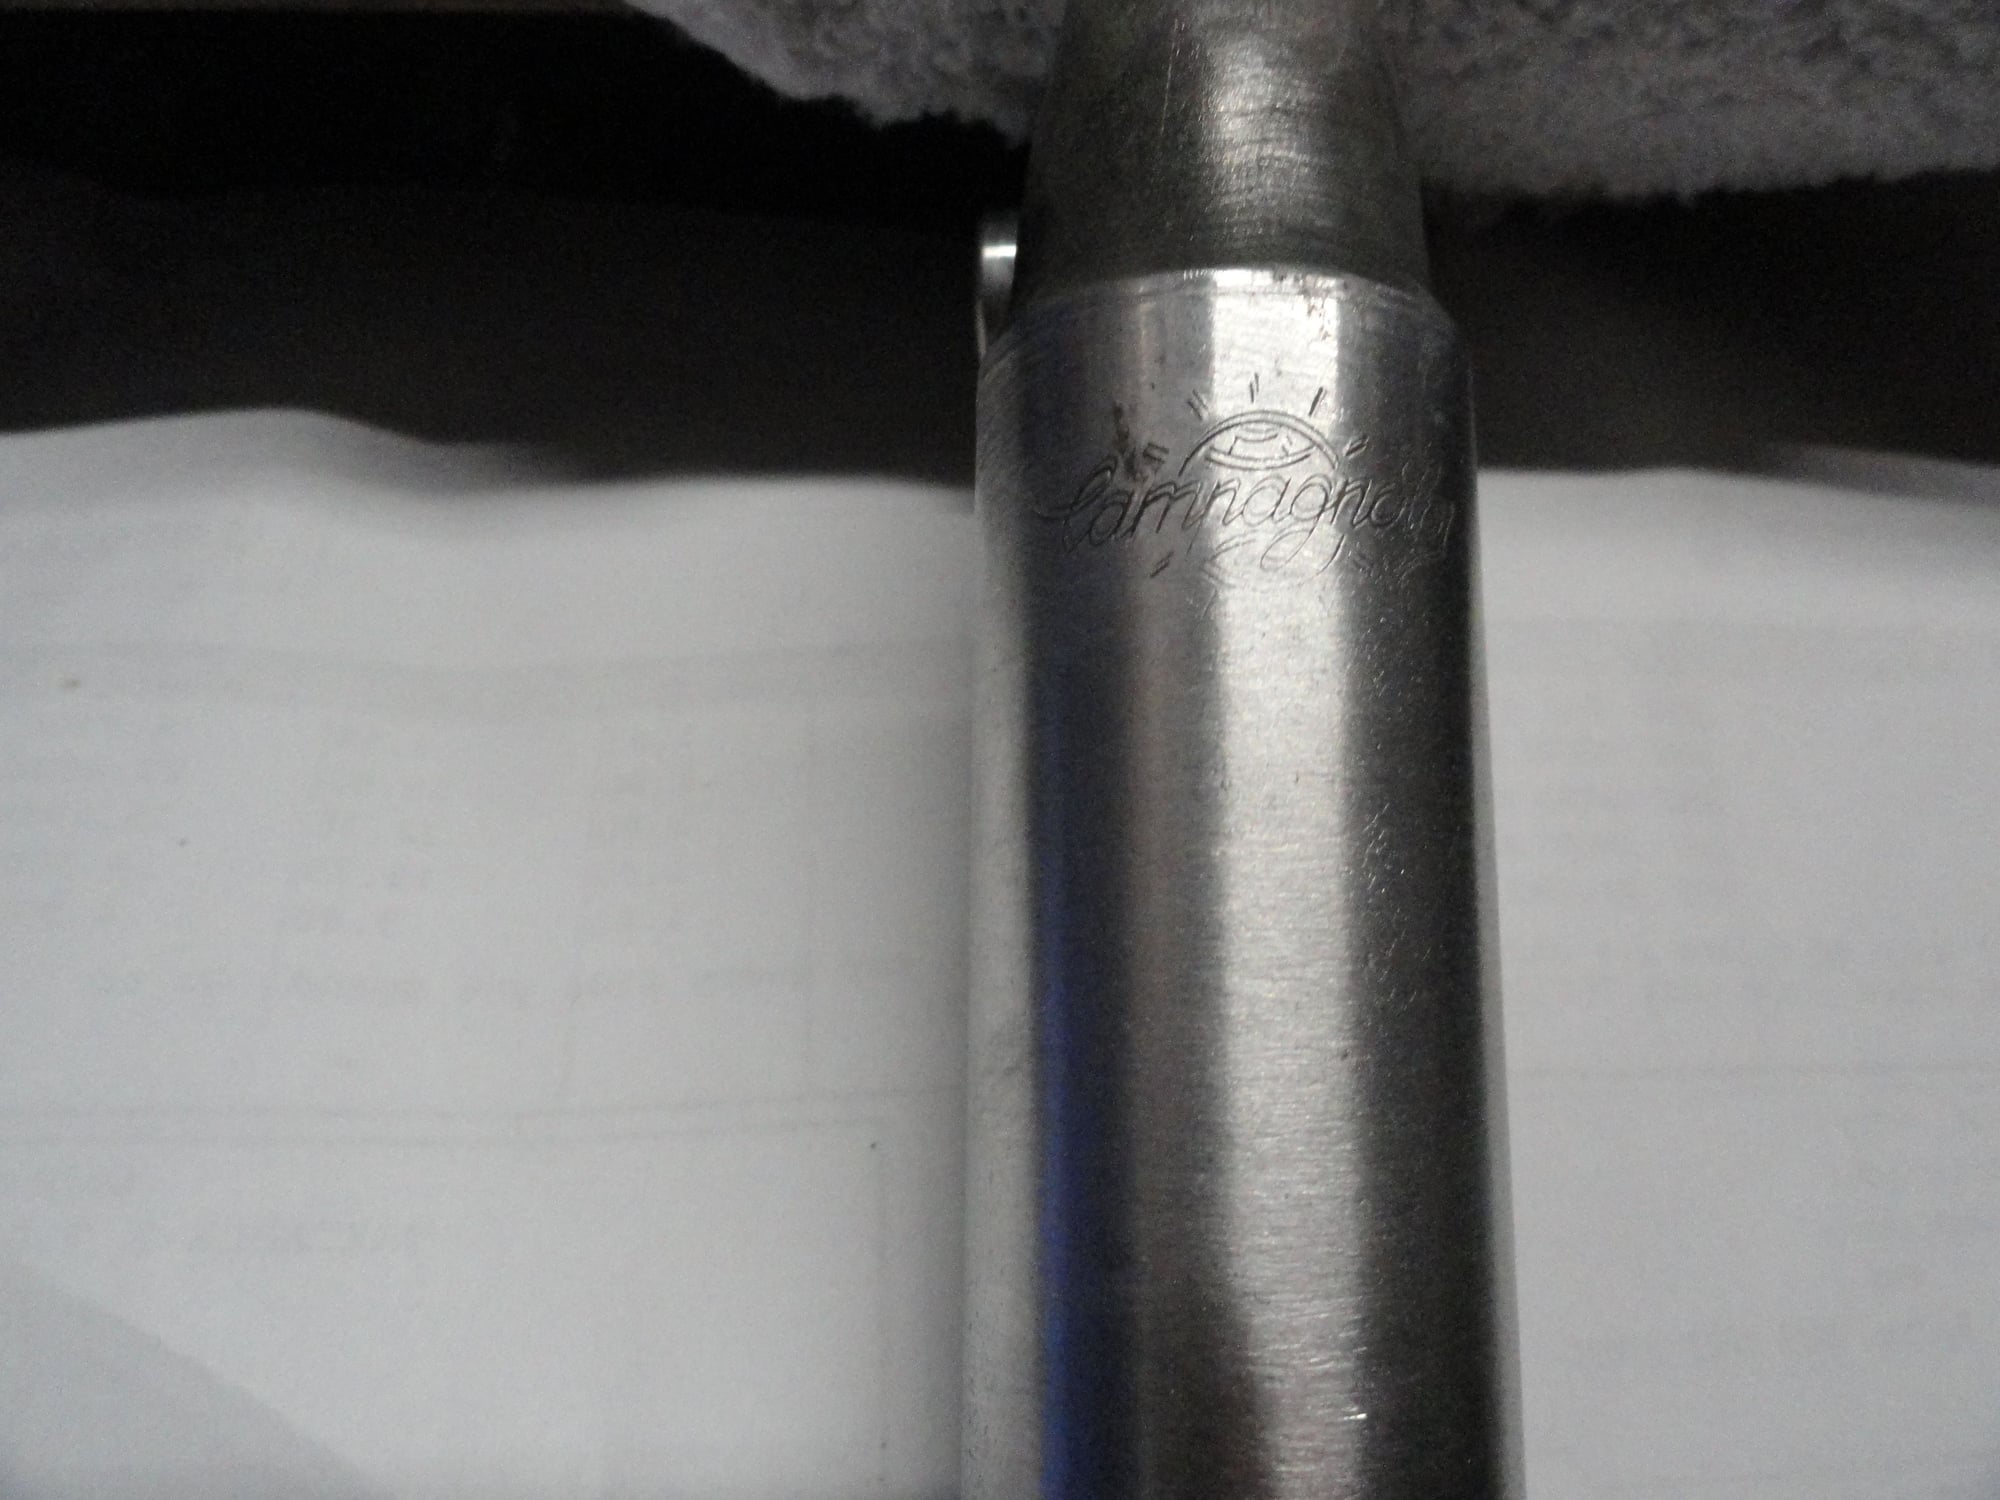
The bottom of the world logo is very light but can still be seen on close inspection
I put a digital caliper on the post and it reads 26.95 with a reading of 26.93 where I was bit aggressive with the corrosion on the bottom of the post. It is a full insertion length post, so the tubes likely will need to be reamed to get the tubing ID corrected to 27.0 size. Lemme know if this is what you are looking for. Smiles, MH
The golf club head refinishing tools help a bit in cleaning some of these bits up. The disclaimer is that the wheel used is pretty hefty pricewise and would be costly for just a few uses. Mine is over 30 years old and has paid for itself many times. About five minutes of polishing work to clean and give the satin finish to the aluminum post.
Mad Honk uses 3m wheel to remove some pitting in the post
Putting final touches on the satin finish
Cleaned and ready for inspection
A little hard to read but it is stamped 27
The bottom of the world logo is very light but can still be seen on close inspection
I put a digital caliper on the post and it reads 26.95 with a reading of 26.93 where I was bit aggressive with the corrosion on the bottom of the post. It is a full insertion length post, so the tubes likely will need to be reamed to get the tubing ID corrected to 27.0 size. Lemme know if this is what you are looking for. Smiles, MH
The golf club head refinishing tools help a bit in cleaning some of these bits up. The disclaimer is that the wheel used is pretty hefty pricewise and would be costly for just a few uses. Mine is over 30 years old and has paid for itself many times. About five minutes of polishing work to clean and give the satin finish to the aluminum post.
Last edited by Mad Honk; 04-29-22 at 04:11 PM.
