


My climb up Mt Fuji
 06-03-18, 04:58 AM
#1
Senior Member
Thread Starter
Join Date: Jun 2015
Location: Fremont, CA
Posts: 238
Bikes: 2015 Spec Roubaix Expert, 2016 Spec Diverge Expert X1, 2018 Allez Sprint eTap
Mentioned: 1 Post(s)
Tagged: 0 Thread(s)
Quoted: 63 Post(s)
Likes: 0
Liked 3 Times
in
3 Posts
My climb up Mt Fuji
I recently noticed I couldn't find any report on this site about riding Mt Fuji. So hopefully the following will be helpful to some people.
I recently was on a business trip to Tokyo, which straddled a weekend, so it gave me the opportunity to justify bringing my own bicycle over there. I figured it would allow me to keep my riding routine, but the weekend specifically would also allow me to ride up Mt Fuji, which has been on my bucket list for a bit
For that ride, I used my trusty 2015 Specialized Roubaix SL4, and I hooked up with an ex-coworker of mine, who happens to be a cyclist, and who happens to like a little climbing challenge just like me!
Riding in Tokyo
I live in the SF Bay Area, where the traffic situation is a bit out of control. That being said, we do have easy access to many great cycling routes with great views, away from most cars.
Tokyo being one of the most populated areas in the world, it’s no surprise that it isn’t exactly the friendliest bicycle place on earth… It isn’t that drivers are bad or inconsiderate; it’s just that roads are narrow, and there are lots of circulation as well as traffic signals.
If you want to keep any sort of speed, you would have to constantly break traffic laws, which would then make things pretty dangerous… Due to jetlag, I ended up riding at around 5am for a few days, so it made things bearable.
While there, I went to visit local landmarks from my hotel in Shinagawa like the Tokyo Tower, the Imperial Palace Garden, Tokyo Skytree and Asakusa. I had been to all those places on previous trips, but when you take the train you might as well have teleported there, and it’s hard to know their relative location... So riding around by bicycle was nice, to finally understand the overall Tokyo layout.
Mt Fuji
The weekend was time for the big ride! Unlike other mountain climbs I attempted before (Death Ride, Haleakala and Mauna Kea), I did not really prepare specifically for Mt Fuji. In fact, the idea for the ride itself came a bit at the last minute. I do climb a fair bit however, so it didn’t turn out to be a problem.
Fuji is about an hour away west of Tokyo by Shinkansen (bullet train), and costs approximately 5,000 yen (~US$45) one-way. It is easily accessible by riding the train to Shin Fuji Station, which itself is approximately 50km south of the mountain.
The very top, reachable by foot, reaches 12,389ft (3776m) of elevation, but the highest elevation reachable by road is 7,874ft (2400m). This is where the so-called “New 5th Station” is located at, and that’s where people hiking to the top will typically start from.
Bringing a Bicycle on Trains
I originally thought it wouldn’t be a problem bringing a bicycle on the Shinkansen. Luckily, I asked beforehand! It turns out any bicycle must be carried in a travel bag.
Unlike air travel, it’s pretty straightforward to pack a bicycle in one of those travel bags: You simply remove the wheels, put a few towels or padding around some parts, pack the whole thing, and you’re ready to go. However, note that the more anal-retentive among us might want to be more thorough than I was with padding and such, to avoid any chance of scratches.
While on your ride, you can store the travel bag in one of those very convenient lockers at the train station, along with anything extra you don’t want to carry on your journey. It’s approximately 200 yen, so just make sure to bring coins with you!
The Ride up Mt Fuji
You’ve all seen those majestic Mt Fuji pictures: An impressive pointy shape with its beautiful snowcap! Funny enough, this time of year the snowcap is pretty much all gone, so what’s left looked a bit more like a very tall pile of dirt
Starting at the Shin Fuji Station, it’s about 30 miles (50km) to reach the New 5th Station. If you care to know, I used the following route:
Japan is notorious for having vending machines every square meter, and I’m only slightly exaggerating! You never have to worry about bringing a drink when leaving home, which tends to be nice in a city where you walk pretty much everywhere.
Because of this, I decided to bring only a single bottle of water, with the intent of refilling regularly on the way up. Turns out, Japan has vending machines everywhere... except on the climb up Mt Fuji DAMMIT! That newbie mistake turned out to be a bad one: You do sweat a lot on that 8,000ft elevation gain climb.
I was doing great for most of the ride, but seeing halfway through that I was running out of water very quickly, I started seriously rationing my sipping. That led to me getting seriously dehydrated. I suddenly went into limp mode around five miles from the top, and I had to stop for a while less than two miles away.
Luckily, the guy riding with me (who also only brought a single bottle!) wasn’t affected as badly as I was, so he was able to reach the top first and bring me back a drink (thank you!!!). Still, the last stretch was pretty miserable. It took me a while to recover at the top, I just felt like puking so eating wasn’t an option. Funny enough riding back down is what helped me the most.
Bottom line: Don’t be an idiot like me, and do bring 2 bottle of water with you!!! And keep in mind this was in June, with moderate weather. If you ever attempt this ride in the dead of the summer, proper hydration plans are definitely a requirement.
The Descent
I love climbing, I really do! Though I’d be lying if I said I didn’t enjoy descents just as much, especially 8,000ft worth Road pavement was in good shape, and you don’t tend to find lots of debris and/or sand on the surface, so you can usually descend without worry. Just remember to stay on the left side of the road, which is the system in Japan, and you’ll be fine!
Having taken my time on the way up, let’s just say my Strava ranking wasn’t anything to write home about… On the way down however, as I do like to give it all I got, I did achieve a respectable 24th place (out of 1000+ riders) on the first long segment, so I was quite happy about it. Sorry, I’m vain like that
The Wrap Up
Overall, I’m very glad I was able to do this ride! I recommend it to anyone who enjoys climbing, and happens to be nearby Tokyo.
Besides making sure you have a proper amount of water with you, I don’t feel it requires any sort of training, provided you’ve done a few 5,000ft+ climbs before.
I would also recommend you do it with a friend of yours, especially if it’s your first time. He/she may come in handy and fetch you a drink from the summit
I recently was on a business trip to Tokyo, which straddled a weekend, so it gave me the opportunity to justify bringing my own bicycle over there. I figured it would allow me to keep my riding routine, but the weekend specifically would also allow me to ride up Mt Fuji, which has been on my bucket list for a bit
For that ride, I used my trusty 2015 Specialized Roubaix SL4, and I hooked up with an ex-coworker of mine, who happens to be a cyclist, and who happens to like a little climbing challenge just like me!
Riding in Tokyo
I live in the SF Bay Area, where the traffic situation is a bit out of control. That being said, we do have easy access to many great cycling routes with great views, away from most cars.
Tokyo being one of the most populated areas in the world, it’s no surprise that it isn’t exactly the friendliest bicycle place on earth… It isn’t that drivers are bad or inconsiderate; it’s just that roads are narrow, and there are lots of circulation as well as traffic signals.
If you want to keep any sort of speed, you would have to constantly break traffic laws, which would then make things pretty dangerous… Due to jetlag, I ended up riding at around 5am for a few days, so it made things bearable.
While there, I went to visit local landmarks from my hotel in Shinagawa like the Tokyo Tower, the Imperial Palace Garden, Tokyo Skytree and Asakusa. I had been to all those places on previous trips, but when you take the train you might as well have teleported there, and it’s hard to know their relative location... So riding around by bicycle was nice, to finally understand the overall Tokyo layout.
Mt Fuji
The weekend was time for the big ride! Unlike other mountain climbs I attempted before (Death Ride, Haleakala and Mauna Kea), I did not really prepare specifically for Mt Fuji. In fact, the idea for the ride itself came a bit at the last minute. I do climb a fair bit however, so it didn’t turn out to be a problem.
Fuji is about an hour away west of Tokyo by Shinkansen (bullet train), and costs approximately 5,000 yen (~US$45) one-way. It is easily accessible by riding the train to Shin Fuji Station, which itself is approximately 50km south of the mountain.
The very top, reachable by foot, reaches 12,389ft (3776m) of elevation, but the highest elevation reachable by road is 7,874ft (2400m). This is where the so-called “New 5th Station” is located at, and that’s where people hiking to the top will typically start from.
Bringing a Bicycle on Trains
I originally thought it wouldn’t be a problem bringing a bicycle on the Shinkansen. Luckily, I asked beforehand! It turns out any bicycle must be carried in a travel bag.
Unlike air travel, it’s pretty straightforward to pack a bicycle in one of those travel bags: You simply remove the wheels, put a few towels or padding around some parts, pack the whole thing, and you’re ready to go. However, note that the more anal-retentive among us might want to be more thorough than I was with padding and such, to avoid any chance of scratches.
While on your ride, you can store the travel bag in one of those very convenient lockers at the train station, along with anything extra you don’t want to carry on your journey. It’s approximately 200 yen, so just make sure to bring coins with you!
The Ride up Mt Fuji
You’ve all seen those majestic Mt Fuji pictures: An impressive pointy shape with its beautiful snowcap! Funny enough, this time of year the snowcap is pretty much all gone, so what’s left looked a bit more like a very tall pile of dirt
Starting at the Shin Fuji Station, it’s about 30 miles (50km) to reach the New 5th Station. If you care to know, I used the following route:
- Route 174 (Fujimi-Odori Street), for about 2 miles
- Route 414 (Gururi Fujisn Fukei-Kaido Street), for about 5 miles
- Route 180 (Fujisan Skyline) for about 15 miles
- Route 152 (Fujisan Skyline) for about 8 miles
Japan is notorious for having vending machines every square meter, and I’m only slightly exaggerating! You never have to worry about bringing a drink when leaving home, which tends to be nice in a city where you walk pretty much everywhere.
Because of this, I decided to bring only a single bottle of water, with the intent of refilling regularly on the way up. Turns out, Japan has vending machines everywhere... except on the climb up Mt Fuji
DAMMIT! That newbie mistake turned out to be a bad one: You do sweat a lot on that 8,000ft elevation gain climb.I was doing great for most of the ride, but seeing halfway through that I was running out of water very quickly, I started seriously rationing my sipping. That led to me getting seriously dehydrated. I suddenly went into limp mode around five miles from the top, and I had to stop for a while less than two miles away.
Luckily, the guy riding with me (who also only brought a single bottle!) wasn’t affected as badly as I was, so he was able to reach the top first and bring me back a drink (thank you!!!). Still, the last stretch was pretty miserable. It took me a while to recover at the top, I just felt like puking so eating wasn’t an option. Funny enough riding back down is what helped me the most.
Bottom line: Don’t be an idiot like me, and do bring 2 bottle of water with you!!! And keep in mind this was in June, with moderate weather. If you ever attempt this ride in the dead of the summer, proper hydration plans are definitely a requirement.
The Descent
I love climbing, I really do! Though I’d be lying if I said I didn’t enjoy descents just as much, especially 8,000ft worth
Road pavement was in good shape, and you don’t tend to find lots of debris and/or sand on the surface, so you can usually descend without worry. Just remember to stay on the left side of the road, which is the system in Japan, and you’ll be fine!Having taken my time on the way up, let’s just say my Strava ranking wasn’t anything to write home about… On the way down however, as I do like to give it all I got, I did achieve a respectable 24th place (out of 1000+ riders) on the first long segment, so I was quite happy about it. Sorry, I’m vain like that
The Wrap Up
Overall, I’m very glad I was able to do this ride! I recommend it to anyone who enjoys climbing, and happens to be nearby Tokyo.
Besides making sure you have a proper amount of water with you, I don’t feel it requires any sort of training, provided you’ve done a few 5,000ft+ climbs before.
I would also recommend you do it with a friend of yours, especially if it’s your first time. He/she may come in handy and fetch you a drink from the summit
Last edited by Jofu; 06-03-18 at 03:02 PM.
 06-03-18, 05:00 AM
#2
Senior Member
Thread Starter
Join Date: Jun 2015
Location: Fremont, CA
Posts: 238
Bikes: 2015 Spec Roubaix Expert, 2016 Spec Diverge Expert X1, 2018 Allez Sprint eTap
Mentioned: 1 Post(s)
Tagged: 0 Thread(s)
Quoted: 63 Post(s)
Likes: 0
Liked 3 Times
in
3 Posts
If you're interested, I also wrote a report on my climb up Mauna Kea last year: https://www.bikeforums.net/road-cycl...nd-hawaii.html
06-03-18, 08:25 AM
#3
Farmer tan

Thanks, Jofu, for your write-up!
Did you get any pics going up?
Your Mauna Kea climb inspired me to give it a shot last year.
I might try Haleakala next month, but haven't trained on the local mountains yet. How would you compare your two Hawaiian climbs, difficulty-wise?
Did you get any pics going up?
Your Mauna Kea climb inspired me to give it a shot last year.
I might try Haleakala next month, but haven't trained on the local mountains yet. How would you compare your two Hawaiian climbs, difficulty-wise?
 06-03-18, 01:28 PM
#5

Should Be More Popular

Join Date: Dec 2007
Location: Malvern, PA (20 miles West of Philly)
Posts: 43,097
Bikes: 1986 Alpine (steel road bike), 2009 Ti Habenero, 2013 Specialized Roubaix
Mentioned: 560 Post(s)
Tagged: 2 Thread(s)
Quoted: 22641 Post(s)
Liked 8,953 Times
in
4,173 Posts
06-03-18, 03:01 PM
#6
Senior Member
Thread Starter
Join Date: Jun 2015
Location: Fremont, CA
Posts: 238
Bikes: 2015 Spec Roubaix Expert, 2016 Spec Diverge Expert X1, 2018 Allez Sprint eTap
Mentioned: 1 Post(s)
Tagged: 0 Thread(s)
Quoted: 63 Post(s)
Likes: 0
Liked 3 Times
in
3 Posts
Around the beginning of route 180
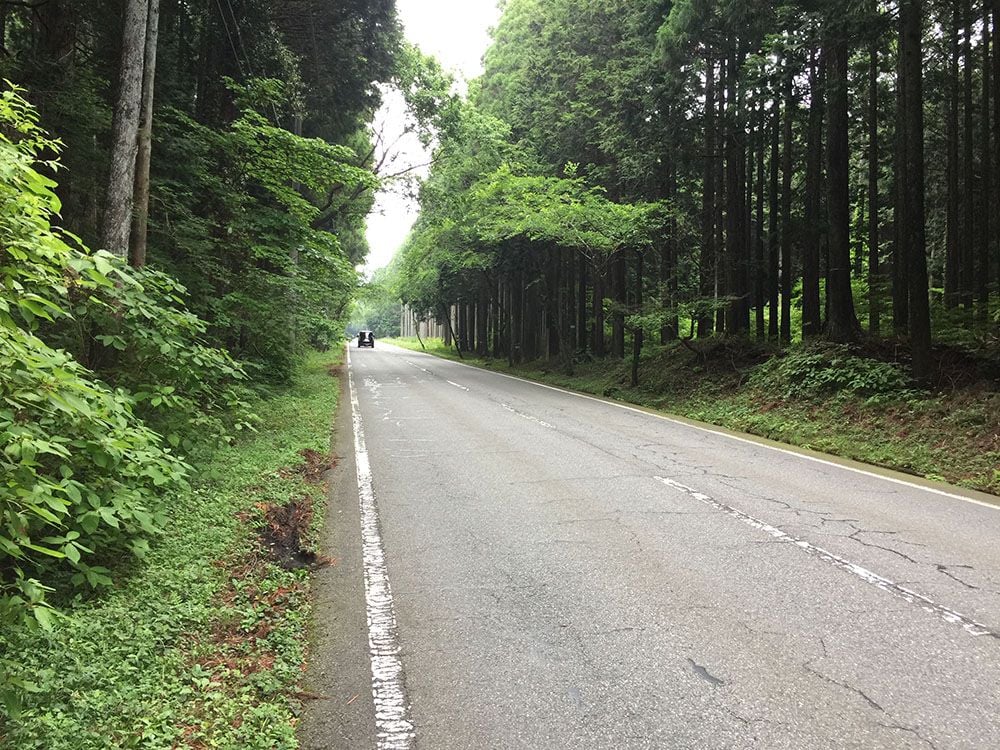
Going through the clouds on route 180:

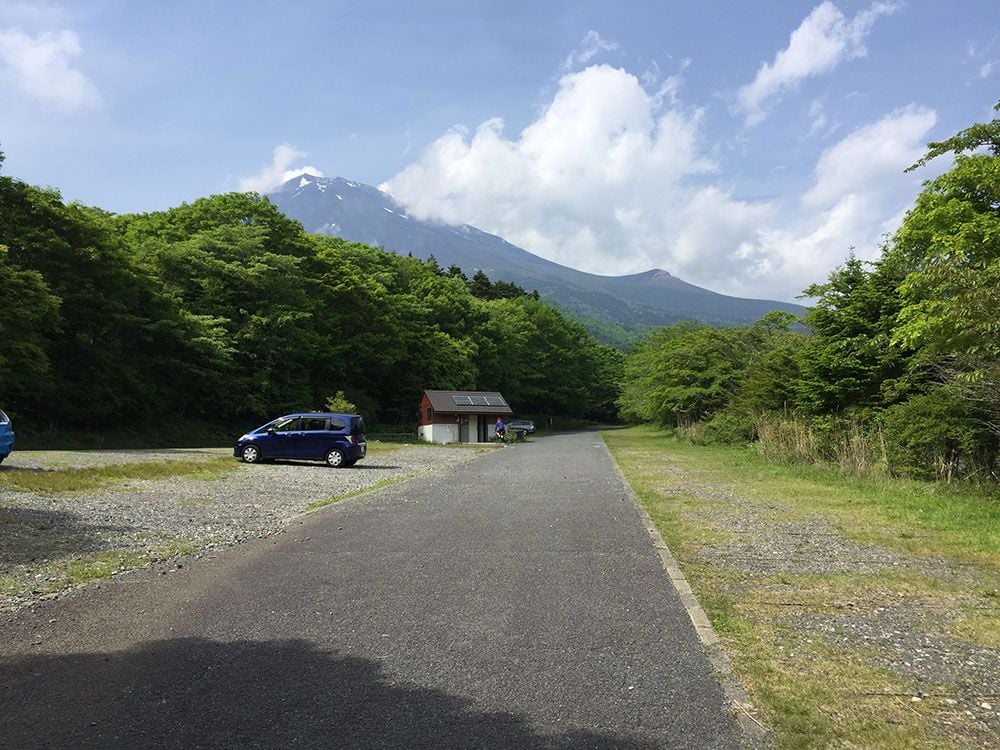
HA! We can now see the summit of Mt Fuji:

Another view of the summit:
The entrance of route 152, taking us to our destination (in case you're wondering, yes I work for PlayStation haha):

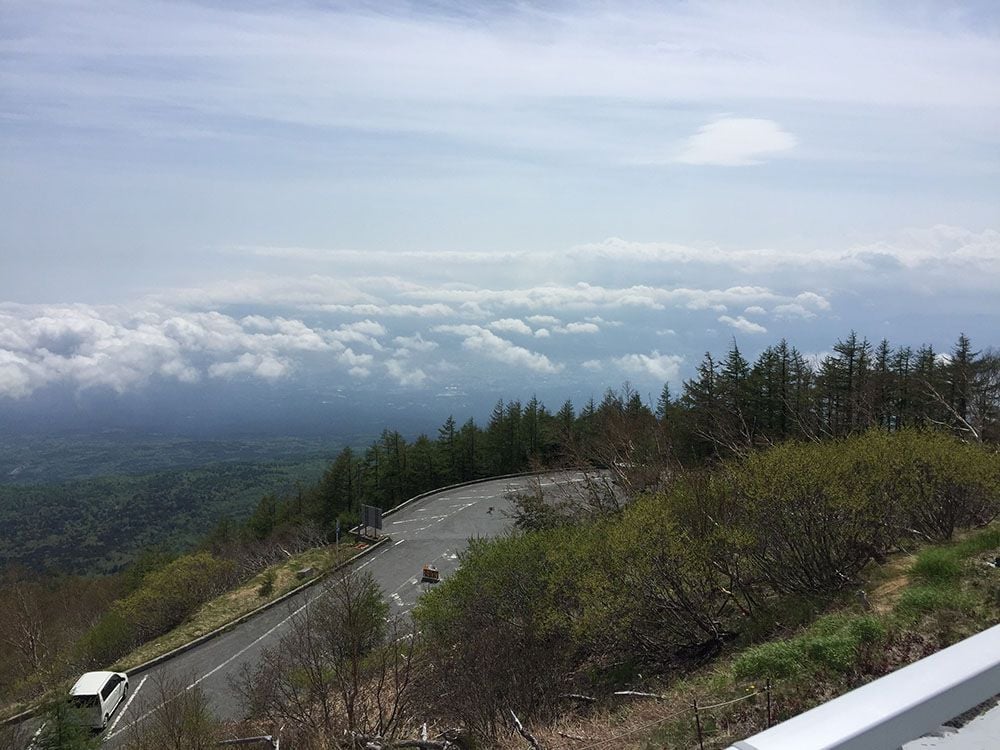
3 view angles from the New 5th Station:


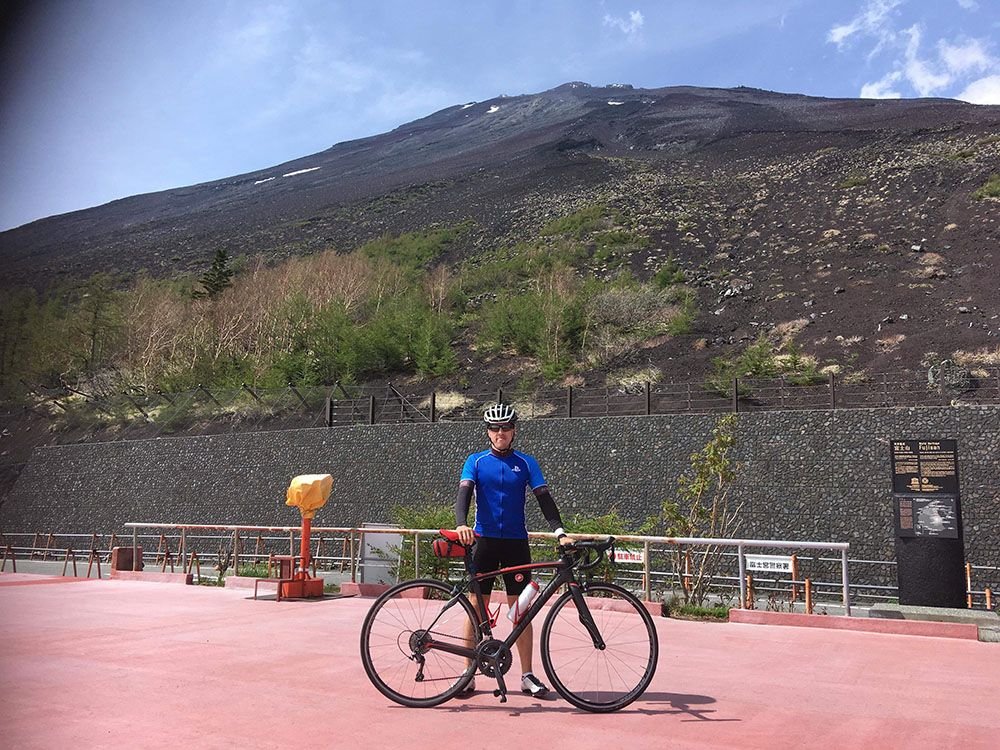
Me at the New 5th Station (pretending to be fine):

Same location, but with the summit in the background. Unfortunately, this picture totally does not convey the sense of size... In person, it's pretty obvious the summit is another 4,500ft of elevation. It must be pretty steep to hike up there!
Going through the clouds on route 180:
HA! We can now see the summit of Mt Fuji:
Another view of the summit:
The entrance of route 152, taking us to our destination (in case you're wondering, yes I work for PlayStation haha):
3 view angles from the New 5th Station:
Me at the New 5th Station (pretending to be fine):
Same location, but with the summit in the background. Unfortunately, this picture totally does not convey the sense of size... In person, it's pretty obvious the summit is another 4,500ft of elevation. It must be pretty steep to hike up there!
06-03-18, 03:13 PM
#8
Senior Member
Thread Starter
Join Date: Jun 2015
Location: Fremont, CA
Posts: 238
Bikes: 2015 Spec Roubaix Expert, 2016 Spec Diverge Expert X1, 2018 Allez Sprint eTap
Mentioned: 1 Post(s)
Tagged: 0 Thread(s)
Quoted: 63 Post(s)
Likes: 0
Liked 3 Times
in
3 Posts
Thanks guys!
I just posted 10 pictures, check them out
Yeah I remember, you ended up making it to the top of Mauna Kea yeah? Still jealous haha.
Haleakala is definitely easier than Mauna Kea. To start with, it's "only" 10,000ft (versus nearly 14,000ft for Mauna Kea), and there is no gravel surprises in the middle of the ride I remember starting to feel the elevation at around 8,000ft, so I would have to stop and catch my breath every 500ft of elevation or so. Another thing to watch out for: I believe the last place to get drinks at is a spot called Kula Marketplace which, if I recall correctly, is around 2,000-2,500ft elevation. So it leaves you with around 7,500ft to go on your own supply. In my case, I did run out of water around 6,500ft, but luckily I was able to bum some from one of the trucks that bring people up for descent-only rides. Curiously, the ranger station at around 6,800ft does not sell or supply water... Overall, I felt this climb was the most beautiful one I've done, so I strongly recommend you do it!

Geoff
Thanks, Jofu, for your write-up!
Did you get any pics going up?
Your Mauna Kea climb inspired me to give it a shot last year.
I might try Haleakala next month, but haven't trained on the local mountains yet. How would you compare your two Hawaiian climbs, difficulty-wise?
Did you get any pics going up?
Your Mauna Kea climb inspired me to give it a shot last year.
I might try Haleakala next month, but haven't trained on the local mountains yet. How would you compare your two Hawaiian climbs, difficulty-wise?
Yeah I remember, you ended up making it to the top of Mauna Kea yeah? Still jealous haha.
Haleakala is definitely easier than Mauna Kea. To start with, it's "only" 10,000ft (versus nearly 14,000ft for Mauna Kea), and there is no gravel surprises in the middle of the ride
I remember starting to feel the elevation at around 8,000ft, so I would have to stop and catch my breath every 500ft of elevation or so. Another thing to watch out for: I believe the last place to get drinks at is a spot called Kula Marketplace which, if I recall correctly, is around 2,000-2,500ft elevation. So it leaves you with around 7,500ft to go on your own supply. In my case, I did run out of water around 6,500ft, but luckily I was able to bum some from one of the trucks that bring people up for descent-only rides. Curiously, the ranger station at around 6,800ft does not sell or supply water... Overall, I felt this climb was the most beautiful one I've done, so I strongly recommend you do it!Geoff
06-03-18, 03:19 PM
#9
Senior Member
Thread Starter
Join Date: Jun 2015
Location: Fremont, CA
Posts: 238
Bikes: 2015 Spec Roubaix Expert, 2016 Spec Diverge Expert X1, 2018 Allez Sprint eTap
Mentioned: 1 Post(s)
Tagged: 0 Thread(s)
Quoted: 63 Post(s)
Likes: 0
Liked 3 Times
in
3 Posts
Oh, and when climbing Haleakala, I recommend starting at Paia (Pa'i'a), by the beach, at the corner of Hana Highway (route 36) and Baldwin Avenue. Did way, you literally start from zero elevation all the way to the summit
Geoff
Geoff
06-03-18, 03:21 PM
#10
Farmer tan
06-03-18, 03:29 PM
#11
SuperGimp

How'd you get your rental car onto the gravel section of Mauna Kea? They had rangers blocking the road when we (drove) up there.
Great ride reports on both, thanks for sharing. We're headed to Tokyo in August, I don't think I can convince the family to part with me for the day though.
Great ride reports on both, thanks for sharing. We're headed to Tokyo in August, I don't think I can convince the family to part with me for the day though.
06-03-18, 03:45 PM
#12
Senior Member
Thread Starter
Join Date: Jun 2015
Location: Fremont, CA
Posts: 238
Bikes: 2015 Spec Roubaix Expert, 2016 Spec Diverge Expert X1, 2018 Allez Sprint eTap
Mentioned: 1 Post(s)
Tagged: 0 Thread(s)
Quoted: 63 Post(s)
Likes: 0
Liked 3 Times
in
3 Posts
How'd you get your rental car onto the gravel section of Mauna Kea? They had rangers blocking the road when we (drove) up there.
Great ride reports on both, thanks for sharing. We're headed to Tokyo in August, I don't think I can convince the family to part with me for the day though.
Great ride reports on both, thanks for sharing. We're headed to Tokyo in August, I don't think I can convince the family to part with me for the day though.
Geoff
06-03-18, 04:26 PM
#13
SuperGimp
Interesting... Were they stopping all traffic, or just rental cars? They were not checking when I went there myself, so maybe we just got lucky! Also, stupid move on my part, but our rental wasn't a 4-wheel drive vehicle (I thought I had requested one online but I was wrong), so it was a bit dicey driving on that gravel section.
Geoff
Geoff
06-03-18, 04:53 PM
#14
Senior Member
Very interesting read! Really enjoyed this thread, Thanks.
06-03-18, 09:24 PM
#16
Kamen Rider

Join Date: Aug 2017
Location: KL, MY
Posts: 1,071
Bikes: Fuji Transonic Elite, Marechal Soul Ultimate, Dahon Dash Altena
Mentioned: 11 Post(s)
Tagged: 0 Thread(s)
Quoted: 351 Post(s)
Liked 277 Times
in
164 Posts
Great account with pictures. Curious about the travel bag though, if you had to take the wheels off how do you protect your rear derailleur and chain? Also do you have to do anything about your stem and handlebars? That's the part that I really dislike handling when it comes to conventional travel cases -- because I have to realign the handlebars again and I almost never get it right the first time.
06-03-18, 10:35 PM
#17
Senior Member
Thread Starter
Join Date: Jun 2015
Location: Fremont, CA
Posts: 238
Bikes: 2015 Spec Roubaix Expert, 2016 Spec Diverge Expert X1, 2018 Allez Sprint eTap
Mentioned: 1 Post(s)
Tagged: 0 Thread(s)
Quoted: 63 Post(s)
Likes: 0
Liked 3 Times
in
3 Posts
Great account with pictures. Curious about the travel bag though, if you had to take the wheels off how do you protect your rear derailleur and chain? Also do you have to do anything about your stem and handlebars? That's the part that I really dislike handling when it comes to conventional travel cases -- because I have to realign the handlebars again and I almost never get it right the first time.
The derailleur is unfortunately not actively protected against banging... It relies on the fact that you will be keeping the bag upside up, and that you happen to also have that metal "foot" thingy which you attach on the rear wheel mounting points. Not very ideal, but it's usually pretty easy to find a spot on the Shinkansen where you can lay down the carrying bag the right way.
Regarding the handle bar, you will see on the video that you don't have to touch it at all, other than turning it sideways.
Hope this helps!
Geoff
06-04-18, 04:49 PM
#18
Senior Member
Did you go on a weekday? How was the traffic?
Anyway, if you go to Tokyo again there are quite a few cycling destinations that unless can get to by train. Izu peninsula, I think it's very popular with cyclist from Tokyo I think. There is a train meant specifically for cyclist to bring their bikes on with no bag required. They look pretty cool.
Plenty of great routes can probably also be found in Nagano.
06-04-18, 09:24 PM
#19
Senior Member
Thread Starter
Join Date: Jun 2015
Location: Fremont, CA
Posts: 238
Bikes: 2015 Spec Roubaix Expert, 2016 Spec Diverge Expert X1, 2018 Allez Sprint eTap
Mentioned: 1 Post(s)
Tagged: 0 Thread(s)
Quoted: 63 Post(s)
Likes: 0
Liked 3 Times
in
3 Posts
Did you go on a weekday? How was the traffic?
Anyway, if you go to Tokyo again there are quite a few cycling destinations that unless can get to by train. Izu peninsula, I think it's very popular with cyclist from Tokyo I think. There is a train meant specifically for cyclist to bring their bikes on with no bag required. They look pretty cool.
Plenty of great routes can probably also be found in Nagano.
Anyway, if you go to Tokyo again there are quite a few cycling destinations that unless can get to by train. Izu peninsula, I think it's very popular with cyclist from Tokyo I think. There is a train meant specifically for cyclist to bring their bikes on with no bag required. They look pretty cool.
Plenty of great routes can probably also be found in Nagano.
Thanks for the tips about riding around Tokyo! I will be going back again, although I�m not sure if it�ll include a weekend again.
By the way, my wife is from Japan, so we go there every summer and new year, but we go to her home town in Shiga prefecture, called Maibara City. So every summer, I make it a point of doing the so-called Biwa-ichi ride, which is 100-mile ride around lake Biwa. It�s apparently getting popular in Japan, but not sure if you�ve heard if it?
Geoff
06-04-18, 10:28 PM
#20
Senior Member
I was riding in Tokyo on week days, but did Mt Fuji on a Sunday. Traffic was pretty light once we got on route 180.
Thanks for the tips about riding around Tokyo! I will be going back again, although I�m not sure if it�ll include a weekend again.
By the way, my wife is from Japan, so we go there every summer and new year, but we go to her home town in Shiga prefecture, called Maibara City. So every summer, I make it a point of doing the so-called Biwa-ichi ride, which is 100-mile ride around lake Biwa. It�s apparently getting popular in Japan, but not sure if you�ve heard if it?
Geoff
Right now, I'm trying to arrange to do the Shimanami Kaido ride. I haven't the climbing ability to tackle Mt. Fuji, unless the climb is 4-5% the entire length, and even then...
06-05-18, 10:00 AM
#21
Kamen Rider
Join Date: Aug 2017
Location: KL, MY
Posts: 1,071
Bikes: Fuji Transonic Elite, Marechal Soul Ultimate, Dahon Dash Altena
Mentioned: 11 Post(s)
Tagged: 0 Thread(s)
Quoted: 351 Post(s)
Liked 277 Times
in
164 Posts
Good question about the derailleur and chain! The following YouTube video shows more than I could explain: https://www.youtube.com/watch?v=3mD1xyauX4U
The derailleur is unfortunately not actively protected against banging... It relies on the fact that you will be keeping the bag upside up, and that you happen to also have that metal "foot" thingy which you attach on the rear wheel mounting points. Not very ideal, but it's usually pretty easy to find a spot on the Shinkansen where you can lay down the carrying bag the right way.
Regarding the handle bar, you will see on the video that you don't have to touch it at all, other than turning it sideways.
Hope this helps!
Geoff

