


Mastering my Derailleurs
 04-06-21, 10:58 AM
#1
Senior Member
Thread Starter
Join Date: Sep 2009
Posts: 947
Mentioned: 2 Post(s)
Tagged: 0 Thread(s)
Quoted: 286 Post(s)
Liked 261 Times
in
129 Posts
Mastering my Derailleurs
I have two bikes, each with relatively new groupsets (road bike with Shimano Ultegra R8000 2x11; 'gravel' bike with Shimano GRX400 2x10).
In my 15-20 years of biking, mainly on the road, I've only ever had to adjust derailleurs periodically (usually at home, after noticing an issue while riding). I've always heard that if everything was set up properly by the mechanic, I shouldn't have to touch the limit screws or B screw (and I've hardly ever messed with them).
I get frustrated though when something all of a sudden goes wrong during a ride, and after I get home I cannot easily diagnose the issue, and I don't have a 'set' routine for making everything run smoothly. So, when something is off, I want a checklist approach that I get down pat, that I use every time...without fail (assuming the parts are not warn, the derailleur hanger is not bent, and the chain and other parts are clean and free of debris).
I'll give an example:
- ride on the gravel bike this morning...everything was 100% for 10+ rides, I hit a small pot hole and all of a sudden I get ghost shifting and generally, difficulty shifting gears until I get home and try to fix it
- I follow the park tool video on the rear derailleur, starting in big chain ring, small sprocket, and shifting up, checking for slow shifts or jumps in sprockets, and then for noise...turning the barrel adjusters along the way per the instructions
- this seemed to have work, then I go into my small chain ring, shift up the cassette and cannot get into the largest sprocket
- everything was fine to now so I did not touch the limit screws
- I turn the barrel adjusters more and it pops out (this part confused me)
- same video has how to fix this, but that was at the shifter and my only adjuster is at the derailleur and it was difficult to adjust...I ended up tightening the barrel adjuster all the way in, backing off 1.5 turns, then loosened the pinch bolt, pulled the cable (difficult on this GRX 400 RD in my opinion)...and restarted the process above. It seems to have worked, and I can shift up and down all sprockets, in both chain rings, but I don't feel confident everything is a-ok (in particular that barrel adjuster and how the cable threads through it)
Is there a single video that you reference for diagnosing and going through a series of adjustments, that if I were to watch multiple times I would improve my confidence...and could actually re-set everything on purpose, knowing I can always get it back to 100%? Are my expectations reasonable?
 04-06-21, 12:14 PM
#2

I'm good to go!
Join Date: Jul 2017
Location: Mississippi
Posts: 14,987
Bikes: Tarmac Disc Comp Di2 - 2020
Mentioned: 51 Post(s)
Tagged: 0 Thread(s)
Quoted: 6193 Post(s)
Liked 4,809 Times
in
3,317 Posts
I'm not a 100% sure what ghost shifting is by any strict definition. If not that your indexing is off in adjustment and putting the chain between two cogs and it going from one to the other. But it would do that in most any gear. And then you'd also know what the fix is for that. Adjust it.
I'm really imagining it as you select a gear. Maybe say two or three higher ratios (smaller cogs on the back) and it never makes it to the last cog right away, then later falls into that gear. In that case your ghost shifting might be a cable binding somewhere.
I'm really imagining it as you select a gear. Maybe say two or three higher ratios (smaller cogs on the back) and it never makes it to the last cog right away, then later falls into that gear. In that case your ghost shifting might be a cable binding somewhere.
04-06-21, 12:35 PM
#3
Senior Member

Join Date: Sep 2010
Location: Roswell, GA
Posts: 8,319
Bikes: '93 Trek 750, '92 Schwinn Crisscross, '93 Mongoose Alta
Mentioned: 30 Post(s)
Tagged: 0 Thread(s)
Quoted: 1438 Post(s)
Liked 1,092 Times
in
723 Posts
Check and make certain that none of your cable housings has gotten dislodged from their sockets due to the pothole. Check to be sure that your axles are secure in their dropouts. Are you really certain that your derailleur did not take a hit when you hit the pothole?
I find videos somewhat lacking when trying to understand a concept rather than just following the video by rote. I find the various Sheldon Brown and Park Tool Web pages more helpful in getting a good understanding of what the various adjustments are doing and how they interact.
I find videos somewhat lacking when trying to understand a concept rather than just following the video by rote. I find the various Sheldon Brown and Park Tool Web pages more helpful in getting a good understanding of what the various adjustments are doing and how they interact.
04-06-21, 12:39 PM
#4
Senior Member
Thread Starter
Join Date: Sep 2009
Posts: 947
Mentioned: 2 Post(s)
Tagged: 0 Thread(s)
Quoted: 286 Post(s)
Liked 261 Times
in
129 Posts
Yeah, not sure the correct term. But I'm riding along in a particular gear, hands on the tops, hit a bump, hear a noise in the RD area and then the bike shifts up/down a sprocket on its own. I then shift up or down, and it's either resistant to shift or jumps two sprockets in a single shift.
04-06-21, 01:03 PM
#5
Senior Member
Thread Starter
Join Date: Sep 2009
Posts: 947
Mentioned: 2 Post(s)
Tagged: 0 Thread(s)
Quoted: 286 Post(s)
Liked 261 Times
in
129 Posts
Check and make certain that none of your cable housings has gotten dislodged from their sockets due to the pothole. Check to be sure that your axles are secure in their dropouts. Are you really certain that your derailleur did not take a hit when you hit the pothole?
I find videos somewhat lacking when trying to understand a concept rather than just following the video by rote. I find the various Sheldon Brown and Park Tool Web pages more helpful in getting a good understanding of what the various adjustments are doing and how they interact.
I find videos somewhat lacking when trying to understand a concept rather than just following the video by rote. I find the various Sheldon Brown and Park Tool Web pages more helpful in getting a good understanding of what the various adjustments are doing and how they interact.
The hanger is definitely okay...I had bent it a while ago, was evident, fixed it and later had it replace just to be sure. It looks completely straight.
 04-06-21, 01:29 PM
#6
Senior Member
Join Date: Sep 2010
Location: Roswell, GA
Posts: 8,319
Bikes: '93 Trek 750, '92 Schwinn Crisscross, '93 Mongoose Alta
Mentioned: 30 Post(s)
Tagged: 0 Thread(s)
Quoted: 1438 Post(s)
Liked 1,092 Times
in
723 Posts
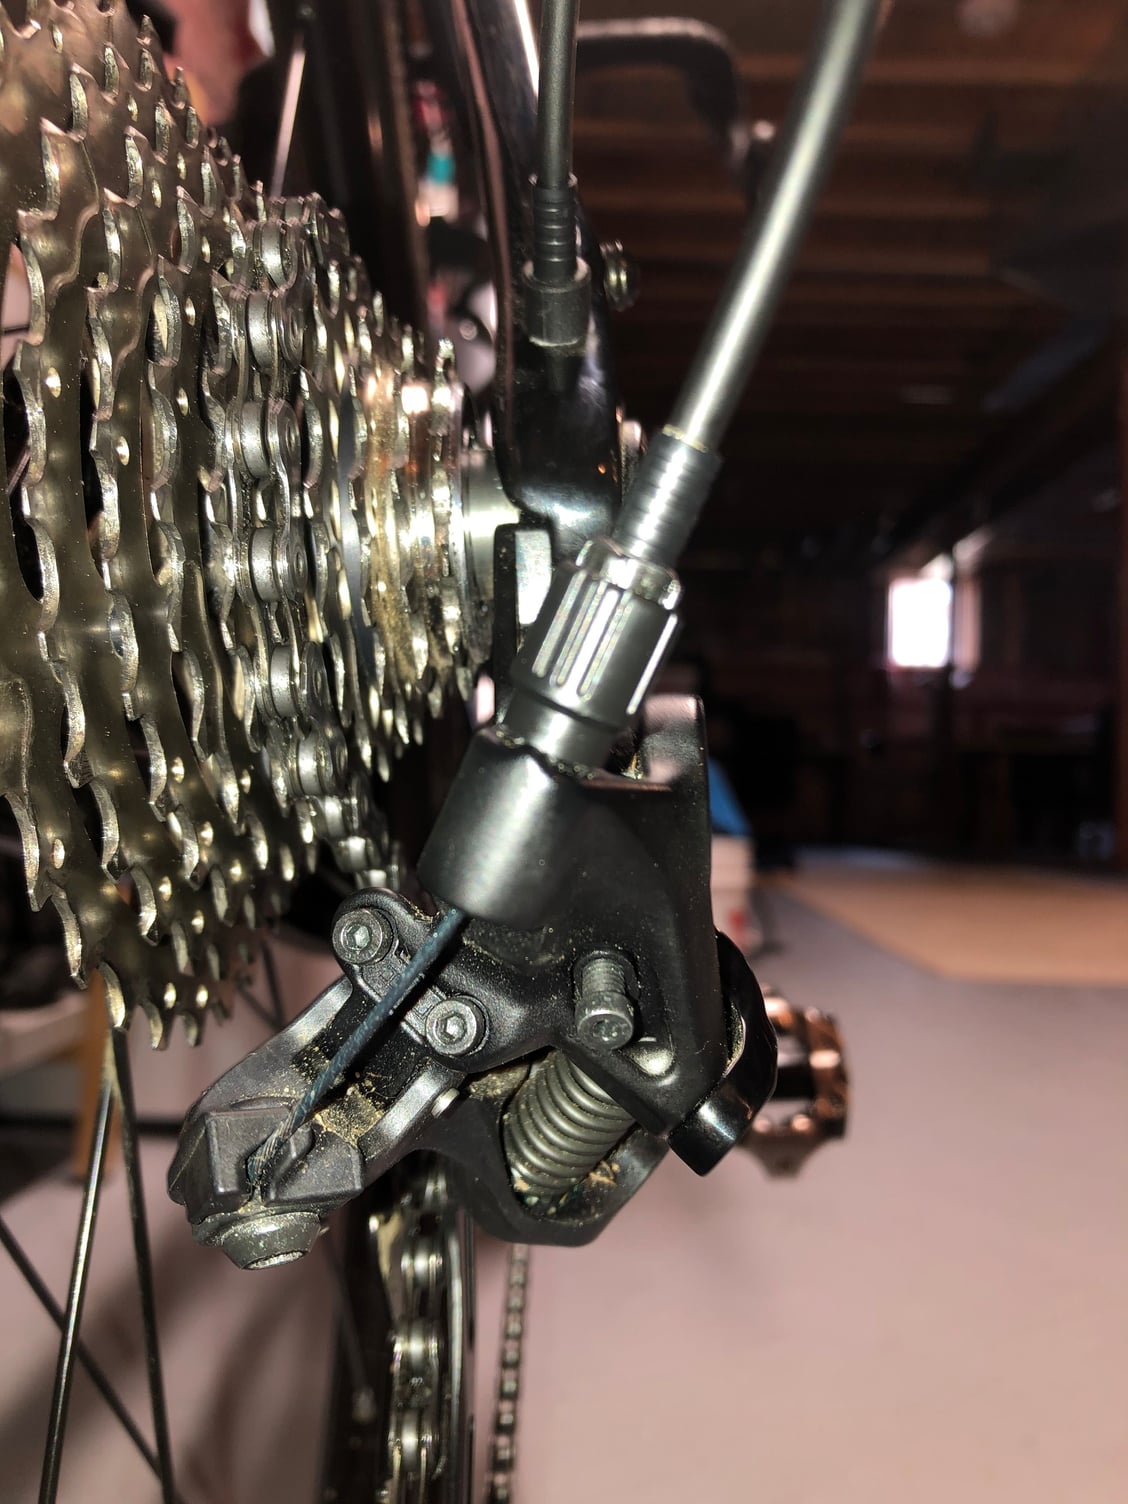
The item with the annular grooves is a ferrule which fits over the end of the housing which contains the cable. The ferrule fits into the socket of the derailleur's barrel adjuster which consists of the grey piece with longitudinal grooves, which you turn with your finger and the silver piece which moves in and out to change the effective length of the housing, often incorrectly referred to as "adjusting the tension". There may be other ferrules and sockets at the ends of various runs of housing as well as at the shifter. Any of these points may have become dislodged from the sudden shock of hitting the pothole, changing the effective length of the housing and upsetting the indexing adjustment.
Likes For dsbrantjr:
04-06-21, 01:52 PM
#7
Senior Member
Owning a RD hanger alignment tool is a must, IMO. A slightly bent hanger can't be seen. The alignment tool will confirm that it's aligned with the wheel. Even a new hanger needs to be aligned.
Cables don't stay perfectly adjusted forever. If the shifts to larger sprockets hesitates, increase the cable tension. If there's hesitation in shifts to smaller sprockets, reduce the cable tension.
Cables don't stay perfectly adjusted forever. If the shifts to larger sprockets hesitates, increase the cable tension. If there's hesitation in shifts to smaller sprockets, reduce the cable tension.
Last edited by DaveSSS; 04-12-21 at 01:59 PM.
Likes For DaveSSS:
04-06-21, 02:02 PM
#8
Really Old Senior Member

I'd pay attention to where it wants to 'ghost shift" to.
I'd the adjust that DER barrel adjuster a click or 2 (keep track so you can return to ground zero) to move the DER in the opposite direction and see what happens.
The fact this repeats makes one wonder how well the cable housing ends are finished and if properly seated.
IF it always ghost shifts to a higher gear, I'd surmise your cables/housing have too much friction for the DER spring to fully overcome until you hit a good jolt to shake it into place.
Likes For Bill Kapaun:
04-06-21, 03:02 PM
#9
SE Wis
Join Date: Apr 2005
Location: Milwaukee, WI
Posts: 10,515
Bikes: '68 Raleigh Sprite, '02 Raleigh C500, '84 Raleigh Gran Prix, '91 Trek 400, 2013 Novara Randonee, 1990 Trek 970
Mentioned: 40 Post(s)
Tagged: 0 Thread(s)
Quoted: 2747 Post(s)
Liked 3,395 Times
in
2,056 Posts
Make sure your index shift housing wires haven't broken through the ferrules as well.
https://www.bikeforums.net/bicycle-m...ly-broken.html
https://www.bikeforums.net/bicycle-m...ly-broken.html
04-06-21, 05:14 PM
#10
Blamester
It is actually quite simple. You have to separate the parts.
Select the bottom gear using the shifter or releasing the cable.
With the pinch bolt loose lightly pull on the cable with your fingers or a pliers click thru all the gears. Make sure each one is smooth.and the cable feeds in cleanly. Pull on the cable and click thru all the gears again the other way. and the cable should pull back out smoothly. If you can don't unseat the cables pull thru the cable adjuster on the derailleur. Nothing should move but the cable. Every movement at one end should be mirrored at the other end.
If that is good it's cable tension.
Is it running good in the bottom gear with no cable tension?
If not adjust with the limit screw.
Take the weight of the screw by pushing the derailleur in. Small turns.
If it is OK wind In the barrel adjuster all the way and back 1 turn.
Pull the cable tight and tighten the pinch bolt.
1 click on the shifter. Wind out the barrel adjuster till it shifts to the selected gear. Or in if you need.
1 more click on the shifter. Adjust if nessecary
Now it's a matter fine tuning.
Run up to the other limit screw. Check it. Push on the derailleur to be sure.
If you can't get enough tension on the cable wind in the adjuster again and pull harder on the cable. or push the derailleur in and then tighten the bolt.
Go slow and it's easy. Watch it move.
Last edited by blamester; 04-06-21 at 05:19 PM.
04-06-21, 06:23 PM
#11
Senior Member
Thread Starter
Join Date: Sep 2009
Posts: 947
Mentioned: 2 Post(s)
Tagged: 0 Thread(s)
Quoted: 286 Post(s)
Liked 261 Times
in
129 Posts
Thanks everyone for the ideas and comments.
After seemingly having everything dialed in with the bike in the stand, I went for a spin around the neighborhood. First thing I did though (with the bike on the stand), and I wasn't sure if necessary, was to switch on the clutch mechanism. When I first got the bike it was mid-winter and I was only using it on the road, and had it set to off. Now I'm primarily using this bike on gravel trails/roads, and while they're relatively tame, I thought I may see how it goes with the clutch.
While riding outside, shifting was good except for moving from up from the third (smallest) sprocket to the fourth...it struggled to shift up, though it did, and then there was noise. I turned the barrel adjuster 1/4 turn ccw...still noise, another turn, and then after having turned it 3/4 ccw total it was good. Road around, shifting through all the gears multiple times and it seems good now. We'll see the next time the back wheel hits something! Good thing is that in about 1000k of riding this has only happened twice.
04-06-21, 07:45 PM
#12
Senior Member
Join Date: Jul 2013
Location: Nor-Cal
Posts: 3,767
Bikes: lots
Mentioned: 7 Post(s)
Tagged: 0 Thread(s)
Quoted: 1958 Post(s)
Liked 2,932 Times
in
1,489 Posts
The clutch is meant to be 'on' whenever you are riding and 'off' only when removing the rear wheel.
