


Chinabomb Disc Brake Road Bike Build
 01-04-17, 03:27 PM
#51
Senior Member

Join Date: Oct 2015
Posts: 15,491
Bikes: 2015 Workswell 066, 2017 Workswell 093, 2014 Dawes Sheila, 1983 Cannondale 500, 1984 Raleigh Olympian, 2007 Cannondale Rize 4, 2017 Fuji Sportif 1 LE
Mentioned: 144 Post(s)
Tagged: 0 Thread(s)
Quoted: 7652 Post(s)
Liked 3,479 Times
in
1,836 Posts

 01-10-17, 11:29 AM
#52

Senior Member
Thread Starter

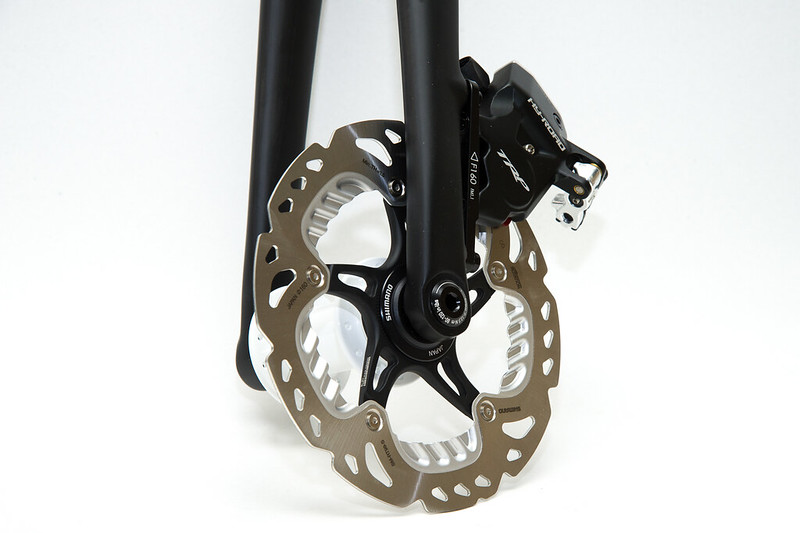
Teaser pics:
 DSC_8581 by joe jackson, on Flickr
 DSC_8582 by joe jackson, on Flickr
 DSC_8584 by joe jackson, on Flickr
 DSC_8586 by joe jackson, on Flickr
DSC_8581 by joe jackson, on FlickrDSC_8582 by joe jackson, on FlickrDSC_8584 by joe jackson, on FlickrDSC_8586 by joe jackson, on Flickr
01-10-17, 11:36 AM
#53
Senior Member
Thread Starter
The rear end pics still have the Shimano AX76 lever-style thru axle installed. My Ibis Hexle arrives in a few days so I'll have a flush-style axle at both ends, assuming it matches the specs online.
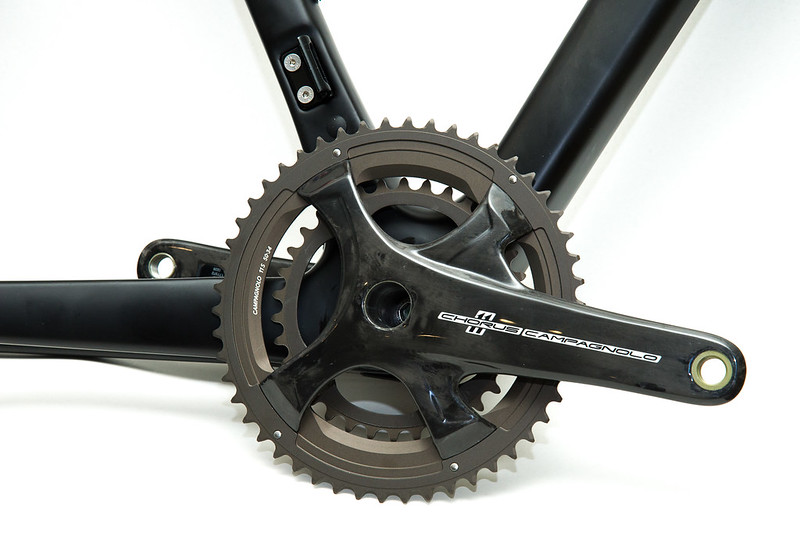
A revision to my earlier posting is in regards to the Chorus crankset. The Campy 'Ultra Torque' OS-Fit cups for BB30 do NOT require Seeger rings. That note was in a tech document for 'Over Torque' BBs and Chorus is 'Ultra Torque.' When I tried installing the crank with the Seeger rings in place, the splined joint which ties the two sides of the crank axle together would barely engage. I ended up driving out one of the cups to remove the Seeger rings.
A revision to my earlier posting is in regards to the Chorus crankset. The Campy 'Ultra Torque' OS-Fit cups for BB30 do NOT require Seeger rings. That note was in a tech document for 'Over Torque' BBs and Chorus is 'Ultra Torque.' When I tried installing the crank with the Seeger rings in place, the splined joint which ties the two sides of the crank axle together would barely engage. I ended up driving out one of the cups to remove the Seeger rings.
Last edited by joejack951; 01-10-17 at 02:42 PM.
02-02-17, 09:30 PM
#54
Senior Member
Thread Starter
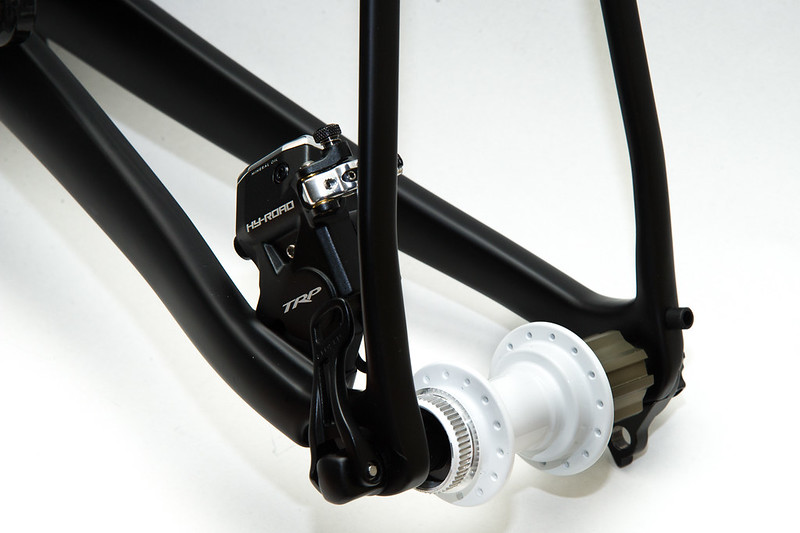
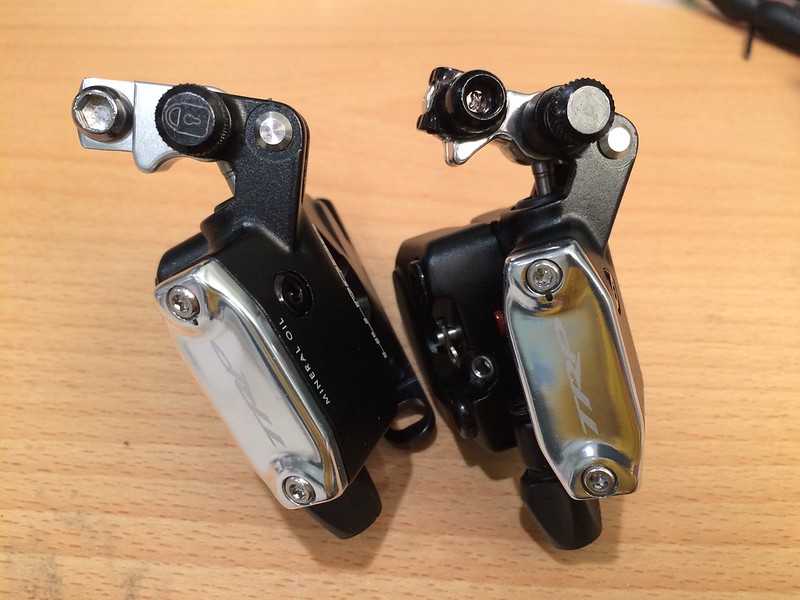
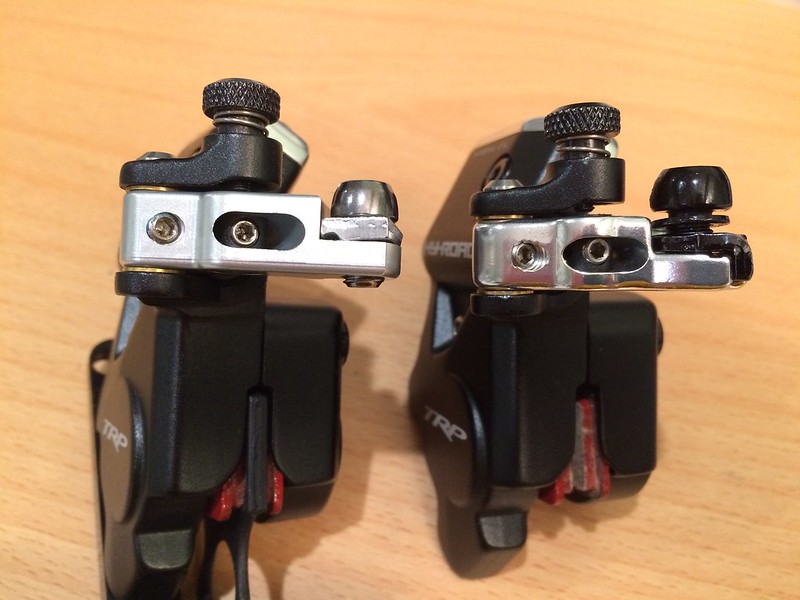
Better pics will come but here are the Campy conversion arms on the HY/RD calipers (left, TRP original right):
 TRP HY/RD with custom Campagnolo conversion arm by joe jackson, on Flickr
 TRP HY/RD with custom Campagnolo conversion arm by joe jackson, on Flickr
TRP HY/RD with custom Campagnolo conversion arm by joe jackson, on FlickrTRP HY/RD with custom Campagnolo conversion arm by joe jackson, on Flickr
02-04-17, 12:23 PM
#56
Senior Member
Thread Starter
With these new arms I like that there is a 'real' clamp that won't crush the brake cable like the rerouted cable arrangement does. I also feel better having the strain relief feature on the arm where the cable bends to reach the clamp.
I made the same offer over on Weight Weenies but if you are willing to test them out and provide some feedback I have a few extra sets of arms available for the cost of shipping.
02-05-17, 03:27 AM
#57
Junior Member
I would recommend some compressionless cable housings for best feel with these brakes. Yokozuna Reaction, Jagwire or TRP are options. I have Yokozuna Reactions installed and the feel is very close to a full hydraulic set up.
The installation instructions can be a bit confusing. To get brake pad automatic adjustment it's important not to have too much tension on the cables (tight cables but the arm retaining screw should be able to be secured by hand). The screw should be disengaged when the brakes are in use or the pads reportedly won't adjust and brake performance is lost when the pads wear.
Looking forward to your first ride report.
 02-05-17, 02:21 PM
#59
Senior Member
Thread Starter
The installation instructions can be a bit confusing. To get brake pad automatic adjustment it's important not to have too much tension on the cables (tight cables but the arm retaining screw should be able to be secured by hand). The screw should be disengaged when the brakes are in use or the pads reportedly won't adjust and brake performance is lost when the pads wear.
Looking forward to your first ride report.
Looking forward to your first ride report.
I'm looking forward to riding this bike, too. I'm nearly finished building the wheels which has been a frustrating experience thanks to attempting to use a truing stand not designed for thru axle hubs, and because of the replaceable end cap feature on the Bitex hubs that makes aligning the wheel in the stand consistently darn near impossible. I need to design something like a thru axle fork end but in truing stand form for working on this wheel in the future.
02-06-17, 12:33 AM
#60
Junior Member
The Yokozuna housings are quite stiff. I worked with my LBS on this as they had some quality cable cutters. I have additional bar top levers as well as Shimano (sorry!) older 10 speed shifters. Housing sits nicely in the bar groove. The bar top levers have meant that the rear brake housing could only be routed on the opposite side of the headset. No other issues and will probably shorten the housing by 20-30 mm now everything is proved. I can look at sharing some photos if you like.
Well done on figuring out the set up procedure! I've done it twice now (pre and post drilled arms). A few minutes per brake with practise ( you'll have come across people on the web spending hours and not getting it to work without the arm adjustment).
I'll be in touch directly regarding trying your spare modified arms.
02-06-17, 07:47 AM
#61
Senior Member

Join Date: Oct 2010
Posts: 182
Mentioned: 2 Post(s)
Tagged: 0 Thread(s)
Quoted: 42 Post(s)
Likes: 0
Liked 26 Times
in
10 Posts
The Abbey Truing Stand Adapter works great, and there are many other good solutions off the shelf or easy enough to hack together as a DIY. I use the Abbey.
02-06-17, 08:38 AM
#62
Senior Member
Thread Starter
The Yokozuna housings are quite stiff. I worked with my LBS on this as they had some quality cable cutters. I have additional bar top levers as well as Shimano (sorry!) older 10 speed shifters. Housing sits nicely in the bar groove. The bar top levers have meant that the rear brake housing could only be routed on the opposite side of the headset. No other issues and will probably shorten the housing by 20-30 mm now everything is proved. I can look at sharing some photos if you like.

Sounds good. Two sets left.
02-06-17, 09:07 AM
#63
Senior Member
Thread Starter
You take awesome photos!
The Abbey Truing Stand Adapter works great, and there are many other good solutions off the shelf or easy enough to hack together as a DIY. I use the Abbey.
The Abbey Truing Stand Adapter works great, and there are many other good solutions off the shelf or easy enough to hack together as a DIY. I use the Abbey.
I think the issue is mostly the Bitex hub. The replaceable end caps are a fairly loose fit and there is no 'pilot' on them to align them to the hub. With a thru axle in place, the axle takes care of the alignment. I started off using two Feedback axle adapters (Feedback Axle Adapters For Truing Stand > Accessories > Tools > Wheel Tools | Jenson USA). Clamping the wheel in place with those is what screwed me up the first time. The wheel was crooked and I didn't realize it. I got my tension, true, and dish perfect with the crooked reference. I wasn't happy when I installed the wheel on my fork and found it WAY out.
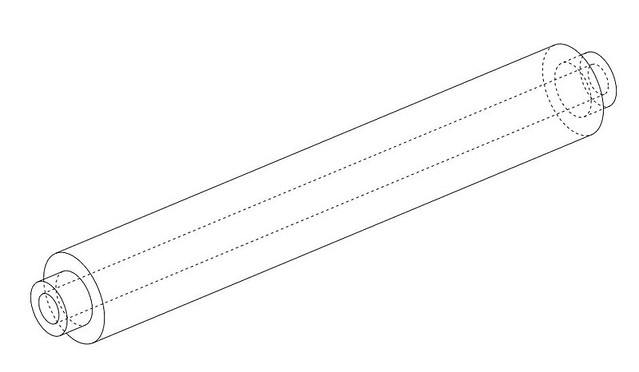
So then I tried only using the piece that fits into the axle with the QR nipple on it. Using a typical quick release axle to clamp it into my stand, I can sorta make it work but it still won't align perfectly every time. For now, I'm going to just use my fork as my stand rather than continue to fight the alignment issues. If I build more wheels using these hubs in the future I plan to make an adapter that goes all the way through the hub like a thru axle, aligning both end caps. I'll leave it just short of the end caps with some little nipples on it and a thru hole for a quick release to clamp it all in place.
Like this:
 thru axle adapter by joe jackson, on Flickr
Last edited by joejack951; 02-06-17 at 09:13 AM.
02-06-17, 10:00 AM
#64
Senior Member
Join Date: Oct 2010
Posts: 182
Mentioned: 2 Post(s)
Tagged: 0 Thread(s)
Quoted: 42 Post(s)
Likes: 0
Liked 26 Times
in
10 Posts
The tool in your sketch would likely work fine. I built several TA wheels in our Park 2.2 stands just using 12mm and 15mm (as appropriate) stock for dummy axles in the stand. It was inconvenient and finicky, but the results were great. And it was like a $7 project at McMaster.
02-06-17, 10:07 AM
#65
Senior Member
Thread Starter
The tool in your sketch would likely work fine. I built several TA wheels in our Park 2.2 stands just using 12mm and 15mm (as appropriate) stock for dummy axles in the stand. It was inconvenient and finicky, but the results were great. And it was like a $7 project at McMaster.
02-07-17, 03:14 AM
#66
Junior Member
Some photos would be nice if you have the time. Sounds like the Yokozuna housing flexible enough though. I am using Ritchey WCS Streem bars with partial internal routing but that appears to actually work in my favor as the bends required of the housing appear more gentle that on most standard bars I've seen. Time will tell. I'm ordering the kit today.
Given the great lengths to which TRP went to add that holding screw for the arm I figured it had to have some significance. I am tempted to remove it to save some weight, though
Sounds good. Two sets left.
Given the great lengths to which TRP went to add that holding screw for the arm I figured it had to have some significance. I am tempted to remove it to save some weight, though
Sounds good. Two sets left.
A few photos of the cable routing. Apologies for photo quality - dark garage! My winter bike is a cyclocross frame, the cable routing over the top tube does tend to make things a bit congested. I may shorten the cable housings at some point.
02-10-17, 10:07 AM
#67
Senior Member
Thread Starter
I got the Yokozuna housing. It routed through the frame easily enough for the rear brake, though I had to start it at the chain stay to get it past the bottom bracket. Routing it through the handlebars seems doable but it is tight. Really tight. It takes a lot of finesse to get the housing to slide through the channels thanks to the rough inner surface of the bars and the ribbed outer surface of the housing. I'm going to try a little lube on the housing to see if that helps things assemble a little easier. Fingers crossed.
02-13-17, 01:22 PM
#68
Senior Member
Thread Starter
Wheels are basically done. Rear needs final tensioning and truing which I am wondering if anyone has opinions about (I'm sure someone does!). I brought the front disc side spokes up to 110 kgf per my Park TM-1 chart which yielded a disc side of ~90 kgf. I have the rear drive side currently at 100 kgf which yields a NDS of ~64 kgf. At best I guess I'll see 70 kgf NDS with a DS of 110 kgf. That isn't terribly confidence inspiring (nor is it godawful, though) but I'm a little hesitant to up the drive side to 120 kgf. What would the other amateur (or pro) wheel builders do here?
02-14-17, 09:36 AM
#69
Senior Member
Thread Starter
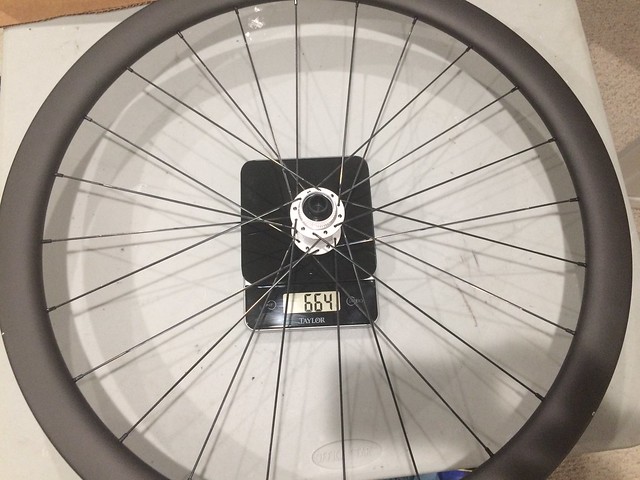
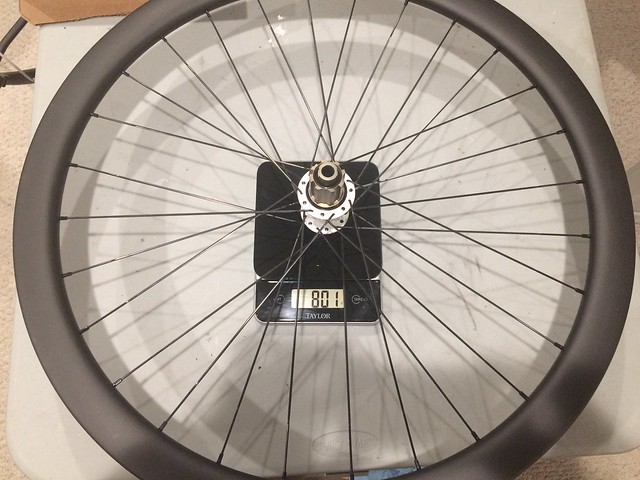
I settled on aiming for 110 kgf on the DS for the rear. Final measurements were 110-116 kgf DS and 64-70 kgf NDS. And for the weight weenie in all of us:
 Untitled by joe jackson, on Flickr
 Untitled by joe jackson, on Flickr
Rims (tubular): 40mm Aero Rim-UAM CARBON WHEELS,carbon wheels,carbon frame,carbon bicycle parts_
Hubs (custom white!, 15mm thru axle front, 12mm thru axle rear): Bitex : MTB hub,BMX hub,SHOW hub,FOLDING hub,CHILD hub, Wheelchair hub, Bitex : MTB hub,BMX hub,SHOW hub,FOLDING hub,CHILD hub, Wheelchair hub
Spokes: 24/28 F/R Sapim CX-Ray with aluminum nipples
Untitled by joe jackson, on FlickrUntitled by joe jackson, on FlickrRims (tubular): 40mm Aero Rim-UAM CARBON WHEELS,carbon wheels,carbon frame,carbon bicycle parts_
Hubs (custom white!, 15mm thru axle front, 12mm thru axle rear): Bitex : MTB hub,BMX hub,SHOW hub,FOLDING hub,CHILD hub, Wheelchair hub, Bitex : MTB hub,BMX hub,SHOW hub,FOLDING hub,CHILD hub, Wheelchair hub
Spokes: 24/28 F/R Sapim CX-Ray with aluminum nipples
02-14-17, 10:54 AM
#70
Senior Member
Join Date: Jul 2014
Location: Western, MA
Posts: 323
Bikes: 2016 Felt Z85 105, 2016 GT Grade Sora
Mentioned: 6 Post(s)
Tagged: 0 Thread(s)
Quoted: 117 Post(s)
Liked 0 Times
in
0 Posts
Hey JoeJack, this bike looks gorgeous. definitely giving this a follow.
02-14-17, 12:06 PM
#71
Senior Member
Join Date: Jan 2010
Location: TC, MN
Posts: 39,520
Bikes: R3 Disc, Haanjo
Mentioned: 354 Post(s)
Tagged: 1 Thread(s)
Quoted: 20810 Post(s)
Liked 9,456 Times
in
4,672 Posts
Nice weight on the wheels. How much do the rims go for?
02-14-17, 12:25 PM
#72
Senior Member
Thread Starter
I paid ~$258 for the pair. I say 'roughly' because it was lumped into a $950 purchase which included the frameset (frame, fork, seatpost), headset, shipping and Paypal fees. $258 was the original quoted price.
Per my spreadsheet, the wheels came in a little porkier than expected (105 grams to be exact). The rims accounted for 50 grams of that (380 claimed, 405 actual) and I guess the hubs made up for the rest. I didn't weigh the hubs separately, though, so I only have Bitex's claimed weights. I imagine the white powder coat added a few grams and maybe the chunkier splines of the Campy freehub added the rest. Still, not bad for a $517 wheelset. And it gives me an excuse to later build a pair of really lightweight wheels for this bike
02-14-17, 12:32 PM
#74
Senior Member
Thread Starter
I should add that the rims were actually purchased through Hongfu, just like the frameset. They were supplied with UAM-branded rim strips (standard practice I guess, not needed for my tubular tires) and valve extenders (the cheap kind, replaced with Continental 'real' extenders), though. FWIW.
02-14-17, 12:48 PM
#75
Senior Member
Join Date: Jan 2010
Location: TC, MN
Posts: 39,520
Bikes: R3 Disc, Haanjo
Mentioned: 354 Post(s)
Tagged: 1 Thread(s)
Quoted: 20810 Post(s)
Liked 9,456 Times
in
4,672 Posts
I paid ~$258 for the pair. I say 'roughly' because it was lumped into a $950 purchase which included the frameset (frame, fork, seatpost), headset, shipping and Paypal fees. $258 was the original quoted price.
Per my spreadsheet, the wheels came in a little porkier than expected (105 grams to be exact). The rims accounted for 50 grams of that (380 claimed, 405 actual) and I guess the hubs made up for the rest. I didn't weigh the hubs separately, though, so I only have Bitex's claimed weights. I imagine the white powder coat added a few grams and maybe the chunkier splines of the Campy freehub added the rest. Still, not bad for a $517 wheelset. And it gives me an excuse to later build a pair of really lightweight wheels for this bike
Per my spreadsheet, the wheels came in a little porkier than expected (105 grams to be exact). The rims accounted for 50 grams of that (380 claimed, 405 actual) and I guess the hubs made up for the rest. I didn't weigh the hubs separately, though, so I only have Bitex's claimed weights. I imagine the white powder coat added a few grams and maybe the chunkier splines of the Campy freehub added the rest. Still, not bad for a $517 wheelset. And it gives me an excuse to later build a pair of really lightweight wheels for this bike
I should add that the rims were actually purchased through Hongfu, just like the frameset. They were supplied with UAM-branded rim strips (standard practice I guess, not needed for my tubular tires) and valve extenders (the cheap kind, replaced with Continental 'real' extenders), though. FWIW.