


Looking for advice on adapting frame
 07-22-20, 09:46 AM
#1
Newbie
Thread Starter
Join Date: Jul 2020
Posts: 4
Mentioned: 1 Post(s)
Tagged: 0 Thread(s)
Quoted: 1 Post(s)
Likes: 0
Liked 0 Times
in
0 Posts
Looking for advice on adapting frame
First post here but I think you all will like the project I am starting.
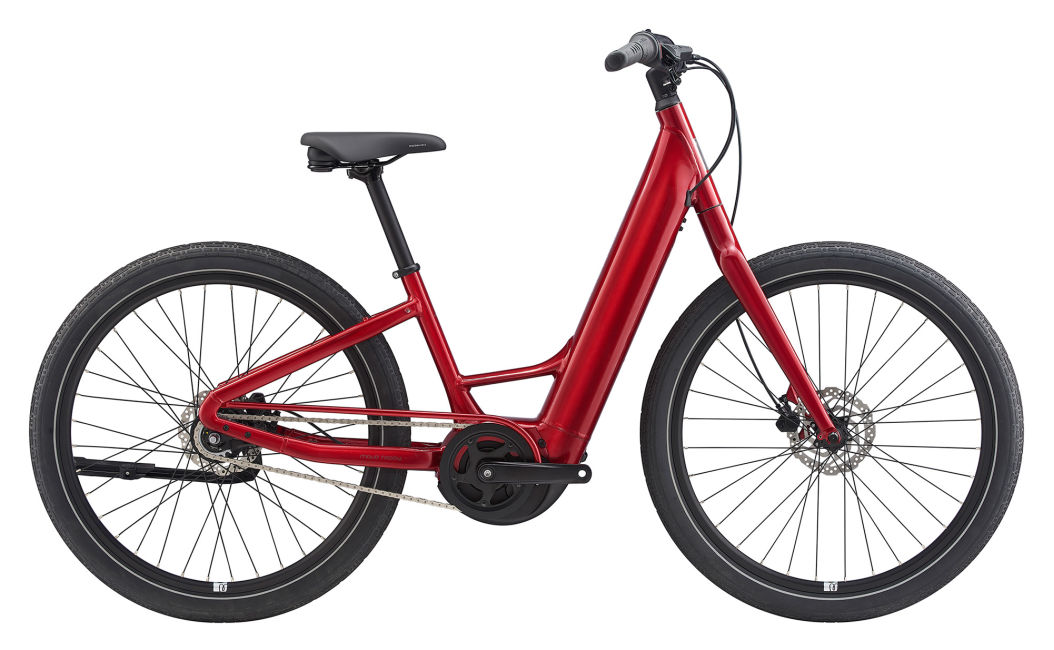
I have a Vroom electric bike that I want to adapt for my SO to use. Because of a recently developed permanent nerve issue the motion of leaning forward and sweeping a leg over the seat isn't an option so I want to make this a step through frame. Basically I want to remove the cross bar and move it as low as possible then add reinforcing tubes where needed. I added pictures of the frame and what I plan to change to my gallery but can't post links to the picture until I have made 10 posts myself. I would rather not just post smileys on a bunch of posts to get the count so I will post this and hope for the best.
My initial thoughts on how I would modify the frame would be to remove the red tubes and add in the yellow. I think I would use 1.5" C channel that would be welded directly to the remaining tubes.
Would the planned additions give the strength needed? What changes would you make?
Should also add that appearance isn't at all a priority getting something functional for as low cost as possible in most important.
Thanks for the help!
 07-22-20, 11:16 AM
#2


Randomhead
Join Date: Aug 2008
Location: Happy Valley, Pennsylvania
Posts: 24,394
Mentioned: 0 Post(s)
Tagged: 0 Thread(s)
Quoted: 4 Post(s)
Liked 3,694 Times
in
2,516 Posts
Is the frame steel? I can't find any info on this bike on the interewebs.
07-22-20, 11:42 AM
#3
Newbie
Thread Starter
Join Date: Jul 2020
Posts: 4
Mentioned: 1 Post(s)
Tagged: 0 Thread(s)
Quoted: 1 Post(s)
Likes: 0
Liked 0 Times
in
0 Posts
Yes steel.
The down tube (tube from headset to bottom bracket) is 1.75" OD while the seat post tube is 1.25" OD.
Its an older and now defunct electric bike company. Batteries are impossible to find but I am going to power it with Makita 18v rechargeable batteries.
The down tube (tube from headset to bottom bracket) is 1.75" OD while the seat post tube is 1.25" OD.
Its an older and now defunct electric bike company. Batteries are impossible to find but I am going to power it with Makita 18v rechargeable batteries.
07-22-20, 01:15 PM
#4
Banned
You are referring to a diagram on a picture no one can see... because you just got here & 2 posts are 8 post too short of the minimum
to offer any pictures..
to offer any pictures..
07-22-20, 01:33 PM
#5
Randomhead
Join Date: Aug 2008
Location: Happy Valley, Pennsylvania
Posts: 24,394
Mentioned: 0 Post(s)
Tagged: 0 Thread(s)
Quoted: 4 Post(s)
Liked 3,694 Times
in
2,516 Posts
Pretty sure he knows that, Bob.
My recommendation is to get some tubing. Possibly the easiest way is to get some 1/2" tubes for laterals, like the old fashioned mixtes. Go from the head tube to the rear dropouts. Some of those bikes had a bend in the laterals to make the step lower.
Otherwise, get a 1 1/8" tube long enough to go from the head tube to the seat tube. Then 1/2" tube to go from the seat tube to the dropouts. Probably need to sleeve the seat tube to properly attach tubes to it without failing.
07-22-20, 01:59 PM
#6
Senior Member

Join Date: Nov 2014
Location: Eugene, Oregon, USA
Posts: 27,547
Mentioned: 217 Post(s)
Tagged: 0 Thread(s)
Quoted: 18372 Post(s)
Liked 4,507 Times
in
3,350 Posts


Likes For CliffordK:
07-22-20, 02:28 PM
#7
Senior Member
Join Date: Nov 2014
Location: Eugene, Oregon, USA
Posts: 27,547
Mentioned: 217 Post(s)
Tagged: 0 Thread(s)
Quoted: 18372 Post(s)
Liked 4,507 Times
in
3,350 Posts
Whew, all those curves will make mirroring the original tube shape to add a second tube complex.
If you do this, don't just use pipe... find a source for some quality chromoly 4130 steel.
A lot of modern step-through bikes use some sort of monotube. That would mean rebuilding the entire front half of your bike.

Of course, a few vintage bikes have used the parallel tube design, sometimes with "ladder rungs" between the two tubes.

I have seen step-through frames (two parallel tubes) with bent seat tubes. You are significantly changing the stress on the seat tube.
Ideally the design would be to transfer most of the strength of the bike down the downtube, through the bottom bracket, and down along the chainstays. And, the seatstays would simply support the seat tube.
The battery mount in your E-Bike looks like it would create a weak spot and put a lot of stress on the chain stays.
If you do this, don't just use pipe... find a source for some quality chromoly 4130 steel.
A lot of modern step-through bikes use some sort of monotube. That would mean rebuilding the entire front half of your bike.
Of course, a few vintage bikes have used the parallel tube design, sometimes with "ladder rungs" between the two tubes.
I have seen step-through frames (two parallel tubes) with bent seat tubes. You are significantly changing the stress on the seat tube.
Ideally the design would be to transfer most of the strength of the bike down the downtube, through the bottom bracket, and down along the chainstays. And, the seatstays would simply support the seat tube.
The battery mount in your E-Bike looks like it would create a weak spot and put a lot of stress on the chain stays.
07-22-20, 03:28 PM
#8
Newbie
Thread Starter
Join Date: Jul 2020
Posts: 4
Mentioned: 1 Post(s)
Tagged: 0 Thread(s)
Quoted: 1 Post(s)
Likes: 0
Liked 0 Times
in
0 Posts
I know. Like I said I don't want to just spam random topics with
 or
or  just to hit the minimum. I get the need for having minimums just makes it difficult for someone like me. Up to 3 now!
07-22-20, 03:38 PM
just to hit the minimum. I get the need for having minimums just makes it difficult for someone like me. Up to 3 now!
07-22-20, 03:38 PM
#9
Banned
So What kind of shop tools can you access? , a tubing bender that will hold up forcing 4130 to bend is a substantial cost...
a frame builder I knew in Eugene has one Its anchored to the concrete floor an d the leverage on the bending arm is about 6 feet long..
so where will you source the materials? one of those high end custom chopper motorbike shops?

a frame builder I knew in Eugene has one Its anchored to the concrete floor an d the leverage on the bending arm is about 6 feet long..
so where will you source the materials? one of those high end custom chopper motorbike shops?
Last edited by fietsbob; 07-22-20 at 03:41 PM.
07-22-20, 05:24 PM
#10
Newbie
Thread Starter
Join Date: Jul 2020
Posts: 4
Mentioned: 1 Post(s)
Tagged: 0 Thread(s)
Quoted: 1 Post(s)
Likes: 0
Liked 0 Times
in
0 Posts
I have access to slightly more then basic tools. My background is mainly woodworking but I have access to a MIG and a metal band saw along with grinder etc.
I don�t plan to bend anything. It�s gonna be ugly as sin but I think I will add some extra pieces to make the whole thing look more Mad Max style.
Planning on sourcing from a local metal supplier and doing all the fab work myself.
I paid like $75 for the whole thing so if it fails it�s no big deal.
I don�t plan to bend anything. It�s gonna be ugly as sin but I think I will add some extra pieces to make the whole thing look more Mad Max style.
Planning on sourcing from a local metal supplier and doing all the fab work myself.
I paid like $75 for the whole thing so if it fails it�s no big deal.
07-22-20, 05:44 PM
#11
Senior Member
Join Date: Nov 2014
Location: Eugene, Oregon, USA
Posts: 27,547
Mentioned: 217 Post(s)
Tagged: 0 Thread(s)
Quoted: 18372 Post(s)
Liked 4,507 Times
in
3,350 Posts
I wouldn't use plain steel. Most of the vintage frames used some kind of a "High-Tensile" steel. But most of the new stuff is chromoly (4130). There are online sources for chromoly including Shapiro's in St. Louis.
My cargo bike uses some of your "Mad Max" styling. I got a lot better welds using TIG than MIG. Although, a lot of car sheet metal is done with short bursts of MIG.

My cargo bike uses some of your "Mad Max" styling. I got a lot better welds using TIG than MIG. Although, a lot of car sheet metal is done with short bursts of MIG.
07-22-20, 06:27 PM
#12
Randomhead
Join Date: Aug 2008
Location: Happy Valley, Pennsylvania
Posts: 24,394
Mentioned: 0 Post(s)
Tagged: 0 Thread(s)
Quoted: 4 Post(s)
Liked 3,694 Times
in
2,516 Posts
07-22-20, 06:50 PM
#13
Senior Member
Join Date: Nov 2014
Location: Eugene, Oregon, USA
Posts: 27,547
Mentioned: 217 Post(s)
Tagged: 0 Thread(s)
Quoted: 18372 Post(s)
Liked 4,507 Times
in
3,350 Posts
I haven't really found it...
What works for me is to click on the user's profile:
https://www.bikeforums.net/members/u...en-136384.html
As part of the URL, it gives the user's ID# 136384
Then I open up my own gallery (which by now the name is cached in Firefox).
https://www.bikeforums.net/g/user/392454
Now replace my user number with the target user number:
https://www.bikeforums.net/g/user/136384
And I get the album:
I don't know if there is a link or a search function, but this method is fast enough for me.
I do like to post the link back in case more photos are added. I like to upload most of the relevant photos, but sometimes there are more photos than I want to upload.
Also, of course, Bike Forums changed the method of uploading photos a few years ago. One can still access the old photos through one's own control panel (attachments), but I don't think one can see other people's old format attachments. Just pick out the attachment and use the [img]...[/img] to link it into the message.
07-22-20, 06:57 PM
#14
Randomhead
Join Date: Aug 2008
Location: Happy Valley, Pennsylvania
Posts: 24,394
Mentioned: 0 Post(s)
Tagged: 0 Thread(s)
Quoted: 4 Post(s)
Liked 3,694 Times
in
2,516 Posts
Thanks, I thought that might be what you were doing once I saw the url
I quoted your post in the user assistance forum
I quoted your post in the user assistance forum
 07-22-20, 07:01 PM
#16
Randomhead
Join Date: Aug 2008
Location: Happy Valley, Pennsylvania
Posts: 24,394
Mentioned: 0 Post(s)
Tagged: 0 Thread(s)
Quoted: 4 Post(s)
Liked 3,694 Times
in
2,516 Posts
Another idea is to take a tube diagonally from the top of the head tube to the down tube and then from the down tube to the seat tube. There is no point to the way you have it drawn, needs to be triangulated.
