


Hub - cup removal
 04-05-23, 03:47 AM
#1
Senior Member
Thread Starter

Join Date: Mar 2015
Location: New Zealand
Posts: 1,053
Bikes: Gunnar, Shogun, Concorde, F Moser, Pete Tansley, Rocky Mtn, Diamant, Krapf, Marin, Avanti, Winora, Emmelle, Ken Evans
Mentioned: 5 Post(s)
Tagged: 0 Thread(s)
Quoted: 275 Post(s)
Liked 417 Times
in
218 Posts
Hub - cup removal
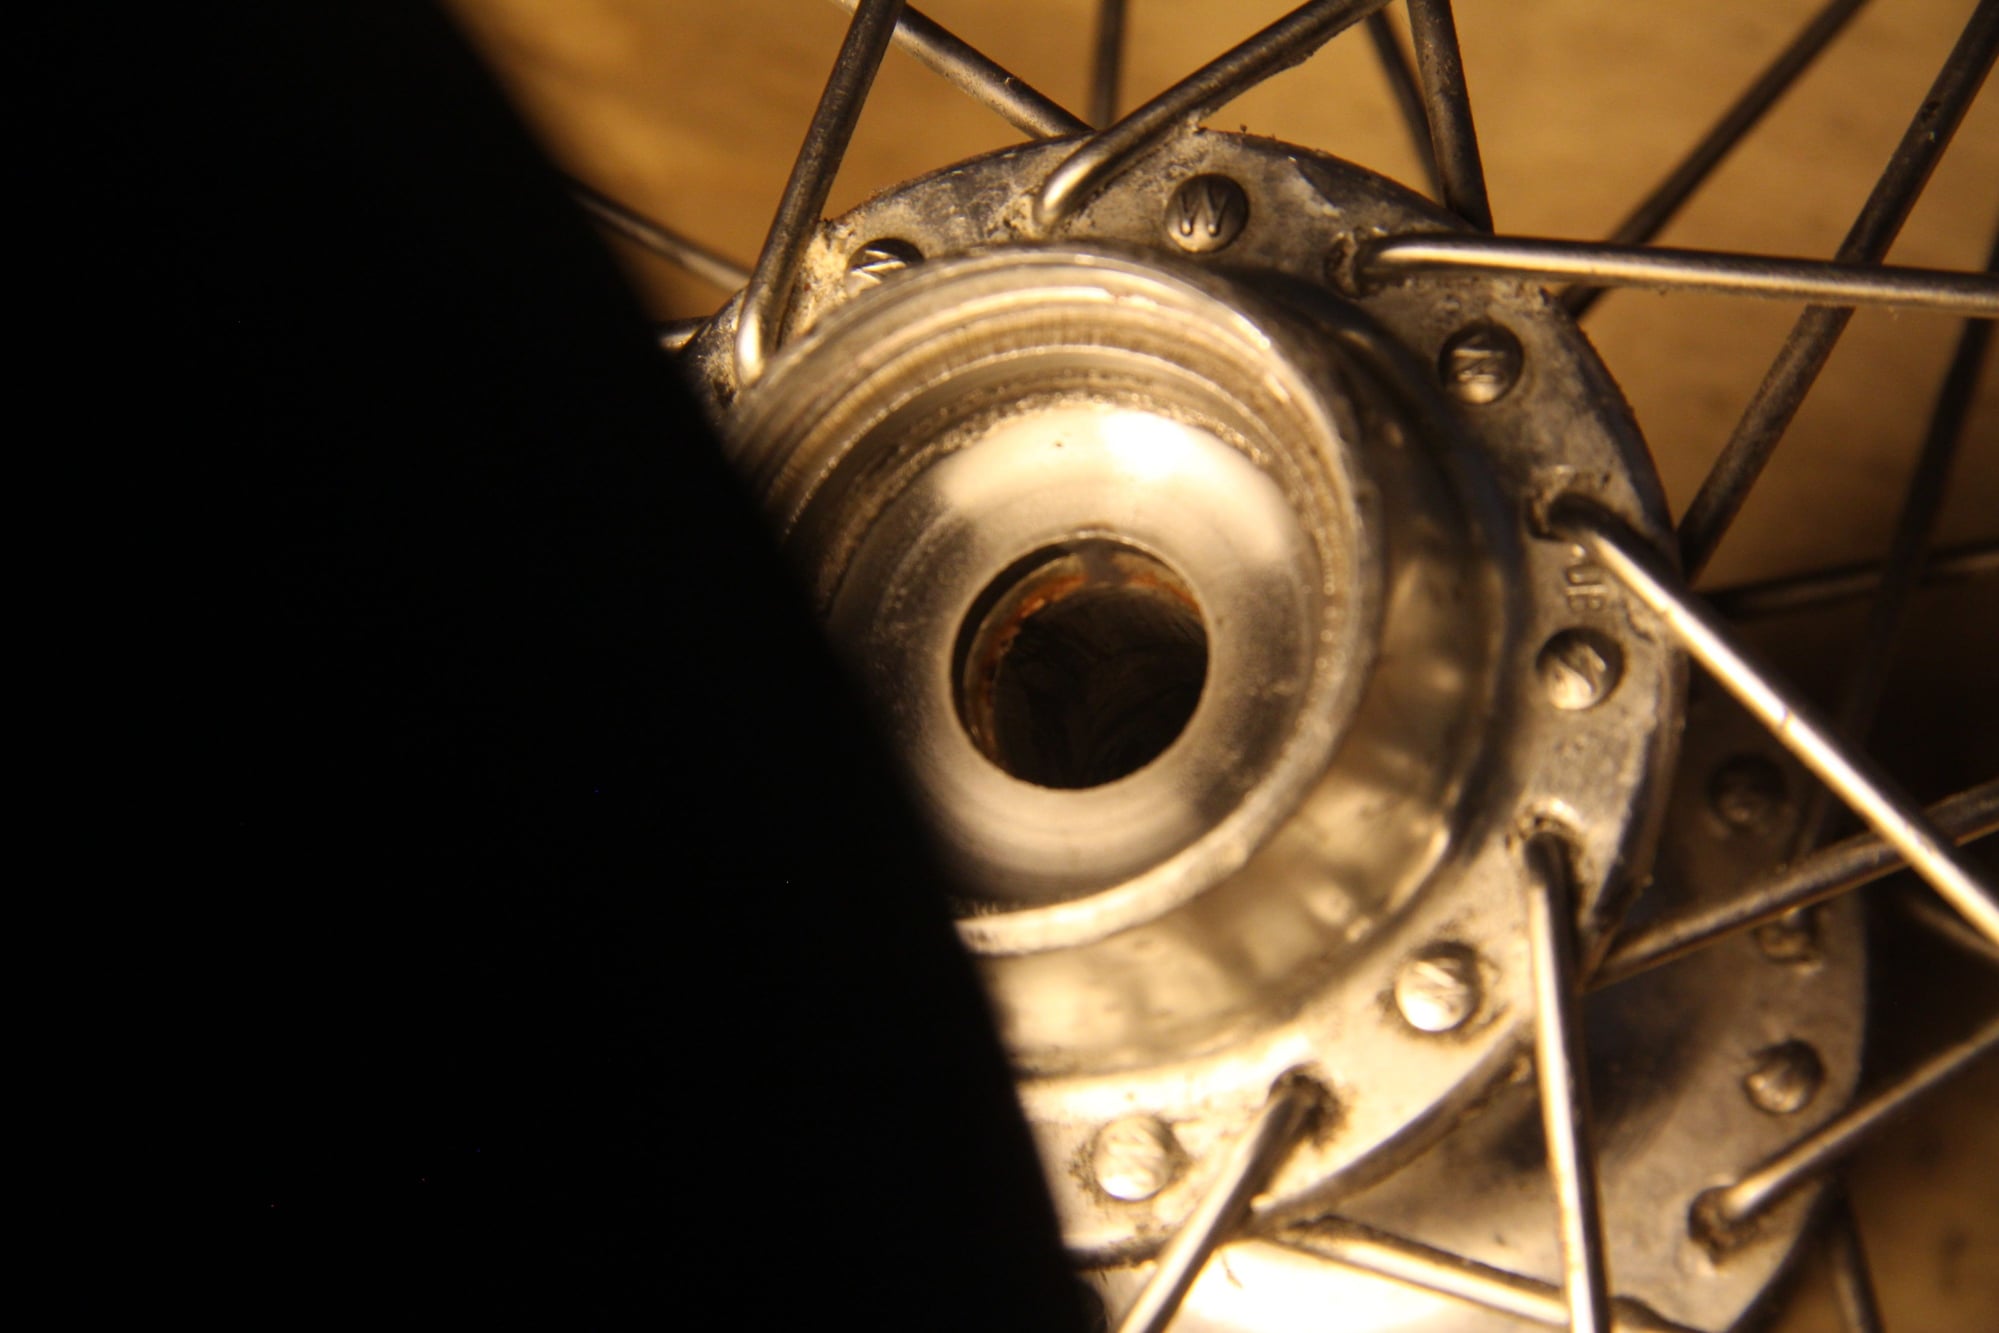
How can I remove a pitted cup that is flush with the hub shell?
 04-05-23, 06:47 AM
#2
Senior Member
Join Date: Apr 2011
Posts: 7,169
Mentioned: 42 Post(s)
Tagged: 0 Thread(s)
Quoted: 4471 Post(s)
Liked 1,608 Times
in
1,057 Posts
You probably cannot. On some it can be done with a punch from the opposite side of the hub.
Do you have a replacement available? If not, what is the point?
Do you have a replacement available? If not, what is the point?
Last edited by Kontact; 04-05-23 at 06:51 AM.
04-05-23, 09:16 AM
#3

Senior Member
Join Date: Apr 2009
Location: New Rochelle, NY
Posts: 38,814
Bikes: too many bikes from 1967 10s (5x2)Frejus to a Sumitomo Ti/Chorus aluminum 10s (10x2), plus one non-susp mtn bike I use as my commuter
Mentioned: 140 Post(s)
Tagged: 1 Thread(s)
Quoted: 5837 Post(s)
Liked 2,673 Times
in
1,488 Posts
There's almost always a pocket behind the race. If so, removal only takes a bit of creative thinking.
Find a disc, ie. a dime with an OD larger than the race ID, yet small enough to fit into the pocket.
File 2 sides to make a racetrack oval, so it'll fit through the hole. Slide it in and let it flop behind the race spanning the hole.
Now punch it out from the opposite side.
OR
IF there's in fact a bit of room, but not a big pocket, to get behind the race, buy a toggle bolt wall anchor. Slide it in and let it expand behind the race, then drive it out.
Last edited by FBinNY; 04-05-23 at 09:24 AM.
Likes For FBinNY:
04-05-23, 01:29 PM
#5
Senior Member

Join Date: Jul 2015
Location: NW Oregon
Posts: 2,978
Bikes: !982 Trek 930R Custom, Diamondback ascent with SERIOUS updates, Fuji Team Pro CF and a '09 Comencal Meta 5.5
Mentioned: 15 Post(s)
Tagged: 1 Thread(s)
Quoted: 1299 Post(s)
Liked 741 Times
in
536 Posts
aluminum has a far quicker expansion ratio than steel... HEAT the hub with a Heat gun( a blow dryer on high might suffice) then drive the cup out with a punch and large heavy hammer... i use a 2 lb. Body/Drilling hammer. Make certain the Hub is on a softer surface, but solidly backed(Wood works well!).. otherwise your hammering force gets changed into entire wheel/hub motion.
the real trick is getting the fresh Cup located squarely to the hub's Axis...Drive only on the upper lip of the cup or you may damage the fresh cup! Using a brass drift is also advised, but will not completely prevent damage to any seating surface contacted..... Careful depth measurement will help once the cup is mostly in place... manufacturers would use a properly shaped installation tool that sets depth from the lip of the hub....
Note: the TONE of your impacts will change once the cup reaches the "fully Seated"point.
the Aluminum hub WILL BE DAMAGED by any contact while installing the fresh cup... Be Aware, Be Careful,and Take your time.
If you get frustrated, set your tools down and walk away for a few minutes.....
Last edited by maddog34; 04-05-23 at 01:41 PM.
Likes For maddog34:
04-05-23, 03:24 PM
#6
Senior Member
Thread Starter
Join Date: Mar 2015
Location: New Zealand
Posts: 1,053
Bikes: Gunnar, Shogun, Concorde, F Moser, Pete Tansley, Rocky Mtn, Diamant, Krapf, Marin, Avanti, Winora, Emmelle, Ken Evans
Mentioned: 5 Post(s)
Tagged: 0 Thread(s)
Quoted: 275 Post(s)
Liked 417 Times
in
218 Posts
yeah i've done it with a punch a few times. Pretty sure I do have a replacement. I have a lot of wheels to scavange parts from. This one is a nice tricolour hub with a good rim, good spokes, so i want to save it.
04-05-23, 03:25 PM
#7
Senior Member
Thread Starter
Join Date: Mar 2015
Location: New Zealand
Posts: 1,053
Bikes: Gunnar, Shogun, Concorde, F Moser, Pete Tansley, Rocky Mtn, Diamant, Krapf, Marin, Avanti, Winora, Emmelle, Ken Evans
Mentioned: 5 Post(s)
Tagged: 0 Thread(s)
Quoted: 275 Post(s)
Liked 417 Times
in
218 Posts
There's almost always a pocket behind the race. If so, removal only takes a bit of creative thinking.
Find a disc, ie. a dime with an OD larger than the race ID, yet small enough to fit into the pocket.
File 2 sides to make a racetrack oval, so it'll fit through the hole. Slide it in and let it flop behind the race spanning the hole.
Now punch it out from the opposite side.
OR
IF there's in fact a bit of room, but not a big pocket, to get behind the race, buy a toggle bolt wall anchor. Slide it in and let it expand behind the race, then drive it out.
Find a disc, ie. a dime with an OD larger than the race ID, yet small enough to fit into the pocket.
File 2 sides to make a racetrack oval, so it'll fit through the hole. Slide it in and let it flop behind the race spanning the hole.
Now punch it out from the opposite side.
OR
IF there's in fact a bit of room, but not a big pocket, to get behind the race, buy a toggle bolt wall anchor. Slide it in and let it expand behind the race, then drive it out.
04-05-23, 04:45 PM
#8
Senior Member
Join Date: Jan 2009
Location: San Diego, CA
Posts: 3,698
Mentioned: 10 Post(s)
Tagged: 0 Thread(s)
Quoted: 850 Post(s)
Liked 1,080 Times
in
753 Posts
Another trick is to get a circlip slightly larger than the I.D. of the race's axle hole and compress and install in the gap. You can then use a drift or small socket to drive it out with the overlap of the circlip. If you are lucky enough to find a new race, before installing put it in the freezer for an hour and pour boiling water over the hub where the race fits. Expansion/Contraction thing helps the race slide in easier.
Likes For Crankycrank:
04-06-23, 03:09 PM
#9
Senior Member
Join Date: Jul 2015
Location: NW Oregon
Posts: 2,978
Bikes: !982 Trek 930R Custom, Diamondback ascent with SERIOUS updates, Fuji Team Pro CF and a '09 Comencal Meta 5.5
Mentioned: 15 Post(s)
Tagged: 1 Thread(s)
Quoted: 1299 Post(s)
Liked 741 Times
in
536 Posts
Another trick is to get a circlip slightly larger than the I.D. of the race's axle hole and compress and install in the gap. You can then use a drift or small socket to drive it out with the overlap of the circlip. If you are lucky enough to find a new race, before installing put it in the freezer for an hour and pour boiling water over the hub where the race fits. Expansion/Contraction thing helps the race slide in easier.

Last edited by maddog34; 04-06-23 at 03:12 PM.
Likes For maddog34:
04-07-23, 10:19 AM
#10
Senior Member
Join Date: May 2008
Location: Fredericksburg, Va
Posts: 9,579
Bikes: '65 Frejus TDF, '73 Bottecchia Giro d'Italia, '83 Colnago Superissimo, '84 Trek 610, '84 Trek 760, '88 Pinarello Veneto, '88 De Rosa Pro, '89 Pinarello Montello, '94 Burley Duet, 97 Specialized RockHopper, 2010 Langster, Tern Link D8
Mentioned: 73 Post(s)
Tagged: 0 Thread(s)
Quoted: 1609 Post(s)
Liked 2,216 Times
in
1,103 Posts
HF had this tool set that I used to overhaul the bearings in an air wrench. Couldn't find it on a search
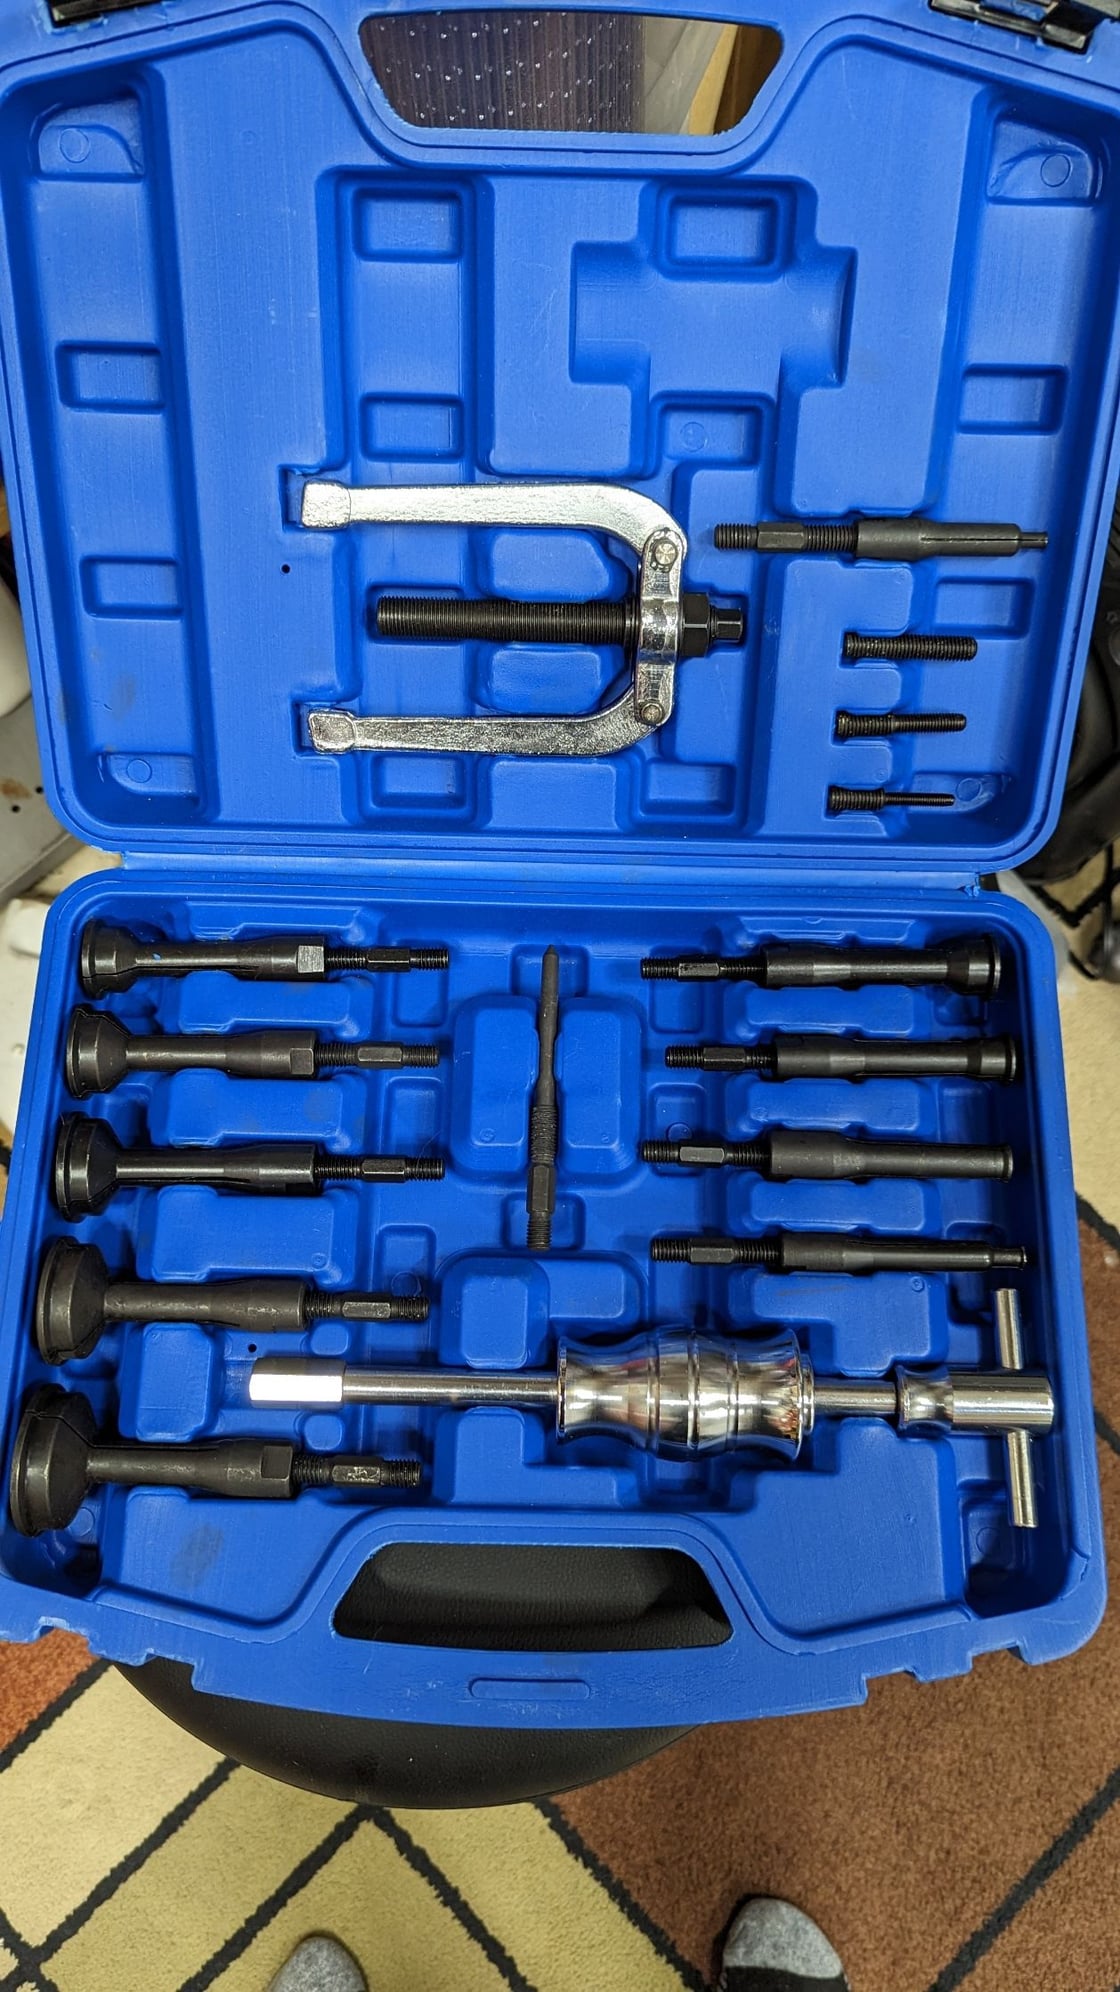
The ends are split into four sections that expand when the screw is turned. Then hammer out.
The ends are split into four sections that expand when the screw is turned. Then hammer out.
__________________
Bikes don't stand alone. They are two tired.
Bikes don't stand alone. They are two tired.
04-07-23, 03:05 PM
#11
Senior Member
If that is a shimano hub you are wasting time trying to remove the race. I have done it, but there is no replacement part from shimano. They did not want the race replaceable.
To my limited knowledge Campi was the only cup and cone manufacturer who had a replaceable inner race and made the parts.
To my limited knowledge Campi was the only cup and cone manufacturer who had a replaceable inner race and made the parts.
04-08-23, 05:15 AM
#12
Senior Member
I bought a cheap "blind bearing" puller like this one:
https://www.amazon.com/KELEN-Bearing...NsaWNrPXRydWU=
I used it to remove cups from Campy hubs. As stated previously, heat the shell first and a couple shots with the puller and they pop right out.
https://www.amazon.com/KELEN-Bearing...NsaWNrPXRydWU=
I used it to remove cups from Campy hubs. As stated previously, heat the shell first and a couple shots with the puller and they pop right out.
