


Making a head badge? Anyone have an idea?
 04-26-10, 12:06 PM
#1
Senior Member
Thread Starter
Join Date: Jan 2008
Location: Eugene, OR
Posts: 522
Bikes: Lots
Mentioned: 0 Post(s)
Tagged: 0 Thread(s)
Quoted: 1 Post(s)
Likes: 0
Liked 0 Times
in
0 Posts
Making a head badge? Anyone have an idea?
Does anyone have ideas of how to make a head badge.
and or any glue or tape to attach the badge and still remove it with no damage.
and or any glue or tape to attach the badge and still remove it with no damage.
 04-26-10, 02:47 PM
#2


Randomhead
Join Date: Aug 2008
Location: Happy Valley, Pennsylvania
Posts: 24,392
Mentioned: 0 Post(s)
Tagged: 0 Thread(s)
Quoted: 4 Post(s)
Liked 3,690 Times
in
2,513 Posts
double sided tape works.
It's pretty common to get head badges cut by water jet -- that's going to run about $200 for 20 or so. Cast head tube badges cost about $500 for the first one. Alternately, you can get stainless shim stock and cut it yourself
It's pretty common to get head badges cut by water jet -- that's going to run about $200 for 20 or so. Cast head tube badges cost about $500 for the first one. Alternately, you can get stainless shim stock and cut it yourself
04-26-10, 03:10 PM
#3
Senior Member

Join Date: Sep 2008
Location: Collegeville, PA
Posts: 1,350
Bikes: Ruckelshaus Randonneur, Specialized Allez (early 90's, steel), Ruckelshaus Path Bomber currently being built
Mentioned: 1 Post(s)
Tagged: 0 Thread(s)
Quoted: 4 Post(s)
Likes: 0
Liked 1 Time
in
1 Post
04-26-10, 03:44 PM
#4
Randomhead
Join Date: Aug 2008
Location: Happy Valley, Pennsylvania
Posts: 24,392
Mentioned: 0 Post(s)
Tagged: 0 Thread(s)
Quoted: 4 Post(s)
Liked 3,690 Times
in
2,513 Posts
Pete, you should get one of those 
Last edited by unterhausen; 04-26-10 at 06:00 PM.
04-26-10, 04:08 PM
#5
Senior Member
Join Date: Sep 2007
Location: Gaseous Cloud around Uranus
Posts: 3,741
Mentioned: 0 Post(s)
Tagged: 0 Thread(s)
Quoted: 38 Post(s)
Likes: 0
Liked 11 Times
in
7 Posts
You can make a better looking one than those with a coping saw and some files.Those things look like they were cast in beach sand.You can attach it with rivets,small screws or clear silly putty(silicone).
Last edited by Booger1; 04-26-10 at 04:11 PM.
04-26-10, 06:01 PM
#6
Randomhead
Join Date: Aug 2008
Location: Happy Valley, Pennsylvania
Posts: 24,392
Mentioned: 0 Post(s)
Tagged: 0 Thread(s)
Quoted: 4 Post(s)
Liked 3,690 Times
in
2,513 Posts
these guys do a really nice job, not sure about price
03-21-20, 11:50 PM
#7
Junior Member
Join Date: Jun 2016
Posts: 17
Mentioned: 0 Post(s)
Tagged: 0 Thread(s)
Quoted: 5 Post(s)
Likes: 0
Liked 4 Times
in
2 Posts
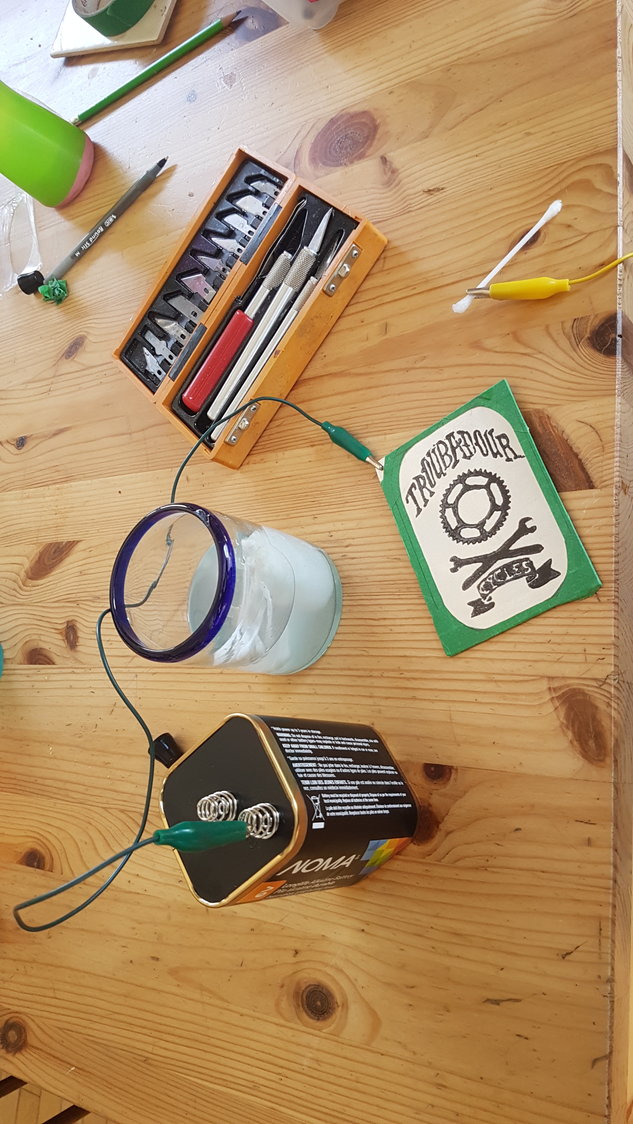
I make mine by electro etching. It's super easy but do the etch outside cuz the byproducts (albeit in small, probably unharmful amounts) are chlorine gas & hydrogen...

03-22-20, 08:48 AM
#9
Junior Member
Join Date: Jun 2016
Posts: 17
Mentioned: 0 Post(s)
Tagged: 0 Thread(s)
Quoted: 5 Post(s)
Likes: 0
Liked 4 Times
in
2 Posts
make sure you so this outside or in a well ventilated area with no open flame, process creates small amounts of hydrogen & chlorine gas. Not fun to breath or blow up
03-22-20, 11:50 AM
#10

Senior Member
Join Date: Aug 2012
Location: Seattle
Posts: 507
Mentioned: 0 Post(s)
Tagged: 0 Thread(s)
Quoted: 103 Post(s)
Liked 144 Times
in
88 Posts
__________________
https://www.flickr.com/photos/54319503@N05/
https://www.draper-cycles.com
https://www.flickr.com/photos/54319503@N05/
https://www.draper-cycles.com
03-22-20, 04:44 PM
#11
Senior Member
Join Date: Feb 2012
Location: Rochester, NY
Posts: 18,063
Bikes: Stewart S&S coupled sport tourer, Stewart Sunday light, Stewart Commuting, Stewart Touring, Co Motion Tandem, Stewart 3-Spd, Stewart Track, Fuji Finest, Mongoose Tomac ATB, GT Bravado ATB, JCP Folder, Stewart 650B ATB
Mentioned: 0 Post(s)
Tagged: 0 Thread(s)
Quoted: 4197 Post(s)
Liked 3,848 Times
in
2,300 Posts
I've had my second batch of "S" badges made and delivered only a few weeks ago. Water cut .044" SS plate, about .875" x 1.55". I do the bending. The first batch of 17 cost about $200 in 2008. The resupply of 20 cost just over $100 recently. First batch was designed on E Machine.com and resupply based on that design file (yes they still had it on record). I silver braze it on then hand finish before masking for paint. Andy
__________________
AndrewRStewart
AndrewRStewart
03-23-20, 07:11 AM
#12
Senior Member
Join Date: Dec 2011
Location: NE Ohio
Posts: 2,595
Bikes: 1992 Serotta Colorado II,Co-Motion Speedster, Giant Escape Hybrid, 1977 Schwinn Super Le Tour
Mentioned: 4 Post(s)
Tagged: 0 Thread(s)
Quoted: 455 Post(s)
Likes: 0
Liked 112 Times
in
85 Posts
Andy, I see McMaster Carr has .048 available. How difficult would it be to cut and file by hand? As a woodworker this is still a bit foreign!
Thanks!
Thanks!
03-23-20, 08:14 AM
#13
Senior Member
Join Date: Feb 2012
Location: Rochester, NY
Posts: 18,063
Bikes: Stewart S&S coupled sport tourer, Stewart Sunday light, Stewart Commuting, Stewart Touring, Co Motion Tandem, Stewart 3-Spd, Stewart Track, Fuji Finest, Mongoose Tomac ATB, GT Bravado ATB, JCP Folder, Stewart 650B ATB
Mentioned: 0 Post(s)
Tagged: 0 Thread(s)
Quoted: 4197 Post(s)
Liked 3,848 Times
in
2,300 Posts
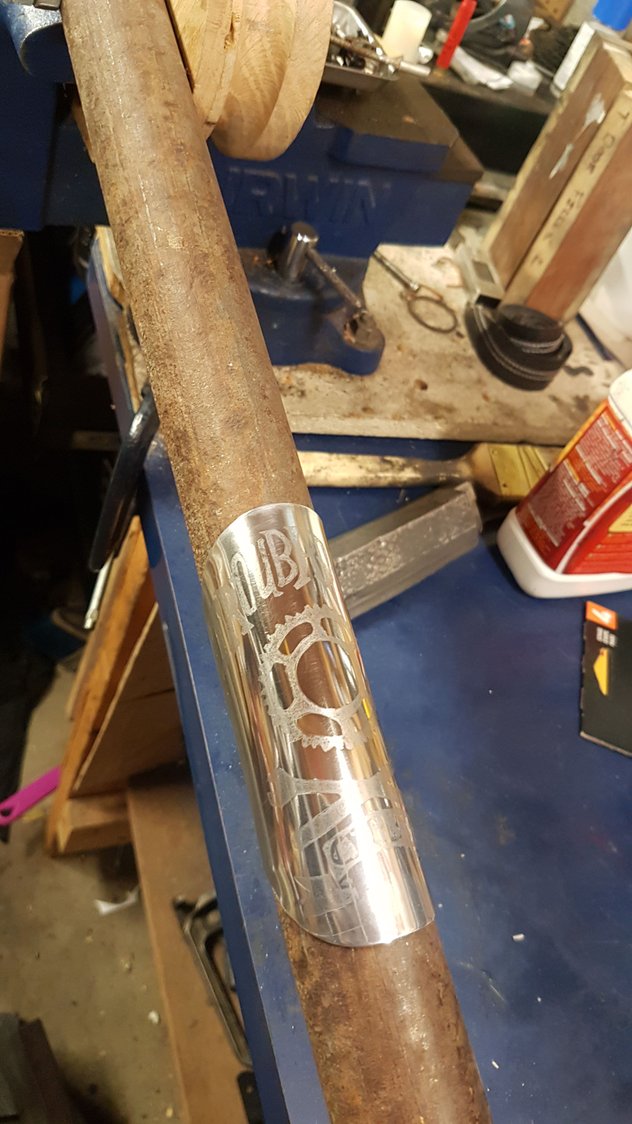
The first attempt I made for a SS badge was by cutting a "S" from a SS tube. I started with drilling a series of holes then opened them up. This was very slow and I still had to file/grind a lot so I next used a jewel's saw. The follow up with files and Dremel took much less time. Here's a shot of the hole drilling step. It was the time it took to do this that motivated me to design a "S" on Emachine.com and seek a quote. I have been very happy with the pre made badges. Andy.

__________________
AndrewRStewart
AndrewRStewart
Likes For Andrew R Stewart:
03-23-20, 09:11 AM
#14
framebuilder
I'll add that a good way to make a head badge is the same way I create and cut out designs for blank lugs. I find the right size and then increase it to 200% with my copy machine. By enlarging the size it becomes much easier to draw and when it is reduced back down to 100% size the lines become clearer and sharper. I like to draw on Vellum paper. It can be erased multiple times and is semi-translucent for folding in half to trace the other side if the design has some symmetry. I print a graph paper grid template onto the Velum paper to help with my drawing. Once my drawing is complete I go back to my copier and reduce the size back to 100% and use clear label sheets to print the design onto. This design is now placed on sheet of stainless steel.
I cut out the design using a jeweler's saw and get right to the edge of the design with jeweler's files. I hog out bigger sections with a Dremel cut-off saw. To bend the curve I use half sections of 0.120" wall tubing. The outside diameter of the inner tube is 1/4" smaller than the outside tube used to press against it. Here are some pictures to help illustrate what I am talking about. A couple of my frame building class students did 2 layer head badges. The bottom layer was stainless and the one on top of it was cut from a sheet of copper. That combination had a nice effect.
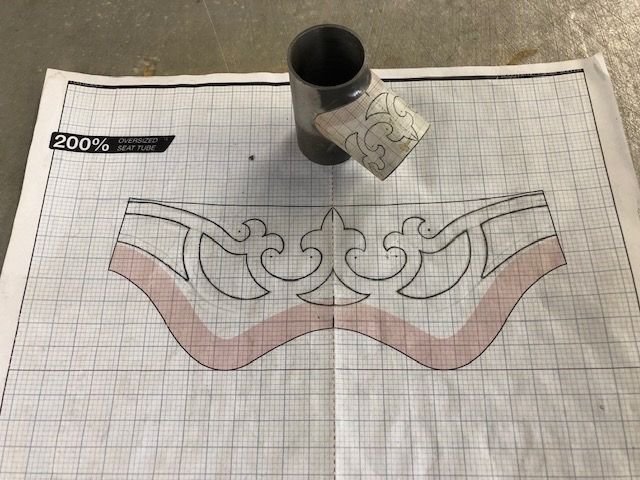
This is a picture of the template drawing being 200% life size and then reduced down to life size and pasted onto a blank lug for cutting.

This is a picture of a frame made in my frame building class. The seat tube badge was made by the process I explained in this post. Now that I look at the picture I realize he cut his own design out of blank lugs too. For those that are interested, I can email a much more complete set of instructions on how to design and cut out blank lugs (which I sell as a fund raiser for our Ukrainian Bicycle Project). The same principles apply to making head badges.
I cut out the design using a jeweler's saw and get right to the edge of the design with jeweler's files. I hog out bigger sections with a Dremel cut-off saw. To bend the curve I use half sections of 0.120" wall tubing. The outside diameter of the inner tube is 1/4" smaller than the outside tube used to press against it. Here are some pictures to help illustrate what I am talking about. A couple of my frame building class students did 2 layer head badges. The bottom layer was stainless and the one on top of it was cut from a sheet of copper. That combination had a nice effect.
This is a picture of the template drawing being 200% life size and then reduced down to life size and pasted onto a blank lug for cutting.
This is a picture of a frame made in my frame building class. The seat tube badge was made by the process I explained in this post. Now that I look at the picture I realize he cut his own design out of blank lugs too. For those that are interested, I can email a much more complete set of instructions on how to design and cut out blank lugs (which I sell as a fund raiser for our Ukrainian Bicycle Project). The same principles apply to making head badges.
03-23-20, 12:42 PM
#15
Banned.

Join Date: Jun 2004
Location: Torrance, CA
Posts: 3,061
Bikes: Homebuilt steel
Mentioned: 18 Post(s)
Tagged: 0 Thread(s)
Quoted: 2193 Post(s)
Liked 425 Times
in
337 Posts
This thread has lots of useful information about making head badges...
https://www.bikeforums.net/framebuil...-creation.html
https://www.bikeforums.net/framebuil...-creation.html
04-06-20, 09:49 AM
#16
Junior Member
Join Date: Jul 2012
Posts: 7
Mentioned: 0 Post(s)
Tagged: 0 Thread(s)
Quoted: 1 Post(s)
Likes: 0
Liked 0 Times
in
0 Posts
04-06-20, 01:09 PM
#17
Randomhead
Join Date: Aug 2008
Location: Happy Valley, Pennsylvania
Posts: 24,392
Mentioned: 0 Post(s)
Tagged: 0 Thread(s)
Quoted: 4 Post(s)
Liked 3,690 Times
in
2,513 Posts
I really like her headbadges, but is it always $150 per bike?
04-06-20, 03:31 PM
#18
Senior Member
Join Date: Jan 2013
Location: South Jersey
Posts: 2,262
Mentioned: 18 Post(s)
Tagged: 0 Thread(s)
Quoted: 713 Post(s)
Liked 796 Times
in
473 Posts
No. One of my friends had her make a mold for casting bronze headbadges and the per badge cost was around $35 after the initial mold fee.
These guys messaged me on Instagram and gave me some very good prices on an order of 20-50 badges.(around $2 each after initial setup fees) https://www.schildnederland.eu/
These guys messaged me on Instagram and gave me some very good prices on an order of 20-50 badges.(around $2 each after initial setup fees) https://www.schildnederland.eu/
04-06-20, 06:55 PM
#19
Randomhead
Join Date: Aug 2008
Location: Happy Valley, Pennsylvania
Posts: 24,392
Mentioned: 0 Post(s)
Tagged: 0 Thread(s)
Quoted: 4 Post(s)
Liked 3,690 Times
in
2,513 Posts
Thanks, I always wondered how people could afford her badges.
I follow Schild on instagram. Problem is I would have to do some design, and that's where it all falls apart
I follow Schild on instagram. Problem is I would have to do some design, and that's where it all falls apart
04-14-20, 03:59 PM
#20

multimodal commuter

Join Date: Nov 2006
Location: NJ, NYC, LI
Posts: 19,808
Bikes: 1940s Fothergill, 1959 Allegro Special, 1963? Claud Butler Olympic Sprint, Lambert 'Clubman', 1974 Fuji "the Ace", 1976 Holdsworth 650b conversion rando bike, 1983 Trek 720 tourer, 1984 Counterpoint Opus II, 1993 Basso Gap, 2010 Downtube 8h, and...
Mentioned: 584 Post(s)
Tagged: 0 Thread(s)
Quoted: 1908 Post(s)
Liked 574 Times
in
339 Posts
A few years ago I restored a 70 year old Armstrong Moth frame. I didn't do much to the paint, just touched up the black paint that was on it (not original) and recreated graphics based on photos of similar bikes (which are hard to find... imagine what happens when you google "armstrong bike"... But I found this photo on bike forums:

I decided to recreate that as a real headbadge. That basically meant making a greyscale drawing, from which a 2D-to-3D software program generated a 3D model. Here is the 'preview' it gave me:

I had that printed in brass (which means the 3D printer put out a wax version, which the 3D printing company cast in brass; I then manually curved it to fit a head tube (somewhat imperfectly) and added some color (imperfectly as well... but I will get back to that). Here is what I have now:

I decided to recreate that as a real headbadge. That basically meant making a greyscale drawing, from which a 2D-to-3D software program generated a 3D model. Here is the 'preview' it gave me:
I had that printed in brass (which means the 3D printer put out a wax version, which the 3D printing company cast in brass; I then manually curved it to fit a head tube (somewhat imperfectly) and added some color (imperfectly as well... but I will get back to that). Here is what I have now:
__________________
www.rhmsaddles.com.
www.rhmsaddles.com.
Likes For rhm:
04-14-20, 07:13 PM
#21
Randomhead
Join Date: Aug 2008
Location: Happy Valley, Pennsylvania
Posts: 24,392
Mentioned: 0 Post(s)
Tagged: 0 Thread(s)
Quoted: 4 Post(s)
Liked 3,690 Times
in
2,513 Posts
All I need to do is get in my time machine and go back 100 years and talk someone named Keller into starting a bike company so I can copy their headbadge
04-15-20, 09:55 AM
#22
multimodal commuter
Join Date: Nov 2006
Location: NJ, NYC, LI
Posts: 19,808
Bikes: 1940s Fothergill, 1959 Allegro Special, 1963? Claud Butler Olympic Sprint, Lambert 'Clubman', 1974 Fuji "the Ace", 1976 Holdsworth 650b conversion rando bike, 1983 Trek 720 tourer, 1984 Counterpoint Opus II, 1993 Basso Gap, 2010 Downtube 8h, and...
Mentioned: 584 Post(s)
Tagged: 0 Thread(s)
Quoted: 1908 Post(s)
Liked 574 Times
in
339 Posts
Be careful, if you do that, you could wind up with Spanish Flu. The irony would be priceless.
__________________
www.rhmsaddles.com.
www.rhmsaddles.com.
04-15-20, 07:43 PM
#23
Randomhead
Join Date: Aug 2008
Location: Happy Valley, Pennsylvania
Posts: 24,392
Mentioned: 0 Post(s)
Tagged: 0 Thread(s)
Quoted: 4 Post(s)
Liked 3,690 Times
in
2,513 Posts
Aren't we at least partially immune to to the Spanish flu?
04-15-20, 09:55 PM
#24
Newbie
Join Date: Apr 2020
Location: Logan, Utah
Posts: 4
Bikes: 29+ full rigid
Mentioned: 0 Post(s)
Tagged: 0 Thread(s)
Quoted: 0 Post(s)
Likes: 0
Liked 0 Times
in
0 Posts
I like cutting them out myself, it adds gives the head badge a little more uniqueness and complexity. The filing is more time consuming. As far as attaching it, any frame builders will drill and tap a tiny threads into the head tube that you can attach the head badge with some tiny hardware.

