


Head Tube Badge Creation
 10-16-18, 05:24 PM
#26


Randomhead
Join Date: Aug 2008
Location: Happy Valley, Pennsylvania
Posts: 24,386
Mentioned: 0 Post(s)
Tagged: 0 Thread(s)
Quoted: 4 Post(s)
Liked 3,686 Times
in
2,509 Posts
Rudi, I see there are many waterslide decal papers available. Which one do you use?
 10-16-18, 06:30 PM
#27

multimodal commuter

Join Date: Nov 2006
Location: NJ, NYC, LI
Posts: 19,808
Bikes: 1940s Fothergill, 1959 Allegro Special, 1963? Claud Butler Olympic Sprint, Lambert 'Clubman', 1974 Fuji "the Ace", 1976 Holdsworth 650b conversion rando bike, 1983 Trek 720 tourer, 1984 Counterpoint Opus II, 1993 Basso Gap, 2010 Downtube 8h, and...
Mentioned: 584 Post(s)
Tagged: 0 Thread(s)
Quoted: 1908 Post(s)
Liked 574 Times
in
339 Posts
At my office II have access to a Brother laser printer, which does color (badly), so that's the printer that I'm using; so I buy water slide paper for a laser printer.
My technique of applying the decals backwards only works with clear decal paper.
10-18-18, 06:32 AM
#28
Randomhead
Join Date: Aug 2008
Location: Happy Valley, Pennsylvania
Posts: 24,386
Mentioned: 0 Post(s)
Tagged: 0 Thread(s)
Quoted: 4 Post(s)
Liked 3,686 Times
in
2,509 Posts
the part I'm missing is where the glue comes from. Isn't it between the backing and decal, and so it's on the wrong side when you apply backwards?
10-18-18, 07:17 AM
#29
multimodal commuter
Join Date: Nov 2006
Location: NJ, NYC, LI
Posts: 19,808
Bikes: 1940s Fothergill, 1959 Allegro Special, 1963? Claud Butler Olympic Sprint, Lambert 'Clubman', 1974 Fuji "the Ace", 1976 Holdsworth 650b conversion rando bike, 1983 Trek 720 tourer, 1984 Counterpoint Opus II, 1993 Basso Gap, 2010 Downtube 8h, and...
Mentioned: 584 Post(s)
Tagged: 0 Thread(s)
Quoted: 1908 Post(s)
Liked 574 Times
in
339 Posts
I've added another photo to the album....
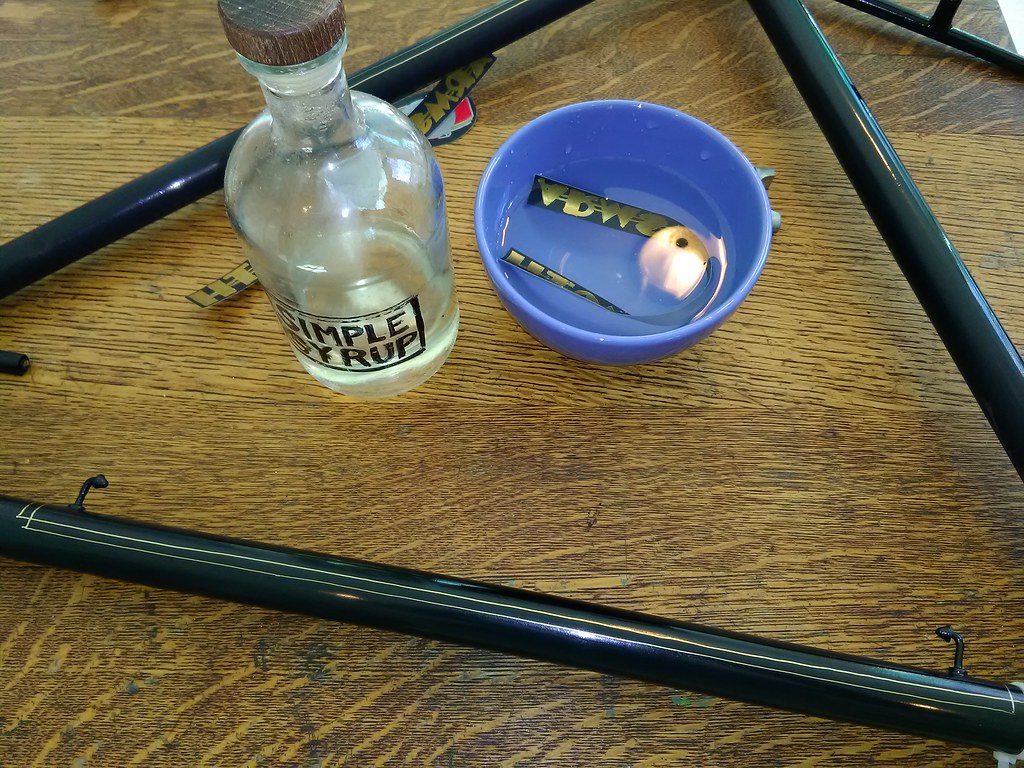
The first few times I tried this method, I used watered down Elmer's Glue; smear it onto the frame before applying the decal, then gradually squeeze out as much of it as possible. On the Armstrong I tried simple syrup. Either way, it's a water soluble glue. Squeezing out the excess glue is the trickiest part of the job. When the decal first goes on, the layer of glue is thick enough to work as a lubricant, and the decal can slide around. But it's not very strong, so at this point it's very easy to tear the decal in half. So little by little you have to press the decal against the frame, moving the excess glue out to the edge, where you wipe it away. If the decal tears, you have to move the pieces around until the seams match up.
So, for example... here's the down tube decal on my Holdsworth. A thin layer of watered down white glue, then the decal:
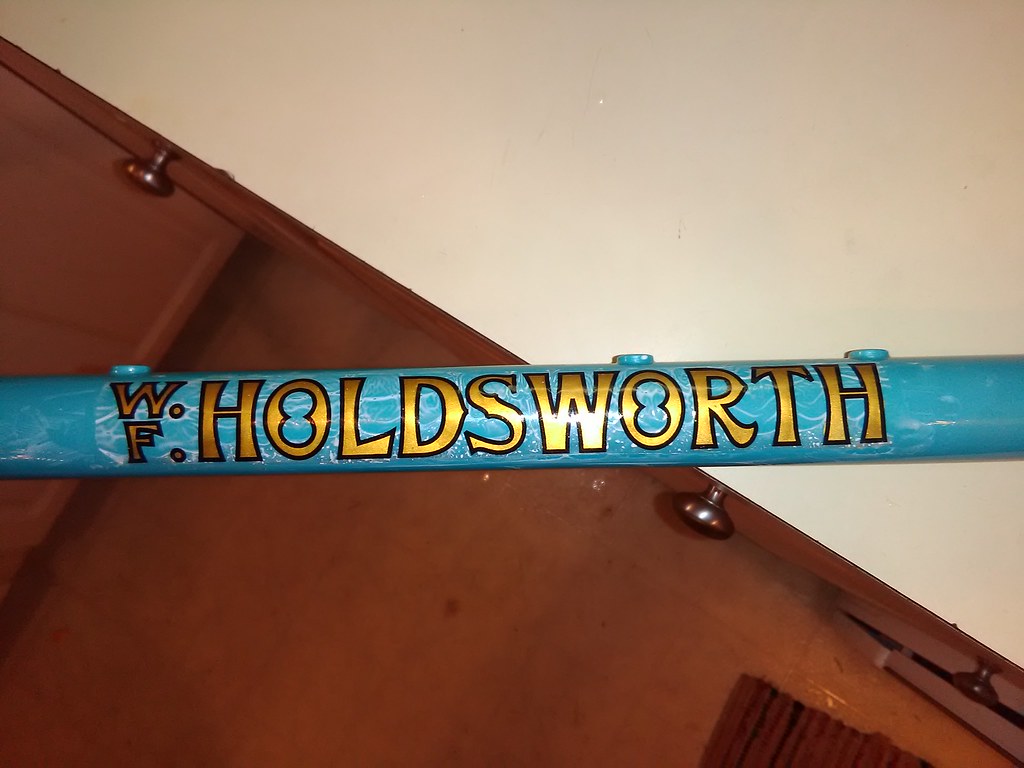
With a soft cloth, I gradually work the glue out from underneath, then this happens:
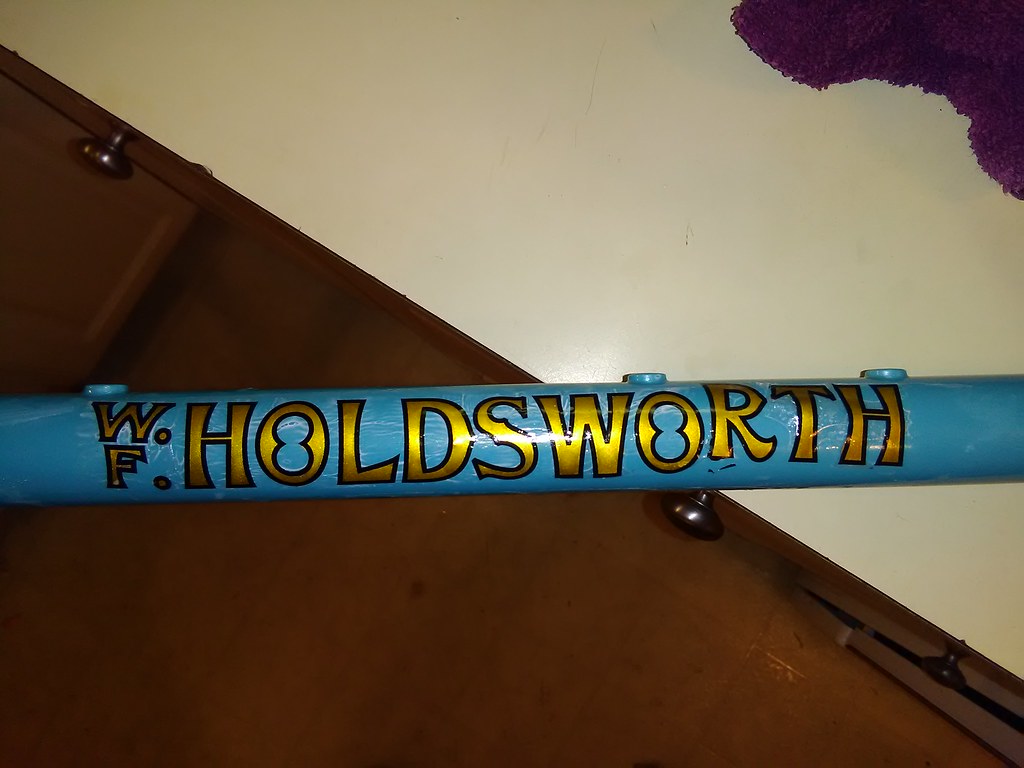
The last three letters have torn away. Doh! It's pretty easy to move them back into place, and keep working... but sometimes the results are imperfect. I don't have a good photo of how this decal turned out (see below). I always print a few extras.
I think you can see that the TH did not get to quite the right place, but the R looks okay.
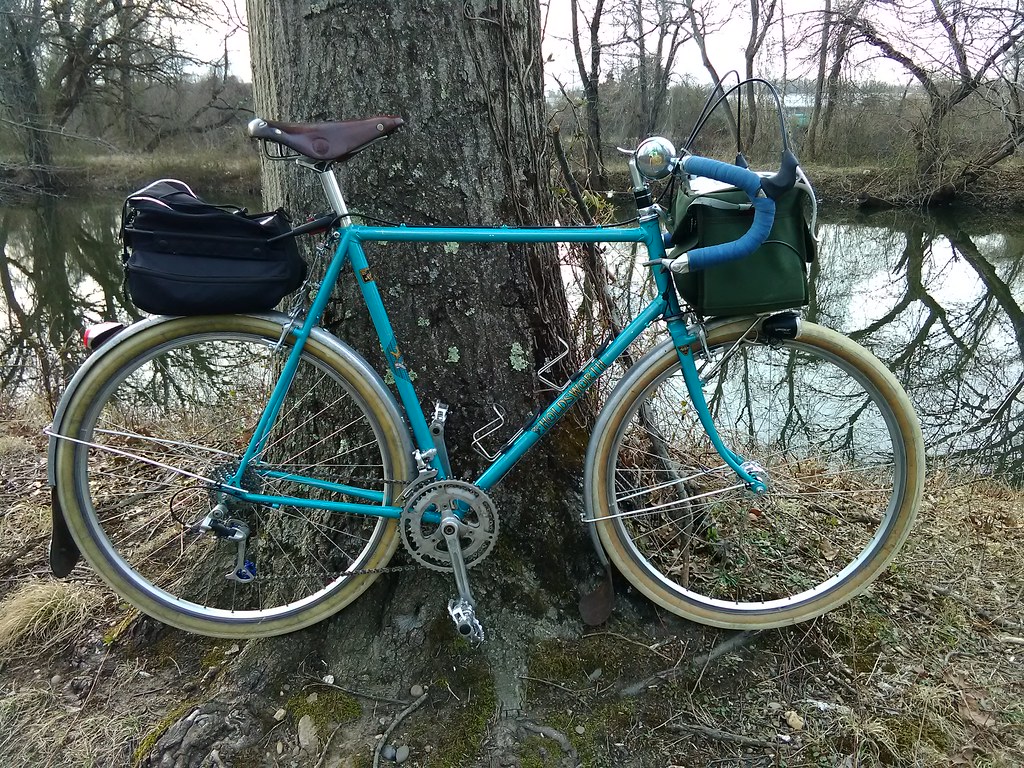
The Holdsworth frame is powder coated, and I did not clearcoat the decals. They've held up pretty well, but more recent photos show part of the H has gone missing.
__________________
www.rhmsaddles.com.
www.rhmsaddles.com.
Last edited by rhm; 10-18-18 at 07:43 AM.
10-18-18, 08:28 AM
#30

Senior Member
Join Date: Feb 2012
Location: Rochester, NY
Posts: 18,056
Bikes: Stewart S&S coupled sport tourer, Stewart Sunday light, Stewart Commuting, Stewart Touring, Co Motion Tandem, Stewart 3-Spd, Stewart Track, Fuji Finest, Mongoose Tomac ATB, GT Bravado ATB, JCP Folder, Stewart 650B ATB
Mentioned: 0 Post(s)
Tagged: 0 Thread(s)
Quoted: 4195 Post(s)
Liked 3,837 Times
in
2,295 Posts
Clear packaging tape (or helicopter tape) placed over the applied decal works well to protect the decal with little negatives.
When I first started out doing this stuff I used simple dry rub on letters available from art/graphics suppliers. Then I used them to create a mock up and had professional dry slide decals made. Later I went to a decal that was entirely rub on (from SSSInk). All of these want to have some form of a covering for long term protection. Initially that was said tape and now it's clear coating paint. But I despise powder coating for my frames so clearing over decals is the usual thing a painter does. For a PCed job one could rattle can clear or use tape. Andy
When I first started out doing this stuff I used simple dry rub on letters available from art/graphics suppliers. Then I used them to create a mock up and had professional dry slide decals made. Later I went to a decal that was entirely rub on (from SSSInk). All of these want to have some form of a covering for long term protection. Initially that was said tape and now it's clear coating paint. But I despise powder coating for my frames so clearing over decals is the usual thing a painter does. For a PCed job one could rattle can clear or use tape. Andy
__________________
AndrewRStewart
AndrewRStewart
Last edited by Andrew R Stewart; 10-18-18 at 08:33 AM.
10-18-18, 09:44 AM
#31
multimodal commuter
Join Date: Nov 2006
Location: NJ, NYC, LI
Posts: 19,808
Bikes: 1940s Fothergill, 1959 Allegro Special, 1963? Claud Butler Olympic Sprint, Lambert 'Clubman', 1974 Fuji "the Ace", 1976 Holdsworth 650b conversion rando bike, 1983 Trek 720 tourer, 1984 Counterpoint Opus II, 1993 Basso Gap, 2010 Downtube 8h, and...
Mentioned: 584 Post(s)
Tagged: 0 Thread(s)
Quoted: 1908 Post(s)
Liked 574 Times
in
339 Posts
^Speaking of packing tape...
The ultimate in instant decals is to print your design with a laser printer onto plain printer paper (or just cut something out of a magazine), then put high quality packing tape over it. Burnish well (rub really hard with a smooth object, such as a spoon or something) until you have completely flattened the texture of the paper; this will impress the laser toner into the gum of the tape. Then cut away the excess paper and soak the tape and remaining paper in water; then rub the paper away with your finger. The paper will abrade away in little balls. You can rub away every trace of the paper without rubbing away any of the gum. Shake the remaining water off, cut the remaining tape to size, and stick it to the bike frame. Press it down really well, and it will stick for a reasonably long time.
This method works fine, but only lasts as long as the packing tape. In my experience the gum on packing tape dries out with exposure to sunlight etc, and will peel off after a couple years. It's great for temporary applications like when you're trying out a design or figuring out the correct size and location for decals.
As an artist, I agree with you about powder coat. But my bikes are not just art projects; I ride the **** out of them, and I find powder coat to be more durable than paint.
__________________
www.rhmsaddles.com.
www.rhmsaddles.com.
10-18-18, 01:01 PM
#32
Senior Member

Join Date: Jul 2006
Location: San Jose (Willow Glen) Ca
Posts: 9,834
Bikes: Kirk Custom JK Special, '84 Team Miyata,(dura ace old school) 80?? SR Semi-Pro 600 Arabesque
Mentioned: 106 Post(s)
Tagged: 0 Thread(s)
Quoted: 2337 Post(s)
Liked 2,809 Times
in
1,534 Posts
as bob noted cloisonne is a classic jewelry technique that would produce really nice results....with a lot of work https://jewelrymakingjournal.com/the...own-cloisonne/
I think you could get close ala gugie..... 3 d print of the lines and then paint fill or for a one time...... sculpt in wax and then do lost wax casting
I think you could get close ala gugie..... 3 d print of the lines and then paint fill or for a one time...... sculpt in wax and then do lost wax casting
__________________
Life is too short not to ride the best bike you have, as much as you can
(looking for Torpado Super light frame/fork or for Raleigh International frame fork 58cm)
Life is too short not to ride the best bike you have, as much as you can
(looking for Torpado Super light frame/fork or for Raleigh International frame fork 58cm)
10-18-18, 03:52 PM
#33
Banned
Repouss� and chasing
Another classic technique https://en.wikipedia.org/wiki/Repouss%C3%A9_and_chasing
you raise an area from the back side , then define it, outlining, from the front..
you raise an area from the back side , then define it, outlining, from the front..
10-20-18, 07:20 AM
#34
Banned.
Thread Starter

Join Date: Jun 2004
Location: Torrance, CA
Posts: 3,061
Bikes: Homebuilt steel
Mentioned: 18 Post(s)
Tagged: 0 Thread(s)
Quoted: 2193 Post(s)
Liked 425 Times
in
337 Posts
I've decided to go down the rabbit hole and try to make my own badge from copper, similar to the process employed by headbadges.com. Any suggestions on the thickness of the copper? 1/16" for two layers? That would make the final badge 1/8". Is that too thick?
10-20-18, 08:18 AM
#35
Senior Member
Join Date: Feb 2012
Location: Rochester, NY
Posts: 18,056
Bikes: Stewart S&S coupled sport tourer, Stewart Sunday light, Stewart Commuting, Stewart Touring, Co Motion Tandem, Stewart 3-Spd, Stewart Track, Fuji Finest, Mongoose Tomac ATB, GT Bravado ATB, JCP Folder, Stewart 650B ATB
Mentioned: 0 Post(s)
Tagged: 0 Thread(s)
Quoted: 4195 Post(s)
Liked 3,837 Times
in
2,295 Posts
Depends on what kind of look you're after. The classic riveted on Raleigh badges were fairly thin sheet (probably about 28 gage or 1/64"). Very flexible and formable, to the extent of being a problem when the edges/ends got snagged on a rag when cleaning. The much thicker plastic ones that are common on Asian bikes (including the Raleighs from there) are often glued (double sticky taped) on and IMO look quite chunky. Not at all what I like on an otherwise elegant bike.
The look I was going for was much like a lug's look. My "S" is brazed on so about 1mm (or .040") thick. This is pretty close to what a finished lug's shore line is.
Of course if you're going for a 3D surface then you either will be stamping thin sheet, engraving/etching thicker plate. Andy
The look I was going for was much like a lug's look. My "S" is brazed on so about 1mm (or .040") thick. This is pretty close to what a finished lug's shore line is.
Of course if you're going for a 3D surface then you either will be stamping thin sheet, engraving/etching thicker plate. Andy
__________________
AndrewRStewart
AndrewRStewart
10-20-18, 09:28 AM
#36
Randomhead
Join Date: Aug 2008
Location: Happy Valley, Pennsylvania
Posts: 24,386
Mentioned: 0 Post(s)
Tagged: 0 Thread(s)
Quoted: 4 Post(s)
Liked 3,686 Times
in
2,509 Posts
I'm pretty sure I used 316 stainless shim stock. .030" maybe? Not sure I still have any info about it. 1/16" is really thick unless you are going to remove a lot of it somehow. I have been thinking about cnc engraving. 30 thou is plenty of material to engrave. Brazing it on adds thickness.
There is a pinstriping tool that seems like it would be useful for this, it's a handle with a small paint pot at the business end and a nozzle. Not sure who makes one, doesn't seem to be Buegler. Brian Chapman uses it in this video (obscenity laden music in the background warning): https://www.instagram.com/p/Bo2GUCel...=chapmancycles
Okay, in the comments he says that's a Kemper fluid writer, they are pretty cheap.
I have thought about getting a graver and trying my hand at engraving
Last edited by unterhausen; 10-20-18 at 09:42 AM.
10-20-18, 09:46 AM
#37
Banned.
Thread Starter
Join Date: Jun 2004
Location: Torrance, CA
Posts: 3,061
Bikes: Homebuilt steel
Mentioned: 18 Post(s)
Tagged: 0 Thread(s)
Quoted: 2193 Post(s)
Liked 425 Times
in
337 Posts
Thanks guys. I'll look for 1/32" or 1mm thick sheet. I'm going to have to engrave some of the lettering so that's going to be interesting. I've got no fallacy that the first try will be presentable so this will be one of those learning curve situations.
10-20-18, 10:55 AM
#38
Senior Member
Join Date: Feb 2012
Location: Rochester, NY
Posts: 18,056
Bikes: Stewart S&S coupled sport tourer, Stewart Sunday light, Stewart Commuting, Stewart Touring, Co Motion Tandem, Stewart 3-Spd, Stewart Track, Fuji Finest, Mongoose Tomac ATB, GT Bravado ATB, JCP Folder, Stewart 650B ATB
Mentioned: 0 Post(s)
Tagged: 0 Thread(s)
Quoted: 4195 Post(s)
Liked 3,837 Times
in
2,295 Posts
I'll just add a comment about making badges. That's the forming them to fit a tube if they were flat to start with. The thicker (or stronger) the material you use the less easily the forming will be. My "S", which is SS plate about .040" thick, has the vertical portions of the letter that are about .160" wide. These portions are near impossible for my simple forming tools to end up curved. For my needs this still flat portion is no problem, they still silver braze well enough and I can file them to emulate the horizontal portions (that do form easily enough). As I have no surface details this filing is no big deal and the whole "S" gets polished anyways.
I use a male/female sandwich of thick walled tubing and a solid bar as my forming tools, squeezed in a vice, I usually will undersize the forming and somewhat need to spread out the final "S" to the head tube's actual curve. Keeping the "S" aligned during this can be tricky and I've reflattened then reformed a few when they end up a tad crooked. Andy (Whose two current frame builds are nearing this step, meaning the frames are almost done )
)
I use a male/female sandwich of thick walled tubing and a solid bar as my forming tools, squeezed in a vice, I usually will undersize the forming and somewhat need to spread out the final "S" to the head tube's actual curve. Keeping the "S" aligned during this can be tricky and I've reflattened then reformed a few when they end up a tad crooked. Andy (Whose two current frame builds are nearing this step, meaning the frames are almost done
)
__________________
AndrewRStewart
AndrewRStewart
Last edited by Andrew R Stewart; 10-20-18 at 10:59 AM. Reason: clairity
10-20-18, 01:40 PM
#39
Banned
using a mound of something like pitch or wax to imbed the curved piece in it
to have it in a situation solidly fixed so you can clamp it firmly
to resist, pushing against it your engraving tool may be beneficial
[Non ferrous/steel]
an annealed metal, like brass, bronze
can be bent easier in that state, once,
the act of bending it work hardens it , then gets re annealed , etc, etc..
....
11-12-18, 09:57 AM
#40
Banned.
Thread Starter
Join Date: Jun 2004
Location: Torrance, CA
Posts: 3,061
Bikes: Homebuilt steel
Mentioned: 18 Post(s)
Tagged: 0 Thread(s)
Quoted: 2193 Post(s)
Liked 425 Times
in
337 Posts
I've decided to try my hand at acid etching to create the badge. Ordered some peel and print blue paper and some ferric chloride etching solution, along with some copper sheet. Now I need to figure out how to clean up my logo design and create a nice sharp digital image because sharp definition is needed in order to create the mask. Good fun.
11-12-18, 10:51 AM
#41
Senior Member

Join Date: Nov 2014
Location: Eugene, Oregon, USA
Posts: 27,547
Mentioned: 217 Post(s)
Tagged: 0 Thread(s)
Quoted: 18350 Post(s)
Liked 4,502 Times
in
3,346 Posts
If you are just doing one badge, you could probably cut your pattern out with an exacto knife in about an hour. No need to do any more work on your drawing. Just be careful as you work.
I've wanted to try a laser cutter sometime (cut paper, plastic, tape, but also etch but not cut metal). but haven't sprung for one yet. The low power units aren't that expensive.
I've wanted to try a laser cutter sometime (cut paper, plastic, tape, but also etch but not cut metal). but haven't sprung for one yet. The low power units aren't that expensive.
11-12-18, 12:51 PM
#42
Banned.
Thread Starter
Join Date: Jun 2004
Location: Torrance, CA
Posts: 3,061
Bikes: Homebuilt steel
Mentioned: 18 Post(s)
Tagged: 0 Thread(s)
Quoted: 2193 Post(s)
Liked 425 Times
in
337 Posts
If you are just doing one badge, you could probably cut your pattern out with an exacto knife in about an hour. No need to do any more work on your drawing. Just be careful as you work.
I've wanted to try a laser cutter sometime (cut paper, plastic, tape, but also etch but not cut metal). but haven't sprung for one yet. The low power units aren't that expensive.
I've wanted to try a laser cutter sometime (cut paper, plastic, tape, but also etch but not cut metal). but haven't sprung for one yet. The low power units aren't that expensive.
11-12-18, 02:57 PM
#43
Bike Butcher of Portland

Join Date: Jul 2014
Location: Portland, OR
Posts: 11,630
Bikes: It's complicated.
Mentioned: 1299 Post(s)
Tagged: 0 Thread(s)
Quoted: 4677 Post(s)
Liked 5,790 Times
in
2,279 Posts
Here's a badge Rudi made for me using the aforementioned 3D print in wax + lost wax casting, this one in brass:
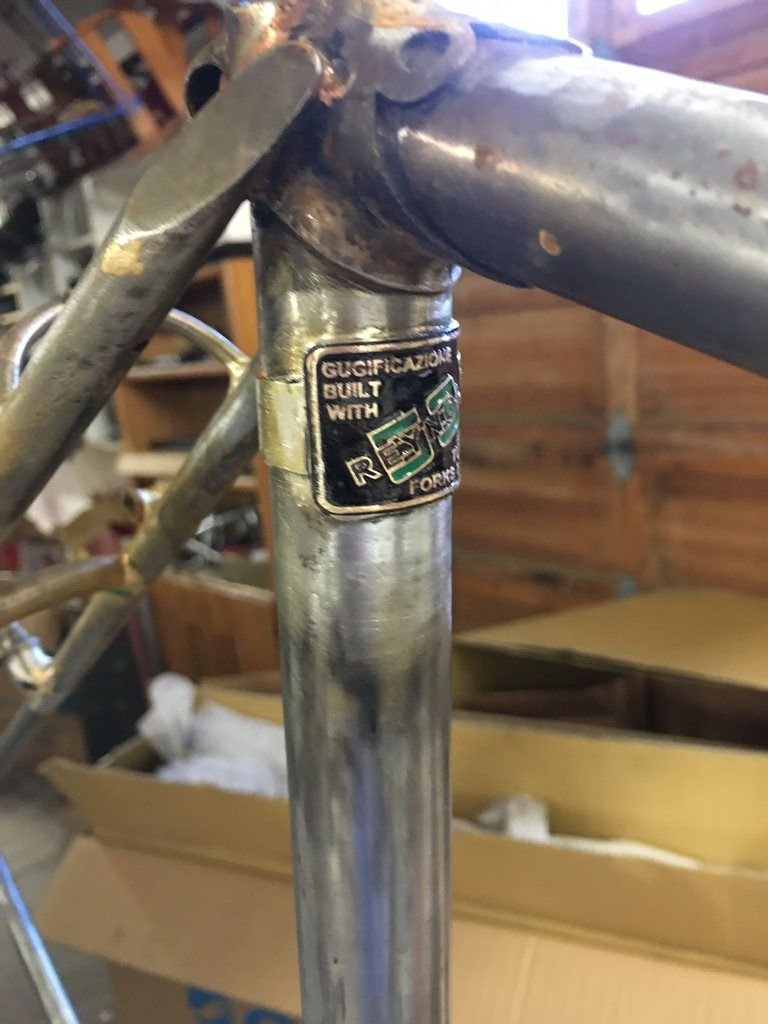
It was silver brazed on. There was the appearance of a crack there, so I added a thinner band of brass to complete the circle. So it's a frame band-aid done with style.
It was silver brazed on. There was the appearance of a crack there, so I added a thinner band of brass to complete the circle. So it's a frame band-aid done with style.
__________________
If someone tells you that you have enough bicycles and you don't need any more, stop talking to them. You don't need that kind of negativity in your life.
If someone tells you that you have enough bicycles and you don't need any more, stop talking to them. You don't need that kind of negativity in your life.
11-12-18, 10:27 PM
#44
Randomhead
Join Date: Aug 2008
Location: Happy Valley, Pennsylvania
Posts: 24,386
Mentioned: 0 Post(s)
Tagged: 0 Thread(s)
Quoted: 4 Post(s)
Liked 3,686 Times
in
2,509 Posts
nice.
I'm working on the design for a brass head badge. I have some more work to do. I took some line art in bitmap form, traced it in Inkscape. From Inkscape, I saved as an SVG. I imported that into Fusion 360 and made a 3d object out of the outlines. It isn't very expensive. I suppose it depends on how comfortable you are with 3d parametric cad.
I hadn't thought about brazing it on. I was even thinking about putting screw holes in the design.
11-12-18, 10:38 PM
#45
Senior Member
You might try the toner transfer method. Print the pattern using a LaserJet printer on inkjet photo paper. Use a clothes iron to melt the plastic toner onto the copper plate. Ferric chloride bath for about 3 hours and backfill the recesses with auto touch up paint .
11-13-18, 07:39 AM
#46
Randomhead
Join Date: Aug 2008
Location: Happy Valley, Pennsylvania
Posts: 24,386
Mentioned: 0 Post(s)
Tagged: 0 Thread(s)
Quoted: 4 Post(s)
Liked 3,686 Times
in
2,509 Posts
I thought about doing that, but my method will cost $13 + shipping. I think getting set up to etch would cost more than that. I got rid of my etchant supplies a long time ago. There is another etchant that works better than ferric chloride, I don't remember what it is now though.
I always wanted to do screen printing. I have also thought about hand cutting masks. I have done a lot of similar work covering RC airplanes. The secret to that is to buy a large quantity of #11 exacto knife blades and discard a blade at the first sign of dullness.
I always wanted to do screen printing. I have also thought about hand cutting masks. I have done a lot of similar work covering RC airplanes. The secret to that is to buy a large quantity of #11 exacto knife blades and discard a blade at the first sign of dullness.
11-13-18, 08:39 AM
#47
multimodal commuter
Join Date: Nov 2006
Location: NJ, NYC, LI
Posts: 19,808
Bikes: 1940s Fothergill, 1959 Allegro Special, 1963? Claud Butler Olympic Sprint, Lambert 'Clubman', 1974 Fuji "the Ace", 1976 Holdsworth 650b conversion rando bike, 1983 Trek 720 tourer, 1984 Counterpoint Opus II, 1993 Basso Gap, 2010 Downtube 8h, and...
Mentioned: 584 Post(s)
Tagged: 0 Thread(s)
Quoted: 1908 Post(s)
Liked 574 Times
in
339 Posts
I have over a dozen sheets of Techniks "Press-n-Peel PCB Transfer Film," which can be used for etching head badges. I have used the stuff successfully, but it is tricky and I have had plenty of failures.
Anyway, if anyone wants a sheet or two at my cost ($2 per sheet, plus shipping), please send me a private message.
Anyway, if anyone wants a sheet or two at my cost ($2 per sheet, plus shipping), please send me a private message.
__________________
www.rhmsaddles.com.
www.rhmsaddles.com.
11-13-18, 09:22 AM
#48
Banned.
Thread Starter
Join Date: Jun 2004
Location: Torrance, CA
Posts: 3,061
Bikes: Homebuilt steel
Mentioned: 18 Post(s)
Tagged: 0 Thread(s)
Quoted: 2193 Post(s)
Liked 425 Times
in
337 Posts
I have over a dozen sheets of Techniks "Press-n-Peel PCB Transfer Film," which can be used for etching head badges. I have used the stuff successfully, but it is tricky and I have had plenty of failures.
Anyway, if anyone wants a sheet or two at my cost ($2 per sheet, plus shipping), please send me a private message.
Anyway, if anyone wants a sheet or two at my cost ($2 per sheet, plus shipping), please send me a private message.
I've read where guys use a laser printer on something like transparency paper instead of the P-n-P film but the film is made for the purpose and cheap enough so what's a few bucks in the grand scheme?
I've been watching tutorials on Youtube trying to learn GIMP so my badge image can be cleaned up. Main problem I'm having is blurry edge lines, particularly on the font. I may have to delete the font in the current artwork and recreate it. Not sure yet, still learning. Open to suggestions of course...
11-13-18, 10:29 AM
#49
Senior Member

Join Date: Aug 2018
Location: Allen, TX
Posts: 2,633
Bikes: 2021 S-Works Turbo Creo SL, 2020 Specialized Roubaix Expert
Mentioned: 7 Post(s)
Tagged: 0 Thread(s)
Quoted: 762 Post(s)
Liked 4,029 Times
in
1,427 Posts
Now you tell me...
I've read where guys use a laser printer on something like transparency paper instead of the P-n-P film but the film is made for the purpose and cheap enough so what's a few bucks in the grand scheme?
I've been watching tutorials on Youtube trying to learn GIMP so my badge image can be cleaned up. Main problem I'm having is blurry edge lines, particularly on the font. I may have to delete the font in the current artwork and recreate it. Not sure yet, still learning. Open to suggestions of course...
Some vector apps have functionality that lets you import a bitmap image and convert it to vector, but I've rarely found a setting that did so acceptably, especially with smallish artwork. Depending on the complexity of your design, you might be better off starting from scratch in a vector app.
-Matt
11-13-18, 10:41 AM
#50
Randomhead
Join Date: Aug 2008
Location: Happy Valley, Pennsylvania
Posts: 24,386
Mentioned: 0 Post(s)
Tagged: 0 Thread(s)
Quoted: 4 Post(s)
Liked 3,686 Times
in
2,509 Posts
Inkscape does a creditable job of converting bitmap to vector. And it's free. I'm not that great of an artist, but I can manipulate Bezier curves all day until they look good (at least to me). What I found in Fusion 360 was that scaling might mess up some of the Bezier curves that Inkscape produces. So it's best to scale in Inkscape. Lots of people use Inkscape for engraving and cnc routing.
Which reminds me, i have a small cnc router that I want to use for making headbadges. But even one of the Chinese spindles is not in the budget right now.
Which reminds me, i have a small cnc router that I want to use for making headbadges. But even one of the Chinese spindles is not in the budget right now.