


Tig welded 27.5 plus MTB build
 10-22-18, 01:33 PM
#1
Senior Member
Thread Starter
Join Date: Jan 2013
Location: South Jersey
Posts: 2,265
Mentioned: 18 Post(s)
Tagged: 0 Thread(s)
Quoted: 714 Post(s)
Liked 800 Times
in
475 Posts
Tig welded 27.5 plus MTB build
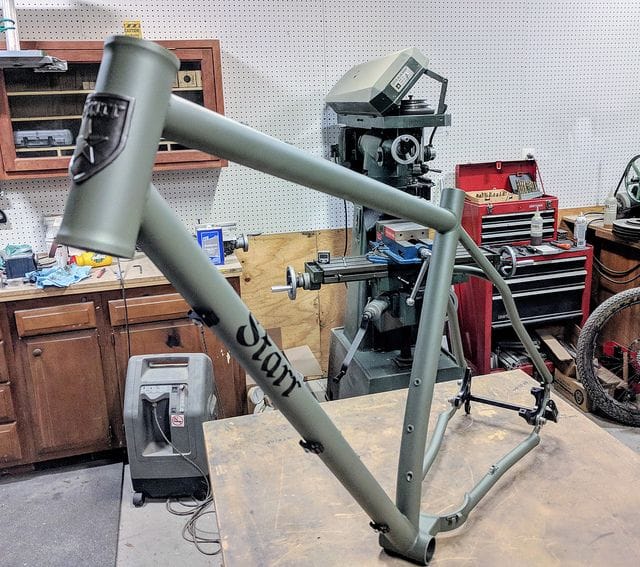
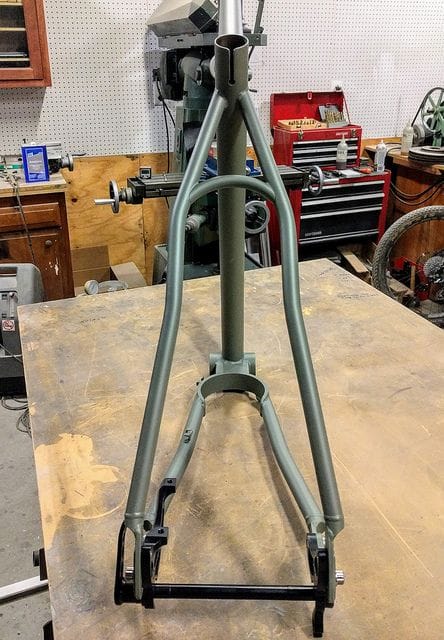
It seems that most of the threads on this forum are focused on lugged construction and brazing, so I thought it would be nice to have a thread about TIG welded frames. This frame will have clearance for a 27.5" x 3" tire, Paragon rocker dropouts, 12 x 148 boost thru axle, bent seat tube w/internal dropper post routing and a 44mm Paragon head tube.
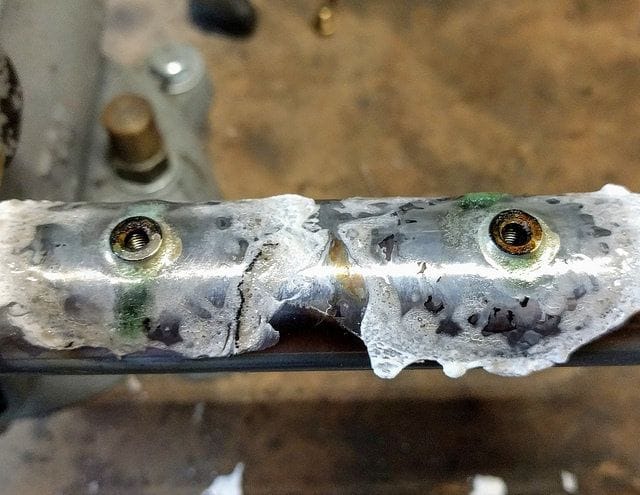
This first set of pictures shows the making of the yoke to fit the 3" tire and a 32t chainring with a 425mm chainstay length. The idea to use the 4" A36 pipe for the yoke was borrowed from a user on the MTBR framebuilding forums, but I added the rectangular tube to join it to the bottom bracket. The chainstays are made from 3/4" .035" 4130 tubing and bent slightly on my Ridgid 368 bender, to provide crankarm clearance. The tube is mitered to fit the yoke with a 4" hole saw on the mill.
Obviously, a few steps were left out of the process of making the yoke because I didn't take pictures of them. The rectangular .065" mild steel tube was first mitered to fit the bottom bracket with a 38mm hole saw on the mill. That was welded to the bottom bracket and then the whole assembly was clamped in the mill vise and centered, so the rectangular tube could be cut with a 4" hole saw to receive the 4" pipe section. The 4" .188" wall A36 steel tube section was cut on the band saw and then faced on the lathe to make it as uniform as possible. The center section of the pipe will get cut out after welding by rough cutting on the band saw and then finishing with the mill.
Last edited by dsaul; 10-22-18 at 01:49 PM.
 10-22-18, 01:47 PM
#2
Senior Member
Thread Starter
Join Date: Jan 2013
Location: South Jersey
Posts: 2,265
Mentioned: 18 Post(s)
Tagged: 0 Thread(s)
Quoted: 714 Post(s)
Liked 800 Times
in
475 Posts
Paragon Machine Works makes these convenient adapters to allow you to join 3/4" round tubing to any of their plate style dropouts. The tapered end makes it easy to join the tube to the dropout at an angle. I have only welded these and don't know how they would work for brazing.
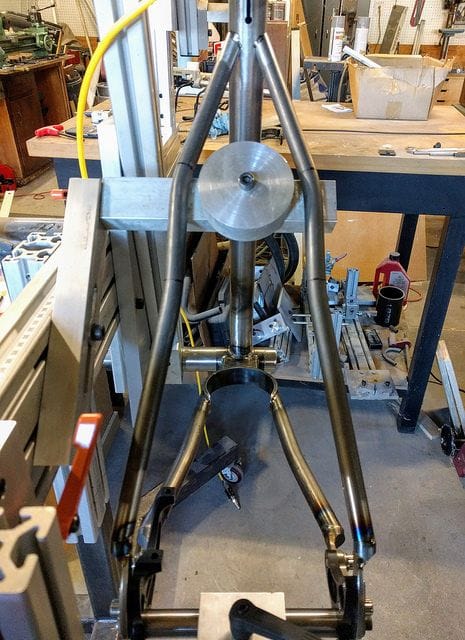
The last two images show the rear end assembly tacked in the jig and then fully welded. I like to start my builds by doing the chainstay assembly first, mostly because a lot of this welding is easier to do without a front triangle attached to it.
The last two images show the rear end assembly tacked in the jig and then fully welded. I like to start my builds by doing the chainstay assembly first, mostly because a lot of this welding is easier to do without a front triangle attached to it.
10-22-18, 09:02 PM
#3


Randomhead
Join Date: Aug 2008
Location: Happy Valley, Pennsylvania
Posts: 24,394
Mentioned: 0 Post(s)
Tagged: 0 Thread(s)
Quoted: 4 Post(s)
Liked 3,694 Times
in
2,516 Posts
looks great. Thanks for taking those pics
10-23-18, 06:25 AM
#4
Senior Member
Thread Starter
Join Date: Jan 2013
Location: South Jersey
Posts: 2,265
Mentioned: 18 Post(s)
Tagged: 0 Thread(s)
Quoted: 714 Post(s)
Liked 800 Times
in
475 Posts
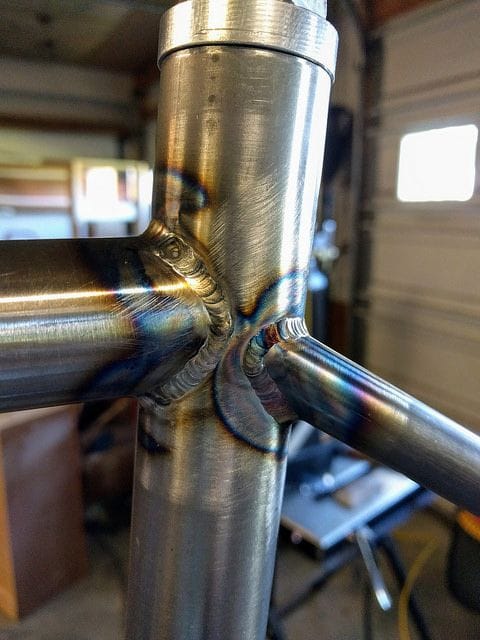
I know that tubes can be mitered with files and paper templates, but doing it with a machine is so much nicer. Plus, the machine is useful for making fixtures. This series of photos shows my process for mitering the downtube. The notch for the seat tube took several trips to the mill to shave small amounts off and get a tight fit. Taking too much off here would make that joint difficult to weld, so I like to sneak up on the right fit.
10-23-18, 06:36 PM
#7
Senior Member

Join Date: Aug 2017
Location: Central Io-way
Posts: 2,673
Bikes: LeMond Zurich, Giant Talon 29er
Mentioned: 17 Post(s)
Tagged: 0 Thread(s)
Quoted: 1221 Post(s)
Liked 629 Times
in
472 Posts
WOW! That Tig work is really top notch! Like a little stack of dimes! You weld professionally? I mean you'd have to with those results!
10-24-18, 05:42 AM
#8
Senior Member
Thread Starter
Join Date: Jan 2013
Location: South Jersey
Posts: 2,265
Mentioned: 18 Post(s)
Tagged: 0 Thread(s)
Quoted: 714 Post(s)
Liked 800 Times
in
475 Posts
Thanks for the compliment. I don't weld professionally. I taught myself and made a mess of it for a while. They don't always come out that good, but I'm definitely improving.
10-24-18, 11:05 AM
#9
Randomhead
Join Date: Aug 2008
Location: Happy Valley, Pennsylvania
Posts: 24,394
Mentioned: 0 Post(s)
Tagged: 0 Thread(s)
Quoted: 4 Post(s)
Liked 3,694 Times
in
2,516 Posts
Your welding looks great on this one. Do you have pictures of your welding setup?
10-24-18, 03:42 PM
#10
Senior Member
Thread Starter
Join Date: Jan 2013
Location: South Jersey
Posts: 2,265
Mentioned: 18 Post(s)
Tagged: 0 Thread(s)
Quoted: 714 Post(s)
Liked 800 Times
in
475 Posts
Sure. Its an inexpensive(for a TIG welder) AHP Alphatig 200 AC/DC welder with a CK 9 series torch with a small gas lens and a Furick FUPA 12 cup. The only changes I made were switching out the original 17 series torch for the 9 series and an upgraded foot pedal. The foot pedal in the pic is the original. It was functional, but didn't feel like I was able to precisely control the heat with it. The new pedal was well worth the $100 for the upgrade.
Last edited by dsaul; 10-24-18 at 03:46 PM.
11-03-18, 06:39 AM
#11
Senior Member
Thread Starter
Join Date: Jan 2013
Location: South Jersey
Posts: 2,265
Mentioned: 18 Post(s)
Tagged: 0 Thread(s)
Quoted: 714 Post(s)
Liked 800 Times
in
475 Posts
Bottle bosses silver brazed in.

Bosses after a bath in the kitchen sink.

Main tubes are fitted and intersections are marked with a sharpie for vent hole locations.

Vent holes made and prepped for welding.

Mid weld out.

Head tube welds.
11-06-18, 07:00 AM
#12
Senior Member
Thread Starter
Join Date: Jan 2013
Location: South Jersey
Posts: 2,265
Mentioned: 18 Post(s)
Tagged: 0 Thread(s)
Quoted: 714 Post(s)
Liked 800 Times
in
475 Posts
Seat stays fitted and tacked.
Welded.

Seat stay bridge fitted.

Bridge brazed in and cleaned up.
Rear view.
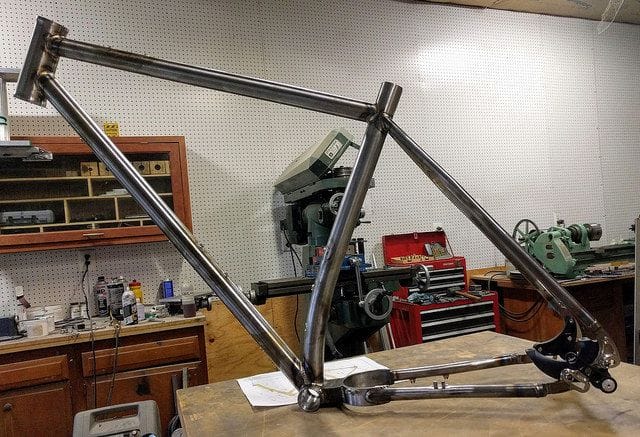
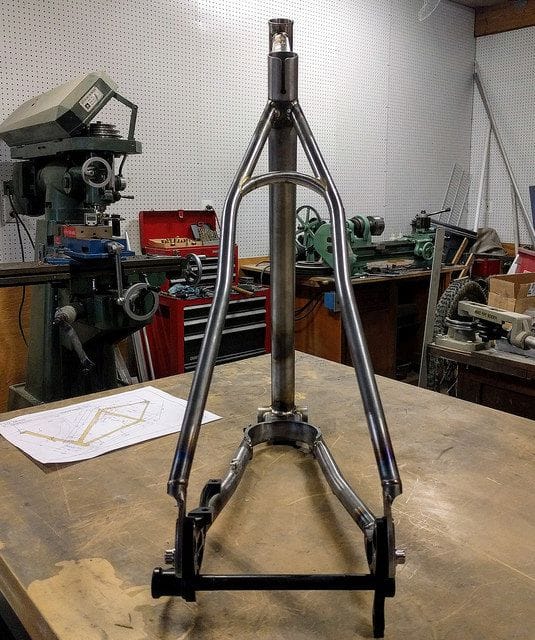
Completed frame, ready for powder coating.
11-06-18, 07:50 AM
#13
Senior Member
Thread Starter
Join Date: Jan 2013
Location: South Jersey
Posts: 2,265
Mentioned: 18 Post(s)
Tagged: 0 Thread(s)
Quoted: 714 Post(s)
Liked 800 Times
in
475 Posts
I forgot to add the process of making and mitering the seat stays.

5/8" .035 4130 tubing is bent on my Ridgid bender. I attach a tube block and zero out the angle gauge on the bender, so I can keep the bends in phase.

Matching S-bend stays.

Mitering the stays takes numerous cuts and trial fittings to get the bends in the right place in relation to the tire.
5/8" .035 4130 tubing is bent on my Ridgid bender. I attach a tube block and zero out the angle gauge on the bender, so I can keep the bends in phase.
Matching S-bend stays.
Mitering the stays takes numerous cuts and trial fittings to get the bends in the right place in relation to the tire.
11-06-18, 11:53 AM
#14
Randomhead
Join Date: Aug 2008
Location: Happy Valley, Pennsylvania
Posts: 24,394
Mentioned: 0 Post(s)
Tagged: 0 Thread(s)
Quoted: 4 Post(s)
Liked 3,694 Times
in
2,516 Posts
That's really looking great. Thanks for all the pictures.
11-06-18, 01:02 PM
#15
Senior Member
Join Date: Aug 2017
Location: Central Io-way
Posts: 2,673
Bikes: LeMond Zurich, Giant Talon 29er
Mentioned: 17 Post(s)
Tagged: 0 Thread(s)
Quoted: 1221 Post(s)
Liked 629 Times
in
472 Posts
Just fantastic looking! Thank you for the thread!
A couple questions, weight? Why did you braze the seat stay bridge instead of Tig? Will you be doing a fork as well or off the shelf?
A couple questions, weight? Why did you braze the seat stay bridge instead of Tig? Will you be doing a fork as well or off the shelf?
11-07-18, 06:02 AM
#16
Senior Member
Thread Starter
Join Date: Jan 2013
Location: South Jersey
Posts: 2,265
Mentioned: 18 Post(s)
Tagged: 0 Thread(s)
Quoted: 714 Post(s)
Liked 800 Times
in
475 Posts
I don't generally weigh my frames, but I would guess its just over 5lbs.
This one is getting a 120mm suspension fork.
 12-24-18, 07:40 PM
#18
Randomhead
Join Date: Aug 2008
Location: Happy Valley, Pennsylvania
Posts: 24,394
Mentioned: 0 Post(s)
Tagged: 0 Thread(s)
Quoted: 4 Post(s)
Liked 3,694 Times
in
2,516 Posts
really nice work. I would love to see it built up

