


Restoration of a Raleigh Stowaway 1983 - (Advice will be needed!)
 04-24-19, 07:25 AM
#51
Senior Member
Crank arms(steel) can be bent back. Several here have done it. Keep at it!
my mudguards are slightly sun bleached but I like the look. The original saddle on mine was the same padded vinyl which came on yours.
my trials will come when I change the rims and tires after awhile. The slight knobby tires are not to my liking but they are brand new and came from the previous owner. The chrome rims will stay sized 451 but switched to aluminium. Trying to locate non black 28 holed ones are a pain.
Cheers!
 05-05-19, 02:04 AM
#52
Member
Thread Starter
Update on Chain, Pedal and Front Hub
I visited the machine shop and he straightened the arms of the pedals.
The fact that there is a machine shop just on the other side of the street where i work, was very convenient.
'Up close and personal'

Still it is very close to the mudguard, but it works. I will take it.
'Chaining Reactions part I'
The next thing to fix was the chain. It was impossible to keep the old chain, its damage is beyond repair.

This chain has 114 links, so it needs shortening.

Placing old and new chain in order to measure the number of links. Notice the severity of rust damage on the old chain.

Counting the number of links the old chain has, i came up to a surprise. It has an odd number of links!
The original chain of Raleigh Twenty has 93 links. There is a half link as the photo shows.
I tried my luck by reducing to 94 links but this proved to be too loose even when placing the back wheel at the farthest position. My feeling was that with 92 links would not be enough to have a chain that is no tense even when placing the back wheel at the closest position towards the bottom bracket. So i ordered a half link.
'Wheel of fortune'
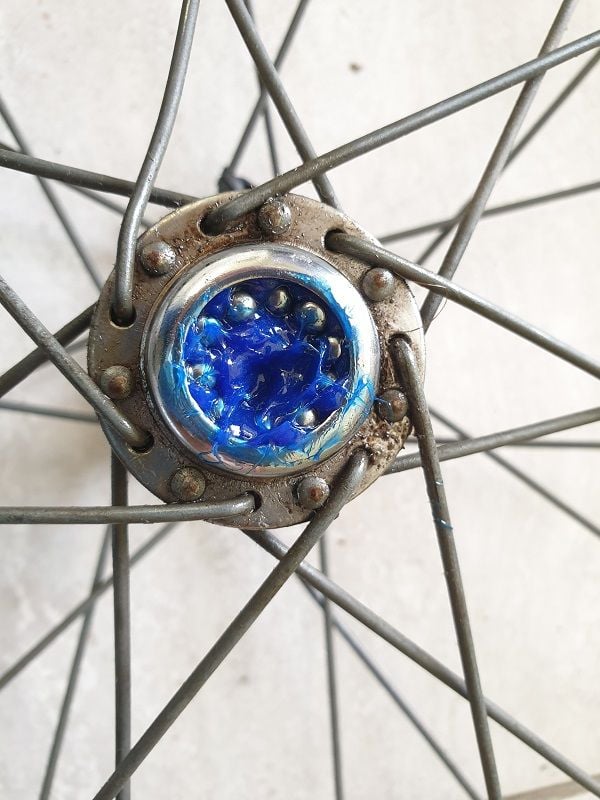
In the meantime i removed the front wheel to check the bearings and fix the wobbling effect.

A lot of dirt is accumulated here, but the good news are that the bearings are in excellent shape! thus the naming 'wheel of fortune' . I will use them again.

When i removed the wheel i thought i was missing the locking nut of the cone (left side). But guess what, Raleigh did not use locking nuts for the cone, which makes it slightly more difficult to screw the wheel without altering the cone setting.
(I read that the cone must be always on the left side where wheel movement tries to unscrew the cone. Otherwise, if placing the cone on the right side, the wheel movement may screw the cone, which would produce more friction and worst of all risk damaging the bearings)
I have read that the best strategy is to unscrew the cone half turn before placing the wheel and you will have the optimal setting. I just tried to keep the cone stabilized using the Raleigh key, while screwing the wheel nut. It worked, neither wheel wobbling effect nor bearings are pressed: the wheel keeps moving freely with minimum stress.
I also received the Brooks Saddle B67, and put it on the bike. The saddle feels like home in this bicycle.
Also assembled brakes, the surprise here was that while fixing the nut that locks the brake wire, broke.
pic here
Imagine what would happen if this nut broke while i was riding! I would have not enough stopping power!
I bought new locking nuts and installed the brakes. They work perfectly now.
Next in my list:
1. Electrical system. Check if lights, dynamo and these old cables still work.
2. Waiting some parts for the gear mechanism, and then assemble the gear mechanism. (a new cable and wire and the small chain at the rear hub)
3. New handle grips and installation.
4. Waiting for the mudguard to get the "STOWAWAY" decal that i am missing and reproduce it. Also will keep the mudguard to have the original color of the bike.
5. Adjusting the chain with the half link.
6. Prepare the saddle with 'proofide' for the breaking in process.
7. Printing of Decals.
Last edited by Fmtrx; 05-13-19 at 01:20 AM.
05-05-19, 07:22 AM
#53

Freewheel Medic

Join Date: Oct 2005
Location: An Island on the Coast of GA!
Posts: 12,882
Bikes: Snazzy* Schwinns, Classy Cannondales & a Super Pro Aero Lotus (* Ed.)
Mentioned: 140 Post(s)
Tagged: 0 Thread(s)
Quoted: 1452 Post(s)
Liked 2,195 Times
in
962 Posts
Go easy on the Proofide. Just a thin coat is all that is needed and only about once a year. Riding is what really shapes a Brooks to your personal anatomy.
One of your spokes (10 o'clock position) looks bent. That should be looked at by a bike shop.
I'm glad the machine shop could straighten the crank arms. Keep up the great work!
One of your spokes (10 o'clock position) looks bent. That should be looked at by a bike shop.
I'm glad the machine shop could straighten the crank arms. Keep up the great work!
__________________
Bob
Enjoying the GA coast all year long!
Thanks for visiting my website: www.freewheelspa.com
Bob
Enjoying the GA coast all year long!
Thanks for visiting my website: www.freewheelspa.com
05-06-19, 03:47 PM
#54
Member
Thread Starter
you are right, it is seriously bent i will have to remove the wheel again...
what made me wonder regarding the proofide is that instructions dictate that i should apply UNDERSIDE of thw saddle and a minimum portion on the saddle. Strange isnt it?
what made me wonder regarding the proofide is that instructions dictate that i should apply UNDERSIDE of thw saddle and a minimum portion on the saddle. Strange isnt it?
05-06-19, 04:19 PM
#55
Senior Member
If you have mudguards, it’s not necessary. One coat under saddle if you don’t have MG.
05-07-19, 06:30 AM
#57
Freewheel Medic
Join Date: Oct 2005
Location: An Island on the Coast of GA!
Posts: 12,882
Bikes: Snazzy* Schwinns, Classy Cannondales & a Super Pro Aero Lotus (* Ed.)
Mentioned: 140 Post(s)
Tagged: 0 Thread(s)
Quoted: 1452 Post(s)
Liked 2,195 Times
in
962 Posts
Proofide is designed to maintain the natural oils in the leather without overwhelming it (as opposed to "waterproof" as you might treat a pair of leather hiking boots). Excess moisture from regular riding in the rain or constantly running through puddles is what is really hard on a Brooks. Probably the second most challenge would be to leave it baking in the sun and exposed to UV with very little riding. I'm guessing this is more of a threat in Greece.
Keep your Brooks dry (without worrying about sweat), away from prolonged UV exposure, treat the top once a year with Proofide, and it should serve you and whoever you leave the Stowaway to in your will.
Keep your Brooks dry (without worrying about sweat), away from prolonged UV exposure, treat the top once a year with Proofide, and it should serve you and whoever you leave the Stowaway to in your will.
__________________
Bob
Enjoying the GA coast all year long!
Thanks for visiting my website: www.freewheelspa.com
Bob
Enjoying the GA coast all year long!
Thanks for visiting my website: www.freewheelspa.com
05-08-19, 02:44 AM
#58
Member
Thread Starter
Proofide is designed to maintain the natural oils in the leather without overwhelming it (as opposed to "waterproof" as you might treat a pair of leather hiking boots). Excess moisture from regular riding in the rain or constantly running through puddles is what is really hard on a Brooks. Probably the second most challenge would be to leave it baking in the sun and exposed to UV with very little riding. I'm guessing this is more of a threat in Greece.
Keep your Brooks dry (without worrying about sweat), away from prolonged UV exposure, treat the top once a year with Proofide, and it should serve you and whoever you leave the Stowaway to in your will.
Keep your Brooks dry (without worrying about sweat), away from prolonged UV exposure, treat the top once a year with Proofide, and it should serve you and whoever you leave the Stowaway to in your will.
LOL. After seeing that the bike managed to survive all these rains and UV rays in this balcony all these years, i am convinced that it is bomb proof.
The metal had only some surface rust, statically is 100% excellent.
Even the chrome still shines, if you take out of the equation that it has some pittings here and there.
Also adding the fact that from now on it will be dry stored (in a room) I suppose that i will have become ashes but this bike will still exists.
I will definitely include this in my will (
 ) .
) .Thanks for the advice on the conditionaing of the saddle, the requirements are minimum, only once a year, this is nice.
'Head Light to avoid being Light Headed in the Dark'
I had some updates regarding the lights:

For starters let's take a look of the replacement front light i got. It is a soubitez one and the chrome paint matches the back soubitez light i already have. On the left all that is left from the poor front light. Accidents happen when riding.
First of all what i learned after some research is that the circuit is closed through the . . steel frame.
Which means that we get the positive from the dynamo to the lights, and
a) the front light is earthed through the stem via the metal base that holds the light.
b) the back light is earthed through the frame using a screw on the frame that removes the paint. I did not like to remove the paint with the screw.
Besides i used crystal clear duct tape as a basis between each metal fixing and the frame of the bike. So earthing through the screw was out of the question.
What i did was to connect a second wire from a bolt of the dynamo driven to the front side and connected to the front light base - which is earthed through the stem.
I installed all the lights and dynamo, and of course...nothing worked. I had to check several things.
1. Was the replacement bulb I bought appropriate. Was the old bulb of the back light burnt ?
2. Was the old wire that connects the front light corroded ?
3. Is the second new wire that i used for the earth ok?
4. Is it possible that there is some corrosion that breaks the earthing connection?
5. Is the dynamo ok?
Using 4 X AAA batteries connected serially , and doing some tests found out that the dynamo did not provide current.
I had nothing to loose, just opened the dynamo and decided to give it a good clean as i noticed that some metal conducts inside were green (oxidized )

after cleaning the dynamo
reinstalled the dynamo, switched off the lights in the room, turned the pedal and voila!
'Let There Be Light'
Isn't it cool that old things can be fixed so easily ?

back light seems ok

However, the front light suffers from some low level light intensity.

Disconnectng the back light from dynamo changed things drastically. Front light luminosity in all its glory.
The dynamo produces 3 Watts, and the allocation is done this way : 2.4 Watt bulb for the front light, 0.6 watts for the back light.
I have to check these possibilities now:
1. I asked for a 2.4 watt bulb in the shop. Did they sell me a 2.4 Watt? Or is it a common 3Watt one ? If this is the case perhaps this explains why it does not produce appropriate levels of lights,
back light steals 0.6 watt and the front 3W one underperforms using only 2.4W.
2. Maybe the Dynamo is worn out, incapable of producing 3 Watts.
I will check 1. and if this is not the case I will buy a second hand dynamo that matches aesthetically the old one.
Still waiting for the half link for my chain from the shop.
Last edited by Fmtrx; 05-13-19 at 01:24 AM.
05-09-19, 11:20 PM
#59
Member
Thread Starter
'Get Grip on Yourself!'
I got the new grips yesterday. The problem is that the right hand one is stuck. I tried with WD40 but it would not do anything.
I am thinking of using a hair dryer today hoping that it will get softer and loose enough to fit.
Anyone has a better idea to suggest ?
The right metal base is of bigger diameter because it is attached on the handlebar.

Taking off the existing grips, i noticed that the right one is quite different: it has a slightly bigger diameter and is smoother inside (above) than the left one (below).
(Perhaps they trimmed the inner part from the factory before fitting?)
What i got was NOS bag (never opened) that contained two grips that match the one as shown below in the picture.

Last edited by Fmtrx; 05-13-19 at 01:26 AM.
05-13-19, 12:44 AM
#60
Member
Thread Starter
'Color my world'
Me at the beauty shop, asking the pretty 25 yo ssistant: "Excuse me do you have nail polish? It is for my personal use!"
Assistant gives a short glance, hesitates for a moment, but then professionalism kicks in and as naturally as it can get she proceeds helping me buy nail polish.
The reader of the text above will start complaining at this point:
"Hey Fmtrx, we are not interested in what you are doing in your personal life, no matter how 'special' this life is from what we can understand. Just finish the
bike please and leave these spicy details of your life out of the room!"
We will come later to this.
So there i went, and started picking appropriate colors for me. We had such kind of process:
I told her i want a bright red please, she gives me one, i tell her i need a brighter color to match my taste please.
Now give me a blue please. Not so deep blue, i need a light color of blue. etc etc
Needless to say that after 5 minutes or so, 4-5 young assistants were around me and also an older assistant in her mid fifties.
This beauty shop is excellent in their service. Isn't it? Or is there a different reason that i had 6 assistants staring at me and trying to help?
I could see in their eyes that they wanted to understand what is wrong with my case, but i just sit back and enjoyed the trolling ( some may say i am a bad person, i say i am just naughty).
At some point the older assistant decided that it was time to break free from these deeper thoughts they had, so she did the crucial question,
an indirect question to check what the heck is going on: "excuse me for what kind of use do you want this ?"
at this point i will provide a hint to the reader by posting the colors of nail polish i bought.

The choice of colors quite reveal my intention of usage.
Then, I offered salvation to all of them by responding : "It is not for my nails, it is for this piece i want to paint, and i took out the twisting handle grip
showing the damaged colors:

So after learning the truth which in this case was not spicy, the assistants returned to their jobs and i saw the older assistant smiling to me and
be more relaxed. We all relax when we get the answers we seek. Don't we ?
Finally I found the correct colors and the result was this:

like new
A side by side comparison of an old grip with my grip after installing the new grips i bought:

Chaining Reactions part II
I installed the half link with the worst possible way. I removed the pin from the link completely! This was so wrong, and i learned it the hard way.
I should have left the pin inside the hole to use it as a guide.

Anyway It took me a while to reinsert the pin, and tried to position the pin in the hole with this wire.
I had a lot of trial and errors, but eventually managed to insert the pin. Lesson learned.
Received the original color mudguard. I wanted to outsource the last decal i am missing: "STOWAWAY".
I placed the mudguard to check the difference between the original color and the color that the paint shop achieved.

There is some difference, but it is less than i originally thought
Waiting these to finish the project and upload the final pictures of the piece:
- Print Decals and install them
- Install Heron
- Install the bike chain
Test Ride and Chaining Reactions part III
Yesterday I did a test ride and after 100 meters i had the first fault. The chain was broken. I was not very happy with this, beacause i found only one of the two parts that broke.
I suspected that the fault could have been at the point i inserted the pins.
This was not the case, the link which is next to the SRAM powerlink was broken. I will return to the shop and tell them to fix it. This has to do with the chain itself and not with my intervention.
Well the positive news are that brakes are working, gears change as they should be, wheels and ride quality is nice, it is stable it is like a new bike.
Well it felt like a new bike for 100 meters that is!
Last edited by Fmtrx; 05-13-19 at 02:12 AM.
05-13-19, 04:51 AM
#61
Freewheel Medic
Join Date: Oct 2005
Location: An Island on the Coast of GA!
Posts: 12,882
Bikes: Snazzy* Schwinns, Classy Cannondales & a Super Pro Aero Lotus (* Ed.)
Mentioned: 140 Post(s)
Tagged: 0 Thread(s)
Quoted: 1452 Post(s)
Liked 2,195 Times
in
962 Posts
100 meters today---- 100,000 meters by the end of May!  Well done!
The nail polish story is perfect C&V ingenuity! We need a full glamor shot of your total project! Don't tease us anymore.
Well done! The nail polish story is perfect C&V ingenuity! We need a full glamor shot of your total project! Don't tease us anymore.
__________________
Bob
Enjoying the GA coast all year long!
Thanks for visiting my website: www.freewheelspa.com
Bob
Enjoying the GA coast all year long!
Thanks for visiting my website: www.freewheelspa.com
05-13-19, 05:56 AM
#62
Member
Thread Starter
I am trying but now it is out of my hands. @LittlePixel offered to help with the coloring of the scans but he will return from holidays in 12 days.
I could do them by myself, but i decided to leave this to a professional, LittlePixel who kindly offered to do them for me.
As soon as i get them i will take some pictures as i take it out to the coast. 12 days... only 12 days...
I could do them by myself, but i decided to leave this to a professional, LittlePixel who kindly offered to do them for me.
As soon as i get them i will take some pictures as i take it out to the coast. 12 days... only 12 days...
05-23-19, 01:29 AM
#63
Member
Thread Starter
This is the prelast update of my restoration project, and my last one will be during the weekend which will include photos of the finished piece.
I took the decision to not to wait, as i wanted to experiment with the process myself.
I could not wait more, i am quite impatient now as 95% of the work is finished and i cannot finalize it because of the decals.
So i took the scanned decals and performed some corrections with the colors and special care with the tear and wear that 'STOWAWAY' suffered.
This decal was outsourced from a used bike, which means it already had some damages, and my attempt to remove it added more damage to it
fortunately only at its outer edges:

Initial damaged decal.

After some fixes with good old Gimp.
After fixing and adjusting all decals, I printed them. Then a surprise happened, which i will show with a picture.

The issue is that a typical printer we all use does not have the capability of printing the white color. What it does is that it adjusts all
colors so that when they mix with the white color of the paper, the final result matches with what you see in you monitor.
So after taking off the sticker from you can see the issue here. I used a black background to have a better look.
If you ever plan to print a decal and it is your first time, NEVER use a transparent sticker. It will not do the job.
I went to the shop and bought several white stickers
For the cutting i used the following cutter:

which produces an excellent cutting quality. Avoid at all costs the usage of a blade and ruler technique.
The results are mediocre.
I had taken some measurements of the placement of the original stickers in the past:


decal reprint.

this time i had to cut each logo individually in order to remove the white areas. Examples above show some trial and error attempts with the blade and ruler technique.
If i could do the job with the transparent sticker it would have been easier: I would just use a rectangle that covers both RALEIGH logos and just apply it.
With the white stickers, I did some cuts, took the middle area between RALEIGH logos and stick it on the tube to use it as a guide before aplpication of the individual RALEIGH logos:

You can notice in this picture that these decals were cut with the blade, the right one has flaws at its edges.
So printed a new set and cut with the sticker cutter.
Regarding the issue with the lights, ( i had dim lighting on the front when I had the tail light connected), i used a multimeter to check the dynamo.
With the front light only the dynamo produced 0.48 ampere, which is normal.
When connecting both lights, then I got 0.2A for the front light and 0.29 A for the rear light.
Normally it should read 0.4A for the front light and 0.1A for the rear one. This leads to a rough assumption that the rear light maybe of higher wattage than 0.6W.
(The rear bulb has no details on it regarding wattage classification.)
Anyway I ordered a 0.6W. I believe that this will solve the last issue.
That was it, this weekend i will return with the photos!
I took the decision to not to wait, as i wanted to experiment with the process myself.
I could not wait more, i am quite impatient now as 95% of the work is finished and i cannot finalize it because of the decals.
So i took the scanned decals and performed some corrections with the colors and special care with the tear and wear that 'STOWAWAY' suffered.
This decal was outsourced from a used bike, which means it already had some damages, and my attempt to remove it added more damage to it
fortunately only at its outer edges:
Initial damaged decal.
After some fixes with good old Gimp.
After fixing and adjusting all decals, I printed them. Then a surprise happened, which i will show with a picture.
The issue is that a typical printer we all use does not have the capability of printing the white color. What it does is that it adjusts all
colors so that when they mix with the white color of the paper, the final result matches with what you see in you monitor.
So after taking off the sticker from you can see the issue here. I used a black background to have a better look.
If you ever plan to print a decal and it is your first time, NEVER use a transparent sticker. It will not do the job.
I went to the shop and bought several white stickers
For the cutting i used the following cutter:
which produces an excellent cutting quality. Avoid at all costs the usage of a blade and ruler technique.
The results are mediocre.
I had taken some measurements of the placement of the original stickers in the past:
decal reprint.
this time i had to cut each logo individually in order to remove the white areas. Examples above show some trial and error attempts with the blade and ruler technique.
If i could do the job with the transparent sticker it would have been easier: I would just use a rectangle that covers both RALEIGH logos and just apply it.
With the white stickers, I did some cuts, took the middle area between RALEIGH logos and stick it on the tube to use it as a guide before aplpication of the individual RALEIGH logos:
You can notice in this picture that these decals were cut with the blade, the right one has flaws at its edges.
So printed a new set and cut with the sticker cutter.
Regarding the issue with the lights, ( i had dim lighting on the front when I had the tail light connected), i used a multimeter to check the dynamo.
With the front light only the dynamo produced 0.48 ampere, which is normal.
When connecting both lights, then I got 0.2A for the front light and 0.29 A for the rear light.
Normally it should read 0.4A for the front light and 0.1A for the rear one. This leads to a rough assumption that the rear light maybe of higher wattage than 0.6W.
(The rear bulb has no details on it regarding wattage classification.)
Anyway I ordered a 0.6W. I believe that this will solve the last issue.
That was it, this weekend i will return with the photos!
Last edited by Fmtrx; 05-28-19 at 11:09 AM.
05-27-19, 03:16 AM
#64
Member
Thread Starter
Hello all,
My restoration adventure finally came to an end.
It was my first attempt in doing such a project, and i can say that i enjoyed it.
What helped most is that all the work was done in my own house , with some visits to my parents' house
to borrow some tools.
There were times that the process was extremely tedious and tiring: For example when i was trying to remove the electrostatic paint
from the inner side of the bottom bracket, or when i tried for hours to reinsert the pins from the chain.
But for sure I learned a few things, and i thank all of you for the support and for the comments.
First the pics:


I covered the first 20 kms with this bike after decades of storage and negligence. I had almost forgotten how smooth was the ride, and the advantage of the 3 speeds against other single speed bicycles.
For sure there were some steep curves where i missed the 5 easier speeds that my 15 speed mountain has - this bike demands a better level of fitness - but overall this bike is extremely usable.
When they marketed this bike for adults to cover their commuting needs, it was done with a valid purpose.
As we talk with British products, and 'Operations' ( ~ restorations)
I will steal a line from a famous British spy movie and will paraphrase it to introduce my next project :
'From Twenty With Love
E N D
But this is not quite the end
Fmtrx will return in
Operation "STEELFINGER" '

'STEELFINGER': 'The All Steel Bicycle' . This is my mother's bicycle, a 1955 Raleigh Sports Tourist. She is waiting patiently to be fixed.
All the best,
Faidon
My restoration adventure finally came to an end.
It was my first attempt in doing such a project, and i can say that i enjoyed it.
What helped most is that all the work was done in my own house , with some visits to my parents' house
to borrow some tools.
There were times that the process was extremely tedious and tiring: For example when i was trying to remove the electrostatic paint
from the inner side of the bottom bracket, or when i tried for hours to reinsert the pins from the chain.
But for sure I learned a few things, and i thank all of you for the support and for the comments.
First the pics:
I covered the first 20 kms with this bike after decades of storage and negligence. I had almost forgotten how smooth was the ride, and the advantage of the 3 speeds against other single speed bicycles.
For sure there were some steep curves where i missed the 5 easier speeds that my 15 speed mountain has - this bike demands a better level of fitness - but overall this bike is extremely usable.
When they marketed this bike for adults to cover their commuting needs, it was done with a valid purpose.
As we talk with British products, and 'Operations' ( ~ restorations)
I will steal a line from a famous British spy movie and will paraphrase it
to introduce my next project :'From Twenty With Love
E N D
But this is not quite the end
Fmtrx will return in
Operation "STEELFINGER" '
'STEELFINGER': 'The All Steel Bicycle' . This is my mother's bicycle, a 1955 Raleigh Sports Tourist. She is waiting patiently to be fixed.
All the best,
Faidon
Last edited by Fmtrx; 09-19-19 at 11:32 PM.
Likes For Fmtrx:

Thread
Thread Starter
Forum
Replies
Last Post
alexander55
Classic and Vintage Bicycles: Whats it Worth? Appraisals.
26
01-11-19 09:05 AM
