


Just wondering: accessory mounts
 06-25-23, 06:07 PM
#1
Senior Member
Thread Starter
Just wondering: accessory mounts
It seems that all accessories have mounts for either the handlebar and the seatpost.
However, I rarely ever mount my lights or cameras on my seat post. Put a saddlebag there and unless your seatpost is extended really long there's no more room to mount anything else. Or if you have a rear trunk or a pannier rack, it's going to block the light and/or the camera. Some members here have a bike radar (Garmin Varia) that mounts on the seatpost.
I don't think manufacturers ever think of things like this.
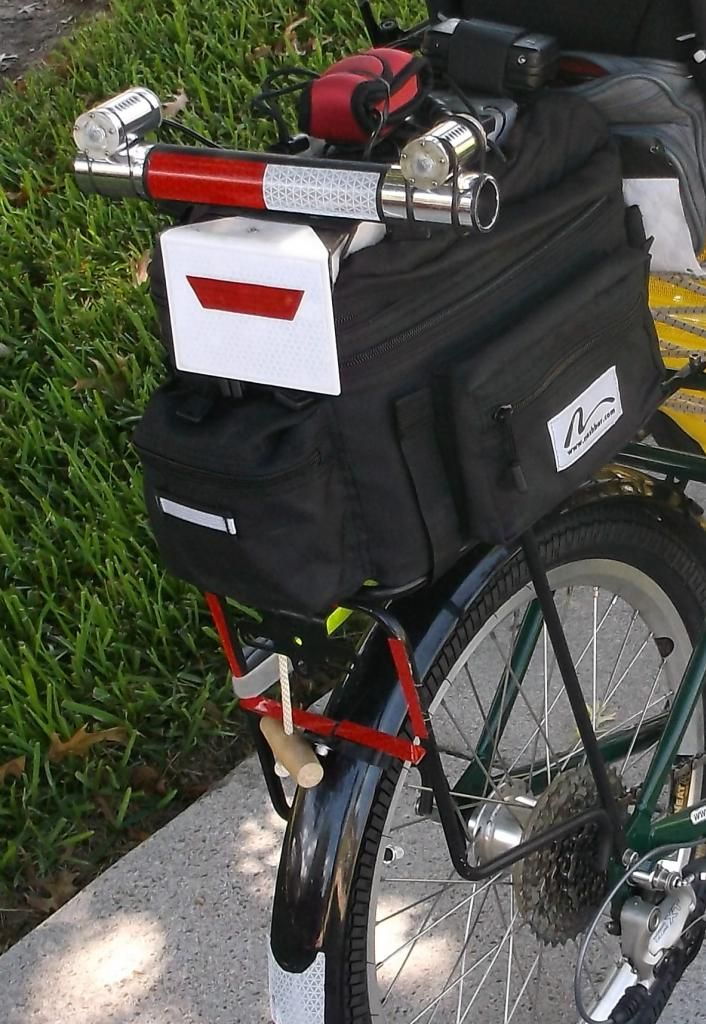
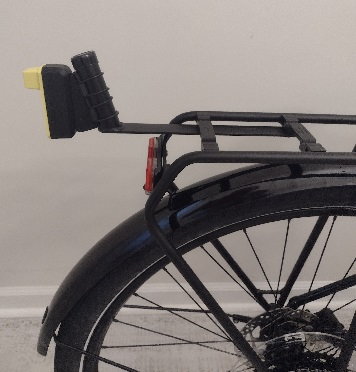
Are there any mounts one can buy so that a cyclist can mount his accessories directly at the back of the pannier rack?
I have already attempted a Google search but not sure of the search terms to use.
I have to hack and improvise all my installations and I'm getting a bit tired of doing this especially losing so many tail lights.
However, I rarely ever mount my lights or cameras on my seat post. Put a saddlebag there and unless your seatpost is extended really long there's no more room to mount anything else. Or if you have a rear trunk or a pannier rack, it's going to block the light and/or the camera. Some members here have a bike radar (Garmin Varia) that mounts on the seatpost.
I don't think manufacturers ever think of things like this.
Are there any mounts one can buy so that a cyclist can mount his accessories directly at the back of the pannier rack?
I have already attempted a Google search but not sure of the search terms to use.
I have to hack and improvise all my installations and I'm getting a bit tired of doing this especially losing so many tail lights.
Last edited by Daniel4; 06-25-23 at 06:11 PM.
 06-25-23, 08:41 PM
#2
Senior Member

Join Date: Sep 2017
Location: Upstate SC
Posts: 1,709
Mentioned: 3 Post(s)
Tagged: 0 Thread(s)
Quoted: 825 Post(s)
Liked 1,659 Times
in
784 Posts
You mean something like this?
Bike Rack Gen 2 Mount for Garmin Varia – Bup Labs
Bike Rack Gen 2 Mount for Garmin Varia – Bup Labs
 06-25-23, 08:43 PM
#3
Senior Member
Thread Starter
You mean something like this?
Bike Rack Gen 2 Mount for Garmin Varia � Bup Labs
Bike Rack Gen 2 Mount for Garmin Varia � Bup Labs
Thanks.
06-25-23, 08:44 PM
#4
Senior Member
Join Date: Aug 2010
Location: Madison, WI
Posts: 11,211
Bikes: 1961 Ideor, 1966 Perfekt 3 Speed AB Hub, 1994 Bridgestone MB-6, 2006 Airnimal Joey, 2009 Thorn Sherpa, 2013 Thorn Nomad MkII, 2015 VO Pass Hunter, 2017 Lynskey Backroad, 2017 Raleigh Gran Prix, 1980s Bianchi Mixte on a trainer. Others are now gone.
Mentioned: 48 Post(s)
Tagged: 0 Thread(s)
Quoted: 3461 Post(s)
Liked 1,467 Times
in
1,144 Posts
...
Are there any mounts one can buy so that a cyclist can mount his accessories directly at the back of the pannier rack?
I have already attempted a Google search but not sure of the search terms to use.
I have to hack and improvise all my installations and I'm getting a bit tired of doing this especially losing so many tail lights.
What do you want to mount on back of a rack?
06-25-23, 09:03 PM
#5
Senior Member
Thread Starter


 06-26-23, 05:18 AM
#7
Senior Member
Join Date: Aug 2010
Location: Madison, WI
Posts: 11,211
Bikes: 1961 Ideor, 1966 Perfekt 3 Speed AB Hub, 1994 Bridgestone MB-6, 2006 Airnimal Joey, 2009 Thorn Sherpa, 2013 Thorn Nomad MkII, 2015 VO Pass Hunter, 2017 Lynskey Backroad, 2017 Raleigh Gran Prix, 1980s Bianchi Mixte on a trainer. Others are now gone.
Mentioned: 48 Post(s)
Tagged: 0 Thread(s)
Quoted: 3461 Post(s)
Liked 1,467 Times
in
1,144 Posts
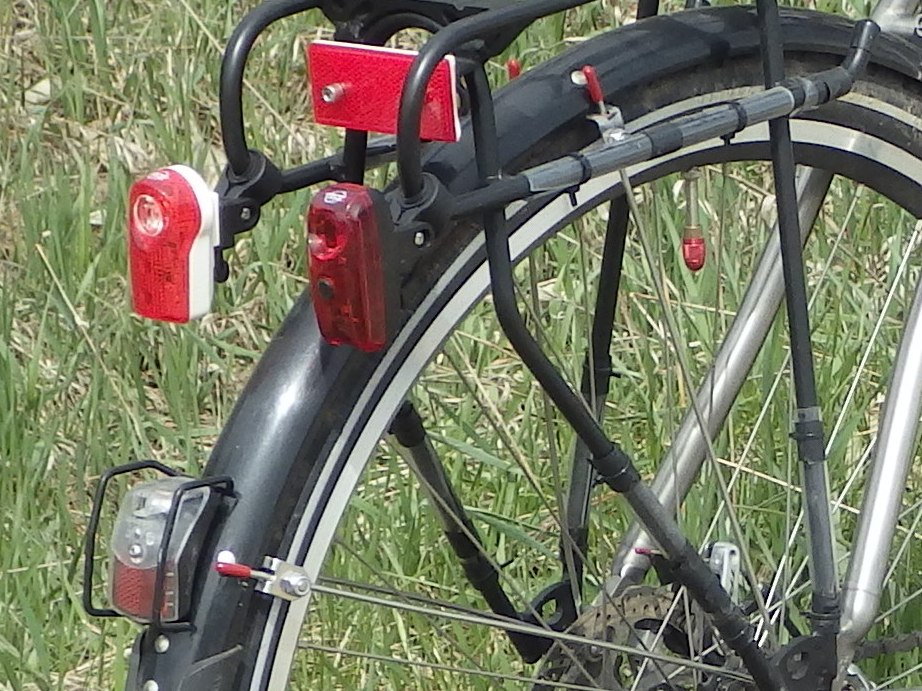
Many of the Busch and Muller lights fit on the Tubus or Racktime racks without adapters.
Some of the other lights have adapters for those racks. Does not say if the bolt spacing is right, you would have to research that.
https://www.universalcycles.com/shop...s.php?id=62442
This says the bolt holes are the right spacing for the German racks that have the holes with 50mm spacing.
https://www.planetbike.com/rear-rack...light-bracket/
If you do not want to use one of the off the shelf adapters, you have to get creative.
If you have some household tools, I made this bracket mount out of a piece of angle aluminum. But you need a hacksaw and a drill to do that.
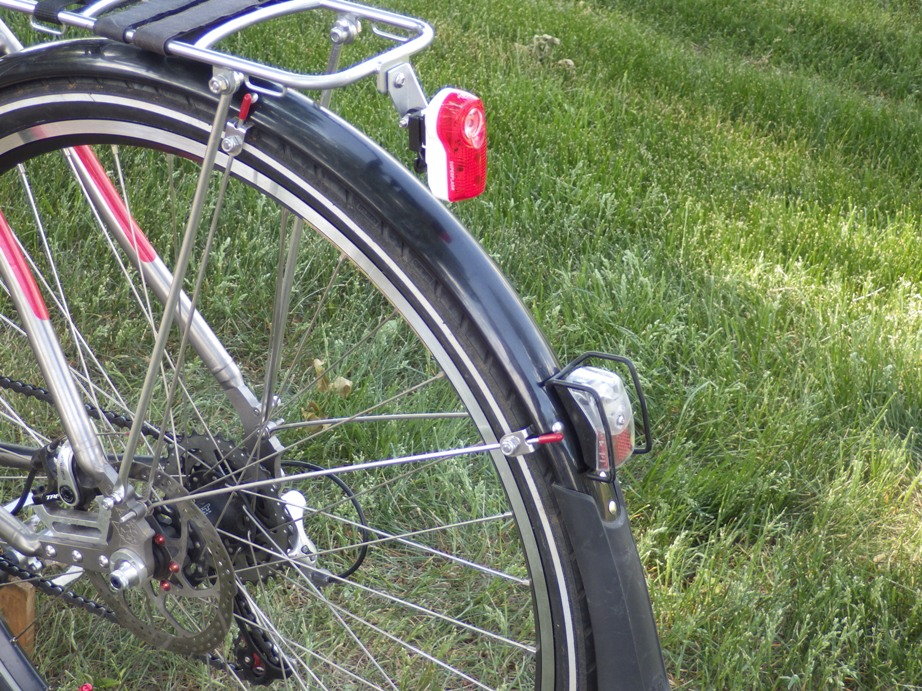
Many Planet Bike lights come with a seatstay mount. I cut some rubber strips from an old innertube and wrapped that strap around the rack tubing to make it thicker, then used the seatstay mounts.
Some of the other lights have adapters for those racks. Does not say if the bolt spacing is right, you would have to research that.
https://www.universalcycles.com/shop...s.php?id=62442
This says the bolt holes are the right spacing for the German racks that have the holes with 50mm spacing.
https://www.planetbike.com/rear-rack...light-bracket/
If you do not want to use one of the off the shelf adapters, you have to get creative.
If you have some household tools, I made this bracket mount out of a piece of angle aluminum. But you need a hacksaw and a drill to do that.
Many Planet Bike lights come with a seatstay mount. I cut some rubber strips from an old innertube and wrapped that strap around the rack tubing to make it thicker, then used the seatstay mounts.
Likes For Tourist in MSN:
06-26-23, 07:02 AM
#8

Senior Member
Join Date: Sep 2005
Location: Michigan
Posts: 3,706
Bikes: Trek 730 (quad), 720 & 830, Bike Friday NWT, Brompton M36R & M6R, Dahon HAT060 & HT060, ...
Mentioned: 10 Post(s)
Tagged: 0 Thread(s)
Quoted: 840 Post(s)
Liked 336 Times
in
251 Posts
Looking from the manufacturers side, their products need to meet common needs, so that these products sell at a reasonable rate. You are largely left to your own wits for more specialized situations - people cope with that as you can see from the examples. Recumbent bikes require various clamps and you can look there for opportunities, see T-Cycle, but prices will be typical for a reduced demand.
06-27-23, 02:24 PM
#10
Senior Member
Join Date: Sep 2017
Posts: 7,887
Mentioned: 38 Post(s)
Tagged: 0 Thread(s)
Quoted: 6972 Post(s)
Liked 10,969 Times
in
4,692 Posts
Have you even done a google search, or looked at some of the larger light manufacturer's websites? Because there are plenty of mounts designed to attach to racks and bags, even to saddlebags. You're just not trying very hard.
I found this in (literally) THREE SECONDS.
I found this in (literally) THREE SECONDS.
Likes For Koyote:
06-27-23, 04:41 PM
#11
Just a person on bike

Join Date: Aug 2013
Location: Seattle, WA
Posts: 2,140
Bikes: 2015 Trek 1.1, 2021 Specialized Roubaix, 2022 Tern HSD S+
Mentioned: 2 Post(s)
Tagged: 0 Thread(s)
Quoted: 132 Post(s)
Liked 86 Times
in
56 Posts
Have you even done a google search, or looked at some of the larger light manufacturer's websites? Because there are plenty of mounts designed to attach to racks and bags, even to saddlebags. You're just not trying very hard.
I found this in (literally) THREE SECONDS.
I found this in (literally) THREE SECONDS.
__________________
The value of your life doesn't change based on the way you travel. - Dawn Schellenberg (SDOT)
The value of your life doesn't change based on the way you travel. - Dawn Schellenberg (SDOT)
07-16-23, 06:33 PM
#12
Senior Member
Join Date: Sep 2017
Location: Upstate SC
Posts: 1,709
Mentioned: 3 Post(s)
Tagged: 0 Thread(s)
Quoted: 825 Post(s)
Liked 1,659 Times
in
784 Posts
How about something like this?
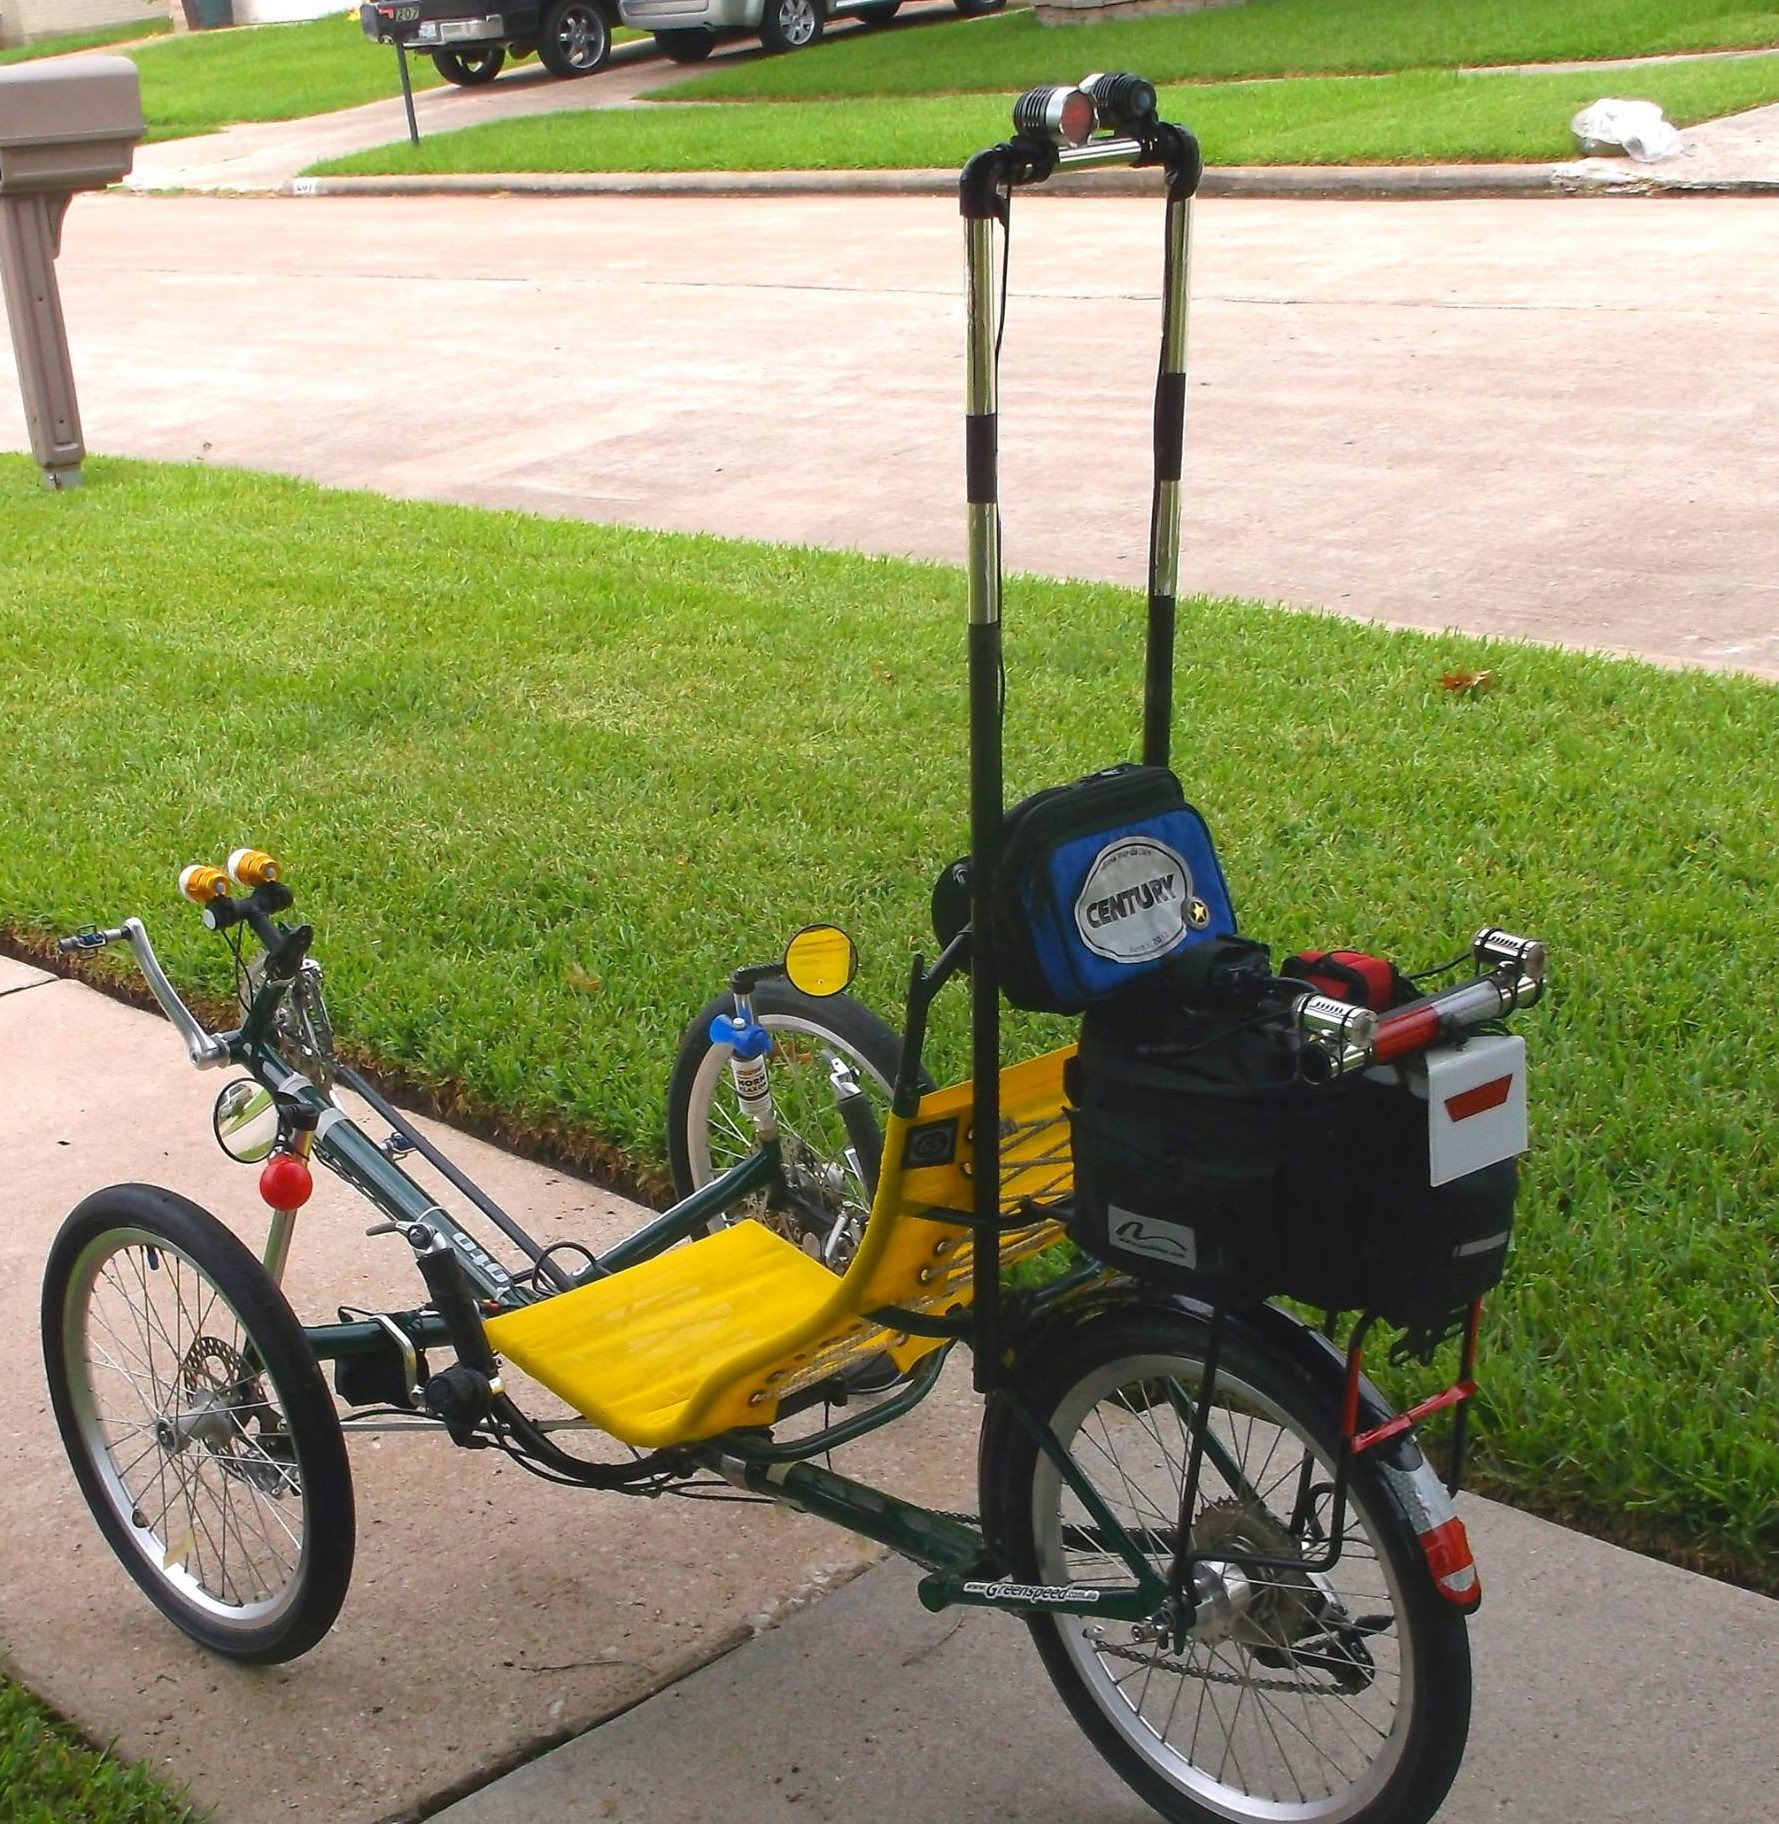
My friend's Trek Verve+ 4S has a factory rack and a rack bag. Her seatpost is low, so there is no place to mount anything there.
Solution? I made up a 'false seatpost' out of 1" wide by 1/8" thick aluminum stock, and some 1" diameter aluminum tubing.
I used a miter saw with an aluminum blade to cut the tubing at an 18 degree angle (18 degrees added to the seatpost 72 degrees = 90) Broke out the MAPP gas torch and aluminum brazing rods to connect the two. Drilled and tapped holes in the rack crossmembers for 6X32 cap screws, and drilled the flat aluminum for the screws. Painted it black and added a 1" diameter plastic cap on the end of the tube. Now I can mount any seatpost mount accessory needed, and not worry about clearing the bag. Currently, there is a video camera mounted.
07-17-23, 04:13 AM
#14
Senior Member
Join Date: Aug 2010
Location: Madison, WI
Posts: 11,211
Bikes: 1961 Ideor, 1966 Perfekt 3 Speed AB Hub, 1994 Bridgestone MB-6, 2006 Airnimal Joey, 2009 Thorn Sherpa, 2013 Thorn Nomad MkII, 2015 VO Pass Hunter, 2017 Lynskey Backroad, 2017 Raleigh Gran Prix, 1980s Bianchi Mixte on a trainer. Others are now gone.
Mentioned: 48 Post(s)
Tagged: 0 Thread(s)
Quoted: 3461 Post(s)
Liked 1,467 Times
in
1,144 Posts
How about something like this?
My friend's Trek Verve+ 4S has a factory rack and a rack bag. Her seatpost is low, so there is no place to mount anything there.
Solution? I made up a 'false seatpost' out of 1" wide by 1/8" thick aluminum stock, and some 1" diameter aluminum tubing.
I used a miter saw with an aluminum blade to cut the tubing at an 18 degree angle (18 degrees added to the seatpost 72 degrees = 90) Broke out the MAPP gas torch and aluminum brazing rods to connect the two. Drilled and tapped holes in the rack crossmembers for 6X32 cap screws, and drilled the flat aluminum for the screws. Painted it black and added a 1" diameter plastic cap on the end of the tube. Now I can mount any seatpost mount accessory needed, and not worry about clearing the bag. Currently, there is a video camera mounted.
...
07-17-23, 06:35 AM
#15
Senior Member
Join Date: Sep 2017
Location: Upstate SC
Posts: 1,709
Mentioned: 3 Post(s)
Tagged: 0 Thread(s)
Quoted: 825 Post(s)
Liked 1,659 Times
in
784 Posts
The trick is to get the stock really hot (above 700 degrees) and then to allow the brazing rod to melt in place. It's more like soldering, but the joints have been extremely strong and lasting.
07-17-23, 01:28 PM
#17
Senior Member
Join Date: Sep 2005
Location: Michigan
Posts: 3,706
Bikes: Trek 730 (quad), 720 & 830, Bike Friday NWT, Brompton M36R & M6R, Dahon HAT060 & HT060, ...
Mentioned: 10 Post(s)
Tagged: 0 Thread(s)
Quoted: 840 Post(s)
Liked 336 Times
in
251 Posts
 .
07-17-23, 04:55 PM
.
07-17-23, 04:55 PM
#18
Senior Member
Join Date: Sep 2017
Location: Upstate SC
Posts: 1,709
Mentioned: 3 Post(s)
Tagged: 0 Thread(s)
Quoted: 825 Post(s)
Liked 1,659 Times
in
784 Posts
The rod should melt on the stock without being in the torch flame. Also, make sure your aluminum pieces are spotlessly clean. I used some very fine grit sandpaper to clean them up.
Likes For Bald Paul:
07-19-23, 01:26 AM
#19
Senior Member
Join Date: Sep 2005
Location: Michigan
Posts: 3,706
Bikes: Trek 730 (quad), 720 & 830, Bike Friday NWT, Brompton M36R & M6R, Dahon HAT060 & HT060, ...
Mentioned: 10 Post(s)
Tagged: 0 Thread(s)
Quoted: 840 Post(s)
Liked 336 Times
in
251 Posts
 , but I used some dedicated flux that likely contributed to the deterioration of the joints over time. Unfortunately, with that regard, I am away from my base for a few weeks and I cannot check what exactly I used.
