


MTBR beam-shots ... seriously ........
 05-28-12, 04:04 AM
#1
Certified Bike Brat
Thread Starter
Join Date: Jan 2011
Location: Montreal, Quebec
Posts: 4,251
Mentioned: 0 Post(s)
Tagged: 0 Thread(s)
Quoted: 5 Post(s)
Likes: 0
Liked 6 Times
in
6 Posts
MTBR beam-shots ... seriously ........
Really - I thought these kind of reviews and information were supposed to HELP people buy a decent light by providing accurate, representative information.
I never did understand the extended shutter speeds posted for their beam-shots, and just out of curiosity, decided to try some shots myself using their reference settings - ISO 100, f4 and 4 seconds.*
So last night I pulled out a digital camera while having supper in a restaurant down the street and set it up to take a few shots later in the evening. I figured anytime after 7:30 in the evening might be OK to start.*
WRONG!
Even inside a dimly lit restaurant, those setting overexposed any photographs to the point they were almost a complete whiteout! Using only ambient lighting! Outside at 8:00pm streetlights were on and it would have been dangerous (and illegal) to drive a bicycle without some kind of lighting, but again - using the camera settings used in MTBR beam-shots - photographs were ridiculously overexposed. So how would you evaluate a light for evening conditions if you can't even take pictures with the settings they chose to use?
And no, there was nothing wrong with the camera. At reasonable settings, it took correctly exposed pictures. In fact I took TWO cameras and checked one against the other just to be sure.
So I actually had to wait till 10:00pm until there was absolutely no ambient light except from a few remote street lights to be able to use those MTBR beam-shot settings. And ...... you must be kidding!*
If these guys really want to pretend that a 4 second exposure at f4 and ISO 100 is representative of anything close to what any light puts out in the real world, or is even vaguely representative of what you'll be looking at if you actually buy any one of these lights - they're probably also selling swampland in Florida.
No wonder most bicycle lighting systems are so mediocre! With people like this doing lighting reviews - there's no need for the bicycle lighting industry to produce better lighting!
There was some discussion many years ago in the MTBR forums about changing the setting standards used to ISO 100, f4 and *ONE second. That would make a lot more sense. But I'm not counting on anything soon. The best strategy might simply be for members to post their own beam-shots - preferably using settings that don't permit taking night shots without any lights at all.
Actually I'm not all that upset - I'm actually amused that people like this can pass themselves off as doing something constructive and that the bicycling public at large will swallow it. My own little venture into bicycle lighting was more about beam spread than light intensity, and nothing met my requirements for coverage, but I really wasn't expecting the products on the market to be quite that dismal. Lots of people really are .... riding in the dark!

 05-28-12, 06:59 AM
#3


Randomhead
Join Date: Aug 2008
Location: Happy Valley, Pennsylvania
Posts: 24,461
Mentioned: 0 Post(s)
Tagged: 0 Thread(s)
Quoted: 4 Post(s)
Liked 3,761 Times
in
2,560 Posts
on edit: I was wrong
The reason they have standard settings is so the beams can be compared. I think it does a reasonably good job of giving a reasonable spread of brightness for different lights. If you go through the DIY beamshots, you will see some that barely register
The reason they have standard settings is so the beams can be compared. I think it does a reasonably good job of giving a reasonable spread of brightness for different lights. If you go through the DIY beamshots, you will see some that barely register
Last edited by unterhausen; 05-28-12 at 07:05 AM.
05-28-12, 07:06 AM
#4
Senior Member

Join Date: Dec 2010
Posts: 8,951
Mentioned: 0 Post(s)
Tagged: 0 Thread(s)
Quoted: 14 Post(s)
Likes: 0
Liked 13 Times
in
12 Posts
Interesting experiment. Do you have a decent light? If so, go out to a dark site and take a pic with those settings and see how the pic compares to your visual assessment. The eye is extremely non-linear in it's response to brightness.
05-28-12, 07:52 AM
#5

don't try this at home.

Join Date: Jan 2006
Location: N. KY
Posts: 5,974
Mentioned: 10 Post(s)
Tagged: 0 Thread(s)
Quoted: 987 Post(s)
Liked 528 Times
in
363 Posts
They probably used this exposure when the lights had a lot less output. But a photo that's mostly dark wouldn't make a good review photo.
What exposure would be reasonable? After playing around with my camera, I think about 2 seconds at F4 and 100 ISO is about right.
I used the photos to compare different beam spreads and intensity. I don't know how far away the playset is, anyway.
For instance, the Dinotte 200L (200 lumens) I have this light, and the photo is probably overexposed compared to real life. But it's still a good bike light for low speeds, with a nice beam width with no sharp cutoff.

Compare it to the Dinotte XML-3

What exposure would be reasonable? After playing around with my camera, I think about 2 seconds at F4 and 100 ISO is about right.
I used the photos to compare different beam spreads and intensity. I don't know how far away the playset is, anyway.
For instance, the Dinotte 200L (200 lumens) I have this light, and the photo is probably overexposed compared to real life. But it's still a good bike light for low speeds, with a nice beam width with no sharp cutoff.
Compare it to the Dinotte XML-3
Last edited by rm -rf; 05-28-12 at 07:56 AM.
05-28-12, 12:27 PM
#6
Senior Member

Join Date: Jul 2002
Posts: 6,956
Mentioned: 0 Post(s)
Tagged: 0 Thread(s)
Quoted: 0 Post(s)
Likes: 0
Liked 6 Times
in
5 Posts
Guys, you can't just set your camera to those settings and expect the photo to be directly comparable. It doesn't work that way. I have some specific settings I use for taillight beamshots, but if I got a different camera, I'd have to start over if I wanted photos you can directly compare for intensity.
05-28-12, 04:51 PM
#7
Certified Bike Brat
Thread Starter
Join Date: Jan 2011
Location: Montreal, Quebec
Posts: 4,251
Mentioned: 0 Post(s)
Tagged: 0 Thread(s)
Quoted: 5 Post(s)
Likes: 0
Liked 6 Times
in
6 Posts
on edit: I was wrong
The reason they have standard settings is so the beams can be compared. I think it does a reasonably good job of giving a reasonable spread of brightness for different lights. If you go through the DIY beamshots, you will see some that barely register
The reason they have standard settings is so the beams can be compared. I think it does a reasonably good job of giving a reasonable spread of brightness for different lights. If you go through the DIY beamshots, you will see some that barely register
05-28-12, 05:00 PM
#8
Certified Bike Brat
Thread Starter
Join Date: Jan 2011
Location: Montreal, Quebec
Posts: 4,251
Mentioned: 0 Post(s)
Tagged: 0 Thread(s)
Quoted: 5 Post(s)
Likes: 0
Liked 6 Times
in
6 Posts
They probably used this exposure when the lights had a lot less output. But a photo that's mostly dark wouldn't make a good review photo.
What exposure would be reasonable? After playing around with my camera, I think about 2 seconds at F4 and 100 ISO is about right.
I used the photos to compare different beam spreads and intensity. I don't know how far away the playset is, anyway.
For instance, the Dinotte 200L (200 lumens) I have this light, and the photo is probably overexposed compared to real life. But it's still a good bike light for low speeds, with a nice beam width with no sharp cutoff.
Compare it to the Dinotte XML-3

But I'm glad to hear you're happy with what you have yourself. Not everyone needs a torch, but everyone needs something they're comfortable with.
05-28-12, 05:08 PM
#9
Senior Member
Join Date: Sep 2011
Posts: 403
Mentioned: 0 Post(s)
Tagged: 0 Thread(s)
Quoted: 0 Post(s)
Likes: 0
Liked 0 Times
in
0 Posts
Guys, you can't just set your camera to those settings and expect the photo to be directly comparable. It doesn't work that way. I have some specific settings I use for taillight beamshots, but if I got a different camera, I'd have to start over if I wanted photos you can directly compare for intensity.
05-28-12, 05:14 PM
#10
Certified Bike Brat
Thread Starter
Join Date: Jan 2011
Location: Montreal, Quebec
Posts: 4,251
Mentioned: 0 Post(s)
Tagged: 0 Thread(s)
Quoted: 5 Post(s)
Likes: 0
Liked 6 Times
in
6 Posts
Four seconds (MTBR exposure time) at fifteen feet per second (bicycle speed) is 60 feet and either i can see that far ahead ... or I can't!
05-28-12, 05:17 PM
#11
Certified Bike Brat
Thread Starter
Join Date: Jan 2011
Location: Montreal, Quebec
Posts: 4,251
Mentioned: 0 Post(s)
Tagged: 0 Thread(s)
Quoted: 5 Post(s)
Likes: 0
Liked 6 Times
in
6 Posts
Guys, you can't just set your camera to those settings and expect the photo to be directly comparable. It doesn't work that way. I have some specific settings I use for taillight beamshots, but if I got a different camera, I'd have to start over if I wanted photos you can directly compare for intensity.
05-28-12, 06:11 PM
#12
Certified Bike Brat
Thread Starter
Join Date: Jan 2011
Location: Montreal, Quebec
Posts: 4,251
Mentioned: 0 Post(s)
Tagged: 0 Thread(s)
Quoted: 5 Post(s)
Likes: 0
Liked 6 Times
in
6 Posts
So actually I took a series of photos of my own light set-up with a couple different models of Sony digital cameras, using both the MTBR settings of "ISO 100, f4 and 4 seconds", and my own settings of "ISO 100, f4 and 1 second". And then I took another set with, of all things, my iPhone 4, which has an excellent reputation for reasonable reproduction. Those results were extremely close to the manual settings on the Sony of "ISO 100, f4 and 1 second". If anything they were slightly darker. The biggest advantage is I can post those immediately - the Sony versions will have to be processed and reduced in size before the site will accept them.
My own interest in a lighting system started last year and I was most interested in effective coverage as I planned on riding both off-road and on-road occasionally in less than ideal circumstances. So I contacted a few companies in the USA and tried out several lens formats. Different lenses disperse or focus the light differently and adding more power doesn't change the coverage - just the intensity.
So this is a P7 with a 15 degree spread.

Which is representative of a lot of 900 lumen bike lights and flashlights and is NOT what I wanted to drive behind. It has reach but very limited spread. Exposing the photograph for 4 seconds makes it much more impressive on the screen, but not in real life. Adding identical multiple lights just puts more light in the same limited area.
And this is a P7 with a 35 degree spread

Which is representative of some other 900 lumen bike lights and flashlights and is still not what I wanted to drive behind. It has less reach and more spread but still not enough. Once again, exposing the photograph for 4 seconds makes it much more impressive on the screen, but still a wanna-be in real life. Adding identical multiple lights still just puts more light in the same limited area.
And this is a P7 with a 15/45 degree spread

Which looks like a real loser if you only go by first impressions. (Actually an extended exposure looks really great - but what you'd see in a four second exposure is what I want in real life).
Thing is - it has pretty good reach and spread - it just lacks intensity because that same 900 lumen output is spread over a much wider area. So lets stack a few and see what happens:
This is a light bar made from 4 of those 15/45 lens configurations. They fit together just like Lego.

Now THAT'S a light I wanna drive with! Hmmmm .... looks just like a single with a 4 second exposure - except that it isn't! Yeah - 4 of these draw 40 watts combined, but I can still get 4 hours from a couple batteries the size of an iPhone.

And reach is pretty good - those posts on the RHS are 10 feet apart, and the lighting is very representative. In fact the dark areas are actually darker than reality.
And this is why I don't understand the need for separate settings for tail lights:

Aren't they both in the same picture?
I deliberately shot some street lights and /or traffic lights in these photos to give a relative reference for reality in case the camera settings weren't enough for some people. And yup - all these shots were taken at the same settings, and pretty representative of what I was looking at.

My own conclusion after looking at the photos posted on the MTBR reviews is that this lighting system has more output and is more effective than a Lupine Betty .... and cost less to boot.
My own interest in a lighting system started last year and I was most interested in effective coverage as I planned on riding both off-road and on-road occasionally in less than ideal circumstances. So I contacted a few companies in the USA and tried out several lens formats. Different lenses disperse or focus the light differently and adding more power doesn't change the coverage - just the intensity.
So this is a P7 with a 15 degree spread.
Which is representative of a lot of 900 lumen bike lights and flashlights and is NOT what I wanted to drive behind. It has reach but very limited spread. Exposing the photograph for 4 seconds makes it much more impressive on the screen, but not in real life. Adding identical multiple lights just puts more light in the same limited area.
And this is a P7 with a 35 degree spread
Which is representative of some other 900 lumen bike lights and flashlights and is still not what I wanted to drive behind. It has less reach and more spread but still not enough. Once again, exposing the photograph for 4 seconds makes it much more impressive on the screen, but still a wanna-be in real life. Adding identical multiple lights still just puts more light in the same limited area.
And this is a P7 with a 15/45 degree spread
Which looks like a real loser if you only go by first impressions. (Actually an extended exposure looks really great - but what you'd see in a four second exposure is what I want in real life).
Thing is - it has pretty good reach and spread - it just lacks intensity because that same 900 lumen output is spread over a much wider area. So lets stack a few and see what happens:
This is a light bar made from 4 of those 15/45 lens configurations. They fit together just like Lego.
Now THAT'S a light I wanna drive with! Hmmmm .... looks just like a single with a 4 second exposure - except that it isn't! Yeah - 4 of these draw 40 watts combined, but I can still get 4 hours from a couple batteries the size of an iPhone.
And reach is pretty good - those posts on the RHS are 10 feet apart, and the lighting is very representative. In fact the dark areas are actually darker than reality.
And this is why I don't understand the need for separate settings for tail lights:
Aren't they both in the same picture?
I deliberately shot some street lights and /or traffic lights in these photos to give a relative reference for reality in case the camera settings weren't enough for some people. And yup - all these shots were taken at the same settings, and pretty representative of what I was looking at.
My own conclusion after looking at the photos posted on the MTBR reviews is that this lighting system has more output and is more effective than a Lupine Betty .... and cost less to boot.
Last edited by Burton; 05-28-12 at 06:24 PM.
05-29-12, 01:06 AM
#13
Senior Member
Join Date: Jun 2009
Location: Silicon Valley, CA
Posts: 3,209
Mentioned: 2 Post(s)
Tagged: 0 Thread(s)
Quoted: 139 Post(s)
Liked 33 Times
in
20 Posts
I think there has been a lot of discussion about 4 second exposures. With really bright lights, 4 seconds can be too long. But it does allow for comparison. You'll often see sets of shots at various exposure times. YMMV.
05-29-12, 01:14 AM
#14
Senior Member
Join Date: Jul 2002
Posts: 6,956
Mentioned: 0 Post(s)
Tagged: 0 Thread(s)
Quoted: 0 Post(s)
Likes: 0
Liked 6 Times
in
5 Posts
 and from my experience, the answer is "definitely not."
Point in case: when I reviewed my Seca 700 Ultra, I first tried using MTBR's camera settings. The resulting photos were much brighter than they appeared in real life, so I adjusted the settings to portray the light the way it looks in real life (to me, anyway). Granted, my eyes are over 40 years old and not necessarily representative of everyone's.
05-29-12, 04:30 AM
#15
Senior Member
Join Date: Sep 2011
Posts: 403
Mentioned: 0 Post(s)
Tagged: 0 Thread(s)
Quoted: 0 Post(s)
Likes: 0
Liked 0 Times
in
0 Posts
They don't need to use the same sensor. They have a sensitivity to light based on the amplification in the electronics. That sensitivity is calibrated against standards produced by the ISO, hence the reason we lazy people call it ISO. My point about DxOMark is that they test cameras against the standard, and plot the accuracy of the manufacturer claims across the range of possible settings. There's relatively good consistency across all of the cameras I've perused, with the caveat that a lot of Nikon DSLRs don't natively do ISO 100 (it's a software hack; shoot at ISO 200 then mathematically decrease the brightness).
05-29-12, 05:25 AM
#16
Certified Bike Brat
Thread Starter
Join Date: Jan 2011
Location: Montreal, Quebec
Posts: 4,251
Mentioned: 0 Post(s)
Tagged: 0 Thread(s)
Quoted: 5 Post(s)
Likes: 0
Liked 6 Times
in
6 Posts
But does every digital camera use the same sensor, and produce the same exact image at a given ISO, shutter speed and f-stop. That's the question and from my experience, the answer is "definitely not."
Point in case: when I reviewed my Seca 700 Ultra, I first tried using MTBR's camera settings. The resulting photos were much brighter than they appeared in real life, so I adjusted the settings to portray the light the way it looks in real life (to me, anyway). Granted, my eyes are over 40 years old and not necessarily representative of everyone's.
and from my experience, the answer is "definitely not."Point in case: when I reviewed my Seca 700 Ultra, I first tried using MTBR's camera settings. The resulting photos were much brighter than they appeared in real life, so I adjusted the settings to portray the light the way it looks in real life (to me, anyway). Granted, my eyes are over 40 years old and not necessarily representative of everyone's.
According to the review you posted in 2008 (asuming its not a typo): [TABLE="width: 100%"]
[TR]
[TD]
[TABLE="class: tborder, width: 100%, align: center"]
[TR]
[TD="class: alt1, bgcolor: #F6F6F4"]"I tried the camera settings used in MTBR's light shootout (6-second exposure, ISO 100, aperture 4.0, daylight color balance) but they come out WAY brighter than what you'd see with your naked eyes, so I once again reduced the exposure time enough to be realistic."[/TD]
[/TR]
[/TABLE]
[/TR]
[/TABLE]
Six seconds is a seriously loooooooong exposure! I'm not surprised it wasn't representative of what you were looking at. At 4 seconds I was getting overexposure to the point that large portions of the photo were completely whited out. But thats simply an exposure issue caused by too much light and is directly ISO related. Personally I think 1 second is a better choice and 1/2 second might be even better. But in light reviews - that would really show what a really poor light output most lights have.
Last edited by Burton; 05-29-12 at 10:09 AM.
05-29-12, 07:30 AM
#17

Se�ior Member
Join Date: Sep 2005
Location: Michigan
Posts: 13,749
Bikes: Windsor Fens, Giant Seek 0 (2014, Alfine 8 + discs)
Mentioned: 13 Post(s)
Tagged: 0 Thread(s)
Quoted: 446 Post(s)
Likes: 0
Liked 8 Times
in
7 Posts
I shoot my beam shots on manual, and when I started I tried to get a setting on the camera that accurately reflected what the beam seemed to look like to me in real life. That meant that with things like a Cateye light that runs off AA cells, the beamshot looks like a dim little splash of grey in a black field.
I use the same settings when shooting other lights once I locked in on it. When I switch cameras I might have to adjust a bit, but if the ISO setting is the same it should be pretty close.
6 seconds is ridiculous. That's nothing like an accurate representation. I think I go with something around 1/2 or 1 second. It's been a while since I did beam shots, and I always just pull up an older one and check to see what settings I used then.
__________________
Work: the 8 hours that separates bike rides.
Work: the 8 hours that separates bike rides.
05-29-12, 10:38 AM
#18
Senior Member
Join Date: Jul 2002
Posts: 6,956
Mentioned: 0 Post(s)
Tagged: 0 Thread(s)
Quoted: 0 Post(s)
Likes: 0
Liked 6 Times
in
5 Posts
Different cameras use different sensors. Thing is - sensors in cameras have simply replaced the film that used to be in older style cameras and there were lots of different films produced by lots of different companies even then. They all used the same sensitivity references (ISO ratings) and the main differences were in color rendition, graininess, or B&W vs color. Some specilized films recorded only IR light or X-rays. Nothing much has changed. Now its just being done digitally.
According to the review you posted in 2008 (asuming its not a typo): [TABLE="width: 100%"]
[TR]
[TD]
[/TD]
[/TR]
[/TABLE]
Six seconds is a seriously loooooooong exposure! I'm not surprised it wasn't representative of what you were looking at. At 4 seconds I was getting overexposure to the point that large portions of the photo were completely whited out. But thats simply an exposure issue caused by too much light and is directly ISO related. Personally I think 1 second is a better choice and 1/2 second might be even better. But in light reviews - that would really show what a really poor light output most lights have.
According to the review you posted in 2008 (asuming its not a typo): [TABLE="width: 100%"]
[TR]
[TD]
[TABLE="class: tborder, width: 100%, align: center"]
[TR]
[TD="class: alt1, bgcolor: #F6F6F4"]"I tried the camera settings used in MTBR's light shootout (6-second exposure, ISO 100, aperture 4.0, daylight color balance) but they come out WAY brighter than what you'd see with your naked eyes, so I once again reduced the exposure time enough to be realistic."
[/TD]
[/TR]
[/TABLE]
[/TR]
[/TABLE]
Six seconds is a seriously loooooooong exposure! I'm not surprised it wasn't representative of what you were looking at. At 4 seconds I was getting overexposure to the point that large portions of the photo were completely whited out. But thats simply an exposure issue caused by too much light and is directly ISO related. Personally I think 1 second is a better choice and 1/2 second might be even better. But in light reviews - that would really show what a really poor light output most lights have.
In the big picture (haha), with the human eye as adaptable to variations in brightness as it is, beam pattern can trump brightness after a certain point. Easy example, my old DiNotte 600L versus my ~270-lumen Cyo. The DiNotte put out twice the light, but in such a flood beam that the area right in front of the bike was the brightest. The eyes adapt for that, and then I can't see what's 3 seconds ahead at highway speed. The Cyo has half the light, but lays it down pretty evenly... I can cruise a highway at 22mph and dodge rocks and debris on the shoulder with a little time to react. So I think people can get a little too caught up in the brightness comparisions, when it's only part of the real-world performance question. My general rule of thumb is that flood beams are great for mountain biking and showing up in heavy city traffic, while center-weighted beams are great for road.
Myself, when shooting photos with manual settings, I prefer the lower noise and extended depth-of-field of ISO50 @ f8.0. I'll need a tripod either way, so I just increase exposure time to achieve a realistic result.
6 seconds is ridiculous
Last edited by mechBgon; 05-29-12 at 01:11 PM.
05-30-12, 04:14 AM
#19
Certified Bike Brat
Thread Starter
Join Date: Jan 2011
Location: Montreal, Quebec
Posts: 4,251
Mentioned: 0 Post(s)
Tagged: 0 Thread(s)
Quoted: 5 Post(s)
Likes: 0
Liked 6 Times
in
6 Posts
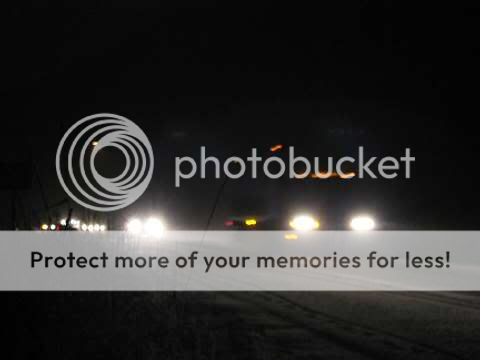
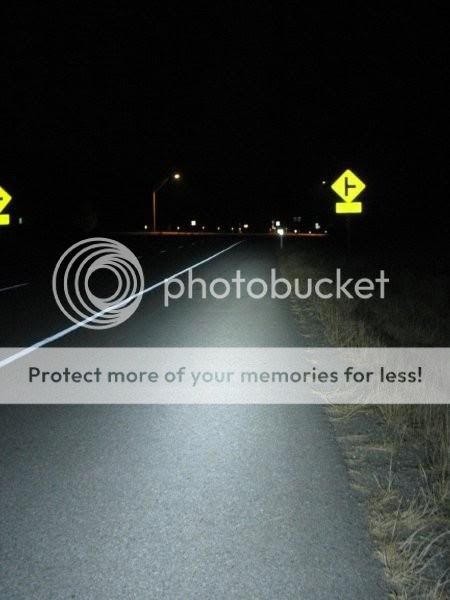
Come on guys - how about some beam shots taken on your commute to give some idea of what you're actually driving with and dealing with. I'm pretty sure traffic, road lighting and personal expectations vary widely and a picture is worth a thousand words.

 06-03-12, 10:51 PM
#22
Certified Bike Brat
Thread Starter
Join Date: Jan 2011
Location: Montreal, Quebec
Posts: 4,251
Mentioned: 0 Post(s)
Tagged: 0 Thread(s)
Quoted: 5 Post(s)
Likes: 0
Liked 6 Times
in
6 Posts
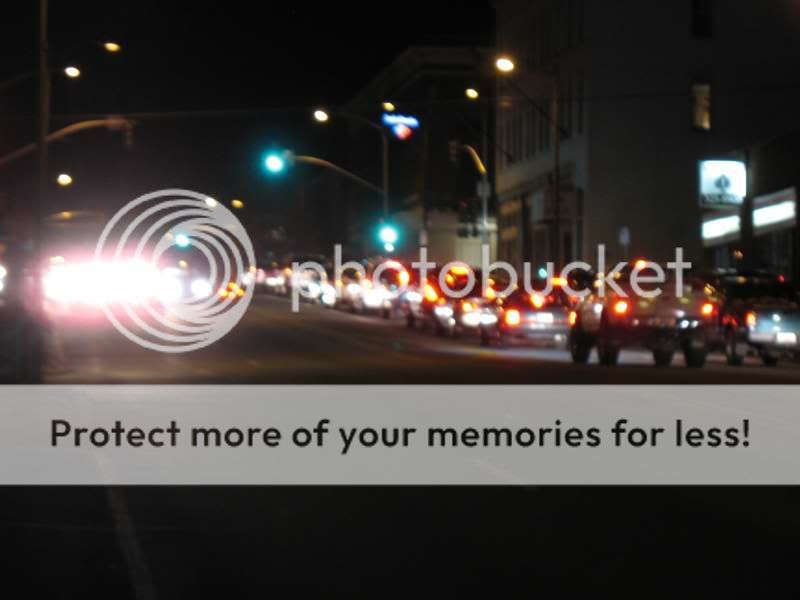
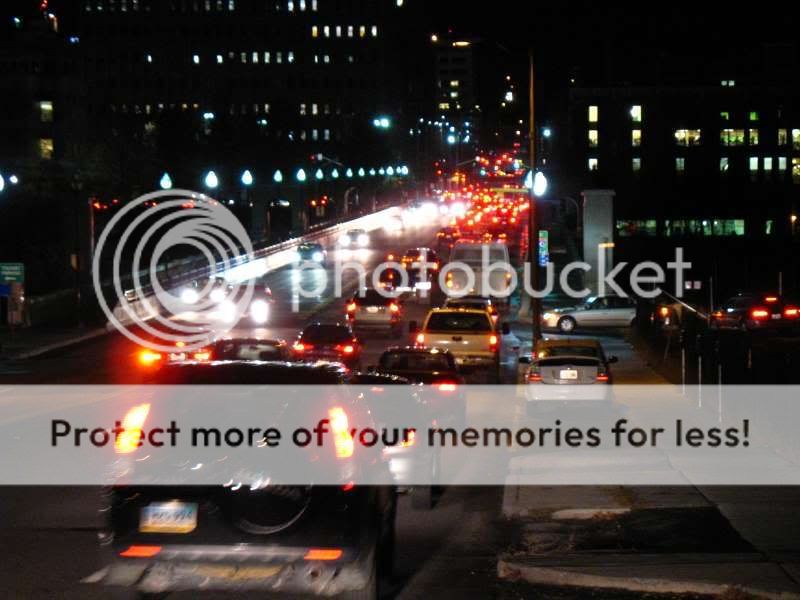
Thanks for the posts mechGon! Some areas of my own commute look like that but I'm not about to take pictures while driving in it! At some point I might clamp a tripod on the handlebars, but still haven't found a video camera that will let you set a manual exposure anyway. So I'm still using stills and manual modes for comparisons.
Can't figure why there aren't more people posting beam shots. There's certainly no reluctance to post BiKE pictures on this forum! Could it be that some of those glowing reports about lights are actually posted by employees of the companies they are praising??
At some point I might clamp a tripod on the handlebars, but still haven't found a video camera that will let you set a manual exposure anyway. So I'm still using stills and manual modes for comparisons.Can't figure why there aren't more people posting beam shots. There's certainly no reluctance to post BiKE pictures on this forum! Could it be that some of those glowing reports about lights are actually posted by employees of the companies they are praising??
Last edited by Burton; 06-06-12 at 08:31 PM.
06-15-12, 05:50 PM
#23
Senior Member

Join Date: May 2005
Posts: 284
Bikes: Specialized Stumpjumper FSR Comp, Specialized Rockhopper Comp, Gt Timberline
Mentioned: 0 Post(s)
Tagged: 0 Thread(s)
Quoted: 1 Post(s)
Likes: 0
Liked 0 Times
in
0 Posts
I tried taking beam shots with my camera, but they turn out making the beam output so low it is silly. My camera doesn't offer much in the way of settings and is a point and shoot type. When I eventually get a real camera I will be sure to take some beam shots. Right now I am running a Gloworm X2 version 2 on the helmet which is rated at 1,200 lumens, and I have one of the original Lupine Betty's from 2007 on the bar which I have upgraded to 22 degrees and 1,750 lumen.

Thread
Thread Starter
Forum
Replies
Last Post
PatrickGSR94
Electronics, Lighting, & Gadgets
12
06-03-12 03:53 AM
Sixty Fiver
Electronics, Lighting, & Gadgets
54
12-07-09 10:56 AM
