


Internal cables for HANDLEBARS ONLY
 09-19-19, 09:05 PM
#1
Newbie
Thread Starter
Join Date: Sep 2019
Posts: 1
Mentioned: 0 Post(s)
Tagged: 0 Thread(s)
Quoted: 2 Post(s)
Likes: 0
Liked 0 Times
in
0 Posts
Internal cables for HANDLEBARS ONLY
Hi all, first time post!
I've been building, gradually, my touring/commuter bike for the past 5 years as I learn new things. Recently I wanted to upgrade my bartape, going for a vintage look by using cloth bartape on top of the more cushiony stuff you can buy these days. I ended up removing this second layer because (1) it wasn't the best color choice, and (2) I thought about how tedious it would be to change brake and bar-end shifter housing. Then I thought, if removing bartape twice is such a chore, why put up with removing it once? And, if you are replacing bartape, the housings can become a factor when you're re-wrapping. So then I thought, internal cable routing.
There are horror stories around internal routing, specifically as they run through frames. It's difficult to replace things, and it can cause structural problems whether you hack the frame or it was designed that way. But for handlebars alone, I feel that's not such an issue: the housing is traveling along basically the same curvy path it would have outside the handlebars and under the bar tape, and they use the same amount of housing either way, so friction is not really an added problem. There are also techniques to reduce the frustrations of replacing cables/housing when internally routed, and I would think that whatever inconvenience this method has should be compared to the inconvenience of redoing bartape each time. I might be missing something (please share what you know!) but most discussions around this topic focus on internal routing through frames and I think handlebars alone can have a different set of problems and opportunities.
Which leads to some questions:
Apologize if this is I just want my steed to be fast, sturdy, maintainable, and looking a bit sharp.
I've been building, gradually, my touring/commuter bike for the past 5 years as I learn new things. Recently I wanted to upgrade my bartape, going for a vintage look by using cloth bartape on top of the more cushiony stuff you can buy these days. I ended up removing this second layer because (1) it wasn't the best color choice, and (2) I thought about how tedious it would be to change brake and bar-end shifter housing. Then I thought, if removing bartape twice is such a chore, why put up with removing it once? And, if you are replacing bartape, the housings can become a factor when you're re-wrapping. So then I thought, internal cable routing.
There are horror stories around internal routing, specifically as they run through frames. It's difficult to replace things, and it can cause structural problems whether you hack the frame or it was designed that way. But for handlebars alone, I feel that's not such an issue: the housing is traveling along basically the same curvy path it would have outside the handlebars and under the bar tape, and they use the same amount of housing either way, so friction is not really an added problem. There are also techniques to reduce the frustrations of replacing cables/housing when internally routed, and I would think that whatever inconvenience this method has should be compared to the inconvenience of redoing bartape each time. I might be missing something (please share what you know!) but most discussions around this topic focus on internal routing through frames and I think handlebars alone can have a different set of problems and opportunities.
Which leads to some questions:
- on average, how much time is saved by bypassing bartape with internal cables, while dealing with the added challenge of replacing these internal cables -- versus external setup?
- can I drill old-school aluminum handlebars for this purpose? If I did this hack technique, are there ways of reinforcing the holes, and to cut them in such a way to make replacing housing/cables easier?
- if NO HACKS, what purpose-made handlebars on the market for touring would you recommend?
- the technique for replacing internally-routed cables/housing seems like, you remove the housing first, then add the new housing, then remove the old cable, then add the new cable. It's not as clean an install as if you replaced both pieces at once. How much chance is there for residual rust/debris from transferring from the old parts to the new? Is it better to replace the housing first, or the cable? What precautions could I take?
- aside from ease of mechanics/aerodynamics (hah, on a touring bike), are there any significant advantages/drawbacks to using external/internal cable routing?
Apologize if this is
I just want my steed to be fast, sturdy, maintainable, and looking a bit sharp.
 09-19-19, 09:34 PM
#2
Senior Member
Join Date: Oct 2014
Location: Portland, OR
Posts: 12,891
Bikes: (2) ti TiCycles, 2007 w/ triple and 2011 fixed, 1979 Peter Mooney, ~1983 Trek 420 now fixed and ~1973 Raleigh Carlton Competition gravel grinder
Mentioned: 129 Post(s)
Tagged: 0 Thread(s)
Quoted: 4791 Post(s)
Liked 3,918 Times
in
2,548 Posts
I will never drill my bars for anything especially anywhere near the stem. I've lived through to many fork/steerer/stem/fork failures already and I tend to ride good equipment I like until it dies. So I have no advice there. I run my housings along the front of the bar under my second finger joint when I am holding the bars by the tops, like during easy and seated power climbing. I also wrap my bar tape from the bar ends so it is an easy matter to unwrap them, mess with cables or lever placement and re-wrap.
So ... "Apologize if this is I just want my steed to be fast, sturdy, maintainable, and looking a bit sharp" ... I think I've covered your criteria.
Ben
So ... "Apologize if this is
I just want my steed to be fast, sturdy, maintainable, and looking a bit sharp" ... I think I've covered your criteria.Ben
09-19-19, 10:07 PM
#3

Senior Member
Join Date: Feb 2012
Location: Rochester, NY
Posts: 18,056
Bikes: Stewart S&S coupled sport tourer, Stewart Sunday light, Stewart Commuting, Stewart Touring, Co Motion Tandem, Stewart 3-Spd, Stewart Track, Fuji Finest, Mongoose Tomac ATB, GT Bravado ATB, JCP Folder, Stewart 650B ATB
Mentioned: 0 Post(s)
Tagged: 0 Thread(s)
Quoted: 4195 Post(s)
Liked 3,837 Times
in
2,295 Posts
Once you watch (or it happens to you) a bar failure (for whatever reason) you likely won't push that envelope. I've seen a few from behind (those riders always seemed to be wanting to lead ) If you do so, carry a cell phone with an "in case of incapacity call..." feature. Really I shouldn't kid on this topic. Sudden loss of upper body support and steering is no fun.
The time servicing one's bike should be FAR less then the time spent riding, by a HUGE factor. Still the way to lessen that time (servicing) is to make the work as easy as possible. That's with no internal routing anywhere. No multiple steps to replace cables, lube old cables. And with internal routing one will often have to more frequent service to maintain the crisp functions of the new set up. Really how often are you replacing cables anyways? The casing under bar tape is the longest lasting (on average) casing on the bike. Which method you use to replace cables inside bars/frames varies and different people have their tricks, done right all work well enough. Are you under the clock while the pack is continuing on down the road during your servicing?
Aero factors are mostly BS for the majority of us. If your paycheck or ego is dependent on winning the sprint to the town sign great. If you're riding with me I'll sit up and let you by anyway.
Internal routing has many machinical drawbacks and little on road advantages. Out industry sells dreams more then experiences though. It's the sizzle not the steak that they focus on. You get to chose what's important to you. Andy
) If you do so, carry a cell phone with an "in case of incapacity call..." feature. Really I shouldn't kid on this topic. Sudden loss of upper body support and steering is no fun.The time servicing one's bike should be FAR less then the time spent riding, by a HUGE factor. Still the way to lessen that time (servicing) is to make the work as easy as possible. That's with no internal routing anywhere. No multiple steps to replace cables, lube old cables. And with internal routing one will often have to more frequent service to maintain the crisp functions of the new set up. Really how often are you replacing cables anyways? The casing under bar tape is the longest lasting (on average) casing on the bike. Which method you use to replace cables inside bars/frames varies and different people have their tricks, done right all work well enough. Are you under the clock while the pack is continuing on down the road during your servicing?
Aero factors are mostly BS for the majority of us. If your paycheck or ego is dependent on winning the sprint to the town sign great. If you're riding with me I'll sit up and let you by anyway.
Internal routing has many machinical drawbacks and little on road advantages. Out industry sells dreams more then experiences though. It's the sizzle not the steak that they focus on. You get to chose what's important to you. Andy
__________________
AndrewRStewart
AndrewRStewart
Last edited by Andrew R Stewart; 09-19-19 at 10:10 PM.
09-19-19, 11:44 PM
#5
Senior Member
If the housing needs replacement, it's likely that the tape would benefit from replacement regardless. It does not take long if you get good at it.
No way in hell I would ride a bike with DIY drilled handlebars down the block not to mention across the country.
On handlebars that do have factory internal routing (for integrated shifters) it would be difficult to replace the housing without removing the tape regardless--it always runs under the tape at least a little bit to the shifters because the shifters need some room to be adjusted. No such handlebars exist for bar end shifters so the point is moot.
For what it's worth the housing from the bar is the least likely to get contaminated. If you really hate wrapping your bars (and the tape doesn't look disgusting) you can probably save time (though not money) by replacing your cable at the first sign of friction, then replace the rest of the housing and the cable the next sign of friction, and then finally replace all the cables and housing, at which time you'll probably want to replace the brake housing. I'd just replace everything and retape every time, but I'm also a paid mechanic and can wrap bars in a couple minutes.
09-20-19, 05:40 AM
#6
Senior Member
Join Date: Jan 2013
Location: South Jersey
Posts: 2,262
Mentioned: 18 Post(s)
Tagged: 0 Thread(s)
Quoted: 713 Post(s)
Liked 796 Times
in
473 Posts
I can't picture a scenario where the bar tape would not have to be removed to replace the cable housing, even if the housing were run through the bars. There is no way to make it run directly from the shifter into the bar, so it will have at least one or two wraps of tape over it.
09-20-19, 07:18 AM
#7
Old fart
Join Date: Nov 2004
Location: Appleton WI
Posts: 24,778
Bikes: Several, mostly not name brands.
Mentioned: 153 Post(s)
Tagged: 0 Thread(s)
Quoted: 3583 Post(s)
Liked 3,395 Times
in
1,929 Posts
Don't use internal cable routing on a handlebar that wasn't designed for such cable routing. Drilling holes to route cables internally on a handlebar not designed for that routing is a recipe for trouble. The holes weaken the bars and create potential failure points. If/when the bar fails, you can be confident it will happen at the least opportune moment. Serious injury or even death is possible.
 09-20-19, 12:20 PM
#8
Senior Member

Join Date: Sep 2010
Location: Roswell, GA
Posts: 8,319
Bikes: '93 Trek 750, '92 Schwinn Crisscross, '93 Mongoose Alta
Mentioned: 30 Post(s)
Tagged: 0 Thread(s)
Quoted: 1438 Post(s)
Liked 1,092 Times
in
723 Posts
I've never tried it and I don't think I would, but how about wrapping the bar tape over a tube large enough to pass the cable housing? Then you could slide the housing in/out for replacement without disturbing the bar tape. Sort of an external, internal routing. Of course it would probably make an annoying rattle unless it was a close fit.
But I think that ending the tape at the center of the bar so that it can be easily removed/replaced, as 79pmooney suggests, is the best way.
But I think that ending the tape at the center of the bar so that it can be easily removed/replaced, as 79pmooney suggests, is the best way.
09-20-19, 04:10 PM
#9
Senior Member
Join Date: Jun 2014
Location: Ontario, Canada
Posts: 4,624
Bikes: iele Latina, Miele Suprema, Miele Uno LS, Miele Miele Beta, MMTB, Bianchi Model Unknown, Fiori Venezia, Fiori Napoli, VeloSport Adamas AX
Mentioned: 16 Post(s)
Tagged: 0 Thread(s)
Quoted: 1324 Post(s)
Liked 927 Times
in
640 Posts
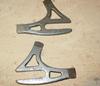
Go to the hardware store and buy yourself a length of PVC pipe or this plastic pipe that has an internal diameter just slightly bigger than your cable housing. When you get it home cut notches along the length of the pipe but don't cut right through the pipe. Tape this to your handlebar. Then you can feed the cable and housing under this. When it's taped over the cable housing can be removed if the housing needs to be replace yet the bar tape/wrap doesn't need to be removed. Conversely, you can remove the bar tape/wrap without the cable housing being disturbed. There used to be a product made for this exact purpose. I have here somewhere. I tried finding an image of it for you but the beast I can find so far is this drawing.
Shimano Bicycle System Components (1982) page 82
Here's an image from that page.

If I find my pieces of Outer Pad soon I'll edit this post and put an image of it in.
Found them and took images for you.


Do NOT drill your handlebar! Especially, don't drill near the brake lever as many handlebars that were so drilled broke and when they broke they broke suddenly.
Cheers
Shimano Bicycle System Components (1982) page 82
Here's an image from that page.
If I find my pieces of Outer Pad soon I'll edit this post and put an image of it in.
Found them and took images for you.
Do NOT drill your handlebar! Especially, don't drill near the brake lever as many handlebars that were so drilled broke and when they broke they broke suddenly.
Cheers
Last edited by Miele Man; 09-20-19 at 07:15 PM. Reason: Added images of the Cabel Housing Pad
09-20-19, 04:49 PM
#10

Senior Member

Join Date: Jul 2006
Location: San Jose (Willow Glen) Ca
Posts: 9,834
Bikes: Kirk Custom JK Special, '84 Team Miyata,(dura ace old school) 80?? SR Semi-Pro 600 Arabesque
Mentioned: 106 Post(s)
Tagged: 0 Thread(s)
Quoted: 2337 Post(s)
Liked 2,811 Times
in
1,535 Posts
time to do would be greater than any savings, risk to facial bone structure large and cushy tape on a touring bike is a good thing
this is a don't do it, no go, no way jose, thing
this is a don't do it, no go, no way jose, thing
__________________
Life is too short not to ride the best bike you have, as much as you can
(looking for Torpado Super light frame/fork or for Raleigh International frame fork 58cm)
Life is too short not to ride the best bike you have, as much as you can
(looking for Torpado Super light frame/fork or for Raleigh International frame fork 58cm)
09-20-19, 07:05 PM
#11
Senior Member
Are you running aero brake levers? You could start by running non-aero old school brake levers, where the cable housing doesn't go under the bar tape. Then you'd just have the bar end shifters, and you only route those part way under the wrap, right? As in, they emerge from the wrap when the flat of the bar starts to curve up, right?
A lot of modern handlebar wraps don't adhere to the bars in the same painful way that they used to -- look for any wrap that has kind of a gel adhesive bonded to the backside, instead of a white wrapper strip to pull off. That'll make swapping wrap easier.
I'd say by the time your cables and housing wear out, your wrap is probably due or overdue.
ALL THAT PRACTICAL STUFF ASIDE, I admire the crazy spirit to try to innovate, put yourself in danger and maybe destroy parts of your bike. So here's what I'd do: if you don't want to run non-aero levers, you're right that internal routing through the handlebar is going to be a bit tricky. You'll have to drill four holes for the brakes. One on each side close to the base of the lever and one one each side as far from the stem as possible while staying out from under the tape. If you have a Madone 9 laying around, take a look at those handlebars. The cables -- both shift and brake -- emerge from a hole on the inner bend near the base of the hood. There's a second set of holes on the outside of the bend near the hood to help you fish cables. So maybe consider drilling six holes. You've got the drill out already -- why not use it?
It will be, as you laid out, a multi-step process when you change housing, because yes, you will need the old cable to guide the new housing as you push it unseen back into the brake lever base. Then you can switch cables, but pray it doesn't accidentally push the housing out of position. That will be a hassle.
For the brake holes near the stem, I'd put them on the bottom side of the handlebar, because it will experience more compression force, and be less likely to crack -- or so I imagine! Who knows! But it will make the cable routing a little neater, since those cables are headed down anyway.
The shift cables, that's just a simple hole at drop right where it starts to curve up. You don't use the drops anyway, do you? No danger there. Drill away. A lot of those touring bars are so thick and burly, you could woodpecker those things and they'd probably be fine. Frames get drilled all the time -- for routing, bottle bosses, you name it. I bet anything Rivendell or Nitto make could take a lot of shots through the hull before heading underwater. But that's just my ignorance making a guess.
Good luck with your project!
If it takes five years or so, that's cool, but come back and post some pics, an obit, or whatever you end up with.
09-20-19, 07:35 PM
#12
Hump, what hump?

Join Date: Dec 2003
Location: SC midlands
Posts: 1,934
Bikes: See signature
Mentioned: 12 Post(s)
Tagged: 0 Thread(s)
Quoted: 337 Post(s)
Liked 227 Times
in
145 Posts
SRAM wireless and be done. Just sayin...
__________________
2010 AB T1X ** 2010 Cannondale SIX-5 ** 1993 Cannondale RS900 ** 1988 Bottecchia Team Record ** 1989 Bianchi Brava ** 1988 Nishiki Olympic ** 1987 Centurion Ironman Expert(2) ** 1985 DeRosa Professional SLX ** 1982 Colnago Super ** 1982 Basso Gap ** 198? Ciocc Competition SL ** 19?? Roberts Audax ** 198? Brian Rourke ** 1982 Mercian Olympic ** 1970 Raleigh Professional MK I ** 1952 Raleigh Sports
2010 AB T1X ** 2010 Cannondale SIX-5 ** 1993 Cannondale RS900 ** 1988 Bottecchia Team Record ** 1989 Bianchi Brava ** 1988 Nishiki Olympic ** 1987 Centurion Ironman Expert(2) ** 1985 DeRosa Professional SLX ** 1982 Colnago Super ** 1982 Basso Gap ** 198? Ciocc Competition SL ** 19?? Roberts Audax ** 198? Brian Rourke ** 1982 Mercian Olympic ** 1970 Raleigh Professional MK I ** 1952 Raleigh Sports

Thread
Thread Starter
Forum
Replies
Last Post
plowmanjoe
Road Cycling
3
06-21-16 01:44 AM
PatrickGSR94
Bicycle Mechanics
32
01-21-15 12:23 AM
