


ID freehub tool?
 04-24-20, 11:41 AM
#1

WGB
Thread Starter
Join Date: Jul 2017
Location: Niagara Region
Posts: 2,913
Bikes: Panasonic PT-4500
Mentioned: 46 Post(s)
Tagged: 0 Thread(s)
Quoted: 1794 Post(s)
Liked 2,328 Times
in
1,375 Posts
ID freehub tool?
Parts bike for $25. Covid driveway drill and find it's got steel rims. I had driven over so bought it anyway. Brought it home and dropped Park crank tool which landed on the edge of the steel base plate for my Park 2 and now threads of tool crushed. Not happy.
Anyway, I'm perplexed by this hub. Spoke protector stamped freehub protector so assuming it's a form of freehub. I doubt the cassette is worth removing but what is it and what tool would remove it??

As mounted, no locking ring for cassette (is this a unibody?), simply a dust cover.
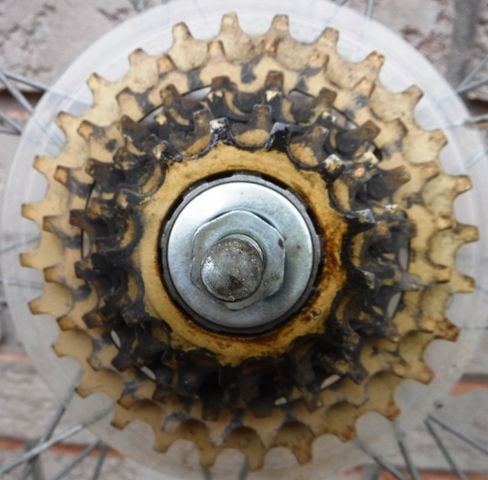
After removal of dust cap and axle

I would assume that the tool would drop in and engage the two groves but the hub is rounded at the bottom so it doesn't look like a Park FR-2 would work. Sheldon Brown shows a photo of a similar hub but the one he shows is threaded on the inside at the top and this is smooth.
https://www.sheldonbrown.com/k7.html

Any ideas?
Anyway, I'm perplexed by this hub. Spoke protector stamped freehub protector so assuming it's a form of freehub. I doubt the cassette is worth removing but what is it and what tool would remove it??
As mounted, no locking ring for cassette (is this a unibody?), simply a dust cover.
After removal of dust cap and axle
I would assume that the tool would drop in and engage the two groves but the hub is rounded at the bottom so it doesn't look like a Park FR-2 would work. Sheldon Brown shows a photo of a similar hub but the one he shows is threaded on the inside at the top and this is smooth.
https://www.sheldonbrown.com/k7.html
Any ideas?
 04-24-20, 11:49 AM
#2
Senior Member
Join Date: Jan 2004
Location: Madison, WI USA
Posts: 6,149
Mentioned: 50 Post(s)
Tagged: 0 Thread(s)
Quoted: 2362 Post(s)
Liked 1,746 Times
in
1,190 Posts
That's a uniglide cassette/freehub. Predecessor to the more familiar hyperglide. Do you want to remove the freehub from the hub, or the cassette from the freehub?
The cassette is secured by the smallest cog acting as a lock ring. To remove it, you need two chain whips, one on the smallest cog and one on one of the larger cogs. Turn the smallest cog counter-clockwise to remove. The rest slide off the splines.
The freehub is seured by the hollow fixing bolt you see in the last photo. There's a special tool for it, but there was just a thread recently, referring to a home-made tool someone made, with some simple square steel stock (I think it was 1/2" square), with the corners slightly ground back. In any event, it engages the fixing bolt much like a 10mm allen wrench works on a newer hyperglide freehub. Once again, counterclockwise to remove.
 04-24-20, 12:22 PM
#3
WGB
Thread Starter
Join Date: Jul 2017
Location: Niagara Region
Posts: 2,913
Bikes: Panasonic PT-4500
Mentioned: 46 Post(s)
Tagged: 0 Thread(s)
Quoted: 1794 Post(s)
Liked 2,328 Times
in
1,375 Posts
madpogue
Thanks. Will simply clean up the hub and wait until life resumes and use co-op as only have one chain whip now and can't see having two.
Thanks. Will simply clean up the hub and wait until life resumes and use co-op as only have one chain whip now and can't see having two.
04-24-20, 12:48 PM
#4
Senior Member
Join Date: Nov 2004
Posts: 23,223
Mentioned: 654 Post(s)
Tagged: 1 Thread(s)
Quoted: 4722 Post(s)
Likes: 0
Liked 3,036 Times
in
1,874 Posts
madpogue
Thanks. Will simply clean up the hub and wait until life resumes and use co-op as only have one chain whip now and can't see having two.
Thanks. Will simply clean up the hub and wait until life resumes and use co-op as only have one chain whip now and can't see having two.
Reassemble the hub and put the wheel back in the frame.
Shift in to the largest cog
Wrap the chain whip around the small cog.
Put clockwise pressure on thee drive side crankarm with one hand while apply counter-clockwise pressure to the chain whip with the other. If this doesn't generate enough force, remove the bicycle from the repair stand, put the drive side crankarm at 3 o'clock and have a family member put foot preesure on the pedal while you use two hands on the chain whip.
04-24-20, 04:55 PM
#5
Senior Member
Join Date: Dec 2016
Location: Long Island, NY
Posts: 2,107
Bikes: Trek 800 x 2, Schwinn Heavy Duti, Schwinn Traveler, Schwinn Le Tour Luxe, Schwinn Continental, Cannondale M400 and Lambert, Schwinn Super Sport
Mentioned: 14 Post(s)
Tagged: 0 Thread(s)
Quoted: 809 Post(s)
Liked 1,018 Times
in
664 Posts
You don't require two chain whips. One will suffice.
Reassemble the hub and put the wheel back in the frame.
Shift in to the largest cog
Wrap the chain whip around the small cog.
Put clockwise pressure on thee drive side crankarm with one hand while apply counter-clockwise pressure to the chain whip with the other. If this doesn't generate enough force, remove the bicycle from the repair stand, put the drive side crankarm at 3 o'clock and have a family member put foot preesure on the pedal while you use two hands on the chain whip.
04-24-20, 05:19 PM
#6
Senior Member
Join Date: Jan 2004
Location: Madison, WI USA
Posts: 6,149
Mentioned: 50 Post(s)
Tagged: 0 Thread(s)
Quoted: 2362 Post(s)
Liked 1,746 Times
in
1,190 Posts
^^^^ Yup, I've also read about tying one of the crank arms to a chainstay. To me those seem to be "any port in a storm" options; given the choice, I would rather use two actual tools made for the job, rather than using the bike itself as a virtual vise (pun slightly intended). Appropriate for someone who doesn't wrench enough to justify owning two chain whips, however.
Before I bought a second chain whip, I would occasionally fabricate one out of an old section of chain and a vise-grip.
Before I bought a second chain whip, I would occasionally fabricate one out of an old section of chain and a vise-grip.
04-25-20, 07:12 AM
#7
Senior Member
Join Date: Nov 2004
Posts: 23,223
Mentioned: 654 Post(s)
Tagged: 1 Thread(s)
Quoted: 4722 Post(s)
Likes: 0
Liked 3,036 Times
in
1,874 Posts
^^^^ Yup, I've also read about tying one of the crank arms to a chainstay. To me those seem to be "any port in a storm" options; given the choice, I would rather use two actual tools made for the job, rather than using the bike itself as a virtual vise (pun slightly intended). Appropriate for someone who doesn't wrench enough to justify owning two chain whips....
04-25-20, 07:41 AM
#8
Senior Member
Join Date: Nov 2008
Location: South Jersey
Posts: 1,959
Bikes: Too many Bicycles to list
Mentioned: 10 Post(s)
Tagged: 0 Thread(s)
Quoted: 90 Post(s)
Liked 137 Times
in
45 Posts
Before I got a second chain whip I would just use a old chain wrapped around the big cog and clamp the chain in my vice and use the whip to undo the small cog.
Glenn
Glenn
Likes For Glennfordx4:
04-25-20, 10:48 AM
#9
Senior Member
Join Date: Jan 2004
Location: Madison, WI USA
Posts: 6,149
Mentioned: 50 Post(s)
Tagged: 0 Thread(s)
Quoted: 2362 Post(s)
Liked 1,746 Times
in
1,190 Posts
Right, then at least the wheel is off the bike, and if anything slips, it won't damage the frame finish.
04-25-20, 11:39 AM
#10
Senior Member
Join Date: Apr 2020
Posts: 331
Bikes: '68 Masi Special road, Grail bike
Mentioned: 0 Post(s)
Tagged: 0 Thread(s)
Quoted: 108 Post(s)
Likes: 0
Liked 70 Times
in
58 Posts
WGB said "I can't see having 2 chain whips". I say if you keep working on vintage bikes
you'll find many times when you need 2.
you'll find many times when you need 2.
04-25-20, 11:53 AM
#11
Ride, Wrench, Swap, Race

Join Date: Jan 2010
Location: Northern California
Posts: 9,181
Bikes: Cheltenham-Pedersen racer, Boulder F/S Paris-Roubaix, Varsity racer, '52 Christophe, '62 Continental, '92 Merckx, '75 Limongi, '76 Presto, '72 Gitane SC, '71 Schwinn SS, etc.
Mentioned: 132 Post(s)
Tagged: 0 Thread(s)
Quoted: 1562 Post(s)
Liked 1,287 Times
in
858 Posts
Note that this particular early freehub does not use a hollow bolt to secure the freehub body to the hubshell.
Instead, there is a straight-walled "snout" integral with the hubshell, which the assembled freehub body slides onto, and with the end of the snout then peened over to secure the freehub body to the hushell, "permanently". I say that in quotes because these had an unfortunate tendency of separating over time, leaving the freehub body free to move about slightly. This didn't cause any problem in use until the time came to adjust the axle bearings, whereupon the process of achieving a correct adjustment was complicated by the presence of freeplay that didn't go away until the hub was test-fitted to the frame and the quick release skewer secured. So the usual simple "workbench" axle bearing adjustment became more of an iterative process of perhaps several readjustments and test-fittings.
If such a loosened freehub body can be fully removed (by pulling, I've done this), the mating surfaces can be cleaned and the body secured solidly using LocTite liquid threadlocker or stud/bearing mount. I then quickly secure moderate axle bearing tension then allow some hours for this to cure undisturbed. Curing is greatly accelerated by the application of heat to the hubshell, hot to the touch (140F) and it will be ready to go in 15 minutes or less.
Servicing the freehub body bearings is done by turning the bearing cup clockwise to loosen, so that the shim stack for the bearing tension adjustment can be accessed just under the cup.
Smaller bearing adjustments (than the equivalent thickness of one shim) can be made by lightly sanding the opposite end of the cup (the tip of the cone on it's reverse side), but such adjustments are irreversible if you take off too much and the bearing becomes too tight as the cup is re-tightened.
I do not ever take the freehub body apart beyond removing the cup and possibly the shim(s).
I made a very nice tool from a 13/16" socket for this purpose using bench grinder and files:
Last edited by dddd; 04-25-20 at 12:05 PM.
04-25-20, 02:58 PM
#12
WGB
Thread Starter
Join Date: Jul 2017
Location: Niagara Region
Posts: 2,913
Bikes: Panasonic PT-4500
Mentioned: 46 Post(s)
Tagged: 0 Thread(s)
Quoted: 1794 Post(s)
Liked 2,328 Times
in
1,375 Posts
Thanks to all for the advice.
I think I'll try both methods, purely as a learning exercise.
The chain on this frame was really rusty so I ditched it and now don't have a trash chain. So per the second chain route I assume it can't hurt to use a new chain? (Won't damage a chain?)
As for the on frame method, I have a couple of old frames I can use without fear of paint damage.
Valid point about a second chain whip but I have had one for years and I've only needed a chain whip at my home one time and that was to clean the cassette on a flipper. All my own bikes are freewheel equipped with down tube shifting.Which reminds me I need an Atom freewheel remover as twice now I've borrowed one from Bertinjim.
04-25-20, 03:30 PM
#13
Senior Member
Join Date: Jan 2004
Location: Madison, WI USA
Posts: 6,149
Mentioned: 50 Post(s)
Tagged: 0 Thread(s)
Quoted: 2362 Post(s)
Liked 1,746 Times
in
1,190 Posts
Can you fish the old rusty chain out of the trash? I suppose you could try a new chain as a second chain whip, I would just be careful about clamping down on it with a vise-grip, vise or whatever.
Hmm, do you have any old innertubes? In a pinch, you MIGHT even be able to wrap an old tube a couple times around the cassette and hold it fast, and use the chain whip on the small cog.
04-28-20, 06:56 PM
#14
WGB
Thread Starter
Join Date: Jul 2017
Location: Niagara Region
Posts: 2,913
Bikes: Panasonic PT-4500
Mentioned: 46 Post(s)
Tagged: 0 Thread(s)
Quoted: 1794 Post(s)
Liked 2,328 Times
in
1,375 Posts
My chain went out last Tuesday but out for a ride and saw a garbage bike and got the chain. Off in a minute. I'll rebuild it just to try T-mar's method. After all per Faber College"Knowledge is good". I'll clean up the cassette (it's probably worthless but why not?). I'll try the method of dddd and save the hub and freehub. Hub is actually really nice, freehub might go to the co-op. Harvested all the spokes as I have a 27 in Rigida aluminum wheelset.
04-28-20, 07:27 PM
#15
Senior Member
Join Date: Jan 2004
Location: Madison, WI USA
Posts: 6,149
Mentioned: 50 Post(s)
Tagged: 0 Thread(s)
Quoted: 2362 Post(s)
Liked 1,746 Times
in
1,190 Posts

