


Parts needed for Ultegra di2 upgrade.
 09-08-20, 09:58 AM
#1
Full Member
Thread Starter
Parts needed for Ultegra di2 upgrade.
I’m wanting to upgrade my Ultegra 8000 mechanical to Di2. I have a 52/36 front, and 11-30 rear cassette that I plan on keeping. I know that I will need the 8070 shifters, but what other pieces of equipment will I need?
 09-08-20, 10:14 AM
#2
Full Member
Join Date: May 2020
Posts: 425
Mentioned: 1 Post(s)
Tagged: 0 Thread(s)
Quoted: 167 Post(s)
Liked 291 Times
in
163 Posts
https://glorycycles.com/shimano-ulte...0-upgrade-kit/
https://www.bike-discount.de/en/buy/...variant-688419
Something like this I would expect.
https://www.bike-discount.de/en/buy/...variant-688419
Something like this I would expect.
09-08-20, 10:21 AM
#3
Senior Member
The only economical way I know to do this is with a resold OEM package. PBK, what Algarve said etc I have done Ultegra and DA with sale packages. I think it was about half retail price.
09-08-20, 10:21 AM
#4
Senior Member
Join Date: Nov 2015
Posts: 8,922
Mentioned: 20 Post(s)
Tagged: 0 Thread(s)
Quoted: 4717 Post(s)
Liked 1,882 Times
in
998 Posts
If you are in the US, Merlin Cycles has everything you need, and they'll have it at your door Saturday
https://www.merlincycles.com/shimano...it-112246.html
https://www.merlincycles.com/shimano...it-112246.html
Likes For noodle soup:
09-08-20, 10:39 AM
#5
Full Member
Thread Starter
yes sir, I’ve been watching a few FB pages for take offs and such. My main thing is that I’m not sure if I need a medium or long cage rear derailer for a 30 tooth gear.
09-08-20, 10:48 AM
#6
Senior Member

Join Date: Nov 2017
Location: Seattle
Posts: 1,955
Bikes: Specialized Roubaix, Canyon Inflite AL SLX, Ibis Ripley AF, Priority Continuum Onyx, Santana Vision, Kent Dual-Drive Tandem
Mentioned: 20 Post(s)
Tagged: 0 Thread(s)
Quoted: 873 Post(s)
Liked 726 Times
in
436 Posts
09-08-20, 02:23 PM
#8
Senior Member
Join Date: Jul 2007
Location: South shore, L.I., NY
Posts: 6,882
Bikes: Flyxii FR322, Cannondale Topstone, Miyata City Liner, Specialized Chisel, Specialized Epic Evo
Mentioned: 18 Post(s)
Tagged: 0 Thread(s)
Quoted: 3238 Post(s)
Liked 2,084 Times
in
1,180 Posts
Assuming yes, you need Shifters, F derailer, R derailer, A Junction at stem or in end of h-bar (that requires drilling holes in the h-bar or using a bar designed for Di2), B Junction to install near bottom bracket, Battery - usually in the seat post with a shim designed to hold the battery, cables - 2 for the shifters, A Junction to B junction, Battery to B junction, F derailer to B junction, R derailer to B junction.
You can keep/re-use your rim brakes, crank and bottom bracket, chain and cassette.
It’s a bit over $1000, add another $89 for the BT unit.
Texas Cyclesport does good packages and is cost effective.
https://www.texascyclesport.com/shim...-upgrade-kits/
Biggest questions I’ve dealt with are 1) Is the frame designed to route Di2 cables internal, is there an opening near the head tube on the down tube big enough for the Di2 cable connector ?. 2) BSA or Press-fit bottom bracket, that needs removal to route cables and install the B junction ?, or maybe a removable hatch or design at the b-bracket to route cables ?. The B junction can be installed in the seat tube, as BTW.
Likes For Steve B.:
09-08-20, 04:25 PM
#9

Asleep at the bars

Join Date: May 2006
Location: San Francisco, CA and Treasure Island, FL
Posts: 1,743
Mentioned: 2 Post(s)
Tagged: 0 Thread(s)
Quoted: 234 Post(s)
Liked 203 Times
in
135 Posts
R8050s are the cable-brake shifters, R8070s are the hydro-brake ones.
__________________
"This 7:48 cycling session burned 5933 calories. Speed up recovery by replacing them with a healthy snack." - Whoop
"This 7:48 cycling session burned 5933 calories. Speed up recovery by replacing them with a healthy snack." - Whoop
09-09-20, 06:32 AM
#10
Full Member
Thread Starter
Rim brakes ??
Assuming yes, you need Shifters, F derailer, R derailer, A Junction at stem or in end of h-bar (that requires drilling holes in the h-bar or using a bar designed for Di2), B Junction to install near bottom bracket, Battery - usually in the seat post with a shim designed to hold the battery, cables - 2 for the shifters, A Junction to B junction, Battery to B junction, F derailer to B junction, R derailer to B junction.
You can keep/re-use your rim brakes, crank and bottom bracket, chain and cassette.
It’s a bit over $1000, add another $89 for the BT unit.
Texas Cyclesport does good packages and is cost effective.
https://www.texascyclesport.com/shim...-upgrade-kits/
Biggest questions I’ve dealt with are 1) Is the frame designed to route Di2 cables internal, is there an opening near the head tube on the down tube big enough for the Di2 cable connector ?. 2) BSA or Press-fit bottom bracket, that needs removal to route cables and install the B junction ?, or maybe a removable hatch or design at the b-bracket to route cables ?. The B junction can be installed in the seat tube, as BTW.
09-09-20, 07:29 AM
#11
Senior Member

Join Date: Aug 2007
Posts: 2,595
Mentioned: 12 Post(s)
Tagged: 0 Thread(s)
Quoted: 608 Post(s)
Liked 352 Times
in
225 Posts
These were the steps that I am taking as I am upgrading to Di2 soon.
The first thing I did was start a planning sheet. This was to help me determine the lengths of wire I needed. Lucky for me Trek had the sheet listed below. I did change a few things because I wanted to use the wireless unit and I did not wan to use a Y cable in the handlebars. I colour coded each of the wires on the planning sheet. Once I had all the lengths, I ordered them from where ever they had stock.
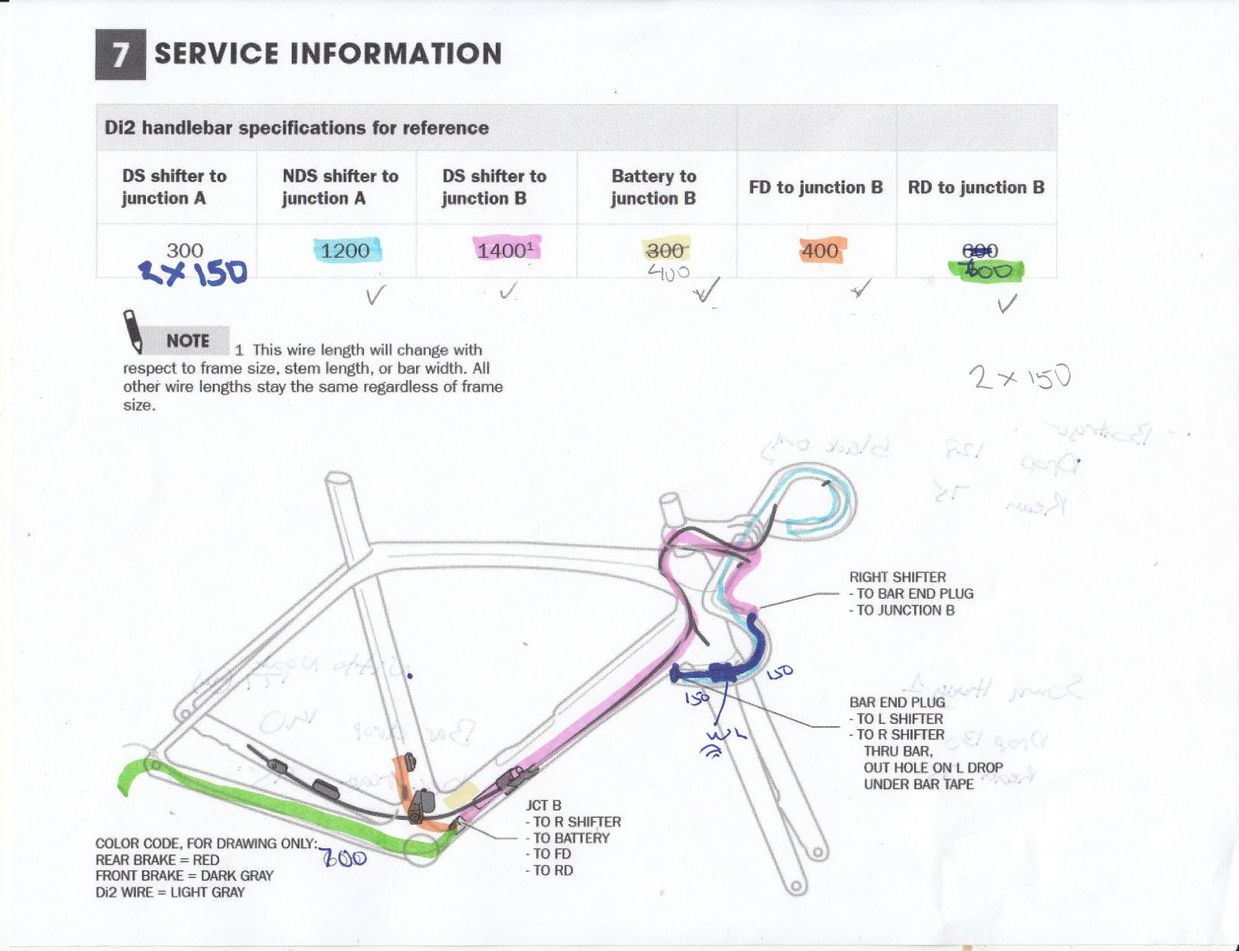
Like you I am using the 8070 so I just ordered the shifters. I went with the medium cage (GS) rear just in case I ever decide to go to a larger cassette then what I am using now. It can't hurt anything by going longer. The front was a non-issue. I purchased the wireless unit, battery, junction A (handlebar) and B boxes. Found a charger second hand on Facebook Marketplace and bought that.
The last things I purchase was the Park Tool IR 1.2 internal routing kit. These is not essential but will make it easier. Last I purchased a Shimano bleed kit and a disc brake bleed block. Your brakes will have to be bled when you install the new levers. My original idea was to have a shop do it but the back log is still weeks in my area so I figure since I do all of my own wrenching I could attempt the bleed.
Everything is ready to go, I just have to find the motivation to take my bike apart to do the install. Of course you don't have to do what I did, this is just another data point in the execution of an upgrade. Good luck.
The first thing I did was start a planning sheet. This was to help me determine the lengths of wire I needed. Lucky for me Trek had the sheet listed below. I did change a few things because I wanted to use the wireless unit and I did not wan to use a Y cable in the handlebars. I colour coded each of the wires on the planning sheet. Once I had all the lengths, I ordered them from where ever they had stock.
Like you I am using the 8070 so I just ordered the shifters. I went with the medium cage (GS) rear just in case I ever decide to go to a larger cassette then what I am using now. It can't hurt anything by going longer. The front was a non-issue. I purchased the wireless unit, battery, junction A (handlebar) and B boxes. Found a charger second hand on Facebook Marketplace and bought that.
The last things I purchase was the Park Tool IR 1.2 internal routing kit. These is not essential but will make it easier. Last I purchased a Shimano bleed kit and a disc brake bleed block. Your brakes will have to be bled when you install the new levers. My original idea was to have a shop do it but the back log is still weeks in my area so I figure since I do all of my own wrenching I could attempt the bleed.
Everything is ready to go, I just have to find the motivation to take my bike apart to do the install. Of course you don't have to do what I did, this is just another data point in the execution of an upgrade. Good luck.
Likes For blakcloud:
09-10-20, 12:44 PM
#12
Asleep at the bars
Join Date: May 2006
Location: San Francisco, CA and Treasure Island, FL
Posts: 1,743
Mentioned: 2 Post(s)
Tagged: 0 Thread(s)
Quoted: 234 Post(s)
Liked 203 Times
in
135 Posts
There's a small F-F junction under the bars connecting the frame wiring to the bar wiring; I found this the perfect place for the WU111 wireless unit. It just replaced that junction. I mention this because I initially put it in the seat tube, which on occasion would result in dropouts. Right in front, under the computer is perfect. The Di2 connectors in general seem well enough weather sealed.
__________________
"This 7:48 cycling session burned 5933 calories. Speed up recovery by replacing them with a healthy snack." - Whoop
"This 7:48 cycling session burned 5933 calories. Speed up recovery by replacing them with a healthy snack." - Whoop
09-10-20, 04:40 PM
#13
Advocatus Diaboli

Join Date: Feb 2015
Location: Wherever I am
Posts: 8,635
Bikes: Merlin Cyrene, Nashbar steel CX
Mentioned: 14 Post(s)
Tagged: 1 Thread(s)
Quoted: 4733 Post(s)
Liked 1,532 Times
in
1,003 Posts
Di2 threads always allow me to remember and appreciate the simple beauty and purity of the cycling experience. 
09-10-20, 04:53 PM
#14
Senior Member
Join Date: Jul 2007
Location: South shore, L.I., NY
Posts: 6,882
Bikes: Flyxii FR322, Cannondale Topstone, Miyata City Liner, Specialized Chisel, Specialized Epic Evo
Mentioned: 18 Post(s)
Tagged: 0 Thread(s)
Quoted: 3238 Post(s)
Liked 2,084 Times
in
1,180 Posts
Is why I love my Di2 system. I’ve done nothing to it for 3 years except I plug it in to charge about every 4 mos.
Last edited by Steve B.; 09-10-20 at 05:54 PM.
Likes For Steve B.:
09-10-20, 04:55 PM
#15
Advocatus Diaboli
Join Date: Feb 2015
Location: Wherever I am
Posts: 8,635
Bikes: Merlin Cyrene, Nashbar steel CX
Mentioned: 14 Post(s)
Tagged: 1 Thread(s)
Quoted: 4733 Post(s)
Liked 1,532 Times
in
1,003 Posts
09-10-20, 05:56 PM
#17
Senior Member
Join Date: Jul 2007
Location: South shore, L.I., NY
Posts: 6,882
Bikes: Flyxii FR322, Cannondale Topstone, Miyata City Liner, Specialized Chisel, Specialized Epic Evo
Mentioned: 18 Post(s)
Tagged: 0 Thread(s)
Quoted: 3238 Post(s)
Liked 2,084 Times
in
1,180 Posts
Ive been assembling bikes since ‘95 or so, I enjoy it. Di2 was a different experience than mechanical, but once set its done forever mostly. That’s always a surprise.
09-10-20, 08:16 PM
#18
Senior Member
Join Date: Aug 2007
Posts: 2,595
Mentioned: 12 Post(s)
Tagged: 0 Thread(s)
Quoted: 608 Post(s)
Liked 352 Times
in
225 Posts
I certainly get your point. The upgrade path is arduous at best. It certainly would have been simpler to purchase a bike with it pre-installed then it would have been as Steve B says kind of set it and forget it (except for charging).
09-15-20, 11:43 PM
#19
Senior Member
Few more tips
1. To eliminate rattling in frame, I used:
https://www.amazon.com/dp/B07FWC1XQZ..._FoAyFb1MYW853
2. When trimming the brakes lines, get the proper tools to cut the hydraulic lines very clean and straight., so it seats properly. Jagwire sells one or use the shimano clamps to cut with razor. Dont over torque hydraulic lines into shifter, you will easily crush the brass olive.
The hardest part for me was wiring all the lines thru a carbon bar, since it wasn't very smooth inside. I've put a few hundred miles on it now, still tweaking front derailleur since I went with a hollowgram cank vs the ultegra. Very happy.
Likes For colnago62:
09-17-20, 02:54 PM
#22
Junior Member
Join Date: Sep 2020
Posts: 6
Mentioned: 0 Post(s)
Tagged: 0 Thread(s)
Quoted: 5 Post(s)
Likes: 0
Liked 1 Time
in
1 Post
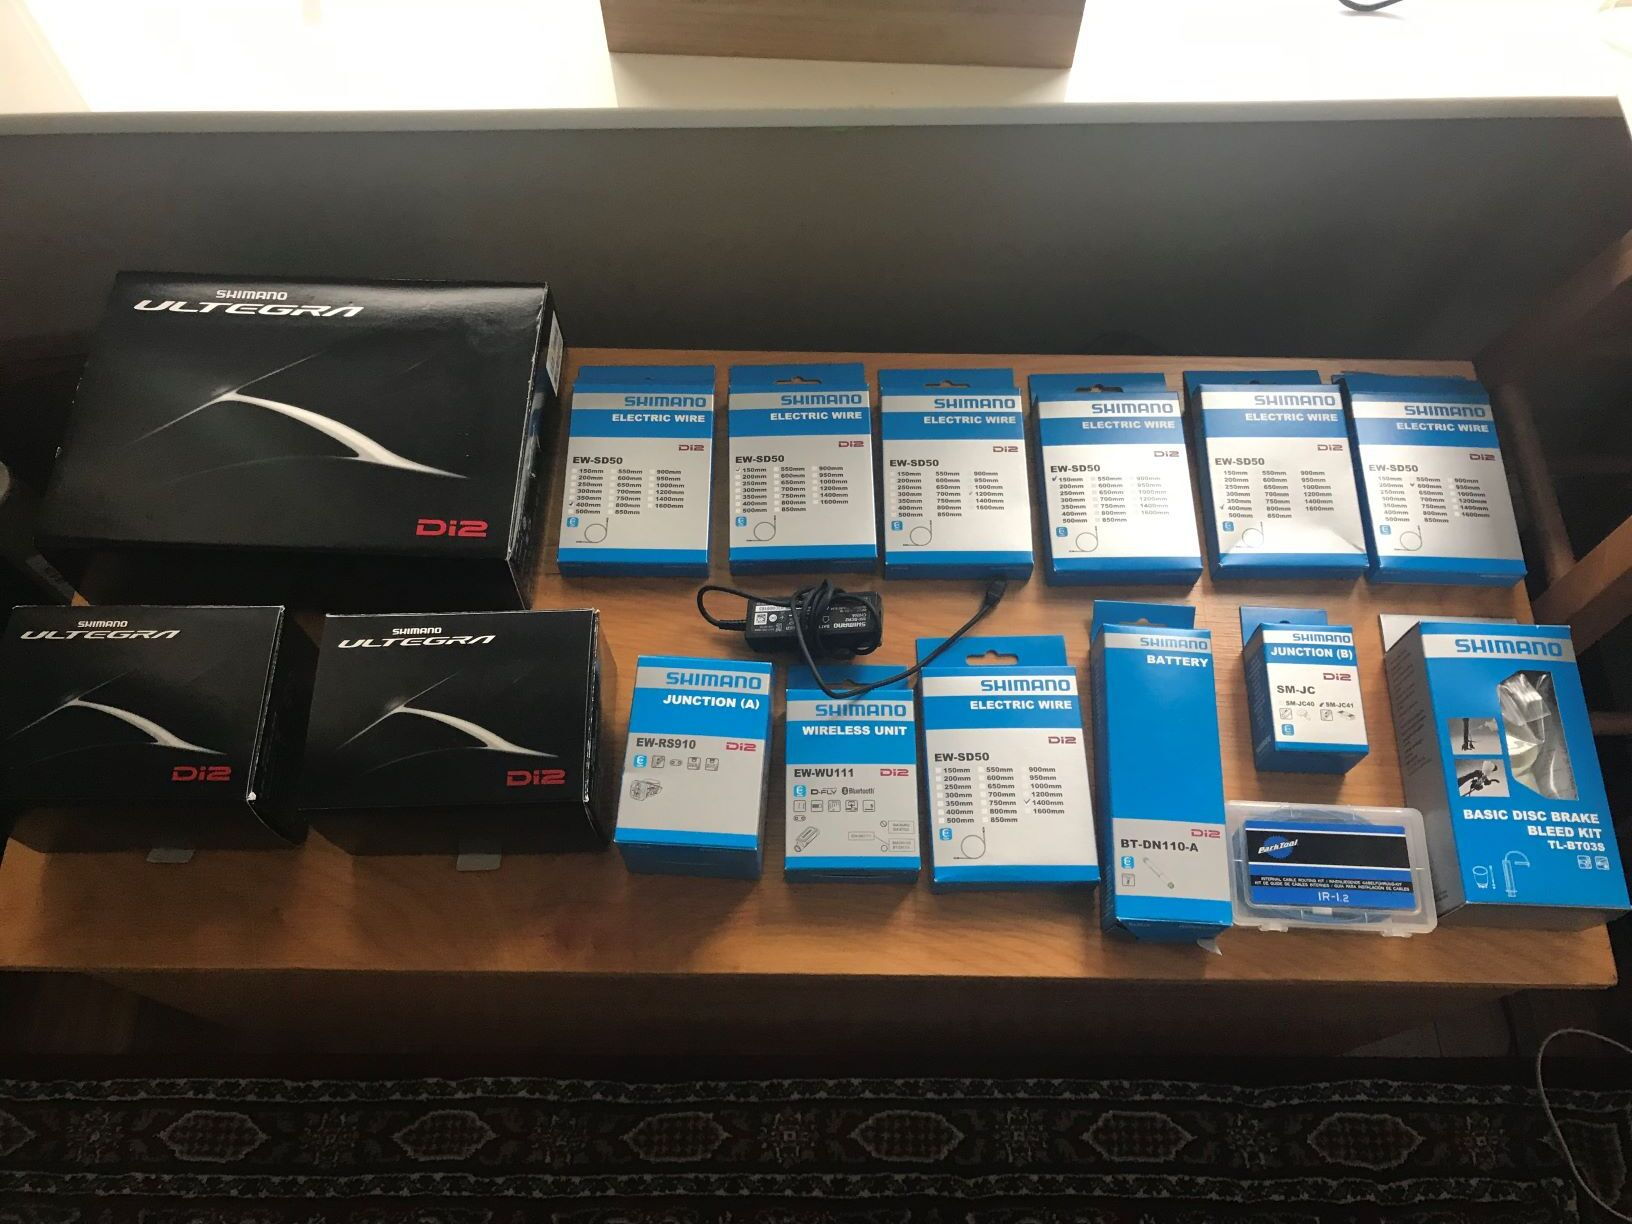
I recently upgraded 2019 Trek Madone SLR 6 Disc Ultegra mechanical components to Di2's...Here are the parts that I used. Trek Bicycle store only charged me $175.00 for the installation.
ST-R8070 SHIFTER / LEVER 1
RD-R8050-SS REAR DERAILUR 1
FD-R8050 FRONT DERAILUR 1
EW-RS910 JUNCTION (A) 1
EW-JC130-MM JUNCTION (B) 1
SM-JC41 JUNCTION (B) 1
EW-JC200
JUNCTION (B) 1
BT-DN110-A BATTERY 1
EW-WU111 WIRELESS UNIT 1
WIRE
EW-SD50 150MM 1
EW-SD50 350MM 1
EW-SD50 550MM 1
EW-SD50 700MM 1
EW-SD50 950MM 2
Good luck!
09-17-20, 07:39 PM
#23
Newbie
Join Date: Sep 2013
Posts: 1
Mentioned: 0 Post(s)
Tagged: 0 Thread(s)
Quoted: 0 Post(s)
Likes: 0
Liked 0 Times
in
0 Posts
I use my short cage DI2 derailleur with an 11-32 cassette. So long as I don’t cross chain from the 52 to the 32, it’s no problem whatsoever. I always use Syncro Shift, so it won’t let me select that combo anyway.
09-18-20, 01:40 PM
#24
Asleep at the bars
Join Date: May 2006
Location: San Francisco, CA and Treasure Island, FL
Posts: 1,743
Mentioned: 2 Post(s)
Tagged: 0 Thread(s)
Quoted: 234 Post(s)
Liked 203 Times
in
135 Posts
I have 50x34 and 11-32t on my C3, with the chain long enough to allow cross chaining 50-32. But on 34-13 if I'm coasting the chain will rattle against the chainstay. R8000 Di2 won't allow shifting into the 11 or 12t while on the 34t. If I took out a link the slight tapping when coasting would stop in the 34-13, but then cross chaining big-big would be iffy. I don't do it much as it's terrible for the chain, but I like to have the option, so it's a trade off that works for me. Just a little 3M protective clear tape on the chainstay and it's of no concern.
__________________
"This 7:48 cycling session burned 5933 calories. Speed up recovery by replacing them with a healthy snack." - Whoop
"This 7:48 cycling session burned 5933 calories. Speed up recovery by replacing them with a healthy snack." - Whoop
09-18-20, 01:57 PM
#25
Senior Member
Join Date: Jul 2007
Location: South shore, L.I., NY
Posts: 6,882
Bikes: Flyxii FR322, Cannondale Topstone, Miyata City Liner, Specialized Chisel, Specialized Epic Evo
Mentioned: 18 Post(s)
Tagged: 0 Thread(s)
Quoted: 3238 Post(s)
Liked 2,084 Times
in
1,180 Posts
Shimano thinks that folks will frig up their systems if they allow cross chain operation so they lock it out with certain crank/cassette settings like 50/34. If you connect with the E-Tube software you can cheat the system to shift small-small (and small-next to small cog) by telling E-Tube you’ve got a 53/39 crank and whatever cassette (I think 12-25 works), then use Manual shift mode (no Syncro) and turn off Gear Position Control. You can then use small-small.
Last edited by Steve B.; 09-18-20 at 03:13 PM.