


Campy Cup & Cone rear hub keeps loosening
 11-22-20, 08:59 PM
#1
Senior Member
Thread Starter
Campy Cup & Cone rear hub keeps loosening
10 Spd Campy Record Rear Hub cup and cone bearings, guess is circa 2004. It has developed side to side play of the wheel. I've readjusted the cones several times. Tighten up till it starts to bind then back off till jtspins smooth. Clamp down on outer lock nut being careful not to let inner cone rotate. Use 2 proper size cone wrenches, estimate lock torque around 40 ft-lb. Its fine when I'm done with no side play at rim, but over next few weeks gradually comes back. Seems to last maybe 400-500 miles to get noticeable side to side play..
Probably some kind of user error? Appreciate any insight
Probably some kind of user error? Appreciate any insight
 11-22-20, 09:30 PM
#2
Senior Member
Join Date: Jul 2013
Location: Nor-Cal
Posts: 3,767
Bikes: lots
Mentioned: 7 Post(s)
Tagged: 0 Thread(s)
Quoted: 1958 Post(s)
Liked 2,932 Times
in
1,489 Posts
Wrong size balls? It's that or you're not actually getting the locknut tight.
Likes For cxwrench:
11-23-20, 02:01 AM
#3

Droid on a mission

Join Date: May 2018
Location: Palm Coast, FL
Posts: 1,005
Bikes: Diamondback Wildwood Classic
Mentioned: 4 Post(s)
Tagged: 0 Thread(s)
Quoted: 317 Post(s)
Liked 280 Times
in
195 Posts
Are the serrations on the locknut too smooth to properly grip against the cone? Just a thought
__________________
JoeTBM (The Bike Man) - I'm a black & white type of guy, the only gray in my life is the hair on my head
 www.TheBikeMenOfFlaglerCounty.com
JoeTBM (The Bike Man) - I'm a black & white type of guy, the only gray in my life is the hair on my head
www.TheBikeMenOfFlaglerCounty.com
11-23-20, 05:55 AM
#4
Senior Member

Join Date: Sep 2010
Location: Roswell, GA
Posts: 8,319
Bikes: '93 Trek 750, '92 Schwinn Crisscross, '93 Mongoose Alta
Mentioned: 30 Post(s)
Tagged: 0 Thread(s)
Quoted: 1438 Post(s)
Liked 1,092 Times
in
723 Posts
I am going to go with not getting the locknut tight enough. I would say that 40 ft-lb with typical cone wrenches is unrealistic. I have to put a lot of effort to get 40 ft-lb with my ~22 inch torque wrench.
11-23-20, 05:55 AM
#5
Blamester
Did you have a look at the races and cones?
Tighten the locknuts more. Both sides.
Or set it a bit tight first and then hopefully it backs out to the right spot as you ride.
If the hub has gone bad you may get a bit more out of it this way.
Tighten the locknuts more. Both sides.
Or set it a bit tight first and then hopefully it backs out to the right spot as you ride.
If the hub has gone bad you may get a bit more out of it this way.
11-23-20, 07:22 AM
#6
Old fart

Join Date: Nov 2004
Location: Appleton WI
Posts: 24,779
Bikes: Several, mostly not name brands.
Mentioned: 153 Post(s)
Tagged: 0 Thread(s)
Quoted: 3583 Post(s)
Liked 3,395 Times
in
1,929 Posts
Check that the threads on the axle, cone and locknut are not damaged.
11-23-20, 08:14 AM
#7
Senior Member
Time for new wheels with the over sized aluminum axle and simple to adjust bearings. No more cone wrenches.
11-23-20, 02:18 PM
#8
Senior Member
Thread Starter
Thanks for all the suggestions!
Wrong size balls? It's that or you're not actually getting the locknut tight. Haven't checked the balls, actually haven't broken it down that far usually been a quick adjust/tighten for that days ride ... probably a good idea to tear it down totally at this point and check balls/races. Still don't see how this would cause a loosening from where it was adjusted unless locknut is loose?
-Are the serrations on the locknut too smooth to properly grip against the cone? Just a thought
-I am going to go with not getting the locknut tight enough. I would say that 40 ft-lb with typical cone wrenches is unrealistic.
-Did you have a look at the races and cones?
Tighten the locknuts more. Both sides.
Or set it a bit tight first and then hopefully it backs out to the right spot as you ride.
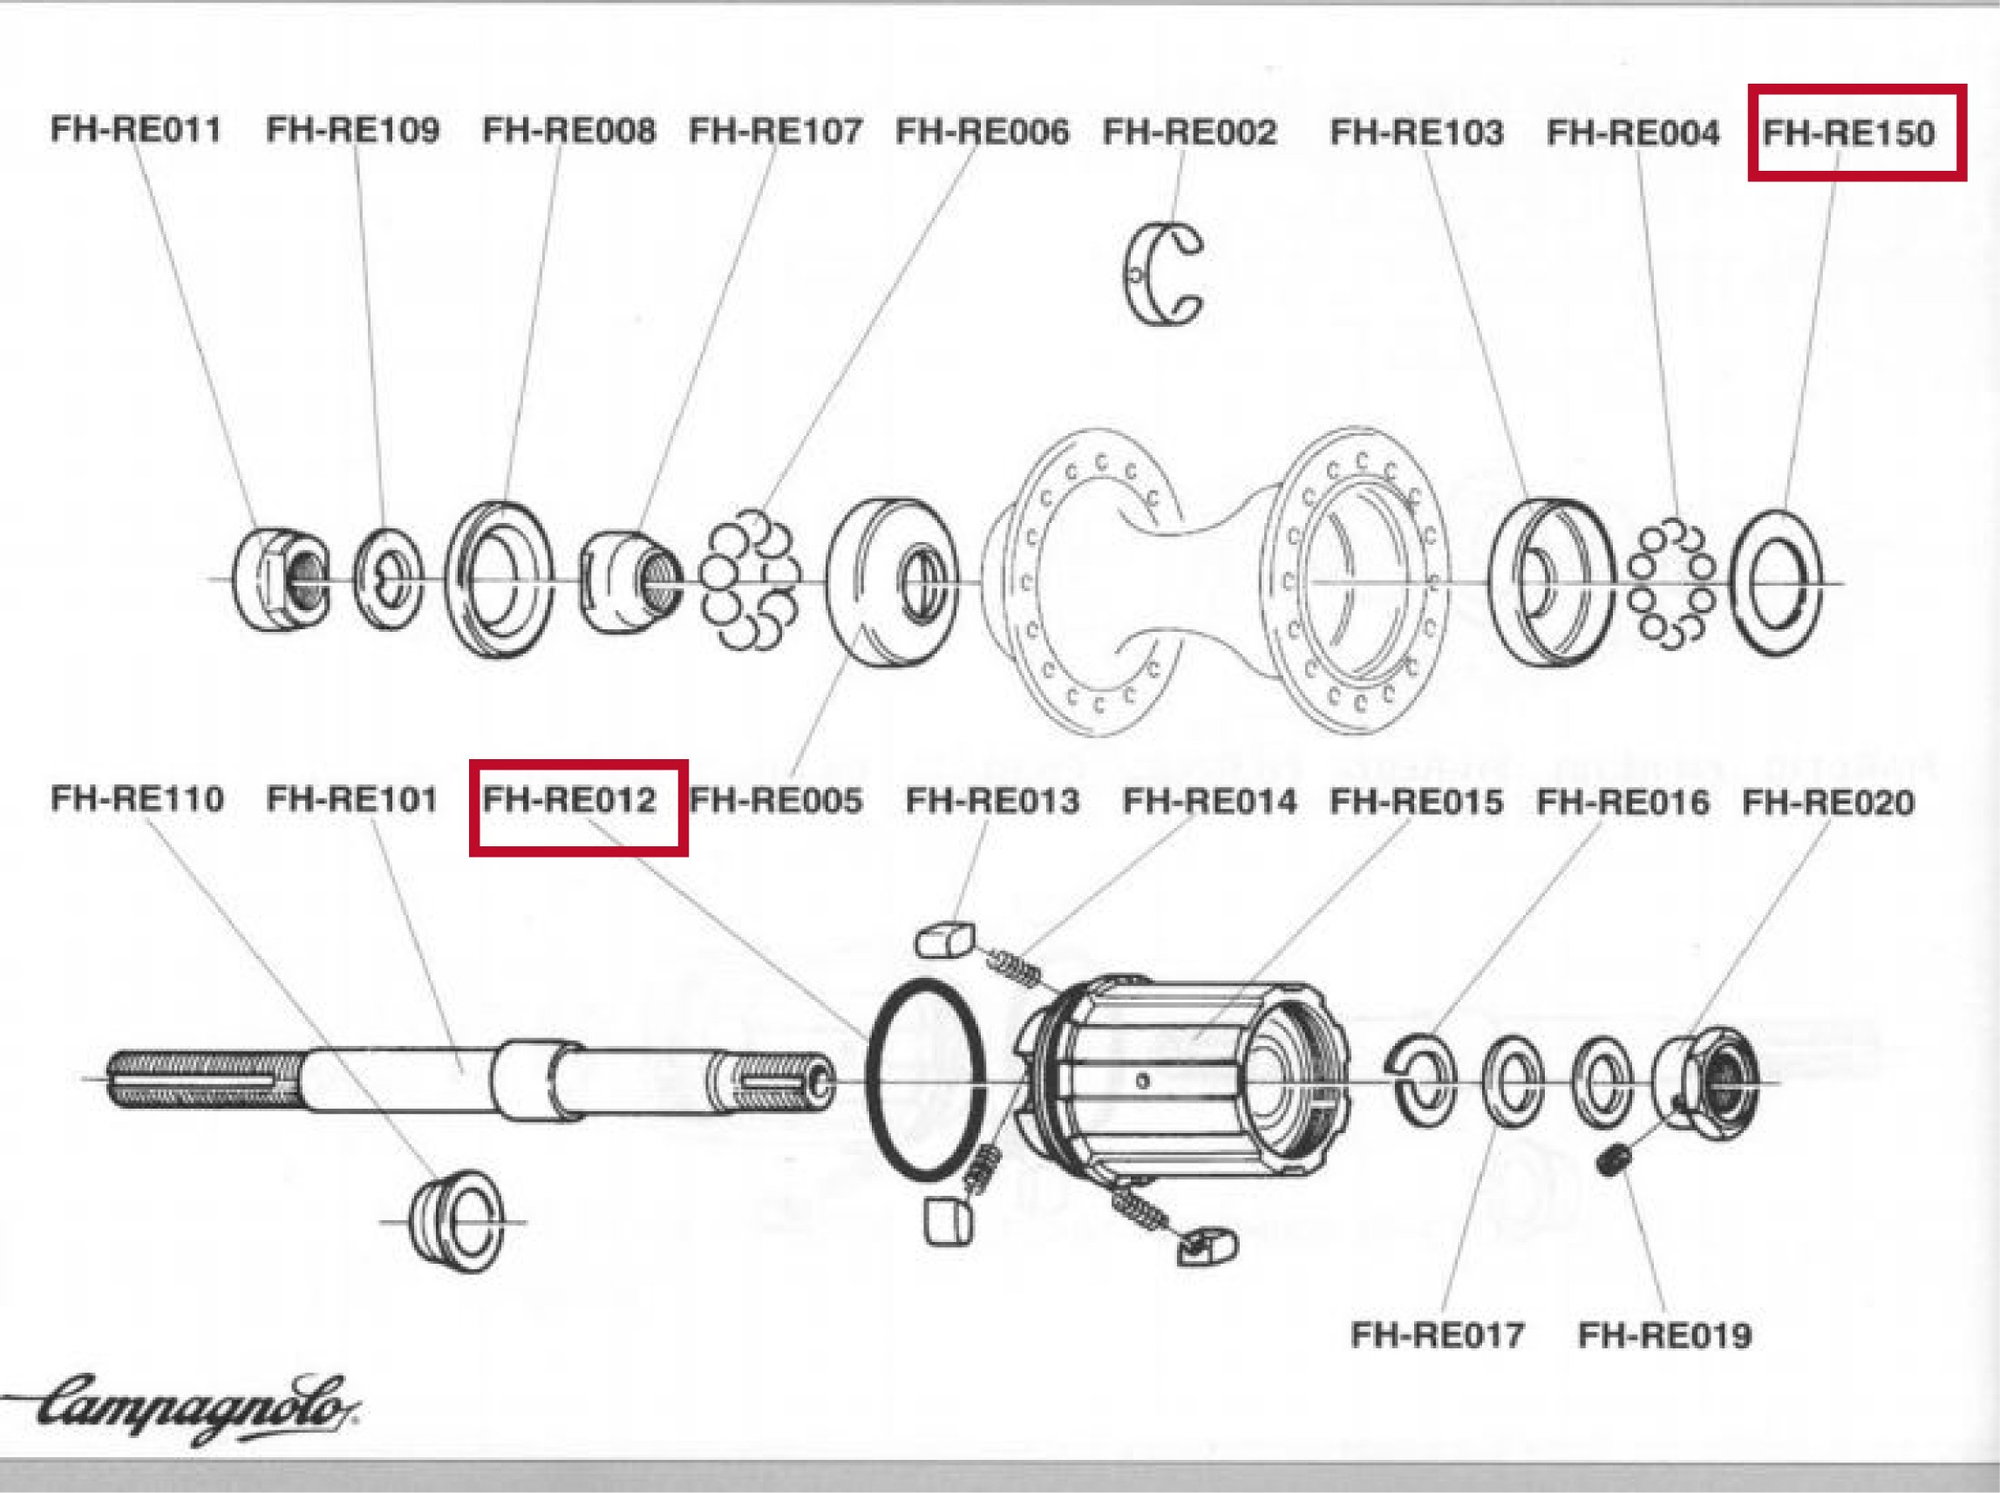
All variations on tightening the locknut. Agree this is only logical way it loosens over time. The Drive Side does not have a lock nut, The cone on the drive side is set to proper depth to position axle correctly in dropouts and locked in place via an Allen head set screw into a channel in the axle which prevents rotation. Then all adjustment is done from non drive side and then locked in place with the only lock nut. The serrations on the lock nut seem fine. Agree I'm probably not getting 35+ft-lb on those short cone wrenches, but I am getting as much as possible on those to point I worry about bending the cone wrench. When I disassemble the lock nut it is still very securely clamped to the keyed washer and cone. It takes a lot of effort to separate the lock nut from the washer/cone to readjust. See attached schematic. Talking this through with you all makes me feel like the likely culprit is the drive side cone is rotating on the axle due to the Allen set screw not being properly engaged.in the axle keyway. The NDS locknut/keyed washer/cone have always been solidly locked together on disassembly so it seems like the only way it can loosen is if the axle can rotate on the drive side.
Wrong size balls? It's that or you're not actually getting the locknut tight. Haven't checked the balls, actually haven't broken it down that far usually been a quick adjust/tighten for that days ride ... probably a good idea to tear it down totally at this point and check balls/races. Still don't see how this would cause a loosening from where it was adjusted unless locknut is loose?
-Are the serrations on the locknut too smooth to properly grip against the cone? Just a thought
-I am going to go with not getting the locknut tight enough. I would say that 40 ft-lb with typical cone wrenches is unrealistic.
-Did you have a look at the races and cones?
Tighten the locknuts more. Both sides.
Or set it a bit tight first and then hopefully it backs out to the right spot as you ride.
All variations on tightening the locknut. Agree this is only logical way it loosens over time. The Drive Side does not have a lock nut, The cone on the drive side is set to proper depth to position axle correctly in dropouts and locked in place via an Allen head set screw into a channel in the axle which prevents rotation. Then all adjustment is done from non drive side and then locked in place with the only lock nut. The serrations on the lock nut seem fine. Agree I'm probably not getting 35+ft-lb on those short cone wrenches, but I am getting as much as possible on those to point I worry about bending the cone wrench. When I disassemble the lock nut it is still very securely clamped to the keyed washer and cone. It takes a lot of effort to separate the lock nut from the washer/cone to readjust. See attached schematic. Talking this through with you all makes me feel like the likely culprit is the drive side cone is rotating on the axle due to the Allen set screw not being properly engaged.in the axle keyway. The NDS locknut/keyed washer/cone have always been solidly locked together on disassembly so it seems like the only way it can loosen is if the axle can rotate on the drive side.
11-23-20, 03:06 PM
#9
Senior Member

Join Date: Apr 2010
Location: Mountain View, CA USA and Golden, CO USA
Posts: 6,341
Bikes: 97 Litespeed, 50-39-30x13-26 10 cogs, Campagnolo Ultrashift, retroreflective rims on SON28/PowerTap hubs
Mentioned: 9 Post(s)
Tagged: 0 Thread(s)
Quoted: 550 Post(s)
Liked 325 Times
in
226 Posts
10 Spd Campy Record Rear Hub cup and cone bearings, guess is circa 2004. It has developed side to side play of the wheel. I've readjusted the cones several times. Tighten up till it starts to bind then back off till jtspins smooth. Clamp down on outer lock nut being careful not to let inner cone rotate. Use 2 proper size cone wrenches, estimate lock torque around 40 ft-lb. Its fine when I'm done with no side play at rim, but over next few weeks gradually comes back. Seems to last maybe 400-500 miles to get noticeable side to side play..
Probably some kind of user error? Appreciate any insight
Probably some kind of user error? Appreciate any insight
Last edited by Drew Eckhardt; 11-23-20 at 03:15 PM.
Likes For Drew Eckhardt:
11-23-20, 07:11 PM
#10
Senior Member

Join Date: Dec 2007
Location: San Jose, California
Posts: 3,504
Bikes: 2001 Tommasini Sintesi w/ Campagnolo Daytona 10 Speed
Mentioned: 5 Post(s)
Tagged: 0 Thread(s)
Quoted: 145 Post(s)
Likes: 0
Liked 35 Times
in
30 Posts
You're doing it wrong.
The only time you loosen is to RESET and START OVER.
1. Loosen - tap with a plastic or rubber mallet to ensure the wheel is reset - i.e. has serious slack or play.
2. Tighten the adjusting cone until you have a super duper small smidgen of end play.
3. Lock the screw to secure the adjusting cone.
4. Secure wheel in the frame - do the old school two finger wobble test.
You can also do this on the bike...but first remove the wheel to do Step 1, then continue with Step 2 and 3 on the bike.
NEVER EVER BACK OFF DURING THE TIGHTENING PROCESS - IF YOU DO YOU HAVE TO GO BACK TO STEP 1.
=8-)
__________________
5000+ wheels built since 1984...
Disclaimer:
1. I do not claim to be an expert in bicycle mechanics despite my experience.
2. I like anyone will comment in other areas.
3. I do not own the preexisting concepts of DISH and ERD.
4. I will provide information as I always have to others that I believe will help them protect themselves from unscrupulous mechanics.
5. My all time favorite book is:
Kahane, Howard. Logic and Contemporary Rhetoric: The Use of Reason in Everyday Life
Likes For mrrabbit:
11-25-20, 03:56 PM
#11
Senior Member
Thread Starter
Thanks for all the Input everyone!
I believe you are referring to the style of hub that came out around 2009, this is prior to that ... see hub schematic I posted.
I was pretty sure there was user error involved!  So never loosen, start over if bearings get to point of binding. I've done too many car hubs where you get the bearing to bind then back off!
Let me confirm my understanding of all the steps from a complete rebuild after balls are in and axle is inserted through hub:
Thanks again for the help!
I believe you are referring to the style of hub that came out around 2009, this is prior to that ... see hub schematic I posted.
You're doing it wrong.
The only time you loosen is to RESET and START OVER.
1. Loosen - tap with a plastic or rubber mallet to ensure the wheel is reset - i.e. has serious slack or play.
2. Tighten the adjusting cone until you have a super duper small smidgen of end play.
3. Lock the screw to secure the adjusting cone.
4. Secure wheel in the frame - do the old school two finger wobble test.
You can also do this on the bike...but first remove the wheel to do Step 1, then continue with Step 2 and 3 on the bike.
NEVER EVER BACK OFF DURING THE TIGHTENING PROCESS - IF YOU DO YOU HAVE TO GO BACK TO STEP 1.
=8-)
The only time you loosen is to RESET and START OVER.
1. Loosen - tap with a plastic or rubber mallet to ensure the wheel is reset - i.e. has serious slack or play.
2. Tighten the adjusting cone until you have a super duper small smidgen of end play.
3. Lock the screw to secure the adjusting cone.
4. Secure wheel in the frame - do the old school two finger wobble test.
You can also do this on the bike...but first remove the wheel to do Step 1, then continue with Step 2 and 3 on the bike.
NEVER EVER BACK OFF DURING THE TIGHTENING PROCESS - IF YOU DO YOU HAVE TO GO BACK TO STEP 1.
=8-)
So never loosen, start over if bearings get to point of binding. I've done too many car hubs where you get the bearing to bind then back off!Let me confirm my understanding of all the steps from a complete rebuild after balls are in and axle is inserted through hub:
- Set axle length even to drop outs by adjusting drive side lock nut fh-re020, then secure in place with set screw fh-re019.
- Make sure bearings are loose - tap with a plastic or rubber mallet to ensure the wheel is reset - i.e. has serious slack or play.
- Tighten non drive side cone fh-re107 to a super duper small smidgen of end play. If you have to loosen start over.at #2
- Secure NDS locknut fh-re011 against cone, using two cone wrenches to make sure cone does not move from #3 adjustment.
- Secure wheel in the frame - do the old school two finger wobble test.
Thanks again for the help!
Last edited by Paniolo; 11-25-20 at 04:02 PM. Reason: clarifictiona
11-25-20, 04:52 PM
#12
Senior Member
Join Date: Feb 2018
Posts: 567
Mentioned: 1 Post(s)
Tagged: 0 Thread(s)
Quoted: 241 Post(s)
Liked 232 Times
in
153 Posts
Thanks for all the suggestions!
Wrong size balls? It's that or you're not actually getting the locknut tight. Haven't checked the balls, actually haven't broken it down that far usually been a quick adjust/tighten for that days ride ... probably a good idea to tear it down totally at this point and check balls/races. Still don't see how this would cause a loosening from where it was adjusted unless locknut is loose?
-Are the serrations on the locknut too smooth to properly grip against the cone? Just a thought
-I am going to go with not getting the locknut tight enough. I would say that 40 ft-lb with typical cone wrenches is unrealistic.
-Did you have a look at the races and cones?
Tighten the locknuts more. Both sides.
Or set it a bit tight first and then hopefully it backs out to the right spot as you ride.
All variations on tightening the locknut. Agree this is only logical way it loosens over time. The Drive Side does not have a lock nut, The cone on the drive side is set to proper depth to position axle correctly in dropouts and locked in place via an Allen head set screw into a channel in the axle which prevents rotation. Then all adjustment is done from non drive side and then locked in place with the only lock nut. The serrations on the lock nut seem fine. Agree I'm probably not getting 35+ft-lb on those short cone wrenches, but I am getting as much as possible on those to point I worry about bending the cone wrench. When I disassemble the lock nut it is still very securely clamped to the keyed washer and cone. It takes a lot of effort to separate the lock nut from the washer/cone to readjust. See attached schematic. Talking this through with you all makes me feel like the likely culprit is the drive side cone is rotating on the axle due to the Allen set screw not being properly engaged.in the axle keyway. The NDS locknut/keyed washer/cone have always been solidly locked together on disassembly so it seems like the only way it can loosen is if the axle can rotate on the drive side.
My archives show the last year Record used this design was 1998. 1999 Record was the OS design with the pinch bolt, so this was originally a 9-speed hub.
11-25-20, 05:40 PM
#13
Senior Member
Join Date: Apr 2010
Location: Mountain View, CA USA and Golden, CO USA
Posts: 6,341
Bikes: 97 Litespeed, 50-39-30x13-26 10 cogs, Campagnolo Ultrashift, retroreflective rims on SON28/PowerTap hubs
Mentioned: 9 Post(s)
Tagged: 0 Thread(s)
Quoted: 550 Post(s)
Liked 325 Times
in
226 Posts
https://branfordbike.com/rear-hub-pa...arts-1999-2006
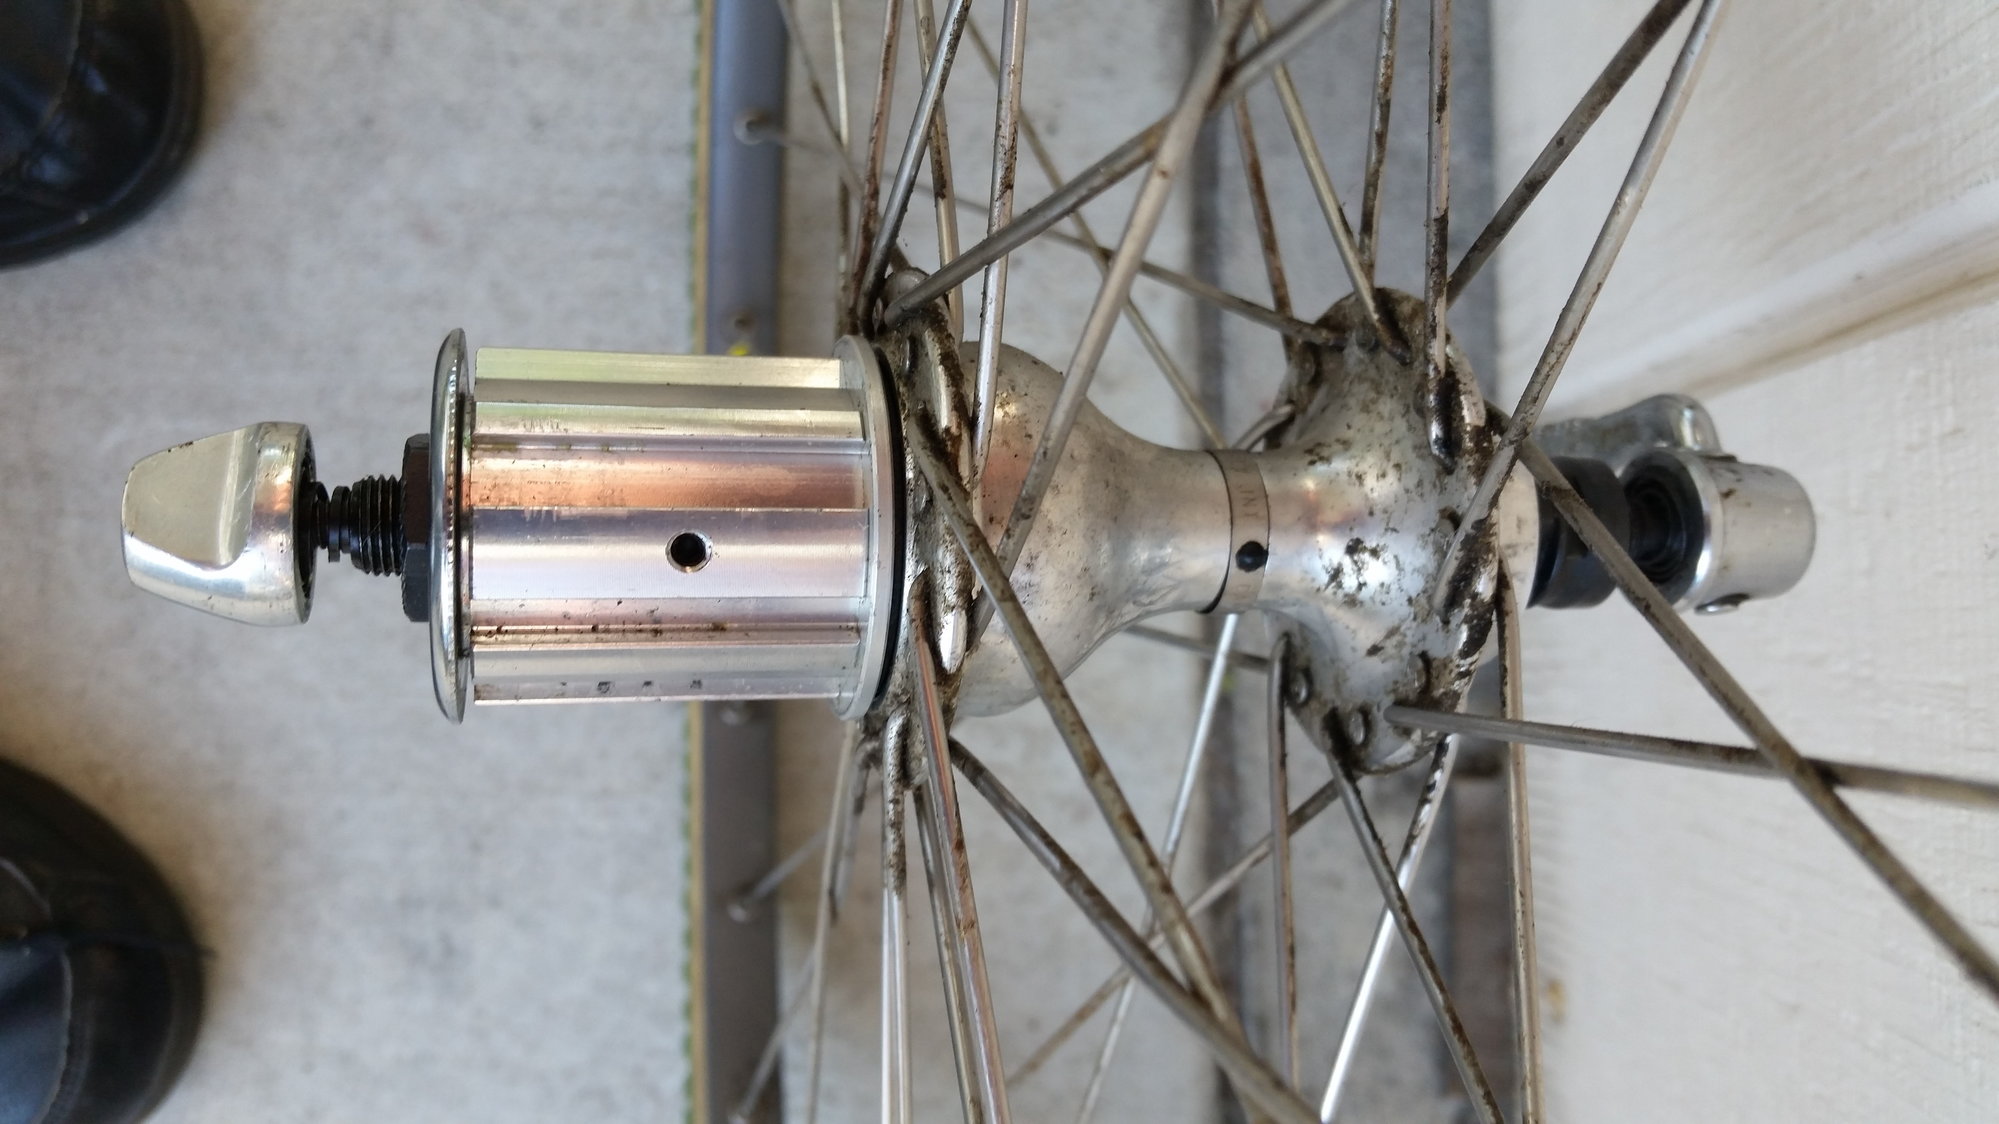
If you have a 10mm steel axle, that's a 1997 or 1998 9 speed hub (same splines, 26mm lock ring not 27mm) or not Daytona/Centaur/Chorus/Record. Record cassette hubs have grease ports. Chorus steel axle did too at least some years.
You could also have an 8 speed hub with a newer freehub. I upgraded when Campagnolo discontinued my favorite cassette in 2000.
10 sped Record hubs. Note the threaded pinch bolt hole in the rear hub:

8 speed Chorus rear hub with Record Titanium freehub body retrofitted. Note non-drive-side lock nut and cone:
Last edited by Drew Eckhardt; 11-28-20 at 01:16 PM.
11-25-20, 05:45 PM
#14
Senior Member
Thread Starter
It's been a while I've rebuilt one of this version hubs, but I think you have this correct. The DS nut gets positioned to locate the axles in the dropouts, tighten the set screw making sure it is in the keyway, and then adjust the play on the NDS.
My archives show the last year Record used this design was 1998. 1999 Record was the OS design with the pinch bolt, so this was originally a 9-speed hub.
My archives show the last year Record used this design was 1998. 1999 Record was the OS design with the pinch bolt, so this was originally a 9-speed hub.
Fingers crossed this time it will hold the adjustment! Thanks for all the help!
11-25-20, 06:28 PM
#15
Senior Member
Thread Starter
Record and Chorus rear hubs switched to oversize aluminum axles in 1999. 10 speed followed in 2001.
https://branfordbike.com/rear-hub-pa...arts-1999-2006
If you have a 10mm steel axle, that's a 1997 or 1998 9 speed hub (same splines, 26mm lock ring not 27mm) or not Daytona/Centaur/Chorus/Record. Record cassette hubs have grease ports. Chorus steel axle did too at least some years.
You could also have an 8 speed hub with a newer freehub. I upgraded when Campagnolo discontinued my favorite cassette in 2000.
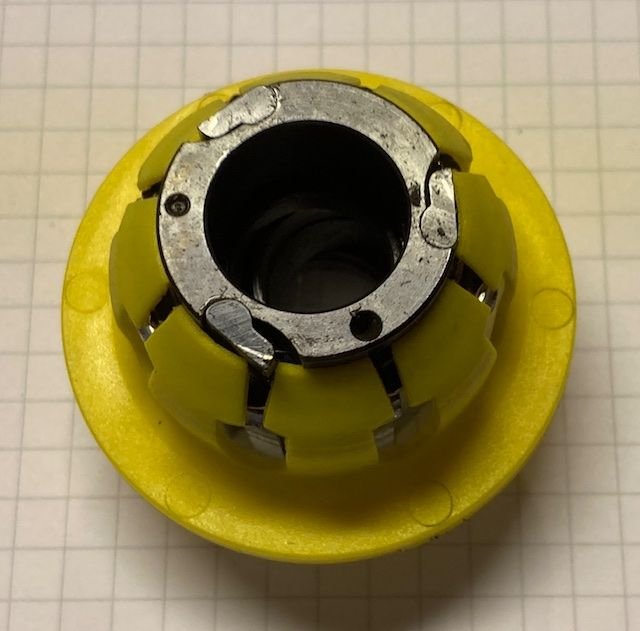
Had a bad run on rears for a year or so with lighter weight, low spoke count wheels. Broke two of the first version Zonda's with rim cracks by the spoke holes then cracked the Open Pro when a spoke broke and did a road side true to get rid of brake rub so I could ride home. Still have those two Zonda rear hubs hoping there will be a use for them sometime. So a heavy 32 hole wheelset was perfect! They are old school but still kicking after 20+ years. Should just rebuild the whole hub again, but I have a Velocity Deep Vee 32h to lace with a pinch style Record hub (from the Open Pro wheel). Plus, I seem to remember having a heck of a time getting the free hub, pawls and little springs all together and back in the hub the last time I did that. Actually think I bent one of the springs on one of the attempts so when it finally went in and ratcheted correct I made a mental note never open that back up while is still worked! lol Sure there is a trick, but I didn't know it!
11-26-20, 01:00 PM
#16
Senior Member
Join Date: Feb 2018
Posts: 567
Mentioned: 1 Post(s)
Tagged: 0 Thread(s)
Quoted: 241 Post(s)
Liked 232 Times
in
153 Posts
I seem to remember having a heck of a time getting the free hub, pawls and little springs all together and back in the hub the last time I did that. Actually think I bent one of the springs on one of the attempts so when it finally went in and ratcheted correct I made a mental note never open that back up while is still worked! lol Sure there is a trick, but I didn't know it!
Last edited by RGMN; 11-26-20 at 06:19 PM. Reason: spelling
11-27-20, 05:53 AM
#17
Junior Member
Also a wire spring clip to hold the pawls. Dental floss works with no tool.
Last edited by Ross200; 11-27-20 at 05:55 AM. Reason: misspelling
11-27-20, 06:54 AM
#18
Generally bewildered

Join Date: Aug 2015
Location: Eastern PA, USA
Posts: 3,037
Bikes: 2014 Trek Domane 6.9, 1999 LeMond Zurich, 1978 Schwinn Superior
Mentioned: 20 Post(s)
Tagged: 0 Thread(s)
Quoted: 1152 Post(s)
Liked 341 Times
in
251 Posts
I know of Mr. Rabbit's wheel prowess, so I expect my understanding will be improved here.
11-27-20, 03:02 PM
#19
Used to be Conspiratemus
Join Date: Jan 2009
Location: Hamilton ON Canada
Posts: 1,512
Mentioned: 4 Post(s)
Tagged: 0 Thread(s)
Quoted: 297 Post(s)
Liked 245 Times
in
163 Posts
^ This is fine for traditional freewheel-type hubs where the cones & locknuts on both ends of the axle are the same. The OP has a different design where this will not work: there is only one locknut and one moveable cone, on the left end. The large nut on the right end, with the set screw, has nothing to do with controlling the bearings of the hub itself. Rather, it holds the freehub body against the ratchet ring and maintains the preload on the cartridge bearings inside the freehub. When you have the nut, RE-020, tightened just enough to compress the thick lock washer, you tighten the set screw enough to keep the nut from moving in normal use. That ensures proper operation of the freehub. But you can’t put a big wrench on it to resist torquing of the moveable cone at the other end of the axle: the nut will simply slide and drag the set screw around with it. Indeed if you remove that nut and the washers under it, the freehub will slide right off the axle (dropping pawls and springs in this design, ) without making any difference to bearing adjustment.
The right end of the hub bearings, unrelated to the freehub, rest on a fixed cone, RE-110, that is press-fitted onto the axle from the left end and driven down against a shoulder that prevents further rightward movement. All adjustment must be made at the left end. To hold the axle motionless while you work on the left cone & locknut, you must clamp the right end of the axle, not the big RE-020 nut, in an axle vise. To get an adequate clamp of the axle, you may need to remove the nut, taking care the freehub body does not dislodge. With the axle properly immobilized against wrench torque, you should be able to get the left-end adjustment in the usual way and it should stay tight. Even if the fixed right cone has got loose and is spinning on the axle, it will not affect bearing adjustment because it is not threaded and can’t move longitudinally.
My suspicion is that you are trying to hold that big RE-020 nut with a wrench or ordinary vise while you torque the left cone & locknut. This is not tightening those left parts together but is only making the RE-020 nut move on its end of the axle. Immobilize the axle and don’t touch that big nut, except to remove it if you need to get access to more axle.
Last edited by conspiratemus1; 11-27-20 at 03:53 PM.
Likes For conspiratemus1:
11-27-20, 03:41 PM
#20
Used to be Conspiratemus
Join Date: Jan 2009
Location: Hamilton ON Canada
Posts: 1,512
Mentioned: 4 Post(s)
Tagged: 0 Thread(s)
Quoted: 297 Post(s)
Liked 245 Times
in
163 Posts
Thanks for all the suggestions!
Wrong size balls? It's that or you're not actually getting the locknut tight. Haven't checked the balls, actually haven't broken it down that far usually been a quick adjust/tighten for that days ride ... probably a good idea to tear it down totally at this point and check balls/races. Still don't see how this would cause a loosening from where it was adjusted unless locknut is loose?
-Are the serrations on the locknut too smooth to properly grip against the cone? Just a thought
-I am going to go with not getting the locknut tight enough. I would say that 40 ft-lb with typical cone wrenches is unrealistic.
-Did you have a look at the races and cones?
Tighten the locknuts more. Both sides.
Or set it a bit tight first and then hopefully it backs out to the right spot as you ride.
All variations on tightening the locknut. Agree this is only logical way it loosens over time. The Drive Side does not have a lock nut, The cone on the drive side is set to proper depth to position axle correctly in dropouts and locked in place via an Allen head set screw into a channel in the axle which prevents rotation. Then all adjustment is done from non drive side and then locked in place with the only lock nut. The serrations on the lock nut seem fine. Agree I'm probably not getting 35+ft-lb on those short cone wrenches, but I am getting as much as possible on those to point I worry about bending the cone wrench. When I disassemble the lock nut it is still very securely clamped to the keyed washer and cone. It takes a lot of effort to separate the lock nut from the washer/cone to readjust. See attached schematic. Talking this through with you all makes me feel like the likely culprit is the drive side cone is rotating on the axle due to the Allen set screw not being properly engaged.in the axle keyway. The NDS locknut/keyed washer/cone have always been solidly locked together on disassembly so it seems like the only way it can loosen is if the axle can rotate on the drive side.
Wrong size balls? It's that or you're not actually getting the locknut tight. Haven't checked the balls, actually haven't broken it down that far usually been a quick adjust/tighten for that days ride ... probably a good idea to tear it down totally at this point and check balls/races. Still don't see how this would cause a loosening from where it was adjusted unless locknut is loose?
-Are the serrations on the locknut too smooth to properly grip against the cone? Just a thought
-I am going to go with not getting the locknut tight enough. I would say that 40 ft-lb with typical cone wrenches is unrealistic.
-Did you have a look at the races and cones?
Tighten the locknuts more. Both sides.
Or set it a bit tight first and then hopefully it backs out to the right spot as you ride.
All variations on tightening the locknut. Agree this is only logical way it loosens over time. The Drive Side does not have a lock nut, The cone on the drive side is set to proper depth to position axle correctly in dropouts and locked in place via an Allen head set screw into a channel in the axle which prevents rotation. Then all adjustment is done from non drive side and then locked in place with the only lock nut. The serrations on the lock nut seem fine. Agree I'm probably not getting 35+ft-lb on those short cone wrenches, but I am getting as much as possible on those to point I worry about bending the cone wrench. When I disassemble the lock nut it is still very securely clamped to the keyed washer and cone. It takes a lot of effort to separate the lock nut from the washer/cone to readjust. See attached schematic. Talking this through with you all makes me feel like the likely culprit is the drive side cone is rotating on the axle due to the Allen set screw not being properly engaged.in the axle keyway. The NDS locknut/keyed washer/cone have always been solidly locked together on disassembly so it seems like the only way it can loosen is if the axle can rotate on the drive side.
-The set screw is not meant to lock necessarily into the slot cut into the axle. Rather, the set-screw is meant to hold the nut RE-020 wherever it needs to be to just flatten the thick lock washer, thus delivering correct preload to the freehub cartridge bearings. The position of the set-screw could be anywhere around the axle, unrelated to the slot. The hub is designed so that when this preload is right, the nut will be in the right place on the axle (although you can cheat a bit by removing one of both of the thin flat washers. But that thick lock washer has to be there. It’s the poor-man’s torque wrench.)
-The position of this large nut has nothing to do with fixing the position of the right axle cone RE-110 — they are completely isolated from each other. You must not think of that big nut as holding the position of the right cone in any way — it is not a lock nut.
-The right cone is the usual failure point of this hub, although all in my fleet are still going strong. If the reason for play is that the cone is worn, the hub is toast because replacements are not available. But I suspect your problem is just that you are not immobilizing the axle during your adjustment, as I said in my previous post. As part of your diagnosis you should pull the axle out so you can look at the fixed cone, though, in an old used hub especially. If the cone is pitted, there is no point wasting any further effort on the hub.
-I have never found that locknuts have to be particularly tight against cones on the left side. I give them a good squeeze but never where i’d worry that the cone wrench would bend. (Geez!
 ). In my hands, the axle will slip in the axle vise before that would happen. I think you are locking the parts together tightly enough, just not in the right place, because the axle is moving as you tighten.
Last edited by conspiratemus1; 11-27-20 at 03:57 PM. Reason: Got RE-110 part number wrong.
11-27-20, 04:08 PM
#21
Used to be Conspiratemus
Join Date: Jan 2009
Location: Hamilton ON Canada
Posts: 1,512
Mentioned: 4 Post(s)
Tagged: 0 Thread(s)
Quoted: 297 Post(s)
Liked 245 Times
in
163 Posts
Finally, when you say the hub develops side-to-side play during riding after adjustment, do you know where the play is? Is it in the hub bearings proper, or is it in the mating of the freehub with the ratchet ring of the hub shell? I ask this because your misunderstanding of the role of the set screw could be causing the freehub to be inadequately secured to the hub. The big RE-020 nut might need to be tighter by another half-turn or some other non-integer beyond where the set-screw drops into the axle slot. If the set-screw has been dragged out of engagement against the axle, the big nut will be free to turn while riding, loosening.
There is a masterful description of the servicing of these hubs somewhere in BikeForums. Googling will find it more likely than using the BikeForums Search.
There is a masterful description of the servicing of these hubs somewhere in BikeForums. Googling will find it more likely than using the BikeForums Search.
