


Need a second set of eyes in this chainline.
 09-02-19, 01:29 PM
#1
Senior Member
Thread Starter

Join Date: Jul 2018
Location: Eugene, OR
Posts: 1,326
Mentioned: 64 Post(s)
Tagged: 0 Thread(s)
Quoted: 535 Post(s)
Liked 346 Times
in
196 Posts
Need a second set of eyes in this chainline.
6 speed ultra, triple crank. Chain is not installed as shown in the pics, but rather resting on third rear cog teeth & middle chainring with the crank pulled taught.
Looks like it should work, but I’m not an experienced judge of such things. Wondering if anyone sees it differently?
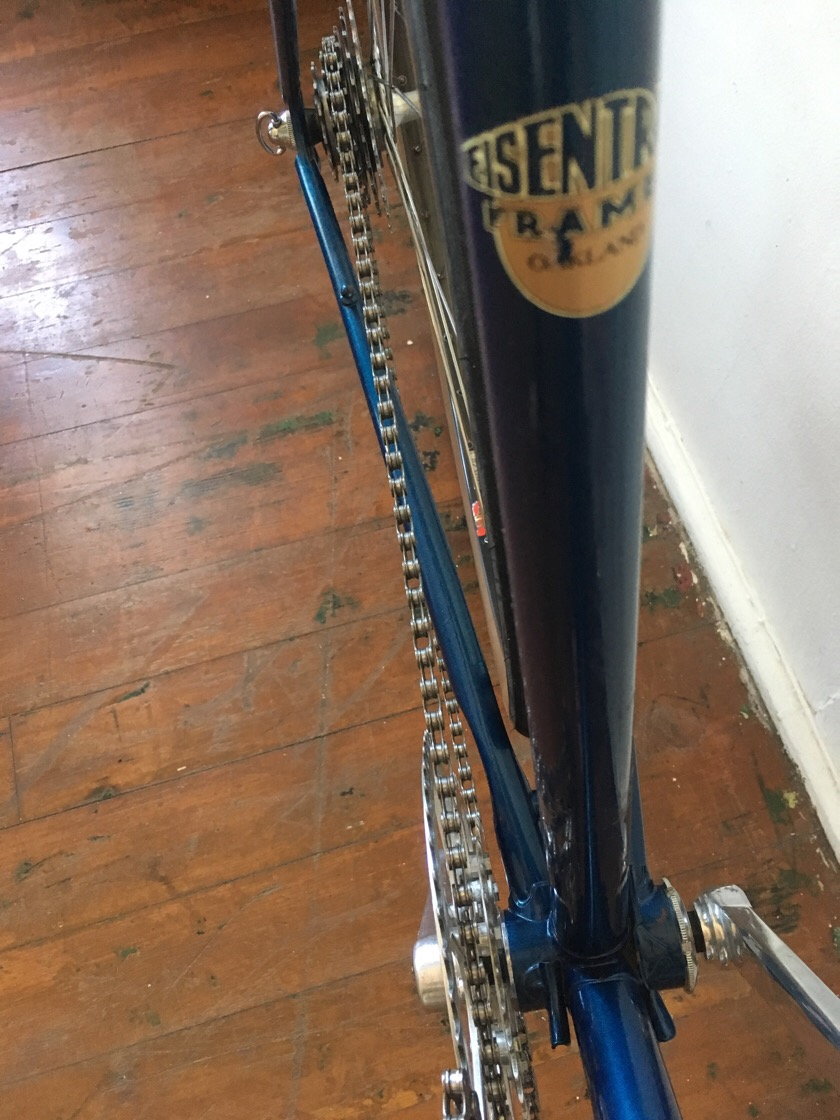
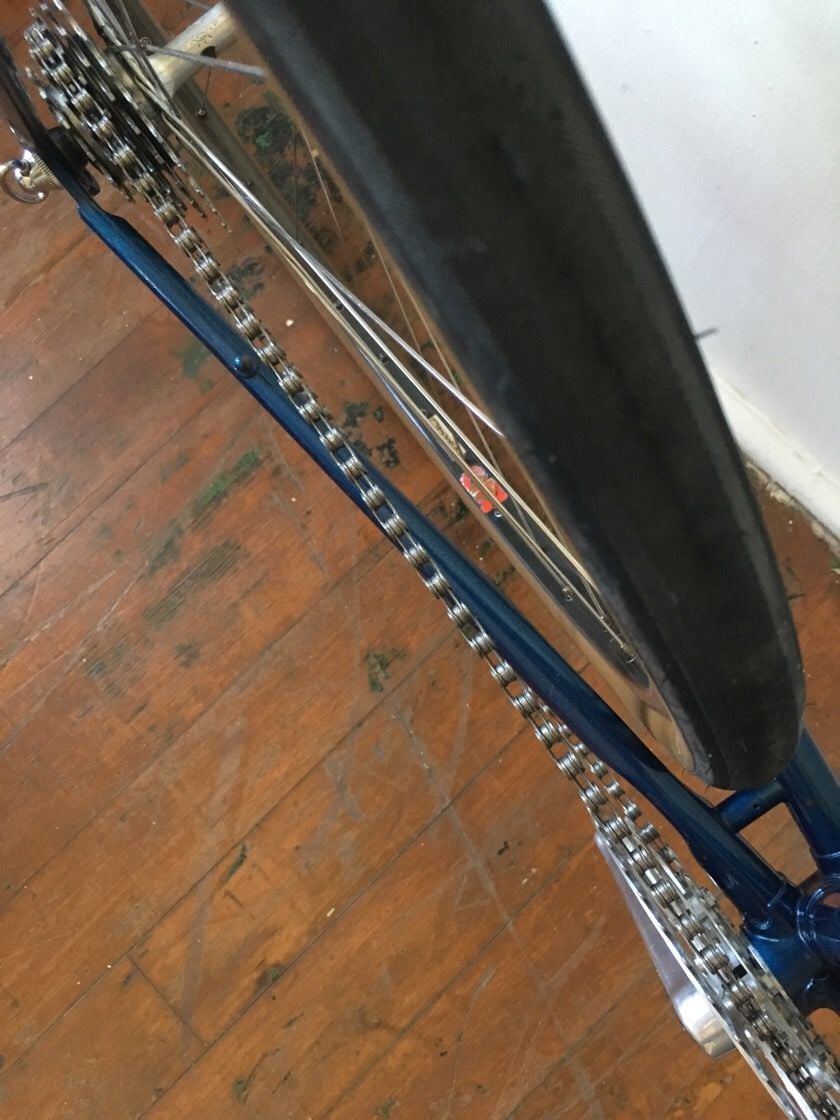
Looks like it should work, but I’m not an experienced judge of such things. Wondering if anyone sees it differently?
 09-02-19, 01:33 PM
#2
Ride, Wrench, Swap, Race

Join Date: Jan 2010
Location: Northern California
Posts: 9,194
Bikes: Cheltenham-Pedersen racer, Boulder F/S Paris-Roubaix, Varsity racer, '52 Christophe, '62 Continental, '92 Merckx, '75 Limongi, '76 Presto, '72 Gitane SC, '71 Schwinn SS, etc.
Mentioned: 132 Post(s)
Tagged: 0 Thread(s)
Quoted: 1565 Post(s)
Liked 1,296 Times
in
866 Posts
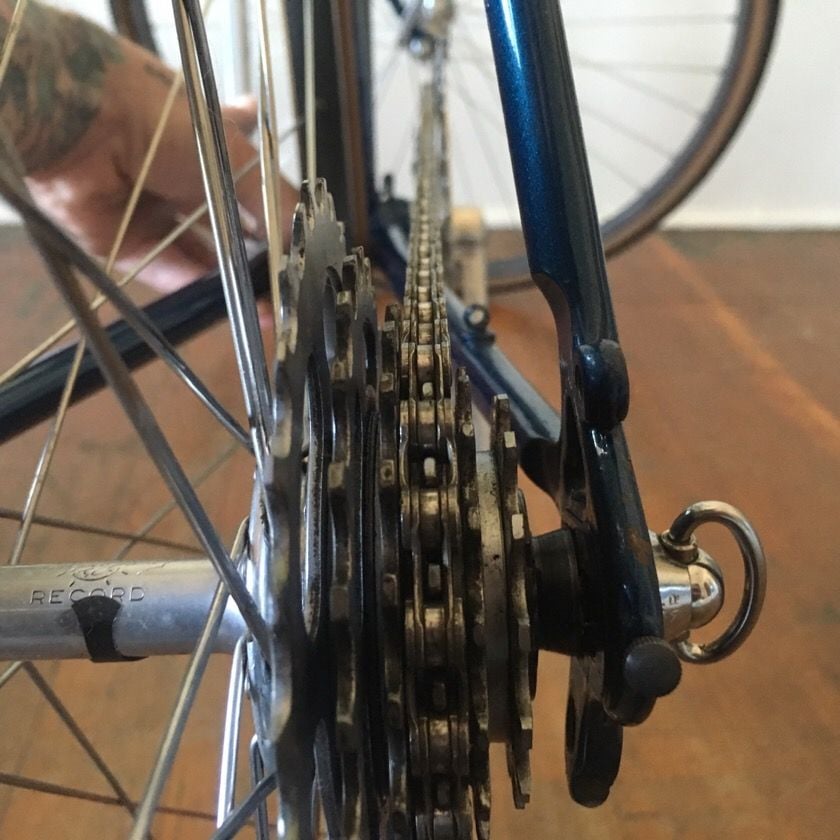
The only good way to eyeball chainline is to sight along the surface of one of the sprockets, which can easily translate that location front to rear within 1mm. It helps greatly if the sprockets are clean, and if there is a well-lit background (or use a flashlight).
Very worthwhile checking the chainline imo.
Very worthwhile checking the chainline imo.
09-02-19, 01:43 PM
#3
Senior Member
Thread Starter
Join Date: Jul 2018
Location: Eugene, OR
Posts: 1,326
Mentioned: 64 Post(s)
Tagged: 0 Thread(s)
Quoted: 535 Post(s)
Liked 346 Times
in
196 Posts
The only good way to eyeball chainline is to sight along the surface of one of the sprockets, which can easily translate that location front to rear within 1mm. It helps greatly if the sprockets are clean, and if there is a well-lit background (or use a flashlight).
Very worthwhile checking the chainline imo.
Very worthwhile checking the chainline imo.
Sort of like so?
Likes For deux jambes:
09-02-19, 01:52 PM
#4

Senior Member
Why not measure? Get your middle ring the right distance from the center of the seat tube, and go from there.
https://www.sheldonbrown.com/chainline.html
Is that rear triangle spaced 126 or 120? If the latter, why bother with ultra 6?
https://www.sheldonbrown.com/chainline.html
Is that rear triangle spaced 126 or 120? If the latter, why bother with ultra 6?
Likes For Salamandrine:
09-02-19, 01:52 PM
#5
Senior Member
Join Date: Sep 2014
Location: Baton Rouge La
Posts: 1,214
Mentioned: 22 Post(s)
Tagged: 0 Thread(s)
Quoted: 394 Post(s)
Liked 346 Times
in
230 Posts
Same as above. I type slow.
I think if you measure from the center line of the middle chainring to the center line of the frame , it should be about 45 mm, for starters. Or 45 mm to half way between the chainrings on a double. The middle of the freewheel should also fall 45 mm from the center line of the frame - a little trickier to measure. Sheldon talks about it here: https://www.sheldonbrown.com/chainline.html
I think if you measure from the center line of the middle chainring to the center line of the frame , it should be about 45 mm, for starters. Or 45 mm to half way between the chainrings on a double. The middle of the freewheel should also fall 45 mm from the center line of the frame - a little trickier to measure. Sheldon talks about it here: https://www.sheldonbrown.com/chainline.html
09-02-19, 01:59 PM
#6
Senior Member
Join Date: Sep 2014
Location: Baton Rouge La
Posts: 1,214
Mentioned: 22 Post(s)
Tagged: 0 Thread(s)
Quoted: 394 Post(s)
Liked 346 Times
in
230 Posts
For what it's worth, on most of my bikes, the little chainring is a lot closer to the chain stay than your's and the small cog on the freewheel is a lot closer to the dropout as well.
09-02-19, 02:09 PM
#7
Ride, Wrench, Swap, Race
Join Date: Jan 2010
Location: Northern California
Posts: 9,194
Bikes: Cheltenham-Pedersen racer, Boulder F/S Paris-Roubaix, Varsity racer, '52 Christophe, '62 Continental, '92 Merckx, '75 Limongi, '76 Presto, '72 Gitane SC, '71 Schwinn SS, etc.
Mentioned: 132 Post(s)
Tagged: 0 Thread(s)
Quoted: 1565 Post(s)
Liked 1,296 Times
in
866 Posts
Also I like to shorten the driveside rear axle extension as much as possible.
The small ring I use as only an occasional bail-out, so it's ok if only the large cogs run smoothly when using the small chainring.
Can't see too much with those photos, I would need to move my head side to side a little to get a good sight line off the side of one of the sprockets.
09-02-19, 02:41 PM
#8
Half way there

Join Date: Sep 2015
Location: North Carolina
Posts: 2,957
Bikes: Many, and the list changes frequently
Mentioned: 5 Post(s)
Tagged: 0 Thread(s)
Quoted: 986 Post(s)
Liked 880 Times
in
527 Posts
Why not measure? Get your middle ring the right distance from the center of the seat tube, and go from there.
https://www.sheldonbrown.com/chainline.html
https://www.sheldonbrown.com/chainline.html
By my eye on your pic, it looks fine.
09-02-19, 07:11 PM
#9
Senior Member
Thread Starter
Join Date: Jul 2018
Location: Eugene, OR
Posts: 1,326
Mentioned: 64 Post(s)
Tagged: 0 Thread(s)
Quoted: 535 Post(s)
Liked 346 Times
in
196 Posts
Why not measure? Get your middle ring the right distance from the center of the seat tube, and go from there.
https://www.sheldonbrown.com/chainline.html
Is that rear triangle spaced 126 or 120? If the latter, why bother with ultra 6?
https://www.sheldonbrown.com/chainline.html
Is that rear triangle spaced 126 or 120? If the latter, why bother with ultra 6?
Now that you’ve asked about the spacing, and the freewheel, I realize I may have been mistaken about it being an Ultra. It is a New Winner, and I was under the assumption that they were all compact spaced. But if an entry in Velobase is correct then it appears there may be a standard spaced NW 6 as well. I’m unsure how to tell either way.
The rear stays are splayed 120 mm though it accepts this 127 mm rear hub without much wrestling. I’m using the freewheel because it came with the wheel when purchased and happens to have gearing I think will work well for me.
09-02-19, 07:18 PM
#10
Senior Member
Thread Starter
Join Date: Jul 2018
Location: Eugene, OR
Posts: 1,326
Mentioned: 64 Post(s)
Tagged: 0 Thread(s)
Quoted: 535 Post(s)
Liked 346 Times
in
196 Posts
Same as above. I type slow.
I think if you measure from the center line of the middle chainring to the center line of the frame , it should be about 45 mm, for starters. Or 45 mm to half way between the chainrings on a double. The middle of the freewheel should also fall 45 mm from the center line of the frame - a little trickier to measure. Sheldon talks about it here: https://www.sheldonbrown.com/chainline.html
I think if you measure from the center line of the middle chainring to the center line of the frame , it should be about 45 mm, for starters. Or 45 mm to half way between the chainrings on a double. The middle of the freewheel should also fall 45 mm from the center line of the frame - a little trickier to measure. Sheldon talks about it here: https://www.sheldonbrown.com/chainline.html
09-02-19, 07:27 PM
#11
Senior Member
Thread Starter
Join Date: Jul 2018
Location: Eugene, OR
Posts: 1,326
Mentioned: 64 Post(s)
Tagged: 0 Thread(s)
Quoted: 535 Post(s)
Liked 346 Times
in
196 Posts
Same here, and this is how I like to see it, so that the chain won't cross so sharply as I use the range of the freewheel with the big chainring.
Also I like to shorten the driveside rear axle extension as much as possible.
The small ring I use as only an occasional bail-out, so it's ok if only the large cogs run smoothly when using the small chainring.
Can't see too much with those photos, I would need to move my head side to side a little to get a good sight line off the side of one of the sprockets.
I took measurements per SB’s instructions as linked above. I’ve got a difference of just over 3 mm. Crankset seems right we’re it needs to be with the middle ring 44.9 mm from center of the seat tube. The rear is coming up short however at 41.6 mm
Is 3.3 mm too much? Seems to me like it would be.
09-02-19, 07:34 PM
#12
Senior Member
Thread Starter
Join Date: Jul 2018
Location: Eugene, OR
Posts: 1,326
Mentioned: 64 Post(s)
Tagged: 0 Thread(s)
Quoted: 535 Post(s)
Liked 346 Times
in
196 Posts
Measured according ti Sheldon’s instructions I’ve got a front ring distance of 44.9 to center of seat tube. Seems close enough. The rear however is 3.3 mm short of being in line with the front. Middle cog is 41.6 mm. Would you say that’s too much of a difference?
09-02-19, 07:37 PM
#13

Senior Member

Join Date: Apr 2005
Location: Ann Arbor, MI
Posts: 16,878
Bikes: 1980 Masi, 1984 Mondonico, 1984 Trek 610, 1980 Woodrup Giro, 2005 Mondonico Futura Leggera ELOS, 1967 PX10E, 1971 Peugeot UO-8
Mentioned: 49 Post(s)
Tagged: 0 Thread(s)
Quoted: 1857 Post(s)
Liked 664 Times
in
506 Posts
The point of chainline is that front chainline and rear chainline should match numerically when the frame is aligned correctly. You need to measure to get the distance from the middle of the cassette or cogset to the centerline of the main triangle of the frame. This assumes the rear dropouts are the correct distance apart and are equidistant from the center of the main triangle. Lennard Zinn goes through all of it in "Zinn and the Art of Road Bike Maintenance." I have 5th edition (or fourth?). I can't say it isn't in any of the other editions.
Have you ridden the bike very much? Any problems with chain dragging or shifting?
Have you ridden the bike very much? Any problems with chain dragging or shifting?
09-02-19, 07:47 PM
#14
Senior Member
Thread Starter
Join Date: Jul 2018
Location: Eugene, OR
Posts: 1,326
Mentioned: 64 Post(s)
Tagged: 0 Thread(s)
Quoted: 535 Post(s)
Liked 346 Times
in
196 Posts
The point of chainline is that front chainline and rear chainline should match numerically when the frame is aligned correctly. You need to measure to get the distance from the middle of the cassette or cogset to the centerline of the main triangle of the frame. This assumes the rear dropouts are the correct distance apart and are equidistant from the center of the main triangle. Lennard Zinn goes through all of it in "Zinn and the Art of Road Bike Maintenance." I have 5th edition (or fourth?). I can't say it isn't in any of the other editions.
Have you ridden the bike very much? Any problems with chain dragging or shifting?
Have you ridden the bike very much? Any problems with chain dragging or shifting?
Rear is 41.6
I've never ridden the bike. I bought is as a frame and fork. It’s almost built, that is until discovering the 3.3 mm discrepancy in the chainline. Looks like I’ve hit an obstacle.
Likes For deux jambes:
09-02-19, 07:50 PM
#15
Phyllo-buster

Join Date: Jan 2010
Location: Nova Scotia
Posts: 8,847
Bikes: roadsters, club bikes, fixed and classic
Mentioned: 133 Post(s)
Tagged: 0 Thread(s)
Quoted: 2298 Post(s)
Liked 2,054 Times
in
1,254 Posts
09-02-19, 08:09 PM
#16
Senior Member
Join Date: Sep 2014
Location: Baton Rouge La
Posts: 1,214
Mentioned: 22 Post(s)
Tagged: 0 Thread(s)
Quoted: 394 Post(s)
Liked 346 Times
in
230 Posts
Why not just add a spacer or two to the left side of the axle and remove the same from the right side? Wouldn't that improve the chain line and after re-dishing the wheel result in less dish and a stronger wheel?
09-02-19, 08:13 PM
#18
Senior Member
Join Date: Apr 2005
Location: Ann Arbor, MI
Posts: 16,878
Bikes: 1980 Masi, 1984 Mondonico, 1984 Trek 610, 1980 Woodrup Giro, 2005 Mondonico Futura Leggera ELOS, 1967 PX10E, 1971 Peugeot UO-8
Mentioned: 49 Post(s)
Tagged: 0 Thread(s)
Quoted: 1857 Post(s)
Liked 664 Times
in
506 Posts
See if you can adjust or move around the axle spacers to move the cassette 3 mm closer to the drive side dropout. That should improve the chainline alignment to pretty darn close to correct. Then dish the rim toward the non-drive side by the same 3 mm. You'll also need to adjust the travel limits on the rear derailleur. You can also just try riding it and see what goes right and what goes wrong. But you don't want the chain to get thrown into the spokes - could break the frame, wheel, and derailleur if nothing goes right.
Likes For Road Fan:
09-02-19, 08:22 PM
#19
Senior Member
Thank you. I remember finding that article in the past, but it didn’t cross my mind when I actually needed it. It is quite helpful and I’ve taken the measurements.
Now that you’ve asked about the spacing, and the freewheel, I realize I may have been mistaken about it being an Ultra. It is a New Winner, and I was under the assumption that they were all compact spaced. But if an entry in Velobase is correct then it appears there may be a standard spaced NW 6 as well. I’m unsure how to tell either way.
The rear stays are splayed 120 mm though it accepts this 127 mm rear hub without much wrestling. I’m using the freewheel because it came with the wheel when purchased and happens to have gearing I think will work well for me.
RE the rear spacing, yeah, you can just cram in a 126 (nominal) hub in there, but you shouldn't. It may be bending the drive side chainstay more than the other side, which exacerbates chainline weirdness. More importantly, the dropouts are being forced out of alignment and this can lead to broken axles. I strongly recommend respacing properly using Sheldon's directions if you want to use 126 mm hubs in there. Follow this up by realigning the dropouts and derailleur hanger. This may sound OCD but it's very important. Stringing works OK for alignment if you don't have a tool, but use fishing line, not rough twine.
My eyeballs are telling me that looks like an ultra 6 freewheel. I'm sure there's measurements out there if you want to verify. Nothing wrong with Ultra 6, but it will make more sense if the hub is converted to 5spd/120 and the wheel is redished. You could fit a 7 speed in there now. IOW, you have room in there for another cog that's kinda being wasted.
Last edited by Salamandrine; 09-02-19 at 08:47 PM.
Likes For Salamandrine:
09-03-19, 09:52 AM
#20
Senior Member
Thread Starter
Join Date: Jul 2018
Location: Eugene, OR
Posts: 1,326
Mentioned: 64 Post(s)
Tagged: 0 Thread(s)
Quoted: 535 Post(s)
Liked 346 Times
in
196 Posts
Thats what I thought too. But after measuring as suggested here, turns out it’s off by just over 3 mm.
I’m glad I posted, as I was really close to putting the rest of the bike together. Maybe it would have functioned fine but I’d rather have it spot on, removing all doubt, and possible risk of dumping the chain or worse.
I’m going to go ahead with respacing, and redishing the rear rear wheel.
Seems that should work right? Thing is, this hub has one keyed washer on the left, and no spacer. The right has one keyed washer, and a single 13 mm spacer. So working with the right side only seems most practical in this case.
09-03-19, 09:57 AM
#21
Senior Member
Thread Starter
Join Date: Jul 2018
Location: Eugene, OR
Posts: 1,326
Mentioned: 64 Post(s)
Tagged: 0 Thread(s)
Quoted: 535 Post(s)
Liked 346 Times
in
196 Posts
Hub has a single 13 mm spacer on the right side, none on the left. If I can’t get to the LBS today, I may try shaving 3 mm from that spacer.
09-03-19, 10:01 AM
#22
Senior Member
Thread Starter
Join Date: Jul 2018
Location: Eugene, OR
Posts: 1,326
Mentioned: 64 Post(s)
Tagged: 0 Thread(s)
Quoted: 535 Post(s)
Liked 346 Times
in
196 Posts
OK, you're fine for the crank and BB spacing then. You actually do have room to take it in a mm or two if you wanted to bias it towards being correct in the two big rings. Fine as is though.
RE the rear spacing, yeah, you can just cram in a 126 (nominal) hub in there, but you shouldn't. It may be bending the drive side chainstay more than the other side, which exacerbates chainline weirdness. More importantly, the dropouts are being forced out of alignment and this can lead to broken axles. I strongly recommend respacing properly using Sheldon's directions if you want to use 126 mm hubs in there. Follow this up by realigning the dropouts and derailleur hanger. This may sound OCD but it's very important. Stringing works OK for alignment if you don't have a tool, but use fishing line, not rough twine.
My eyeballs are telling me that looks like an ultra 6 freewheel. I'm sure there's measurements out there if you want to verify. Nothing wrong with Ultra 6, but it will make more sense if the hub is converted to 5spd/120 and the wheel is redished. You could fit a 7 speed in there now. IOW, you have room in there for another cog that's kinda being wasted.
Thanks again for chiming in. Yep, I’m gonna go ahead, and make it right. Resolve for 120 mm. Redish. And align dropouts.
09-03-19, 01:11 PM
#23
Senior Member
Join Date: Sep 2014
Location: Baton Rouge La
Posts: 1,214
Mentioned: 22 Post(s)
Tagged: 0 Thread(s)
Quoted: 394 Post(s)
Liked 346 Times
in
230 Posts
Well that sounds like a plan. But if by shaving 3 mm off you mean filing or otherwise modifying your existing spacer, you run the risk of not getting the two faces perfectly parallel, which would have the same effect as slightly misaligned drop outs, as far as stressing the axle or misaligning the bearing surfaces. Better to find another spacer of the thickness you need. Also, if you're going from 126 to 120, or whatever, spacing make sure the drop out clears the small cog and chain. And you may need a shorter axle, or maybe not.
09-03-19, 03:17 PM
#24
Senior Member
Join Date: Apr 2005
Location: Ann Arbor, MI
Posts: 16,878
Bikes: 1980 Masi, 1984 Mondonico, 1984 Trek 610, 1980 Woodrup Giro, 2005 Mondonico Futura Leggera ELOS, 1967 PX10E, 1971 Peugeot UO-8
Mentioned: 49 Post(s)
Tagged: 0 Thread(s)
Quoted: 1857 Post(s)
Liked 664 Times
in
506 Posts
Normally, a hub has more than just that buffer part at the ends of an axle. If that's really all there is before you have the faces of the cone, the wheel was not re-assembled professionally at some point in its long history. There is usually a thin locknut at the outer face of each cone (to lock in the bearing setting on each side), some kind of thin buffer washer facing to the dropout (which may be threaded and serve as an additional locknut), and more makers-up-of-dead-space between them ... to make up dead space and to establish the distance from the hub body to the dropout at each side. there should be no loose parts when it's all adjusted and tightened. You should take the opportunity to measure the over locknut distance (OLD). Based on your discription previously, I think it's probably OLD =126 mm or 128 mm. Most frames that are not indexed are less than 130 mm, and very little is left in the wild that is 120, or was 120 and has not been cold-set to 126 mm or 128 mm.
09-03-19, 04:09 PM
#25
Senior Member
Well that sounds like a plan. But if by shaving 3 mm off you mean filing or otherwise modifying your existing spacer, you run the risk of not getting the two faces perfectly parallel, which would have the same effect as slightly misaligned drop outs, as far as stressing the axle or misaligning the bearing surfaces. Better to find another spacer of the thickness you need. Also, if you're going from 126 to 120, or whatever, spacing make sure the drop out clears the small cog and chain. And you may need a shorter axle, or maybe not.
Perhaps it would be helpful to go over the procedure for converting 6 speed hubs to 5 speed. This kind of thing used to be done all the time, though usually it was the other way, converting 5 to 6. Most of the shops I worked in had dedicated campy drawers with axles and spacers just for this purpose. Definitely verify the current OLD before doing any of this. Also verify that if there is 6mm less axle that you still have space for that ultra 6 freewheel. Looks like it, but as always, measure twice, cut once. Sometimes three times is good.
Anyhow:
There is no swapping spacers from side to side. ALL changes happen on the drive side.
Leave the NDS cone and locknut alone and on the axle.
Take off the drive side spacer. Swap it out for a smaller 5 speed one. The new spacer should be 6mm smaller, not 3mm smaller. As NOS Campy spacers are probably unobtanium, you'll probably need a 3 and a 4mm.
Cut 6mm off the axle with a hacksaw. File and deburr. Put the locknut back on and adjust the hub. Redish the wheel. Theoretically, the rim will shift over 3mm to the NDS.
Hopefully I've remembered this correctly. I've done it many dozens of times I'm sure, but it's been decades.