


Lotus Super Pro Aero ~ Rare Find
 11-10-19, 04:55 PM
#101

www.theheadbadge.com

Join Date: Sep 2005
Location: Southern Florida
Posts: 28,513
Bikes: https://www.theheadbadge.com
Mentioned: 124 Post(s)
Tagged: 0 Thread(s)
Quoted: 2422 Post(s)
Liked 4,393 Times
in
2,092 Posts
@cudak888
Kurt, great idea to leave the bottom open for tightening. I'll need to wrap my head around (sic) the visualization of the two pieces. I have plenty of scrap leather to fiddle with while working on this version.
Hopefully I have something to show by tomorrow morning.
Kurt, great idea to leave the bottom open for tightening. I'll need to wrap my head around (sic) the visualization of the two pieces. I have plenty of scrap leather to fiddle with while working on this version.
Hopefully I have something to show by tomorrow morning.
Keeping both side panels as one piece will avoid the cut and stitch on the front edge, which will definitely affect the smooth aero look that you are going for.
Incidentally, what are you using to stitch them together?
-Kurt
__________________


Last edited by cudak888; 11-10-19 at 05:00 PM.
 11-11-19, 07:56 AM
#102
Freewheel Medic
Thread Starter

Join Date: Oct 2005
Location: An Island on the Coast of GA!
Posts: 12,882
Bikes: Snazzy* Schwinns, Classy Cannondales & a Super Pro Aero Lotus (* Ed.)
Mentioned: 140 Post(s)
Tagged: 0 Thread(s)
Quoted: 1452 Post(s)
Liked 2,195 Times
in
962 Posts
Kurt, I use a waxed thread which is sold by Speedy Awl to work with their canvas and leather sewing awl.
I made great progress in designing and cutting the "U" shaped pattern for the lower half. It is about 90-95% done. I need to continue to work on the transition "sweep" where the hood is next to the bars. Sorry, no pictures yet.
I made great progress in designing and cutting the "U" shaped pattern for the lower half. It is about 90-95% done. I need to continue to work on the transition "sweep" where the hood is next to the bars. Sorry, no pictures yet.
__________________
Bob
Enjoying the GA coast all year long!
Thanks for visiting my website: www.freewheelspa.com
Bob
Enjoying the GA coast all year long!
Thanks for visiting my website: www.freewheelspa.com
Likes For pastorbobnlnh:
12-11-19, 02:16 PM
#104
Senior Member

Join Date: Sep 2015
Location: Madison, WI
Posts: 2,701
Mentioned: 52 Post(s)
Tagged: 0 Thread(s)
Quoted: 1136 Post(s)
Liked 650 Times
in
336 Posts
I would become a member here and try the Classic and Vintage Sales Forum. No sale fees like eBay, and you'll be reaching genuine enthusiasts here instead of dealing with the general public. We can also help with valuation (in the C&V Appraisals forum) and with tips on shipping.
Bike Forums membership is $3 for a 30 day trial, or $12 for the year, or $20 for two years.
https://www.bikeforums.net/payments.php
Bike Forums membership is $3 for a 30 day trial, or $12 for the year, or $20 for two years.
https://www.bikeforums.net/payments.php
Likes For TenGrainBread:
12-11-19, 02:21 PM
#105
Fat Guy on a Little Bike
Join Date: Jun 2008
Location: Philadelphia, PA
Posts: 15,944
Bikes: Two wheeled ones
Mentioned: 42 Post(s)
Tagged: 0 Thread(s)
Quoted: 1254 Post(s)
Liked 345 Times
in
174 Posts
Most of the members here know how to find bikes inexpensively, and are a frugal lot. Being a member here is great, but, full disclosure, it's not a good place to sell a complete bike if you want anything approach market value. The answer is ebay, and with a Lotus Super Aero Pro, you'll likely need to be patient. Limited demand.
12-11-19, 08:30 PM
#106
Freewheel Medic
Thread Starter
Join Date: Oct 2005
Location: An Island on the Coast of GA!
Posts: 12,882
Bikes: Snazzy* Schwinns, Classy Cannondales & a Super Pro Aero Lotus (* Ed.)
Mentioned: 140 Post(s)
Tagged: 0 Thread(s)
Quoted: 1452 Post(s)
Liked 2,195 Times
in
962 Posts
This made me realize I need to post pictures of my completed leather hood prototypes I made in November. One was my design and the second is based on suggestions from cudak888.
Best of luck Crawfisher on selling your Lotus Super Pro Aero. Do you have a range you are looking for and where are you located?
Best of luck Crawfisher on selling your Lotus Super Pro Aero. Do you have a range you are looking for and where are you located?
__________________
Bob
Enjoying the GA coast all year long!
Thanks for visiting my website: www.freewheelspa.com
Bob
Enjoying the GA coast all year long!
Thanks for visiting my website: www.freewheelspa.com
Likes For pastorbobnlnh:
12-13-19, 10:08 PM
#107
Freewheel Medic
Thread Starter
Join Date: Oct 2005
Location: An Island on the Coast of GA!
Posts: 12,882
Bikes: Snazzy* Schwinns, Classy Cannondales & a Super Pro Aero Lotus (* Ed.)
Mentioned: 140 Post(s)
Tagged: 0 Thread(s)
Quoted: 1452 Post(s)
Liked 2,195 Times
in
962 Posts
I had a chance to take pictures of the completed goat-leather hoods for the Dura Ace AX brake levers. Remember these are my first attempt prototypes. Prototypes provide good reference points for making improvements for the final ones.


I'm leaning towards the one piece design with a modification to the top pointy tip. I believe I can smooth it out by cutting that junction better, which should help it to lay flat. cudak888 suggested the two piece design which does provide a better top look. However, the stitching on the sides reminds me of Frankenstein.
I'm leaning towards the one piece design with a modification to the top pointy tip. I believe I can smooth it out by cutting that junction better, which should help it to lay flat. cudak888 suggested the two piece design which does provide a better top look. However, the stitching on the sides reminds me of Frankenstein.
__________________
Bob
Enjoying the GA coast all year long!
Thanks for visiting my website: www.freewheelspa.com
Bob
Enjoying the GA coast all year long!
Thanks for visiting my website: www.freewheelspa.com
12-13-19, 10:13 PM
#108
www.theheadbadge.com
Join Date: Sep 2005
Location: Southern Florida
Posts: 28,513
Bikes: https://www.theheadbadge.com
Mentioned: 124 Post(s)
Tagged: 0 Thread(s)
Quoted: 2422 Post(s)
Liked 4,393 Times
in
2,092 Posts
I had a chance to take pictures of the completed goat-leather hoods for the Dura Ace AX brake levers. Remember these are my first attempt prototypes. Prototypes provide good reference points for making improvements for the final ones.
I'm leaning towards the one piece design with a modification to the top pointy tip. I believe I can smooth it out by cutting that junction better, which should help it to lay flat. cudak888 suggested the two piece design which does provide a better top look. However, the stitching on the sides reminds me of Frankenstein.
I'm leaning towards the one piece design with a modification to the top pointy tip. I believe I can smooth it out by cutting that junction better, which should help it to lay flat. cudak888 suggested the two piece design which does provide a better top look. However, the stitching on the sides reminds me of Frankenstein.
If you decide against it, is there any chance you made a template of it? I'd like to try having one laser cut, just for giggles.
-Kurt
__________________
12-14-19, 06:07 AM
#109
Freewheel Medic
Thread Starter
Join Date: Oct 2005
Location: An Island on the Coast of GA!
Posts: 12,882
Bikes: Snazzy* Schwinns, Classy Cannondales & a Super Pro Aero Lotus (* Ed.)
Mentioned: 140 Post(s)
Tagged: 0 Thread(s)
Quoted: 1452 Post(s)
Liked 2,195 Times
in
962 Posts
Kurt, your suggestion is a good one it just needs a different medium from which to be made--- or a different stitch--- or a different method to join the two pieces.
I'll be glad to provide a template from these pieces. However, they are a bit asymmetrical in that I drew them by hand and not on a drafting table, or computer program.
The goat leather is very stretchy. This would make a great bar cover similar to the elk skin sleeves Velo Orange used to sell. I'm also thinking of other applications, both bike and non-bike ones.
__________________
Bob
Enjoying the GA coast all year long!
Thanks for visiting my website: www.freewheelspa.com
Bob
Enjoying the GA coast all year long!
Thanks for visiting my website: www.freewheelspa.com
Last edited by pastorbobnlnh; 12-14-19 at 12:55 PM.
Likes For pastorbobnlnh:
12-14-19, 06:40 AM
#110
Senior Member
Join Date: Jun 2014
Location: Ontario, Canada
Posts: 4,624
Bikes: iele Latina, Miele Suprema, Miele Uno LS, Miele Miele Beta, MMTB, Bianchi Model Unknown, Fiori Venezia, Fiori Napoli, VeloSport Adamas AX
Mentioned: 16 Post(s)
Tagged: 0 Thread(s)
Quoted: 1324 Post(s)
Liked 927 Times
in
640 Posts
When making those leather brake lever covers. Would it be possible to mold the leather to the shape or the top of the brake lever body so you wouldn't have a seam there?
Cheers
Cheers
Likes For Miele Man:
12-14-19, 01:04 PM
#111
Freewheel Medic
Thread Starter
Join Date: Oct 2005
Location: An Island on the Coast of GA!
Posts: 12,882
Bikes: Snazzy* Schwinns, Classy Cannondales & a Super Pro Aero Lotus (* Ed.)
Mentioned: 140 Post(s)
Tagged: 0 Thread(s)
Quoted: 1452 Post(s)
Liked 2,195 Times
in
962 Posts
Kurt's side seams work well for an aero lever. We need to remember these are some of the earliest aero levers and they really don't look all that different from the non aero DA EX levers which proceeded them.
I'm not going to give up on this project yet. I need to mount these back on the bars in order to see how much extra leather is needed to transition onto the wrapped portion of the bars (hope that makes sense).
__________________
Bob
Enjoying the GA coast all year long!
Thanks for visiting my website: www.freewheelspa.com
Bob
Enjoying the GA coast all year long!
Thanks for visiting my website: www.freewheelspa.com
Likes For pastorbobnlnh:
01-10-20, 07:26 AM
#112
Freewheel Medic
Thread Starter
Join Date: Oct 2005
Location: An Island on the Coast of GA!
Posts: 12,882
Bikes: Snazzy* Schwinns, Classy Cannondales & a Super Pro Aero Lotus (* Ed.)
Mentioned: 140 Post(s)
Tagged: 0 Thread(s)
Quoted: 1452 Post(s)
Liked 2,195 Times
in
962 Posts
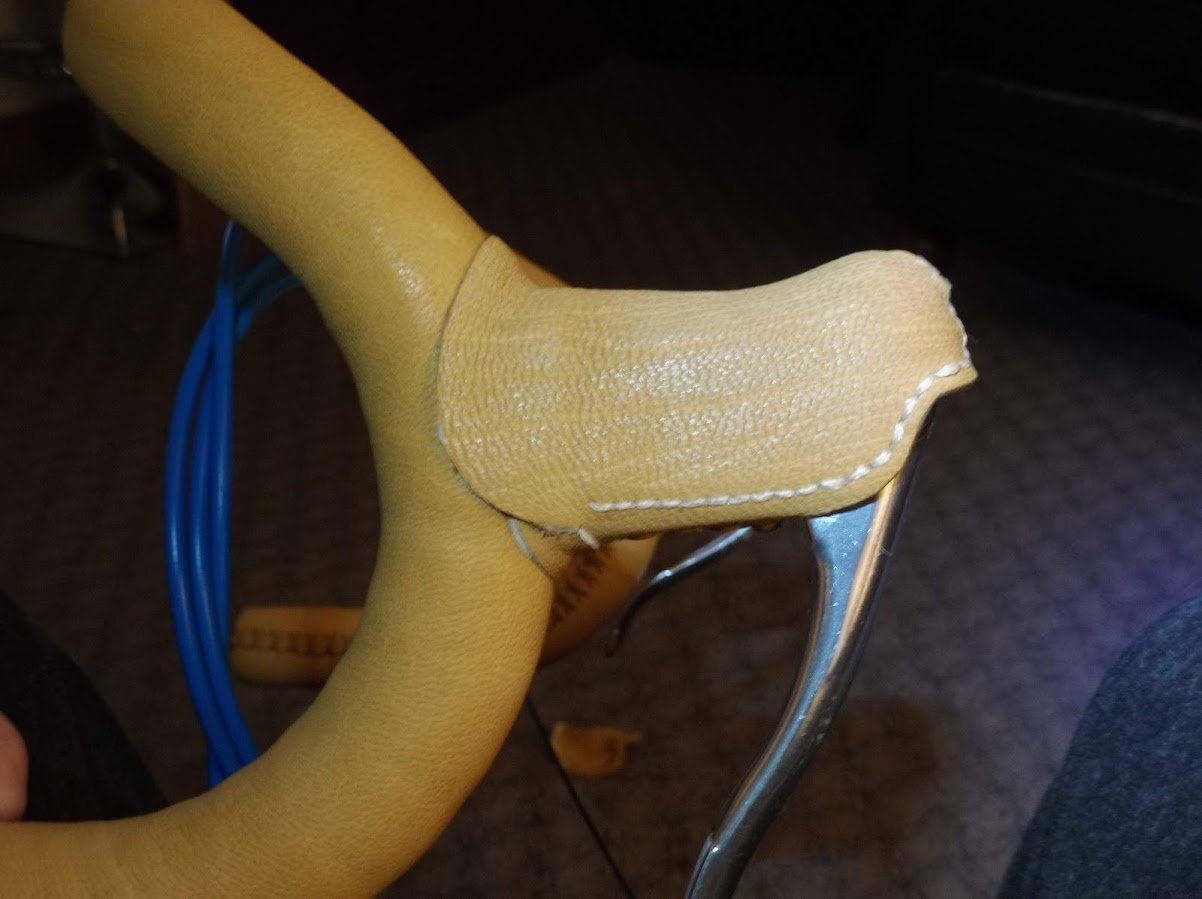
Dura Ace AX Leather Hoods: Round Three ~ Refinements
My last attempt on this project is pictured a few posts above. I made a second variant based on suggestions from cudak888 which is the "baseball" stitched one on the bottom. While it was a rough prototype and not a finished product, I was not pleased with the result and stitching the two sections together was significant work. I might go back and try to refine it further, but I decided to concentrate on improving the original prototype.
Basically, the first was satisfactory with the exception of the pointy "Spock like" protrusion at the top where a traditional lever would have the cable housing exit. While the original AX hoods have this feature, my leather variant was not even close and was not visually appealing.
I kept examining this variant and picturing how I could sew it into a smoother seam with little or no protrusion at the top. This past week, I took the original apart and began trimming and re-stitching it until I achieved a tighter fit and smoother look. Below are the results.


Still not perfect, but to my eye (and Mrs. PB's eye) these are much closer to what I hope to achieve. As you can see in the top picture, the one on the right does not have a symmetrical front. I refined my pattern and achieved a slightly better result on the one on the left. I feel as if I am close, but further refinements need to be made. Before working on the next prototype, I believe I will mount these on bars and wrap them to see how they look.
Any more suggestions or insights?
My last attempt on this project is pictured a few posts above. I made a second variant based on suggestions from cudak888 which is the "baseball" stitched one on the bottom. While it was a rough prototype and not a finished product, I was not pleased with the result and stitching the two sections together was significant work. I might go back and try to refine it further, but I decided to concentrate on improving the original prototype.
Basically, the first was satisfactory with the exception of the pointy "Spock like" protrusion at the top where a traditional lever would have the cable housing exit. While the original AX hoods have this feature, my leather variant was not even close and was not visually appealing.
I kept examining this variant and picturing how I could sew it into a smoother seam with little or no protrusion at the top. This past week, I took the original apart and began trimming and re-stitching it until I achieved a tighter fit and smoother look. Below are the results.
Still not perfect, but to my eye (and Mrs. PB's eye) these are much closer to what I hope to achieve. As you can see in the top picture, the one on the right does not have a symmetrical front. I refined my pattern and achieved a slightly better result on the one on the left. I feel as if I am close, but further refinements need to be made. Before working on the next prototype, I believe I will mount these on bars and wrap them to see how they look.
Any more suggestions or insights?
__________________
Bob
Enjoying the GA coast all year long!
Thanks for visiting my website: www.freewheelspa.com
Bob
Enjoying the GA coast all year long!
Thanks for visiting my website: www.freewheelspa.com
02-10-20, 09:17 PM
#113
Freewheel Medic
Thread Starter
Join Date: Oct 2005
Location: An Island on the Coast of GA!
Posts: 12,882
Bikes: Snazzy* Schwinns, Classy Cannondales & a Super Pro Aero Lotus (* Ed.)
Mentioned: 140 Post(s)
Tagged: 0 Thread(s)
Quoted: 1452 Post(s)
Liked 2,195 Times
in
962 Posts
Okay, still not satisfied with my third rendition. I decided to glue an underlayer of leather to make them thicker and more like the original AX hoods. I made them longer for the transition onto the bars. And finally I added a row of bottom stitches to give the hoods a more finished look. I also had decided to make bar wrap, AKA Velo Orange Elk Hide Wrap that they used to sell.

I still need to make the left hand one. When I do, I plan to run the stitching all the way around the curve of the transition area with bar wrap.
As a side note, I've cleaned all the components and plan to reinstall soon. I also found a matching Fiamme Ergal yellow label tubular rim for the rear wheel (which was a mismatched Mavic clincher).
__________________
Bob
Enjoying the GA coast all year long!
Thanks for visiting my website: www.freewheelspa.com
Bob
Enjoying the GA coast all year long!
Thanks for visiting my website: www.freewheelspa.com
Likes For pastorbobnlnh:
02-10-20, 11:53 PM
#114

Senior Member
Join Date: Jun 2006
Posts: 20,305
Mentioned: 130 Post(s)
Tagged: 0 Thread(s)
Quoted: 3464 Post(s)
Liked 2,829 Times
in
1,995 Posts
The title had me going...
Pastor Bob gets a
Lotus Super Seven...
late midlife crisis car.
� Be seeing you...�
and you
shades of The Prisoner - a 60�s CBS broadcast mid season replacement from England
bike content, The Village emblem was a penny farthing with surrey even.
Pastor Bob gets a
Lotus Super Seven...
late midlife crisis car.
� Be seeing you...�
and you
shades of The Prisoner - a 60�s CBS broadcast mid season replacement from England
bike content, The Village emblem was a penny farthing with surrey even.
02-11-20, 12:00 AM
#115
Senior Member
Join Date: Jun 2006
Posts: 20,305
Mentioned: 130 Post(s)
Tagged: 0 Thread(s)
Quoted: 3464 Post(s)
Liked 2,829 Times
in
1,995 Posts
Okay, still not satisfied with my third rendition. I decided to glue an underlayer of leather to make them thicker and more like the original AX hoods. I made them longer for the transition onto the bars. And finally I added a row of bottom stitches to give the hoods a more finished look. I also had decided to make bar wrap, AKA Velo Orange Elk Hide Wrap that they used to sell.
I still need to make the left hand one. When I do, I plan to run the stitching all the way around the curve of the transition area with bar wrap.
As a side note, I've cleaned all the components and plan to reinstall soon. I also found a matching Fiamme Ergal yellow label tubular rim for the rear wheel (which was a mismatched Mavic clincher).
aero hoods without a raised region up forward are for me too likely I would slide my hand too far forward beyond the lever.
02-11-20, 06:09 AM
#116
www.theheadbadge.com
Join Date: Sep 2005
Location: Southern Florida
Posts: 28,513
Bikes: https://www.theheadbadge.com
Mentioned: 124 Post(s)
Tagged: 0 Thread(s)
Quoted: 2422 Post(s)
Liked 4,393 Times
in
2,092 Posts
That's looking pretty good, Bob. Maybe a bit of trimming at the back, where it meets the bars? The curve is an interesting touch, but it takes a bit of getting used to 
-Kurt
-Kurt
__________________
02-11-20, 07:10 AM
#117
Senior Member
Join Date: Jan 2004
Location: Madison, WI USA
Posts: 6,154
Mentioned: 50 Post(s)
Tagged: 0 Thread(s)
Quoted: 2363 Post(s)
Liked 1,749 Times
in
1,191 Posts
^^^^^ Looks like you're running the cockpit on ethernet cables .
.
Likes For madpogue:
02-11-20, 07:29 AM
#118
Freewheel Medic
Thread Starter
Join Date: Oct 2005
Location: An Island on the Coast of GA!
Posts: 12,882
Bikes: Snazzy* Schwinns, Classy Cannondales & a Super Pro Aero Lotus (* Ed.)
Mentioned: 140 Post(s)
Tagged: 0 Thread(s)
Quoted: 1452 Post(s)
Liked 2,195 Times
in
962 Posts
Hahaha! More specifically vintage "Shimano Blue." Think about all those Shimano packages which are blue. These are Shimano cables in that color. It is spot on for the blue "Lotus" and "Aero" decals on the frame. It is also a match to the blue highlights painted into the "Dura Ace AX" engravings on the components, a little of which can be seen on the brake lever.
__________________
Bob
Enjoying the GA coast all year long!
Thanks for visiting my website: www.freewheelspa.com
Bob
Enjoying the GA coast all year long!
Thanks for visiting my website: www.freewheelspa.com
02-11-20, 08:06 AM
#119
Freewheel Medic
Thread Starter
Join Date: Oct 2005
Location: An Island on the Coast of GA!
Posts: 12,882
Bikes: Snazzy* Schwinns, Classy Cannondales & a Super Pro Aero Lotus (* Ed.)
Mentioned: 140 Post(s)
Tagged: 0 Thread(s)
Quoted: 1452 Post(s)
Liked 2,195 Times
in
962 Posts
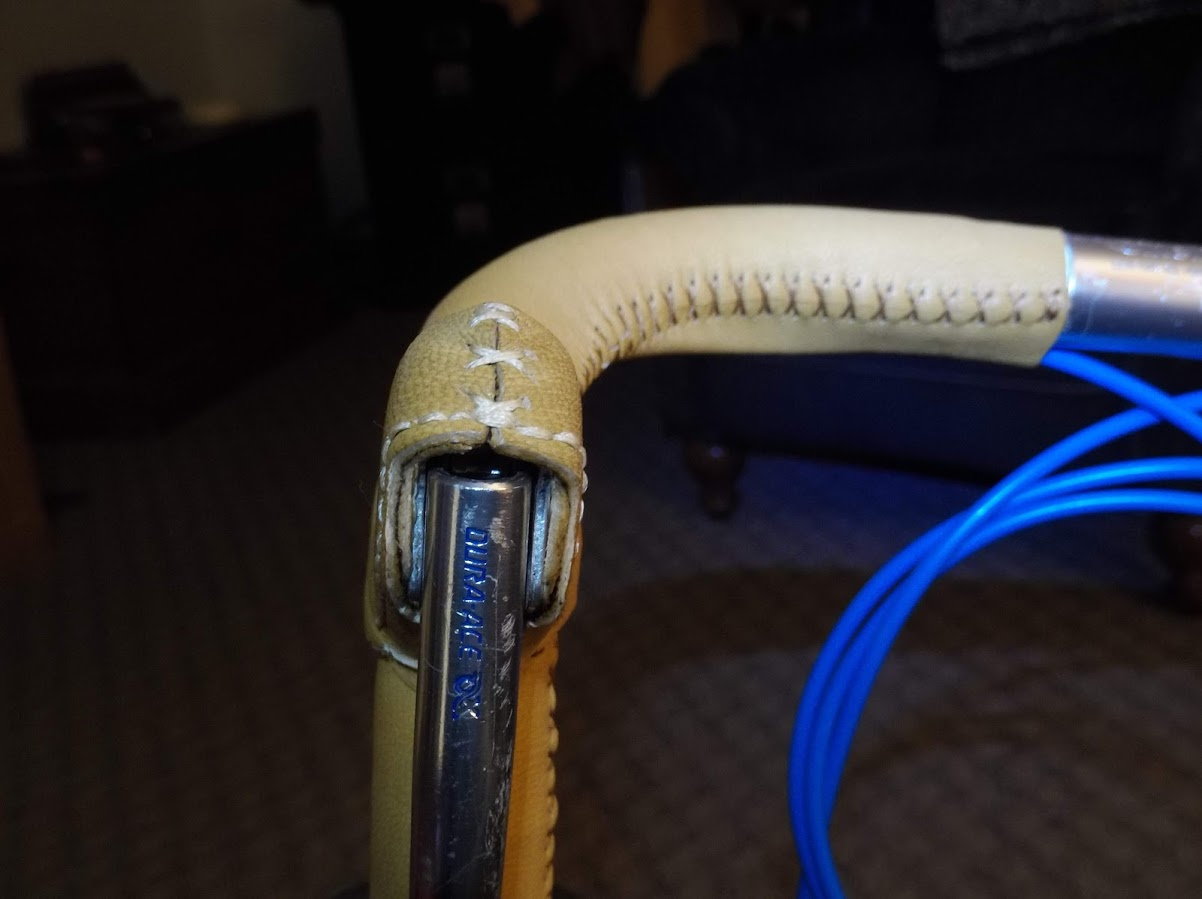
 .
.Since this was a major revision over the last pair, I was actually very pleased with the result and how it looked when mounted. I still have room to improve and I'll try to incorporate these changes into the left hood.

The white dash lines approximate where I'll run the stitching all the way around the hood.
In the blue circle you'll notice an extra piece of leather. This was fill for the under-layer. Despite careful measurements, it turned out it was about 1/2 inch too short. This caused a "valley" between the top of the hood and the bar. On the left one I'll make the under-layer of leather a 1/2 inch longer. The other proportions were spot on with what I needed.
In the red oval, while not pictured here (look above at the front view) I plan to back stich the "X" stitching before mounting. Currently it is over, under, over under over. By going back up it should look like 5 Xs stacked on top of each other.
__________________
Bob
Enjoying the GA coast all year long!
Thanks for visiting my website: www.freewheelspa.com
Bob
Enjoying the GA coast all year long!
Thanks for visiting my website: www.freewheelspa.com
02-11-20, 08:10 AM
#120
Freewheel Medic
Thread Starter
Join Date: Oct 2005
Location: An Island on the Coast of GA!
Posts: 12,882
Bikes: Snazzy* Schwinns, Classy Cannondales & a Super Pro Aero Lotus (* Ed.)
Mentioned: 140 Post(s)
Tagged: 0 Thread(s)
Quoted: 1452 Post(s)
Liked 2,195 Times
in
962 Posts
I tried adding some foam padding under the hoods for cushioning, but found it very difficult to work with and to neatly stretch the leather around the foam--- so I gave up. Since I'll run the levers pointing slightly up, that angle and the nub should provide me the needed security to not worry about my hand sliding off the front. Plus, the goatskin leather has a pretty good gripping surface.
__________________
Bob
Enjoying the GA coast all year long!
Thanks for visiting my website: www.freewheelspa.com
Bob
Enjoying the GA coast all year long!
Thanks for visiting my website: www.freewheelspa.com
02-11-20, 08:19 AM
#121
Senior Member
Join Date: Jan 2016
Posts: 3,448
Mentioned: 33 Post(s)
Tagged: 0 Thread(s)
Quoted: 874 Post(s)
Liked 2,287 Times
in
1,278 Posts
Pastor Bob, That is a nice job on those bars. I think this is a major step since the first go round. If I had those on a bike it would be my (excuse the expression) "Sunday Going To Meeting " bike! Very nice indeed. I sailed on a Swan 52 that had a 52" wheel that was wrapped in Elk Hide as well as all the stantions . I can't imagine how many hours it would take to do something like that , but it sure looks good , and I am vegan! Is that not right or what? Also, I have the Shimano blue cables on my Windsor and it really sets off the silver with blue highlighted decals .Joe
 02-11-20, 11:22 AM
#122
Freewheel Medic
Thread Starter
Join Date: Oct 2005
Location: An Island on the Coast of GA!
Posts: 12,882
Bikes: Snazzy* Schwinns, Classy Cannondales & a Super Pro Aero Lotus (* Ed.)
Mentioned: 140 Post(s)
Tagged: 0 Thread(s)
Quoted: 1452 Post(s)
Liked 2,195 Times
in
962 Posts
Thank you for the kind comments Kabuki12 ! As I began on this project I thought about how what I was doing could offend vegan, vegetarian and others who are concerned about animal welfare. I do respect their opinions. However, I could think of no other material that I had the skill set to craft into reasonably acceptable hood replacements.
This has been a fun project in that I haven't given up with the first or second, or now third renditions. Instead I've pushed forward, envisioning new ways to solve the next challenge. We should all tackle the opportunities which present themselves by going at them again and again.
This has been a fun project in that I haven't given up with the first or second, or now third renditions. Instead I've pushed forward, envisioning new ways to solve the next challenge. We should all tackle the opportunities which present themselves by going at them again and again.
__________________
Bob
Enjoying the GA coast all year long!
Thanks for visiting my website: www.freewheelspa.com
Bob
Enjoying the GA coast all year long!
Thanks for visiting my website: www.freewheelspa.com
02-11-20, 01:07 PM
#123
Senior Member
Join Date: Jun 2006
Posts: 20,305
Mentioned: 130 Post(s)
Tagged: 0 Thread(s)
Quoted: 3464 Post(s)
Liked 2,829 Times
in
1,995 Posts
I tried adding some foam padding under the hoods for cushioning, but found it very difficult to work with and to neatly stretch the leather around the foam--- so I gave up. Since I'll run the levers pointing slightly up, that angle and the nub should provide me the needed security to not worry about my hand sliding off the front. Plus, the goatskin leather has a pretty good gripping surface.
Shape foam to fit, ultra high density closed cell foam is the common term. Latex being best, sometimes used on door armrests.
Bond to lever. final sculpting post bonding.
02-11-20, 02:34 PM
#124
Freewheel Medic
Thread Starter
Join Date: Oct 2005
Location: An Island on the Coast of GA!
Posts: 12,882
Bikes: Snazzy* Schwinns, Classy Cannondales & a Super Pro Aero Lotus (* Ed.)
Mentioned: 140 Post(s)
Tagged: 0 Thread(s)
Quoted: 1452 Post(s)
Liked 2,195 Times
in
962 Posts
repechage Thanks for that tip. Can I pick up that type of foam at an auto parts store or should I just go to Amazon?
__________________
Bob
Enjoying the GA coast all year long!
Thanks for visiting my website: www.freewheelspa.com
Bob
Enjoying the GA coast all year long!
Thanks for visiting my website: www.freewheelspa.com
02-11-20, 07:18 PM
#125
www.theheadbadge.com
Join Date: Sep 2005
Location: Southern Florida
Posts: 28,513
Bikes: https://www.theheadbadge.com
Mentioned: 124 Post(s)
Tagged: 0 Thread(s)
Quoted: 2422 Post(s)
Liked 4,393 Times
in
2,092 Posts
Kurt, I agree, it needs work at this area. The rounded trim is bit sloppy because it was done while the levers were mounted to the bars and the hoods were firmly attached to the levers. I left extra leather in this area knowing it would need trimming in order to find a good final shape. Trying to match the sweep of the original hoods is a possibility--- but I need a bit of extra "skin" in order to cover up my flaws. .
Since this was a major revision over the last pair, I was actually very pleased with the result and how it looked when mounted. I still have room to improve and I'll try to incorporate these changes into the left hood.
The white dash lines approximate where I'll run the stitching all the way around the hood.
In the blue circle you'll notice an extra piece of leather. This was fill for the under-layer. Despite careful measurements, it turned out it was about 1/2 inch too short. This caused a "valley" between the top of the hood and the bar. On the left one I'll make the under-layer of leather a 1/2 inch longer. The other proportions were spot on with what I needed.
In the red oval, while not pictured here (look above at the front view) I plan to back stich the "X" stitching before mounting. Currently it is over, under, over under over. By going back up it should look like 5 Xs stacked on top of each other.
.Since this was a major revision over the last pair, I was actually very pleased with the result and how it looked when mounted. I still have room to improve and I'll try to incorporate these changes into the left hood.
The white dash lines approximate where I'll run the stitching all the way around the hood.
In the blue circle you'll notice an extra piece of leather. This was fill for the under-layer. Despite careful measurements, it turned out it was about 1/2 inch too short. This caused a "valley" between the top of the hood and the bar. On the left one I'll make the under-layer of leather a 1/2 inch longer. The other proportions were spot on with what I needed.
In the red oval, while not pictured here (look above at the front view) I plan to back stich the "X" stitching before mounting. Currently it is over, under, over under over. By going back up it should look like 5 Xs stacked on top of each other.
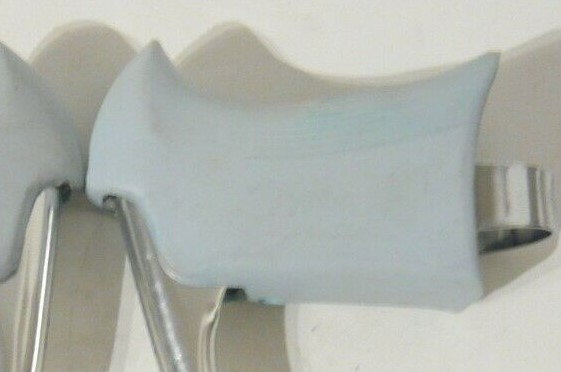
What's more, now that I see the factory hoods in white, I now realize why I've always been adverse to the shape. They look disconcertingly similar to the shape of klansman's headwear
 . Not the imagery I want to be reminded of when I look at a bike.
Is there any chance that you might create a third hood once you have the left one perfected? I know I've mentioned this before, but I'm really curious to try a pair laser-cut to your pattern.
-Kurt
__________________