


Roll your own touch-up color?
 10-28-20, 04:37 PM
#1

Senior Member
Thread Starter

Join Date: Jan 2008
Location: Beaverton, OR
Posts: 14,744
Bikes: Yes
Mentioned: 525 Post(s)
Tagged: 0 Thread(s)
Quoted: 3230 Post(s)
Liked 3,868 Times
in
1,439 Posts
Roll your own touch-up color?
I find myself in need of touch-up paint for my Specialized Allez. I got amazingly lucky matching the original color to a spray can of Gloss Cherry Red Rustoleum, but I need some liquid paint for touch up and blending, and oddly enough the Cherry Red Rustoleum doesn't seem to be available in brush on form. So I'm trying to find another match.
I had some Model Master Guards Red on hand from another project and it seemed pretty close. When I brushed it on it looked perfect, but it dried much too dark. So I tried mixing in a bit of International Orange (also Model Master, FWIW). I'm basically still experimenting at this point, but on first go I got it close enough to think I can probably make this work. (Kindly disregard the sloppy application, magnified as it is by the extreme close-up.)

This is, of course, an ongoing problem and already I've got a couple of other bikes that would benefit if I could get the hang of this color mixing thing. So, given what an resourceful bunch hangs out here, I thought I'd ask.
Has anyone else tried mixing their own colors for touch-up paint? Any tips you can share?
I had some Model Master Guards Red on hand from another project and it seemed pretty close. When I brushed it on it looked perfect, but it dried much too dark. So I tried mixing in a bit of International Orange (also Model Master, FWIW). I'm basically still experimenting at this point, but on first go I got it close enough to think I can probably make this work. (Kindly disregard the sloppy application, magnified as it is by the extreme close-up.)
This is, of course, an ongoing problem and already I've got a couple of other bikes that would benefit if I could get the hang of this color mixing thing. So, given what an resourceful bunch hangs out here, I thought I'd ask.
Has anyone else tried mixing their own colors for touch-up paint? Any tips you can share?
__________________
My Bikes
My Bikes
 10-28-20, 05:01 PM
#2
Senior Member
Join Date: Dec 2016
Location: Long Island, NY
Posts: 2,109
Bikes: Trek 800 x 2, Schwinn Heavy Duti, Schwinn Traveler, Schwinn Le Tour Luxe, Schwinn Continental, Cannondale M400 and Lambert, Schwinn Super Sport
Mentioned: 14 Post(s)
Tagged: 0 Thread(s)
Quoted: 809 Post(s)
Liked 1,022 Times
in
665 Posts
Yes, it is a challenge and sometimes, maybe most times, I end up with "good enough". I use the tiny jars of Testors paint. One of my problems is that I work inside with artificial light. The light is different outside or near a window. The other problem, as you found out, is that the color changes as it dries.
My Fuji Espree that looked good at first, came out not looking so good when it was done, but it was pretty iffy anyway. There were so many nicks, scratches and defects, I didn't really think that touching up was going to be the thing that would save the paint. The previous owner probably wound a chain around the top tube.
Anyway, your color match looks pretty good to me. The other thing that I do is to wet sand the painted area to level it after the paint as dried. Starting with 400 and working up to, believe or not 3000. Then rubbing compound, polishing compound, then wax. You can probably skip a few steps.
Likes For Velo Mule:
10-28-20, 05:06 PM
#3
Senior Member
Join Date: Oct 2005
Location: Upper Left, USA
Posts: 1,915
Mentioned: 50 Post(s)
Tagged: 0 Thread(s)
Quoted: 634 Post(s)
Liked 444 Times
in
298 Posts
Andy_K can you spray a heavy dollop of the Rustoleum onto some paper and then brush that on? I did that with some spray.bike paint for some touch ups and it worked well.
Likes For tricky:
10-28-20, 05:47 PM
#4
Senior Member
Thread Starter
Join Date: Jan 2008
Location: Beaverton, OR
Posts: 14,744
Bikes: Yes
Mentioned: 525 Post(s)
Tagged: 0 Thread(s)
Quoted: 3230 Post(s)
Liked 3,868 Times
in
1,439 Posts
Andy_K can you spray a heavy dollop of the Rustoleum onto some paper and then brush that on? I did that with some spray.bike paint for some touch ups and it worked well.

I'll keep that as a fallback idea, but I really want to develop the skill to mix colors like this.
__________________
My Bikes
My Bikes
10-28-20, 06:34 PM
#5
Senior Member

Join Date: Feb 2012
Location: Williamsburg, VA Sebastian, FL
Posts: 1,363
Bikes: 1987 Centurion Ironman Master, 1992 Koga Miyata Exerciser, 1992 Schwinn Crosscut
Mentioned: 6 Post(s)
Tagged: 0 Thread(s)
Quoted: 209 Post(s)
Likes: 0
Liked 175 Times
in
92 Posts
A simple possible solution is to take your fork into a Lowes or Home Depot and have them color match it.
They will then mix you a small container of that exact color.
I've only done it once, but the result was spot-on.
They will then mix you a small container of that exact color.
I've only done it once, but the result was spot-on.
Likes For 67tony:
10-28-20, 06:38 PM
#6
Senior Member

Join Date: Mar 2014
Location: City of Angels
Posts: 4,870
Bikes: A few too many
Mentioned: 42 Post(s)
Tagged: 1 Thread(s)
Quoted: 1364 Post(s)
Liked 2,180 Times
in
1,183 Posts
This one of those....It would be good to have a picture of the area that you are working on. Color matching is in my opinion not that difficult it just requires patience. For small spots, I like to use a small-cap to mix with. I keep the trial color in the cap so that I can make adjustments to the color later...even if it dries out you can use thinner to rejuvenate it. Saving the original color lets you start from the same place every time, and lessens the trial and error.
We know that paint changes color after it's dried so again save the paint to make the adjustments necessary.
You didn't ask about the application but I will offer some hints that I have found useful. I try to get the chipped area as close to horizontal as possible in order to minimize the sag the is always found at the bottom edge of the chipped area after it has been painted. Start in the center of the chip and using a toothpick dab the pant in the middle of the chip and let it "flow" to the edge of the area affected....if it'd to thick thin it a little and do not try to fill the chip all at once...remember the paint will shrink etc.
If you are spraying the paint, I often use the soft mask technique, I don't like the hard edge that masking tapes leave behind. The soft mask is accomplished by either using a lint-free cloth or crumpled newspaper. Positon the soft mask well away from the spot you are trying to blend and spray over the mask toward the chip/spot. This will minimize the hard edge and help to blend the color.
If you don't want to soft mask, then use a piece of stiff paper with a ragged hole in the middle and spray paint through the hole in the paper in order to minimize that splotchy look from spraying directly from can to frame....this technique allows you to "feather" the paint.
And remember practice makes perfect...or better than "good enough".
Always works for me.
Good Luck, Ben

The line you see is from the applide decal
The soft-mask....no color matching but close enough to "blend" without any sanding or polishing....spray away from the mask!

How it was.
We know that paint changes color after it's dried so again save the paint to make the adjustments necessary.
You didn't ask about the application but I will offer some hints that I have found useful. I try to get the chipped area as close to horizontal as possible in order to minimize the sag the is always found at the bottom edge of the chipped area after it has been painted. Start in the center of the chip and using a toothpick dab the pant in the middle of the chip and let it "flow" to the edge of the area affected....if it'd to thick thin it a little and do not try to fill the chip all at once...remember the paint will shrink etc.
If you are spraying the paint, I often use the soft mask technique, I don't like the hard edge that masking tapes leave behind. The soft mask is accomplished by either using a lint-free cloth or crumpled newspaper. Positon the soft mask well away from the spot you are trying to blend and spray over the mask toward the chip/spot. This will minimize the hard edge and help to blend the color.
If you don't want to soft mask, then use a piece of stiff paper with a ragged hole in the middle and spray paint through the hole in the paper in order to minimize that splotchy look from spraying directly from can to frame....this technique allows you to "feather" the paint.
And remember practice makes perfect...or better than "good enough".
Always works for me.
Good Luck, Ben
The line you see is from the applide decal
The soft-mask....no color matching but close enough to "blend" without any sanding or polishing....spray away from the mask!
How it was.
Last edited by xiaoman1; 10-28-20 at 07:05 PM.
Likes For xiaoman1:
10-28-20, 07:13 PM
#7
Senior Member
Thread Starter
Join Date: Jan 2008
Location: Beaverton, OR
Posts: 14,744
Bikes: Yes
Mentioned: 525 Post(s)
Tagged: 0 Thread(s)
Quoted: 3230 Post(s)
Liked 3,868 Times
in
1,439 Posts
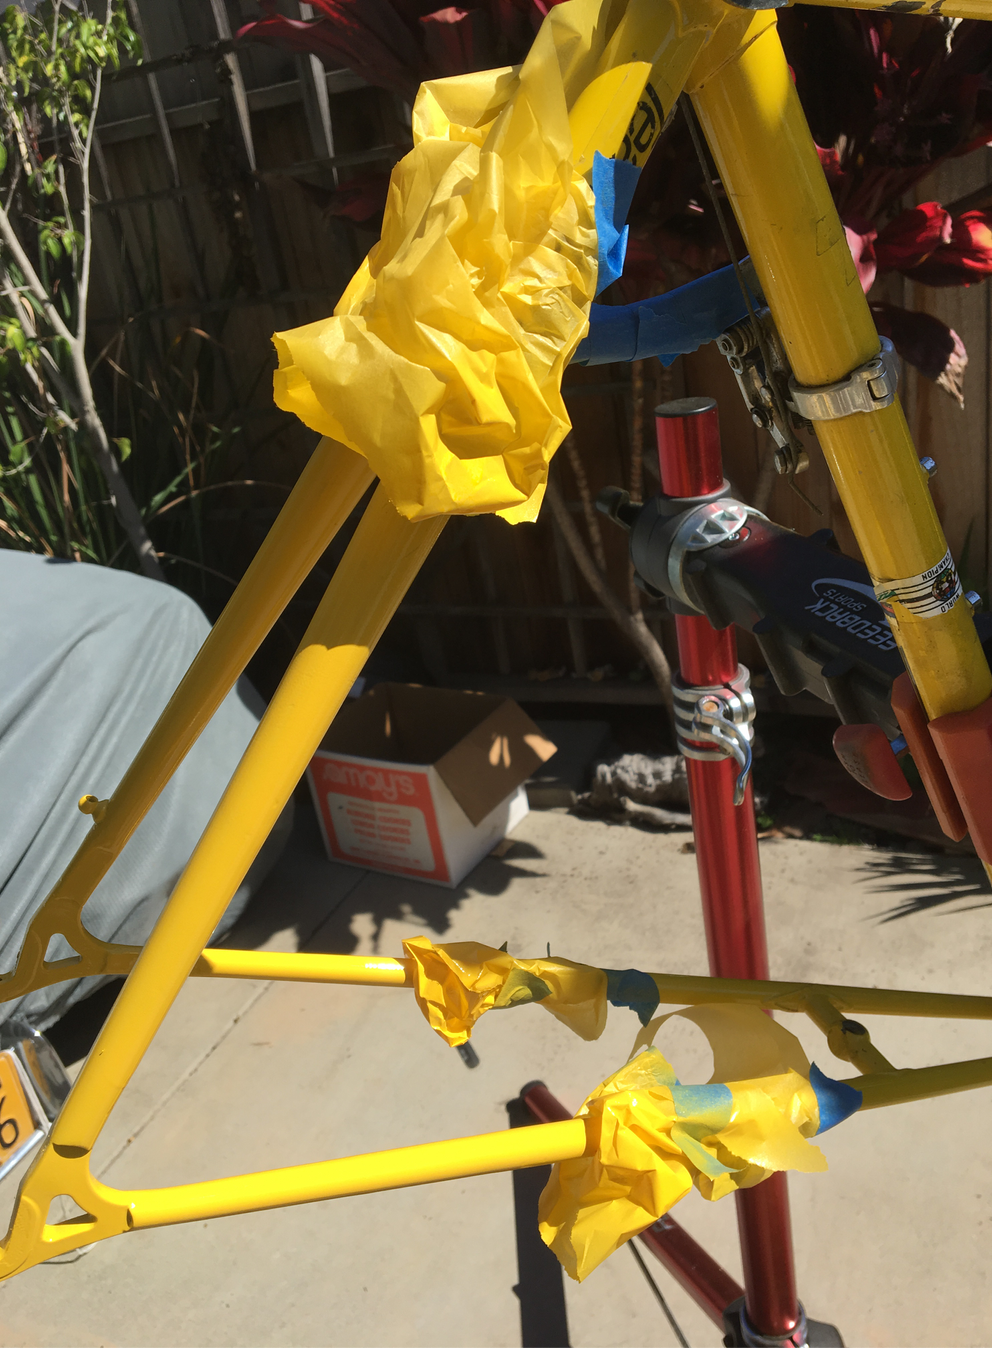
Here's a basic before and after:


I've got good basic coverage now, but a handful of areas to fix. Besides the usual chips and scratches in the original paint, there are some self-inflicted problem with my spray job. Most of what I needed to paint was offset areas like the lugs, but there was a bit of paint scraped away around the edges, so I couldn't just mask it sharply. The masking didn't go as well as I had hoped in that it left a lot of residue that I haven't been able to get off without scraping away some paint. On the tubes that required partial paint, I intended to stay away from my tape, but I got carried away with the primer and ended up having to go right to the tape. That left some ledges that I've been working on sanding smooth. I'm planning to try some feathering with touch-up paint to further hide the color transition if I can manage it without adding texture.
Here's a better pic of the color transition problem area.

__________________
My Bikes
My Bikes
10-28-20, 07:15 PM
#8
Senior Member
Thread Starter
Join Date: Jan 2008
Location: Beaverton, OR
Posts: 14,744
Bikes: Yes
Mentioned: 525 Post(s)
Tagged: 0 Thread(s)
Quoted: 3230 Post(s)
Liked 3,868 Times
in
1,439 Posts
That could work. I only need about an ounce of paint, but this could be more cost effective than buying a bunch of small jars of model paint. I've also heard it suggested that some auto body places will do this, but the reports on their willingness are mixed.
__________________
My Bikes
My Bikes
Likes For Andy_K:
10-28-20, 07:57 PM
#9
se�or miembro

Join Date: Dec 2018
Location: Pac NW
Posts: 6,620
Bikes: '70s - '80s Campagnolo
Mentioned: 92 Post(s)
Tagged: 0 Thread(s)
Quoted: 3877 Post(s)
Liked 6,466 Times
in
3,198 Posts
Roll your own ...
[Thread needed sound.]
Likes For SurferRosa:
10-28-20, 08:20 PM
#10
Senior Member
Join Date: Mar 2014
Location: City of Angels
Posts: 4,870
Bikes: A few too many
Mentioned: 42 Post(s)
Tagged: 1 Thread(s)
Quoted: 1364 Post(s)
Liked 2,180 Times
in
1,183 Posts
Thanks for the tips! You can see the work in progress here: https://www.bikeforums.net/classic-v...uarantine.html
Here's a basic before and after:
I've got good basic coverage now, but a handful of areas to fix. Besides the usual chips and scratches in the original paint, there are some self-inflicted problem with my spray job. Most of what I needed to paint was offset areas like the lugs, but there was a bit of paint scraped away around the edges, so I couldn't just mask it sharply. The masking didn't go as well as I had hoped in that it left a lot of residue that I haven't been able to get off without scraping away some paint. On the tubes that required partial paint, I intended to stay away from my tape, but I got carried away with the primer and ended up having to go right to the tape. That left some ledges that I've been working on sanding smooth. I'm planning to try some feathering with touch-up paint to further hide the color transition if I can manage it without adding texture.
Here's a better pic of the color transition problem area.
 .... seeing the final results I will say it looks great! I am glad to see that you were able to bring it back.
When I saw it in the sales I was wondering who would take on the challenge.
It's a great frame to fuss over and if it had been my size I would have wanted it, those frames are very hard to come by glad that you got it and know that you will give it the attention it deserves..
Looking forward to seeing how it progresses.
Great Job, Ben
10-29-20, 01:13 AM
#11
Senior Member
Thread Starter
Join Date: Jan 2008
Location: Beaverton, OR
Posts: 14,744
Bikes: Yes
Mentioned: 525 Post(s)
Tagged: 0 Thread(s)
Quoted: 3230 Post(s)
Liked 3,868 Times
in
1,439 Posts
Yeah, that was bad even by my humble standards. It started as a test with a toothpick, but I dripped too much on and then grabbed the first brush I could find to try to feather it out, but the brush turned out to be a stiff bristled brush that I'm pretty sure is intended to produce texture like this. I'll fix it.
When I bought the frame I was really planning to have to get it repainted entirely, but I wanted to try a bit of spray paint to get it to the point where I could ride it until I was ready to ship it off to a painter. Between how well and turned out and how much of the original paint is still in great shape I'm going to be wrestling with myself over whether or not to keep my paint job. It doesn't look nearly as good on close inspection, but from even three feet away it looks fantastic, and I expect it will seem even better once there are shiny components to draw the eye.
When I bought the frame I was really planning to have to get it repainted entirely, but I wanted to try a bit of spray paint to get it to the point where I could ride it until I was ready to ship it off to a painter. Between how well and turned out and how much of the original paint is still in great shape I'm going to be wrestling with myself over whether or not to keep my paint job. It doesn't look nearly as good on close inspection, but from even three feet away it looks fantastic, and I expect it will seem even better once there are shiny components to draw the eye.
__________________
My Bikes
My Bikes
10-29-20, 01:28 AM
#12
Senior Member

Join Date: Aug 2017
Location: Northern Virginia
Posts: 727
Bikes: Current: 2016 Bianchi Volpe; 1973 Peugeot UO-8. Past: 1974 Fuji S-10-S with custom black Imron paint by Stinsman Racing of PA.
Mentioned: 2 Post(s)
Tagged: 0 Thread(s)
Quoted: 215 Post(s)
Liked 204 Times
in
142 Posts
Yes, it is a challenge and sometimes, maybe most times, I end up with "good enough". I use the tiny jars of Testors paint. One of my problems is that I work inside with artificial light. The light is different outside or near a window. The other problem, as you found out, is that the color changes as it dries.
My Fuji Espree that looked good at first, came out not looking so good when it was done, but it was pretty iffy anyway. There were so many nicks, scratches and defects, I didn't really think that touching up was going to be the thing that would save the paint. The previous owner probably wound a chain around the top tube.
Anyway, your color match looks pretty good to me. The other thing that I do is to wet sand the painted area to level it after the paint as dried. Starting with 400 and working up to, believe or not 3000. Then rubbing compound, polishing compound, then wax. You can probably skip a few steps.
My Fuji Espree that looked good at first, came out not looking so good when it was done, but it was pretty iffy anyway. There were so many nicks, scratches and defects, I didn't really think that touching up was going to be the thing that would save the paint. The previous owner probably wound a chain around the top tube.
Anyway, your color match looks pretty good to me. The other thing that I do is to wet sand the painted area to level it after the paint as dried. Starting with 400 and working up to, believe or not 3000. Then rubbing compound, polishing compound, then wax. You can probably skip a few steps.
10-29-20, 05:31 AM
#13
Senior Member
Having two daughters I have an endless supply of finger nail polish. I�ve had to lighten and darken colors a few times. You can usually find a good match at the store. CVS employees are use to me bringing in bike frames or forks to match colors.
__________________
Semper fi
Semper fi
Likes For sloar:
10-29-20, 06:52 AM
#14
Senior Member

Join Date: Oct 2009
Posts: 1,102
Mentioned: 15 Post(s)
Tagged: 0 Thread(s)
Quoted: 288 Post(s)
Liked 329 Times
in
160 Posts
I�ve mixed colors a couple times and never had much success. I just learned to live with the results. Orange is tough, maybe because it�s a lighter color.
I guess what I�m trying to say is that I don�t have anything to say.
I guess what I�m trying to say is that I don�t have anything to say.
Likes For jethin:
10-29-20, 07:15 AM
#15
Senior Member

Join Date: Jan 2015
Location: Los Angeles
Posts: 4,701
Bikes: 82 Medici, 2011 Richard Sachs, 2011 Milwaukee Road
Mentioned: 55 Post(s)
Tagged: 0 Thread(s)
Quoted: 1946 Post(s)
Liked 2,008 Times
in
1,107 Posts
I know you want to mix and stuff but you did well with that Rustoleum. If you can find a plastic straw, (I brought some back from Texas.) put the straw over the spray nozzle and spray into a small cup. I�ve done that for clear lacquer that I can only find in a can and the silvery color I used for a Trek 716.
__________________
I don't do: disks, tubeless, e-shifting, or bead head nymphs.
I don't do: disks, tubeless, e-shifting, or bead head nymphs.
10-29-20, 07:33 AM
#16
Senior Member
Join Date: Dec 2014
Location: Central Virginia
Posts: 4,777
Bikes: Numerous
Mentioned: 150 Post(s)
Tagged: 0 Thread(s)
Quoted: 1676 Post(s)
Liked 3,089 Times
in
911 Posts
Andy_K can you spray a heavy dollop of the Rustoleum onto some paper and then brush that on? I did that with some spray.bike paint for some touch ups and it worked well.
Edit : should have kept reading, Jeff beat me to it!
__________________
N = '96 Colnago C40, '04 Wilier Alpe D'Huez, '10 Colnago EPS, '85 Merckx Pro, '89 Merckx Century, '86 Tommasini Professional, '04 Teschner Aero FX Pro, '05 Alan Carbon Cross, '86 De Rosa Professional, '82 Colnago Super, '95 Gios Compact Pro, '95 Carrera Zeus, '84 Basso Gap, �89 Cinelli Supercorsa, �83 Bianchi Specialissima, �VO Randonneur, Ritchey Breakaway Steel, '84 Paletti Super Prestige, Heron Randonneur
N = '96 Colnago C40, '04 Wilier Alpe D'Huez, '10 Colnago EPS, '85 Merckx Pro, '89 Merckx Century, '86 Tommasini Professional, '04 Teschner Aero FX Pro, '05 Alan Carbon Cross, '86 De Rosa Professional, '82 Colnago Super, '95 Gios Compact Pro, '95 Carrera Zeus, '84 Basso Gap, �89 Cinelli Supercorsa, �83 Bianchi Specialissima, �VO Randonneur, Ritchey Breakaway Steel, '84 Paletti Super Prestige, Heron Randonneur
Likes For RobbieTunes:
10-29-20, 08:08 AM
#18
Junior Member

Just wanted to add my 2 cents- I�ll order the small container of rusto (or any other OIL BASED paint- one shot, testors, etc) enamel and mix in standard oil paint to tint, for subtler colors. Painters color wheels are helpful. Some experimenting can get you pretty close.
10-29-20, 08:35 AM
#19
Senior Member

Join Date: Jul 2017
Location: Queens, NY for now...
Posts: 1,515
Bikes: 82 Lotus Unique, 86 Lotus Legend, 88 Basso Loto, 88 Basso PR, 89 Basso PR, 96 Bianchi CDI, 2013 Deda Aegis, 2019 Basso Diamante SV
Mentioned: 46 Post(s)
Tagged: 0 Thread(s)
Quoted: 943 Post(s)
Liked 172 Times
in
113 Posts
Lot's of great knowledge here. I tried to match a yellow color a couple of years ago, using Testors (yellow, green and orange) and I was super difficult to get the ride shade, but kind of fun. As long as you don't obsess too much about the result being perfect, it can be pretty satisfying. My end result was decent, and certainly better than the obvious chips, and maybe one day I'll go back to it and give it another shot.
10-29-20, 08:35 AM
#20
Senior Member
Thread Starter
Join Date: Jan 2008
Location: Beaverton, OR
Posts: 14,744
Bikes: Yes
Mentioned: 525 Post(s)
Tagged: 0 Thread(s)
Quoted: 3230 Post(s)
Liked 3,868 Times
in
1,439 Posts
Just wanted to add my 2 cents- I�ll order the small container of rusto (or any other OIL BASED paint- one shot, testors, etc) enamel and mix in standard oil paint to tint, for subtler colors. Painters color wheels are helpful. Some experimenting can get you pretty close.
__________________
My Bikes
My Bikes
10-29-20, 08:40 AM
#21
Senior Member
Thread Starter
Join Date: Jan 2008
Location: Beaverton, OR
Posts: 14,744
Bikes: Yes
Mentioned: 525 Post(s)
Tagged: 0 Thread(s)
Quoted: 3230 Post(s)
Liked 3,868 Times
in
1,439 Posts
I've also got two daughters but only one of them wears nail polish. I've gotten a couple of exact matches that way, including a metallic red that I thought was going to be impossible. Instead, my daughter brought me the only metallic red nail polish she had and it was a perfect match. For another bike I spent about a month looking at burgundy polish while I was in stores with her and without even having the bike with me I spotted one that immediately struck me as a perfect match and it was. I was really proud of that one.
__________________
My Bikes
My Bikes
Likes For Andy_K:
10-29-20, 08:43 AM
#22
Senior Member
Thread Starter
Join Date: Jan 2008
Location: Beaverton, OR
Posts: 14,744
Bikes: Yes
Mentioned: 525 Post(s)
Tagged: 0 Thread(s)
Quoted: 3230 Post(s)
Liked 3,868 Times
in
1,439 Posts
This is pretty much exactly where I'm at right now. I have other solutions available, but I kind of want to play with the color matching. Next up on the docket is a repainted bike that's supposed to be Molteni Orange. It's looking like orange with a bit of yellow and probably some white or gray to make it creamy. I've tried before and given up with that. I read all the threads on what Molteni Orange is, but I couldn't find a match from the recommended colors.
__________________
My Bikes
My Bikes
10-29-20, 08:51 AM
#23
Junior Member
Big thumbs up for the nail polish. Our local drugstore has an unbelievable selection of colors, especially red. My 2019 Trek Verve is Viper Red, two tries and got a perfect match. It also fills chips quite well.
10-29-20, 09:08 AM
#24
Junior Member
I consulted a color wheel for this one. I have a basic understanding of yellow and blue make green, but I have no intuition for what I'd add to red to make brighter red. But after looking at the color wheel it clicked and now looking at it I can see the orange. My brother went to art school for a few years before deciding that he wanted to be paid to work, so I'll consult with him if things get really tricky. The guy once spent half and hour talking to me about the color of shadows!
10-29-20, 02:04 PM
#25

Senior Member
Join Date: Jun 2006
Posts: 20,305
Mentioned: 130 Post(s)
Tagged: 0 Thread(s)
Quoted: 3464 Post(s)
Liked 2,828 Times
in
1,995 Posts
Folk will find that when mixing color, the more different colors required the faster the chroma, or intensity will drop.
so, if mixing is required note that the color will get less �bright� as you modify.
some people even in design school don�t get it.
lighter, brighter to duller is the movement.
do not be surprised how many colors include black to get there
so, if mixing is required note that the color will get less �bright� as you modify.
some people even in design school don�t get it.
lighter, brighter to duller is the movement.
do not be surprised how many colors include black to get there
Likes For repechage: