


How to remove stuck fixed cup?
 04-12-20, 03:12 PM
#1
^that guy^
Thread Starter
How to remove stuck fixed cup?
Trying to remove an Italian bottom bracket fixed cup the from a vintage Bianchi, but the little bastard doesn't want to budge. I've tried the Sheldon Brown method with the 1/2" bolt, nut and washers but it appears to have caved in the center of the cup slightly (RIP Dura Ace cup) and snapped the 1/2" bolt. And yes, I'm rotating counter clockwise to loosen.
 04-12-20, 03:16 PM
#2
Really Old Senior Member

Grade 8 bolt?
Penetrating oil liberally applied multiple times starting a couple days before attempted removal?
I lay the bike on its side, cup on the bottom.
Squirt PO into the shell from the top and let it run down the sides of the shell to where you really want it.
Penetrating oil liberally applied multiple times starting a couple days before attempted removal?
I lay the bike on its side, cup on the bottom.
Squirt PO into the shell from the top and let it run down the sides of the shell to where you really want it.
04-12-20, 03:18 PM
#3
Senior Member

Join Date: Nov 2015
Location: Dublin, Ireland
Posts: 1,261
Bikes: Bianchi Ti Megatube; Colnago Competition; Planet-X EC-130E; Klein Pulse; Amp Research B4; Litespeed Catalyst; Trek Y11
Mentioned: 8 Post(s)
Tagged: 0 Thread(s)
Quoted: 600 Post(s)
Liked 478 Times
in
258 Posts
Careful surgery with a grinder? I'm guessing a "Dremel"-type tool would be too weak/delicate to ever get the job done.
04-12-20, 03:24 PM
#4
^that guy^
Thread Starter
Grade 8 bolt?
Penetrating oil liberally applied multiple times starting a couple days before attempted removal?
I lay the bike on its side, cup on the bottom.
Squirt PO into the shell from the top and let it run down the sides of the shell to where you really want it.
Penetrating oil liberally applied multiple times starting a couple days before attempted removal?
I lay the bike on its side, cup on the bottom.
Squirt PO into the shell from the top and let it run down the sides of the shell to where you really want it.
04-12-20, 03:39 PM
#5
Senior Member

Join Date: Sep 2010
Location: Roswell, GA
Posts: 8,319
Bikes: '93 Trek 750, '92 Schwinn Crisscross, '93 Mongoose Alta
Mentioned: 30 Post(s)
Tagged: 0 Thread(s)
Quoted: 1438 Post(s)
Liked 1,092 Times
in
723 Posts
WD-40 is for sissies; actually it is for drying ignition wires, originally, Water Displacer recipe #40.
Get some REAL penetrating oil, Kano Kroil is the best, PB Blaster is second best. Spray it on, tap with a hammer (the vibrations help it penetrate), spray more and WAIT for it to work. Heating the shell with a hair dryer may also help during removal.
Get some REAL penetrating oil, Kano Kroil is the best, PB Blaster is second best. Spray it on, tap with a hammer (the vibrations help it penetrate), spray more and WAIT for it to work. Heating the shell with a hair dryer may also help during removal.
04-12-20, 03:44 PM
#6

Mad bike riding scientist

Join Date: Nov 2004
Location: Denver, CO
Posts: 27,342
Bikes: Some silver ones, a red one, a black and orange one, and a few titanium ones
Mentioned: 152 Post(s)
Tagged: 1 Thread(s)
Quoted: 6201 Post(s)
Liked 4,204 Times
in
2,358 Posts
Trying to remove an Italian bottom bracket fixed cup the from a vintage Bianchi, but the little bastard doesn't want to budge. I've tried the Sheldon Brown method with the 1/2" bolt, nut and washers but it appears to have caved in the center of the cup slightly (RIP Dura Ace cup) and snapped the 1/2" bolt. And yes, I'm rotating counter clockwise to loosen.
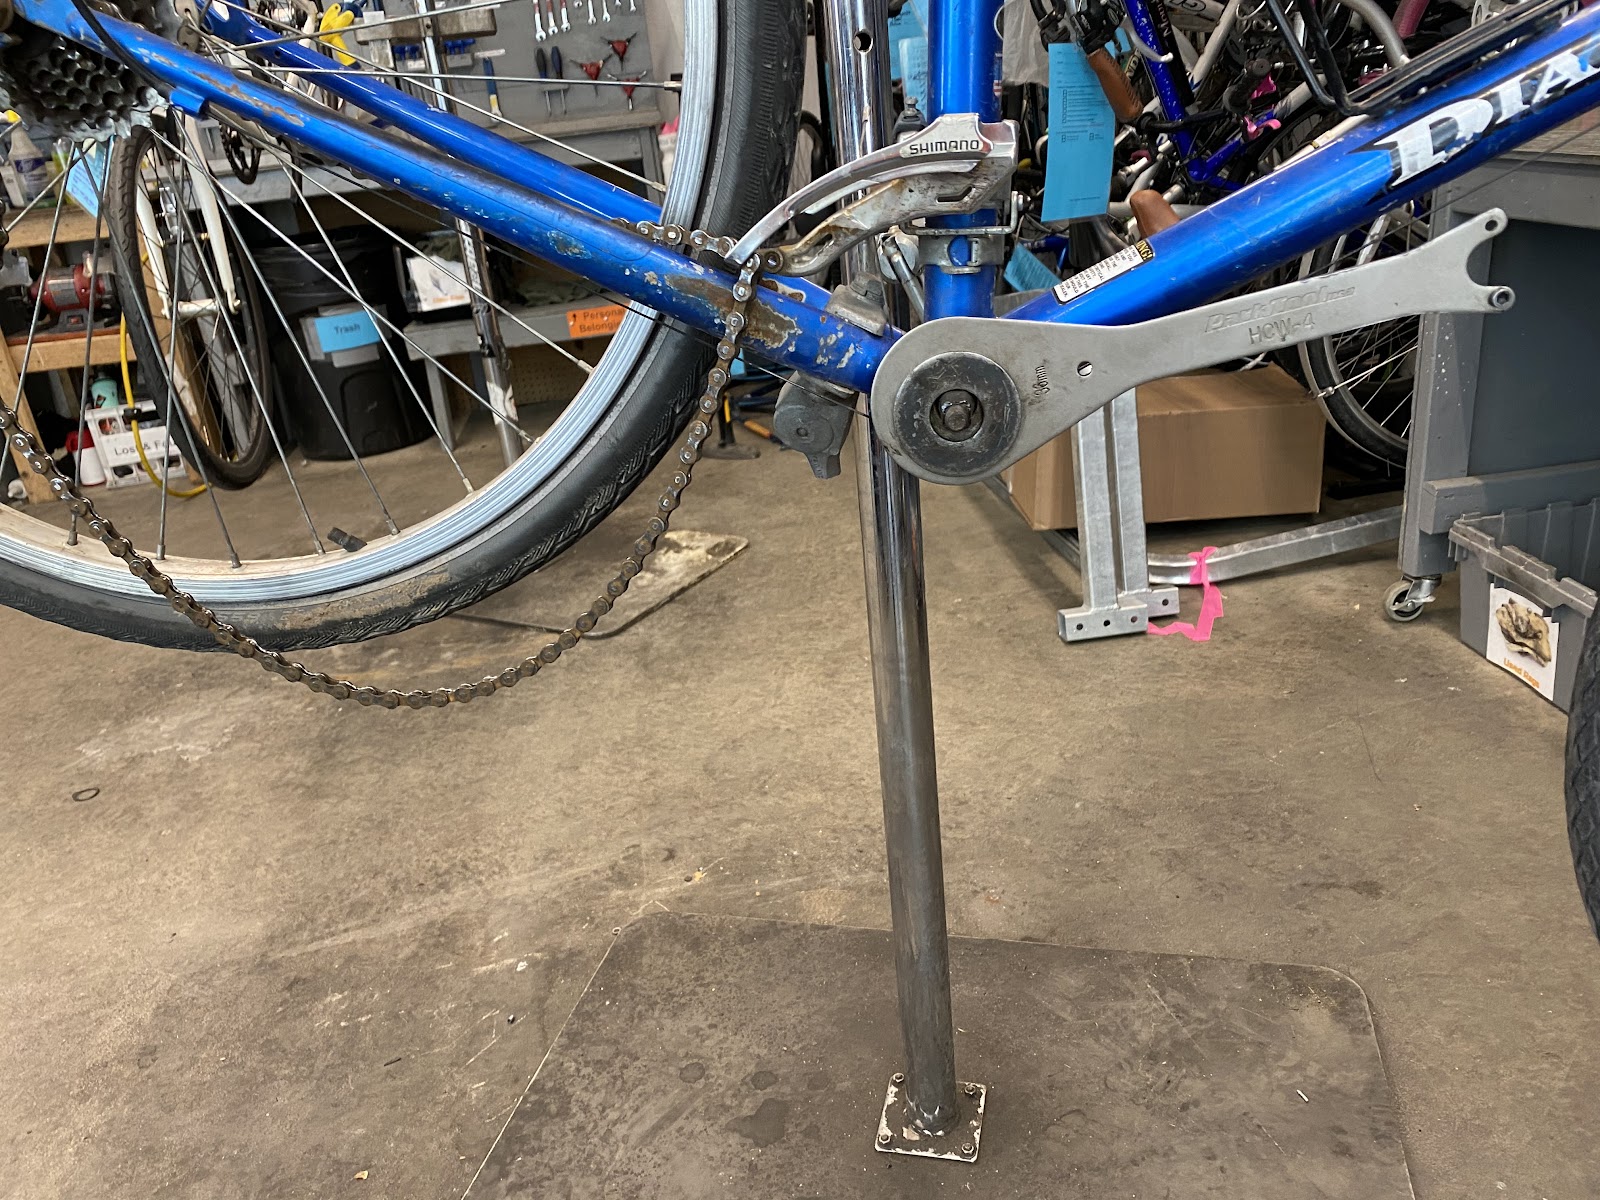
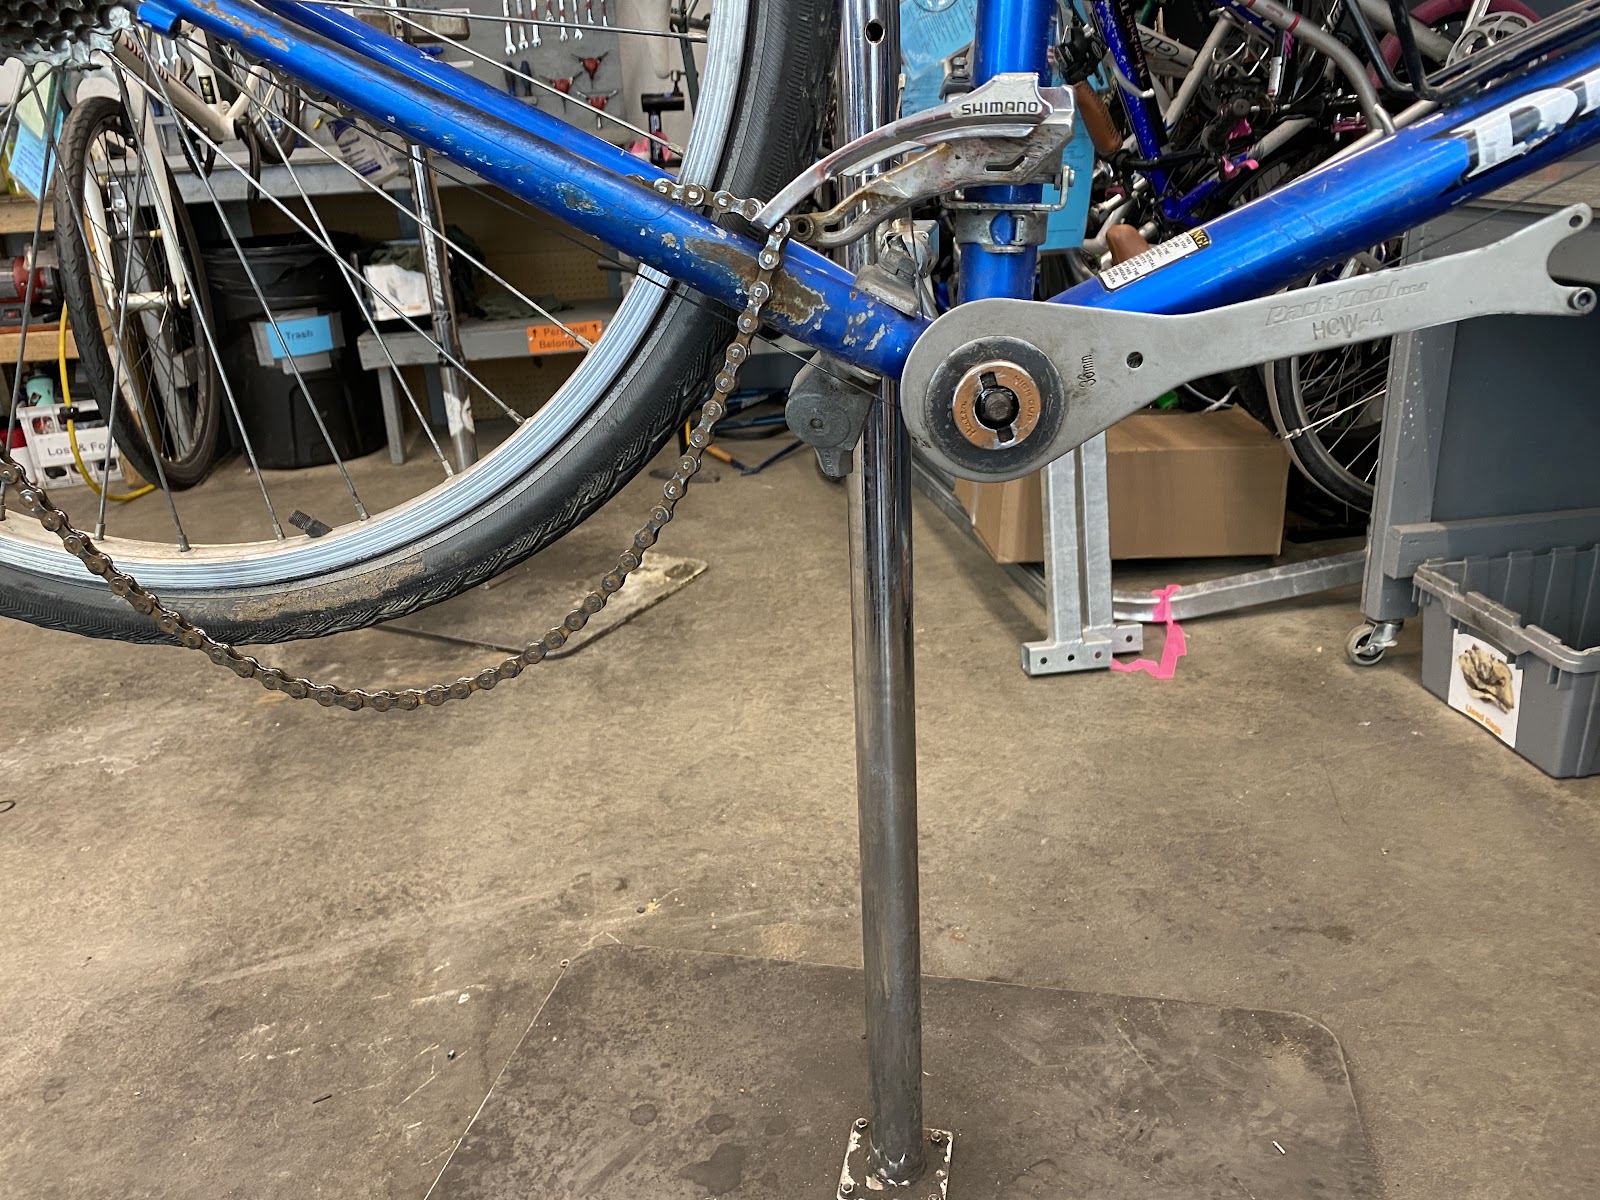
I, like most everyone, have been taught to remove the adjustable cup first, followed by the fixed cup. We avoid removing the fixed cup because it can be difficult to remove. I propose to stand the procedure on its head. Remove the fixed cup first since it is the hardest one and the wrench needs the most stabilization. The spindle can be used in the same manner as the threaded axle in the above tool but it will allow the wrench to turn with the cup so that the tool doesn�t even need to be removed to completely remove the fixed cup.
Since there are 2 types of spindle, the procedure and fastener used will depend on which spindle is present. The nut or bolt used on the spindle can be used to hold everything in place.
Tool Assembly
The parts for the nutted spindle needed are shown here
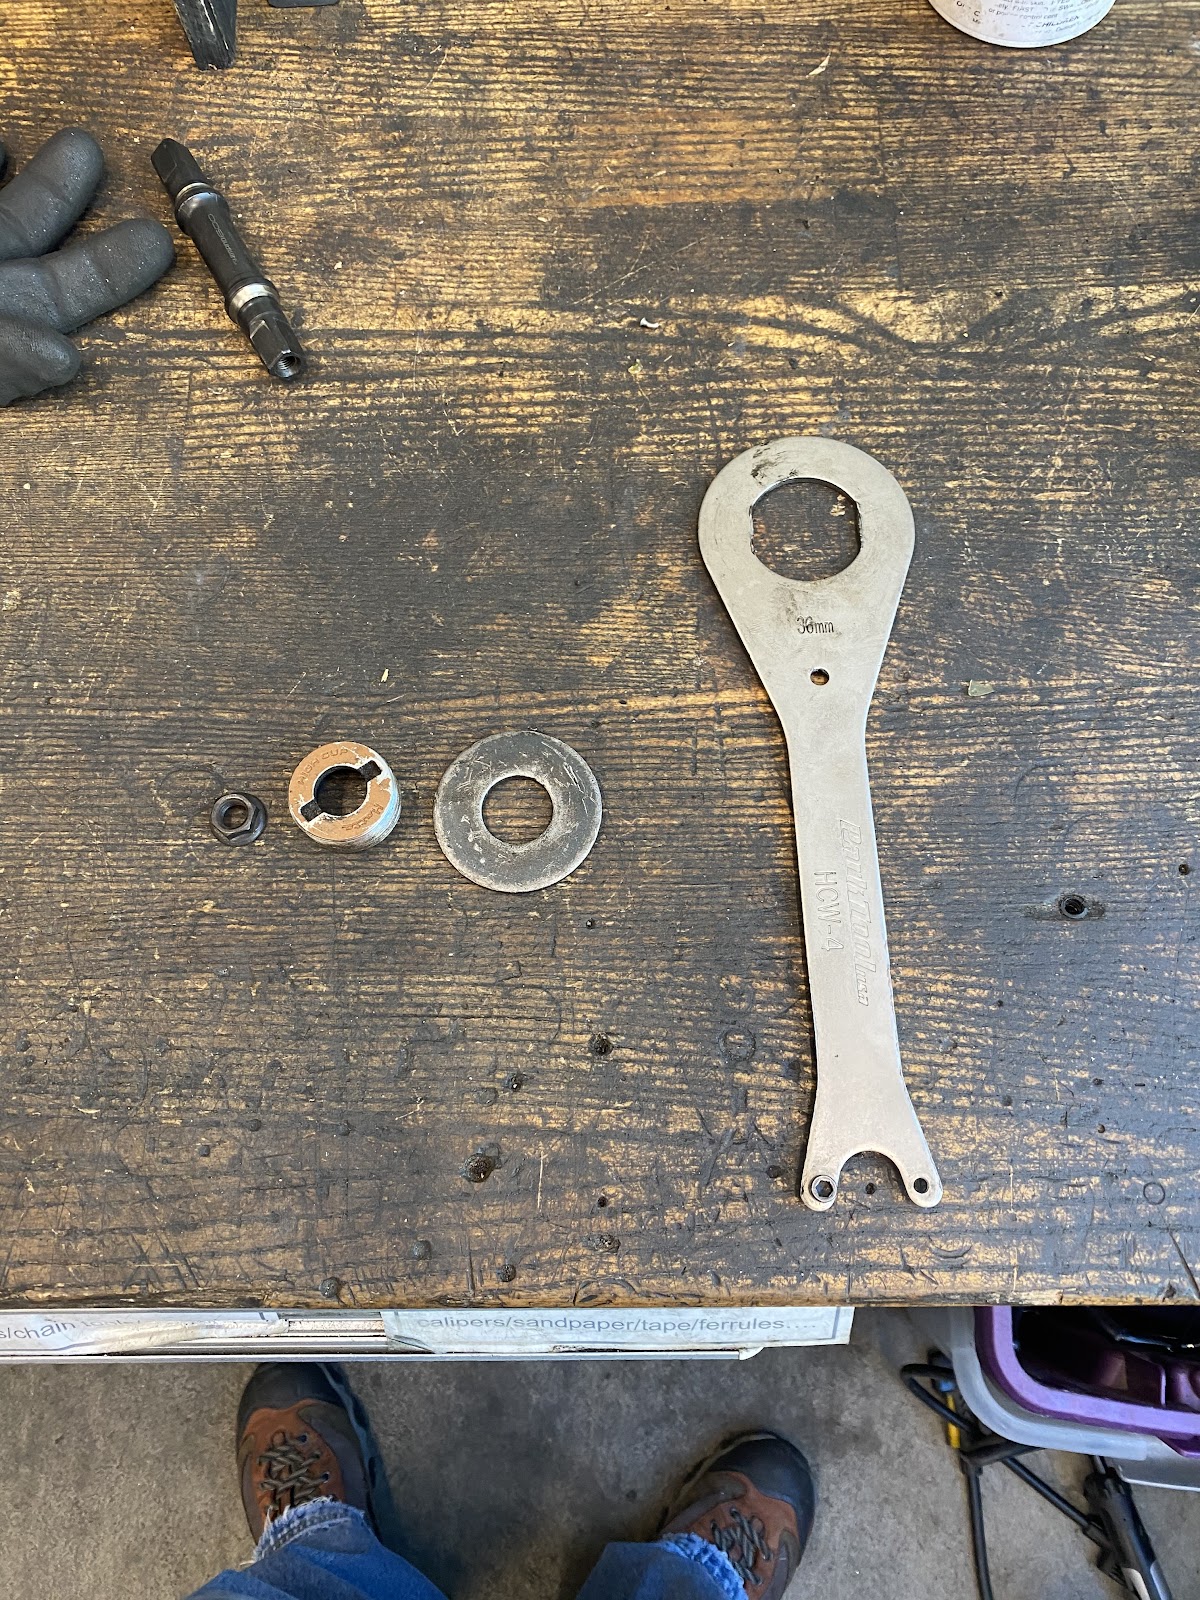
A large fender washer, an adjustable cup, and the spindle nut are needed. Another washer may be needed to get the spacing right. The order of assembly follows
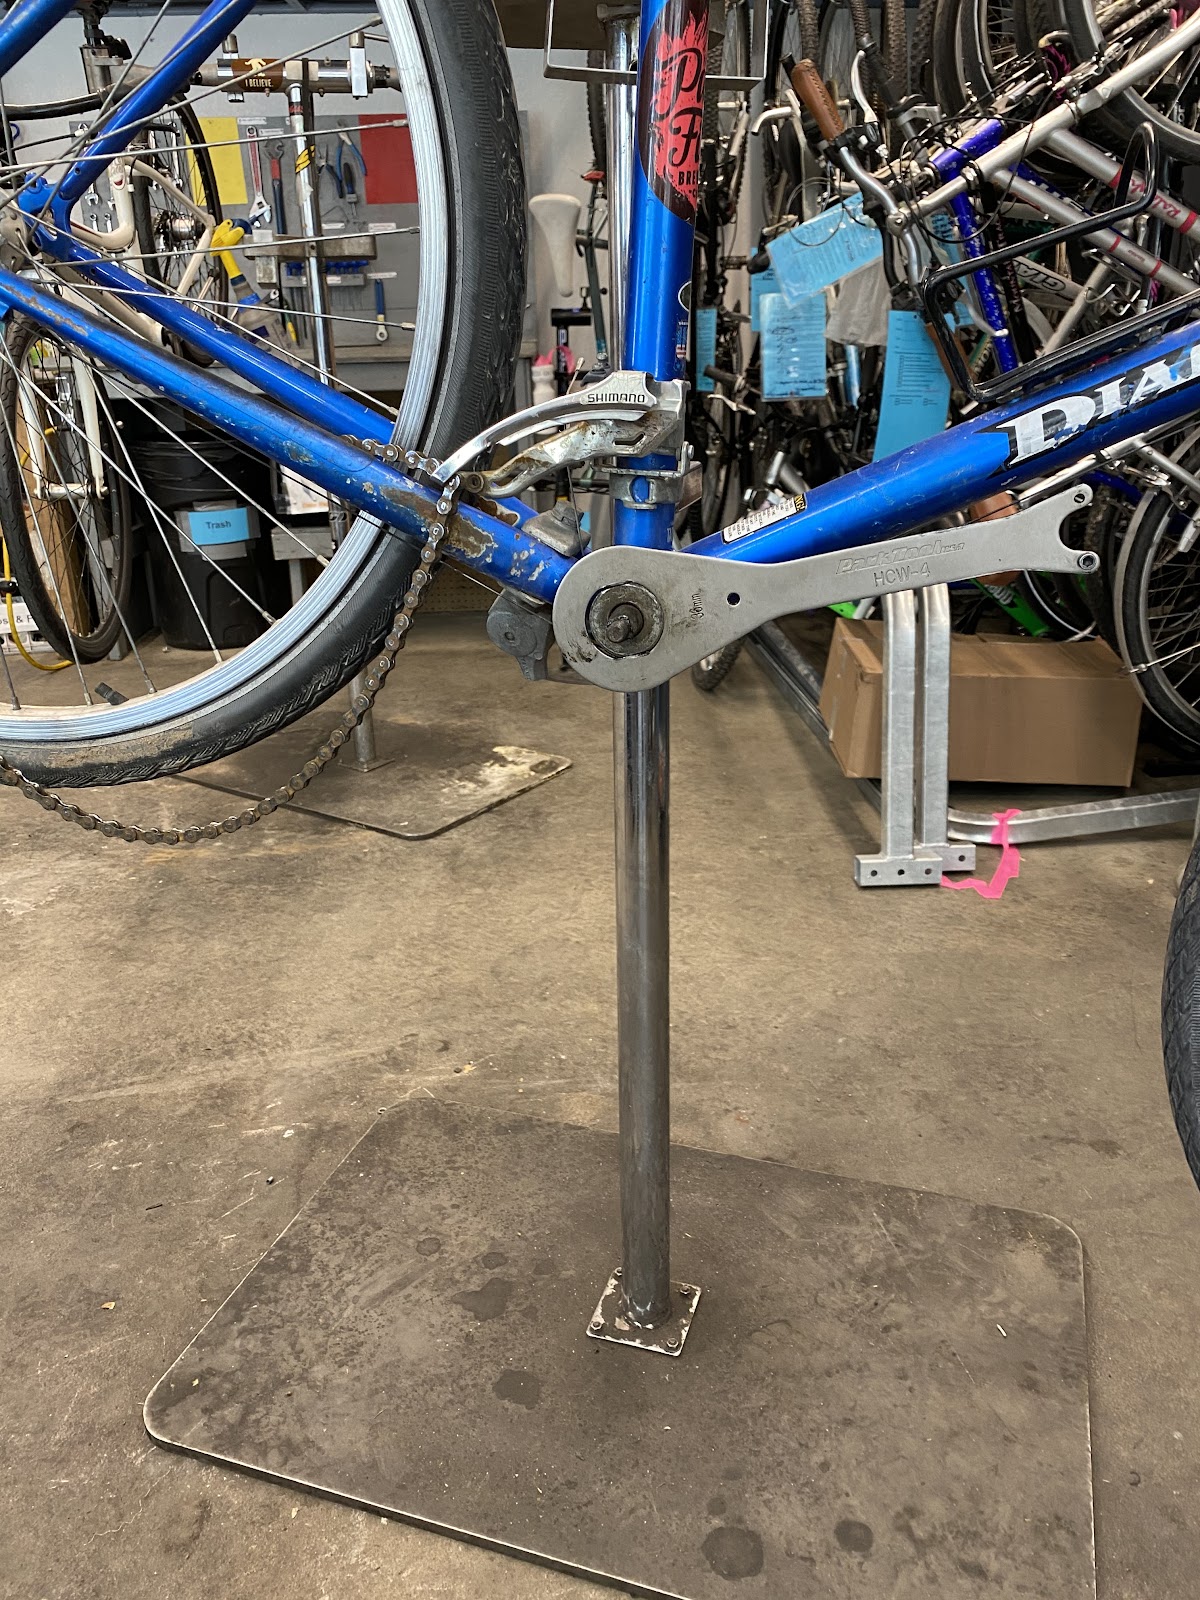

From above it should look like this

Turn the wrench as usual. If more leverage is needed, a cheater bar is needed.

For bolted spindles, the order of assembly is the same except a bolt is needed.
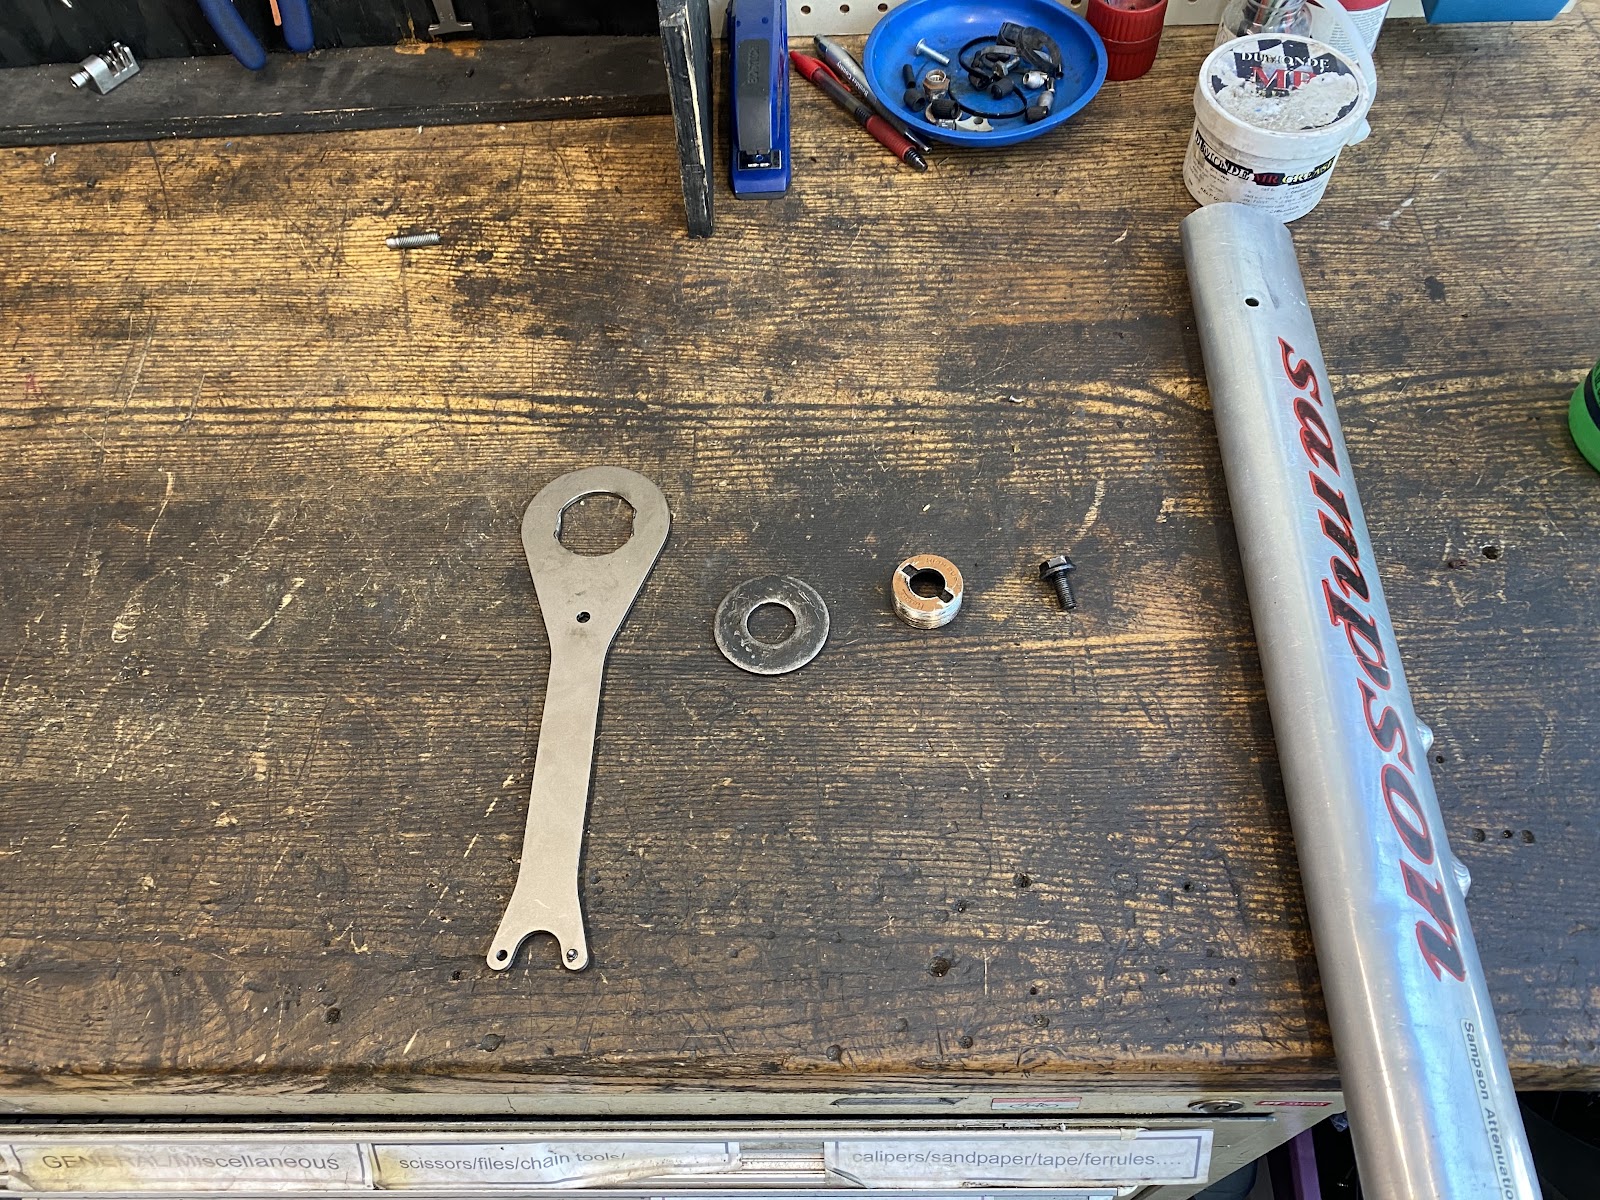

This method is much easier to use than other methods. The spindle stabilizes the wrench and turns with it much like a cartridge bearing does. It makes it easier to remove the fixed cup and results in less blood spilled.
__________________
Stuart Black
Plan Epsilon Around Lake Michigan in the era of Covid
Old School�When It Wasn�t Ancient bikepacking
Gold Fever Three days of dirt in Colorado
Pokin' around the Poconos A cold ride around Lake Erie
Dinosaurs in Colorado A mountain bike guide to the Purgatory Canyon dinosaur trackway
Solo Without Pie. The search for pie in the Midwest.
Picking the Scablands. Washington and Oregon, 2005. Pie and spiders on the Columbia River!
Likes For cyccommute:
04-12-20, 03:52 PM
#7
Senior Member
Join Date: Jun 2018
Location: The Urban Shores Of Michigami
Posts: 1,748
Bikes: ........................................ .....Holdsworth "Special"..... .......Falcon "Special".......... .........Miyata 912........... ........................................
Mentioned: 11 Post(s)
Tagged: 0 Thread(s)
Quoted: 702 Post(s)
Liked 671 Times
in
419 Posts
cyccommute , Mr Brown needs to update the "bible" to include your method
04-12-20, 05:18 PM
#8
Senior Member
Join Date: Sep 2010
Location: Roswell, GA
Posts: 8,319
Bikes: '93 Trek 750, '92 Schwinn Crisscross, '93 Mongoose Alta
Mentioned: 30 Post(s)
Tagged: 0 Thread(s)
Quoted: 1438 Post(s)
Liked 1,092 Times
in
723 Posts
Using the proper tool often makes the job go better, your refinement seems like a great idea.
04-12-20, 05:53 PM
#9
Newbie
Join Date: Dec 2005
Posts: 48
Mentioned: 0 Post(s)
Tagged: 0 Thread(s)
Quoted: 2 Post(s)
Liked 0 Times
in
0 Posts
Worst case scenario weld a large nut to it then wrench it out
this if the Sheldon method won't work or I have rounded the edges by using the wrong tool and am relaxing it anyway
this if the Sheldon method won't work or I have rounded the edges by using the wrong tool and am relaxing it anyway
04-13-20, 06:04 AM
#10
Senior Member
Join Date: Apr 2007
Location: Ottawa, Canada
Posts: 777
Bikes: Raleigh Classic 15, 84; Miyata 912, 85; Miyata Ridge Runner SE, 85; Miyata 610, 86; Miyata 100M, 86; Miyata Valley Runner, 88; Miyata Triple Cross, 89; GT Karakoram, 90; Miyata Elevation 300, 91; Marinoni Touring, 95; Long Haul Trucker, 2013
Mentioned: 9 Post(s)
Tagged: 0 Thread(s)
Quoted: 159 Post(s)
Liked 133 Times
in
80 Posts
Yo, cyccommute! Great idea.
04-13-20, 06:17 AM
#11
Half way there

Join Date: Sep 2015
Location: North Carolina
Posts: 2,956
Bikes: Many, and the list changes frequently
Mentioned: 5 Post(s)
Tagged: 0 Thread(s)
Quoted: 986 Post(s)
Liked 880 Times
in
527 Posts
Excellent! I'll try it the next time I have a chance. I usually clamp the flats in a bench vise and use the frame for leverage.
04-13-20, 08:56 AM
#12
Mad bike riding scientist
Join Date: Nov 2004
Location: Denver, CO
Posts: 27,342
Bikes: Some silver ones, a red one, a black and orange one, and a few titanium ones
Mentioned: 152 Post(s)
Tagged: 1 Thread(s)
Quoted: 6201 Post(s)
Liked 4,204 Times
in
2,358 Posts
Thanks, all.
__________________
Stuart Black
Plan Epsilon Around Lake Michigan in the era of Covid
Old School�When It Wasn�t Ancient bikepacking
Gold Fever Three days of dirt in Colorado
Pokin' around the Poconos A cold ride around Lake Erie
Dinosaurs in Colorado A mountain bike guide to the Purgatory Canyon dinosaur trackway
Solo Without Pie. The search for pie in the Midwest.
Picking the Scablands. Washington and Oregon, 2005. Pie and spiders on the Columbia River!
Stuart Black
Plan Epsilon Around Lake Michigan in the era of Covid
Old School�When It Wasn�t Ancient bikepacking
Gold Fever Three days of dirt in Colorado
Pokin' around the Poconos A cold ride around Lake Erie
Dinosaurs in Colorado A mountain bike guide to the Purgatory Canyon dinosaur trackway
Solo Without Pie. The search for pie in the Midwest.
Picking the Scablands. Washington and Oregon, 2005. Pie and spiders on the Columbia River!
04-13-20, 12:08 PM
#13

Senior Member

Join Date: Jul 2006
Location: San Jose (Willow Glen) Ca
Posts: 9,835
Bikes: Kirk Custom JK Special, '84 Team Miyata,(dura ace old school) 80?? SR Semi-Pro 600 Arabesque
Mentioned: 106 Post(s)
Tagged: 0 Thread(s)
Quoted: 2337 Post(s)
Liked 2,813 Times
in
1,536 Posts
good grade helps also try freeze off.....combo of penetrating oil and thermal (cold) shock, and leverage
__________________
Life is too short not to ride the best bike you have, as much as you can
(looking for Torpado Super light frame/fork or for Raleigh International frame fork 58cm)
Life is too short not to ride the best bike you have, as much as you can
(looking for Torpado Super light frame/fork or for Raleigh International frame fork 58cm)
04-17-20, 10:38 AM
#14
^that guy^
Thread Starter
Got it! 2 days of soaking in PB blaster and the grade 8 hardware did the trick.
 04-17-20, 03:32 PM
#16
Full Member
