


Steel bottom bracket crack: run to failure strategy
 09-24-20, 09:39 PM
#1
Senior Member
Thread Starter
Join Date: Dec 2006
Location: Houston, TX
Posts: 895
Bikes: 2017 Co-op ADV 1.1; ~1991 Novara Arriba; 1990 Fuji Palisade; mid-90's Moots Tandem; 1985 Performance Superbe
Mentioned: 1 Post(s)
Tagged: 0 Thread(s)
Quoted: 390 Post(s)
Liked 572 Times
in
332 Posts
Steel bottom bracket crack: run to failure strategy
I have a low-end 1990 Fuji steel road bike which hadn't seen much use in 25 years until COVID hit. I replaced bad rubber/plastic and started riding it for exercise. It has a cup and cone bottom bracket, and I noticed a bit of play so I opened it up. In addition to some very slight pitting on the non-drive side cup, I saw an internal crack at 6:00 beginning on the NDS running 3/4 of the way to the DS. No sign of the crack externally, though the bike has unusually thick paint. My initial decision was that the frame is now scrap but I could run it to failure being alert to crack growth. I buttoned it back up.
However, I got to thinking that I might be able to increase time to failure by:
a) drilling end of crack to arrest it.
b) install cartridge BB bearing/spindle to replace cup and cone, on the logic that I'd get more circumferential metal to reduce the load on the crack. (This assumes I can get all the right dimensions, which I have not yet confirmed.)
I think I can get away with $30-$40 for the cartridge and the tool. That's probably more $ than I ought to be putting into it, but gives me a little project to do.
Thoughts on this run-to-failure strategy? Any practical experience?
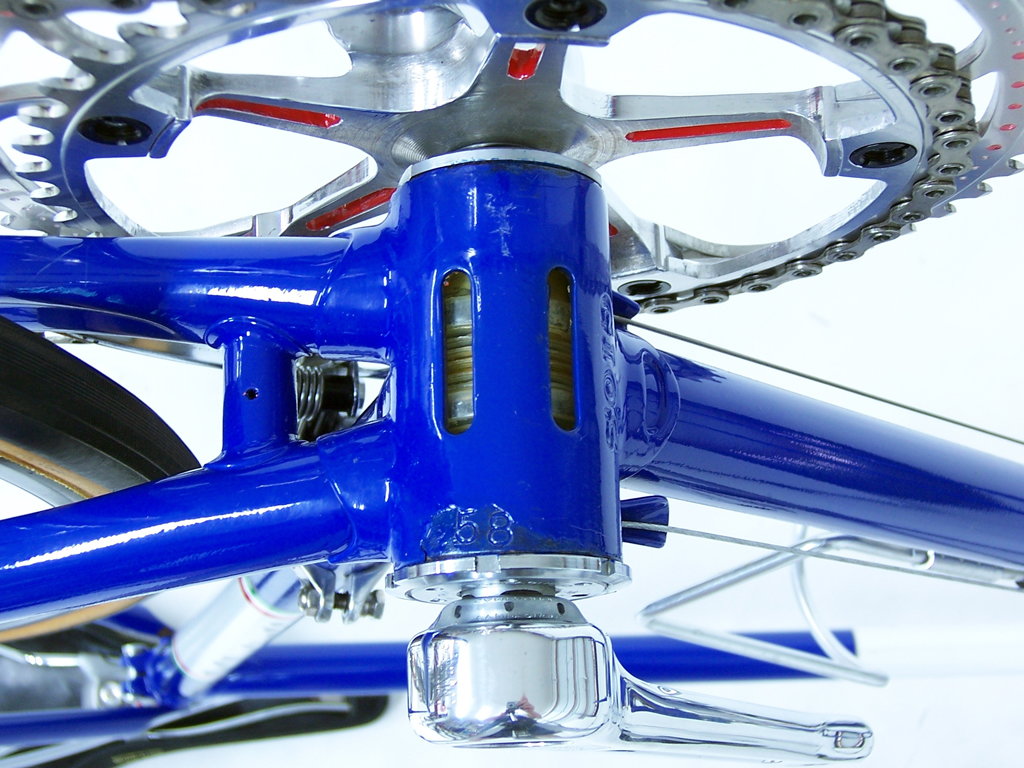
Crack is very similar to the photo (not mine; I buttoned it back up after cleaning/greasing). My crack is NOT intersecting any penetrations.

Not my photo, but the crack in my BB is very similar.. at 6:00 position, starting on NDS.
However, I got to thinking that I might be able to increase time to failure by:
a) drilling end of crack to arrest it.
b) install cartridge BB bearing/spindle to replace cup and cone, on the logic that I'd get more circumferential metal to reduce the load on the crack. (This assumes I can get all the right dimensions, which I have not yet confirmed.)
I think I can get away with $30-$40 for the cartridge and the tool. That's probably more $ than I ought to be putting into it, but gives me a little project to do.
Thoughts on this run-to-failure strategy? Any practical experience?
Crack is very similar to the photo (not mine; I buttoned it back up after cleaning/greasing). My crack is NOT intersecting any penetrations.
Not my photo, but the crack in my BB is very similar.. at 6:00 position, starting on NDS.
 09-24-20, 10:20 PM
#2
Really Old Senior Member

Is there room for a skinny hose clamp?
09-25-20, 12:33 AM
#3
Senior Member
I have a low-end 1990 Fuji steel road bike which hadn't seen much use in 25 years until COVID hit. I replaced bad rubber/plastic and started riding it for exercise. It has a cup and cone bottom bracket, and I noticed a bit of play so I opened it up. In addition to some very slight pitting on the non-drive side cup, I saw an internal crack at 6:00 beginning on the NDS running 3/4 of the way to the DS. No sign of the crack externally, though the bike has unusually thick paint. My initial decision was that the frame is now scrap but I could run it to failure being alert to crack growth. I buttoned it back up.
However, I got to thinking that I might be able to increase time to failure by:
a) drilling end of crack to arrest it.
b) install cartridge BB bearing/spindle to replace cup and cone, on the logic that I'd get more circumferential metal to reduce the load on the crack. (This assumes I can get all the right dimensions, which I have not yet confirmed.)
I think I can get away with $30-$40 for the cartridge and the tool. That's probably more $ than I ought to be putting into it, but gives me a little project to do.
Thoughts on this run-to-failure strategy? Any practical experience?
Crack is very similar to the photo (not mine; I buttoned it back up after cleaning/greasing). My crack is NOT intersecting any penetrations.
Not my photo, but the crack in my BB is very similar.. at 6:00 position, starting on NDS.
09-25-20, 06:52 AM
#4
Senior Member
Join Date: Feb 2012
Location: Golden, CO and Tucson, AZ
Posts: 2,837
Bikes: 2016 Fuji Tread, 1983 Trek 520
Mentioned: 13 Post(s)
Tagged: 0 Thread(s)
Quoted: 676 Post(s)
Liked 741 Times
in
430 Posts
I'm not sure I completely agree that a cartridge adds stability, but it may be incremental. The joint between the sides is often just a tight plastic sleeve. Good luck with it. And the cost of the tool may pay off on another bike sometime. If there's a co-op near you, they'll have a bin full of salvaged cartridges. And a tool you can rent.
If the shell fails, you'll have warning and it shouldn't cause harm if you heed obvious warnings. I don't know this from experience with a total failure, but it's hard to ignore BB noises.
Be aware that the cable guide screw may interfere with a cartridge BB. At minimum, loosen the screw when installing the cartridge. Sometimes the "screw" is just a plastic knob that can be cut off.
09-25-20, 07:02 AM
#5
Senior Member
Join Date: Dec 2010
Location: northern Deep South
Posts: 8,901
Bikes: Fuji Touring, Novara Randonee
Mentioned: 36 Post(s)
Tagged: 0 Thread(s)
Quoted: 2604 Post(s)
Liked 1,928 Times
in
1,210 Posts
Color me confused. The picture looks like you're showing us a cup. If that's the case, as long as you can screw it in without boogering it up, I'd think it would run for a long time (or until you break it trying to remove it again).
If it's the shell on the bike frame itself, you might see if a good welder can weld the crack back up. You'll have to fix the paint around the BB, and perhaps get your LBS to run taps into the shell to clean up from the weld.
If it's the shell on the bike frame itself, you might see if a good welder can weld the crack back up. You'll have to fix the paint around the BB, and perhaps get your LBS to run taps into the shell to clean up from the weld.
09-25-20, 08:05 AM
#6
Senior Member
Join Date: Nov 2017
Location: A Dutchman in Budapest, Hungary.
Posts: 92
Bikes: Koga Miyata GranTourer 1985, Koga Miyata Adventure 1992, Cinelli Sentiero, Giant Terrago 1993, Presto Amsterdam 1975(?), Dahon Classic III Stainless
Mentioned: 2 Post(s)
Tagged: 0 Thread(s)
Quoted: 38 Post(s)
Liked 37 Times
in
21 Posts
I wouldn't be so sure it's a crack. Many bottom bracket shells were/are welded from sheet metal. The weld was made at 6 o'clock on the outside of the shell and then ground down. On the inside of the shell, a line remains visible in the steel where the two sides meet.
It does not hurt to switch to a cartridge bottom bracket and to take a look at the shell every couple of months, but I wouldn't be surprised if this frame had a few more decades of life left in it. By the way, the fact that the crack is only visible in the steel, not in the paint is also a giveaway: paint typically shows a visible crack earlier than steel does.
It does not hurt to switch to a cartridge bottom bracket and to take a look at the shell every couple of months, but I wouldn't be surprised if this frame had a few more decades of life left in it. By the way, the fact that the crack is only visible in the steel, not in the paint is also a giveaway: paint typically shows a visible crack earlier than steel does.
09-25-20, 08:44 AM
#7
Really Old Senior Member
I would stick with cup & cone.
DS will take similar force/stress from either type.
Torquing down the NDS on a cartridge is going to have a "wedging" effect spreading the shell, like a pipe fitting.
A cup w/ lock ring isn't.
DS will take similar force/stress from either type.
Torquing down the NDS on a cartridge is going to have a "wedging" effect spreading the shell, like a pipe fitting.
A cup w/ lock ring isn't.
Last edited by Bill Kapaun; 09-25-20 at 09:12 AM.
Likes For Bill Kapaun:
09-25-20, 08:49 AM
#8

Friendship is Magic

Join Date: Nov 2010
Location: Sacramento, CA
Posts: 22,984
Bikes: old ones
Mentioned: 304 Post(s)
Tagged: 0 Thread(s)
Quoted: 26407 Post(s)
Liked 10,376 Times
in
7,204 Posts
I wouldn't be so sure it's a crack. Many bottom bracket shells were/are welded from sheet metal. The weld was made at 6 o'clock on the outside of the shell and then ground down. On the inside of the shell, a line remains visible in the steel where the two sides meet.
It does not hurt to switch to a cartridge bottom bracket and to take a look at the shell every couple of months, but I wouldn't be surprised if this frame had a few more decades of life left in it. By the way, the fact that the crack is only visible in the steel, not in the paint is also a giveaway: paint typically shows a visible crack earlier than steel does.
It does not hurt to switch to a cartridge bottom bracket and to take a look at the shell every couple of months, but I wouldn't be surprised if this frame had a few more decades of life left in it. By the way, the fact that the crack is only visible in the steel, not in the paint is also a giveaway: paint typically shows a visible crack earlier than steel does.
 09-25-20, 10:01 AM
#9
I'm good to go!
Join Date: Jul 2017
Location: Mississippi
Posts: 14,985
Bikes: Tarmac Disc Comp Di2 - 2020
Mentioned: 51 Post(s)
Tagged: 0 Thread(s)
Quoted: 6193 Post(s)
Liked 4,808 Times
in
3,316 Posts
Drilling does help to stop cracks, but I've seen a lot of people that drill cracks fail to find the actual end of the crack and the drilled hole does nothing. Probably won't hurt though to try even if you do miss the end of the crack. Use a strong magnifier to look before you drill.
What Bill Kapaun said makes sense. And if you happen to have a two piece crank with external cups, that too, I think, will be better than a cartridge.
Brazing is an option too. For certain the more than 800�F heat is going to mess up some paint on the seat and down tube too. But if you want it to last longer, that's what to do. Doing nothing it still might last long enough.
09-25-20, 10:13 AM
#10
Blamester
I wouldn't be so sure it's a crack. Many bottom bracket shells were/are welded from sheet metal. The weld was made at 6 o'clock on the outside of the shell and then ground down. On the inside of the shell, a line remains visible in the steel where the two sides meet.
It does not hurt to switch to a cartridge bottom bracket and to take a look at the shell every couple of months, but I wouldn't be surprised if this frame had a few more decades of life left in it. By the way, the fact that the crack is only visible in the steel, not in the paint is also a giveaway: paint typically shows a visible crack earlier than steel does.
It does not hurt to switch to a cartridge bottom bracket and to take a look at the shell every couple of months, but I wouldn't be surprised if this frame had a few more decades of life left in it. By the way, the fact that the crack is only visible in the steel, not in the paint is also a giveaway: paint typically shows a visible crack earlier than steel does.
09-25-20, 11:24 AM
#11
Mother Nature's Son

Join Date: Mar 2016
Location: Sussex County, Delaware
Posts: 3,115
Bikes: 2014 Orbea Avant MD30, 2004 Airborne Zeppelin TI, 2003 Lemond Poprad, 2001 Lemond Tourmalet, 2014? Soma Smoothie
Mentioned: 15 Post(s)
Tagged: 0 Thread(s)
Quoted: 853 Post(s)
Liked 1,434 Times
in
816 Posts
You state the picture is not of your bb shell, but it is similar to what yous looks like. Without an actual picture of yours, everything is just speculation. Just going by your description, not so sure it is a crack. You have actually seen it, hence, you have a better idea of that than anyone commenting here. I would not do anything, including riding the bike, until I got confirmation from someone knowledgeable about such things, and has actually had eyes on it.
Last edited by delbiker1; 09-25-20 at 11:26 AM. Reason: add more info
09-25-20, 12:25 PM
#12
I'm good to go!
Join Date: Jul 2017
Location: Mississippi
Posts: 14,985
Bikes: Tarmac Disc Comp Di2 - 2020
Mentioned: 51 Post(s)
Tagged: 0 Thread(s)
Quoted: 6193 Post(s)
Liked 4,808 Times
in
3,316 Posts
Good catch... in my speed reading ADHD (without the H) world, I missed that. And if they are just seeing the mark going through the threads shown in that picture, then that looks like a seam or other artifact of the manufacturing process.
09-25-20, 12:57 PM
#13
Half way there

Join Date: Sep 2015
Location: North Carolina
Posts: 2,957
Bikes: Many, and the list changes frequently
Mentioned: 5 Post(s)
Tagged: 0 Thread(s)
Quoted: 986 Post(s)
Liked 880 Times
in
527 Posts
Picture does not convince me that it's a crack. To me it looks like a scratch. It's common to see a welded seam at 6 o-clock so that's a possibility as others have said.
Why not post a pic of yours. Any opinions based on that "similar" picture are low value.
Why not post a pic of yours. Any opinions based on that "similar" picture are low value.
09-25-20, 01:45 PM
#14
Senior Member

Join Date: Mar 2014
Location: City of Angels
Posts: 4,870
Bikes: A few too many
Mentioned: 42 Post(s)
Tagged: 1 Thread(s)
Quoted: 1364 Post(s)
Liked 2,180 Times
in
1,183 Posts
To my old eyes, it looks like a crack on both sides of the BB shell....Drill it and see what happens,
Best, Ben
Just saw that it appears to have migrated completely out on side....possible toast to me.
Best, Ben
Just saw that it appears to have migrated completely out on side....possible toast to me.
09-25-20, 02:45 PM
#15
Senior Member
Thread Starter
Join Date: Dec 2006
Location: Houston, TX
Posts: 895
Bikes: 2017 Co-op ADV 1.1; ~1991 Novara Arriba; 1990 Fuji Palisade; mid-90's Moots Tandem; 1985 Performance Superbe
Mentioned: 1 Post(s)
Tagged: 0 Thread(s)
Quoted: 390 Post(s)
Liked 572 Times
in
332 Posts
Bottom Bracket Surface Defect Solved: Not a Body Crack
Short story is I ground on the defect and it was only superficial. No evidence of crack through body on either end or on outside. Problem solved.
Excess details: I opened it back up to make measurements and inspect more closely. I hadn't removed the drive side cup the first time. Ended up I had the same surface defect on the DS. Interestingly, the defect curves; I'd expect a tube weld to be straight. It is very similar to the defect in the previous internet photo I posted. Here is picture of mine:

Photo from DS. Surface defect does not touch cable guide screw hole.
I decided to splurge and get a cartridge instead of a cone/cup rebuild kit. I'll have to use a short screw for the cable guide.
Thanks everyone!
Last edited by flangehead; 09-25-20 at 02:49 PM. Reason: Clarify title.
09-25-20, 02:55 PM
#16
Half way there
Join Date: Sep 2015
Location: North Carolina
Posts: 2,957
Bikes: Many, and the list changes frequently
Mentioned: 5 Post(s)
Tagged: 0 Thread(s)
Quoted: 986 Post(s)
Liked 880 Times
in
527 Posts
That's a weld line. It looks like it curves a bit because of the machining for the threading, which widens the inside diameter.
Hang on to the spindle and cups if the bearing surfaces are good.
Hang on to the spindle and cups if the bearing surfaces are good.
09-25-20, 03:37 PM
#17
Mother Nature's Son
Join Date: Mar 2016
Location: Sussex County, Delaware
Posts: 3,115
Bikes: 2014 Orbea Avant MD30, 2004 Airborne Zeppelin TI, 2003 Lemond Poprad, 2001 Lemond Tourmalet, 2014? Soma Smoothie
Mentioned: 15 Post(s)
Tagged: 0 Thread(s)
Quoted: 853 Post(s)
Liked 1,434 Times
in
816 Posts
Not sure of this, you may not have to replace the screw. Just back it out before installation of the new BB, screw it back in after installation. I have a couple of bikes that I have to backout the screw before pulling the BB, both cartridge type, and back in after reinstalling. That is not unusual and it does not affect anything afterward.
I am glad you figured it out and there is no crack in the shell.
I am glad you figured it out and there is no crack in the shell.
Last edited by delbiker1; 09-25-20 at 03:41 PM. Reason: add more info
09-26-20, 08:16 AM
#18
Old fart

Join Date: Nov 2004
Location: Appleton WI
Posts: 24,784
Bikes: Several, mostly not name brands.
Mentioned: 153 Post(s)
Tagged: 0 Thread(s)
Quoted: 3587 Post(s)
Liked 3,400 Times
in
1,934 Posts
+1 this. The OP's picture shows what I would identify as the weld seam. But the OP says the picture isn't his bike. A picture of the actual area of concern on the actual bike would probably help.
09-26-20, 09:40 AM
#19
Senior Member
Join Date: Aug 2016
Posts: 712
Mentioned: 2 Post(s)
Tagged: 0 Thread(s)
Quoted: 283 Post(s)
Liked 262 Times
in
164 Posts
Sand the outside and remove the paint. Turn the bike upside down. Find a magnifier. Using something like a syringe and needle, drip a bit of coleman fuel, paint thinner, something like it onto the "crack" and watch it. See if the drip keeps disappearing into the crack. Look at the inside and see if it's making that area wet. If the liquid is getting through to the other side, it's a crack and not a weld. Someone who is a pro at steel frame repair will give you the next step.
