


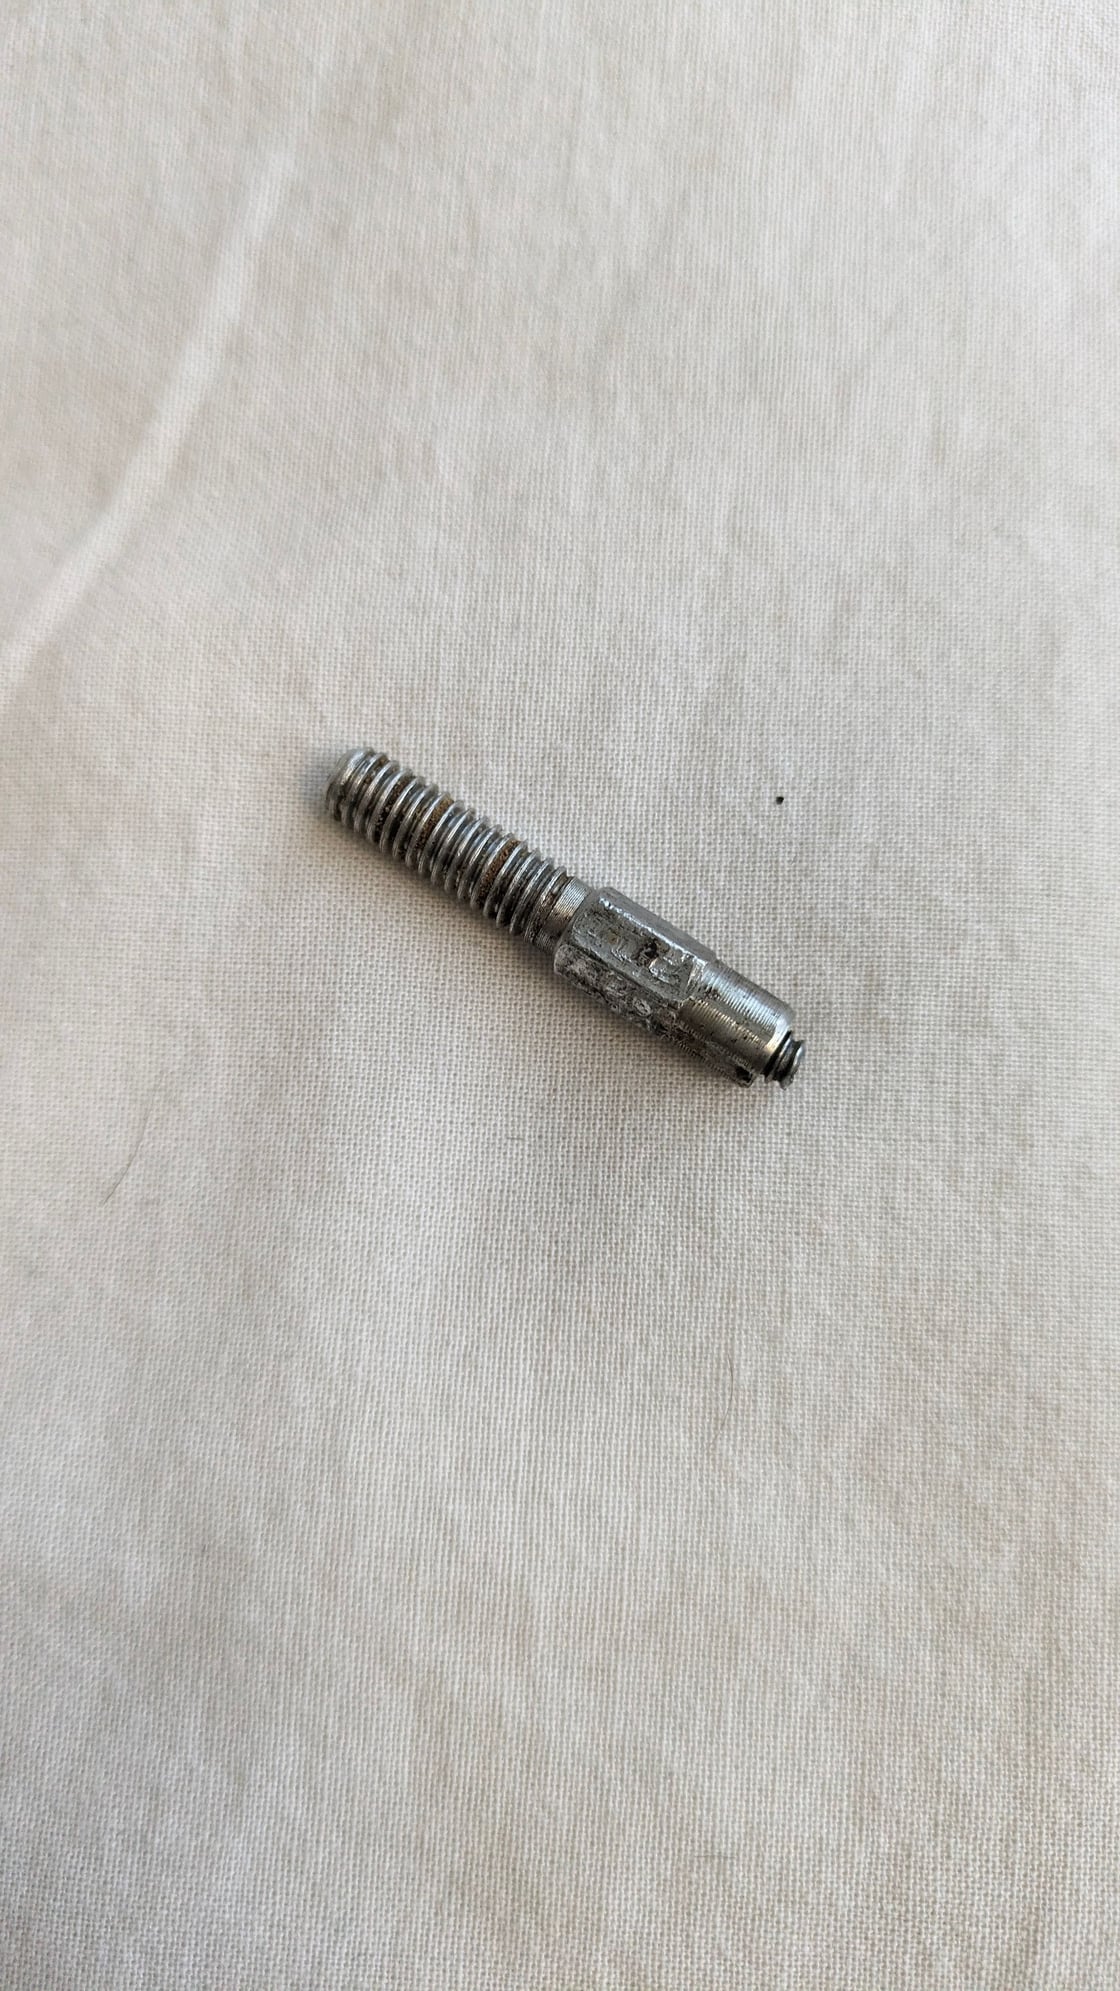
Dahon frame lockjaw bolt

 02-16-24, 07:08 PM
#3
Newbie
Thread Starter
I have not.
I bought it and didn't have time to check everything , then realized that is broken . Still it was really good deal .
I bought it and didn't have time to check everything , then realized that is broken . Still it was really good deal .
02-17-24, 03:42 AM
#4
Senior Member
Join Date: Aug 2014
Location: UK
Posts: 746
Bikes: Dahon Jetstream p8 (sold), customized Dahon Helios x10, customzed Dahon Smooth Hound x11,customized Dahon Hammerhead 8.0 d7, Planet X Free Ranger (mullet setup 1x11), Planet X Giovanissimi 20 (1x9), Frog 52 (1x9) and Frog 48 1s
Mentioned: 0 Post(s)
Tagged: 0 Thread(s)
Quoted: 264 Post(s)
Liked 240 Times
in
176 Posts
where are you based? this would help to advise where you may find a supplier.
If it is mini velo, Dahon Japan or japanese dealer will be able to help as the bulk of the sales were there. In Europe, may be holland bike
in the UK, CH white might be able to help but i would advise to speak to them as they don't put everything they have on the website.
https://foldingbike.biz/epages/7665e...9266a564b29464
02-17-24, 03:56 AM
#5
Senior Member
There used to be a USA folding bike dealer that sold nationwide by mail, called Thor Bikes, he had parts like this, but he's closed the business. For a while he was still selling parts on Ebay, don't know if still true. That hinge design is very common on Dahons. Perhaps a Dahon dealer has it, or can get it. I cannot recall the shape on the broken end; You might be able to make a replacement, by getting a long bolt in that thread size (preferrably high-strength stainless, or at least grade 5 plated), cut to length, and lock a couple nuts on it, torqued against each other hard, and you just use one of those nuts to adjust the joint, as there is zero tension or resistance on it when the joint is open.
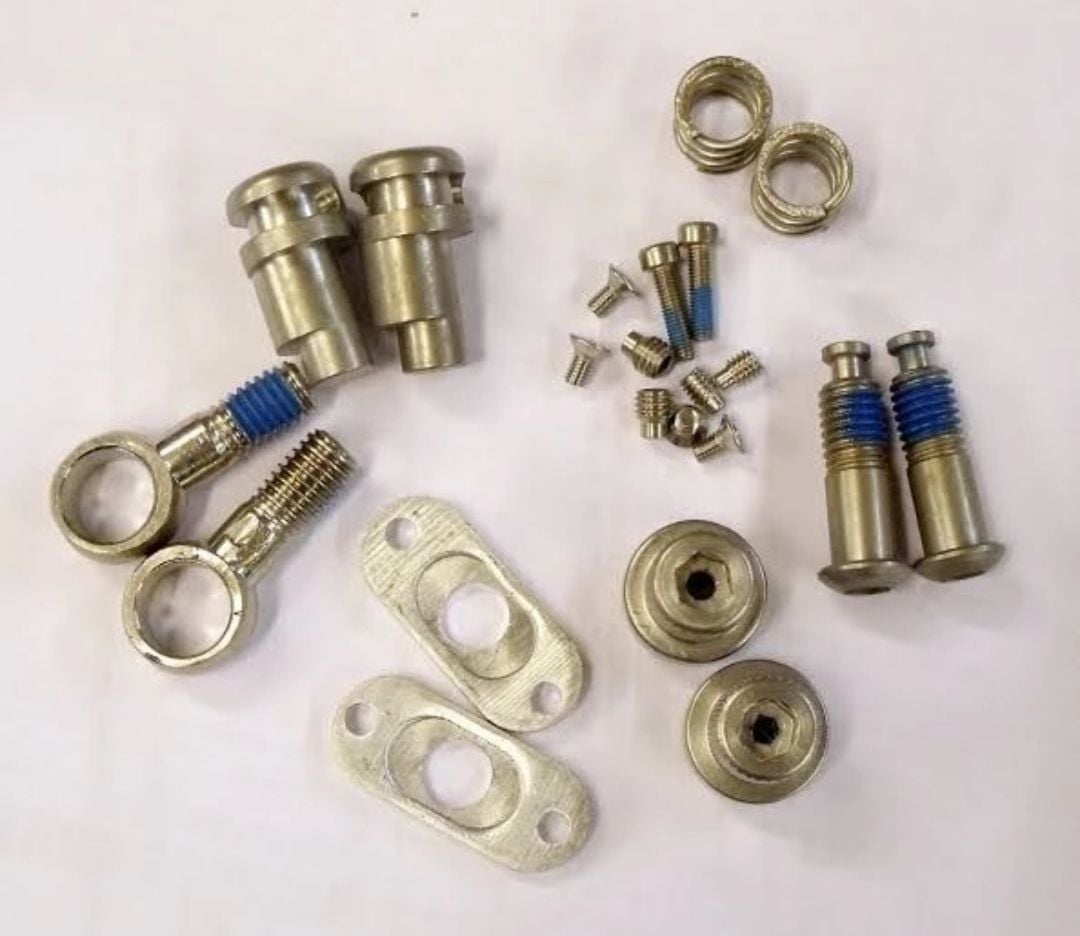
EDIT: What country are you located? I looked at all this kits available, this is the one you want (I searched for "lockjaw", the parts did NOT look like yours. This is a kit for all Dahon steel frame bikes):
https://foldingbike.biz/epages/7665e.../DAHFRAMLSPEED

EDIT: What country are you located? I looked at all this kits available, this is the one you want (I searched for "lockjaw", the parts did NOT look like yours. This is a kit for all Dahon steel frame bikes):
https://foldingbike.biz/epages/7665e.../DAHFRAMLSPEED
Last edited by Duragrouch; 02-17-24 at 04:09 AM.
Likes For Duragrouch:
Likes For Ron Damon:
02-17-24, 04:28 AM
#7
Senior Member
I saw that when I searched on that site for "lockjaw" kit. But none of those parts resemble the broken part posted in the OP.
02-17-24, 06:31 AM
#8
Senior Member
Join Date: Aug 2014
Location: UK
Posts: 746
Bikes: Dahon Jetstream p8 (sold), customized Dahon Helios x10, customzed Dahon Smooth Hound x11,customized Dahon Hammerhead 8.0 d7, Planet X Free Ranger (mullet setup 1x11), Planet X Giovanissimi 20 (1x9), Frog 52 (1x9) and Frog 48 1s
Mentioned: 0 Post(s)
Tagged: 0 Thread(s)
Quoted: 264 Post(s)
Liked 240 Times
in
176 Posts
That is it, OP used the term "lockjaw" which was the system on minivelo and cadenza that Ron showed in picture. The part the OP showed seem to be the adjusting threaded bar from the cam over locking mechanism on "regular" dahon frame (Mu, speed, helios, mariner etc.).
02-17-24, 08:40 AM
#9
Newbie
Thread Starter
 02-17-24, 08:44 AM
#10
Newbie
Thread Starter
You might be able to make a replacement, by getting a long bolt in that thread size (preferrably high-strength stainless, or at least grade 5 plated), cut to length, and lock a couple nuts on it, torqued against each other hard, and you just use one of those nuts to adjust the joint, as there is zero tension or resistance on it when the joint is open.
Yes , I thought that will be my only solution , I have researched quite a bit , couldn't find the exact part . Thanks !
Yes , I thought that will be my only solution , I have researched quite a bit , couldn't find the exact part . Thanks !
 02-17-24, 09:57 PM
#12
Senior Member
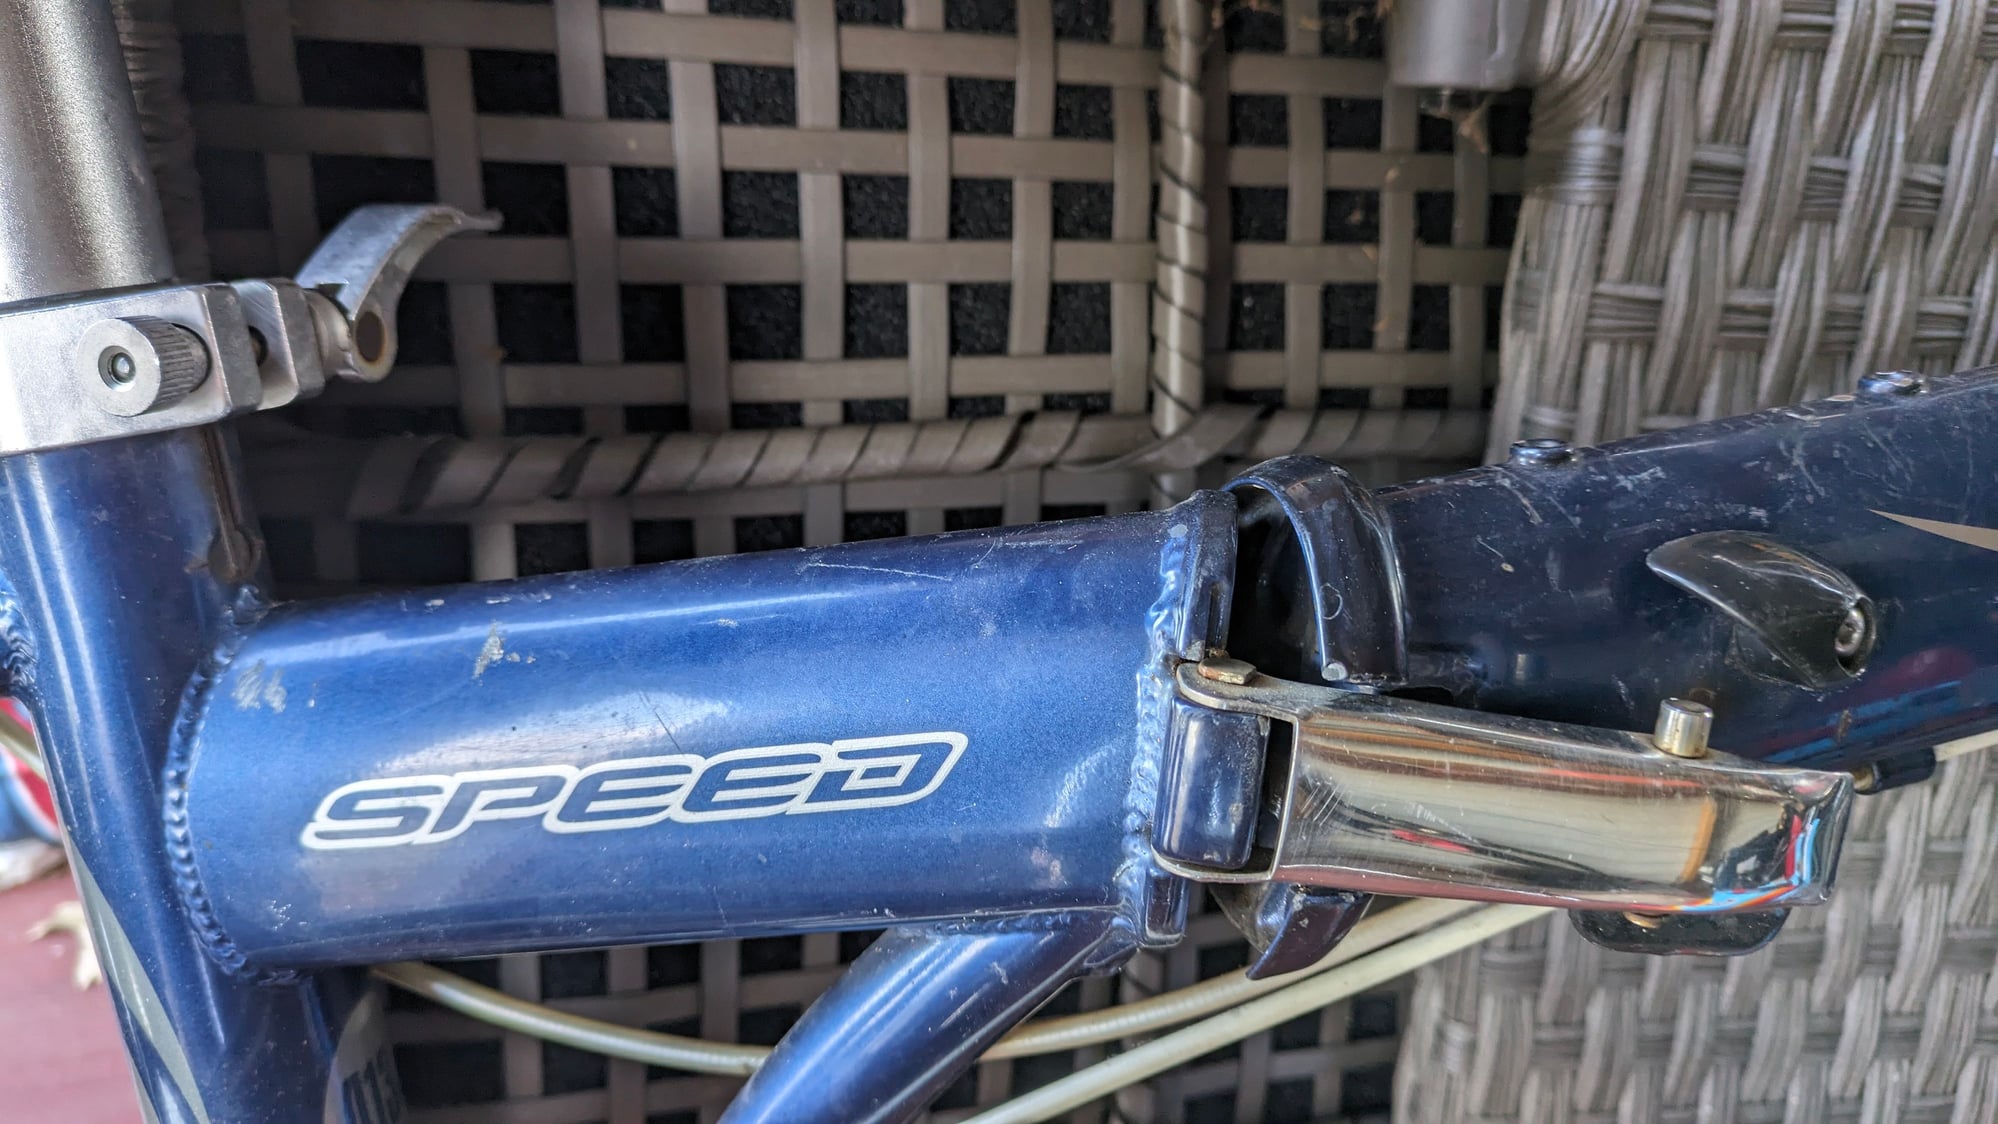
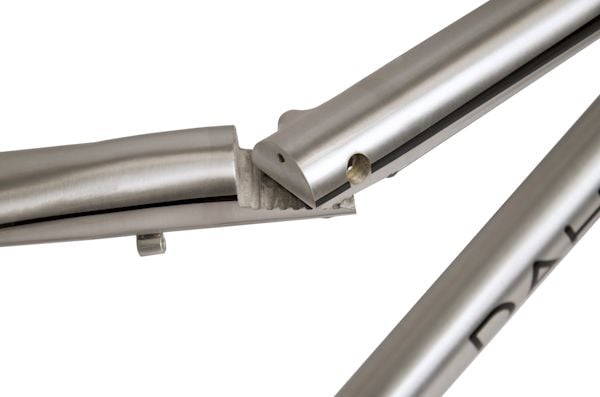
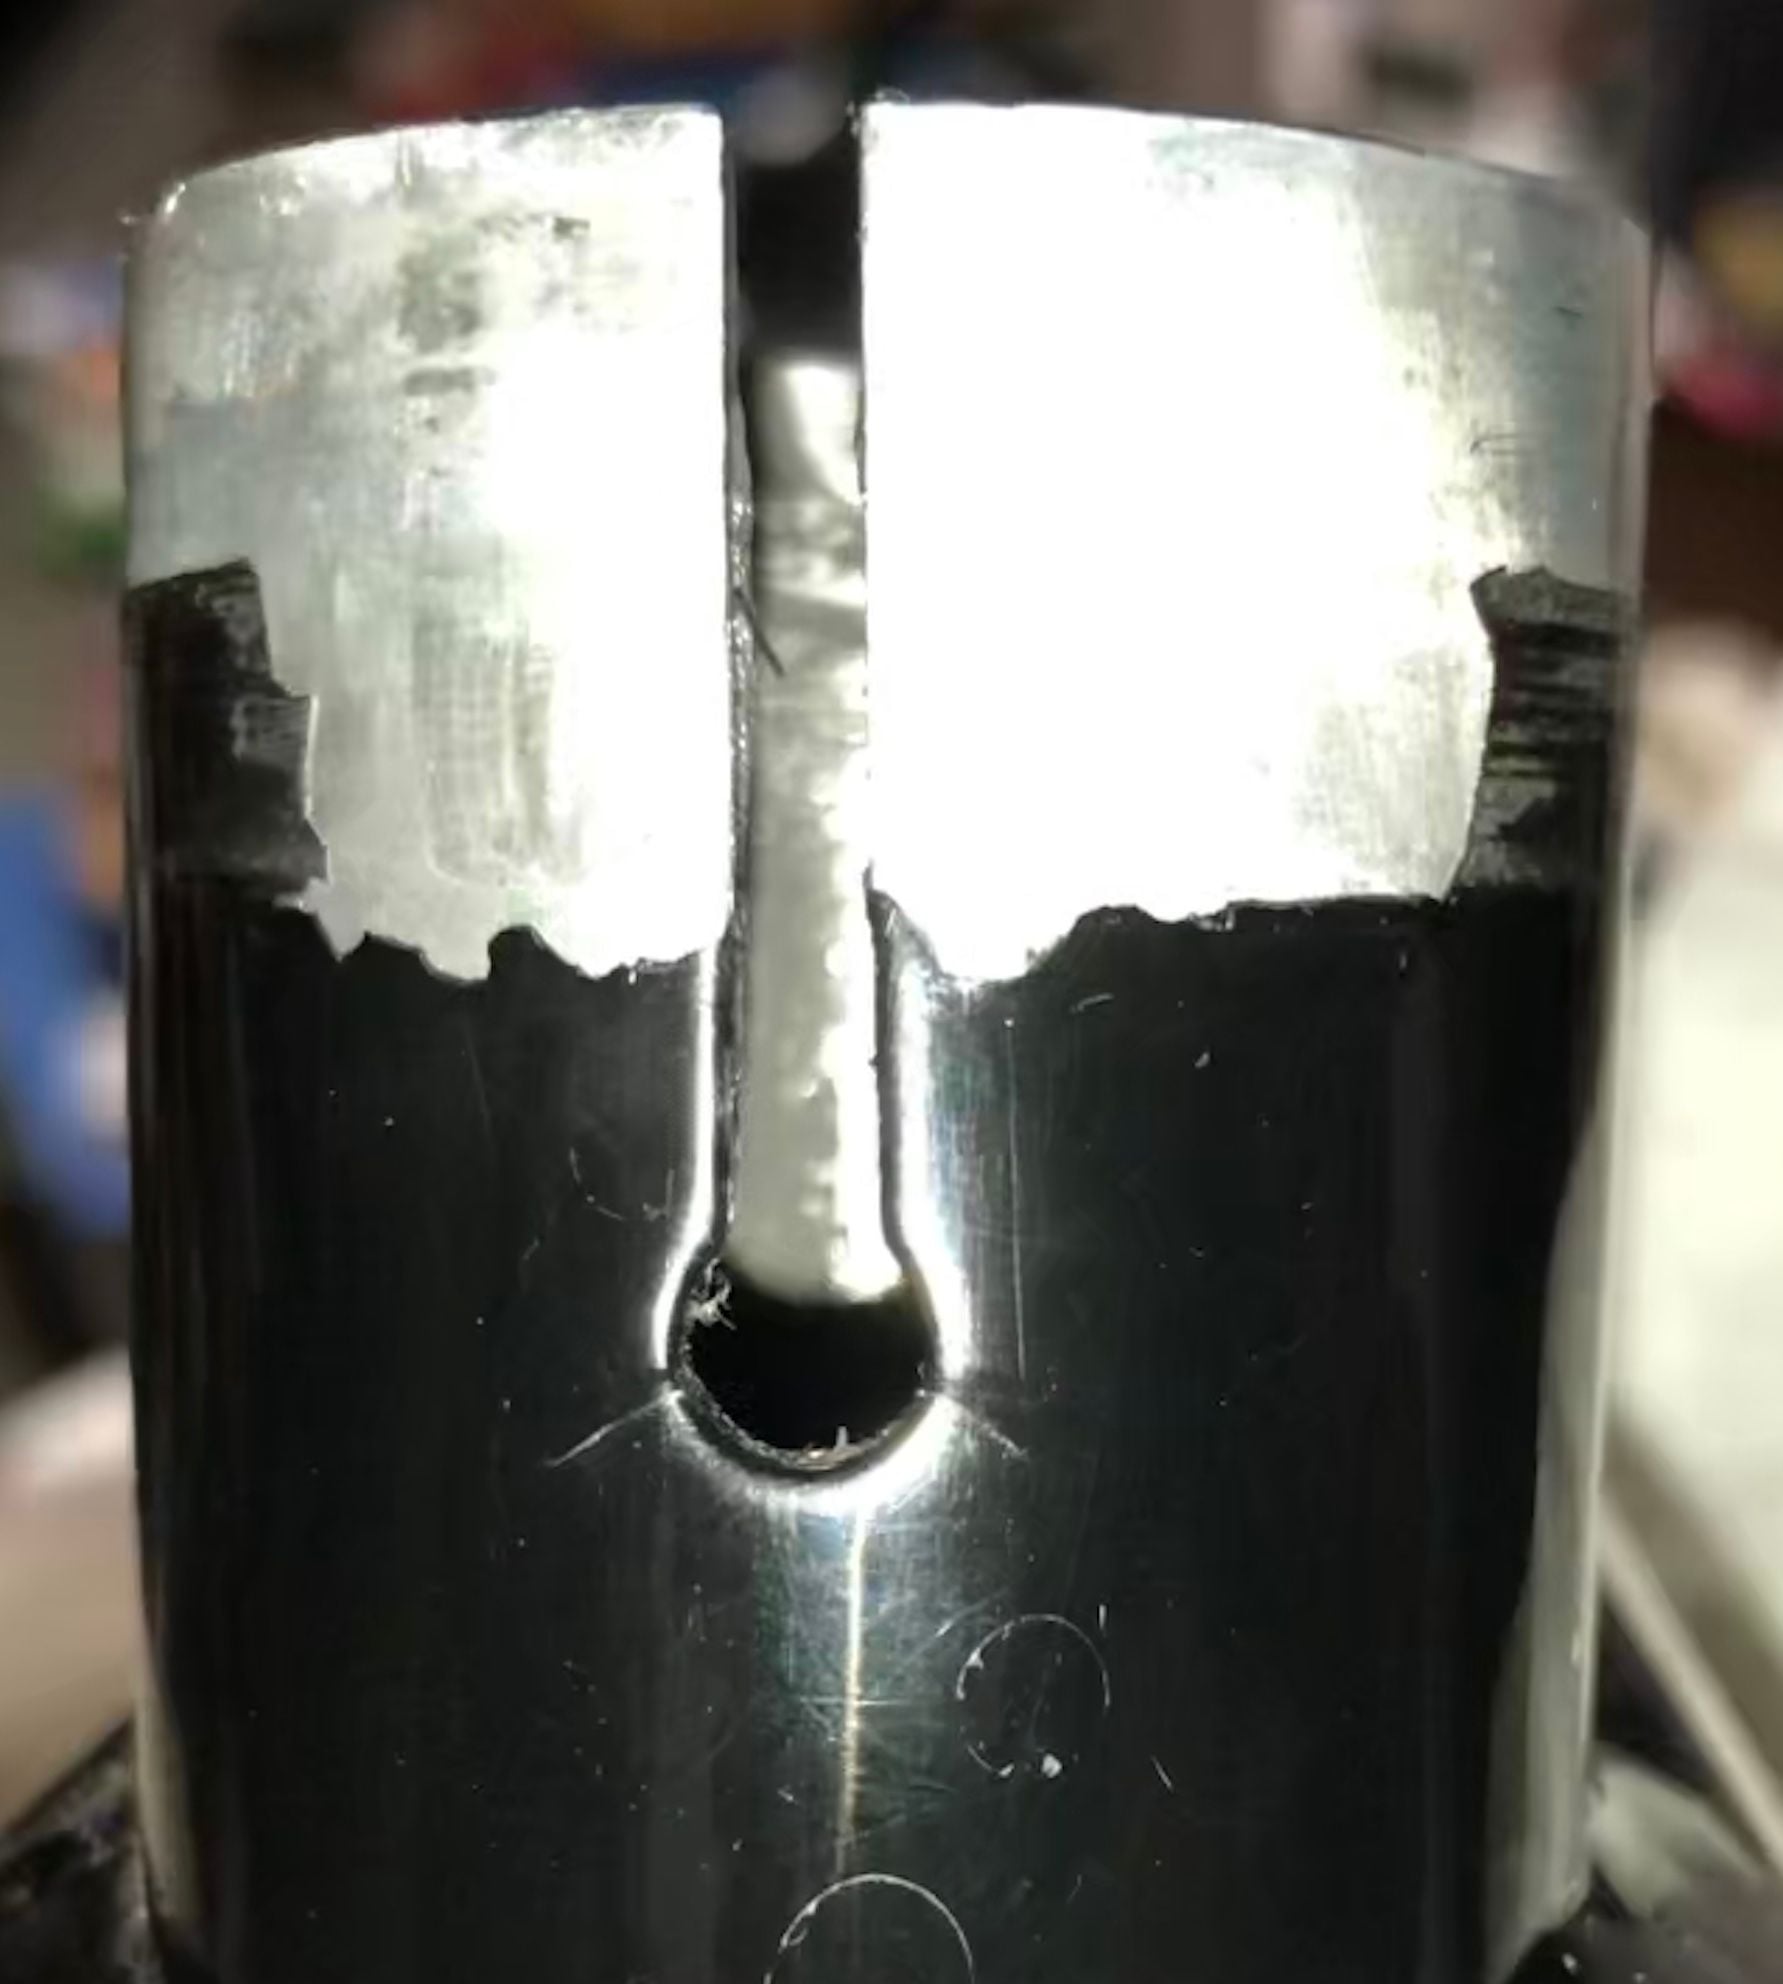
1) Check for circumferential cracks emanating from the radius at the bottom of the seatpost clamping slot, like this (which eventually proceeded around the chainstays and vertically down the tube, and I had to replace the frame):
If any crack, you might drill a tiny hole, like 1/16" or 3/32", at the end of the crack to reduce the stress concentration. I waited too long to do this. Not sure if it will stop any crack, but can't hurt. EDIT: I see cracks just starting. I think you may have time to save this frame, if promptly doing the above, and (2) below.
2) If the bushing (Dahon calls a "shim") between the seat tube and seatpost, is black plastic, REPLACE IMMEDIATELY with aluminum shim available online; Inside diameter spec of shim is 33.9mm, I think the outside is 1 or 2mm larger, can't recall. If a choice of lengths, get the longer shim, distributes force over a larger area. The plastic allows excessive compression of the seat tube there under clamping loads, and combined with tensile stress from rider weight, causes fatigue crack. Aluminum shim compresses MUCH less, and also structurally reinforces the joint. Later Dahons have aluminum shim, and even later, moved that slot to the rear of the tube, so is loaded more in compression, so less fatigue issues.
I wish they made a stainless steel replacement shim, would be stronger.
EDIT: I suggest you put screws in the bottle-cage holes on top of the frame tube, to keep out rain water. I added a cage, then took it off, was always hitting it with my foot until it broke, and bottle leaked when full in that horizontal position.
Last edited by Duragrouch; 02-18-24 at 12:03 AM.
02-18-24, 08:55 AM
#13
Senior Member
Join Date: Sep 2004
Location: Chicago area
Posts: 2,551
Bikes: Airborne "Carpe Diem", Motobecane "Mirage", Trek 6000, Strida 2, Dahon "Helios XL", Dahon "Mu XL", Tern "Verge S11i"
Mentioned: 23 Post(s)
Tagged: 0 Thread(s)
Quoted: 980 Post(s)
Liked 582 Times
in
399 Posts
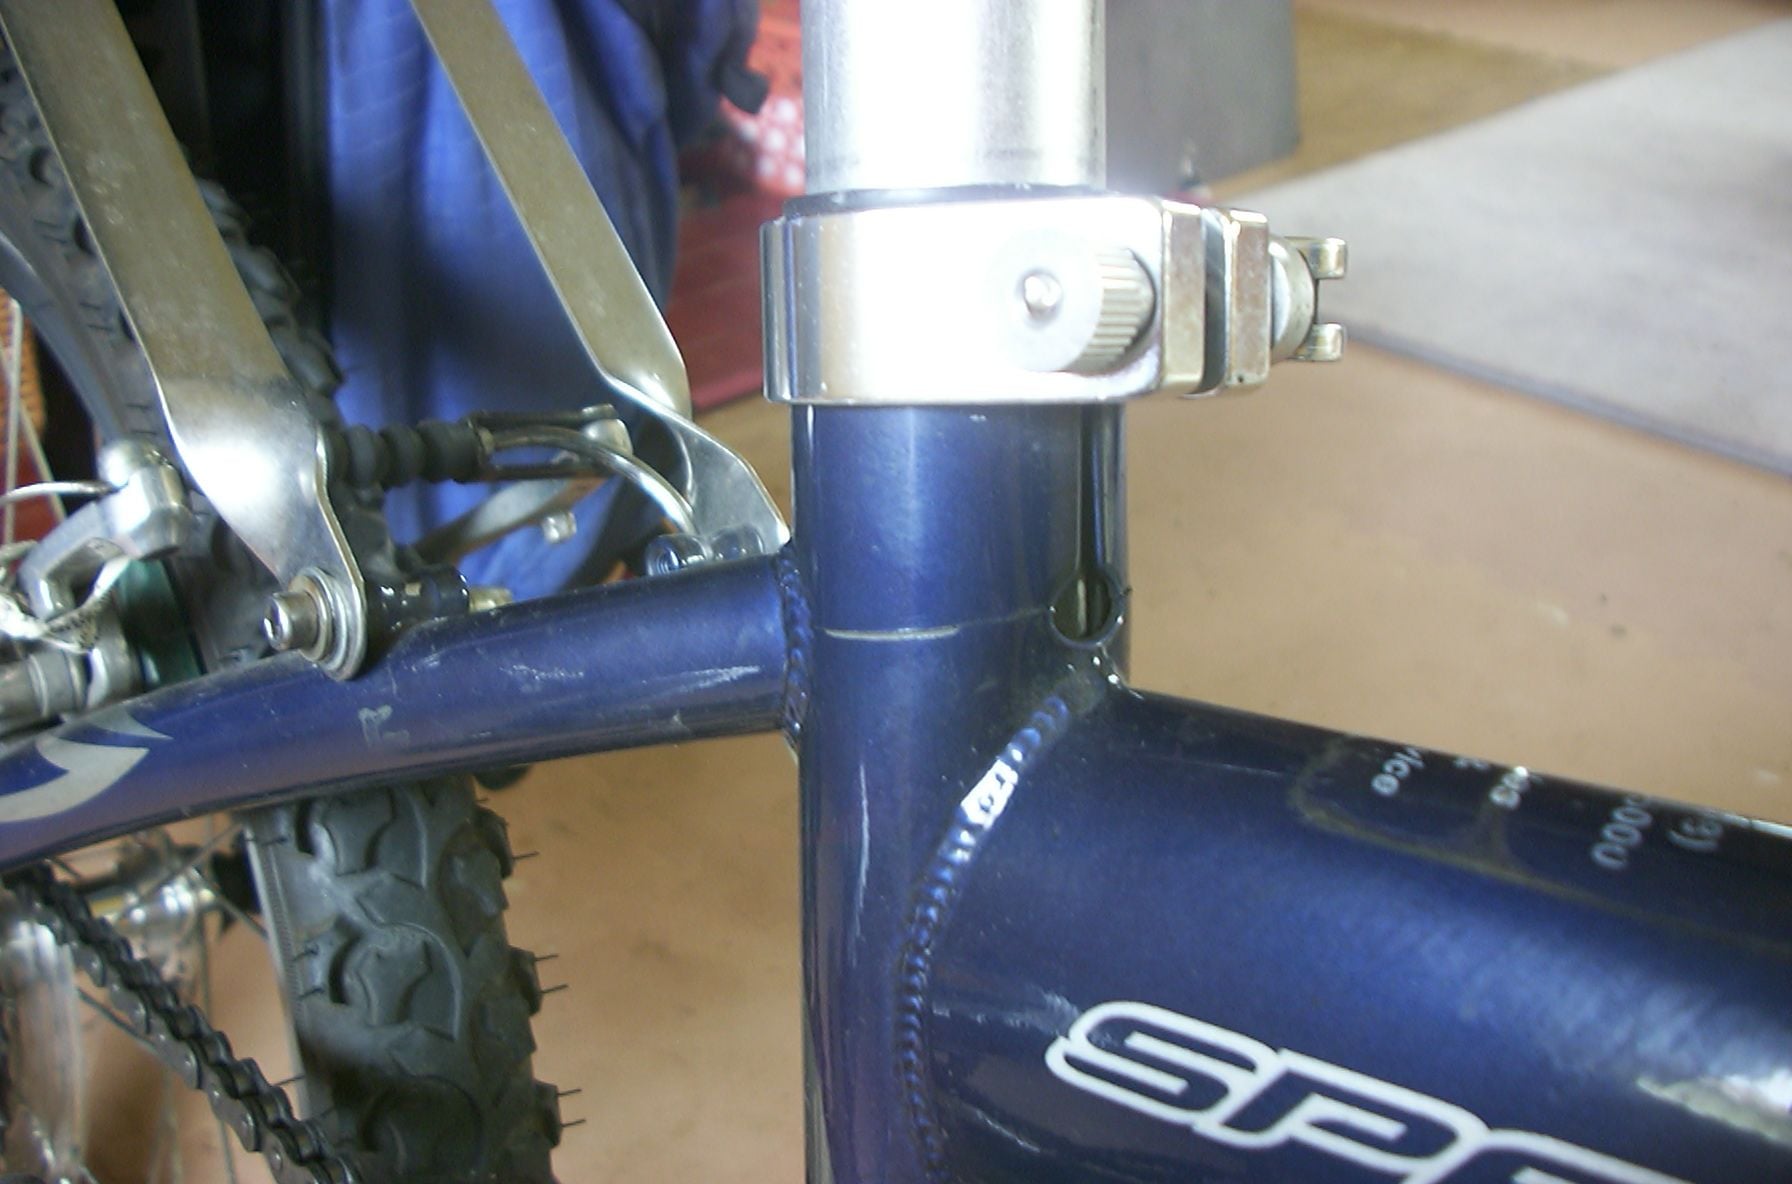
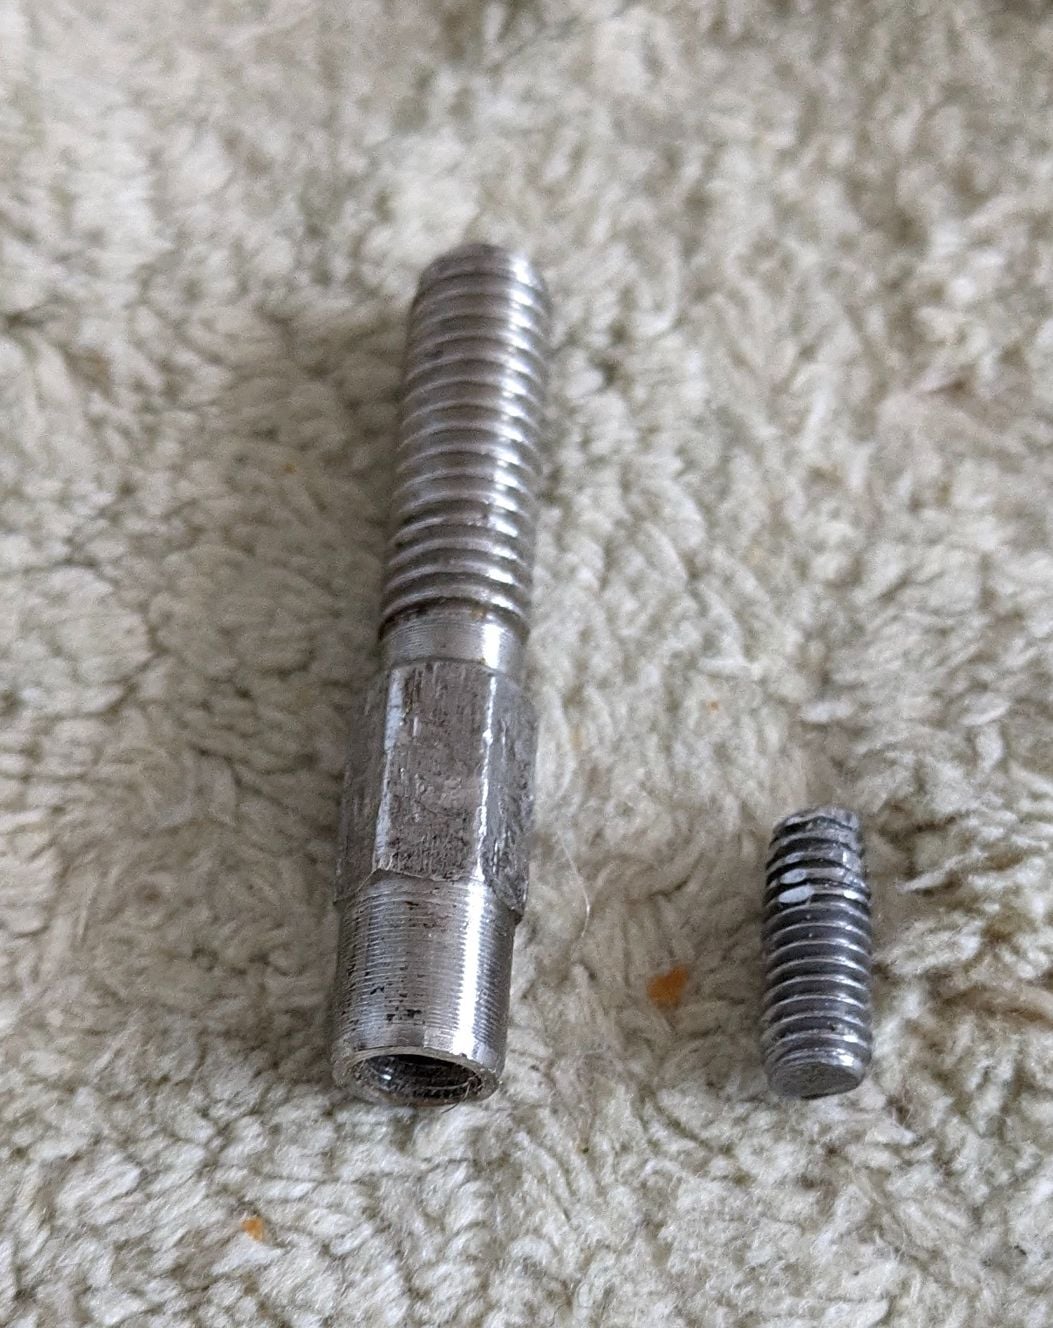
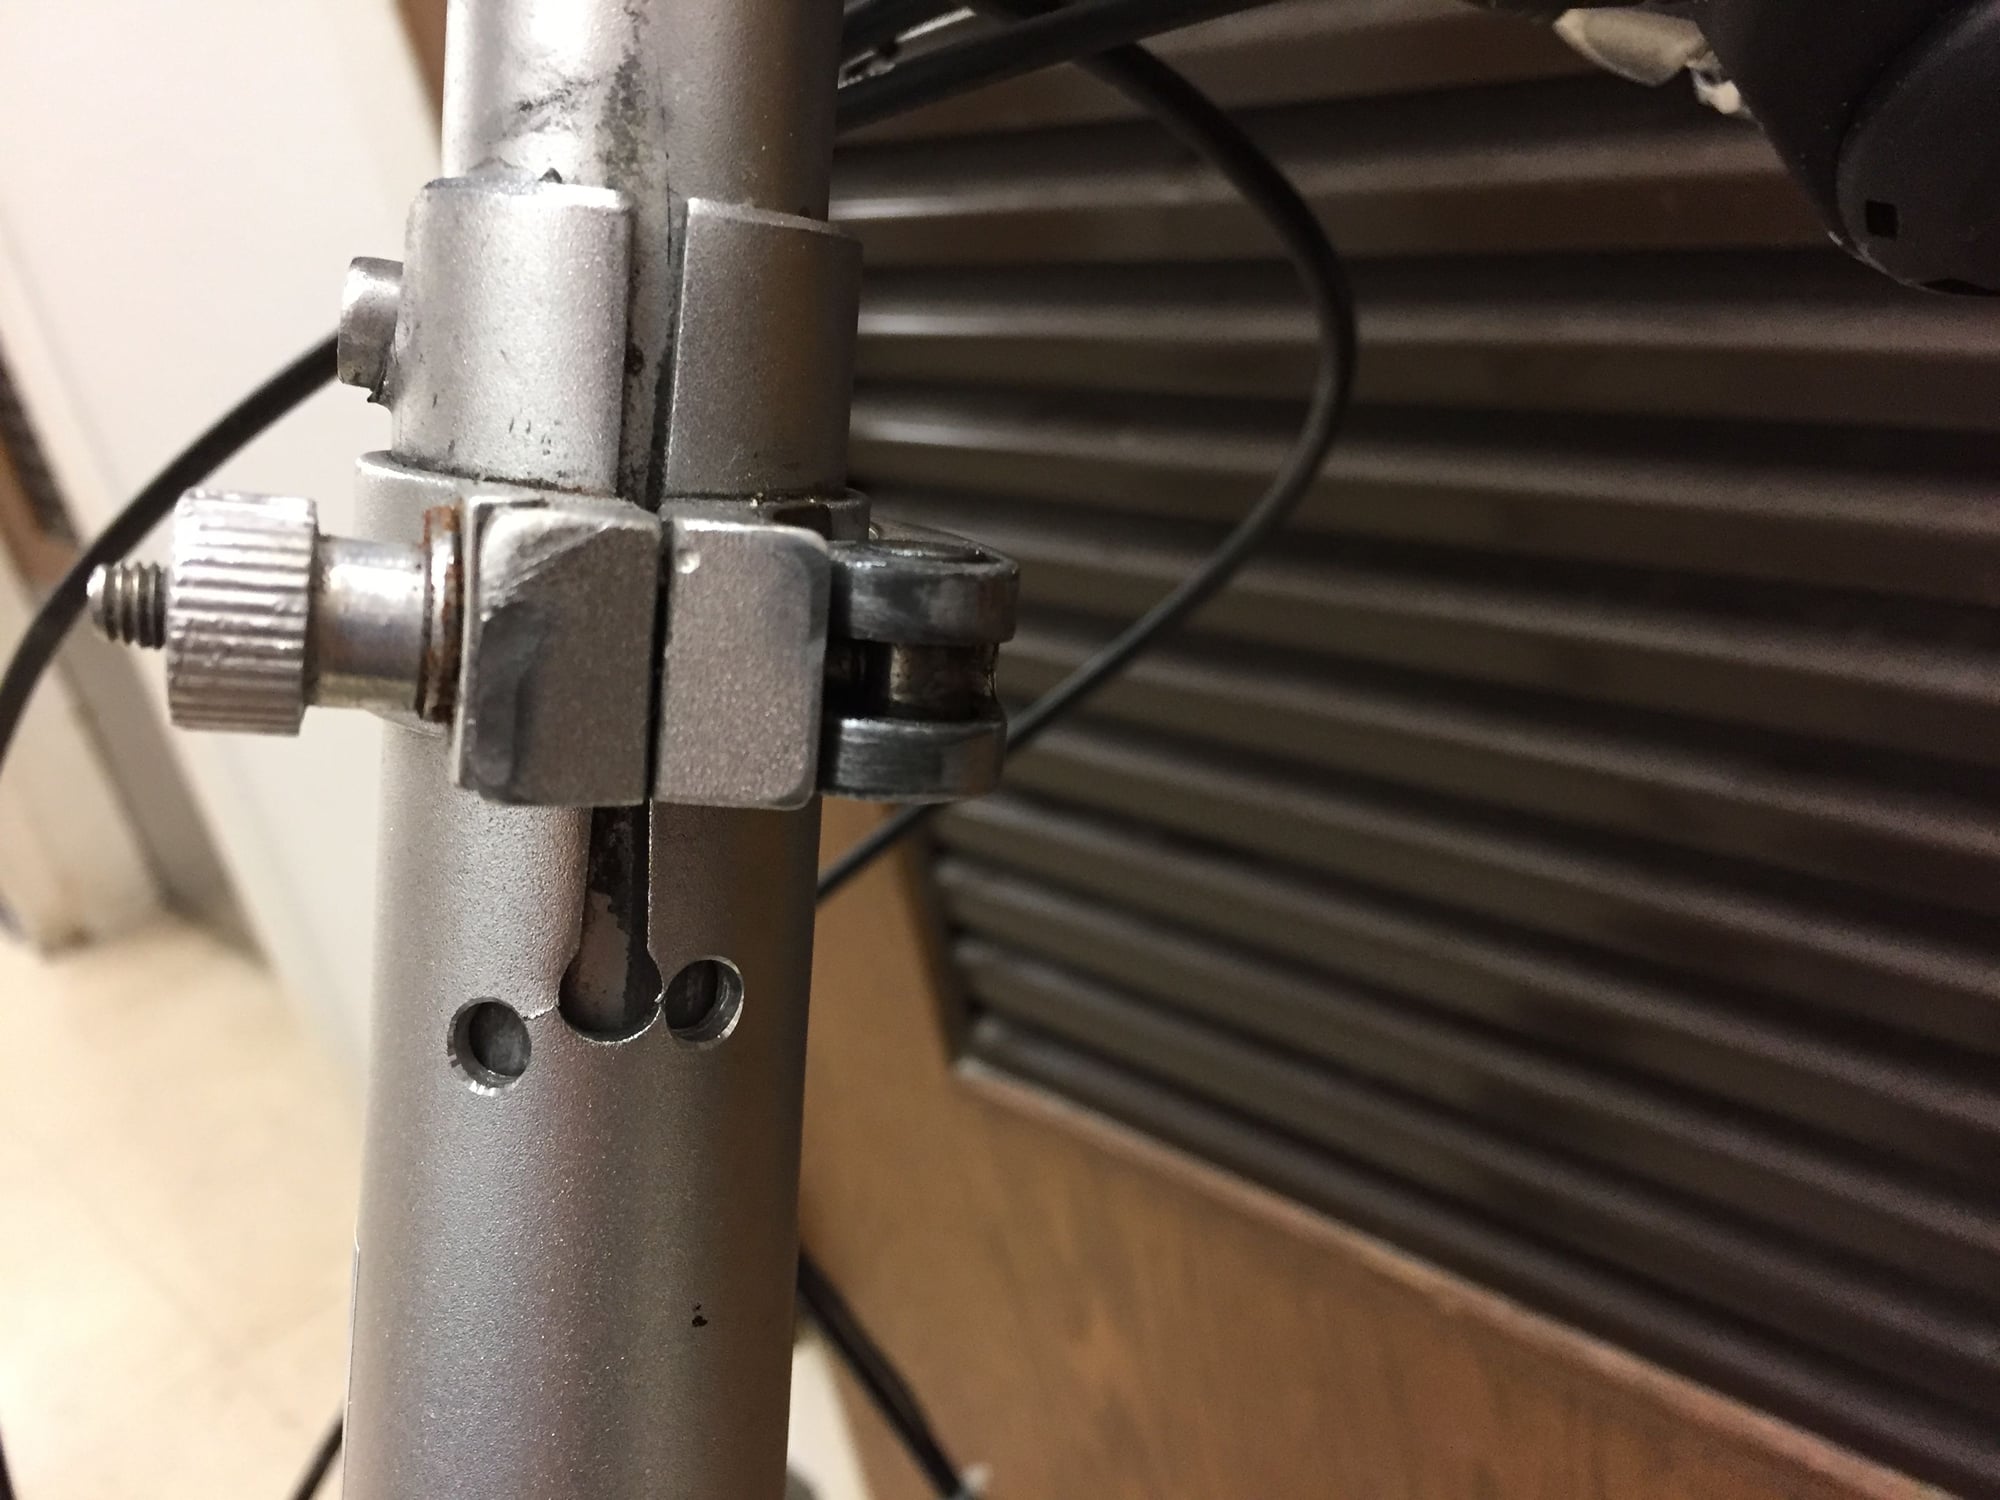
The piece shown is the adjustment bolt for a common Dahon frame latch. IIRC these were called "Vise-Grip", not "LockJaw".
The larger threaded end screws into a cylindrical piece that rotates in the frame latch. The thread is M6-1.00.
The threads at the other end are the remains of a screw that connects the adjusting bolt to another cylindrical piece that is mounted in the frame. This screw has a M4-.70 thread and is long enough to bottom out in the hole on the adjustment bolt without binding the cylindrical piece; this connection is supposed to be loose so the adjustment bolt can rotate freely.
It's not clear why the head of that screw broke off. Possibly it unscrewed to the point that the head was interfering with the operation of the latch. In any case, you should remove the remnant of the screw and replace it. I'd try grabbing it with pliers, or clamp it in a vise. You can probably find a replacement at a good hardware store (get stainless steel). Adjust the length so the screw *almost* binds the cylindrical frame piece.
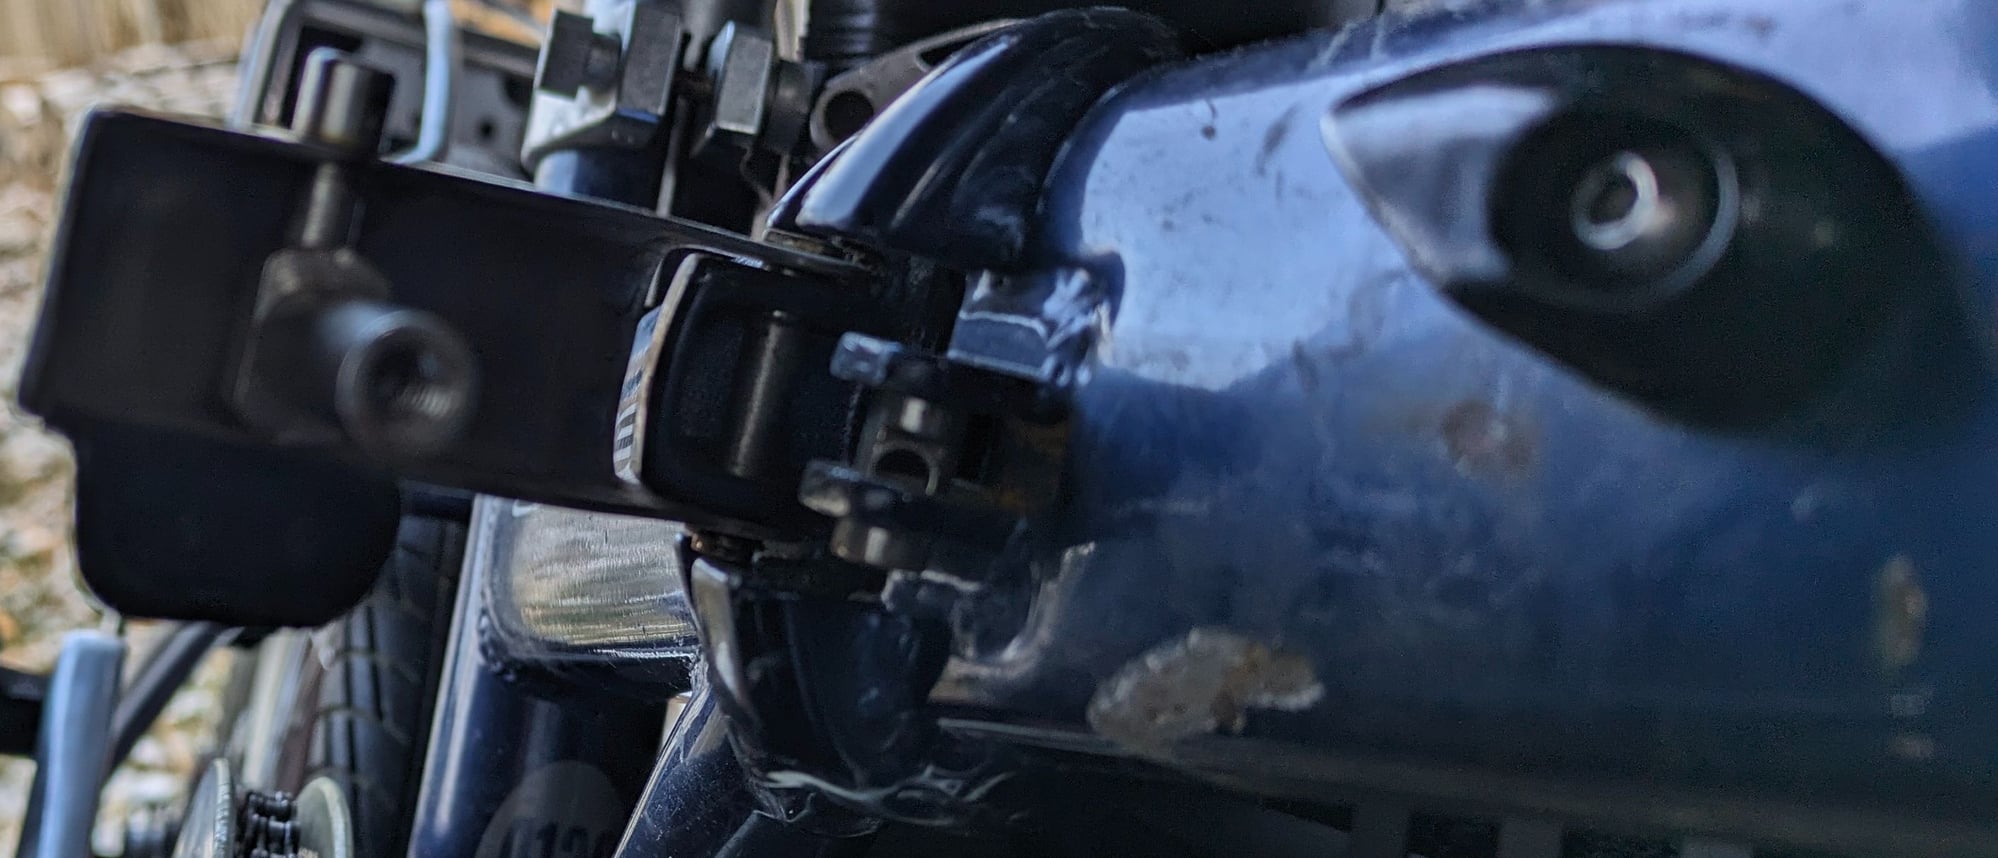
If you want to go "official", THIS looks like it might be the same latch.
There is a thread describing a similar problem to yours HERE.
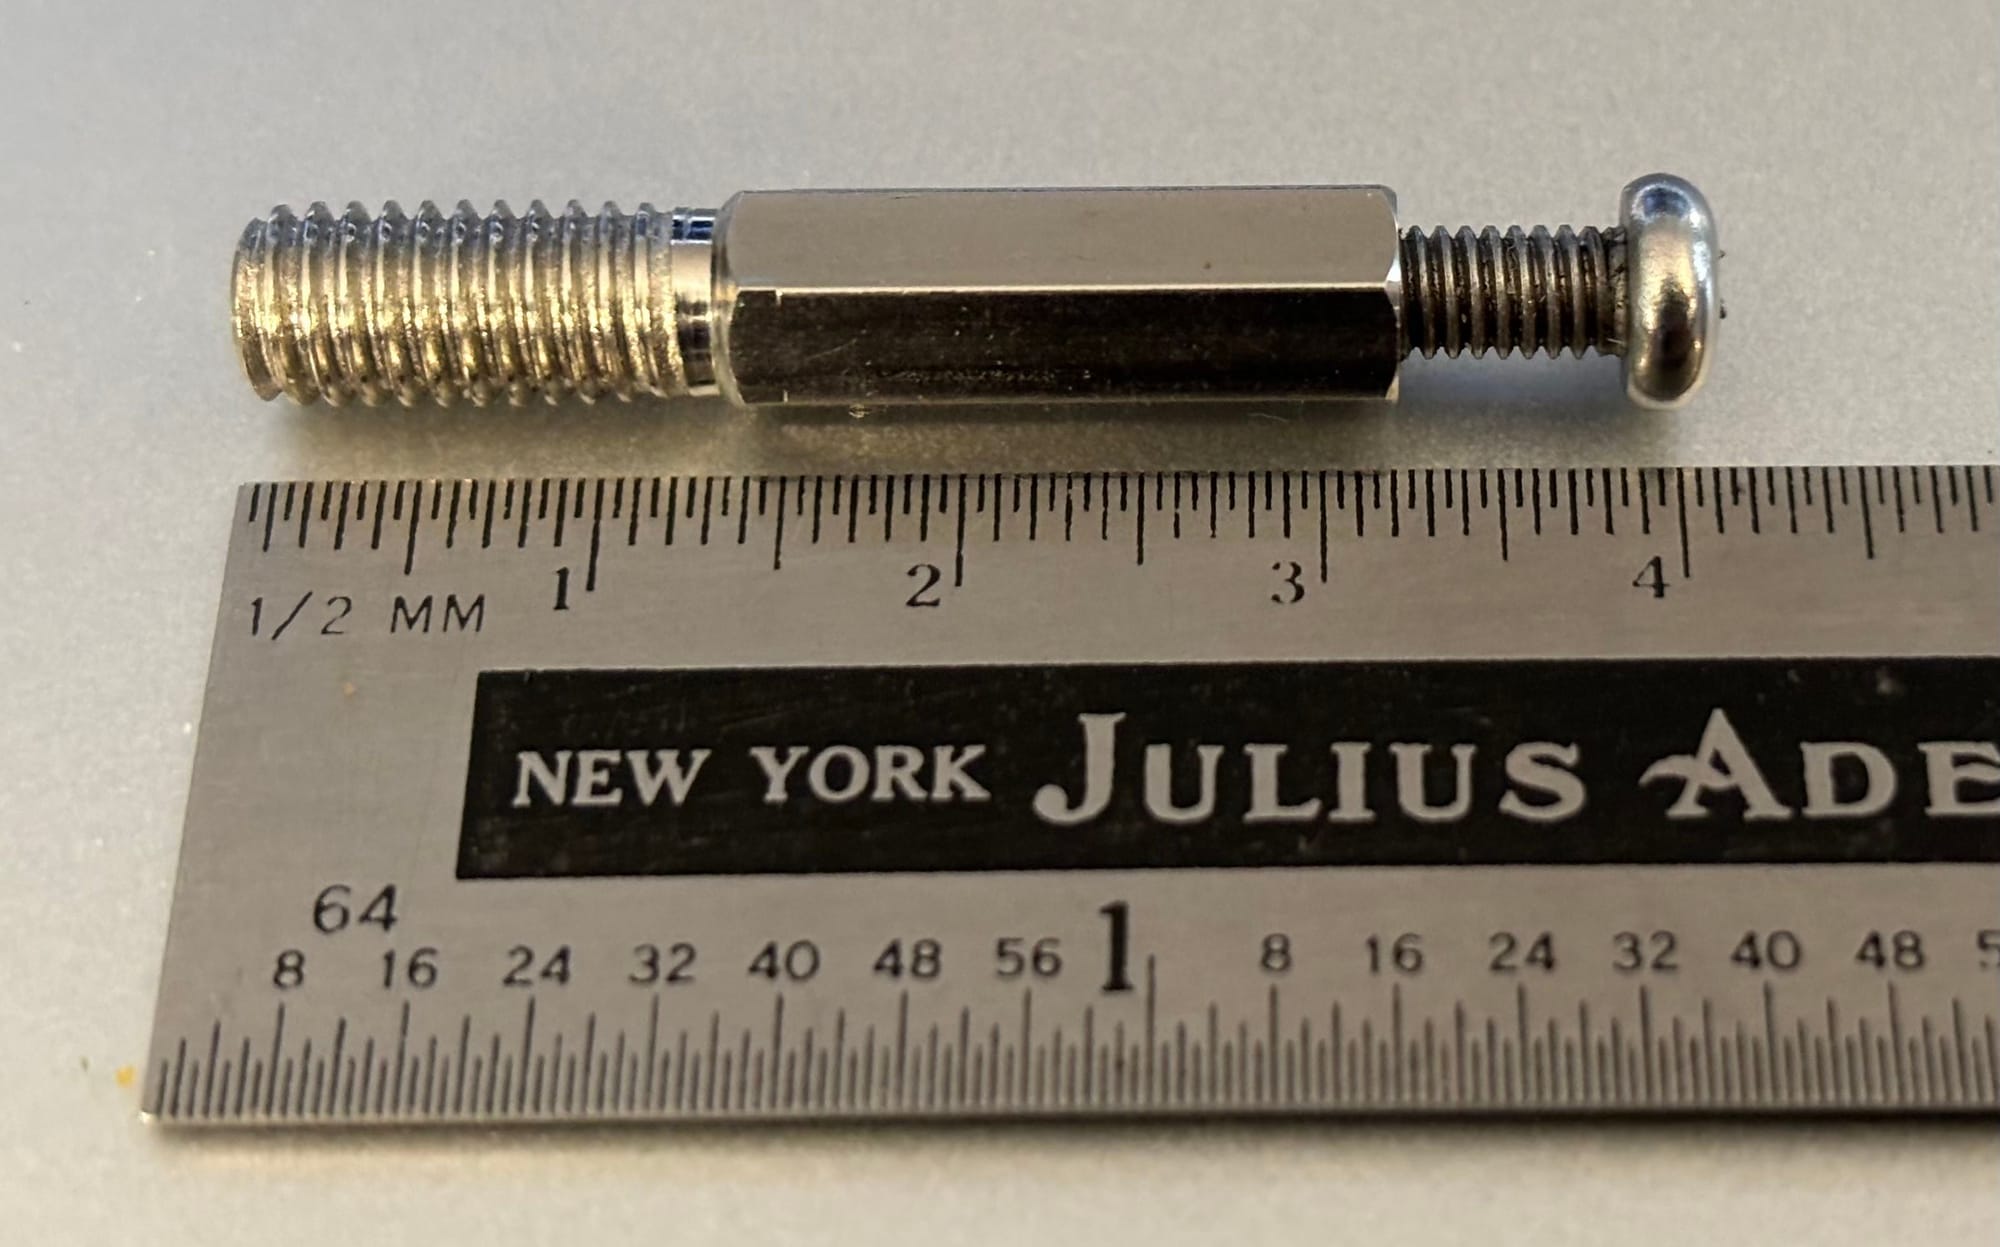
This is from another Dahon frame latch. The screw inserted on the right is bottomed out in the hole.
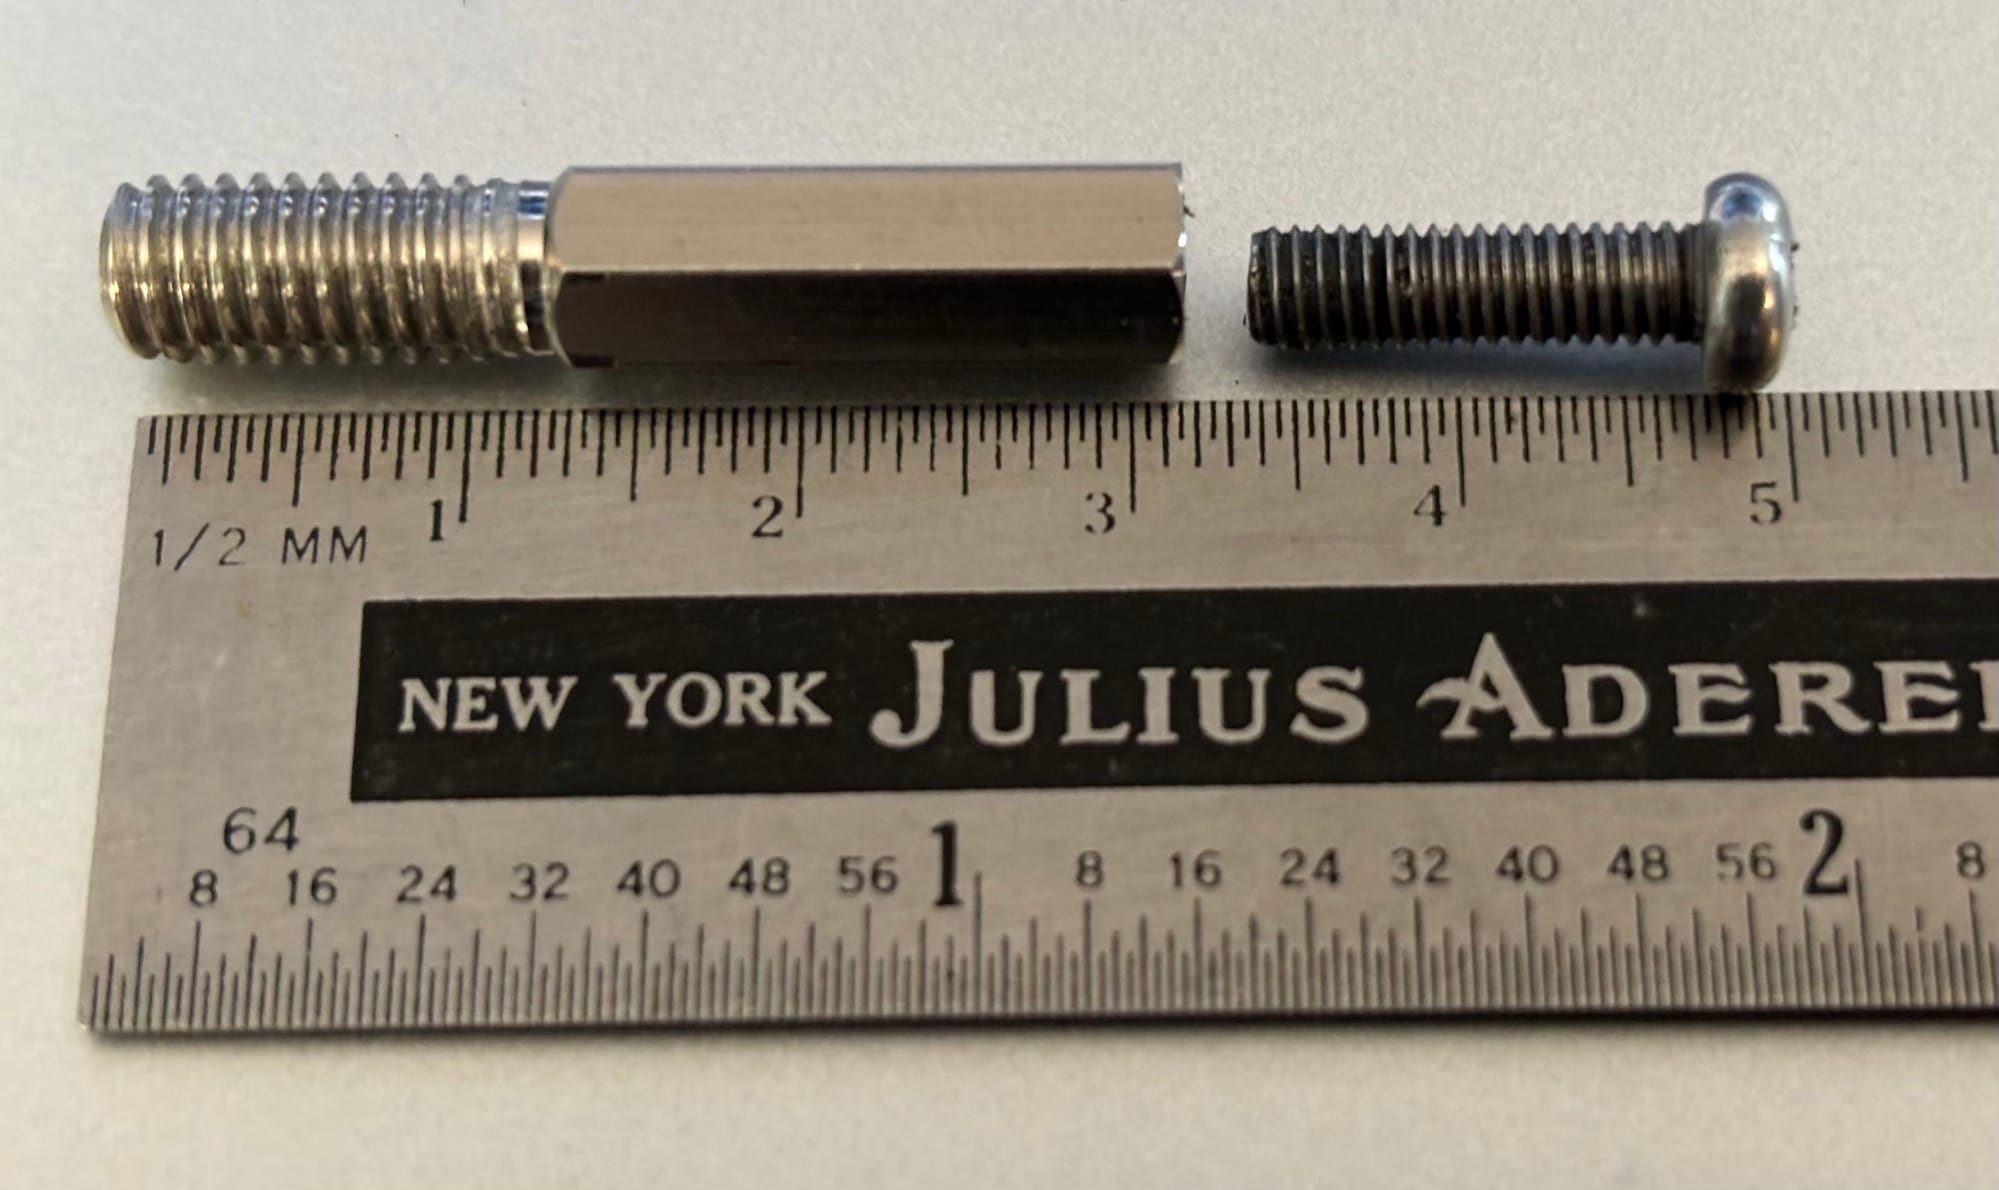
Here's the screw out of the hole. It's about 13mm long. So, basically you just need this screw!
Hope this helps.
The larger threaded end screws into a cylindrical piece that rotates in the frame latch. The thread is M6-1.00.
The threads at the other end are the remains of a screw that connects the adjusting bolt to another cylindrical piece that is mounted in the frame. This screw has a M4-.70 thread and is long enough to bottom out in the hole on the adjustment bolt without binding the cylindrical piece; this connection is supposed to be loose so the adjustment bolt can rotate freely.
It's not clear why the head of that screw broke off. Possibly it unscrewed to the point that the head was interfering with the operation of the latch. In any case, you should remove the remnant of the screw and replace it. I'd try grabbing it with pliers, or clamp it in a vise. You can probably find a replacement at a good hardware store (get stainless steel). Adjust the length so the screw *almost* binds the cylindrical frame piece.
If you want to go "official", THIS looks like it might be the same latch.
There is a thread describing a similar problem to yours HERE.
This is from another Dahon frame latch. The screw inserted on the right is bottomed out in the hole.
Here's the screw out of the hole. It's about 13mm long. So, basically you just need this screw!
Hope this helps.
02-18-24, 09:27 AM
#14
Senior Member
Join Date: Sep 2004
Location: Chicago area
Posts: 2,551
Bikes: Airborne "Carpe Diem", Motobecane "Mirage", Trek 6000, Strida 2, Dahon "Helios XL", Dahon "Mu XL", Tern "Verge S11i"
Mentioned: 23 Post(s)
Tagged: 0 Thread(s)
Quoted: 980 Post(s)
Liked 582 Times
in
399 Posts
My next bike, a Tern Verge S11i, developed these same cracks. I was looking for them, so I caught them early. Rather than drill "stop holes", I greatly enlarged the stress-relief at the bottom of the seat tube slot. Several thousands of miles later, the cracks have not returned.
Cracks are seen radiating out from the seat tube. The bike had about 4,000 miles on it.
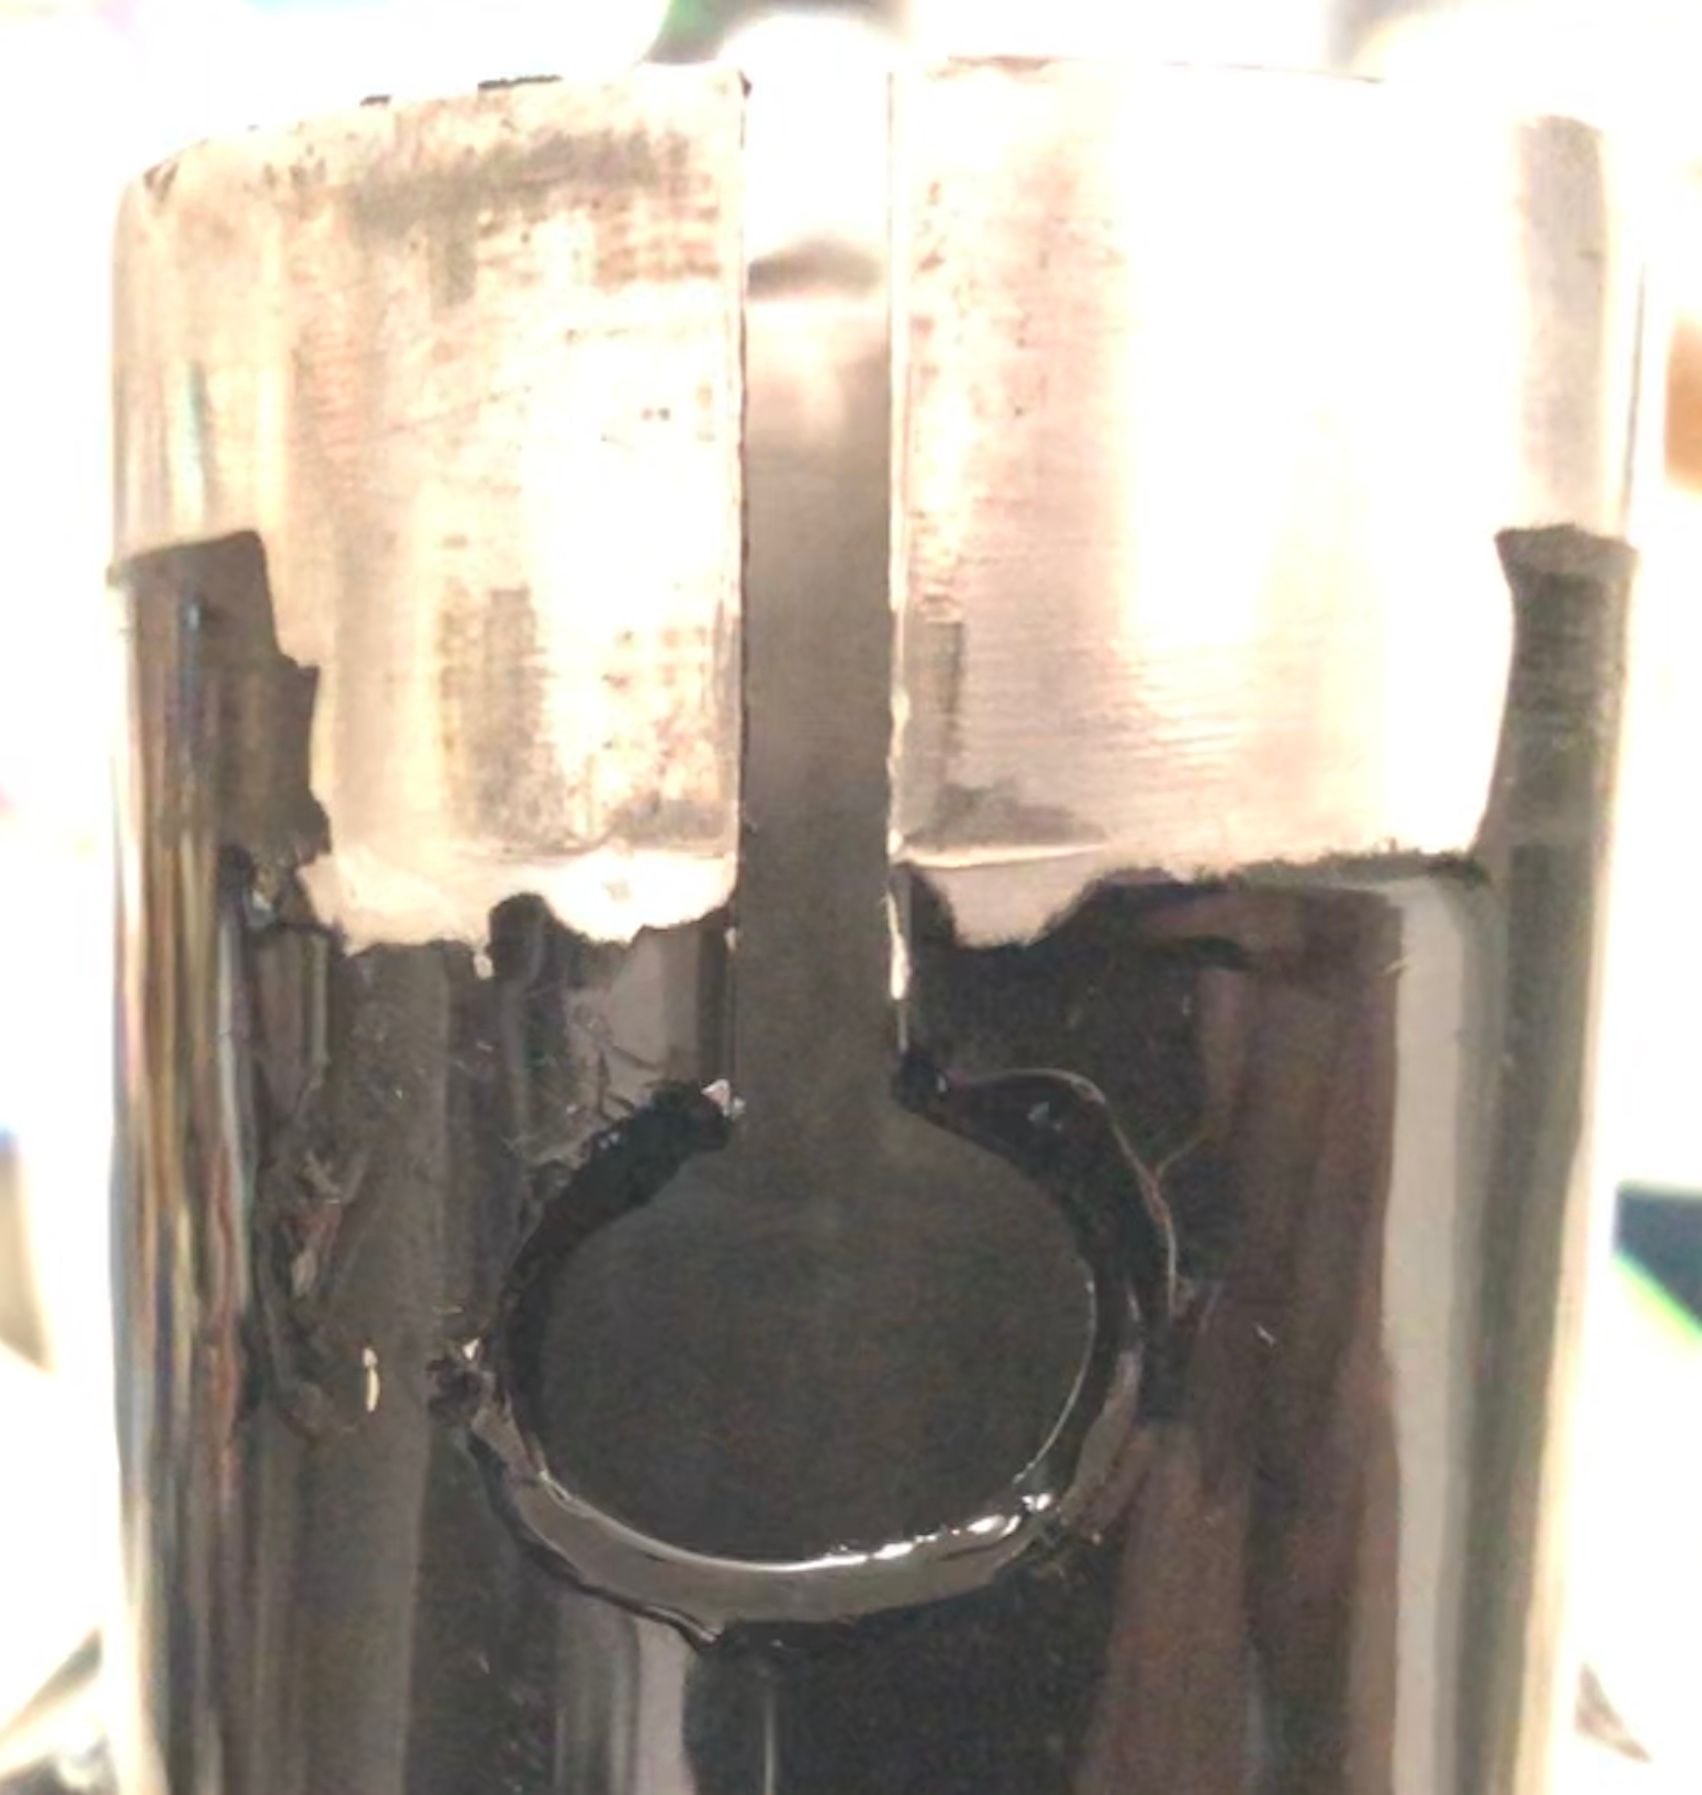
The modified stress-breaker. The radius of curvature is now large enough to resist the recurrence of cracks after several thousand miles. The defect on the left is the result of a slip with the Dremel tool.
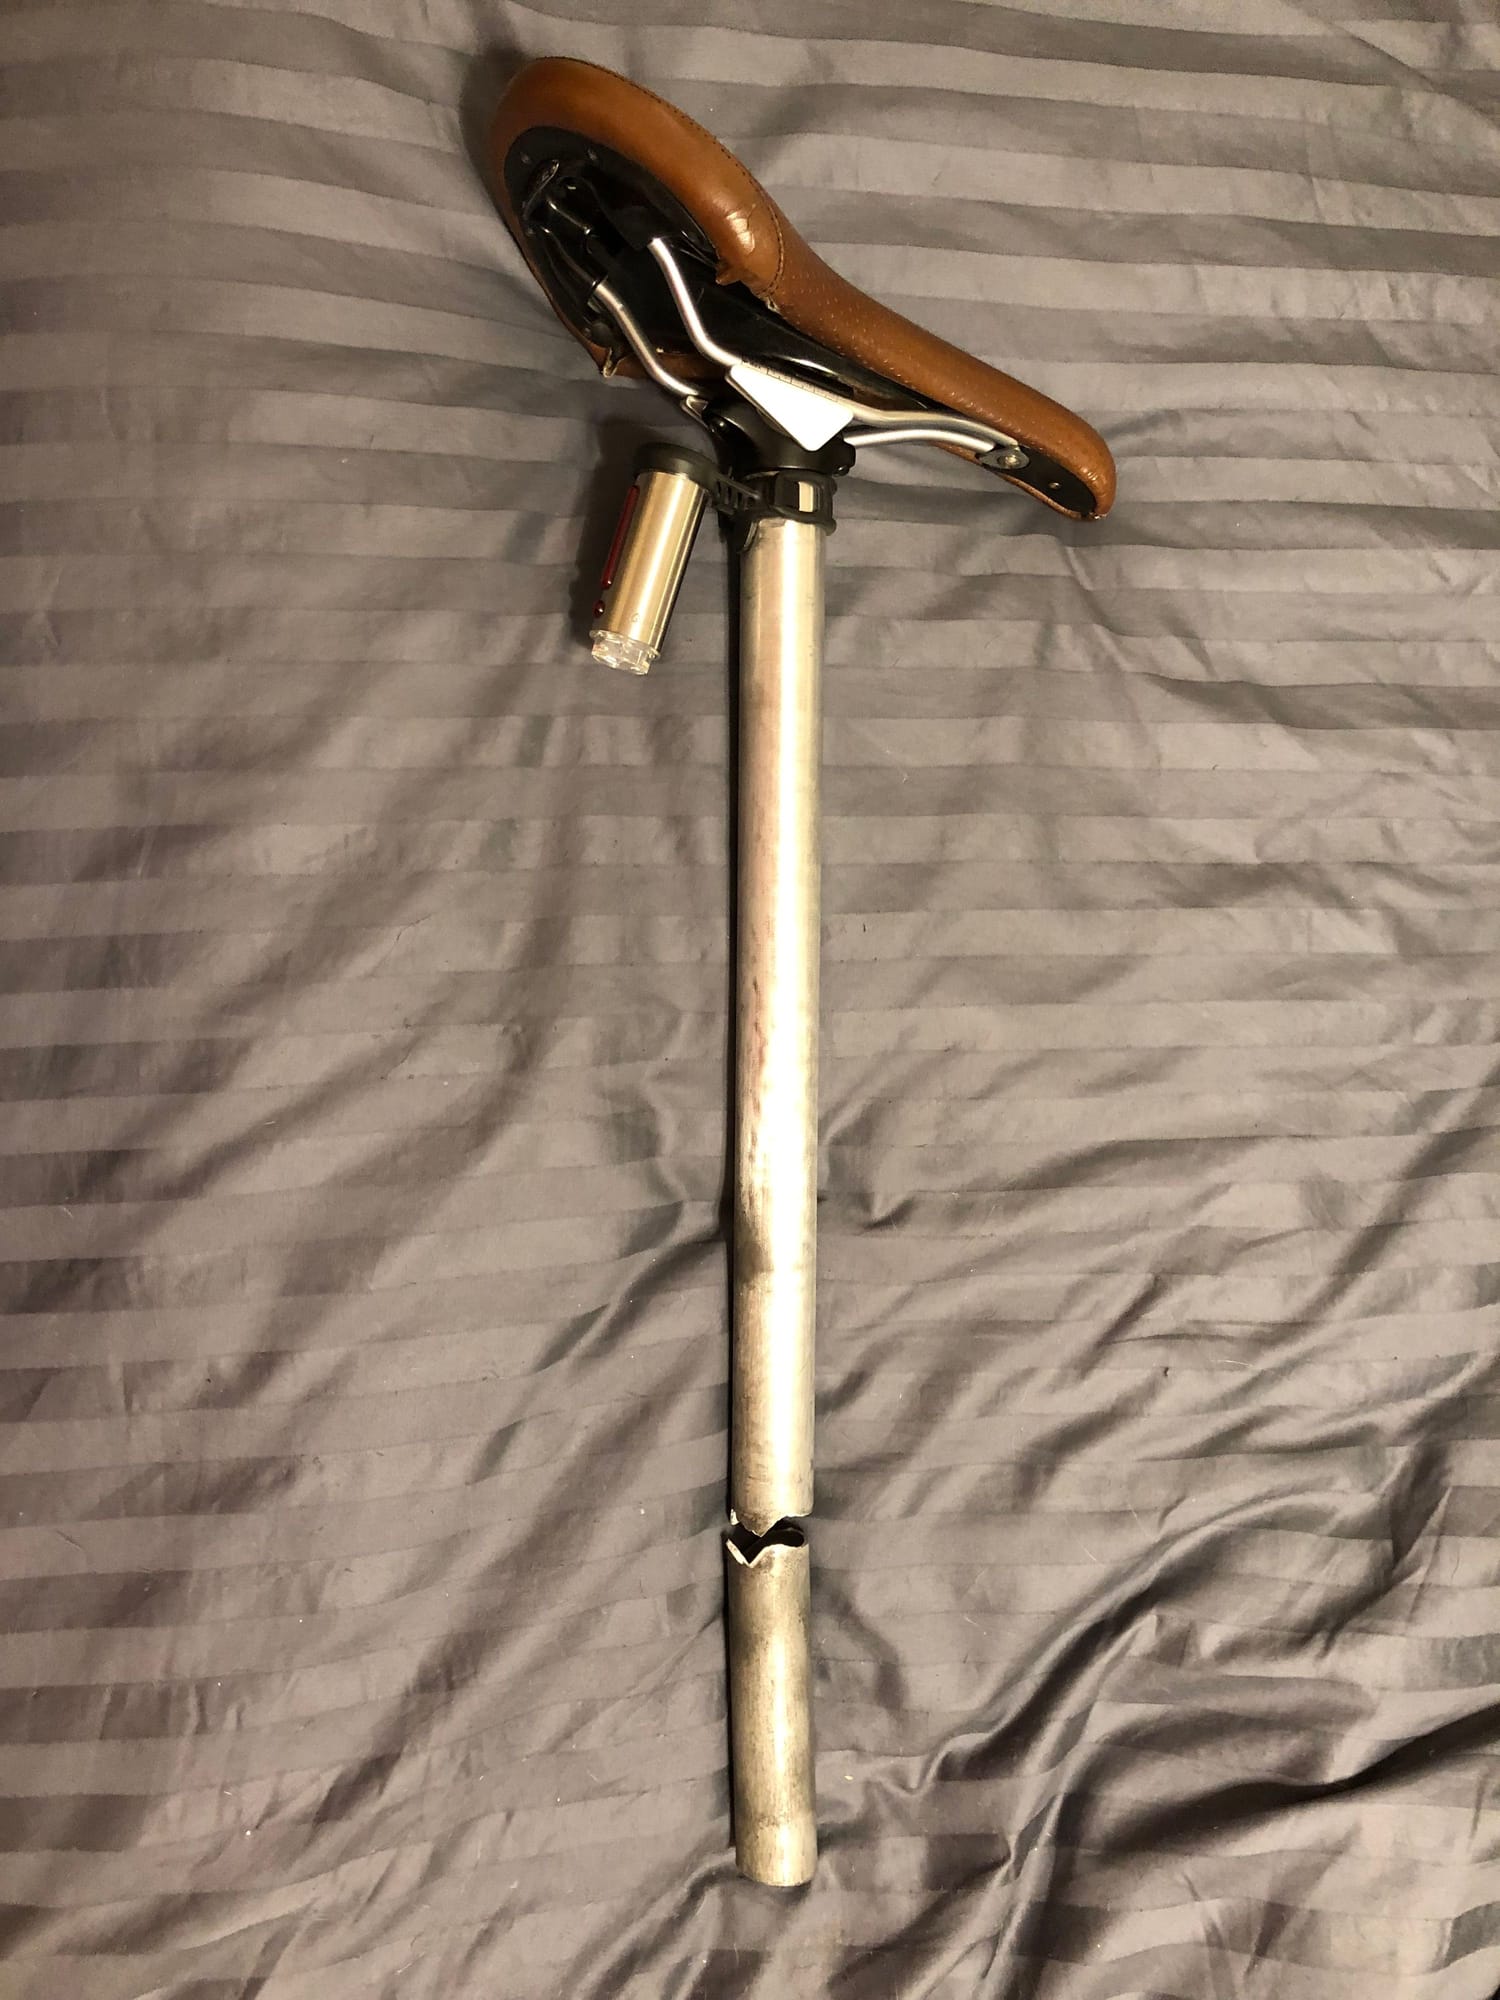
The disconnected seat tube top and latch are seen here. The homemade "stays" allow the bike to be picked up by the saddle.
02-18-24, 11:06 AM
#15
Newbie
Thread Starter
The piece shown is the adjustment bolt for a common Dahon frame latch. IIRC these were called "Vise-Grip", not "LockJaw".
The larger threaded end screws into a cylindrical piece that rotates in the frame latch. The thread is M6-1.00.
The threads at the other end are the remains of a screw that connects the adjusting bolt to another cylindrical piece that is mounted in the frame. This screw has a M4-.70 thread and is long enough to bottom out in the hole on the adjustment bolt without binding the cylindrical piece; this connection is supposed to be loose so the adjustment bolt can rotate freely.
It's not clear why the head of that screw broke off. Possibly it unscrewed to the point that the head was interfering with the operation of the latch. In any case, you should remove the remnant of the screw and replace it. I'd try grabbing it with pliers, or clamp it in a vise. You can probably find a replacement at a good hardware store (get stainless steel). Adjust the length so the screw *almost* binds the cylindrical frame piece.
If you want to go "official", THIS looks like it might be the same latch.
There is a thread describing a similar problem to yours HERE.
This is from another Dahon frame latch. The screw inserted on the right is bottomed out in the hole.
Here's the screw out of the hole. It's about 13mm long. So, basically you just need this screw!
Hope this helps.
Thank you !!!
It came off very easy .
Off to the store to find the correct screw !
Likes For kiramen:
02-18-24, 03:41 PM
#16
Senior Member
Join Date: Sep 2004
Location: Chicago area
Posts: 2,551
Bikes: Airborne "Carpe Diem", Motobecane "Mirage", Trek 6000, Strida 2, Dahon "Helios XL", Dahon "Mu XL", Tern "Verge S11i"
Mentioned: 23 Post(s)
Tagged: 0 Thread(s)
Quoted: 980 Post(s)
Liked 582 Times
in
399 Posts
This supports the hypothesis that the screw had backed itself out to the point that the head was interfering with the frame each time the latch was operated. Eventually this caused the screw to break.
The replacement screw should probably be installed with a thread locking agent to prevent this from happening again.
The replacement screw should probably be installed with a thread locking agent to prevent this from happening again.
Likes For sweeks:
02-18-24, 09:51 PM
#17
Senior Member
Post #14, sweeks:
Thank you for that. I had thought about the same thing, the OP's cracks there just starting, perhaps just opening up that radius. If doing that, I would recommend final smoothing of that edge as much as possible, then taking a hard steel dowel or kitchen knife honing "steel" (rod, one that is fairly smooth, not deep striations) and "burnishing" the radius edge (in a circumferential direction, not axial), both to be smooth, and introduce a bit of residual compressive stress to the surface, both help in fatigue life.
This is only happening because the front of the tube is loaded in tension under rider weight. Dahon later put the slot in the back, loaded in compression, where it always should have been. Also, the aluminum shim helps. EDIT: Even worse with the slot in front on aluminum frames, aluminum is worse in fatigue strength, but this happened on steel frames too. The aluminum frames (later Mariner, Vitesse, et al) were the first to put the slot on the back of the seat tube. And, the aluminum frames added an additional U-section welded gusset between the front seat tube and the top of the main tube. With the Mu frames, I think the main tube is higher and the seat tube sticking up is shorter, they may have felt the gusset was not needed.
Last edited by Duragrouch; 02-19-24 at 12:33 AM.
02-19-24, 06:03 AM
#18
Senior Member
Join Date: Sep 2004
Location: Chicago area
Posts: 2,551
Bikes: Airborne "Carpe Diem", Motobecane "Mirage", Trek 6000, Strida 2, Dahon "Helios XL", Dahon "Mu XL", Tern "Verge S11i"
Mentioned: 23 Post(s)
Tagged: 0 Thread(s)
Quoted: 980 Post(s)
Liked 582 Times
in
399 Posts
FWIW, the seat tubes on both my ill-fated Dahon and the Tern had the slots on the back. There must be *some* tensile stress at that location. I don't know why the stress-breaker doesn't have a larger radius... seems like that could preempt the problem entirely.
EDIT: Here's an ugly yet effective fix for cracks on the Mu's handlepost:
Ugly... but the cracks were stable for several thousands of miles.
Last edited by sweeks; 02-19-24 at 06:06 AM.
02-19-24, 09:45 PM
#19
Senior Member
Heh... I did exactly that! I applied black touch-up paint, so it isn't apparent.
FWIW, the seat tubes on both my ill-fated Dahon and the Tern had the slots on the back. There must be *some* tensile stress at that location. I don't know why the stress-breaker doesn't have a larger radius... seems like that could preempt the problem entirely.
EDIT: Here's an ugly yet effective fix for cracks on the Mu's handlepost:
Ugly... but the cracks were stable for several thousands of miles.
The front of the seat tube will always be loaded in tension under rider weight, as long as the seatpost is inclined aft. A vertical seatpost would help in this regard, but then you don't have the advantage of the effective top-tube length increasing, with increasing seat height, the reason why Dahons fit such a wide range of rider heights. The slot with larger radius at the bottom, just made it worse in terms of stress. Aluminum makes it worse in terms of stress, the tube is a tiny bit greater wall thickness in aluminum versus steel, but aluminum is not a great material for fatigue strength, you really need to keep the stress level down for good fatigue life. Fatigue happens in tension, not compressive stress. Thus I would love to find a stainless steel shim, versus the aluminum one; You can get high strength aluminum, but the issue here is not strength, but *stiffness*, and steel has 3X the elastic stiffness of aluminum, so a steel shim/bushing would allow less flex at the seat tube there.
Oysh, handlepost cracks too? I love my tried-and-true early Speed steel stem (probably 4130 chrome moly), fixed height, equal to adjustable stem at max height, that's what I like, even though I'm not that tall. If you decide to go that route, know that when I replaced my frame with a newer one (due to the crack), the fork steering tube did not stick up as much (designed for the newer telescoping stem), so I had to stay with the old fork to use the old steel stem.
02-20-24, 05:58 AM
#20
Senior Member
Join Date: Sep 2004
Location: Chicago area
Posts: 2,551
Bikes: Airborne "Carpe Diem", Motobecane "Mirage", Trek 6000, Strida 2, Dahon "Helios XL", Dahon "Mu XL", Tern "Verge S11i"
Mentioned: 23 Post(s)
Tagged: 0 Thread(s)
Quoted: 980 Post(s)
Liked 582 Times
in
399 Posts
I was reminded about aluminum's poor performance under tension last year when my seatpost cracked while I was riding. I had made a small mark on the front (tension... duh!) for ease of adjustment. The mark was smooth so as not to be a stress riser (me smart!). Lesson learned! Luckily, I wasn't hurt too much, and was able to replace the (now shorter) post and ride to my train... looking like an idiot.

Long lever arm with stress riser... what could go wrong?
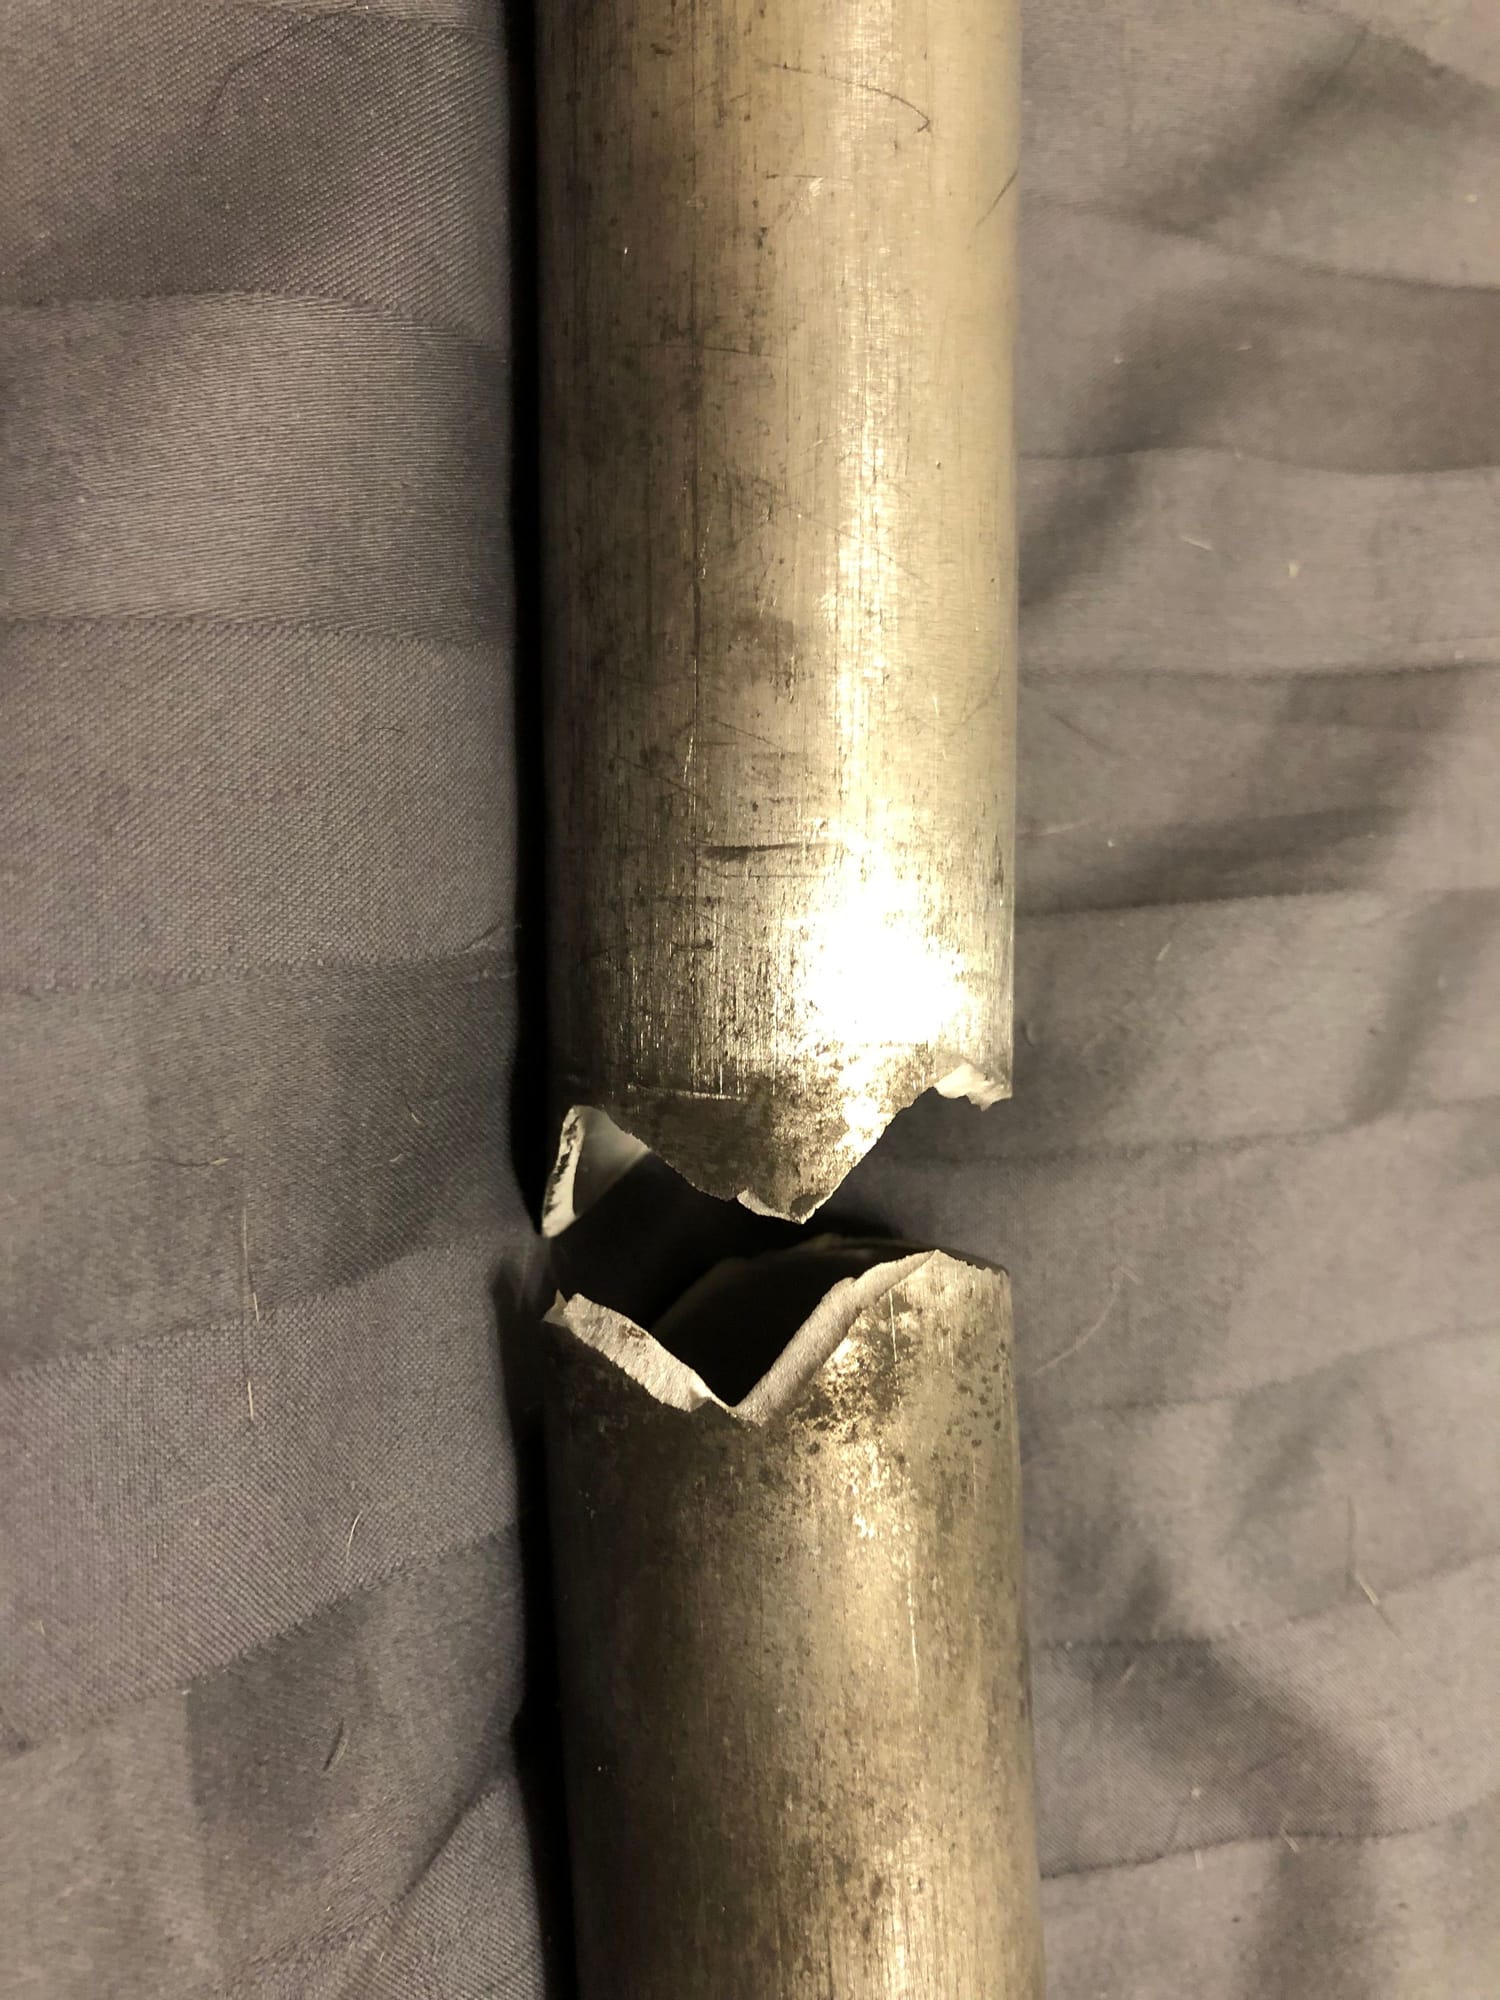
So that's where the creaking sound was coming from!
02-21-24, 12:30 AM
#21
Senior Member
Not exactly... I'm an endodontist. There's a bit of mechanical engineering there, and dentistry in general requires some understanding of material science. I've always been sort of a "gear head" anyway.
I was reminded about aluminum's poor performance under tension last year when my seatpost cracked while I was riding. I had made a small mark on the front (tension... duh!) for ease of adjustment. The mark was smooth so as not to be a stress riser (me smart!). Lesson learned! Luckily, I wasn't hurt too much, and was able to replace the (now shorter) post and ride to my train... looking like an idiot.
Long lever arm with stress riser... what could go wrong?
So that's where the creaking sound was coming from!
Different materials have different "notch sensitivity". The seatpost is probably 6061-T6 or 7075-T6 for greater strength, but I can't recall if the latter has a greater notch sensitivity.
I mark my seapost with a black sharpie, needs to be renewed about annually. I don't fold my bike often.
Last edited by Duragrouch; 02-21-24 at 12:34 AM.
02-24-24, 12:32 PM
#22
Senior Member
Join Date: Sep 2004
Location: Chicago area
Posts: 2,551
Bikes: Airborne "Carpe Diem", Motobecane "Mirage", Trek 6000, Strida 2, Dahon "Helios XL", Dahon "Mu XL", Tern "Verge S11i"
Mentioned: 23 Post(s)
Tagged: 0 Thread(s)
Quoted: 980 Post(s)
Liked 582 Times
in
399 Posts
 02-24-24, 07:09 PM
#23
Senior Member
The metal has got to go somewhere. If not removing a burr, if just re-forming it, you need to be careful to not create another sharp burr, unless that is desired.
Last edited by Duragrouch; 02-24-24 at 07:13 PM.
02-24-24, 07:47 PM
#24
Senior Member
Join Date: Sep 2004
Location: Chicago area
Posts: 2,551
Bikes: Airborne "Carpe Diem", Motobecane "Mirage", Trek 6000, Strida 2, Dahon "Helios XL", Dahon "Mu XL", Tern "Verge S11i"
Mentioned: 23 Post(s)
Tagged: 0 Thread(s)
Quoted: 980 Post(s)
Liked 582 Times
in
399 Posts
Off topic:
In dentistry, a "chamfer" is the term used for the finish line between restorative materials and a tooth. The material has to be able to take and hold a sharp edge; metals, especially gold alloys, work well with a chamfer finish line.
"Burnishing" means applying pressure with a smooth metal instrument to a metal chamfer to deform it into tight contact with the tooth, forming a very close fit. This works especially well with gold.
Porcelain and some other materials work better with "butt" joints.
Here endeth the lesson. I think we both have the same basic understanding!
