


Rear derailleur confusion here
 09-20-23, 09:01 AM
#1
Junior Member
Thread Starter

Join Date: Apr 2022
Location: SWFL
Posts: 125
Bikes: Cannondale Bent 2, Fuji Royale, Mongoose Snare
Mentioned: 1 Post(s)
Tagged: 0 Thread(s)
Quoted: 103 Post(s)
Liked 8 Times
in
6 Posts
Rear derailleur confusion here
I've messed with all three screws and can't get it to shift to a lower gear. What exactly moves it inwards more? I even bent the frame a little in. It's been a while since I've had it running but before I was able to shift through all gears so idk what happened
 09-20-23, 09:09 AM
#2
Junior Member
Thread Starter
Join Date: Apr 2022
Location: SWFL
Posts: 125
Bikes: Cannondale Bent 2, Fuji Royale, Mongoose Snare
Mentioned: 1 Post(s)
Tagged: 0 Thread(s)
Quoted: 103 Post(s)
Liked 8 Times
in
6 Posts
Okay, I've just confirmed that manually I can get it to shift into inner most position.
Should I use my hand or something to hold it in place while I adjust the cable?
Should I use my hand or something to hold it in place while I adjust the cable?
09-20-23, 09:22 AM
#3

Senior Member

Join Date: Oct 2011
Location: Ellensburg,WA
Posts: 3,180
Bikes: Schwinn Broadway, Specialized Secteur Sport(crashed) Spec. Roubaix Sport, Spec. Crux
Mentioned: 7 Post(s)
Tagged: 0 Thread(s)
Quoted: 179 Post(s)
Liked 169 Times
in
84 Posts
What shifter and derailleur? Two screws adjust limits. Once set they need to be left alone. Third screw is the "b" screw and is used to adjust the gap between the derailleur jockey wheel and the cassettes largest cog. None of the three are to adjust the indexing that your shifter transmits through a cable to the derailleur. Cable tension is applied to dial in alignment between derailleur and cassette.
__________________
Sir Mark, Knight of Sufferlandria
Sir Mark, Knight of Sufferlandria
09-20-23, 09:23 AM
#4
I'm good to go!
Join Date: Jul 2017
Location: Mississippi
Posts: 14,992
Bikes: Tarmac Disc Comp Di2 - 2020
Mentioned: 51 Post(s)
Tagged: 0 Thread(s)
Quoted: 6196 Post(s)
Liked 4,810 Times
in
3,318 Posts
Limit screws only limit how far either way the DR can move. Usually you set them when you install the DR before putting the chain on. Mostly I think they are just to prevent you from shifting the chain off the cog on either side of the cassette. But if your bike is well adjusted, they really don't ever get used. They are there for a backup since your bike won't stay well adjusted all the time.
Which third screw were you messing with? The b screw is what position your jockey wheel to the cogs on the cassette. The Shimano RD's I use say to adjust it so the jockey wheel is close but not interfering (touching) any of the cogs when shifted to any position.
If you are talking about the barrel adjuster, then that is the one that positions the RD for the position selected by the shift lever. If you can't get in all the positions on the rear, then something is up with your cable binding somewhere. Or you just didn't tighten the pinch bolt on the cable in the proper place.
09-20-23, 09:31 AM
#5
I'm good to go!
Join Date: Jul 2017
Location: Mississippi
Posts: 14,992
Bikes: Tarmac Disc Comp Di2 - 2020
Mentioned: 51 Post(s)
Tagged: 0 Thread(s)
Quoted: 6196 Post(s)
Liked 4,810 Times
in
3,318 Posts
Oh, this might be a problem...
Bike frame? The part the RD is mounted on? If your RD hanger got bent, then you probably need to get that checked by a shop or get a derailleur hanger tool and learn how to use it.
I even bent the frame a little in.
Likes For Iride01:
09-20-23, 10:00 AM
#6
Senior Member
Join Date: Apr 2019
Location: UK
Posts: 1,404
Mentioned: 3 Post(s)
Tagged: 0 Thread(s)
Quoted: 682 Post(s)
Liked 453 Times
in
338 Posts
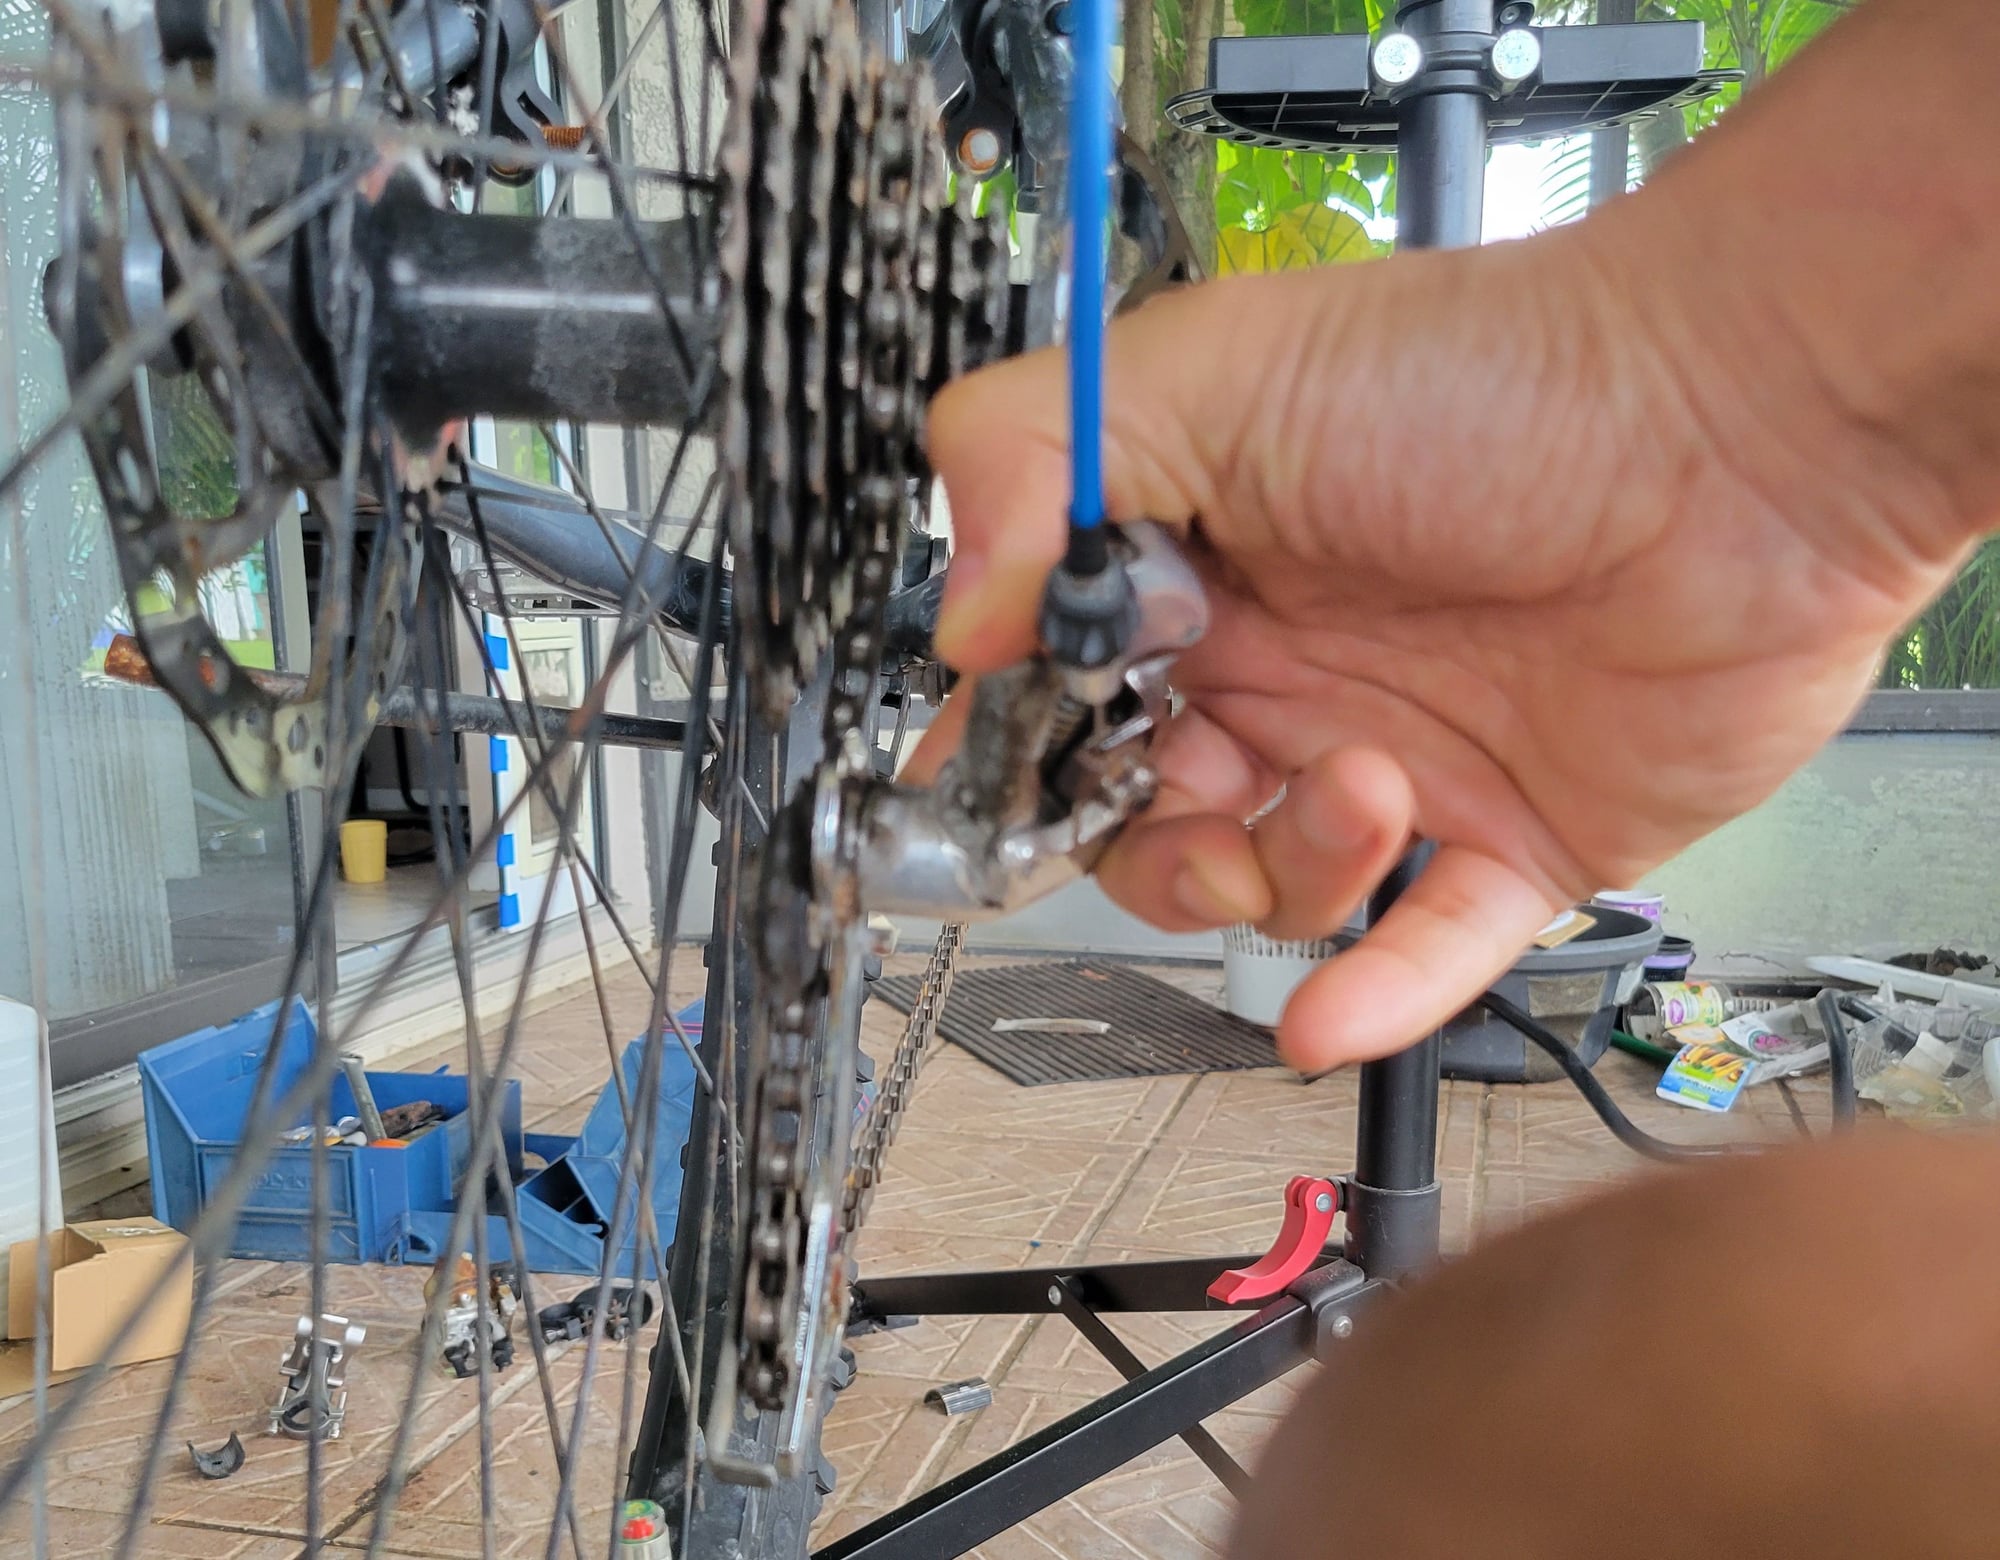
Base of bike stand in super sharp focus there 
There is no way you should be bending the frame to align the rear mech. What makes it move inward is the tension on the cable
You don�t need to hold it in. Shift to the smallest cog. If it doesn�t get there, open up the top limiter a bit. If the chain falls off, close up the top limiter a bit. Dial in the adjuster all the way on the cable entry (or shifter if applicable) then back it out 2 turns. Use a cable puller ideally or just pull the cable with pliers (but don�t mash it) & clamp it. Shift up 2 gears and use the adjuster to fine tune the alignment.
09-20-23, 10:00 AM
#7
Senior Member
Join Date: Dec 2020
Location: Wake Forest, NC
Posts: 5,794
Bikes: 1989 Cinelli Supercorsa
Mentioned: 11 Post(s)
Tagged: 0 Thread(s)
Quoted: 3513 Post(s)
Liked 2,927 Times
in
1,776 Posts
Yeah, this is not good, at least as written by the OP. Maybe he'll clarify...
09-20-23, 10:02 AM
#8
Senior Member
Join Date: Dec 2020
Location: Wake Forest, NC
Posts: 5,794
Bikes: 1989 Cinelli Supercorsa
Mentioned: 11 Post(s)
Tagged: 0 Thread(s)
Quoted: 3513 Post(s)
Liked 2,927 Times
in
1,776 Posts
Likes For smd4:
09-20-23, 10:03 AM
#9
Senior Member
Join Date: Dec 2020
Location: Wake Forest, NC
Posts: 5,794
Bikes: 1989 Cinelli Supercorsa
Mentioned: 11 Post(s)
Tagged: 0 Thread(s)
Quoted: 3513 Post(s)
Liked 2,927 Times
in
1,776 Posts

Likes For choddo:
09-20-23, 10:48 AM
#11
Senior Member
Join Date: Dec 2020
Location: Wake Forest, NC
Posts: 5,794
Bikes: 1989 Cinelli Supercorsa
Mentioned: 11 Post(s)
Tagged: 0 Thread(s)
Quoted: 3513 Post(s)
Liked 2,927 Times
in
1,776 Posts
09-20-23, 11:17 AM
#12
Junior Member
Thread Starter
Join Date: Apr 2022
Location: SWFL
Posts: 125
Bikes: Cannondale Bent 2, Fuji Royale, Mongoose Snare
Mentioned: 1 Post(s)
Tagged: 0 Thread(s)
Quoted: 103 Post(s)
Liked 8 Times
in
6 Posts
Okay I'm getting closer. I lubed RD a bit and adjusted the screws again. I can never tell which is which. Idk how anyone does unless they're doing this for a living. Anyway, got it moving. I guess it was seized.
But now my chain looks short lol. I did take a couple links off cuz at first it looked too long with the RD hanging too far back. I'll put the links back on and check again.
I'm not sure what you're saying about the bike stand
And even though you explained to me the purpose of the 3rd adjustment screw i don't understand. As long as it shifts and doesn't make noise I'm good
09-20-23, 12:01 PM
#14
Senior Member
Join Date: Apr 2019
Location: UK
Posts: 1,404
Mentioned: 3 Post(s)
Tagged: 0 Thread(s)
Quoted: 682 Post(s)
Liked 453 Times
in
338 Posts
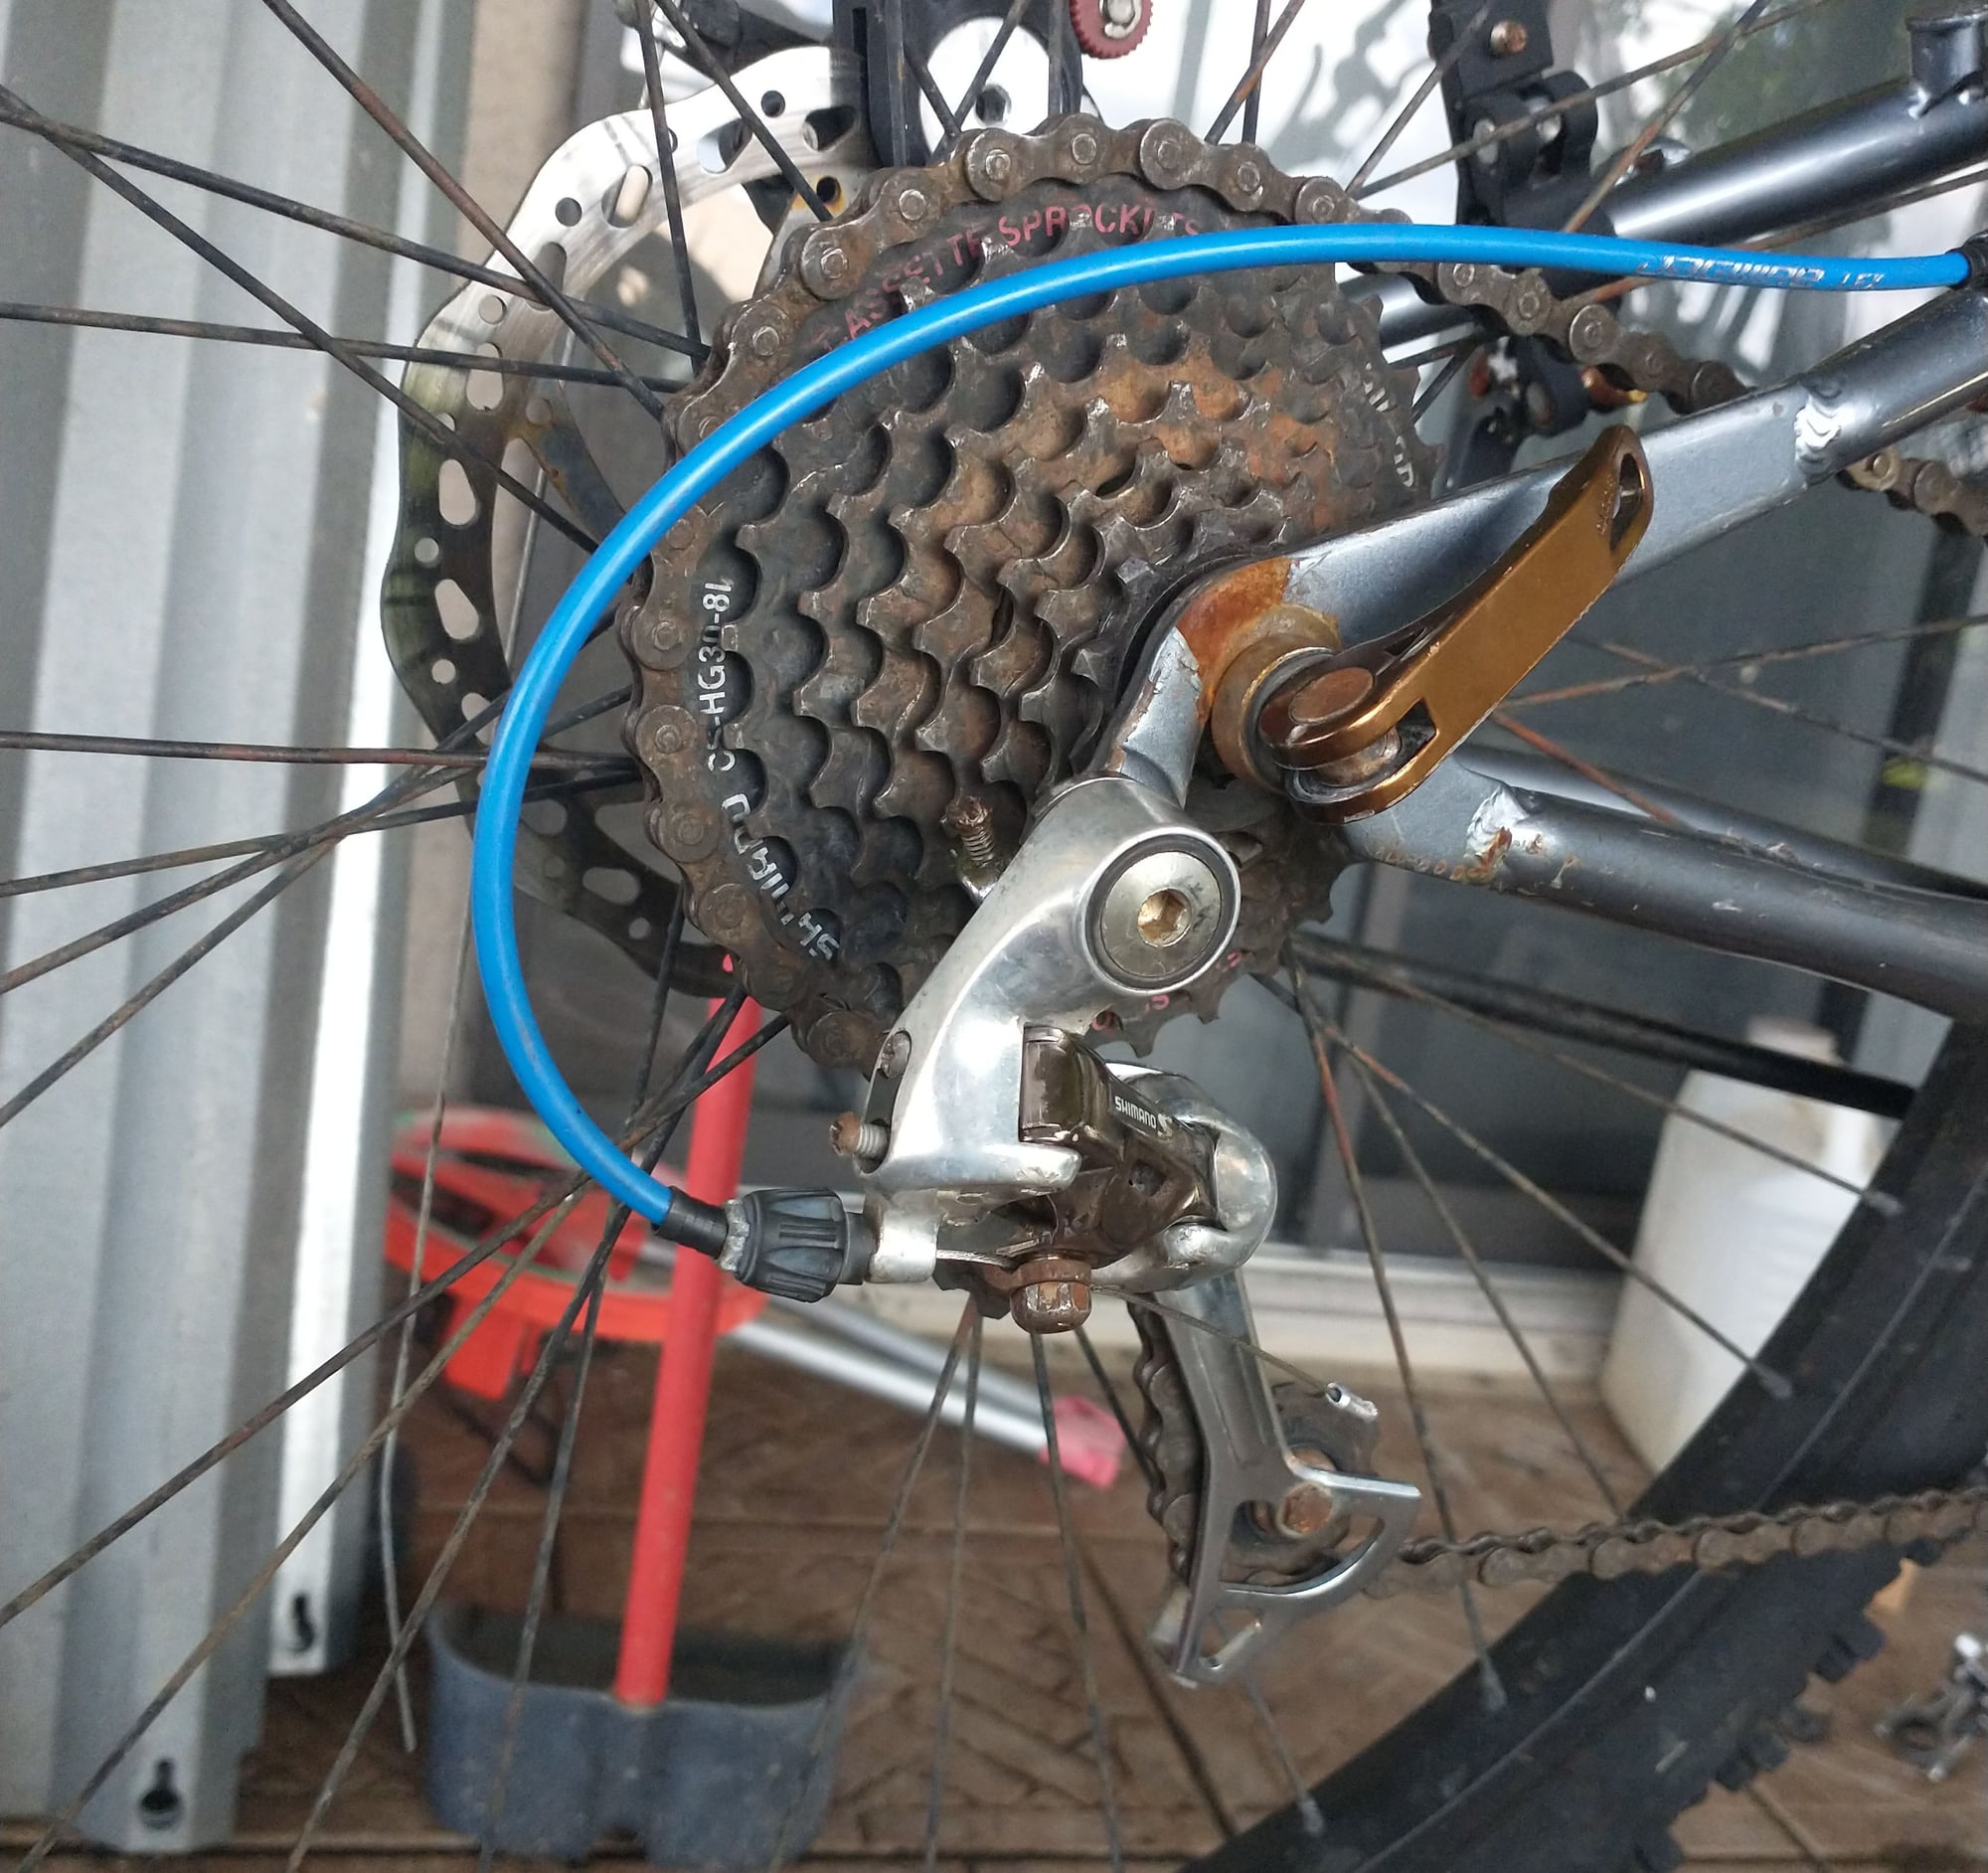
The B screw changes how the mech lines up vertically. So that when it’s in the big cog like there, the chain coming off the top jockey wheel has just enough room to line up nicely onto the bottom of the cog and go round. Too close or too far are both bad.
Yeah that does seem to need a bit more protection from water. The flaked off paint & rust just above the skewer suggests the frame has got bent there maybe. No mech hanger I think so maybe it’s taken a bash?
and actually, given that circular mark on the dropout there which looks like it's from the skewer clamp - is that wheel actually sat as high as it should be? You'll never get the mech aligned if it's not.
Last edited by choddo; 09-20-23 at 12:09 PM.
Likes For choddo:
09-20-23, 12:15 PM
#15

Senior Member

Join Date: Jul 2006
Location: San Jose (Willow Glen) Ca
Posts: 9,847
Bikes: Kirk Custom JK Special, '84 Team Miyata,(dura ace old school) 80?? SR Semi-Pro 600 Arabesque
Mentioned: 106 Post(s)
Tagged: 0 Thread(s)
Quoted: 2338 Post(s)
Liked 2,827 Times
in
1,543 Posts
go here and read before you do anything else to completely destroy what you are working on
https://www.parktool.com/en-us/blog/repair-help
https://www.parktool.com/en-us/blog/...eur-adjustment
https://www.parktool.com/en-us/blog/repair-help
https://www.parktool.com/en-us/blog/...eur-adjustment
__________________
Life is too short not to ride the best bike you have, as much as you can
(looking for Torpado Super light frame/fork or for Raleigh International frame fork 58cm)
Life is too short not to ride the best bike you have, as much as you can
(looking for Torpado Super light frame/fork or for Raleigh International frame fork 58cm)
Likes For squirtdad:
09-20-23, 12:20 PM
#16
I'm good to go!
Join Date: Jul 2017
Location: Mississippi
Posts: 14,992
Bikes: Tarmac Disc Comp Di2 - 2020
Mentioned: 51 Post(s)
Tagged: 0 Thread(s)
Quoted: 6196 Post(s)
Liked 4,810 Times
in
3,318 Posts
If that pic is with the chain in the big front ring, then you probably are still good on the chain length. If you push the RD cage forward towards the crank at the pulley wheel and it's at it's absolute forward limit, then you might need another link. Chain sizing just needs to be long enough for the Big/Big combo and not go slack in the Small/Small combo. Which on some 3x bikes BITD (long ago in the vintage days) with large differences in large and small ring, they would go slack and you'd be told not to use the Small/Small because there were the same or similar ratio in the middle ring.
Most manufacturers will say to size your chain by wrapping it around the Big/Big without going through the RD cage and then add a link or two. Some are different for 3x fronts. If you have mix and match components on your bike and have gone outside the specs, then you might not be able to size the chain properly.
The inner shifter cable looks like it might be shiny and new in the picture. Did you just replace it?
Last edited by Iride01; 09-20-23 at 12:25 PM.
Likes For Iride01:
09-20-23, 02:41 PM
#17
Newbie
Begin at the beginning:
Lube the chain and DR pivots
[Your housing from the chainstay cable stop to the DR is a little short; the housing should be straight where it enters the DR. It's probably not bad enough to cause shifting problems, but if you want to be thorough . . .]
Sight from the rear and verify that the DR cage is parallel to the cogs
Open the chain if you have a quick-disconnect link, remove it, and move the DR through its range of travel; it should move smoothly with good spring tension. If you leave the chain on, set your shifter to the position for the smallest cog and pull on a length of bare cable and verify that the DR moves smoothly through its range. Verify correct chain length by shifting to the largest chainring and largest cog; the lower derailleur pulley should still be able to swing up at least another inch but not a whole lot more
Reinstall the chain if needed. With slack in the cable, try shifting to the smallest cog. If the DR doesn't move far enough outboard, relax the high-limit screw until it does
Pull on a length of exposed cable and verify that the DR will shift to the largest cog without throwing the chain into the spokes. Relax or tighten the low-limit screw if needed
With the chain on the middle ring and smallest cog and with minimal slack in the cable, shift to the next inboard cog. If the shift is sluggish or doesn't happen, use the barrel adjuster to increase cable tension until the shift is clean
Shift to the third largest cog and try shifting to the next largest and largest. Adjust your cable tension at both extremes, then verify that the chain shifts cleanly up and down all the cogs
09-20-23, 02:41 PM
#18
Senior Member

Join Date: Jul 2015
Location: NW Oregon
Posts: 2,975
Bikes: !982 Trek 930R Custom, Diamondback ascent with SERIOUS updates, Fuji Team Pro CF and a '09 Comencal Meta 5.5
Mentioned: 15 Post(s)
Tagged: 1 Thread(s)
Quoted: 1299 Post(s)
Liked 739 Times
in
534 Posts

you are hurting your bike more than you are helping your bike.
DON'T BEND THE DERAILLEUR HANGER.. take it to a shop and have the DERAILLEUR HANGER STRAIGHTENED before you think you've "Fixed it"
i can visibly see the Derailleur is now Out Of Alignment in your pic.
and LUBE THE CHAIN, ok? Wow.
Last edited by maddog34; 09-20-23 at 02:47 PM.
Likes For maddog34:
09-20-23, 04:03 PM
#19
Senior Member
Join Date: Dec 2020
Location: Wake Forest, NC
Posts: 5,794
Bikes: 1989 Cinelli Supercorsa
Mentioned: 11 Post(s)
Tagged: 0 Thread(s)
Quoted: 3513 Post(s)
Liked 2,927 Times
in
1,776 Posts
The comments about your bike stand is that you managed to get that part perfectly in focus. The rear derailleur�the part we need to see�not so much.
PS: +12 on lubing your chain.
Last edited by smd4; 09-20-23 at 04:50 PM.
Likes For smd4:
09-20-23, 04:39 PM
#20
Senior Member
Join Date: Apr 2016
Posts: 1,235
Mentioned: 3 Post(s)
Tagged: 0 Thread(s)
Quoted: 500 Post(s)
Liked 435 Times
in
334 Posts
The floor is in focus, the derailleur isn't. Probably not easy to see on a small screen.Focus is fine in that one, but the cable clamp looks incorrectly positioned.
Likes For Crankycrank:
09-20-23, 07:18 PM
#23
Senior Member
Join Date: Apr 2011
Posts: 7,067
Mentioned: 41 Post(s)
Tagged: 0 Thread(s)
Quoted: 4409 Post(s)
Liked 1,563 Times
in
1,026 Posts
Likes For Kontact:
09-20-23, 07:28 PM
#25
Senior Member
Join Date: Apr 2011
Posts: 7,067
Mentioned: 41 Post(s)
Tagged: 0 Thread(s)
Quoted: 4409 Post(s)
Liked 1,563 Times
in
1,026 Posts
And the cable is routed wrong. It goes to the outside of the bolt, and that's the explanation.
Likes For Kontact: