


Post your homemade Wheel Dishing tool!
 04-28-20, 07:00 PM
#1
Tortoise Wins by a Hare!
Thread Starter
Join Date: Feb 2006
Location: Looney Tunes, IL
Posts: 7,398
Bikes: Wabi Special FG, Raleigh Roper, Nashbar AL-1, Miyata One Hundred, '70 Schwinn Lemonator and More!!
Mentioned: 22 Post(s)
Tagged: 0 Thread(s)
Quoted: 1549 Post(s)
Liked 941 Times
in
504 Posts
Post your homemade Wheel Dishing tool!
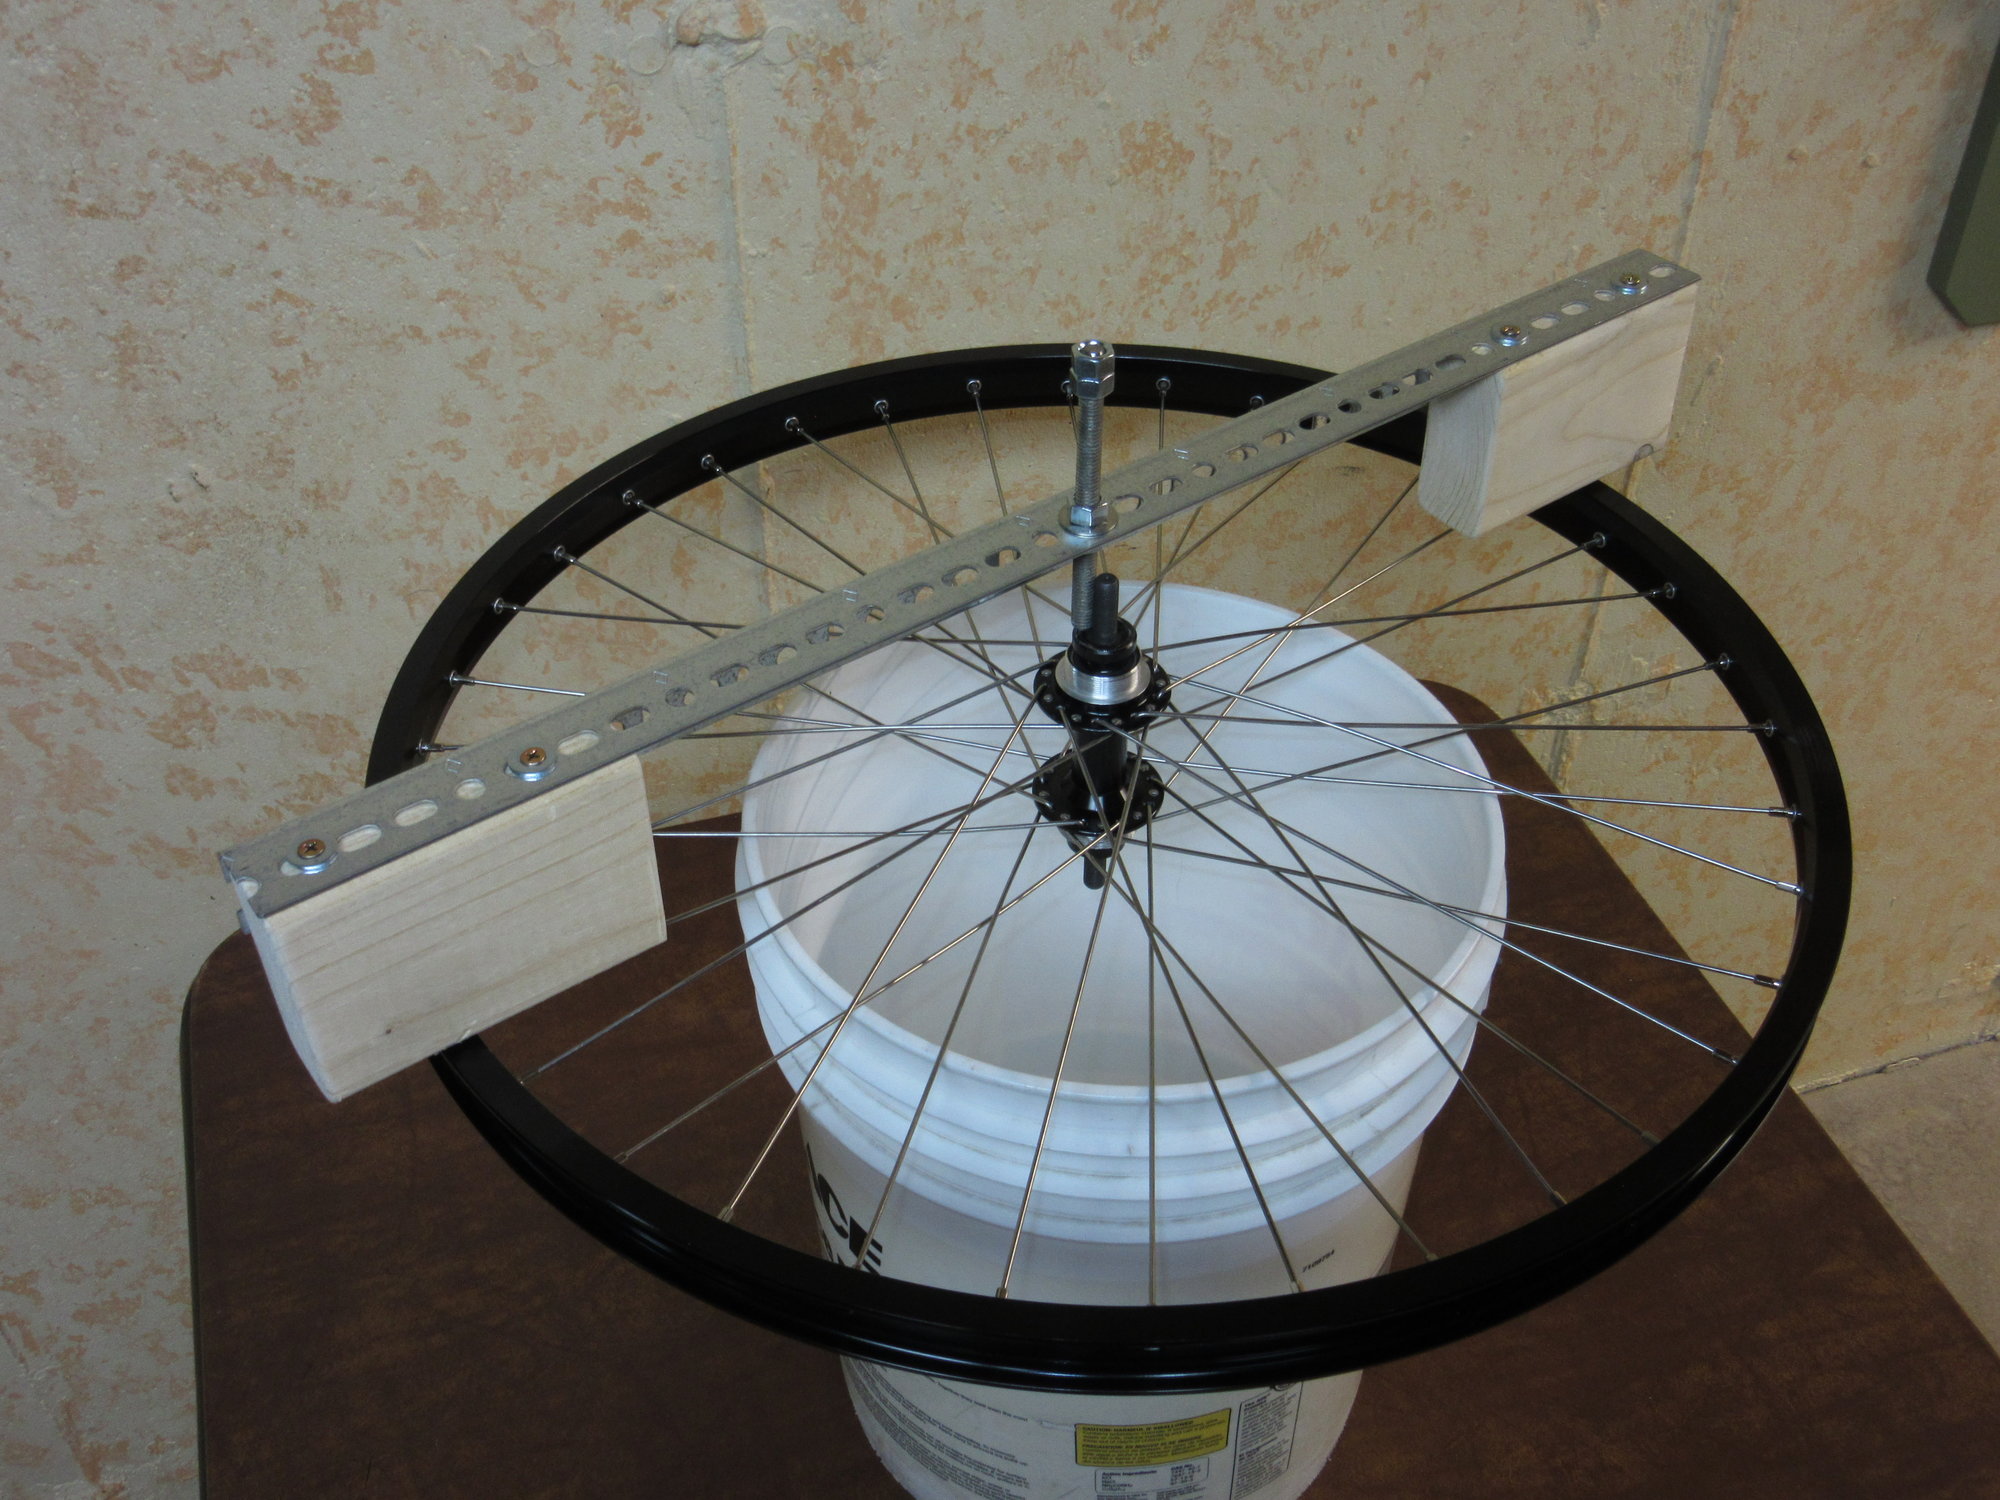
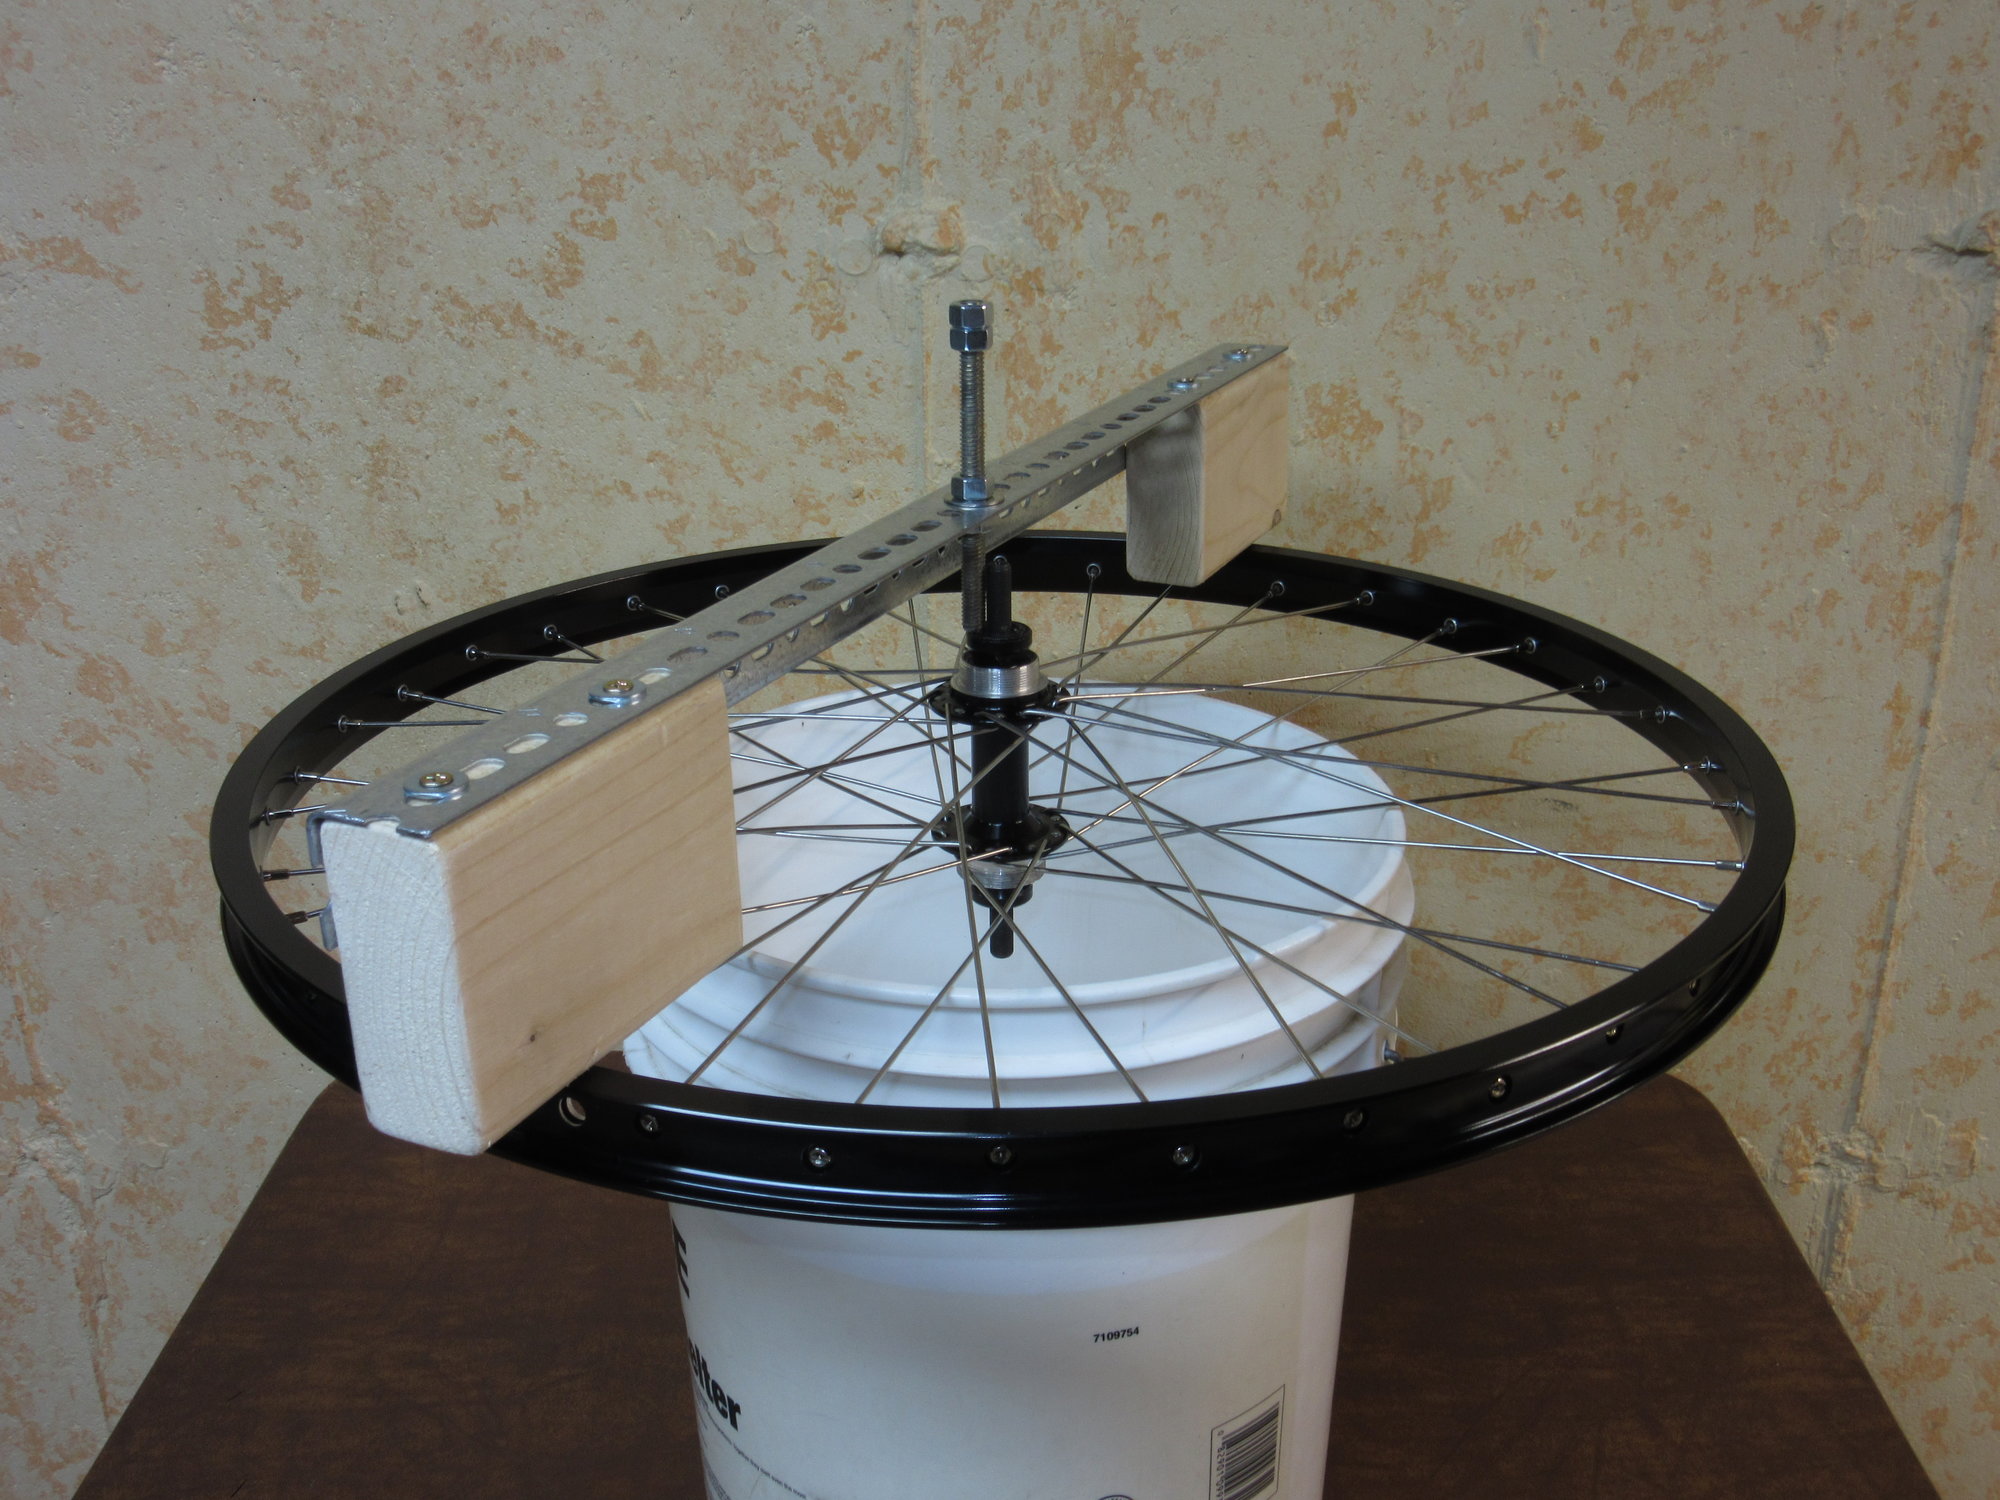
I made this recently out of leftover materials I had lying around.
One section of 1 1/2" perforated angle steel (26 inches long)
Two 5" sections of 2x4
4 wood screws with washers
3/8" threaded rod with washers and lock nuts
Easily adjustable for different size wheels.
Show us your homemade wheel dishing gauge!
One section of 1 1/2" perforated angle steel (26 inches long)
Two 5" sections of 2x4
4 wood screws with washers
3/8" threaded rod with washers and lock nuts
Easily adjustable for different size wheels.
Show us your homemade wheel dishing gauge!
Last edited by AlmostTrick; 04-28-20 at 07:03 PM.

Likes For AlmostTrick:
04-28-20, 08:44 PM
#2

Senior Member
Join Date: Feb 2012
Location: Rochester, NY
Posts: 18,073
Bikes: Stewart S&S coupled sport tourer, Stewart Sunday light, Stewart Commuting, Stewart Touring, Co Motion Tandem, Stewart 3-Spd, Stewart Track, Fuji Finest, Mongoose Tomac ATB, GT Bravado ATB, JCP Folder, Stewart 650B ATB
Mentioned: 0 Post(s)
Tagged: 0 Thread(s)
Quoted: 4201 Post(s)
Liked 3,856 Times
in
2,305 Posts
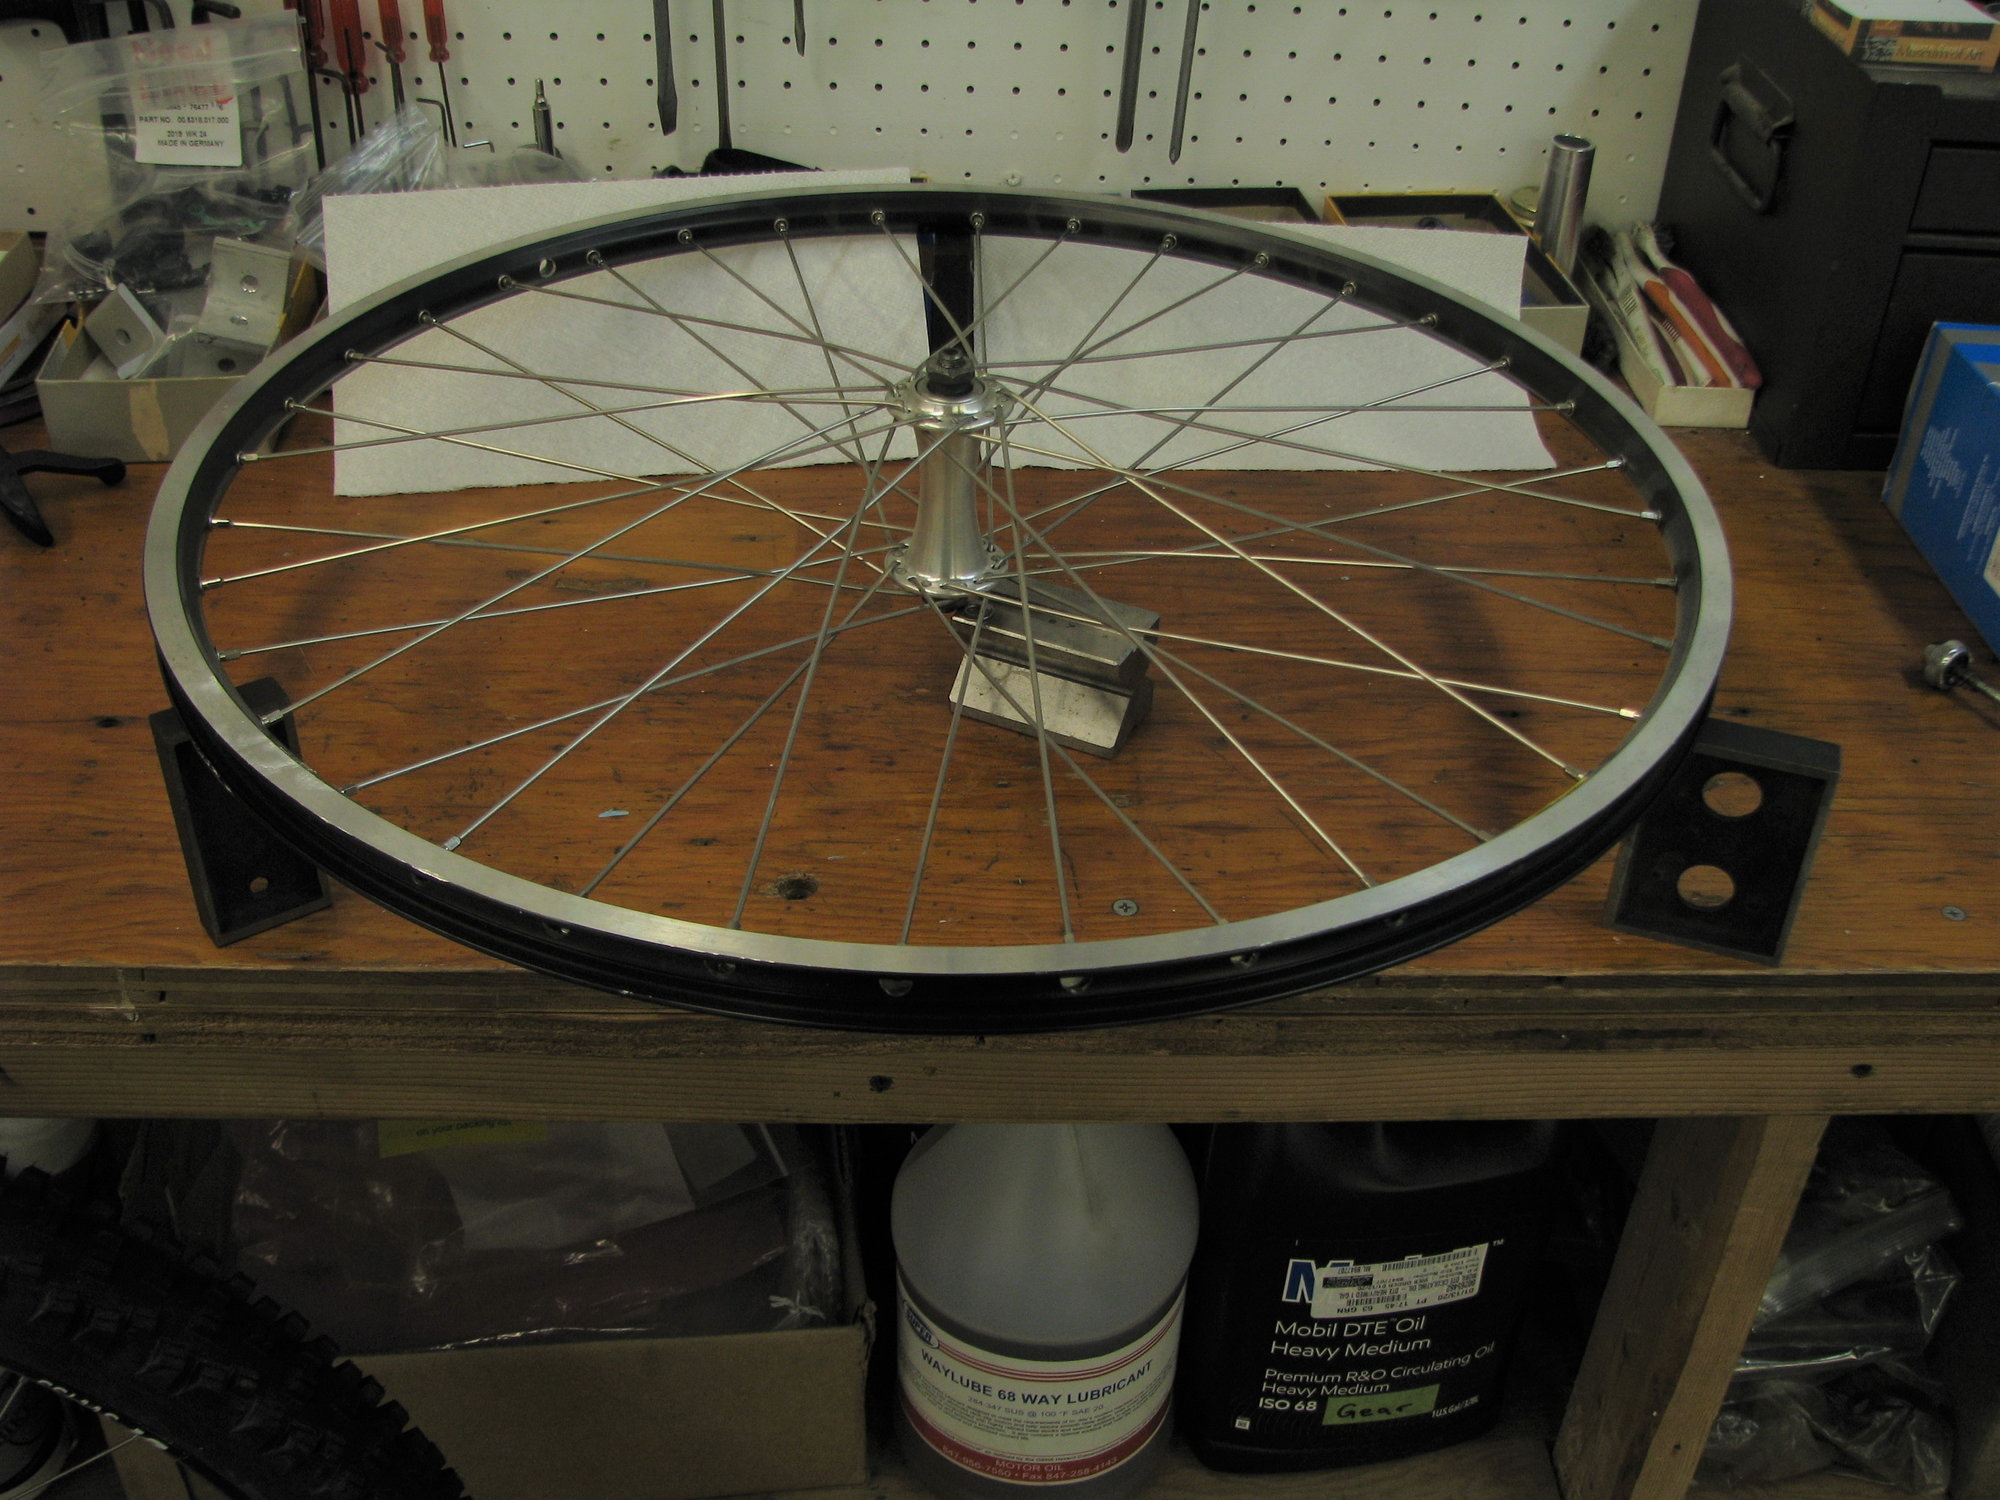
Three stand offs support the rim above the bench top. Could be any stack of coins or other bits. Center stand off to the lock nut, again could be anything but allowing for height adjustment. Third shot is my wheel corner with a bunch of real tools. Andy


__________________
AndrewRStewart
AndrewRStewart
04-28-20, 09:31 PM
#3
Senior Member
Join Date: Oct 2009
Location: Sherwood, OR
Posts: 1,279
Mentioned: 29 Post(s)
Tagged: 0 Thread(s)
Quoted: 336 Post(s)
Liked 309 Times
in
180 Posts
Andrew R Stewart Do you like your reference block setup better than the Var?
04-29-20, 12:10 AM
#4
Senior Member
Haven't heard of wheel dishing. Please explain this to me? Can be a short explanation, and if I feel the need to do it I'll search for more in depth.
Much obliged
Much obliged
04-29-20, 02:02 AM
#5
Senior Member
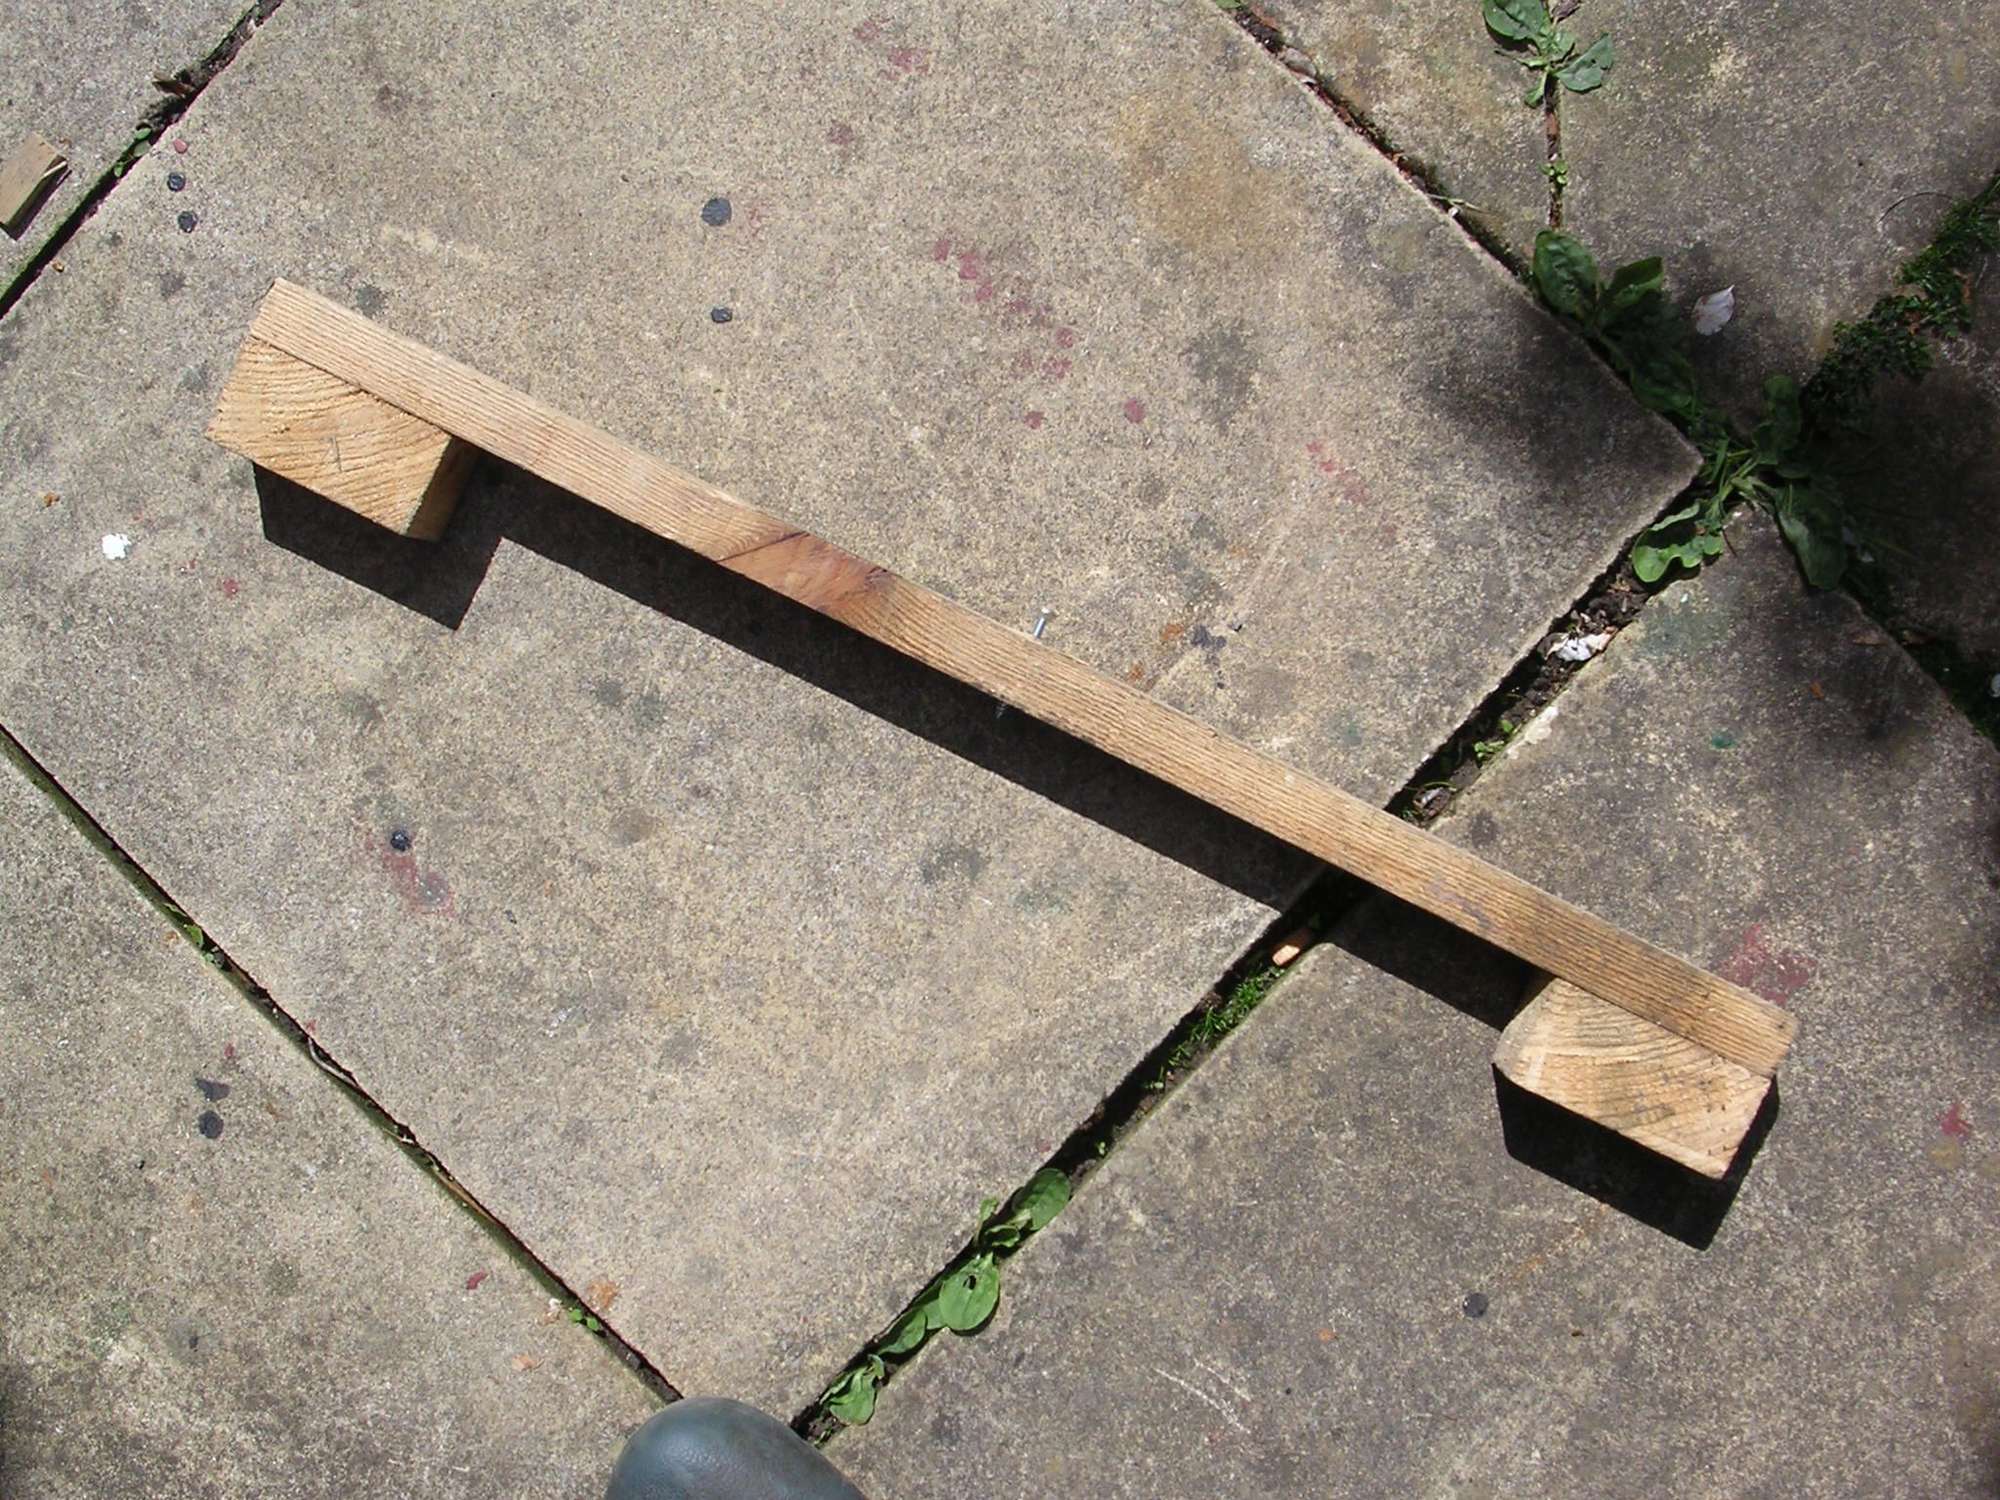
Here's a dishing tool I made from a scrap piece of maple veneered plywood, a couple bits of aluminum, a brass rod that I threaded and a couple pieces of scrap cherry turned on the lathe. Compared to stuff I usually try to fabricate, it worked out really well in that it functions as designed.
To answer Dwillems26's question, the purpose of the dishing too is to check how well the rim is centered on the hub. If you look at the photo below you will see, barely, that the center probe of the tool locates the lock nut that will contact the inside of the dropout on one side. Turn the wheel over and check the position of the probe with the corresponding locknut on that side. If the probe contacts each locknut just the same, the rim is centered. If you have good contact on one side and a gap on the other, adjustment is in order to center the rim. Assuming that the difference between the probe and the locknuts is significant. There are rules to determine how much the rim needs to be moved, usually by either direct measurement of the gap of the probe or by setting it up so that the probe is perfect on one side but the tool rocks on the other. Measured "rock" at the rim is twice the amount of adjustment necessary, I think. My practice is to start checking dish when the spokes start getting to acceptable tension and then finish up tension while adjucting the dish. If care is taken along the way, dish adjustment on a finished wheel is usually pretty minor and can be adjust during the processes of final truing and tensioning. Probably Park tool has a better explanation along with demos of the use of their tool.

To answer Dwillems26's question, the purpose of the dishing too is to check how well the rim is centered on the hub. If you look at the photo below you will see, barely, that the center probe of the tool locates the lock nut that will contact the inside of the dropout on one side. Turn the wheel over and check the position of the probe with the corresponding locknut on that side. If the probe contacts each locknut just the same, the rim is centered. If you have good contact on one side and a gap on the other, adjustment is in order to center the rim. Assuming that the difference between the probe and the locknuts is significant. There are rules to determine how much the rim needs to be moved, usually by either direct measurement of the gap of the probe or by setting it up so that the probe is perfect on one side but the tool rocks on the other. Measured "rock" at the rim is twice the amount of adjustment necessary, I think. My practice is to start checking dish when the spokes start getting to acceptable tension and then finish up tension while adjucting the dish. If care is taken along the way, dish adjustment on a finished wheel is usually pretty minor and can be adjust during the processes of final truing and tensioning. Probably Park tool has a better explanation along with demos of the use of their tool.
04-29-20, 07:27 AM
#6
Old fart

Join Date: Nov 2004
Location: Appleton WI
Posts: 24,784
Bikes: Several, mostly not name brands.
Mentioned: 153 Post(s)
Tagged: 0 Thread(s)
Quoted: 3587 Post(s)
Liked 3,400 Times
in
1,934 Posts
Briefly, the sprocket cluster on one side of the rear hub requires that the drive side rear hub flange be offset inward to provide clearance for the sprockets. So, when you build the wheel, the rim needs to be centered with respect to the hub centerline, not the midpoint between the hub flanges.
Likes For JohnDThompson:
04-29-20, 08:07 AM
#7
Senior Member
Join Date: Feb 2012
Location: Rochester, NY
Posts: 18,073
Bikes: Stewart S&S coupled sport tourer, Stewart Sunday light, Stewart Commuting, Stewart Touring, Co Motion Tandem, Stewart 3-Spd, Stewart Track, Fuji Finest, Mongoose Tomac ATB, GT Bravado ATB, JCP Folder, Stewart 650B ATB
Mentioned: 0 Post(s)
Tagged: 0 Thread(s)
Quoted: 4201 Post(s)
Liked 3,856 Times
in
2,305 Posts
Andrew R Stewart Do you like your reference block setup better than the Var?
No, why would I chose to use a clumsy method when the industry standard is within an arm's reach? My photos are for all those out in forum land who don't have a proper dishing tool but do have a table and can find household bits to use as the stand offs. Andy
__________________
AndrewRStewart
AndrewRStewart
04-29-20, 08:55 AM
#8
Senior Member

Join Date: May 2016
Location: Southeast US
Posts: 921
Mentioned: 9 Post(s)
Tagged: 0 Thread(s)
Quoted: 318 Post(s)
Liked 149 Times
in
104 Posts
I did it with two soda cans (Kroger orange, if you must know) at the rim plus a pill bottle and small stack of coins to probe the hub. It worked well for my starter bike but I'm on to a "real" bike now and prefer submillimeter precision. I need to buy the tool.
Likes For rseeker:
04-29-20, 09:12 AM
#9
Senior Member
Thanks for explaining it. Don't think I'll ever build a wheel, but I did contemplate it for a day lol. It's still good info to know. Y'all impress me!
04-29-20, 09:29 AM
#10
Senior Member
Join Date: Feb 2012
Location: Golden, CO and Tucson, AZ
Posts: 2,837
Bikes: 2016 Fuji Tread, 1983 Trek 520
Mentioned: 13 Post(s)
Tagged: 0 Thread(s)
Quoted: 676 Post(s)
Liked 741 Times
in
430 Posts
Great idea for a thread! I've always been into recycling scrap and getting by with minimal purchases. You don't have to spend much to put together a workable home bike shop.
Mine is close enough to the OP's that I won't waste time posting a photo. Mine uses a section of old bed frame because that's what was in the scrap pile at the time.
Mine is close enough to the OP's that I won't waste time posting a photo. Mine uses a section of old bed frame because that's what was in the scrap pile at the time.
Likes For gilesa:
05-02-20, 02:13 PM
#13
Junior Member
Join Date: May 2020
Posts: 10
Mentioned: 0 Post(s)
Tagged: 0 Thread(s)
Quoted: 1 Post(s)
Liked 0 Times
in
0 Posts
Very impressive to make it yourself.
This tool can be used not only when building your own wheel but also when re-aligning it again? (E.g. when there is a wiggle in the wheel - not sure what this is called in English)
This tool can be used not only when building your own wheel but also when re-aligning it again? (E.g. when there is a wiggle in the wheel - not sure what this is called in English)
05-02-20, 03:03 PM
#14
Tortoise Wins by a Hare!
Thread Starter
Join Date: Feb 2006
Location: Looney Tunes, IL
Posts: 7,398
Bikes: Wabi Special FG, Raleigh Roper, Nashbar AL-1, Miyata One Hundred, '70 Schwinn Lemonator and More!!
Mentioned: 22 Post(s)
Tagged: 0 Thread(s)
Quoted: 1549 Post(s)
Liked 941 Times
in
504 Posts
Yes, if the wheel comes out of true you could use the tool to check for proper center as you re-true it. Often, any minor truing would not require it, but hey, if you have it might as well use it.
10-07-22, 05:16 PM
#15
Full Member
Join Date: Mar 2011
Location: North New Jersey
Posts: 190
Bikes: Specilized Roubaix, 71 Raleigh Professional, 74 Raliegh Intl, 74 Peugot PX-10, 82 Puegoet PSN, Olmo Competition , Schwinn High Sierra & Others
Mentioned: 5 Post(s)
Tagged: 0 Thread(s)
Quoted: 42 Post(s)
Liked 59 Times
in
22 Posts
My quick wheel dish tool
I use a leftover cabinet toe kick board and a cheap depth gauge from Amazon.

Likes For LarryBSky:
10-07-22, 06:13 PM
#16
Senior Member
Join Date: May 2005
Location: SFBay
Posts: 2,334
Bikes: n, I would like n+1
Mentioned: 0 Post(s)
Tagged: 0 Thread(s)
Quoted: 127 Post(s)
Likes: 0
Liked 133 Times
in
108 Posts
This varies a bit from others� opinions, but IMO this is a case where the increased accuracy of a formal tool isn�t really significant over that of the DIY method. What is significant is the ease of use, but that�s more about how frequently you use the tool, not about the quality of work you can do.
I normally just flip in the stand, but past that I use whatever flat surface and pile of blocks is nearby. While unnecessary, I�m willing to bet that with a pack of post-it notes, a pair of coffee mugs, and some pocket change I can get wheel dish error under 50 microns of true centerline. Your wheel probably isn�t that true as it rotates, and if we include the seam your rim might not even be that consistent in thickness.
