


Dimpling a Honjo Front Fender to clear the fork crown?
 11-24-12, 06:38 PM
#1

Senior Member
Thread Starter

Join Date: Apr 2005
Location: Ann Arbor, MI
Posts: 16,874
Bikes: 1980 Masi, 1984 Mondonico, 1984 Trek 610, 1980 Woodrup Giro, 2005 Mondonico Futura Leggera ELOS, 1967 PX10E, 1971 Peugeot UO-8
Mentioned: 49 Post(s)
Tagged: 0 Thread(s)
Quoted: 1856 Post(s)
Liked 664 Times
in
506 Posts
Dimpling a Honjo Front Fender to clear the fork crown?
I'm installing a Honjo front fender which is not drilled and is not dimpled. Drilling of course is needed to add either a daruma bolt to attach it to a caliper brake pivot bolt, or a vertical bolt to thread it into the fork crown. My fork uses cantis, so no daruma is used.
Heine and others recommend adding a dimple to the fender at the bolt location to enable the fender to clear the fork. This reduces stresses in the fender ('tis said) and let's you get a good fender line. What it amounts to is cold-setting the fender.
I'm looking for, what's the best way to do this? Heine (BQ, V9#2) recommends making a set of forms out of a 2 x 4 and a dowel and gently hammering the dowel into place to distort the fender. I think the forms are kind hard to make, so I'm looking for a simpler technique. Elsewhere (sorry, can't find the source) it's suggested to bolt it onto the fork with a large steel washer between the fork and fender, and bend the fender forward to set the aluminum.
I'm concerned about getting this done without building a set of forms that have to be curved with some intricacy.
What have you guys used? What works best, looks neatest, needs simplest tooling ... ?
 11-24-12, 06:54 PM
#2
Senior Member
Join Date: Aug 2010
Location: Liberty, Missouri
Posts: 3,120
Bikes: 1966 Paramount | 1971 Raleigh International | ca. 1970 Bernard Carre | 1989 Waterford Paramount | 2012 Boulder Brevet | 2019 Specialized Diverge
Mentioned: 23 Post(s)
Tagged: 0 Thread(s)
Quoted: 129 Post(s)
Liked 77 Times
in
40 Posts
Calling Southpaw Boston - As I recall, he figured out a quite elegant solution to dimpling the fenders using a dowel.
11-25-12, 09:35 PM
#3
Senior Member
Thread Starter
Join Date: Apr 2005
Location: Ann Arbor, MI
Posts: 16,874
Bikes: 1980 Masi, 1984 Mondonico, 1984 Trek 610, 1980 Woodrup Giro, 2005 Mondonico Futura Leggera ELOS, 1967 PX10E, 1971 Peugeot UO-8
Mentioned: 49 Post(s)
Tagged: 0 Thread(s)
Quoted: 1856 Post(s)
Liked 664 Times
in
506 Posts
Ok, I looked over some of the Southpawboston threads. He's got some great methods and tools for chainstay clearancing, but I didn't see a good discussion on the fork crown area.
11-25-12, 10:07 PM
#4
Wookie Jesus inspires me.
Join Date: Mar 2011
Location: Seattle, WA
Posts: 2,215
Mentioned: 0 Post(s)
Tagged: 0 Thread(s)
Quoted: 4 Post(s)
Likes: 0
Liked 2 Times
in
2 Posts
I didn't have a form, but I had a dowel. I just took the dowel, placed it on a fender, and tapped it with a hammer against a flat surface. Worked like a charm.
11-26-12, 07:57 AM
#5

Senior Member

__________________
Bikes on Flickr
I prefer email to private messages. You can contact me at justinhughes@me.com
Bikes on Flickr
I prefer email to private messages. You can contact me at justinhughes@me.com
11-28-12, 01:55 PM
#6
Senior Member

Hey, I missed this thread. Glad I found it.
I assume that Road Fan is inquiring about the part of the fender where the daruma bolt actually goes through?
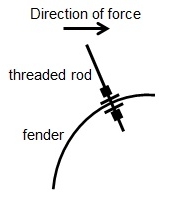
This is exactly what I do! but I use a long threaded rod as a lever.
Get some 6mm threaded rod stock, two steel fender washers (that's what they're called! Get a couple roughly the size of the daruma washer or slightly larger; find them at your hardware store) and two 6mm nuts.
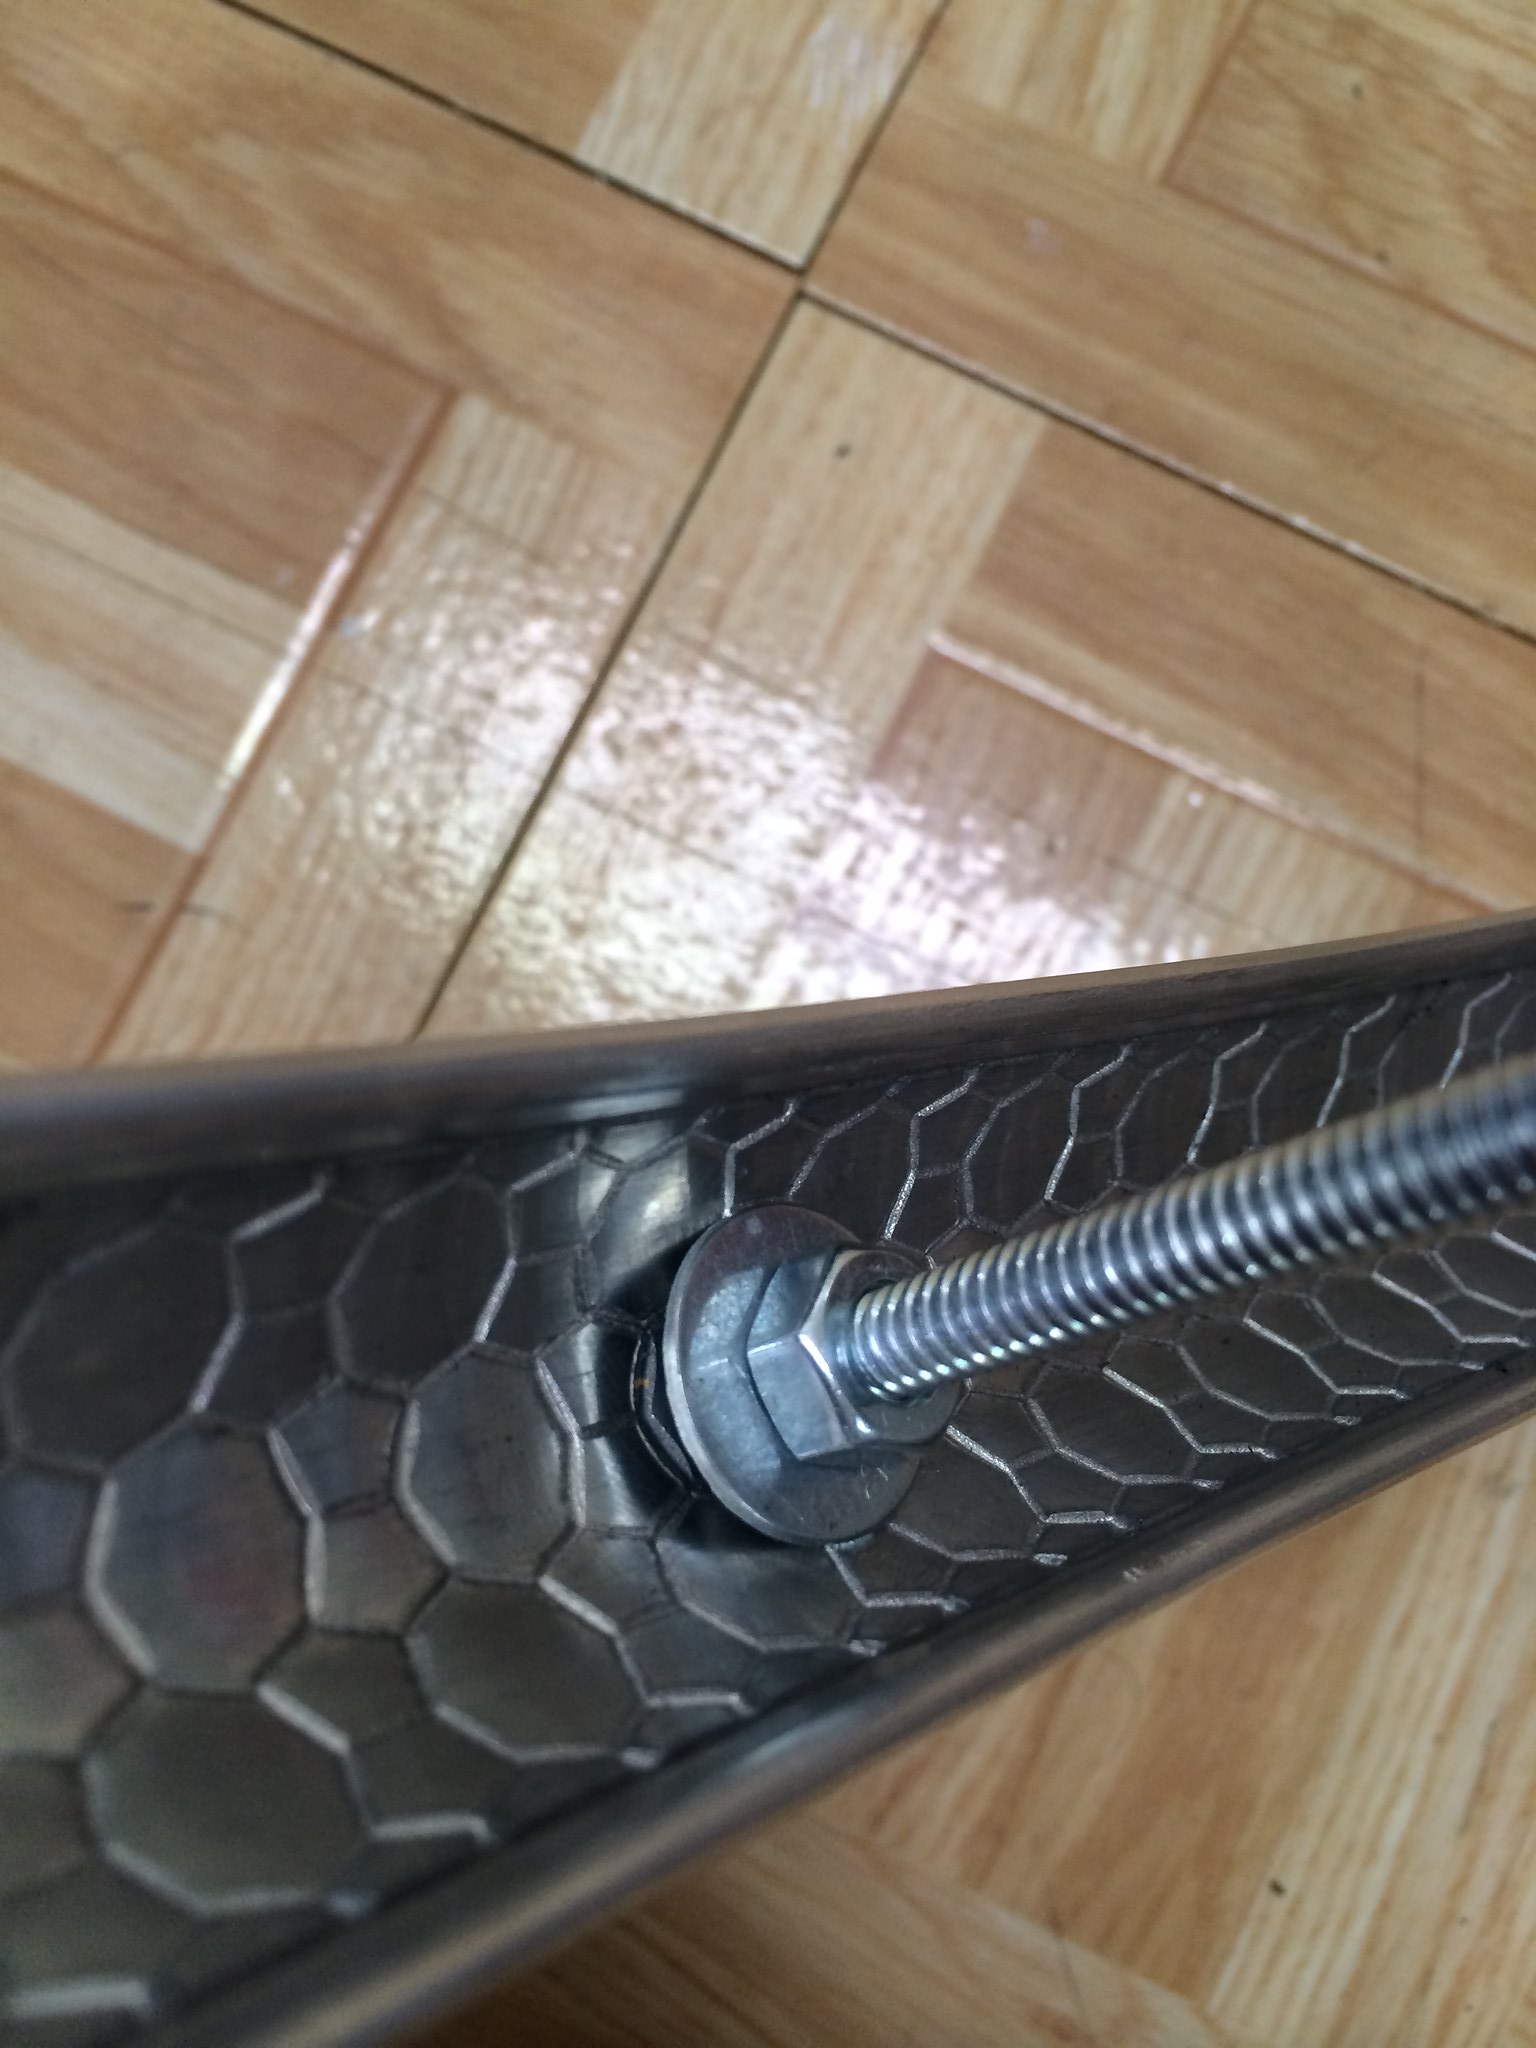
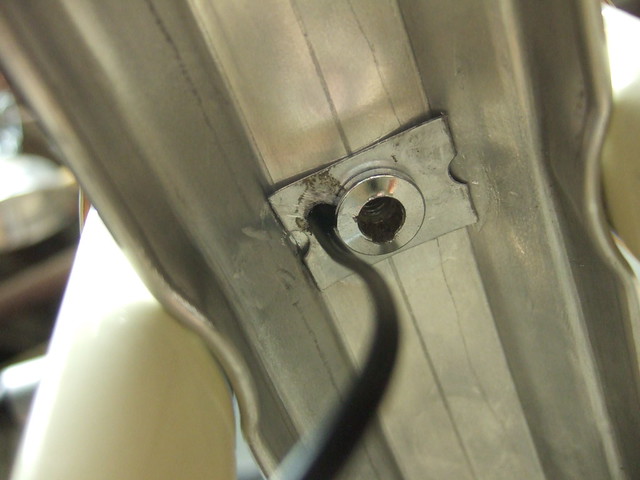
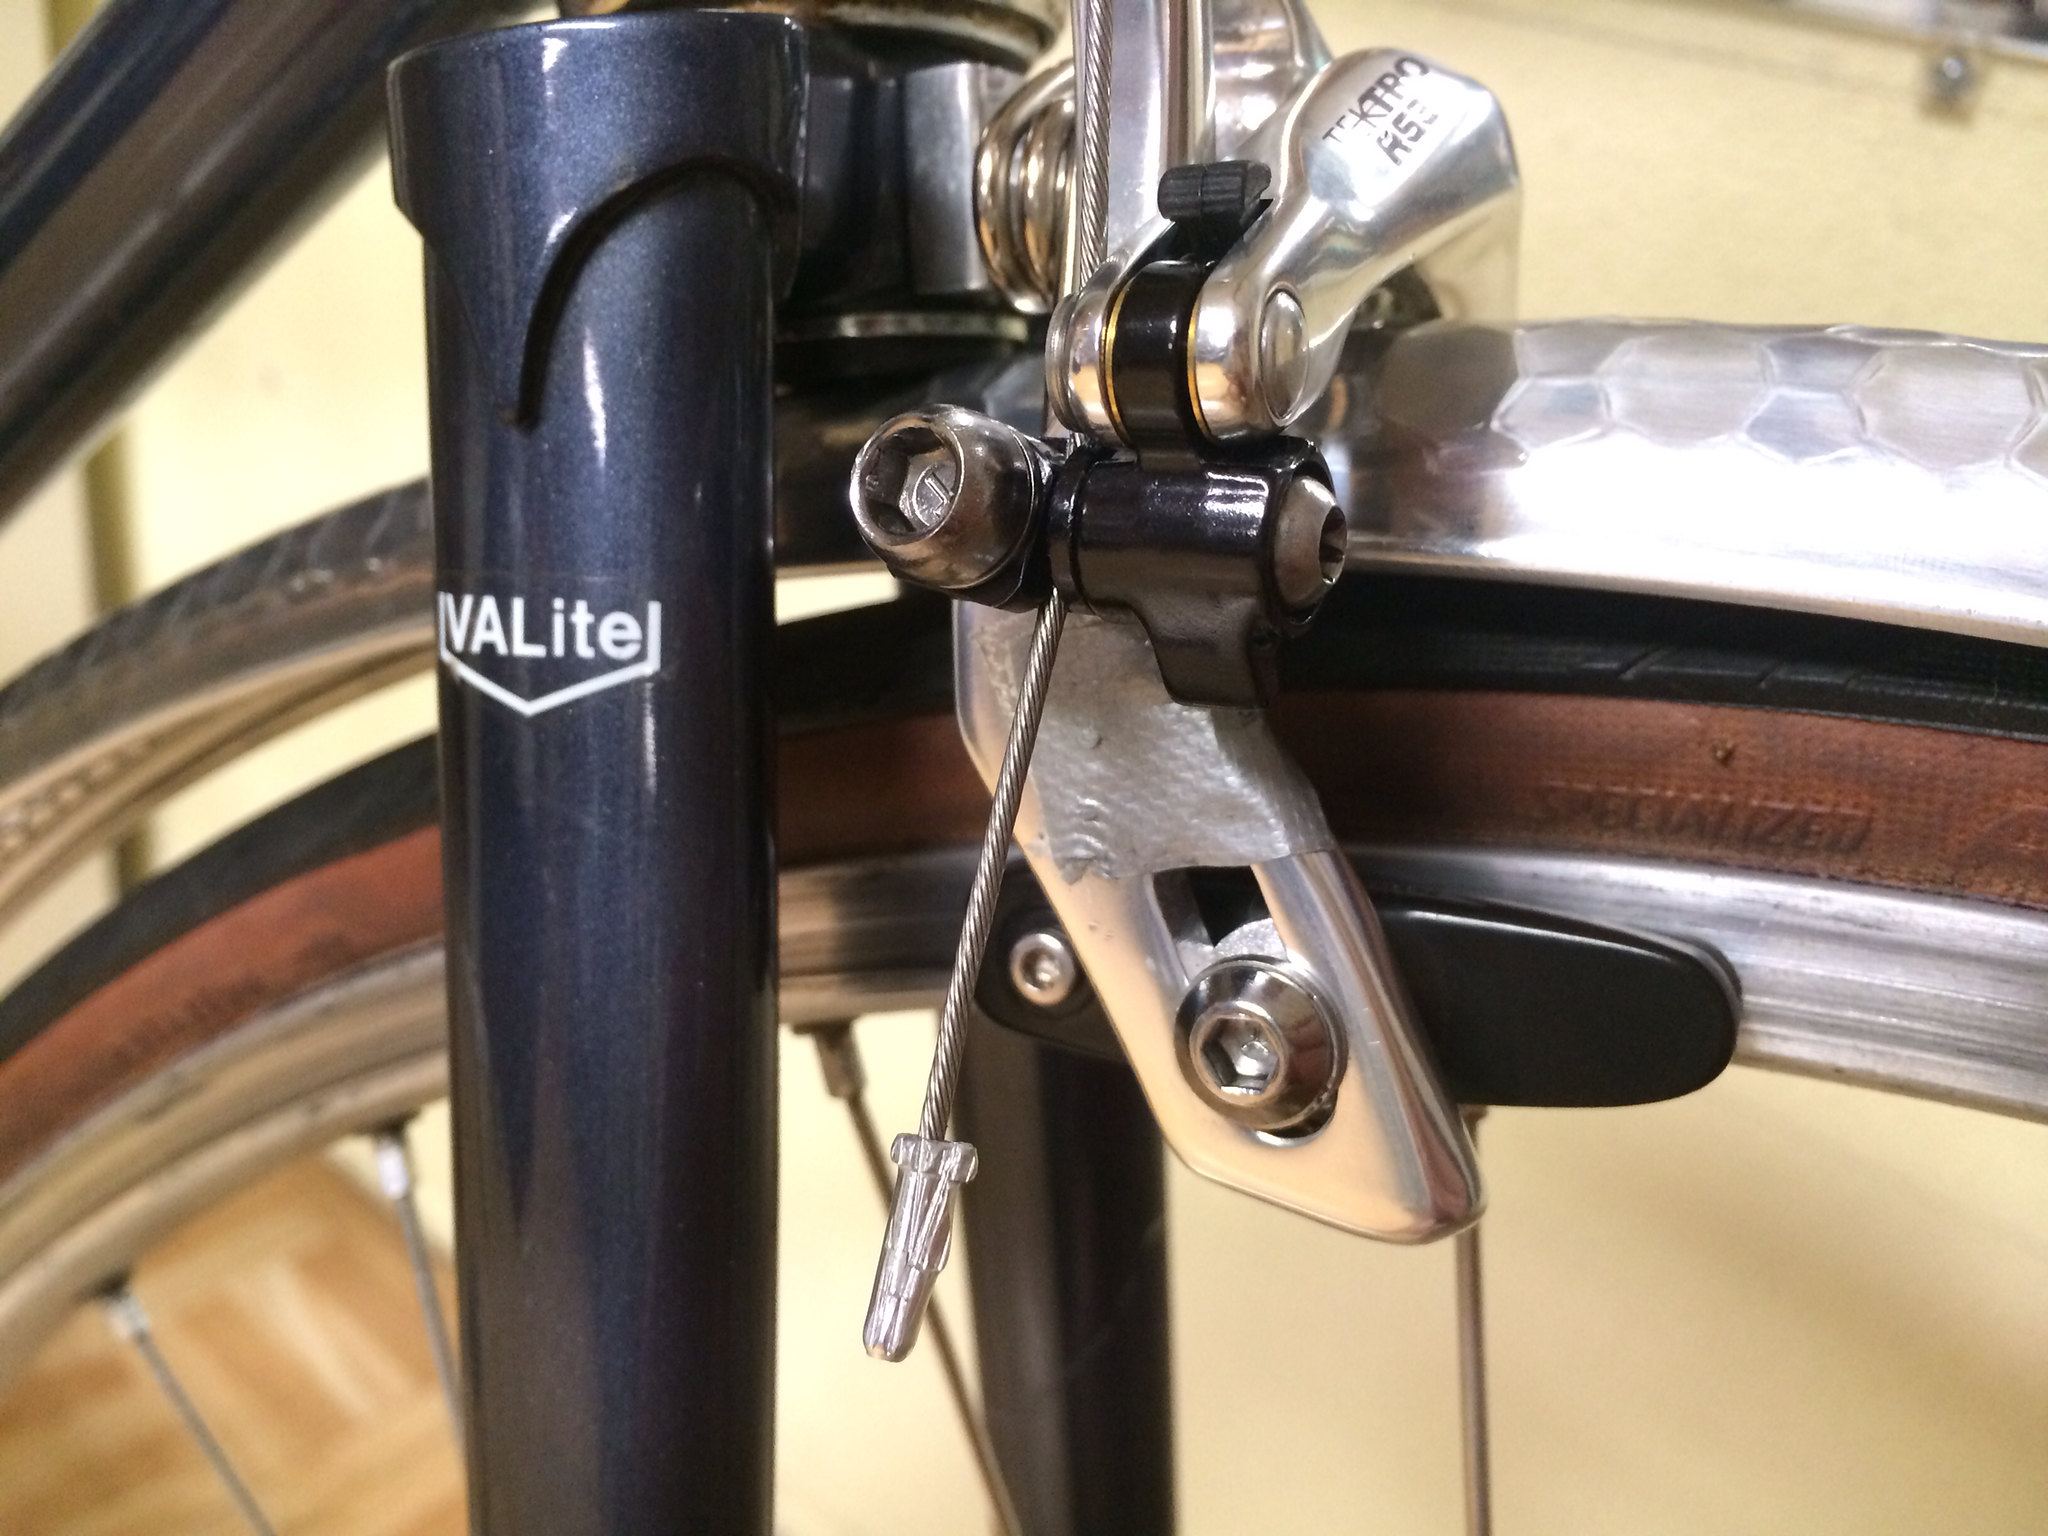
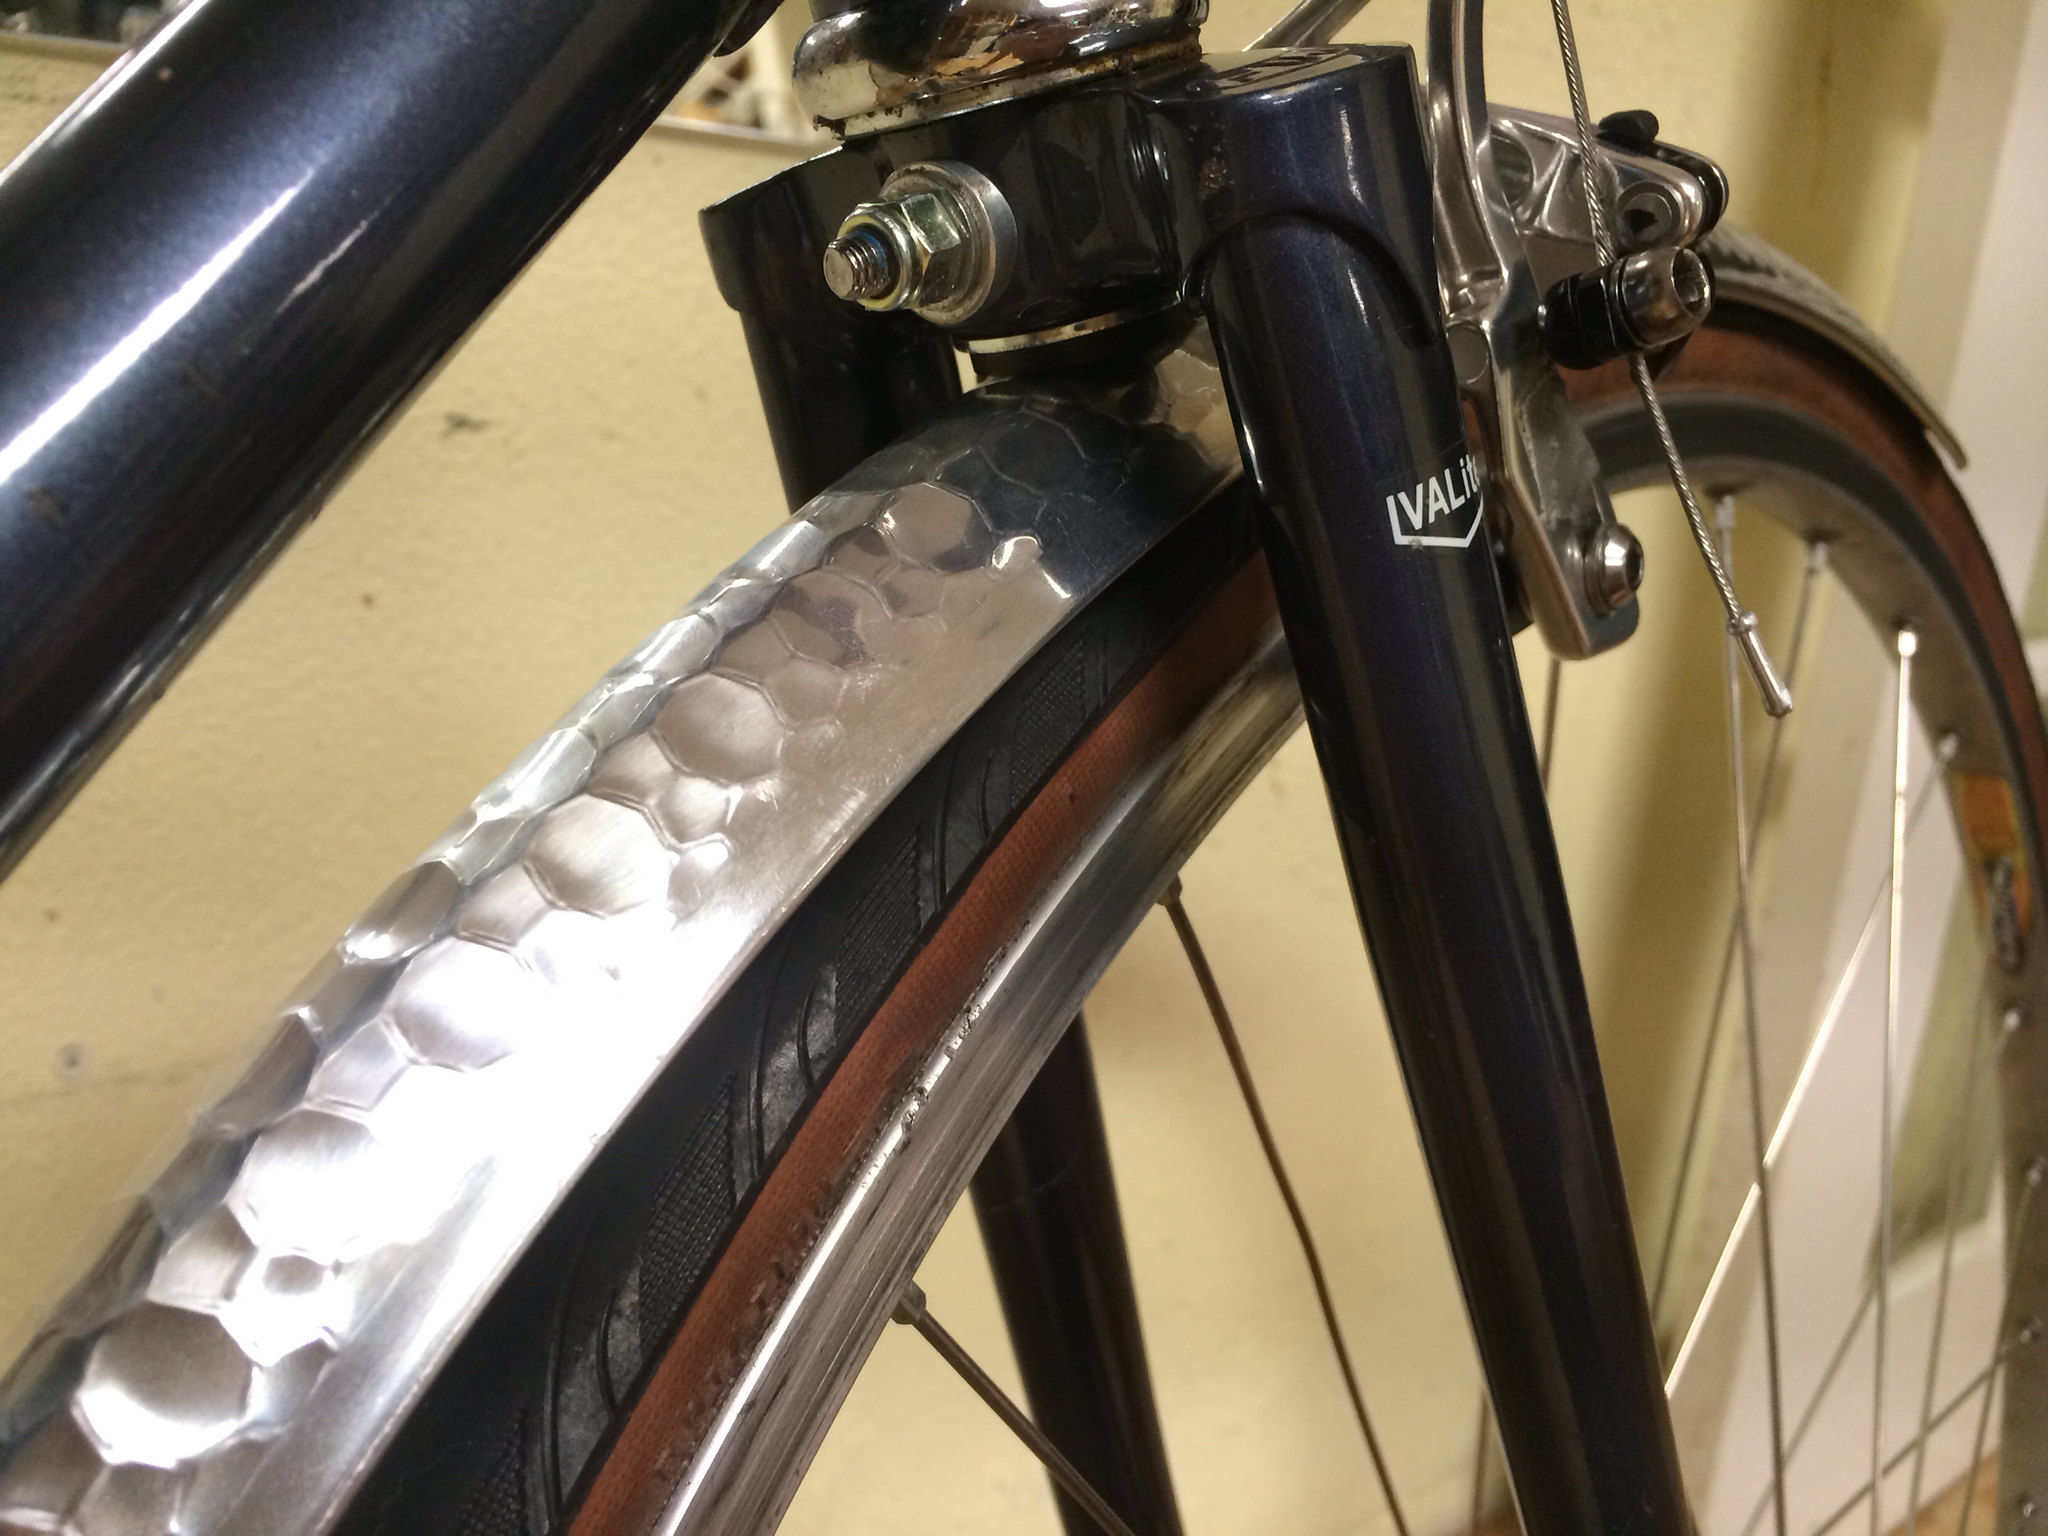
After drilling the fender for the daruma bolt, feed the threaded rod through the hole in the fender. Attach a fender washer and nut on each end of the rod to sandwich the fender between the two washers, leaving most of the rod sticking above the fender. Tighten the nuts all the way to pinch the fender flat and tight between the washers. Now get another person to help you. One person holds the fender steady with both hands, and the other person torques the rod like a lever. The lever action should be toward the FRONT of the fender, which will cause a perfectly round indentation in the fender, with the front end of the indent sunken deeper into the fender. This angle should match the angle at which the daruma bolt seats the fender.
Like this:
I assume that Road Fan is inquiring about the part of the fender where the daruma bolt actually goes through?
Get some 6mm threaded rod stock, two steel fender washers (that's what they're called! Get a couple roughly the size of the daruma washer or slightly larger; find them at your hardware store) and two 6mm nuts.
After drilling the fender for the daruma bolt, feed the threaded rod through the hole in the fender. Attach a fender washer and nut on each end of the rod to sandwich the fender between the two washers, leaving most of the rod sticking above the fender. Tighten the nuts all the way to pinch the fender flat and tight between the washers. Now get another person to help you. One person holds the fender steady with both hands, and the other person torques the rod like a lever. The lever action should be toward the FRONT of the fender, which will cause a perfectly round indentation in the fender, with the front end of the indent sunken deeper into the fender. This angle should match the angle at which the daruma bolt seats the fender.
Like this:
Last edited by southpawboston; 11-28-12 at 05:57 PM.
11-28-12, 03:11 PM
#7
Old fart

Join Date: Nov 2004
Location: Appleton WI
Posts: 24,782
Bikes: Several, mostly not name brands.
Mentioned: 153 Post(s)
Tagged: 0 Thread(s)
Quoted: 3587 Post(s)
Liked 3,398 Times
in
1,932 Posts
I wonder if you could make your own daruma using a star nut and a bolt?
 11-28-12, 04:01 PM
#8
Senior Member
08-14-15, 08:36 AM
#9
Junior Member

Join Date: Jul 2015
Location: District of Columbia / Jakarta / Oxford
Posts: 18
Bikes: Fuji Sagres, Main Street Pedicab, Schwinn Traveler, Lightspeed Arenberg, Bianchi Volpe
Mentioned: 0 Post(s)
Tagged: 0 Thread(s)
Quoted: 0 Post(s)
Likes: 0
Liked 0 Times
in
0 Posts
Get some 6mm threaded rod stock, two steel fender washers (that's what they're called! Get a couple roughly the size of the daruma washer or slightly larger; find them at your hardware store) and two 6mm nuts.
After drilling the fender for the daruma bolt, feed the threaded rod through the hole in the fender. Attach a fender washer and nut on each end of the rod to sandwich the fender between the two washers, leaving most of the rod sticking above the fender. Tighten the nuts all the way to pinch the fender flat and tight between the washers. Now get another person to help you. One person holds the fender steady with both hands, and the other person torques the rod like a lever. The lever action should be toward the FRONT of the fender, which will cause a perfectly round indentation in the fender, with the front end of the indent sunken deeper into the fender. This angle should match the angle at which the daruma bolt seats the fender.

Last edited by LaissezPasser; 08-14-15 at 08:51 AM.
08-14-15, 09:22 AM
#10
Senior Member
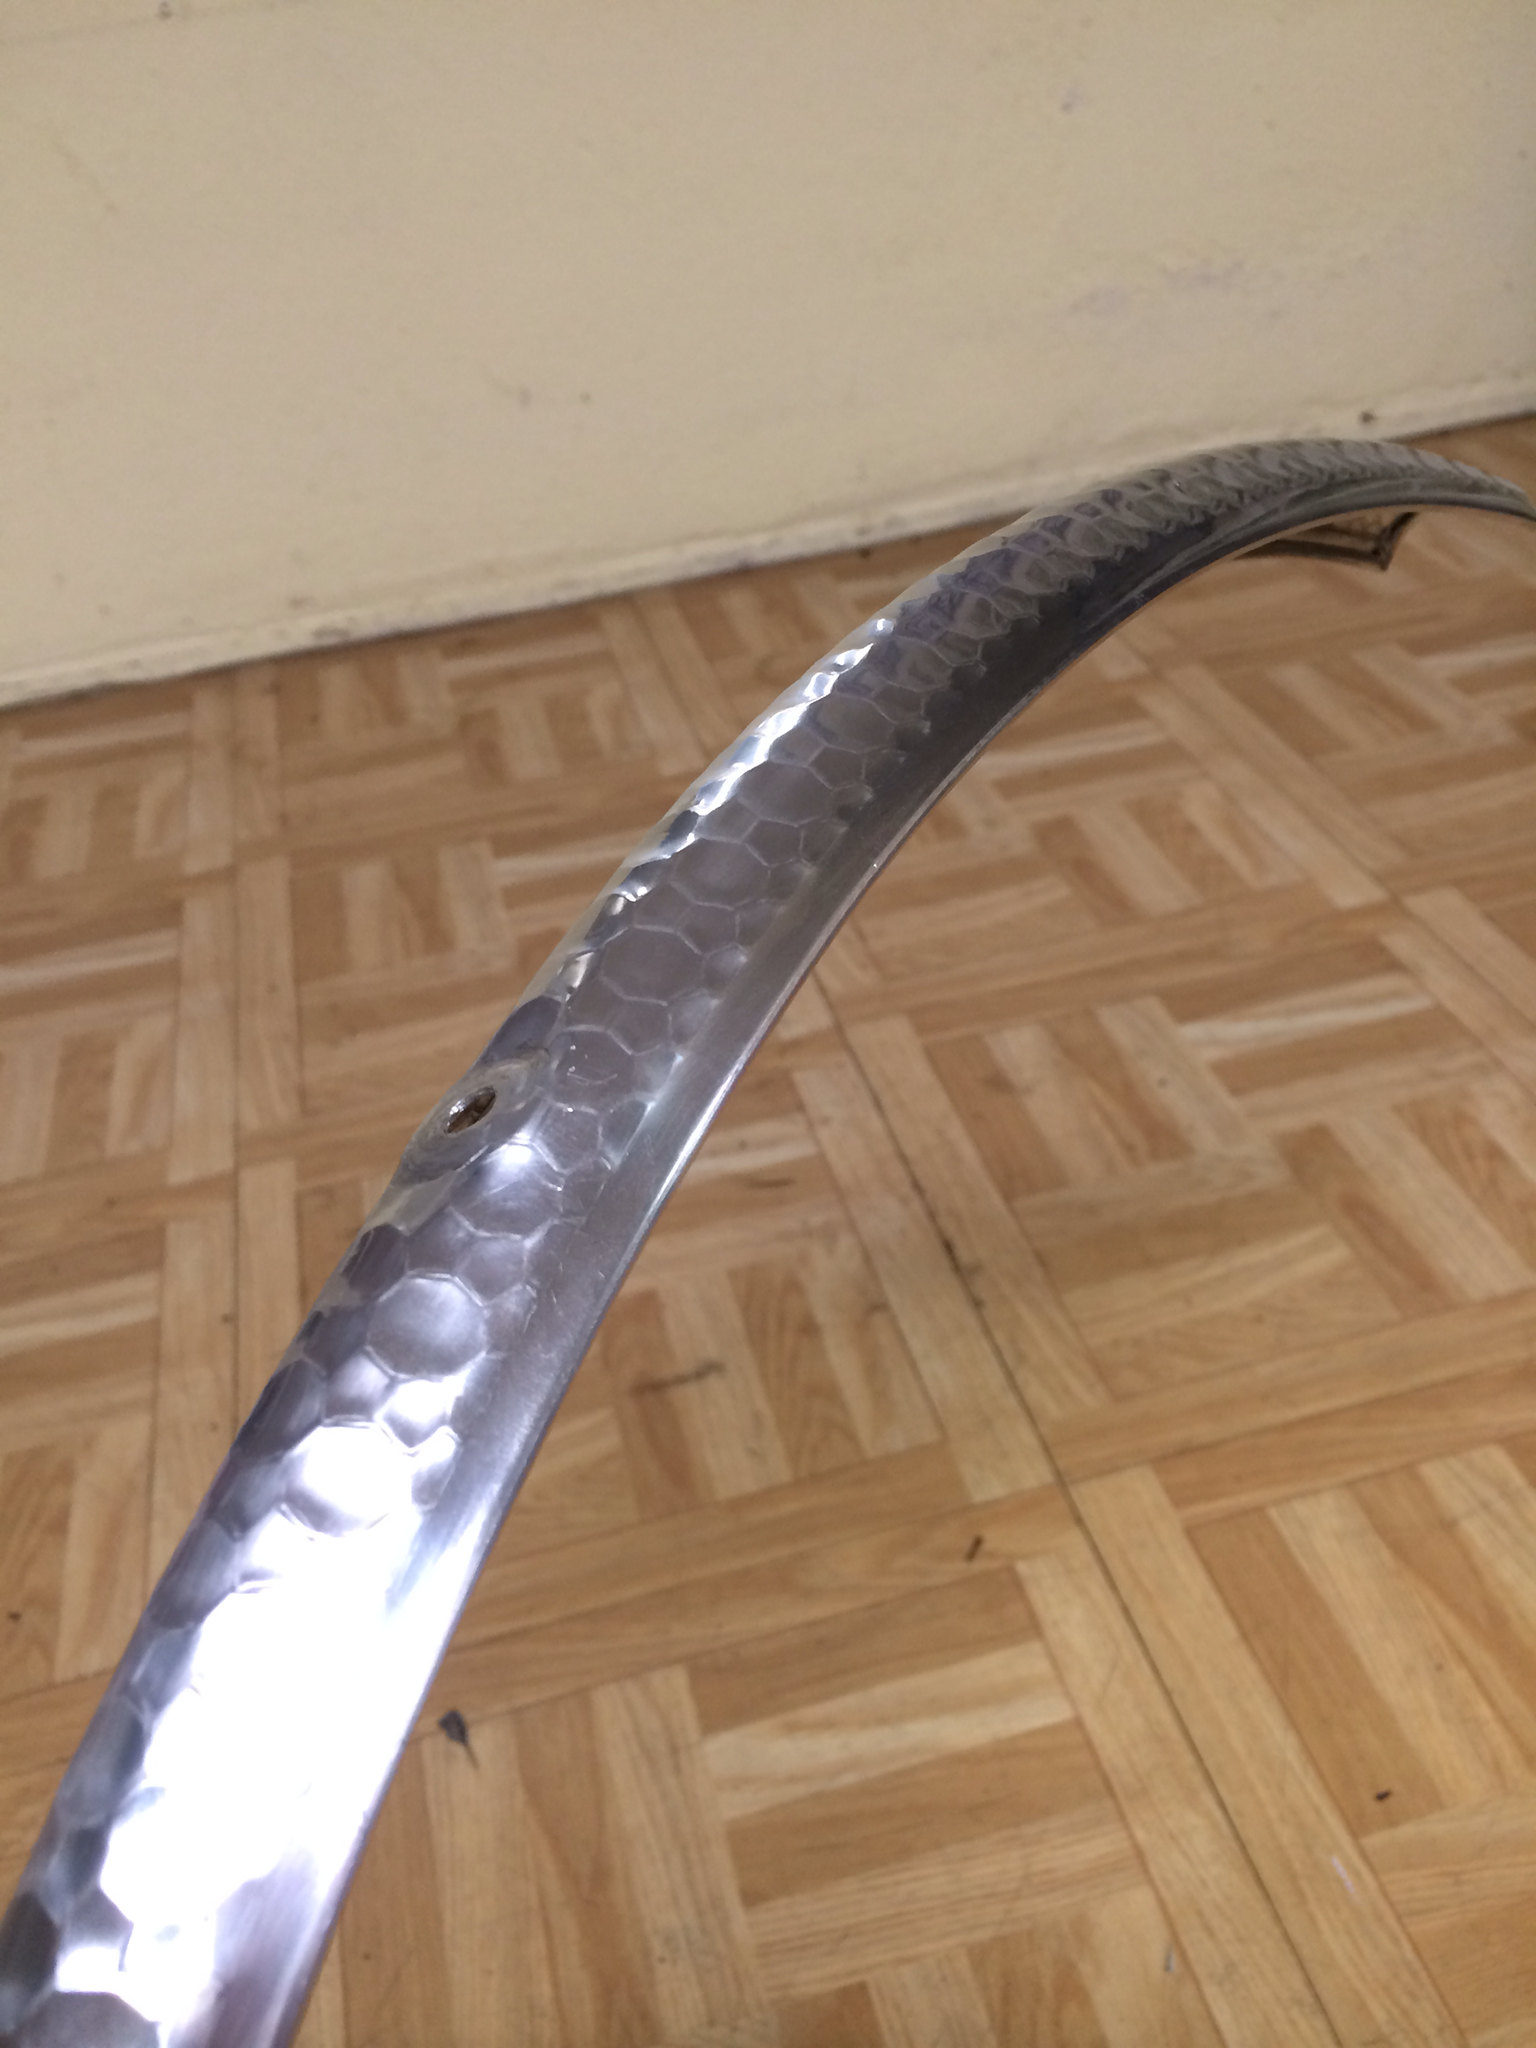
Just so I'm clear, is it really okay to flatten the aluminum like a pancake with the washers/nuts/rod stock rig, like this? This is the first time I've done this. I'm working with 35mm VO fenders, which I imagine have a more acute curve to be flattened than, say, wider 45mm fenders. Mind taking a look at these pictures, particularly at the size of the gap between washer and the fender's concave side, before I go ahead with tightening the nuts and flattening the flattening it?
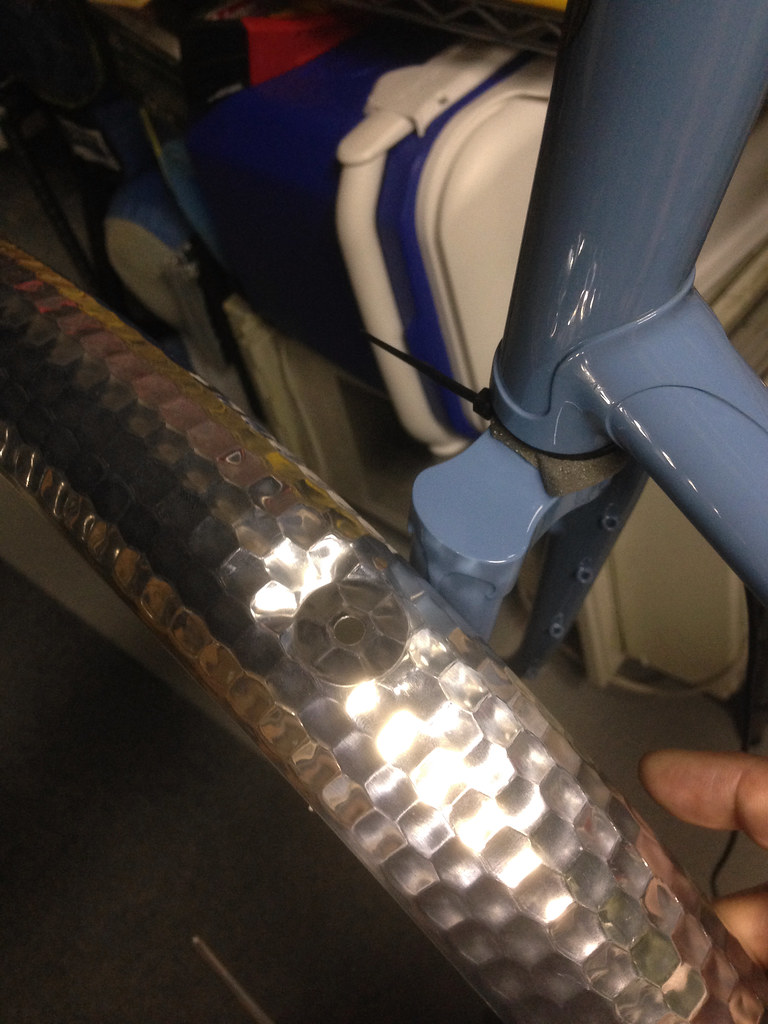
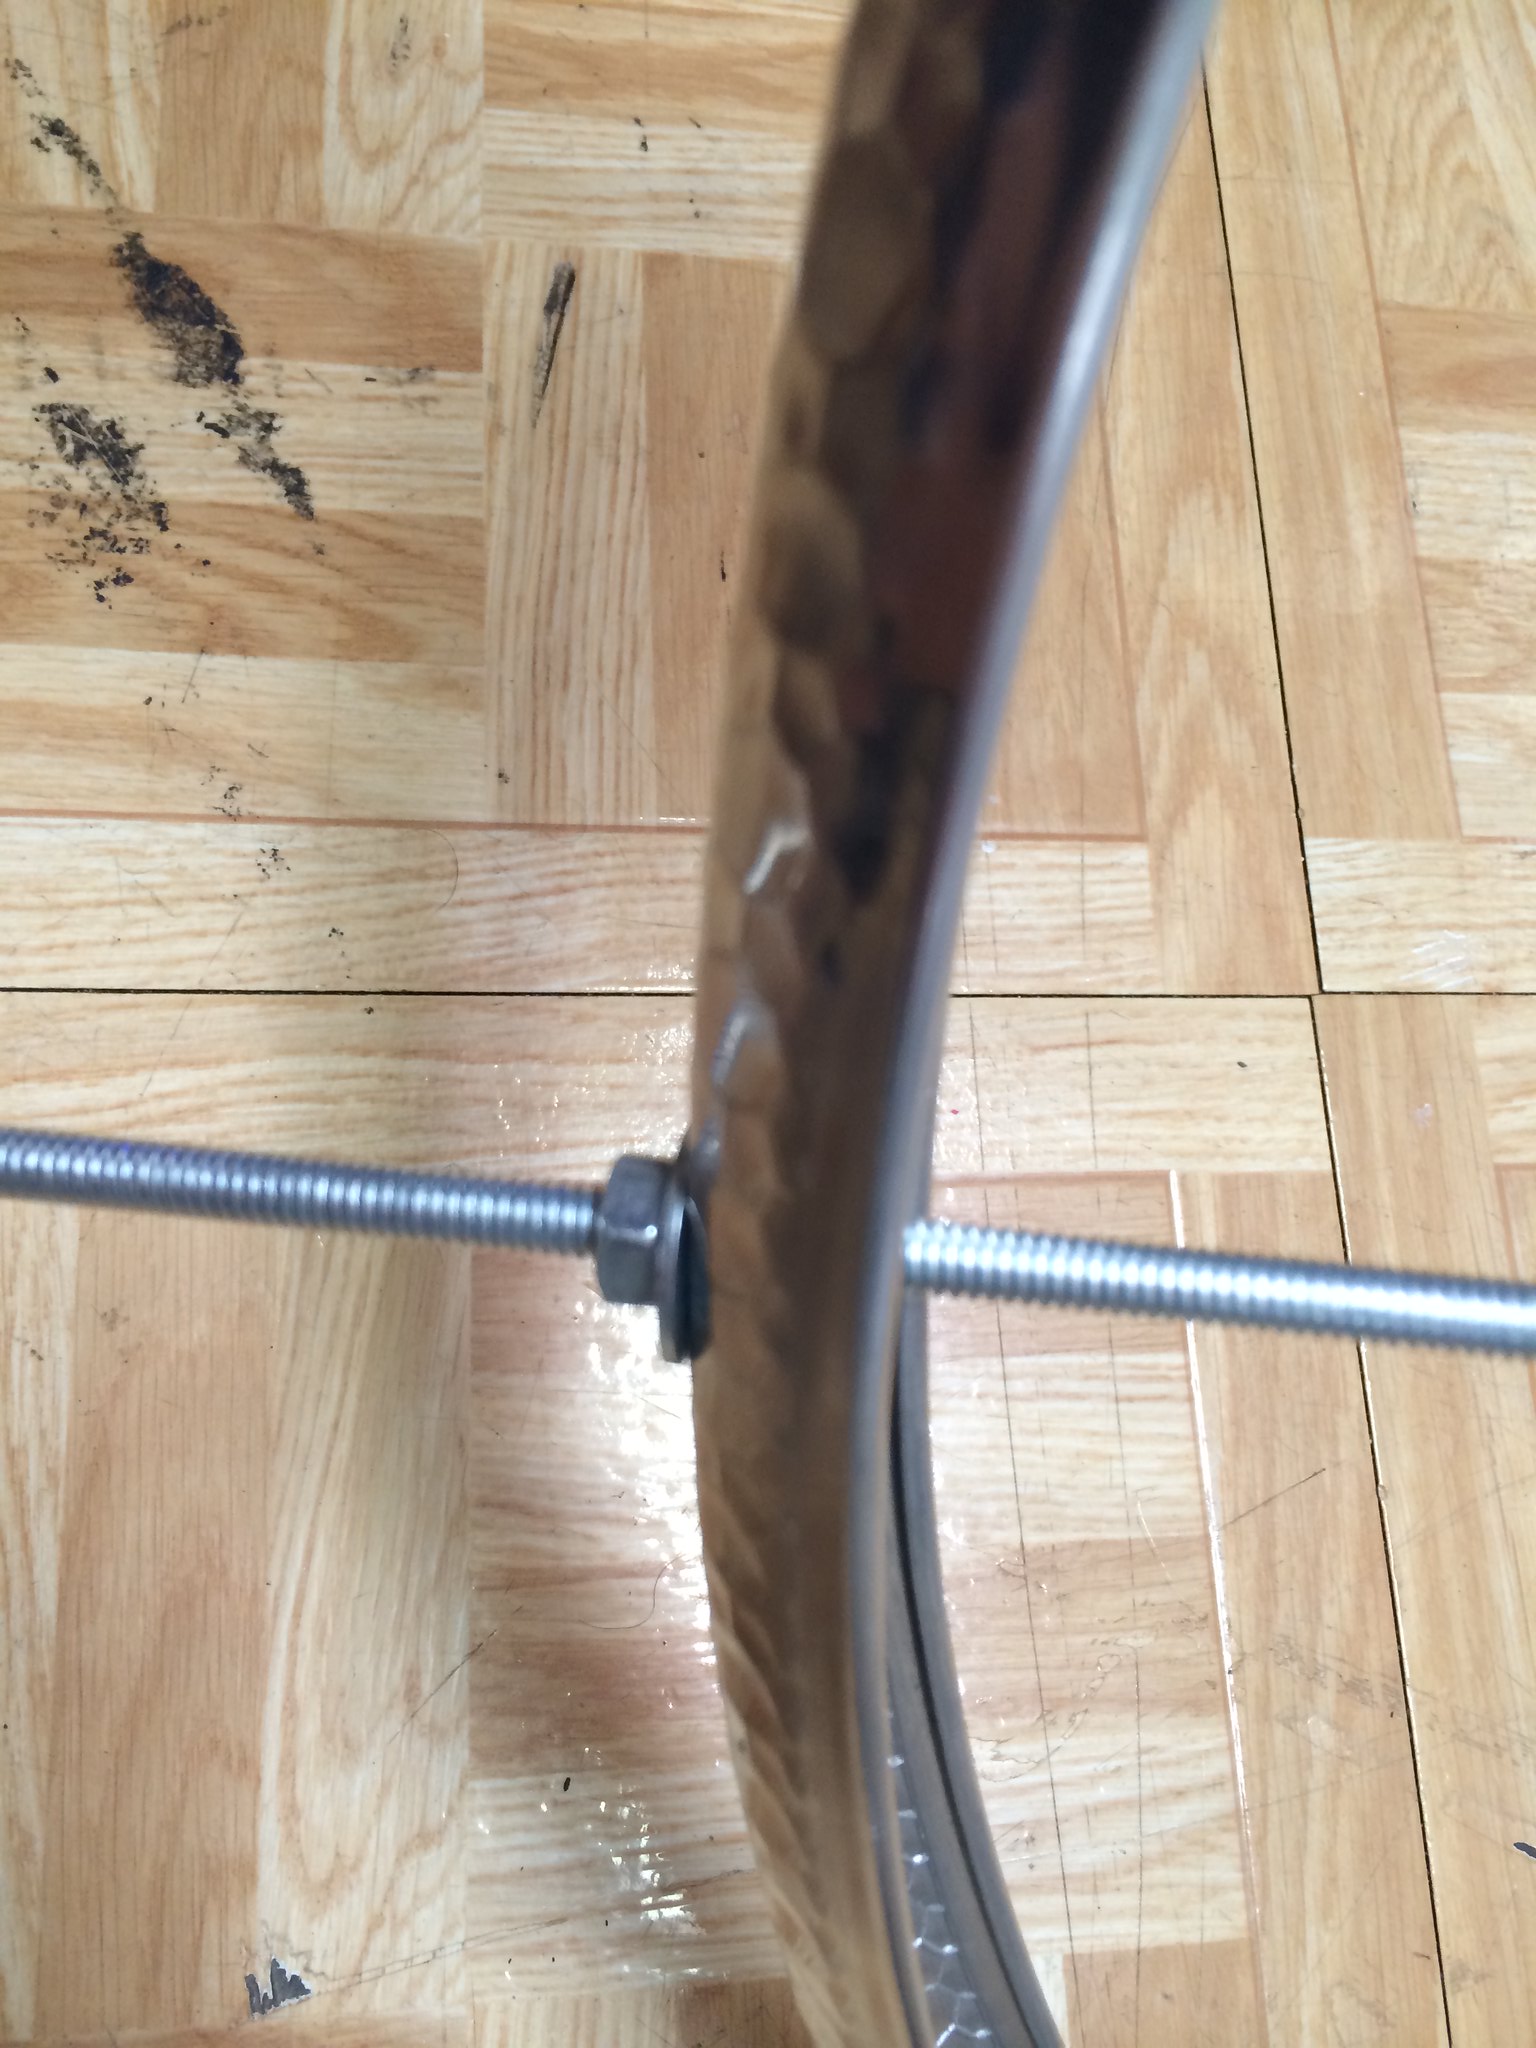
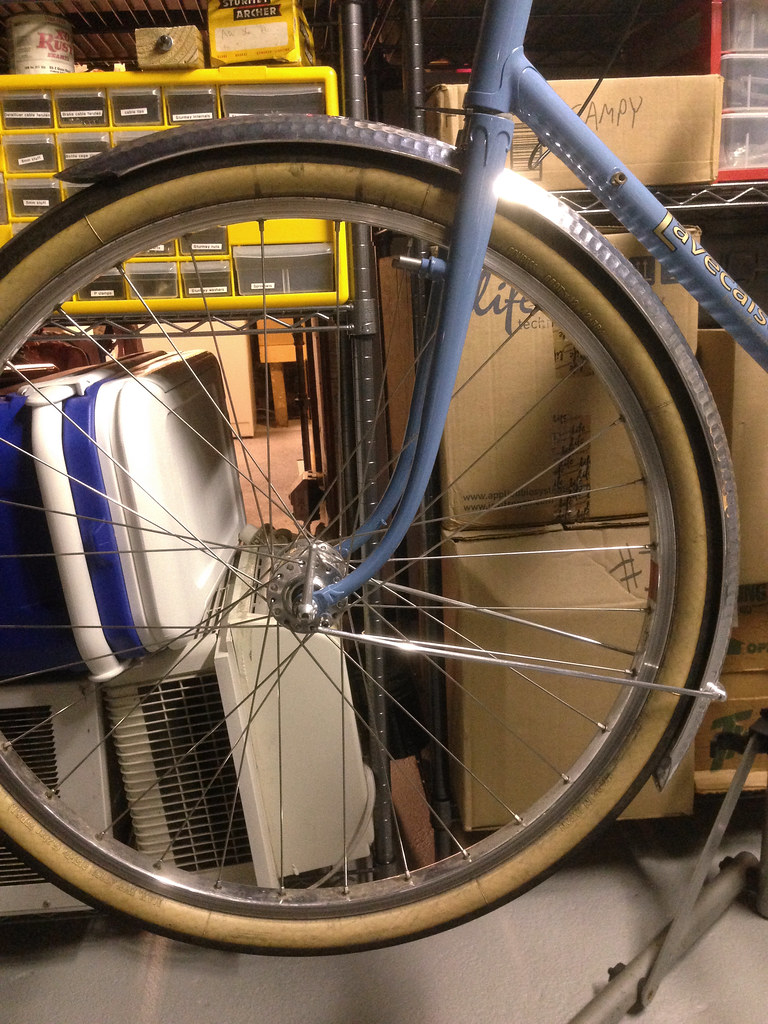
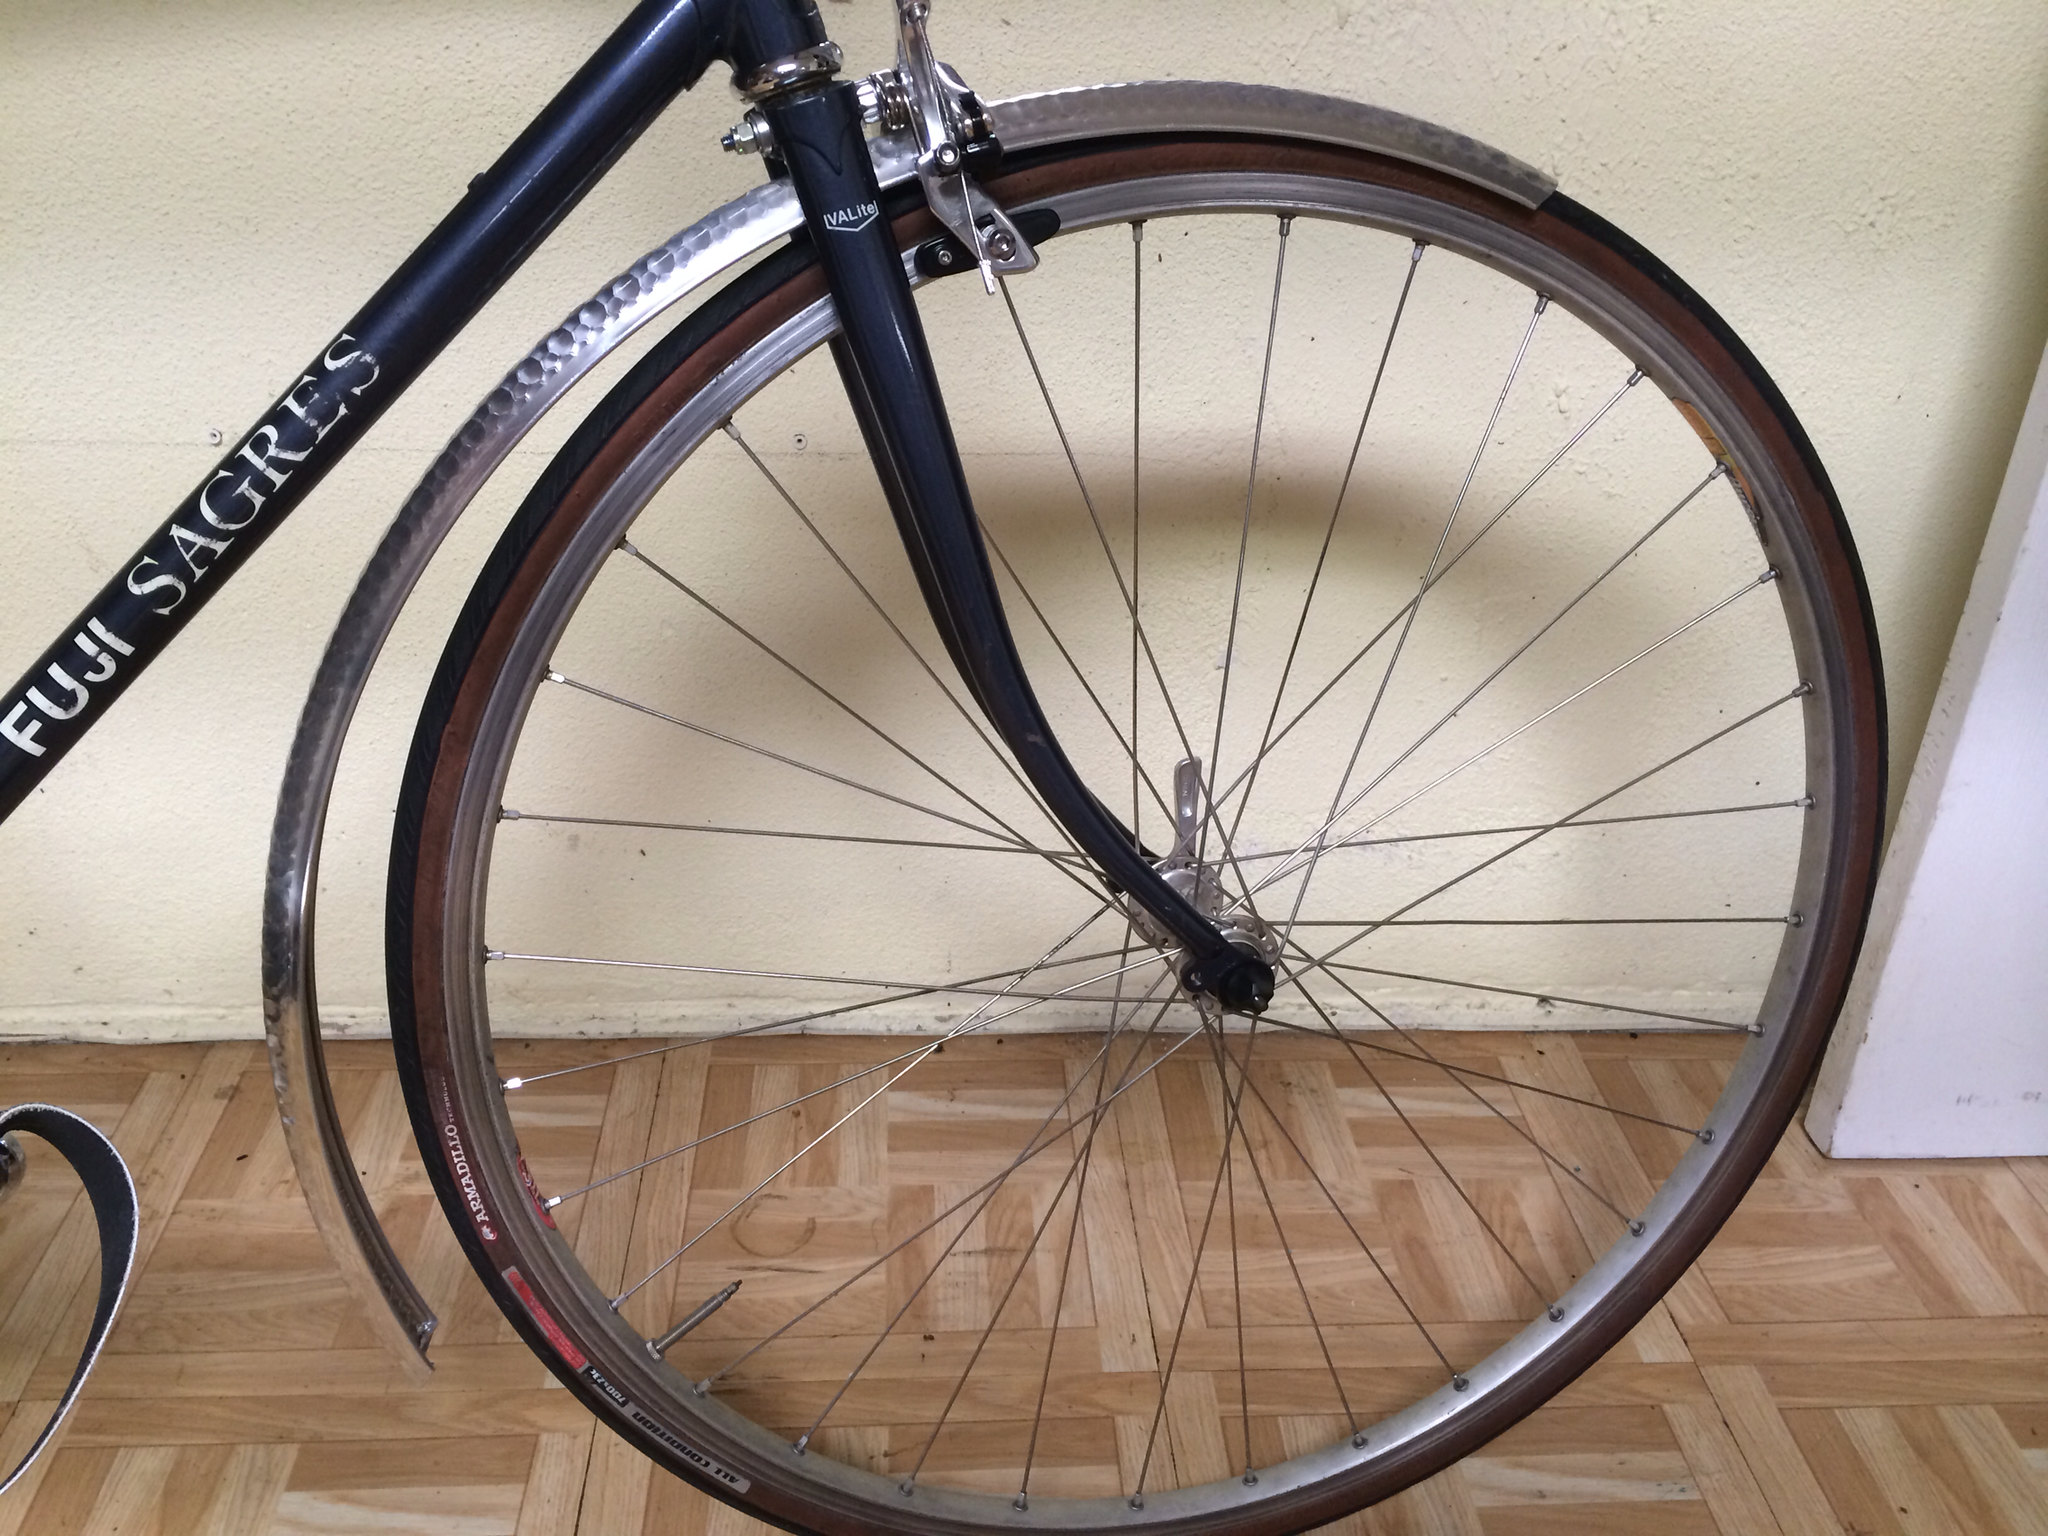
In the end, this leads to a much more reliable fender with minimal risk of eventual cracking because it is stress relieved. Notice in this next pic, the fender is attached to the fork at only one point-- the daruma bolt. The stays are just suspended in air, they are not actually bolted to the dropout eyelets (although you can't tell this from the pic!). The fender is completely stress relieved and 100% aligned.
Last edited by southpawboston; 08-14-15 at 09:26 AM.
08-14-15, 09:36 AM
#11
Junior Member
Join Date: Jul 2015
Location: District of Columbia / Jakarta / Oxford
Posts: 18
Bikes: Fuji Sagres, Main Street Pedicab, Schwinn Traveler, Lightspeed Arenberg, Bianchi Volpe
Mentioned: 0 Post(s)
Tagged: 0 Thread(s)
Quoted: 0 Post(s)
Likes: 0
Liked 0 Times
in
0 Posts
Thanks so much! It sounds like I just need your courage to flatten whatever's in my way and bend these fenders to my will.
Your photos and clarification of that step are especially helpful. I probably would have done the same, but I was wondering about it ; )
Here goes everything...
Here goes everything...
08-14-15, 09:43 AM
#12
Banned
I'd carve a wooden form like the inside shape you want it to be ,
a polished face of a hammer wont make marks every time you hit it..
trouble with aluminum is It's hard to anneal , and that reduces the work hardening that is natural to a reshaping .
but it can be reshaped a small hammer blow at a time , till its shaped like the form you made underneath it.
this is a way to narrow the width to not wear the paint where the edges touch the Paint.
08-14-15, 12:06 PM
#13
Extraordinary Magnitude

Join Date: Aug 2009
Location: Waukesha WI
Posts: 13,646
Bikes: 1978 Trek TX700; 1978/79 Trek 736; 1984 Specialized Stumpjumper Sport; 1984 Schwinn Voyageur SP; 1985 Trek 620; 1985 Trek 720; 1986 Trek 400 Elance; 1987 Schwinn High Sierra; 1990 Miyata 1000LT
Mentioned: 84 Post(s)
Tagged: 0 Thread(s)
Quoted: 2608 Post(s)
Liked 1,699 Times
in
935 Posts
Southpawboston has been really great with documenting how he's done this so well.
I can't seem to get it right for anything though...
I can't seem to get it right for anything though...
__________________
*Recipient of the 2006 Time Magazine "Person Of The Year" Award*
Commence to jigglin� huh?!?!
"But hey, always love to hear from opinionated amateurs." -says some guy to Mr. Marshall.
Commence to jigglin� huh?!?!
"But hey, always love to hear from opinionated amateurs." -says some guy to Mr. Marshall.
08-14-15, 01:37 PM
#14
Senior Member
Join Date: Jan 2007
Location: Ontario
Posts: 2,648
Mentioned: 16 Post(s)
Tagged: 0 Thread(s)
Quoted: 478 Post(s)
Liked 634 Times
in
336 Posts
I also had problems with clearance on either side with the ends of the crown "lug", which meant I couldn't get the fender high enough into the crown for a good line (VO fender, trek 600). Is it recommended to dimple the sides of the fender as well?
08-14-15, 01:59 PM
#15
Senior Member
Likes For southpawboston:
08-14-15, 07:21 PM
#16
Senior Member
Thread Starter
Join Date: Apr 2005
Location: Ann Arbor, MI
Posts: 16,874
Bikes: 1980 Masi, 1984 Mondonico, 1984 Trek 610, 1980 Woodrup Giro, 2005 Mondonico Futura Leggera ELOS, 1967 PX10E, 1971 Peugeot UO-8
Mentioned: 49 Post(s)
Tagged: 0 Thread(s)
Quoted: 1856 Post(s)
Liked 664 Times
in
506 Posts
Wow, I had totally forgotten about this thread.
I'm not happy with the fenders on my 650b - if I find a deal on some 55 mm hoops I might try it again. I think I did the chainstay hole well and the fork crown, but after two tries I can't sort out the seatstay hole.
Anyway guys, thanks for the great dialog!
I'm not happy with the fenders on my 650b - if I find a deal on some 55 mm hoops I might try it again. I think I did the chainstay hole well and the fork crown, but after two tries I can't sort out the seatstay hole.
Anyway guys, thanks for the great dialog!
Likes For Road Fan:
08-14-15, 08:55 PM
#17
Junior Member
Join Date: Jul 2015
Location: District of Columbia / Jakarta / Oxford
Posts: 18
Bikes: Fuji Sagres, Main Street Pedicab, Schwinn Traveler, Lightspeed Arenberg, Bianchi Volpe
Mentioned: 0 Post(s)
Tagged: 0 Thread(s)
Quoted: 0 Post(s)
Likes: 0
Liked 0 Times
in
0 Posts
One person holds the fender steady with both hands, and the other person torques the rod like a lever. The lever action should be toward the FRONT of the fender, which will cause a perfectly round indentation in the fender, with the front end of the indent sunken deeper into the fender. This angle should match the angle at which the daruma bolt seats the fender.
Like this:
Like this:


 08-14-15, 10:34 PM
#18
Senior Member

When you install the metal fender stays around the back of the bottom part of the rear fender, and attatch the other end of the stays to the eyelet by the fork ends, wouldn't that act to pull the rear of the fender in toward the tire?
Likes For Velocivixen:
08-14-15, 11:15 PM
#19
Junior Member
Join Date: Jul 2015
Location: District of Columbia / Jakarta / Oxford
Posts: 18
Bikes: Fuji Sagres, Main Street Pedicab, Schwinn Traveler, Lightspeed Arenberg, Bianchi Volpe
Mentioned: 0 Post(s)
Tagged: 0 Thread(s)
Quoted: 0 Post(s)
Likes: 0
Liked 0 Times
in
0 Posts
So. Solutions?
Last edited by LaissezPasser; 08-15-15 at 12:13 PM.
08-13-19, 12:23 PM
#20
Newbie
Join Date: Aug 2019
Location: UK - Suffolk
Posts: 1
Bikes: Bickerton, Humber, Mercian, Bianchi, Harry Quinn, Dawes
Mentioned: 0 Post(s)
Tagged: 0 Thread(s)
Quoted: 0 Post(s)
Likes: 0
Liked 0 Times
in
0 Posts
Well... how did it all pan out?
Hi,
I just got a pair of Honjo fenders and I've been reading all I can about best installation practice. I'm particularly interested in the technique you describe for preparing the front fender before fitting the Daruma. Was it a success? Would you recommend it? My fenders are 35mm hammered.
Best wishes.
08-13-19, 02:29 PM
#21
Senior Member
Thread Starter
Join Date: Apr 2005
Location: Ann Arbor, MI
Posts: 16,874
Bikes: 1980 Masi, 1984 Mondonico, 1984 Trek 610, 1980 Woodrup Giro, 2005 Mondonico Futura Leggera ELOS, 1967 PX10E, 1971 Peugeot UO-8
Mentioned: 49 Post(s)
Tagged: 0 Thread(s)
Quoted: 1856 Post(s)
Liked 664 Times
in
506 Posts
Well, after 6 � years I have not done my fender as Anton (aka Somerville) did, except for using the same broad principle. I attached my Daruma to the drilling on my fender and threaded it into the fork crown bottom with a fender washer (or something) above it and tilted my fender up in the back and down in the front. I have no recollection how I formed it from there. I think I just did the pull and push, drilled it for the stay and attached it, installed the wheel, and set up the stay to make a decent rear gap, then bolted it all down. I think I re-installed at one point to get more front fender coverage and raise the mudflap off the ground somewhat. I didn't need any more fender side clearance. Not much riding on it since this re-fitting and a more difficult re-fitting in the rear.
I also haven't installed any more Al fenders. I have one project for it, to add 35 mm fenders to Mrs. Road Fan's Georgena Terry Classic, a steel road frame from 1997. Here the frame to wheel clearances are extremely tight, and I'm fitting the fenders split, using the River City Bikes split fender brackets. Several other projects have gotten in the way. One result is that my 1984 Trek 610, Mrs. Road Fan's Georgena Terry from 2013 and my build of my steel Meridian tandem have received SKS chromoplastic fenders. I think once I'm done with the Trek and decide what to do with the 1980 Woodrup build, I'll be done with Honjo, Velo Orange, or Grand Bois aluminum fenders. No offense, but I think they are more trouble than they are worth.
I also haven't installed any more Al fenders. I have one project for it, to add 35 mm fenders to Mrs. Road Fan's Georgena Terry Classic, a steel road frame from 1997. Here the frame to wheel clearances are extremely tight, and I'm fitting the fenders split, using the River City Bikes split fender brackets. Several other projects have gotten in the way. One result is that my 1984 Trek 610, Mrs. Road Fan's Georgena Terry from 2013 and my build of my steel Meridian tandem have received SKS chromoplastic fenders. I think once I'm done with the Trek and decide what to do with the 1980 Woodrup build, I'll be done with Honjo, Velo Orange, or Grand Bois aluminum fenders. No offense, but I think they are more trouble than they are worth.
Last edited by Road Fan; 08-13-19 at 02:38 PM.
Likes For Road Fan:

Thread
Thread Starter
Forum
Replies
Last Post
Jaywalk3r
Bicycle Mechanics
7
06-21-13 12:51 PM
Altair 4
Hybrid Bicycles
3
01-08-12 07:24 PM
