


Repainting a bunch of fillet brazed Schwinns
 03-04-22, 12:24 PM
#1

framebuilder
Thread Starter
Repainting a bunch of fillet brazed Schwinns
In this subject thread I'm going to document the process of repainting a bunch of Schwinn fillet brazed frames. I've been involved for 22 years in a charity bicycle project in Ukraine. Over those years I've been donated a number of fillet brazed Schwinns (like the Super Sport). They have accumulated and now it is time to do something about them and get the money from their sales over to Ukraine. It makes no sense to spend money sending bikes with 27 X 1/4" tires. My day job is to teach framebuilding classes (I've even done some in Ukraine) but from time to time I teach frame painting classes as well. Usually the students for my painting classes are pro or semi-pro builders. I have 2 local just-retired guys taking my painting class now. I chose these Schwinns as painting projects for class. I have pair of early 70's yellow Super Sports - a ladies and a 24". We'll repaint them yellow again. I also have a 22" and a 24" Super Sport from 1965. One was candy blue and the other gold. That model year they didn't have a kickstand mount but did have down tube shifter bosses (instead of levers near the stem). These are fairly rare as they predate the 1970 bike boom. I have that 1976 Schwinn Superior I started another subject thread about. I'm going to paint it candy red as an example of how candies are done. I've got another early 70's 22" Super Sport C&V member Steve donated. It was that Robin's egg blue but of course I can now paint it any color. I have to consider what colors and type of paint works best for instruction.
The 1st step of the painting process was to sandblast the frames. I have an amazing sandblaster so there was no need to use a chemical stripper. Some frame work was necessary like minor alignments and replacing a few damaged braze-ons. I've had to ream and hone some of the seat tubes so they fit a 26.8 seat post nicely. Probably some new owners will want to replace the steel seat posts that came with these bicycles with aluminum ones. In a perfect world, I would already have owners that can request water bottle braze-ons or a specific color. Mostly I'm going to leave them as they originally came except to repair any damages. Next week we will be putting the primer coats on.

Sandblasting the Lady's Super Sport

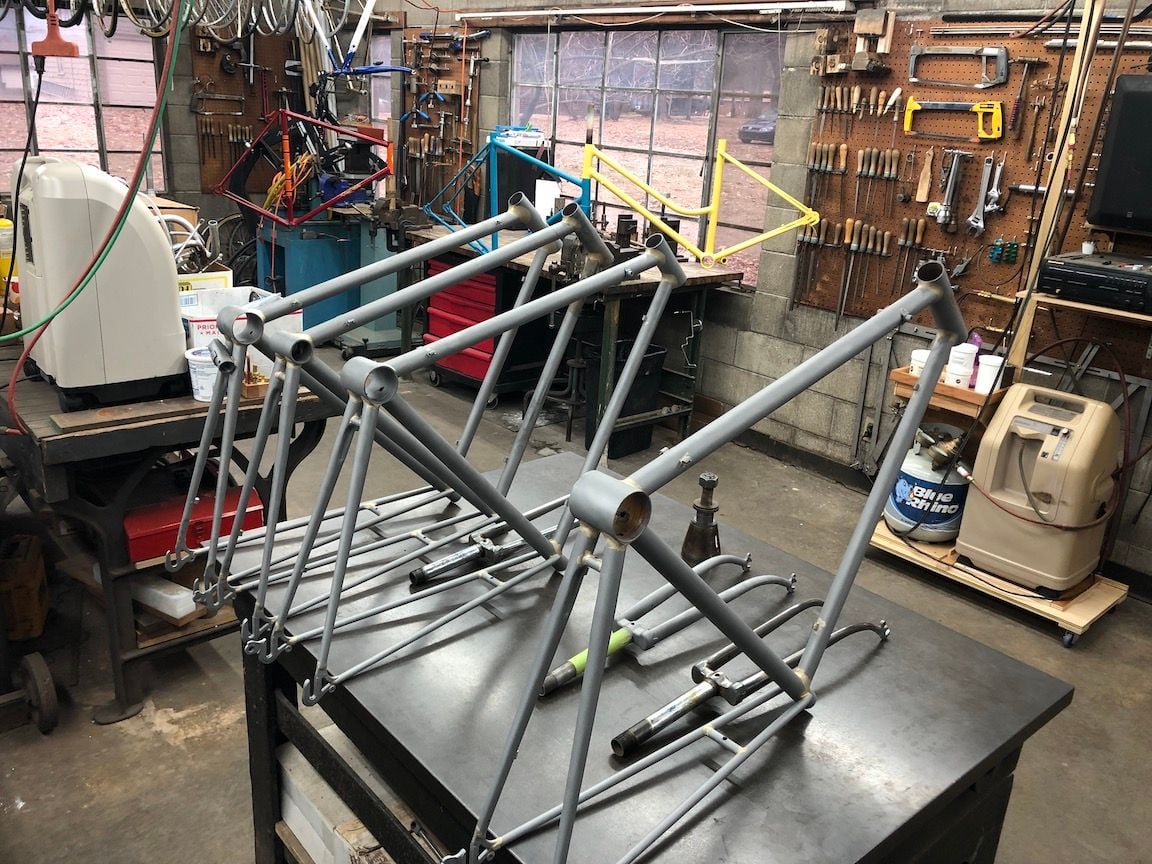
Lining them on on the alignment table ready to be cleaned after sandblasting and before applying the primer.
The 1st step of the painting process was to sandblast the frames. I have an amazing sandblaster so there was no need to use a chemical stripper. Some frame work was necessary like minor alignments and replacing a few damaged braze-ons. I've had to ream and hone some of the seat tubes so they fit a 26.8 seat post nicely. Probably some new owners will want to replace the steel seat posts that came with these bicycles with aluminum ones. In a perfect world, I would already have owners that can request water bottle braze-ons or a specific color. Mostly I'm going to leave them as they originally came except to repair any damages. Next week we will be putting the primer coats on.
Sandblasting the Lady's Super Sport
Lining them on on the alignment table ready to be cleaned after sandblasting and before applying the primer.

Likes For Doug Fattic:
03-05-22, 04:33 AM
#2
Senior Member
Join Date: Nov 2013
Location: Near Pottstown, PA: 30 miles NW of Philadelphia
Posts: 2,189
Bikes: 2 Trek Mtn, Cannondale R600 road, 6 vintage road bikes
Mentioned: 83 Post(s)
Tagged: 0 Thread(s)
Quoted: 472 Post(s)
Liked 1,058 Times
in
407 Posts
Great! I’m particularly interested in how you handle BB, HT, and ST. I see you properly masked the steerer to prevent primer and paint getting on the crown race seat and steerer. How to you minimize messing with the other tight or interference fits? A friend had an old Firestone painted without such worries. I think they did wrong but he says it’s fine. Ugh.
Looks like you did I not mask those fits for sand blasting. Did you you blast inside those tubes, or just across the ends? Did you really use sand or some other media?
BTW, I’ve been thinking ALOT about your friends “over there” lately.
Looks like you did I not mask those fits for sand blasting. Did you you blast inside those tubes, or just across the ends? Did you really use sand or some other media?
BTW, I’ve been thinking ALOT about your friends “over there” lately.
Likes For Prowler:
03-05-22, 06:46 AM
#3
Senior Member

Join Date: Mar 2014
Location: City of Angels
Posts: 4,870
Bikes: A few too many
Mentioned: 42 Post(s)
Tagged: 1 Thread(s)
Quoted: 1364 Post(s)
Liked 2,182 Times
in
1,184 Posts
Doug,
Very nice to have the process document...I will be following this thread. Thanks for starting this, I wish that I were in your neck of the woods...I'd sign up for the class!
Best, Ben
Very nice to have the process document...I will be following this thread. Thanks for starting this, I wish that I were in your neck of the woods...I'd sign up for the class!
Best, Ben
__________________
"EVERY PERSON IS GUILTY OF ALL THE GOOD THEY DID NOT DO"
Voltaire
Voice recognition may sometimes create odd spelling and grammatical errors
"EVERY PERSON IS GUILTY OF ALL THE GOOD THEY DID NOT DO"
Voltaire
Voice recognition may sometimes create odd spelling and grammatical errors
Likes For xiaoman1:
03-05-22, 06:54 AM
#4
framebuilder
Thread Starter
Great! I�m particularly interested in how you handle BB, HT, and ST. I see you properly masked the steerer to prevent primer and paint getting on the crown race seat and steerer. How to you minimize messing with the other tight or interference fits? A friend had an old Firestone painted without such worries. I think they did wrong but he says it�s fine. Ugh.
Looks like you did I not mask those fits for sand blasting. Did you you blast inside those tubes, or just across the ends? Did you really use sand or some other media?
BTW, I�ve been thinking ALOT about your friends �over there� lately.
Looks like you did I not mask those fits for sand blasting. Did you you blast inside those tubes, or just across the ends? Did you really use sand or some other media?
BTW, I�ve been thinking ALOT about your friends �over there� lately.
I'll sandblast any area that has any rust. So sometimes that includes the insides of openings. the word "sandblasting" is an generic action verb referring to the process and not the material. All kinds of media can be used and I've found what I believe is the best for removing paint with my pressure blaster. There are 2 kinds of sandblasters - suction and pressure. I use a much more expensive pressure blaster which has much more media coming through the nozzle but at much lower pressure. That removes paint faster without damaging the tubes themselves If I do it right.
I got highly motivated to paint these frames because I saw the damage right in the city our frame/bike shop is located. And they make perfect projects for painting class. The campus where our shop is located is right where the tip of Russian convey is stalled in their attempt to take Kyiv. Right next to our little shop is 2 big mostly glass (but maybe they are plastic) greenhouses that grow tomatoes and cucumbers year round. Ukrainians love tomatoes and cucumbers. Here is a picture taken by some news agency of a street close to where our shop is located.

This is a street in the city I go to every year
Likes For Doug Fattic:
03-10-22, 09:17 PM
#5
framebuilder
Thread Starter
This week in painting class we've been able to start spraying primer. We've done 2 frames so far - the yellow Super Sport Ladies frame and a 21" men's Super Sport. On the ladies frame we used yellow House of Kolor primer spraying with my W-300 Iwata spray gun. We applied 2+ coats. The ratio was 4 parts yellow to 1 part activator to 1 part reducer.
On the men's frame we mixed 3 parts H of K blue primer to 1 part white primer. This way if the frame gets paint chips between the color and primer, they won't be so obvious. On this frame we used my 3M "Performance" spray gun. I like using my 3M guns for primers. I have another older 3M "Accuspry" gun. The new 3M gun has better ergonomics but worse cup shape. They have disposable cups and nozzles that can be changed when they eventually get dirty. It is possible to change the nozzle size when changing nozzles. This is a handy feature when spraying different viscosities of paint. We will continue priming the other 4 frames until all 6 are finished.
Our next step will be to sand the primer with 600 grit wet dry sandpaper before applying color coats. I'll explain more of the process after the primers have all been applied on all 6 frames.
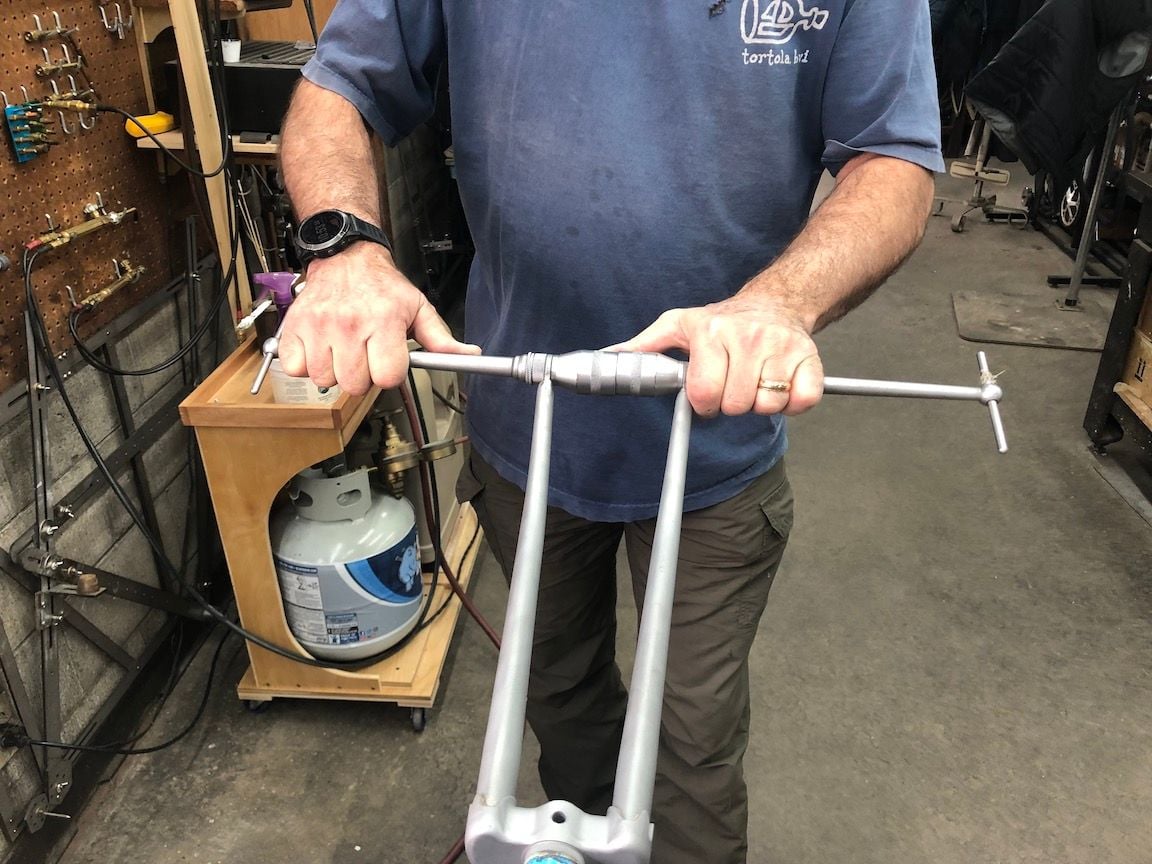
a little alignment was necessary on the fork before it was ready to be primed. Phil took off a bit of rough with a file too.

Phil in the spray booth.
4 waiting to be primed
we
On the men's frame we mixed 3 parts H of K blue primer to 1 part white primer. This way if the frame gets paint chips between the color and primer, they won't be so obvious. On this frame we used my 3M "Performance" spray gun. I like using my 3M guns for primers. I have another older 3M "Accuspry" gun. The new 3M gun has better ergonomics but worse cup shape. They have disposable cups and nozzles that can be changed when they eventually get dirty. It is possible to change the nozzle size when changing nozzles. This is a handy feature when spraying different viscosities of paint. We will continue priming the other 4 frames until all 6 are finished.
Our next step will be to sand the primer with 600 grit wet dry sandpaper before applying color coats. I'll explain more of the process after the primers have all been applied on all 6 frames.
a little alignment was necessary on the fork before it was ready to be primed. Phil took off a bit of rough with a file too.
Phil in the spray booth.
4 waiting to be primed
we
Likes For Doug Fattic:
03-11-22, 05:51 AM
#6
Full Member
Really interesting discussion of the process. Also, could you tell us more about the frame/bike shop in Ukraine, I'd be interested in a thread on that for sure.
Likes For KenNC:
03-11-22, 10:09 PM
#7
framebuilder
Thread Starter
Building frames in Ukraine is where I learned to switch fuels from acetylene to propane because of the convenience and cost advantages of using propane. There was a learning curve. I started out with some horrible but usable Russian torch handle. The next trip over I took a Harris used in the Miele factory in Toronto and eventually brought over a Victor J-28 with propane tips and finally Meco multiport tips that make using propane even better. My subject thread on Velocipede Salon on acetylene vs propane has almost 200,000 views so obviously I'm not the only one interested in making the switch.
Here are some pictures of the inside of the shop. I don't even want to tell you where it is located now or show you the outside because it is in an unfortunate location where I very much doubt it will survive the invasion. The fellow I've worked for all 22 years is hiding out with his wife in an underground place and I don't like to think about that either. The fixture on the alignment table is the one laser cut and etched over there and also what I use here in the States. I don't use my Anvil much in the States but over there it is great for putting on the rear triangles in a repetitive way.
Feel free to ask questions.

Looking towards the bicycle assembly end of the shop.

Looking at the frame building end
03-12-22, 06:16 AM
#8
framebuilder
Thread Starter
Here is a picture of the frame building tools I could hang on the wall. Some of them (like the surface gauge to check alignment and 123 blocks) are stored on the shelves to the left of this picture. The brazing equipment and supplies (torch, flux and rod) are on those shelves too. This is an example of the basic tools a person would need to make frames as an amateur. The one tool I miss the most is a 42" X 1" belt sander.

Our framebuilding tools behind one of our fillet brazed transportation frames in the process of being built.
Our framebuilding tools behind one of our fillet brazed transportation frames in the process of being built.
Likes For Doug Fattic:
03-12-22, 06:53 AM
#9
Senior Member
Join Date: Jan 2019
Location: Toledo Ohio
Posts: 1,498
Bikes: 1964 Huffy Sportsman, 1972 Fuji Newest, 1973 Schwinn Super Sport (3), 1982 Trek 412, 1983 Trek 700, 1989 Miyata 1000LT, 1991 Bianchi Boardwalk, plus others
Mentioned: 21 Post(s)
Tagged: 0 Thread(s)
Quoted: 583 Post(s)
Liked 700 Times
in
395 Posts
So, were you fillet brazing those frames because of cost or lack of availability of lugs? Perhaps it was cheaper for a smaller operation, or maybe a strength advantage?
Last edited by sd5782; 03-13-22 at 06:49 AM. Reason: Spelling
03-12-22, 08:09 AM
#10
framebuilder
Thread Starter
Fillet brazing allowed me to design the frame to fit the widest (size wise) possible number of people. The straddle size over the middle of the top tube is 30 1/2". From years of measuring customers for custom frames, I know 90% of males are able to stand over a top tube of that height. The head tube length above the top tube is longer than typical. This allows the adjustable stem to be raised a little higher for tall people. The top tube slopes at a 6� angle to help me achieve both of those objectives. Brass is economical too so it is a win, win. Fortunately I was able to buy from True Temper at a discount outside butted seat tubes and extra heavy head tubes. Otherwise I would have had to put sleeves for support on the end of the ST and HT. The fillet brazed Super Sport (and its cousins) also use extra heavy head tubes and seat tubes too.
I designed the first batch of frames to be made out of one piece head tubes with sockets for the top and down tube. They came from Miele in Toronto when they went bankrupt. Those 2 sockets are much easier to braze than a full lug. Kostya the guy that began doing the building did not have any natural talent for brazing and so I tried to make it as easy as possible for him. However the top tube of those frames did not slope enough so that limited having smaller riders being able to use those bikes.
Using either silver or brass (actually bronze but builders say brass) or fillet brazing or using lugs is more than strong enough for these bicycles. They could withstand a nuclear blast (maybe that is a poor choice of words in this situation).
03-12-22, 09:19 AM
#11
Senior Member
Join Date: Jan 2019
Location: Toledo Ohio
Posts: 1,498
Bikes: 1964 Huffy Sportsman, 1972 Fuji Newest, 1973 Schwinn Super Sport (3), 1982 Trek 412, 1983 Trek 700, 1989 Miyata 1000LT, 1991 Bianchi Boardwalk, plus others
Mentioned: 21 Post(s)
Tagged: 0 Thread(s)
Quoted: 583 Post(s)
Liked 700 Times
in
395 Posts
It is all quite interesting with more universal sizing kept in mind. I am reminded of how so many British 3 speeds are the 21” frames, as are many of the early hybrid style bikes. That is what 90% are so fit yourself to it. The taller head tube with the sloping top tube obviously gives you the adjustability you are looking for in your mission of transportation over racing. Obviously too, that would limit your off the shelf bulk lugs at an economical price. Glad to see that frame helping someone. We are all enjoying watching this process.
03-12-22, 09:18 PM
#12
Senior Member
Join Date: May 2019
Location: Bloomington, IN
Posts: 2,955
Bikes: Paramount, Faggin, Ochsner, Ciocc, Basso
Mentioned: 117 Post(s)
Tagged: 0 Thread(s)
Quoted: 1309 Post(s)
Liked 1,913 Times
in
1,143 Posts
Doug,
I am always glad to see the good we do in this world, and you sir are doing a lot! I possibly can help a bit in your project, it is uplifting to see this happening. Please PM me so I can see if I can help. Smiles, MH
I am always glad to see the good we do in this world, and you sir are doing a lot! I possibly can help a bit in your project, it is uplifting to see this happening. Please PM me so I can see if I can help. Smiles, MH
03-13-22, 09:55 AM
#13
The Wheezing Geezer

Join Date: Oct 2021
Location: Espa�ola, NM
Posts: 1,064
Bikes: 1976 Fredo Speciale, Rivendell Clem Smith Jr., Libertas mixte
Mentioned: 1 Post(s)
Tagged: 0 Thread(s)
Quoted: 414 Post(s)
Liked 939 Times
in
450 Posts
Hope your friends and shop survive this surreal reality. Maybe take some of those tools underground, too?
Prayers.
Prayers.
03-13-22, 12:00 PM
#14
framebuilder
Thread Starter
I think this invasion in the middle part of Ukraine caught Ukrainians by surprise. I thought that where this shop was located was far enough away from anything important that it would not be a problem. However the 1st wave of missiles were directed to take out the airport where that large carbo plane was located. That airport is very close by. The guy in charge of the shop had to suddenly flee and is now in hiding. I have no idea what he was able to do before he left. Unlike some of my Ukrainian friends, I don't have any contact with him. I'm worried about his van too. It was very useful for hauling things we needed transported. We also have shipping containers close to the shop with stuff we hope will not get destroyed as well. Both things and knowledge are in peril.
Likes For Doug Fattic:
03-13-22, 06:59 PM
#15
Mr. Anachronism
Join Date: Jan 2013
Location: Somewhere west of Tobie's
Posts: 2,087
Bikes: fillet-brazed Chicago Schwinns, and some other stuff
Mentioned: 29 Post(s)
Tagged: 0 Thread(s)
Quoted: 526 Post(s)
Liked 256 Times
in
165 Posts
I was going to add a suggestion to think outside the box as far as colors go, but it's hard to get past the disheartening horror of what's going on where that little shop is (was). What a graphic example of how much we take for granted in this time and place. Please add my thanks to you for using your talents to improve the lives of complete strangers in a very real way.
__________________
"My only true wisdom is in knowing I have none" -Socrates
"My only true wisdom is in knowing I have none" -Socrates
Last edited by Hudson308; 03-17-22 at 08:35 AM.
Likes For Hudson308:
03-14-22, 03:55 PM
#16
framebuilder
Thread Starter
Tom and I put the primer on the 1976 Superior this morning. The plan is to paint it a candy red. I like using House of Kolor primers because they are not only a good primer but they come in the 3 primary colors + white and black so they can be mixed for almost any color combination. Tom has already been through the process of practicing the procedure. Typically I put on 2 coats of primer but in this case we did 4 for training purposes. I did a coat to again show how it is done. Tom put on the 2nd coat with me suggesting changes when necessary. Then me again as another example (it is hard to remember every stroke). Repetition is very useful in learning situations. And finally Tom again after seeing me do it a 2nd time.
Next the frame will be wet sanded with 600 grit sandpaper. After it is all smoothed out we will spray a sealer coat. Their are 2 purposes for putting on a sealer coat. The 1st reason is that the color coat adhers better to a sealer if it is sprayed within the proper time window. The 2nd reason is that most paints are somewhat translucent (and a candy is very translucent!) and to avoid a patchy look an even sealer is sprayed before the color coats are applied. Typically the wait time between the sealer an color is around a couple of hours (it depends on the sealer). So the sealer goes on before lunch and the color after.
There are 2 more Schwinn Super Sports to paint. I will probably do one the kind of candy blue that was common in the 60's and sometimes in the 70's. The other one started life with that Schwinn gold. It isn't practical to paint it that color again. I'm open to suggestions (as long as it serves a training purpose - some colors only I can do).
My afternoons after paint class last week and now is to work getting money to Ukraine. It is challenging. We have to go through hoops to verify we actually know the people we are sending money too. In the already Russian controlled city I am presently sending money too, they are finding it difficult to deliver food for those in need.

Tom spraying red primer on the 1976 Schwinn Superior.
Next the frame will be wet sanded with 600 grit sandpaper. After it is all smoothed out we will spray a sealer coat. Their are 2 purposes for putting on a sealer coat. The 1st reason is that the color coat adhers better to a sealer if it is sprayed within the proper time window. The 2nd reason is that most paints are somewhat translucent (and a candy is very translucent!) and to avoid a patchy look an even sealer is sprayed before the color coats are applied. Typically the wait time between the sealer an color is around a couple of hours (it depends on the sealer). So the sealer goes on before lunch and the color after.
There are 2 more Schwinn Super Sports to paint. I will probably do one the kind of candy blue that was common in the 60's and sometimes in the 70's. The other one started life with that Schwinn gold. It isn't practical to paint it that color again. I'm open to suggestions (as long as it serves a training purpose - some colors only I can do).
My afternoons after paint class last week and now is to work getting money to Ukraine. It is challenging. We have to go through hoops to verify we actually know the people we are sending money too. In the already Russian controlled city I am presently sending money too, they are finding it difficult to deliver food for those in need.
Tom spraying red primer on the 1976 Schwinn Superior.
Likes For Doug Fattic:
03-14-22, 07:34 PM
#17
Senior Member

I think this invasion in the middle part of Ukraine caught Ukrainians by surprise. I thought that where this shop was located was far enough away from anything important that it would not be a problem. However the 1st wave of missiles were directed to take out the airport where that large carbo plane was located. That airport is very close by. The guy in charge of the shop had to suddenly flee and is now in hiding. I have no idea what he was able to do before he left. Unlike some of my Ukrainian friends, I don't have any contact with him. I'm worried about his van too. It was very useful for hauling things we needed transported. We also have shipping containers close to the shop with stuff we hope will not get destroyed as well. Both things and knowledge are in peril.
03-17-22, 06:50 AM
#18
framebuilder
Thread Starter
There is going to be a pause in the repainting of these Schwinn fillet brazed frames. It will be at least 3 weeks before both students and I can coordinate our schedules again. I'm looking forward to continuing to teach them how to paint bicycle frames. I've got really nice professional equipment but the same principles apply if painting with rattle cans.
Likes For Doug Fattic:
03-24-22, 06:49 PM
#19
Senior Member
Join Date: May 2019
Location: Bloomington, IN
Posts: 2,955
Bikes: Paramount, Faggin, Ochsner, Ciocc, Basso
Mentioned: 117 Post(s)
Tagged: 0 Thread(s)
Quoted: 1309 Post(s)
Liked 1,913 Times
in
1,143 Posts
Doug,
I am seeing my dentist in Michigan City tomorrow morning about 11am. (I like her, she gives hugs!) But I might be able to squeeze in a quick trip to Niles after she is finished with me. If you have a few minutes to spare, I can call you when I am finished. If so PM me. Thanks, Dave
I am seeing my dentist in Michigan City tomorrow morning about 11am. (I like her, she gives hugs!) But I might be able to squeeze in a quick trip to Niles after she is finished with me. If you have a few minutes to spare, I can call you when I am finished. If so PM me. Thanks, Dave
