


Campy Record h-limit screw stuck, stripped, and resists screw extractor.
 08-01-18, 06:09 PM
#1
Senior Member
Thread Starter
Join Date: Aug 2010
Location: Cincinnati, OH
Posts: 56
Bikes: 1980's (probably) Windsor 10-speed road bike
Mentioned: 0 Post(s)
Tagged: 0 Thread(s)
Quoted: 10 Post(s)
Liked 0 Times
in
0 Posts
Campy Record h-limit screw stuck, stripped, and resists screw extractor.
Hi y’all! It’s been a little while.
I have a road bike with Campy drivetrain on a Soma frame running 700-25c Continentals (Gatorskin in the rear). My rear derailleur is a Campy Record, circa 2009 (I’m not precisely sure).
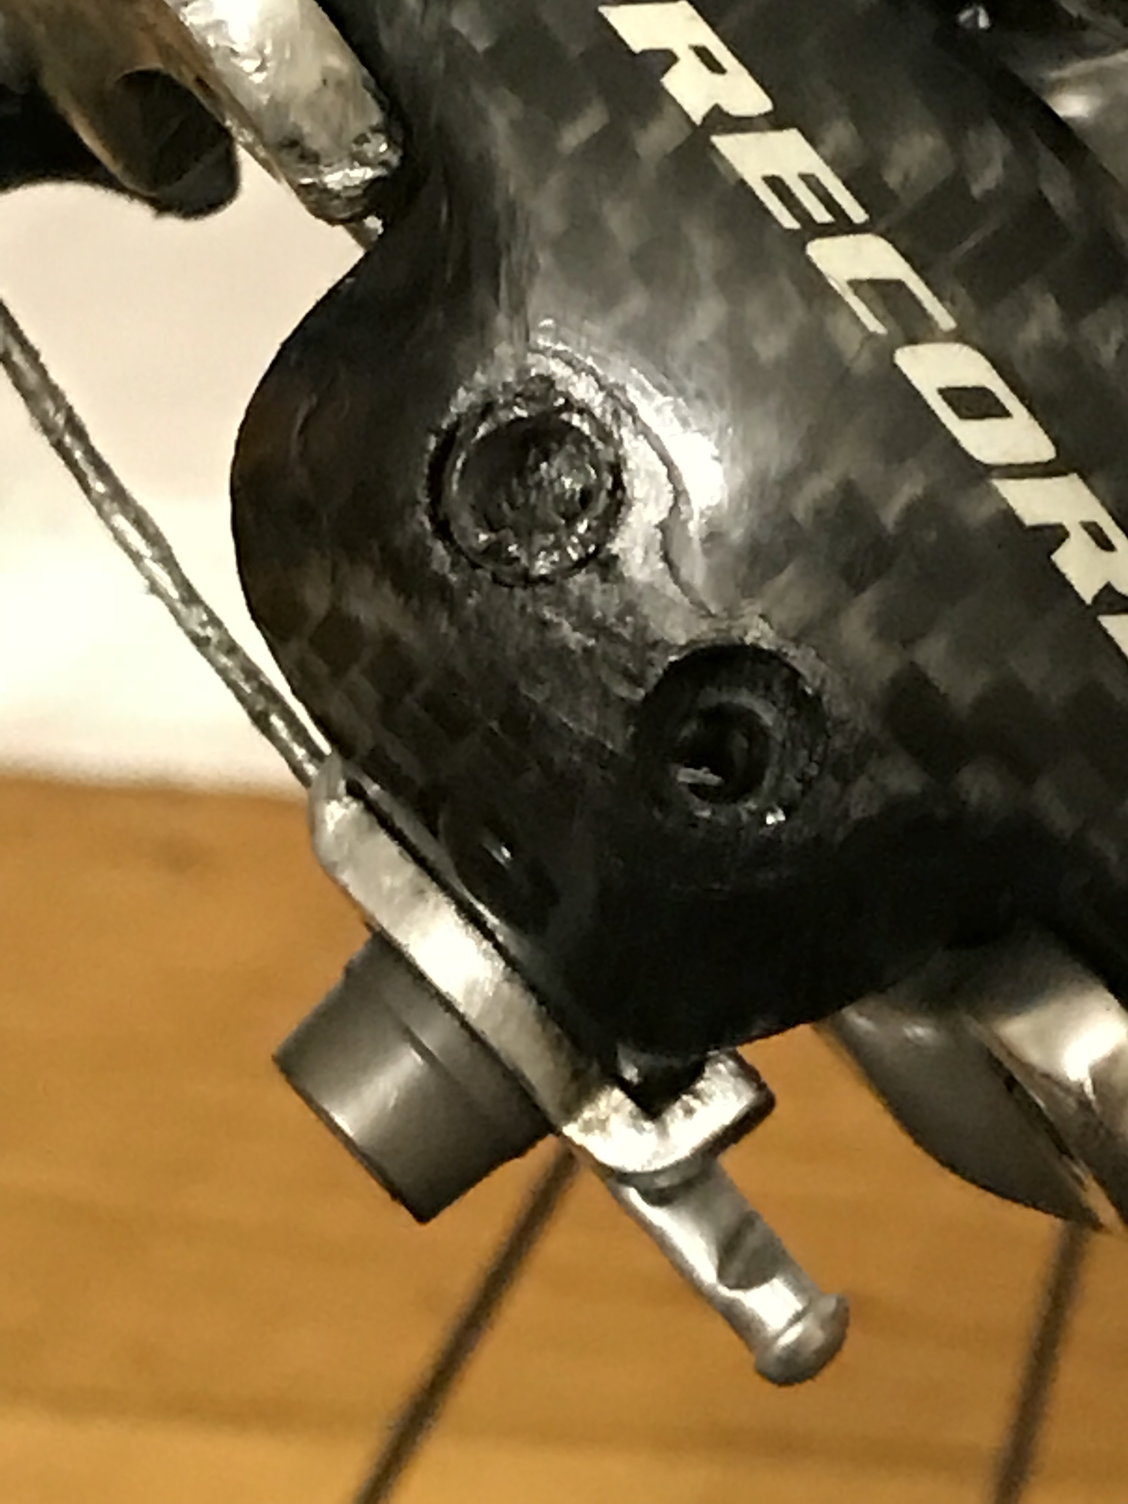
i recently cleaned the chain and decided to tune my gearing. I tried to turn my h-limit screw but it wouldn’t budge. I tried harder and it started stripping. I got a better Phillips screwdriver and tried to saturate around the screw with a penetrating lube. The screw stripped even more so I sawed a flathead-compatible groove into it and added more lube. Finally I have drilled through the head and attempted to reverse it with a screw extractor (of the appropriate size for an m4 screw). Nothing had worked.
Further, I have unfortunately drilled a very small home through part of the sidewall of the h-limit hole. I don’t _think_ it’s beyond saving but I’m unsure.
I wanted to avoid taking it to the LBS because I want to be more self-sufficient. I may resort to that but I thought first I’d ask here if there were any other methods I could try. Of course at this point I can probably drill out the core and if careful avoid doing further damage, but I think that should be a last resort.
If I had more of the screw head available I might try using a metal bonding agent to bond a bit to it, but alas I do not. However, there’s a large enough cavity within the screw that I could probably bond it to something on its interior.
But maybe there’s something simpler I’m overlooking. Thoughts?
I have a road bike with Campy drivetrain on a Soma frame running 700-25c Continentals (Gatorskin in the rear). My rear derailleur is a Campy Record, circa 2009 (I’m not precisely sure).
i recently cleaned the chain and decided to tune my gearing. I tried to turn my h-limit screw but it wouldn’t budge. I tried harder and it started stripping. I got a better Phillips screwdriver and tried to saturate around the screw with a penetrating lube. The screw stripped even more so I sawed a flathead-compatible groove into it and added more lube. Finally I have drilled through the head and attempted to reverse it with a screw extractor (of the appropriate size for an m4 screw). Nothing had worked.
Further, I have unfortunately drilled a very small home through part of the sidewall of the h-limit hole. I don’t _think_ it’s beyond saving but I’m unsure.
I wanted to avoid taking it to the LBS because I want to be more self-sufficient. I may resort to that but I thought first I’d ask here if there were any other methods I could try. Of course at this point I can probably drill out the core and if careful avoid doing further damage, but I think that should be a last resort.
If I had more of the screw head available I might try using a metal bonding agent to bond a bit to it, but alas I do not. However, there’s a large enough cavity within the screw that I could probably bond it to something on its interior.
But maybe there’s something simpler I’m overlooking. Thoughts?
 08-01-18, 06:38 PM
#2
Full Member

I assume when you say stripped you do not mean the screw thread but the screw Philips head. If so, get some vice grips and tighten hard and turn the screw. Hopefully it will come out and you just need replace the screw. I think metal bonding agent will be useless as it is way too tight for this to work. But perhaps a photo as I don't understand "drilled a very small home through part of the sidewall of the h-limit hole."
08-01-18, 07:41 PM
#3
Senior Member
Thread Starter
Join Date: Aug 2010
Location: Cincinnati, OH
Posts: 56
Bikes: 1980's (probably) Windsor 10-speed road bike
Mentioned: 0 Post(s)
Tagged: 0 Thread(s)
Quoted: 10 Post(s)
Liked 0 Times
in
0 Posts
Thanks for the tips, and, yes, the screw head is what stripped out.. Unfortunately as you’ll see below, there’s nothing to grab with pliers or channel locks. I tried that a few stages ago but to no avail.
And while I can take a photo of the screw it’s really difficult to take a shot of the very small hole I’d drilled. I don’t think it’s material to getting the screw out.
And while I can take a photo of the screw it’s really difficult to take a shot of the very small hole I’d drilled. I don’t think it’s material to getting the screw out.
08-01-18, 08:04 PM
#4
Senior Member
Join Date: Jan 2013
Location: Llano Estacado
Posts: 3,702
Bikes: old clunker
Mentioned: 13 Post(s)
Tagged: 0 Thread(s)
Quoted: 684 Post(s)
Likes: 0
Liked 105 Times
in
83 Posts
Not simpler but a different approach: maybe demount and disassemble the whole thing to get access to the screw from the opposite end, then drive it through from the back side. You may have used up all the "simpler" options.
Likes For AnkleWork:
08-01-18, 08:34 PM
#5
Senior Member

Join Date: Sep 2010
Location: Roswell, GA
Posts: 8,319
Bikes: '93 Trek 750, '92 Schwinn Crisscross, '93 Mongoose Alta
Mentioned: 30 Post(s)
Tagged: 0 Thread(s)
Quoted: 1438 Post(s)
Liked 1,092 Times
in
723 Posts
08-01-18, 10:55 PM
#6
Senior Member
Thread Starter
Join Date: Aug 2010
Location: Cincinnati, OH
Posts: 56
Bikes: 1980's (probably) Windsor 10-speed road bike
Mentioned: 0 Post(s)
Tagged: 0 Thread(s)
Quoted: 10 Post(s)
Liked 0 Times
in
0 Posts
If you cannot access the backside, you can try using left-hand drill bits to drill it out. Harbor Freight has a cheap set: https://www.harborfreight.com/left-h...-pc-61686.html
And yeah, I’m using a reverse-threaded/left-hand drill bit already, specifically designed for extracting screws, but it’s just eating away at the screw and not biting.
I think you’ve both helped confirm that there’s not a magic option I’m overlooking so on I go.
Cheers!
Likes For AnkleWork:
08-02-18, 10:54 AM
#8
Banned
Replace the whole RD.. then look for different screws with a Torx head..
why did you have to mess with the stoke limit screws, so much you, that broke them..?
why did you have to mess with the stoke limit screws, so much you, that broke them..?
08-02-18, 03:14 PM
#9
Senior Member
Thread Starter
Join Date: Aug 2010
Location: Cincinnati, OH
Posts: 56
Bikes: 1980's (probably) Windsor 10-speed road bike
Mentioned: 0 Post(s)
Tagged: 0 Thread(s)
Quoted: 10 Post(s)
Liked 0 Times
in
0 Posts
I'm trying to avoid spending a couple/few hundred on a new RD, and I as I described initially the screw was seized before I started messing with it. I followed a fairly diligent approach, beginning with the least-intense method to attempting to loosen it, and stepping toward where I am now at a fairly desperate stage. Before getting to this point I tried using a penetrating lube, I talked to a couple LBSes about suggestions they had, I researched online. This is how one develops self-reliance: by learning how to, and sometimes how not to, fix things.
08-02-18, 04:11 PM
#10
Banned
Had a Touring rider come in with a Broken Carbon Chorus outer plate ,
after hanging out a few days for special order shipping, rode off
with a less costly all metal Campag RD, Potenza I think, and was off on his merry way again..
after hanging out a few days for special order shipping, rode off
with a less costly all metal Campag RD, Potenza I think, and was off on his merry way again..
08-02-18, 04:29 PM
#11
Senior Member
Thread Starter
Join Date: Aug 2010
Location: Cincinnati, OH
Posts: 56
Bikes: 1980's (probably) Windsor 10-speed road bike
Mentioned: 0 Post(s)
Tagged: 0 Thread(s)
Quoted: 10 Post(s)
Liked 0 Times
in
0 Posts
08-02-18, 09:08 PM
#12
Senior Member
if that doesn't work, then replace the carbon plate. They can be found online for the (excessive) price of about $100.
BTW : the shift ratio on current Campy derailleurs is allegedly different than your 10-speed unit.
08-02-18, 10:43 PM
#13
Senior Member
Thread Starter
Join Date: Aug 2010
Location: Cincinnati, OH
Posts: 56
Bikes: 1980's (probably) Windsor 10-speed road bike
Mentioned: 0 Post(s)
Tagged: 0 Thread(s)
Quoted: 10 Post(s)
Liked 0 Times
in
0 Posts
Bingo. The front parallelogram cage plate on the Record rear derailleur can be completely removed. One it is, then use a small set of vice grips to attempt to clamp and then unthread the offending screw.
if that doesn't work, then replace the carbon plate. They can be found online for the (excessive) price of about $100.
BTW : the shift ratio on current Campy derailleurs is allegedly different than your 10-speed unit.
if that doesn't work, then replace the carbon plate. They can be found online for the (excessive) price of about $100.
BTW : the shift ratio on current Campy derailleurs is allegedly different than your 10-speed unit.
08-02-18, 11:10 PM
#14
Senior Member
U R welcome.
Now promise me not to strip the heads on the pins that hold the parallogram cage plates in place. Find a flat blade screwdriver that fits the slot. As large as you can find that still slides into the slot securely. Clamp the handle of the screwdriver in a small set of vice grips so that you can apply enough leverage to unscrew the pins. Make sure you do not lose the teeny tiny brass bushings that fit around the pins.
And upon re-installation, grease the pins before sliding them back in. And grease the limit screws before installation. Check the thread on your old screws - they may be compatible with pretty much all derailleur limit screws, including the trashed Shimano or whatever ones you can find in the bin of your local Co-op.
You own the best designed and most serviceable rear derailleur ever. It is a tiny little miracle of carbon, alu and titanium. Due to the serviceability and superior construction, it should last multiples of what a cheaper derailleur will last. Finally, while your at it, you may as well take both of the main springs out and regrease the internals. When you get good at this, it takes about 40 minutes for a complete overhaul, and will add years to the life of the derailleur.
Do not mess up the re-installation of the lower titanium bolt into the softer alu derailleur body. Careful here...
Likes For Dave Mayer:
08-03-18, 04:43 PM
#15
Senior Member
Thread Starter
Join Date: Aug 2010
Location: Cincinnati, OH
Posts: 56
Bikes: 1980's (probably) Windsor 10-speed road bike
Mentioned: 0 Post(s)
Tagged: 0 Thread(s)
Quoted: 10 Post(s)
Liked 0 Times
in
0 Posts
Just to close this out: went to my LBS and they confirmed that I basically made the RD unusable. The captive spring is loose because I damaged the carbon shell too much.
Live and learn.
Live and learn.
Likes For AnkleWork:
08-03-18, 07:54 PM
#17
Senior Member
Thread Starter
Join Date: Aug 2010
Location: Cincinnati, OH
Posts: 56
Bikes: 1980's (probably) Windsor 10-speed road bike
Mentioned: 0 Post(s)
Tagged: 0 Thread(s)
Quoted: 10 Post(s)
Liked 0 Times
in
0 Posts
I’m still trying. Given my ignorance I defaulted to trusting their opinion, but, yeah, the springs are sold with the limit screws and are inserted with them. I thought there may have been another spring in there that was “captive” but on closer inspection that don’t make no sense. So I’m still looking, and may disassemble.
In the event that I do need a new RD, if I’m reading other sites and references to the Branford Bikes knowledge base correctly, I could opt for a cheaper compatible Campy RD, right? Something like the 10-speed Veloce with comparable cage length?
In the event that I do need a new RD, if I’m reading other sites and references to the Branford Bikes knowledge base correctly, I could opt for a cheaper compatible Campy RD, right? Something like the 10-speed Veloce with comparable cage length?
08-06-18, 04:12 PM
#18
Senior Member
Thread Starter
Join Date: Aug 2010
Location: Cincinnati, OH
Posts: 56
Bikes: 1980's (probably) Windsor 10-speed road bike
Mentioned: 0 Post(s)
Tagged: 0 Thread(s)
Quoted: 10 Post(s)
Liked 0 Times
in
0 Posts
 12-04-20, 06:42 PM
#19
Newbie
Join Date: Oct 2012
Posts: 4
Mentioned: 0 Post(s)
Tagged: 0 Thread(s)
Quoted: 0 Post(s)
Likes: 0
Liked 0 Times
in
0 Posts
U R welcome.
Now promise me not to strip the heads on the pins that hold the parallogram cage plates in place. Find a flat blade screwdriver that fits the slot. As large as you can find that still slides into the slot securely. Clamp the handle of the screwdriver in a small set of vice grips so that you can apply enough leverage to unscrew the pins. Make sure you do not lose the teeny tiny brass bushings that fit around the pins.
And upon re-installation, grease the pins before sliding them back in. And grease the limit screws before installation. Check the thread on your old screws - they may be compatible with pretty much all derailleur limit screws, including the trashed Shimano or whatever ones you can find in the bin of your local Co-op.
You own the best designed and most serviceable rear derailleur ever. It is a tiny little miracle of carbon, alu and titanium. Due to the serviceability and superior construction, it should last multiples of what a cheaper derailleur will last. Finally, while your at it, you may as well take both of the main springs out and regrease the internals. When you get good at this, it takes about 40 minutes for a complete overhaul, and will add years to the life of the derailleur.
Do not mess up the re-installation of the lower titanium bolt into the softer alu derailleur body. Careful here...
Now promise me not to strip the heads on the pins that hold the parallogram cage plates in place. Find a flat blade screwdriver that fits the slot. As large as you can find that still slides into the slot securely. Clamp the handle of the screwdriver in a small set of vice grips so that you can apply enough leverage to unscrew the pins. Make sure you do not lose the teeny tiny brass bushings that fit around the pins.
And upon re-installation, grease the pins before sliding them back in. And grease the limit screws before installation. Check the thread on your old screws - they may be compatible with pretty much all derailleur limit screws, including the trashed Shimano or whatever ones you can find in the bin of your local Co-op.
You own the best designed and most serviceable rear derailleur ever. It is a tiny little miracle of carbon, alu and titanium. Due to the serviceability and superior construction, it should last multiples of what a cheaper derailleur will last. Finally, while your at it, you may as well take both of the main springs out and regrease the internals. When you get good at this, it takes about 40 minutes for a complete overhaul, and will add years to the life of the derailleur.
Do not mess up the re-installation of the lower titanium bolt into the softer alu derailleur body. Careful here...
12-04-20, 08:50 PM
#20
Senior Member
Wow: someone actually did digest my tedious essay on the servicing of a Campy derailleur.
OK: I'm impressed. Finding the two tiny brass bushings indicates that you did get down deep into the derailleur. But, honestly, I don't know the ideal orientation of these bushings. They certainly exist to take out any side play in the outer derailleur parallelogram cage. So as long as they are both installed on the same side (either top or bottom), it probably doesn't matter.
OK: I'm impressed. Finding the two tiny brass bushings indicates that you did get down deep into the derailleur. But, honestly, I don't know the ideal orientation of these bushings. They certainly exist to take out any side play in the outer derailleur parallelogram cage. So as long as they are both installed on the same side (either top or bottom), it probably doesn't matter.
12-06-20, 06:39 PM
#21
Newbie
Join Date: Oct 2012
Posts: 4
Mentioned: 0 Post(s)
Tagged: 0 Thread(s)
Quoted: 0 Post(s)
Likes: 0
Liked 0 Times
in
0 Posts
Wow: someone actually did digest my tedious essay on the servicing of a Campy derailleur.
OK: I'm impressed. Finding the two tiny brass bushings indicates that you did get down deep into the derailleur. But, honestly, I don't know the ideal orientation of these bushings. They certainly exist to take out any side play in the outer derailleur parallelogram cage. So as long as they are both installed on the same side (either top or bottom), it probably doesn't matter.
OK: I'm impressed. Finding the two tiny brass bushings indicates that you did get down deep into the derailleur. But, honestly, I don't know the ideal orientation of these bushings. They certainly exist to take out any side play in the outer derailleur parallelogram cage. So as long as they are both installed on the same side (either top or bottom), it probably doesn't matter.
Your message gave me the confidence to take that face plate off and actually properly service it! But then I stupidly forgot where the bushings came from!
So when you say same side, you mean top or bottom side, not left or right? I've put them on the top, i.e. closest to the casette, and they feel ok so far
Last edited by jdotd; 12-06-20 at 06:44 PM.

