


Drillium Dude Wannabe
 01-07-13, 07:52 AM
#1
Senior Member
Thread Starter
Join Date: Jul 2012
Location: Amsterdam
Posts: 747
Bikes: Enough for now
Mentioned: 2 Post(s)
Tagged: 0 Thread(s)
Quoted: 2 Post(s)
Likes: 0
Liked 5 Times
in
5 Posts
Drillium Dude Wannabe
Being inspired by the beautiful work by DD and the presence of a lend Dremel a some time on my hands, I thought I'd give it shot.
Some left-over campy dt-shifters:
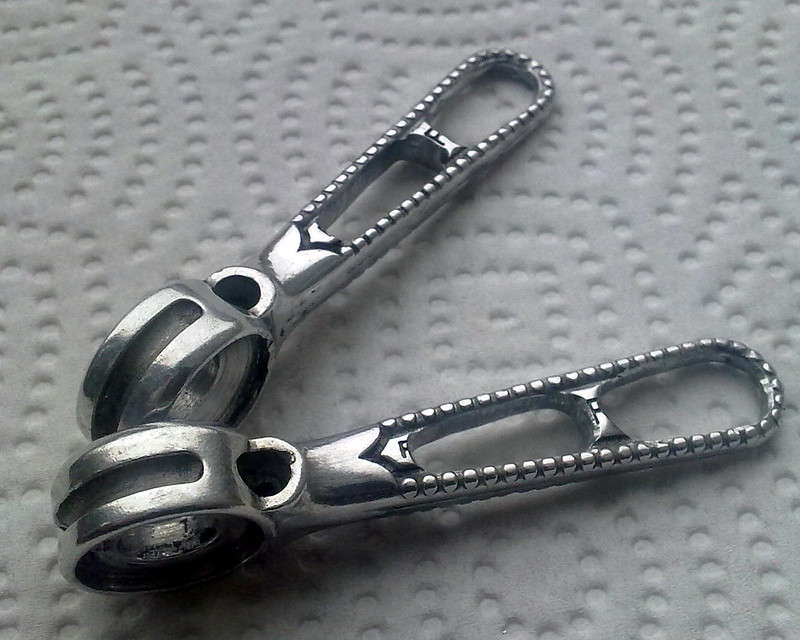
They're definitely not perfect, but I forgot to follow DD's posted instructions step-by-step.
Some left-over campy dt-shifters:
They're definitely not perfect, but I forgot to follow DD's posted instructions step-by-step.
Last edited by Zieleman; 01-07-13 at 02:35 PM.
 01-07-13, 08:09 AM
#2

Cat 6

Join Date: Dec 2007
Location: Mountain Brook, AL
Posts: 7,482
Mentioned: 27 Post(s)
Tagged: 0 Thread(s)
Quoted: 500 Post(s)
Liked 183 Times
in
118 Posts
What do they look like on the "right" side? 
A good first go, but IMO you need to get rid of the P's (probably easier at the beginning)
A good first go, but IMO you need to get rid of the P's (probably easier at the beginning)
01-07-13, 09:02 AM
#3
Senior Member
Join Date: Jul 2011
Location: Metro Exurb
Posts: 424
Bikes: 1982 Torker BMX, 1990 Cannondale Black Lightning, 1996 Cannondale F400
Mentioned: 0 Post(s)
Tagged: 0 Thread(s)
Quoted: 0 Post(s)
Likes: 0
Liked 0 Times
in
0 Posts
A for effort, but don't quit your day job yet.
01-07-13, 09:08 AM
#4
Senior Member

Join Date: Apr 2007
Location: Thunder Bay, Ontario, Canada - burrrrr!
Posts: 11,674
Bikes: 1958 Rabeneick 120D, 1968 Legnano Gran Premio, 196? Torpado Professional, 2000 Marinoni Piuma
Mentioned: 210 Post(s)
Tagged: 0 Thread(s)
Quoted: 1372 Post(s)
Likes: 0
Liked 1,751 Times
in
938 Posts
Don't give up your day job.
Sorry to be negative, but the result of your work looks amateurish, poorly planned and unfinished. That said, no one expects perfection from a novice. If it is in you to keep at it, do so and your skill level will increase. Be prepared to make a mistake or two, as you learn. My guess is that Drillium Dude did not get it perfect, the first time out of the gate, either.
I have built lots of bikes, and not all of them turned out perfect. Even today, after hundreds of builds, I still goof, now and again.
__________________
"98% of the bikes I buy are projects".
"98% of the bikes I buy are projects".
01-07-13, 09:13 AM
#5
Senior Member

Not bad for a first try. I'd probably practice on less valuable parts than Campy however
01-07-13, 09:25 AM
#6
Senior Member

Join Date: Feb 2011
Location: adelaide, australia
Posts: 2,798
Mentioned: 6 Post(s)
Tagged: 0 Thread(s)
Quoted: 227 Post(s)
Liked 390 Times
in
149 Posts
I just see the main excavation work done. Go at them with a small round and flat file and a little patience and they'll come up a treat.
01-07-13, 09:33 AM
#7
MIKE is my name!

Join Date: Mar 2012
Location: finland,baltimore
Posts: 2,846
Bikes: hans lutz, , puch mistral ultima,2x Austro Daimler Smoked chrome Ultima,Austro Daimler Mixte,Austro Daimler 531 mixte, flying arrow,F Moser,
Mentioned: 5 Post(s)
Tagged: 0 Thread(s)
Quoted: 7 Post(s)
Liked 20 Times
in
4 Posts
When you guys have done this work yourself then give the guy comment,
It's not that difficult but it's not that easy either!
it looks pretty good to me, I might not have gone so thin on the top but that is taste.
i did one seat post and it was a lot of work to make it look good.
It's not that difficult but it's not that easy either!
it looks pretty good to me, I might not have gone so thin on the top but that is taste.
i did one seat post and it was a lot of work to make it look good.
01-07-13, 10:43 AM
#8
Senior Member

Join Date: Aug 2011
Location: Puyallup, WA
Posts: 443
Bikes: Tommasini Super Prestige, Kamra Triathlee, Nishiki Tri-A equipe', Sakai 2000
Mentioned: 2 Post(s)
Tagged: 0 Thread(s)
Quoted: 0 Post(s)
Likes: 0
Liked 3 Times
in
3 Posts
 Get your self a set of jewelers files to smooth out the insides. Depending on the bits you have for your Dremel you could maybe get a bit closer with that before going to the file work, let the cutter do it's job- don't push too hard or let it chatter. Slow and steady wins the race here, if get in a hurry you risk removing too much.
 -Andy
01-07-13, 10:51 AM
#9
Senior Member
Join Date: Jul 2012
Location: Las Vegas, NV
Posts: 624
Bikes: 1949 'Italian' , 1950 San Giusto, 1897 Union, and a number of "projects"... 198? Grandis, a couple of Mixte's...
Mentioned: 0 Post(s)
Tagged: 0 Thread(s)
Quoted: 1 Post(s)
Likes: 0
Liked 1 Time
in
1 Post
Being at work, I can't see the photos, but just a general comment about cutting aluminum with files, burrs and bits...keep the cutting surfaces lubed with WD-40 so the alloy does not clog them.
Joe
Joe
01-07-13, 10:55 AM
#10
Cisalpinist

Join Date: Jan 2011
Location: Holland
Posts: 5,557
Bikes: blue ones.
Mentioned: 0 Post(s)
Tagged: 0 Thread(s)
Quoted: 5 Post(s)
Likes: 0
Liked 16 Times
in
11 Posts
He, those lil' triangles at the base of the teardrop shape are a beehutch to get rid of. As others suggested, remove the P's, polish and fill in the filed area's with some model paint. I'll post some images of my own try (and subsequent failure) once I unearth them - it's a bit of a mess in casa Italuminium at the moment due to my move
01-07-13, 12:53 PM
#11
Senior Member
Join Date: Jul 2009
Posts: 11,128
Bikes: 1986 Alan Record Carbonio, 1985 Vitus Plus Carbone 7, 1984 Peugeot PSV, 1972 Line Seeker, 1986(est.) Medici Aerodynamic (Project), 1985(est.) Peugeot PY10FC
Mentioned: 22 Post(s)
Tagged: 0 Thread(s)
Quoted: 150 Post(s)
Likes: 0
Liked 34 Times
in
27 Posts
I'm not sure, but you might be able to just get rid of the center web on those levers. Simplex had been making levers with what seems to be much less material on it without problems.
Although these are retrofrictions (which might lessen some of the stress on the levers),
IIRC, they also had a version with similar minimalist design that was just plain friction style.
Chombi
Although these are retrofrictions (which might lessen some of the stress on the levers),
IIRC, they also had a version with similar minimalist design that was just plain friction style.
Chombi
01-07-13, 01:05 PM
#13
Senior Member

Join Date: Apr 2005
Location: Wherever
Posts: 16,748
Mentioned: 92 Post(s)
Tagged: 0 Thread(s)
Quoted: 556 Post(s)
Likes: 0
Liked 132 Times
in
78 Posts
As for the OP's efforts here, I agree, this is one tough crowd. A little more work cleaning up and these will be nice, Zieleman.
01-07-13, 01:51 PM
#15
Senior Member
Join Date: Jul 2012
Location: Las Vegas, NV
Posts: 624
Bikes: 1949 'Italian' , 1950 San Giusto, 1897 Union, and a number of "projects"... 198? Grandis, a couple of Mixte's...
Mentioned: 0 Post(s)
Tagged: 0 Thread(s)
Quoted: 1 Post(s)
Likes: 0
Liked 1 Time
in
1 Post
Good advice Joe. Especially with fine little Swiss jeweler's files. And ESPECIALLY with aluminum. But you know what I use? Chalk. Stick is about an inch in diameter and four inches long. Meant for filling the teeth in files so they don't load up. Works great.
As for the OP's efforts here, I agree, this is one tough crowd. A little more work cleaning up and these will be nice, Zieleman.
As for the OP's efforts here, I agree, this is one tough crowd. A little more work cleaning up and these will be nice, Zieleman.
Is this some specific type of chalk ? Hadn't heard of this and would like to know more. I'd much rather have a dry 'lubricant' for these ops.
Joe
01-07-13, 01:54 PM
#16
Senior Member

i think it's a great start, but not quite finished. get those little jeweler's hand files and go to town.
__________________
Check out www.djcatnap.com for articles on vintage Japanese & French bicycle restorations, components and history.
Check out www.djcatnap.com for articles on vintage Japanese & French bicycle restorations, components and history.
01-07-13, 02:23 PM
#18
Senior Member
Join Date: Apr 2005
Location: Wherever
Posts: 16,748
Mentioned: 92 Post(s)
Tagged: 0 Thread(s)
Quoted: 556 Post(s)
Likes: 0
Liked 132 Times
in
78 Posts
 01-07-13, 02:27 PM
#20
Banned.

Join Date: Jul 2009
Location: PAZ
Posts: 12,294
Mentioned: 255 Post(s)
Tagged: 0 Thread(s)
Quoted: 2588 Post(s)
Liked 4,824 Times
in
1,709 Posts
BTW, keep the webs! Although these are the thicker later models, they still flex too much and can break if they're completely hollowed out. Don't ask me how I know
DD
 01-07-13, 02:27 PM
#21
Banned.
Join Date: Jul 2009
Location: PAZ
Posts: 12,294
Mentioned: 255 Post(s)
Tagged: 0 Thread(s)
Quoted: 2588 Post(s)
Liked 4,824 Times
in
1,709 Posts
01-07-13, 02:32 PM
#22
Senior Member
Thread Starter
Join Date: Jul 2012
Location: Amsterdam
Posts: 747
Bikes: Enough for now
Mentioned: 2 Post(s)
Tagged: 0 Thread(s)
Quoted: 2 Post(s)
Likes: 0
Liked 5 Times
in
5 Posts
Thanks for the feedback y'all! They are indeed not quite finished... I tried to do some finishing touches with sandpaper and a dremel touch-up bit and removed the p's, but will probably need the above mentioned juwelers-files to make it look better.
This one is meant to be a learning project before i start to drill on other stuff (though I already had a NR RD in mind...) and all your comments are very helpful when it comes to critics and ideas on shape, tools and standards. I'll post some more pics of the progress when able.
Cheers!
This one is meant to be a learning project before i start to drill on other stuff (though I already had a NR RD in mind...) and all your comments are very helpful when it comes to critics and ideas on shape, tools and standards. I'll post some more pics of the progress when able.
Cheers!
01-07-13, 02:33 PM
#23
Senior Member
Join Date: Apr 2005
Location: Wherever
Posts: 16,748
Mentioned: 92 Post(s)
Tagged: 0 Thread(s)
Quoted: 556 Post(s)
Likes: 0
Liked 132 Times
in
78 Posts
Important info D.D. I like the center web too, for aesthetic reasons. Just needs to dress it a bit and remove the P's and they'll look great.
01-07-13, 03:15 PM
#25
Cisalpinist
Join Date: Jan 2011
Location: Holland
Posts: 5,557
Bikes: blue ones.
Mentioned: 0 Post(s)
Tagged: 0 Thread(s)
Quoted: 5 Post(s)
Likes: 0
Liked 16 Times
in
11 Posts
Oh bollocks, I think I went to far with my shifters then. Ah well, they're meant for the ALAN, which is a suicide bike anyway. YOLO. Campanyolo.