


The Ol’ Raleigh Green Paint Question (Superbe Restoration)
 10-20-20, 09:50 PM
#1
Junior Member
Thread Starter

Join Date: Oct 2020
Posts: 12
Mentioned: 0 Post(s)
Tagged: 0 Thread(s)
Quoted: 1 Post(s)
Likes: 0
Liked 0 Times
in
0 Posts
The Ol’ Raleigh Green Paint Question (Superbe Restoration)
Hey hey. First, thank you all for the incredible wealth of information within this community. On so many levels bikeforums has help me grow as a cyclist. Many thanks.
So....about the elusive Raleigh Green. I’m doing a moderate restoration of a ‘69 Superbe. The paint was well beyond patina, so I stripped it. My plan was to go with 2pt auto primer, Land Rover bronze green for the base....and then add a thin airbrush of a Testors blend of lime green and black as a topcoat to the dry base. Both are enamels, and I expect to be good up to this point and get back some of the pearlescent in the original Raleigh paint (or so I hope based on the YouTube video from a guy who seems like he’s spent some time around paint).
Here comes the question: the Testors Gloss is enamel. I will let it dry for some number of days before I touch it. But then I plan to put the decals on and add an enamel automotive clear coat. Before I spend another $50 on clear coat (and further regret not just doing a custom powder coat and calling it ‘close enough’ as time and expense mount), does anyone know if I should expect the 2-pt auto clear coat (Eastwood or equivalent) to compromise the Testors enamel? It’s all enamel, and I will 800 grit the Testors before the aerosol clear goes on.
Long first post, but so it goes. Many thanks to anyone who might be able to point me in the right direction.
AG
 10-21-20, 08:16 AM
#2
Senior Member
Join Date: Jan 2007
Location: Ontario
Posts: 2,648
Mentioned: 16 Post(s)
Tagged: 0 Thread(s)
Quoted: 478 Post(s)
Liked 634 Times
in
336 Posts
Would it be worth your time to try an experiment off the bike first? Perhaps spray a piece of pipe or whatever with a base coat, then testors, then clear? It would definitely tell you one way or another what to expect!
10-21-20, 08:39 AM
#3
Junior Member
Thread Starter
Join Date: Oct 2020
Posts: 12
Mentioned: 0 Post(s)
Tagged: 0 Thread(s)
Quoted: 1 Post(s)
Likes: 0
Liked 0 Times
in
0 Posts
However, the curing time required between stages has me hoping a little collective wisdom might help accelerate the process.
10-21-20, 11:04 AM
#4
Senior Member
Join Date: Dec 2016
Location: Long Island, NY
Posts: 2,111
Bikes: Trek 800 x 2, Schwinn Heavy Duti, Schwinn Traveler, Schwinn Le Tour Luxe, Schwinn Continental, Cannondale M400 and Lambert, Schwinn Super Sport
Mentioned: 14 Post(s)
Tagged: 0 Thread(s)
Quoted: 811 Post(s)
Liked 1,024 Times
in
666 Posts
I have clear coated over acrylic, enamel and Dupicolor paints. All have worked. Always test a sample first and remember to include sanding with the sample if that is what you are going to do.
I usually allow a week for the paint to settle when switching paint types before clear coating it. If I am applying paint that is all the the same family, I do clear coat on the same day.
This sounds like a candy apple paint or sometimes called flamboyant paint where a think color is applied over silver or gold base.
Please post pictures of the project as it progresses.
10-21-20, 02:40 PM
#5
Junior Member
Thread Starter
Join Date: Oct 2020
Posts: 12
Mentioned: 0 Post(s)
Tagged: 0 Thread(s)
Quoted: 1 Post(s)
Likes: 0
Liked 0 Times
in
0 Posts
Thanks so much, Velo Mule. I like the concept of the Flamboyant paint, an outlandish term for an outlandish process for a vintage workhorse. As acknowledged elsewhere, the Raleigh house enamels of that late ‘60s-early 70s period had metallic hints of bronze that suffuse the green with gold in sunlight. The video describing the overlay approach to “Raleigh Green” describes 12 parts Lime Green Gloss Testors Enamel to 1 part Black gloss, airbrushed over a Hunter green basecoat. Apparently the Testors takes forever to kick and harden; the resilience is unclear, although the use in model rocketry gives me some confidence, especially if it takes an enamel (or urethane) clear coat.
I’ve also picked up from other threads that it’s key that the first two coats of clear on the decals (all of which match the originals for the ‘69 Superbe and came from eBay) are a very light dusting. Then, at tack, the wet coat. To go big on the first pass is to risk compromising the ink on the decal as the hardener activates.
As for the pics, I will definitely post those and some of the process when complete.
Should anyone else have any insight on this process, I really appreciate it. Thanks again.
10-28-20, 02:15 PM
#6
Junior Member
Thread Starter
Join Date: Oct 2020
Posts: 12
Mentioned: 0 Post(s)
Tagged: 0 Thread(s)
Quoted: 1 Post(s)
Likes: 0
Liked 0 Times
in
0 Posts
Unfortunately I can’t post photos until I hit ten posts, but the first test of the Testors topcoat on the Rover Bronze Green base is pretty close to the original Raleigh Green, albeit with a bit more sparkle.
10-28-20, 05:36 PM
#11
Senior Member
Join Date: Dec 2016
Location: Long Island, NY
Posts: 2,111
Bikes: Trek 800 x 2, Schwinn Heavy Duti, Schwinn Traveler, Schwinn Le Tour Luxe, Schwinn Continental, Cannondale M400 and Lambert, Schwinn Super Sport
Mentioned: 14 Post(s)
Tagged: 0 Thread(s)
Quoted: 811 Post(s)
Liked 1,024 Times
in
666 Posts
Almost there AGMarin .
10-29-20, 10:57 AM
#12
Senior Member
Join Date: Mar 2013
Location: Maryland
Posts: 3,800
Bikes: Lots of English 3-speeds, a couple of old road bikes, 3 mountain bikes, 1 hybrid, and a couple of mash-ups
Mentioned: 53 Post(s)
Tagged: 0 Thread(s)
Quoted: 887 Post(s)
Liked 335 Times
in
225 Posts
You could buy a length of thin-wall conduit at a home store and experiment on that. It's a cheap way to try things out.
10-29-20, 05:05 PM
#15
Junior Member
Thread Starter
Join Date: Oct 2020
Posts: 12
Mentioned: 0 Post(s)
Tagged: 0 Thread(s)
Quoted: 1 Post(s)
Likes: 0
Liked 0 Times
in
0 Posts
Photos
...and with that, ten posts and photo posting capabilities.
Attached are photos that illustrate the progression from the stripped bike to current state and the Testors test coating.
After light compounding immediately compromised the paint, I stripped the green top coat and went down to the black enamel basecoat except where spot rust required going down to bare metal.
Then Citristrip to eliminate paint around lugs and Naval Jelly to treat rust.
Primer is Spraymax 2K automotive prime/fill.
Base is one coat pastel blue Land Rover Acrylic 1K enamel, followed by 4 coats Land Rover Bronze Green Acrylic 1K enamel.
After curing for 4 days, the paint was no longer releasing gas at a discernible level. So, I set up the test on the back side of the chain guard, wet sanding with 600 grit.
The Testors paint is 12 parts Lime Green Gloss Enamel to 1 part Black Gloss enamel, diluted 3:1 with Testors thinner.
The test was applied with a cheap airbrush with a .5mm nozzle. The backside used less than 0.5ml of the mix. Based on this, the whole bike will take maybe 6 bottles of the Testor paint to cover the entirety. We shall see.
Test shows the Topcoat (dry) in bright sun and inside. You can see the luminance in the paint from the yellow notes in the Testor and the metallic notes in the Lime gloss.
It is a close match to the only remaining original paint that was not faded: the section of fork within the head tube.
Relative to the bare basecoat, the top-coated paint has much more life and shares the dynamic qualities of the famed Raleigh Green. Not perfect, but close.
Next step will be to test the impact of 1K Acrylic Enamel Clearcoat, again from a Spraymax mix applied from the Aerosol using a cheap trigger tool.

Stripped.

Primed.
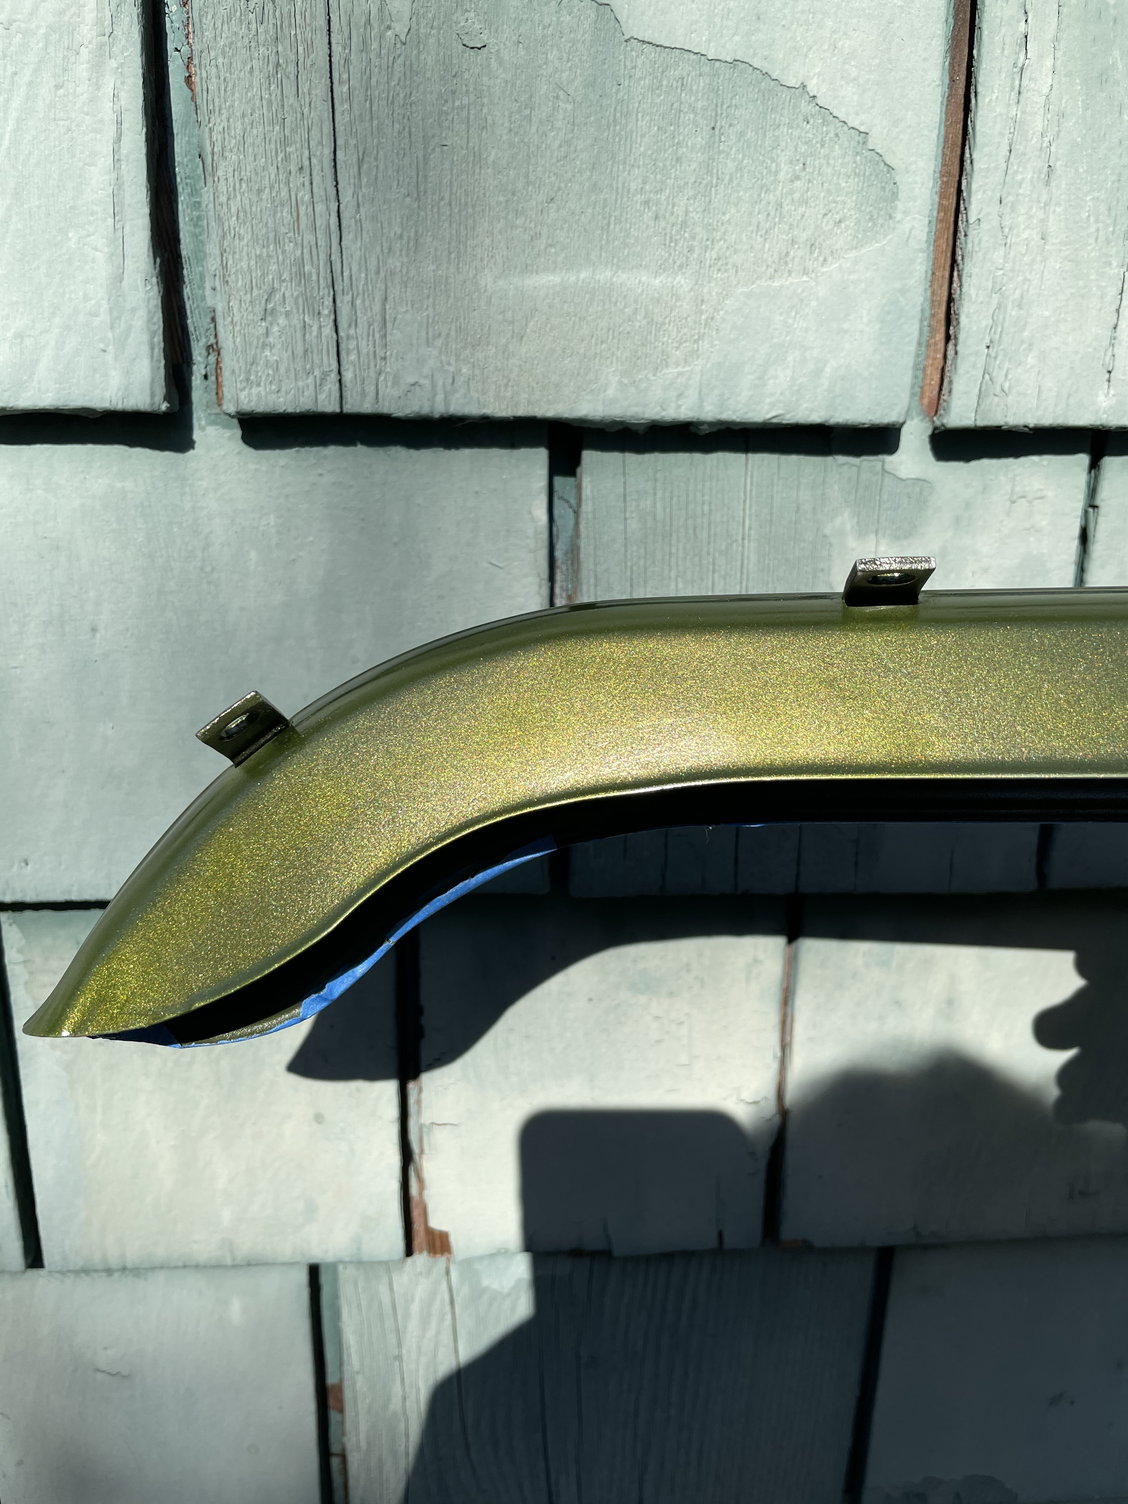
testors raleigh green mix on inside face of chain guard over the bronze-green basecoat. Direct sun.
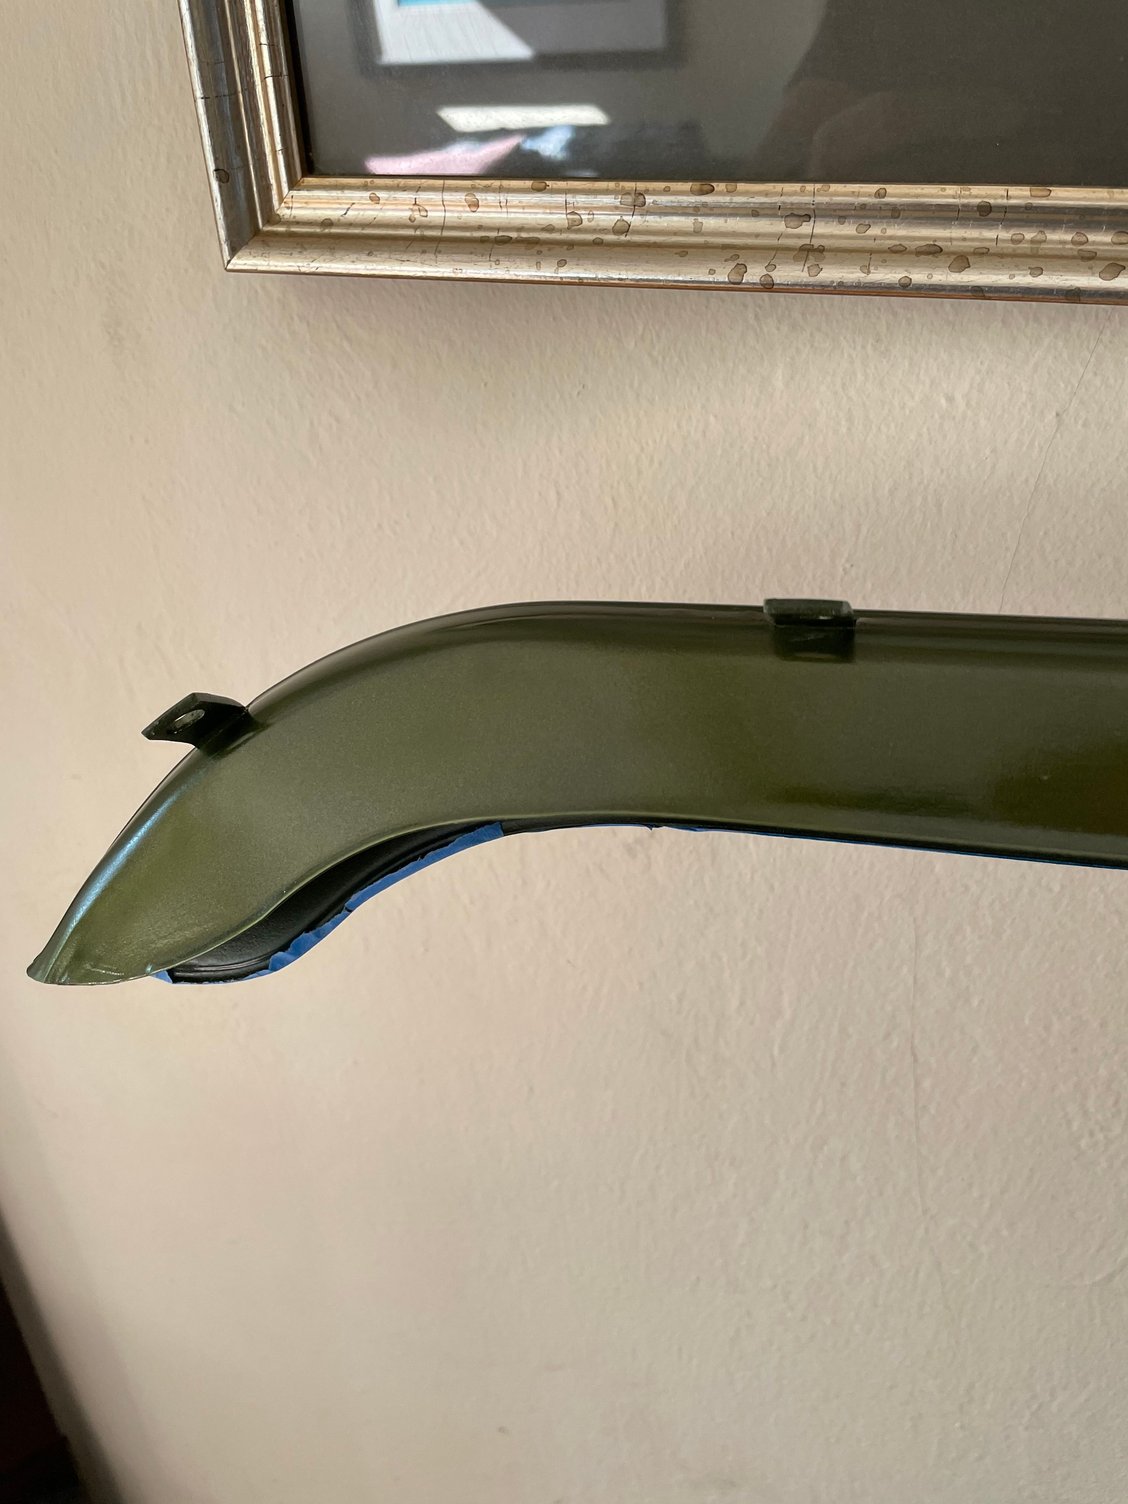
Inside.
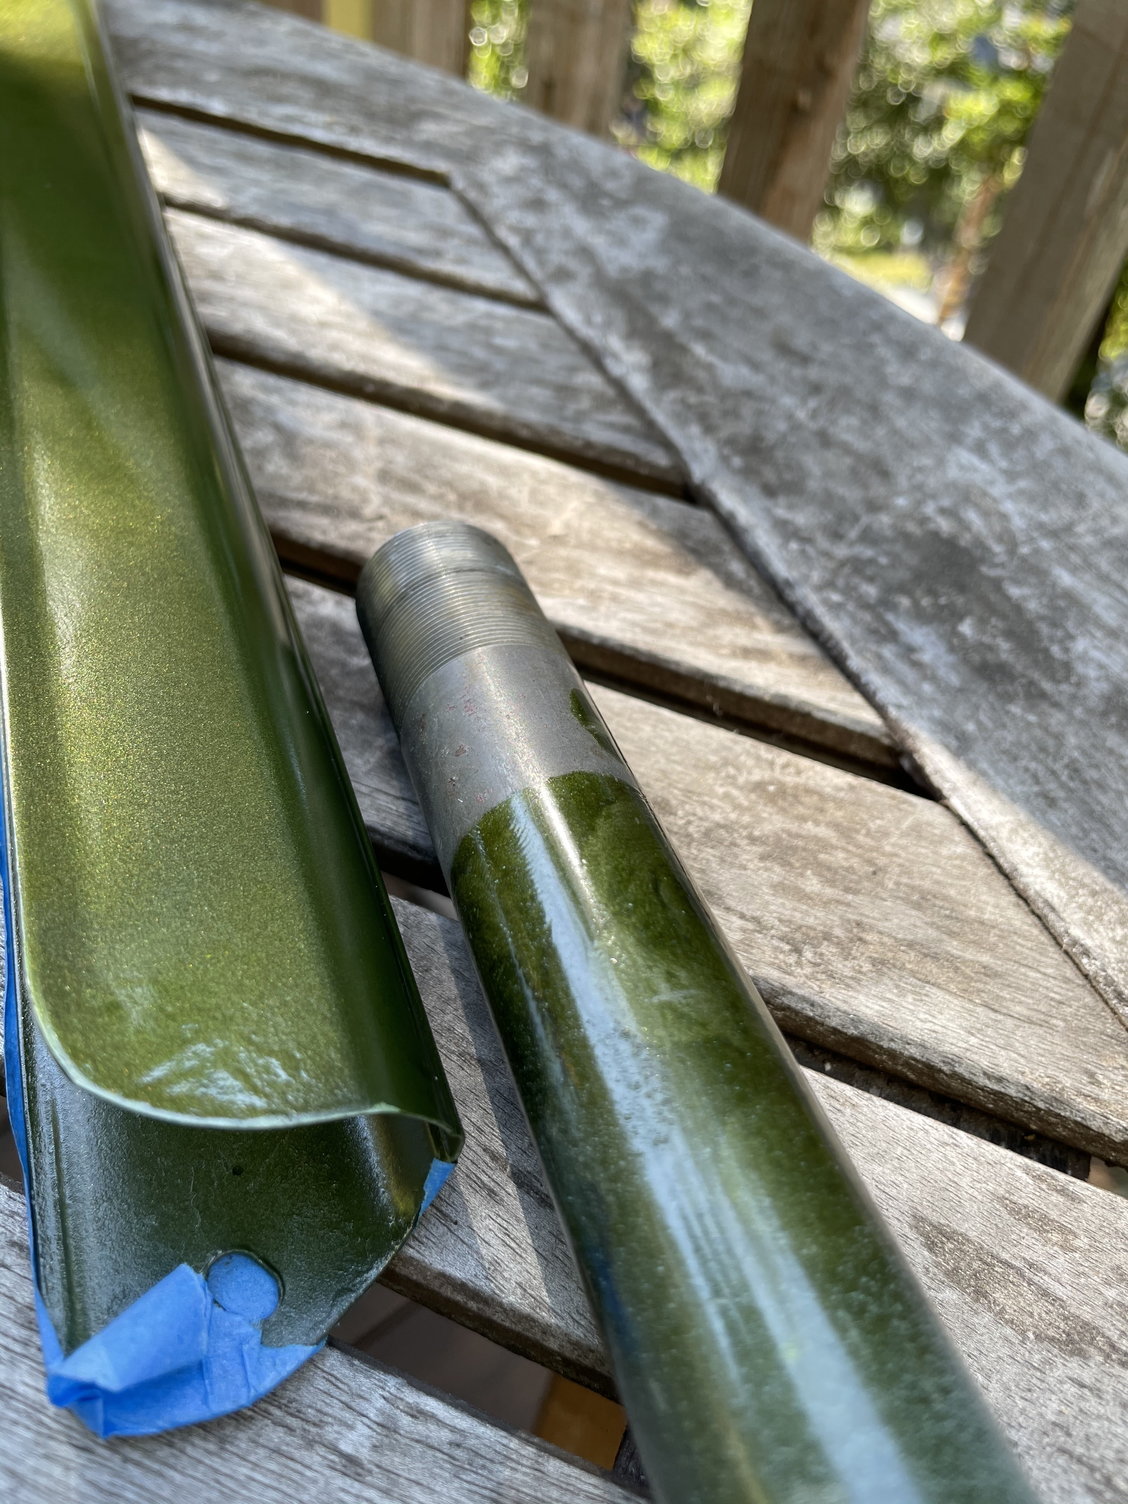
Relative to original ‘69 paint.

Relative to unfinished bronze green Land Rover enamel.

Land Rover Bronze Green acrylic enamel (aerosol). V flat.
Attached are photos that illustrate the progression from the stripped bike to current state and the Testors test coating.
After light compounding immediately compromised the paint, I stripped the green top coat and went down to the black enamel basecoat except where spot rust required going down to bare metal.
Then Citristrip to eliminate paint around lugs and Naval Jelly to treat rust.
Primer is Spraymax 2K automotive prime/fill.
Base is one coat pastel blue Land Rover Acrylic 1K enamel, followed by 4 coats Land Rover Bronze Green Acrylic 1K enamel.
After curing for 4 days, the paint was no longer releasing gas at a discernible level. So, I set up the test on the back side of the chain guard, wet sanding with 600 grit.
The Testors paint is 12 parts Lime Green Gloss Enamel to 1 part Black Gloss enamel, diluted 3:1 with Testors thinner.
The test was applied with a cheap airbrush with a .5mm nozzle. The backside used less than 0.5ml of the mix. Based on this, the whole bike will take maybe 6 bottles of the Testor paint to cover the entirety. We shall see.
Test shows the Topcoat (dry) in bright sun and inside. You can see the luminance in the paint from the yellow notes in the Testor and the metallic notes in the Lime gloss.
It is a close match to the only remaining original paint that was not faded: the section of fork within the head tube.
Relative to the bare basecoat, the top-coated paint has much more life and shares the dynamic qualities of the famed Raleigh Green. Not perfect, but close.
Next step will be to test the impact of 1K Acrylic Enamel Clearcoat, again from a Spraymax mix applied from the Aerosol using a cheap trigger tool.
Stripped.
Primed.
testors raleigh green mix on inside face of chain guard over the bronze-green basecoat. Direct sun.
Inside.
Relative to original ‘69 paint.
Relative to unfinished bronze green Land Rover enamel.
Land Rover Bronze Green acrylic enamel (aerosol). V flat.
10-29-20, 07:51 PM
#16

Friendship is Magic

Join Date: Nov 2010
Location: Sacramento, CA
Posts: 22,985
Bikes: old ones
Mentioned: 304 Post(s)
Tagged: 0 Thread(s)
Quoted: 26425 Post(s)
Liked 10,381 Times
in
7,209 Posts
.
...if bb chance you are stll worried about what will happen to your base coats whan you apply the final Spray Maxx 2K clear, I have sprayed it as a final coating over just about every sort of paint you can imagine, with good results. This includes applying it over the original paint and decals on a late 1950's Lenton Grand Prix as a preservative, over various Testors enamels and lacquers, sold in small spray cans in hobby shops, automotive quality color coats, vinyl and slide decals, and regular spray enamel by Rustoleum from the Home Depot. It has thus fr worked well over everything.
That said, it is always advisable to test a small area first, and I do the conduit pipe test patch for almost everything I'm trying to color match anyway.
But that Clear Glamour 2K stuff is space age magic. You do have to spray it to saturation on the surface, just this side of running, to get a really high gloss, deep clear finish. Otherwise, it has revolutionized frame painting by the home hobbyist.
Also, IME it's a waste of time to finely polish the paint surface you have , prior to applying the 2K urethane stuff. The real gloss seems to come from applying the urethane thickly, to just short of runs. It flows to a smooth and shiny final surface if you do that.
Last edited by 3alarmer; 10-29-20 at 07:54 PM.
10-31-20, 05:46 PM
#17
Junior Member
Thread Starter
Join Date: Oct 2020
Posts: 12
Mentioned: 0 Post(s)
Tagged: 0 Thread(s)
Quoted: 1 Post(s)
Likes: 0
Liked 0 Times
in
0 Posts
Thanks, @3alarmer. That’s the stuff I plan to use. I appreciate the advice on application.
How long did you dry the Testors before applying the 2X clear? I’ve got to let it dry to touch to put the decals on before the clear, but am uncertain on whether or not I should give the Testors a full week to really cure. Some sources indicate that allowing the “base” (in this case, Testors over wet sanded enamel acrylic auto basecoat dried for 72 hours) to fully cure creates binding problems for the clear, even if sanded and prepped appropriately.
Testing on the pipe is the move, but if you have any further advice on this, I’d appreciate it.
10-31-20, 10:11 PM
#18
Friendship is Magic
Join Date: Nov 2010
Location: Sacramento, CA
Posts: 22,985
Bikes: old ones
Mentioned: 304 Post(s)
Tagged: 0 Thread(s)
Quoted: 26425 Post(s)
Liked 10,381 Times
in
7,209 Posts
Thanks, @3alarmer. That’s the stuff I plan to use. I appreciate the advice on application.
How long did you dry the Testors before applying the 2X clear? I’ve got to let it dry to touch to put the decals on before the clear, but am uncertain on whether or not I should give the Testors a full week to really cure. Some sources indicate that allowing the “base” (in this case, Testors over wet sanded enamel acrylic auto basecoat dried for 72 hours) to fully cure creates binding problems for the clear, even if sanded and prepped appropriately.
Testing on the pipe is the move, but if you have any further advice on this, I’d appreciate it.
How long did you dry the Testors before applying the 2X clear? I’ve got to let it dry to touch to put the decals on before the clear, but am uncertain on whether or not I should give the Testors a full week to really cure. Some sources indicate that allowing the “base” (in this case, Testors over wet sanded enamel acrylic auto basecoat dried for 72 hours) to fully cure creates binding problems for the clear, even if sanded and prepped appropriately.
Testing on the pipe is the move, but if you have any further advice on this, I’d appreciate it.
That said, as you have correctly surmised, messing around with the sticker/decal application before your color coat is fully dry courts problems, not the least of which is lifting some of it off the primer when you mark some lines on weak adhesive masking tape applied to the frame in order to give yourself some reference lines for decal applications. Without this, I can't reliably get them on straight and in proper position on both sides of the down tube, and there is nothing more aggravating than getting the things on there a little crooked after all the work of stripping, priming, and color matching the color coat.
So I usually wait. Sometimes I wait as much as a week before I am brave enough to apply the decals. And even then, I stick the low tack masking tape onto some kind of cloth or other surface to ofurther reduce its adhesion, before I put it lightly on the tube I want to mark with a reference line. Use the wet method of applying your vinyl stickers, as described in the instructions that come with them.
I then let the stickers dry another day or two (depending on temp and humidity...it's usually hot and dry here when I'm doing this stuff, so things dry within that time.) when you use the wet method, some water gets inevitably trapped , and the adhesive on the decals needs some time to cure fully anyway. Then the urethane goes on , all in one final operation, over everything, like putting it all under glass. You have a limited pot life with the stuff once you mix it in the can anyway. So I try to spray it all out in one operation, leaving a little in the spray can in case a final inspection reveals I missed any obvious spots. But even in the final touch up phase, it's important to apply it heavily to the point where is is saturated, Otherwise, the stuff has a tendency to give a little bit of an orange peal effect, with a light application.
The best results I get are to try to fully saturate and cover everything on the first go with the urethane, and one can is enough to do a frame and fork in my experience. For which I am thankful.
I use an old seat post of the right diameter to hold the frame in a work stand, out in the back yard. That way I can rotate it at will, to spray the various frame tube surfaces evenly and to inspect all sides in good light while painting. The fork is easily done held either in the same fork stand by the steerer tube, or in an old Black and Decker Workmate. But you can also get good results just holding the fork steerer in your hand, as long as you have some place to hang it up afterwards.
So far, this has worked very well for me, and I've been doing it for 5-6 years this way. No lifting or separation of layers has been noted. Paint seems solid and durable.
 03-27-24, 10:01 PM
#19
Newbie
Join Date: Mar 2024
Posts: 9
Mentioned: 0 Post(s)
Tagged: 0 Thread(s)
Quoted: 1 Post(s)
Likes: 0
Liked 1 Time
in
1 Post
I know this thread is a few years old, I was wondering how the final bike came out and whether there existed any other sources for the elusive Bronze Green paint. I've heard spray.bike is a UK(?) company you'd think they'd make this really common Raleigh green. I got a 72 Superbe that I'm going to need to paint and re-decal, I can't believe how hard it is to match this paint.
