


Removing and replacing (new) cantilever bosses
 02-20-20, 06:36 AM
#1
Junior Member
Thread Starter
Join Date: Dec 2019
Posts: 8
Mentioned: 0 Post(s)
Tagged: 0 Thread(s)
Quoted: 3 Post(s)
Likes: 0
Liked 0 Times
in
0 Posts
Removing and replacing (new) cantilever bosses
Hello All,
I’ve an old frame that I’d like to convert to 584/650b. The frame is currently set-up with cantilever bosses for 622/700 wheels. I would like to remove these bosses (front and back) and replace them with new ones, in the appropriate location for 584/650b wheels.
Any advice (especially on the safety) on carrying out such a procedure would be much appreciated.
Many thanks in advance.
Best,
Sam
 02-20-20, 07:22 AM
#2
Senior Member
Join Date: Dec 2011
Location: NE Ohio
Posts: 2,595
Bikes: 1992 Serotta Colorado II,Co-Motion Speedster, Giant Escape Hybrid, 1977 Schwinn Super Le Tour
Mentioned: 4 Post(s)
Tagged: 0 Thread(s)
Quoted: 455 Post(s)
Likes: 0
Liked 112 Times
in
85 Posts
I'm sure the more experienced builder's will weigh in but I will make a comment or two.
I recently completed my frame building course and the mitering and placement of the cantilever posts was quite an interesting and time consuming process. I sure any competent frame builder can accomplish it for you.
About 4 years ago I did a 659b conversion , with a Miyata 610, and I was able to make the original cantilever brakes work. There is quite a bit of information available on this subject so you might be able to forego the extensive frame work.
02-20-20, 08:19 AM
#3

Senior Member
Join Date: Feb 2012
Location: Rochester, NY
Posts: 18,073
Bikes: Stewart S&S coupled sport tourer, Stewart Sunday light, Stewart Commuting, Stewart Touring, Co Motion Tandem, Stewart 3-Spd, Stewart Track, Fuji Finest, Mongoose Tomac ATB, GT Bravado ATB, JCP Folder, Stewart 650B ATB
Mentioned: 0 Post(s)
Tagged: 0 Thread(s)
Quoted: 4201 Post(s)
Liked 3,857 Times
in
2,305 Posts
Removal can be done with hear or mechanical methods. Heat is faster but has more risk. Sawing then filing is slow but easier to control the goings on.
Plan on new bosses. Take care as to location and placement as different canits like somewhat different boss to boss widths. Also the spring holes really want to be symmetrically positioned so the two side will be able to be centered. Use brass/bronze if you're brazing them on, silver is too touchy to large gaps and learning this the hard way isn't a good choice with one's brakes.
This isn't the project that I would suggest for a newbie who has no brazing or metal fab experience. Andy
__________________
AndrewRStewart
AndrewRStewart
02-20-20, 11:35 AM
#4
Junior Member
Thread Starter
Join Date: Dec 2019
Posts: 8
Mentioned: 0 Post(s)
Tagged: 0 Thread(s)
Quoted: 3 Post(s)
Likes: 0
Liked 0 Times
in
0 Posts
Thanks for the feedback.
My plan was to go the hand tool way and hack, file and sand the old braze-ons off, and prepare the new cantis studs at home.
Being a total newbie to framebuilding and frame modifying, I was then planning on doing the brazing at a local cycle cooperative where they do brazing one day every month. I’ve not yet attended, but I assume it would be supervised by someone experienced who can offer assistance.
The suggestion to use brass rather than silver is much appreciated. I’ve read though that, due to the higher temps required for brass brazing, silver is better for heat sensitive places like forks. Given the removal and rebrazing of the new studs, is it at all risky to go with brass on the forks?
Thanks!
Sam
02-20-20, 11:54 AM
#5


Randomhead
Join Date: Aug 2008
Location: Happy Valley, Pennsylvania
Posts: 24,396
Mentioned: 0 Post(s)
Tagged: 0 Thread(s)
Quoted: 4 Post(s)
Liked 3,696 Times
in
2,517 Posts
the worry about heat damage is overblown IMHO. A beginner using silver for a fillet is just a bad combination.
I think you should practice brazing a lot before you do this. That's a lot less expensive with LFB than silver.
When you remove the bosses, make sure not to cut into the tubes at all. Leaving a little filler is preferable to thinning the tube. I worked on a bike where a friend removed the bosses and there was a slice in the seat stay. I would have worried if that was on a fork blade
02-20-20, 11:56 AM
#6
Senior Member
Join Date: Feb 2012
Location: Rochester, NY
Posts: 18,073
Bikes: Stewart S&S coupled sport tourer, Stewart Sunday light, Stewart Commuting, Stewart Touring, Co Motion Tandem, Stewart 3-Spd, Stewart Track, Fuji Finest, Mongoose Tomac ATB, GT Bravado ATB, JCP Folder, Stewart 650B ATB
Mentioned: 0 Post(s)
Tagged: 0 Thread(s)
Quoted: 4201 Post(s)
Liked 3,857 Times
in
2,305 Posts
Sam- Brass is so maligned compared to silver these days. Millions of frames are on the road using only brass for everything and haven't resulted in thousands of failures. Brass is far more forgiving with fit up and gaps, with less then ideal cleanliness and vastly cheaper to practice with. One of the challenges with canti bosses is their set up. Depending on rim widths, pad thickness, canti design and how this all results in a boss base/stay (blade) relationship can be hard to get right. Spend some time figuring out the boss location and how to hold the bosses during set up then also brazing.
Attend the brazing clinic as you are also getting the bosses prepped. Plan on a few brazing sessions before doing the frame work. Andy
Attend the brazing clinic as you are also getting the bosses prepped. Plan on a few brazing sessions before doing the frame work. Andy
__________________
AndrewRStewart
AndrewRStewart
02-20-20, 05:57 PM
#7
Old fart

Join Date: Nov 2004
Location: Appleton WI
Posts: 24,784
Bikes: Several, mostly not name brands.
Mentioned: 153 Post(s)
Tagged: 0 Thread(s)
Quoted: 3587 Post(s)
Liked 3,400 Times
in
1,934 Posts
I've removed cantilever bosses using heat; it's pretty easy. Position the frame or fork so the bosses are pointed down. Have a bucket of water or sand underneath for them to land in when they come off. Fire up your torch and keep the heat mostly on the boss until the brass starts to soften up. Then put a little heat onto the stay/blade to get it to melt. Often, the boss will just fall off at that point, otherwise grab it with a pliers and gently pull it off while keeping the flame moving on the brass to liquefy it. While the stay/blade is still hot, hit it with the flame again to liquefy the brass residue and use a wire brush to brush the brass off the stay. When cooled, little or no cleanup will be required to smooth out the old mount area.
Likes For JohnDThompson:
02-21-20, 12:43 AM
#8
Junior Member
Thread Starter
Join Date: Dec 2019
Posts: 8
Mentioned: 0 Post(s)
Tagged: 0 Thread(s)
Quoted: 3 Post(s)
Likes: 0
Liked 0 Times
in
0 Posts
Prior to this, I assume you sand away as much of the paint as possible?
I’ve noticed while looking this up online that often a jig is used when brazing on the cantilever bosses. I assume this is to ensure they are symmetrically placed and also to hold them in place while brazing. Is this necessary or just advised?
thanks!
I’ve noticed while looking this up online that often a jig is used when brazing on the cantilever bosses. I assume this is to ensure they are symmetrically placed and also to hold them in place while brazing. Is this necessary or just advised?
thanks!
02-21-20, 07:52 AM
#9
Old fart
Join Date: Nov 2004
Location: Appleton WI
Posts: 24,784
Bikes: Several, mostly not name brands.
Mentioned: 153 Post(s)
Tagged: 0 Thread(s)
Quoted: 3587 Post(s)
Liked 3,400 Times
in
1,934 Posts
I’ve noticed while looking this up online that often a jig is used when brazing on the cantilever bosses. I assume this is to ensure they are symmetrically placed and also to hold them in place while brazing. Is this necessary or just advised?


Likes For JohnDThompson:
02-21-20, 07:57 AM
#10
Randomhead
Join Date: Aug 2008
Location: Happy Valley, Pennsylvania
Posts: 24,396
Mentioned: 0 Post(s)
Tagged: 0 Thread(s)
Quoted: 4 Post(s)
Liked 3,696 Times
in
2,517 Posts
I made that same fixture. Sans the fancy wingnuts though. I was recently wondering if I could find it.
It has some advantages over the fancy Anvil fixture I have now, but of course that's what I used because it cost me $400
It has some advantages over the fancy Anvil fixture I have now, but of course that's what I used because it cost me $400
02-21-20, 09:59 AM
#11
Senior Member
Join Date: Feb 2012
Location: Rochester, NY
Posts: 18,073
Bikes: Stewart S&S coupled sport tourer, Stewart Sunday light, Stewart Commuting, Stewart Touring, Co Motion Tandem, Stewart 3-Spd, Stewart Track, Fuji Finest, Mongoose Tomac ATB, GT Bravado ATB, JCP Folder, Stewart 650B ATB
Mentioned: 0 Post(s)
Tagged: 0 Thread(s)
Quoted: 4201 Post(s)
Liked 3,857 Times
in
2,305 Posts
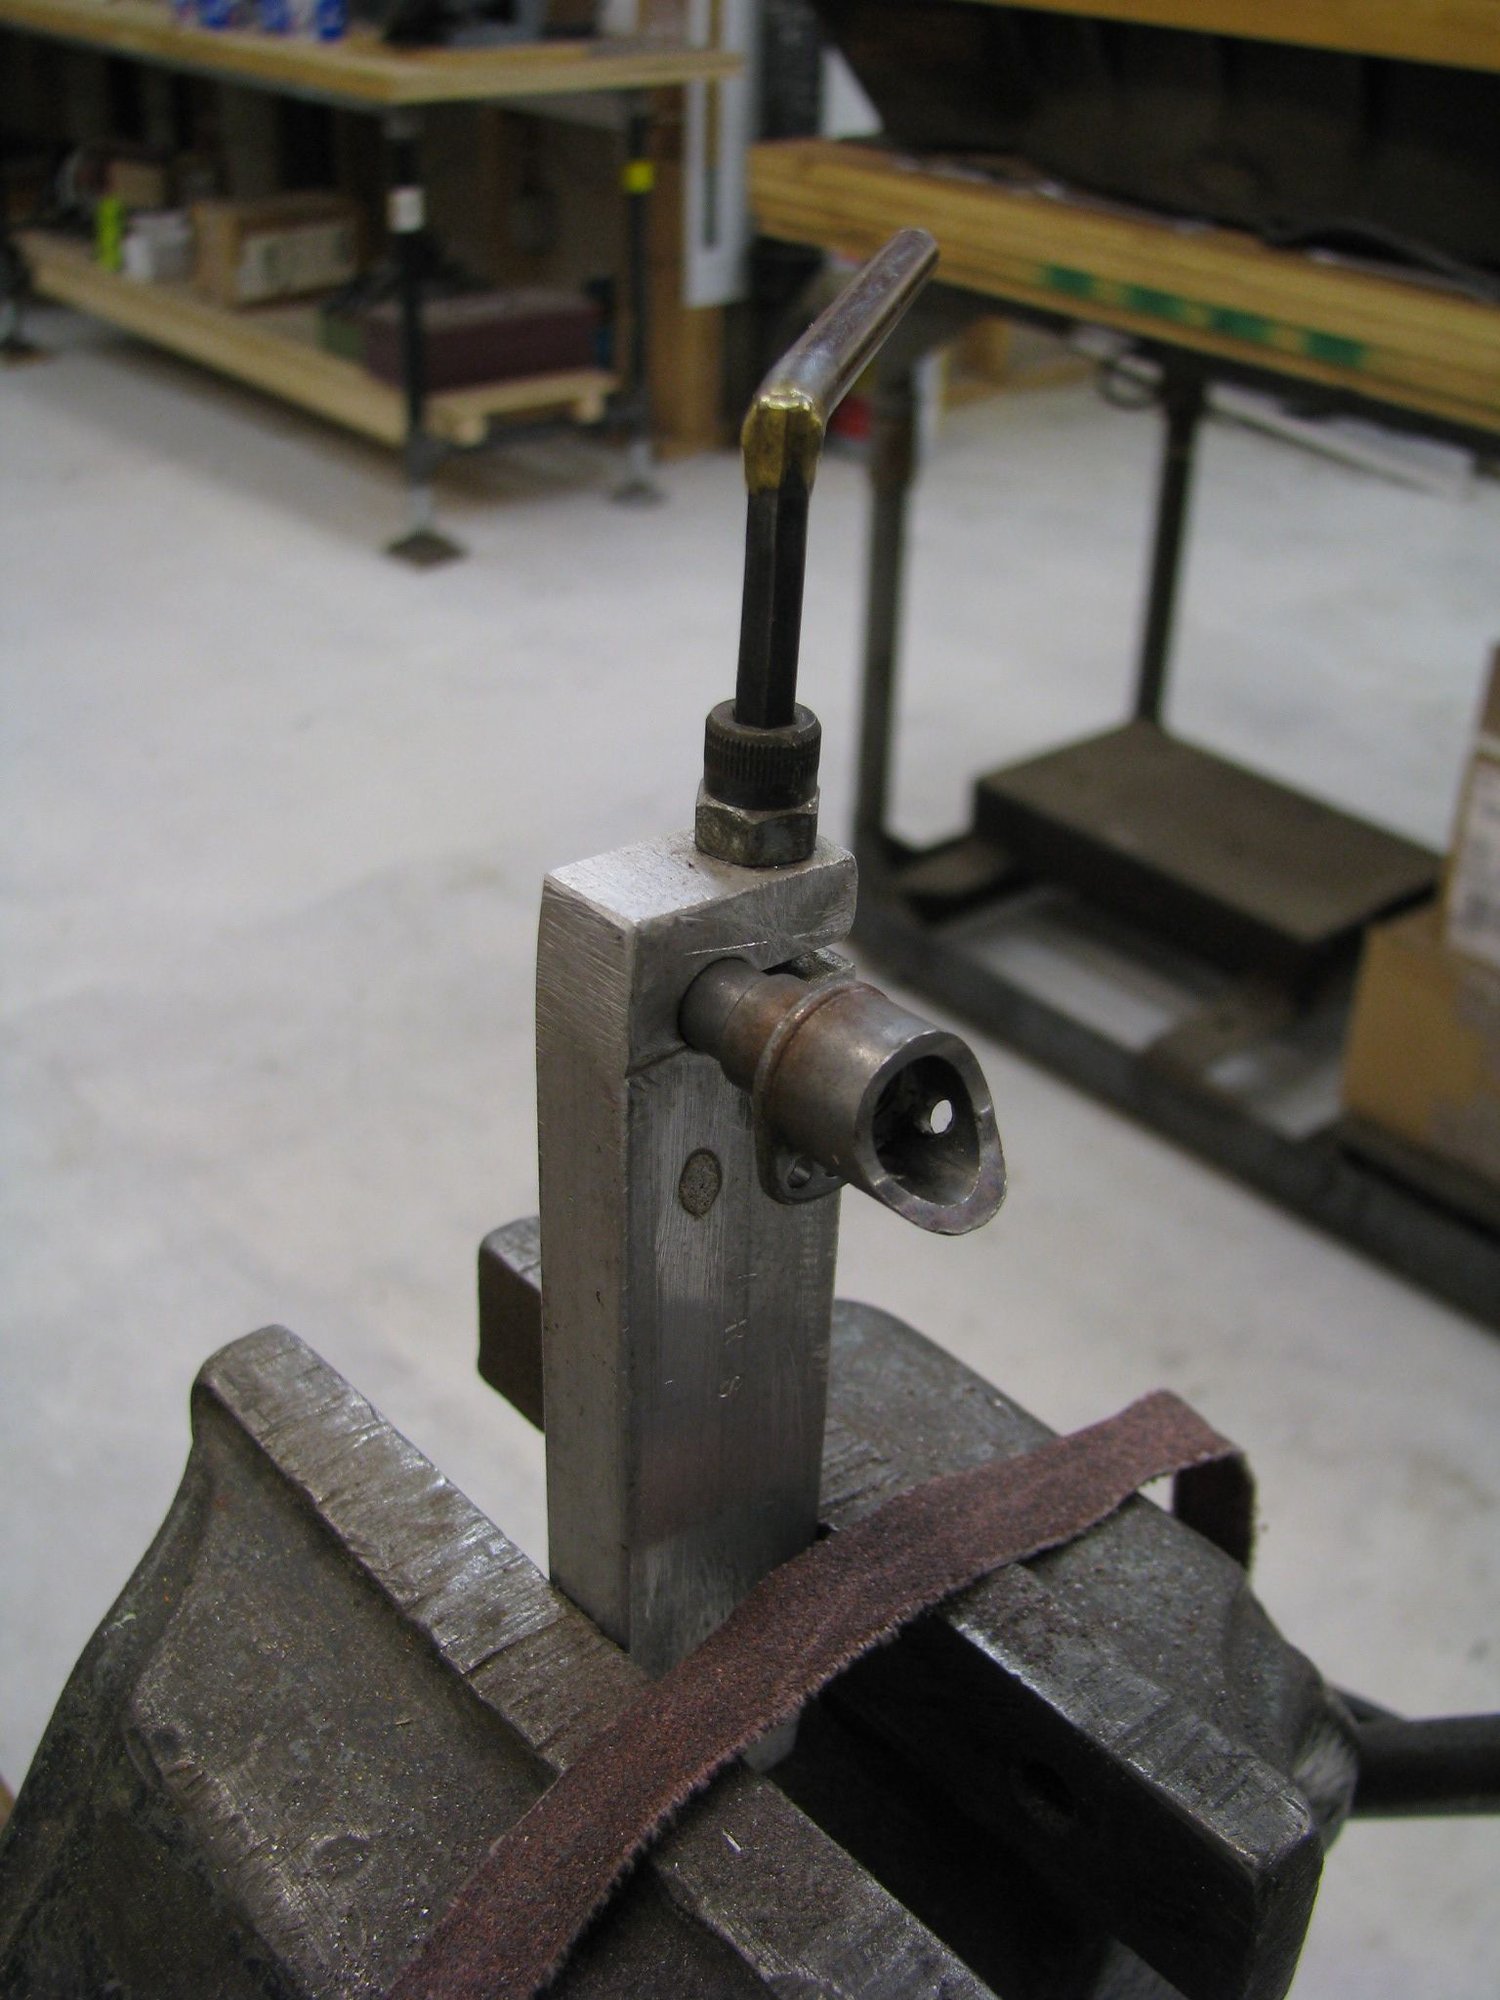
Besides the boss holding aspects of a nice fixture I find it also really speeds up the boss base mitering. It's becomes real quick to refit the boss in the fixture and compare your miter progress with the actual need. And then remove the boss to go back to the vice and file. Here's a shot of the little boss clamp I made to make mitering easier. Andy
__________________
AndrewRStewart
AndrewRStewart
02-21-20, 10:15 AM
#12
Randomhead
Join Date: Aug 2008
Location: Happy Valley, Pennsylvania
Posts: 24,396
Mentioned: 0 Post(s)
Tagged: 0 Thread(s)
Quoted: 4 Post(s)
Liked 3,696 Times
in
2,517 Posts
Something like that would be pretty nice for filing, have to think about it. I somehow manage to do without, but it can be annoying
04-25-20, 01:33 AM
#13
Newbie
Join Date: May 2014
Location: British Columbia
Posts: 4
Mentioned: 0 Post(s)
Tagged: 0 Thread(s)
Quoted: 1 Post(s)
Likes: 0
Liked 6 Times
in
2 Posts
Put heat on the bosses and they come right off. Look on YouTube for Paul Brodie’s video on how he removed cantilever bosses.
04-25-20, 03:13 AM
#14
blahblahblah chrome moly

Join Date: Apr 2009
Location: Seattle
Posts: 1,987
Mentioned: 92 Post(s)
Tagged: 0 Thread(s)
Quoted: 1173 Post(s)
Liked 2,569 Times
in
1,073 Posts
Sorry I haven't read every post, but has it been mentioned yet that the originals might be welded?
Better find out before trying to melt them off!
Yes it is usually obvious to an experienced eye, but I don't know how experienced our OP is.
TIG welded is very common, maybe even the predominant method? I don't know why, seems crazy to me -- IMHO the only reason to TIG them is if you don't know how to braze. Brass brazing is so GD fast, and 100% reliable.
Remember to braze the post part to the base part, if they're separate pieces of metal, as Mafac (and clones thereof) were. This adds something like one second per boss to the process, since it's already hot. Mafac style are swaged together, but not well enough to be reliable; they need at least a tiny dab of braze to be perfectly invincible.
Mark B in Seattle
04-25-20, 03:18 AM
#15
Senior Member
Last year I did my first canti stud install and it went quite nicely. The jig I made is similar to what others have done, but much more crude looking. It clamps down to the two tubes that are getting the studs and allows me to get them aligned properly. Brass filler is what was used. You can do it so long as you prepare for the job at hand. FWIW, it is easier and safer to use heat when removing the old studs. No chance of cutting into the tubes, they just fall off or pull off with a pliers while being heated.
04-25-20, 07:29 AM
#16
Randomhead
Join Date: Aug 2008
Location: Happy Valley, Pennsylvania
Posts: 24,396
Mentioned: 0 Post(s)
Tagged: 0 Thread(s)
Quoted: 4 Post(s)
Liked 3,696 Times
in
2,517 Posts
I assume the OP has done something since February. It would be nice if people would check back in.
