


Homebuilt Spoke Tensiometer
 11-07-17, 11:27 AM
#1

Senior Member
Thread Starter

Join Date: Feb 2016
Location: Olympic Peninsula, WA
Posts: 645
Bikes: '8? Ciocc Mockba 80, '82 Ron Cooper, '84 Allez, '86 Tommasini Racing, '86? Klein Quantum, '87 Ciocc Designer 84, '95 Trek 5500, '98 Litespeed Classic, '98 S-Works Mtb
Mentioned: 34 Post(s)
Tagged: 0 Thread(s)
Quoted: 226 Post(s)
Liked 309 Times
in
122 Posts
Homebuilt Spoke Tensiometer
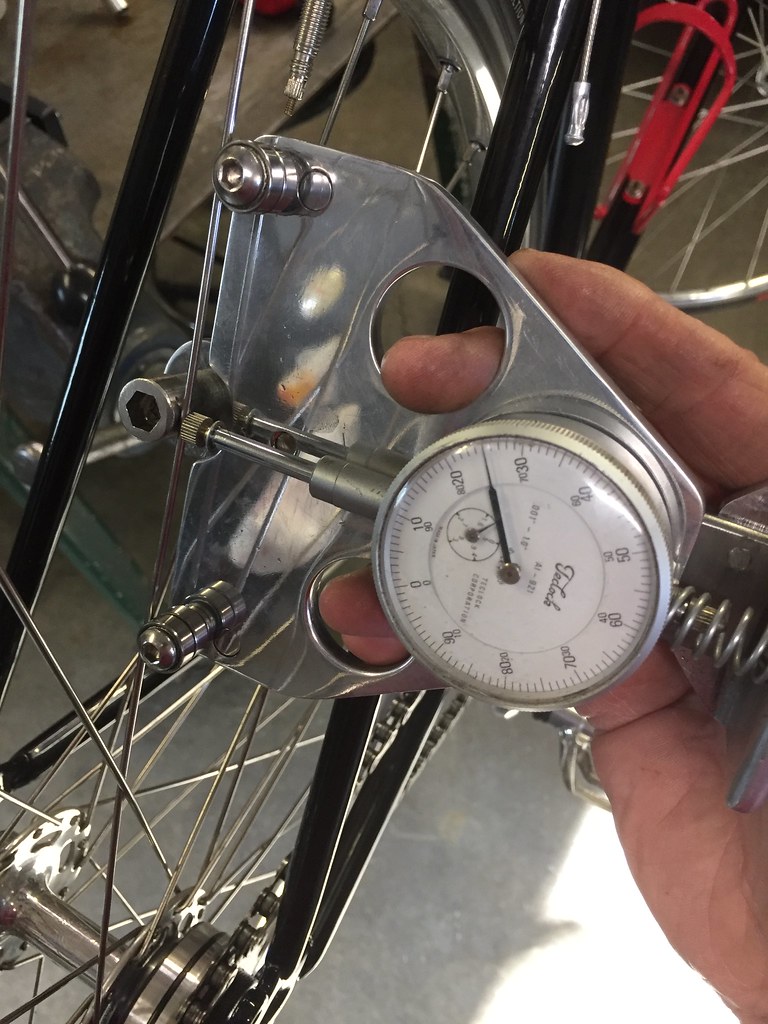
An early snowfall in the Pacific Northwest has taken me off the road and into my workshop to get after a slew of winter projects. First up was the rebuild of a spoke tensiometer that I built a few years ago. This is my take on the Jobst Brandt / FSA / Wheel Fanatyk device. Like other tensiometers, it measures spoke deflection between two points under a fixed load. I built this for $0 with materials I had on hand. Looking closely at the photos of my tensiometer, you will see that the spokes are are "nested" between two ball bearings separated by a thin spacer. I think this makes it easier to use than the FSA / Wheel Fanatyk tensiometer.
My first version used much larger ball bearings (32mm OD)....'cuz that is what I had on hand. This resulted in an overall width that was awkward to place in some wheel/spoke configurations. Yesterday's rebuild involved replacing the large bearings with 13mm OD bearings. The device is now ~1" narrower and much easier to use. This prompted me to make new calibration charts for 2.0, 1.8, and 1.7mm spokes.
Soooo....here is the rebuilt tensionmeter in use.
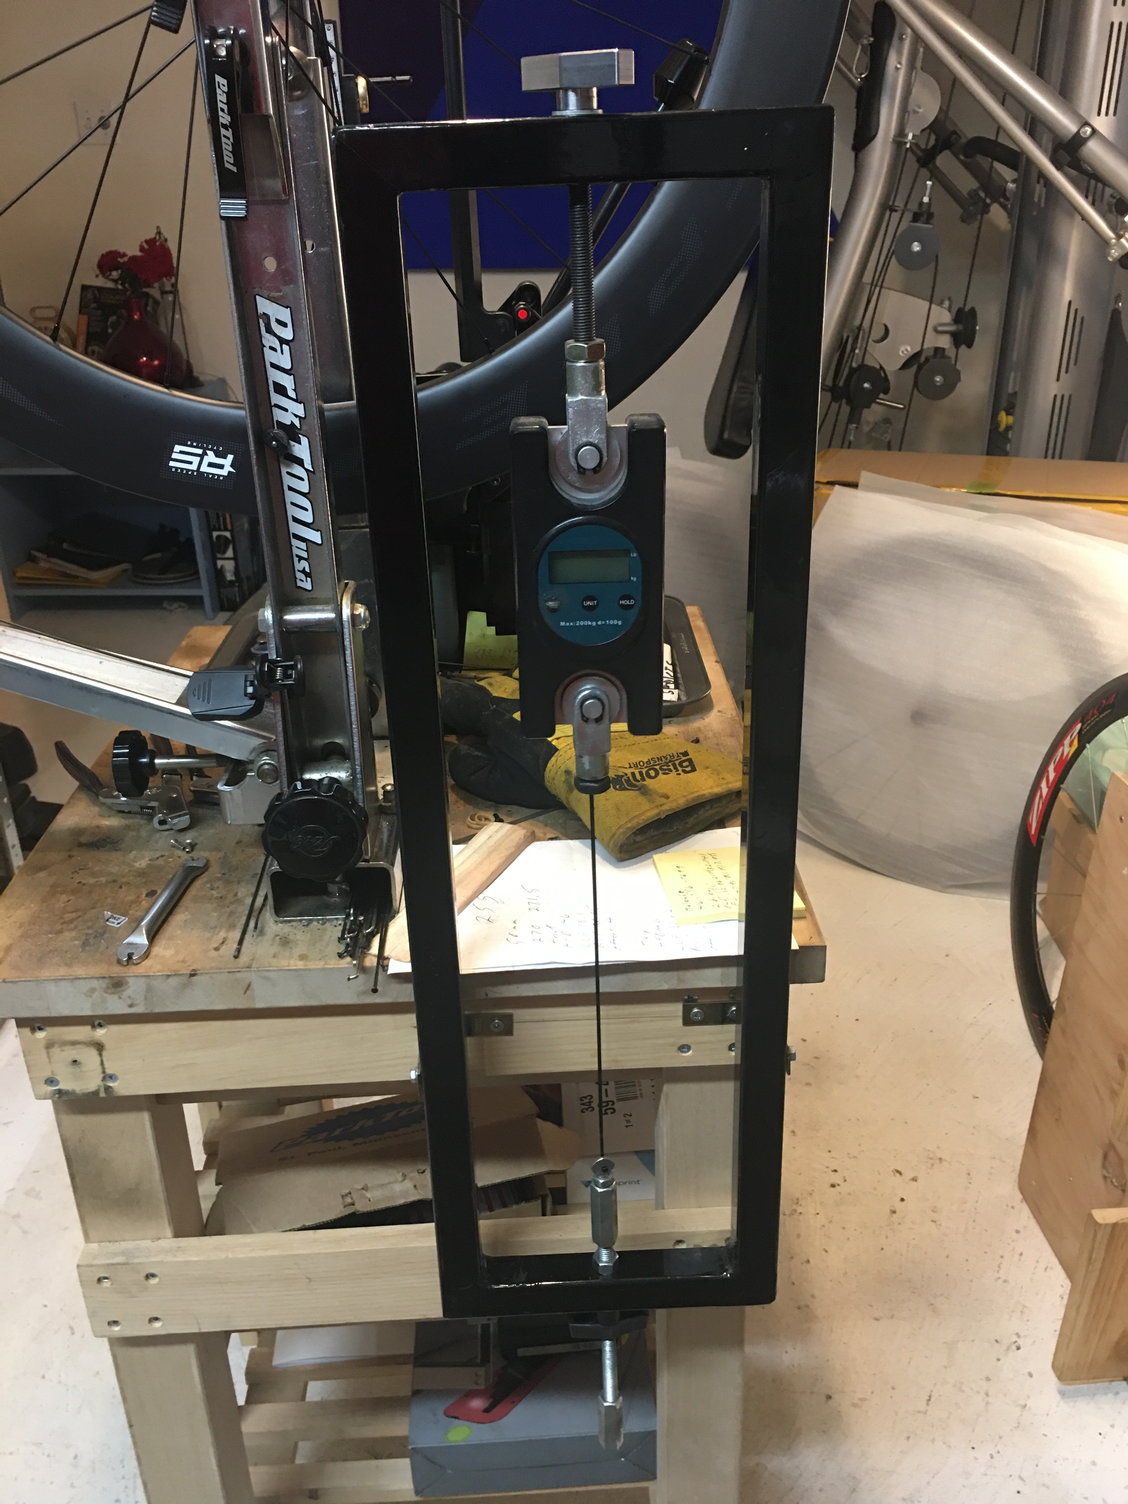
A view of my calibration fixture.

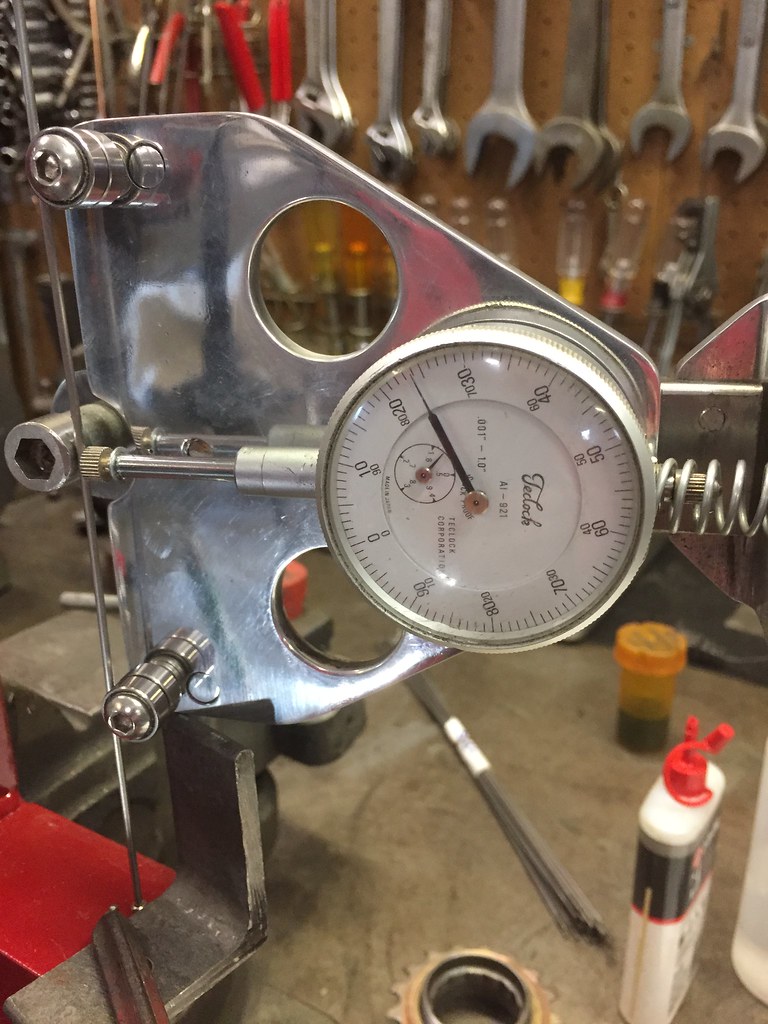
And a close up of the tensiometer while in the calibration fixture.
My first version used much larger ball bearings (32mm OD)....'cuz that is what I had on hand. This resulted in an overall width that was awkward to place in some wheel/spoke configurations. Yesterday's rebuild involved replacing the large bearings with 13mm OD bearings. The device is now ~1" narrower and much easier to use. This prompted me to make new calibration charts for 2.0, 1.8, and 1.7mm spokes.
Soooo....here is the rebuilt tensionmeter in use.
A view of my calibration fixture.
And a close up of the tensiometer while in the calibration fixture.

Likes For Dean51:
 11-07-17, 11:36 AM
#3
Senior Member
Join Date: Sep 2004
Location: Chicago area
Posts: 2,551
Bikes: Airborne "Carpe Diem", Motobecane "Mirage", Trek 6000, Strida 2, Dahon "Helios XL", Dahon "Mu XL", Tern "Verge S11i"
Mentioned: 23 Post(s)
Tagged: 0 Thread(s)
Quoted: 980 Post(s)
Liked 582 Times
in
399 Posts
Beautiful! Nicely thought out and made. I'm getting by with the Park Tools gauge, but I couldn't build one myself. 
Tuning by pitch is complicated by contact with other spokes, which can damp the vibrations. Still, $5 ain't bad!
I'll keep my gauge, thanks.
Steve
Tuning by pitch is complicated by contact with other spokes, which can damp the vibrations. Still, $5 ain't bad!
I'll keep my gauge, thanks.
Steve
11-07-17, 11:50 AM
#4
Don't make me sing!
Join Date: Aug 2012
Location: Western PA
Posts: 1,022
Bikes: 2013 Specialized Crosstrail Elite, 1986 Centurion Elite RS, Diamondback hardtail MTB, '70s Fuji Special Road Racer, 2012 Raleigh Revenio 2.0, 1992 Trek 1000
Mentioned: 2 Post(s)
Tagged: 0 Thread(s)
Quoted: 308 Post(s)
Liked 0 Times
in
0 Posts
An early snowfall in the Pacific Northwest has taken me off the road and into my workshop to get after a slew of winter projects. First up was the rebuild of a spoke tensiometer that I built a few years ago. This is my take on the Jobst Brandt / FSA / Wheel Fanatyk device. Like other tensiometers, it measures spoke deflection between two points under a fixed load. I built this for $0 with materials I had on hand. Looking closely at the photos of my tensiometer, you will see that the spokes are are "nested" between two ball bearings separated by a thin spacer. I think this makes it easier to use than the FSA / Wheel Fanatyk tensiometer.
My first version used much larger ball bearings (32mm OD)....'cuz that is what I had on hand. This resulted in an overall width that was awkward to place in some wheel/spoke configurations. Yesterday's rebuild involved replacing the large bearings with 13mm OD bearings. The device is now ~1" narrower and much easier to use. This prompted me to make new calibration charts for 2.0, 1.8, and 1.7mm spokes.
Soooo....here is the rebuilt tensionmeter in use.
A view of my calibration fixture.
And a close up of the tensiometer while in the calibration fixture.
 11-07-17, 11:53 AM
#5
Passista
Join Date: Jul 2005
Posts: 7,597
Bikes: 1998 Pinarello Asolo, 1992 KHS Monta�a pro, 1980 Raleigh DL-1, IGH Hybrid, IGH Utility
Mentioned: 5 Post(s)
Tagged: 0 Thread(s)
Quoted: 866 Post(s)
Liked 721 Times
in
396 Posts
Great job! I thought about making one myself, but doubt it would turn up as neat as yours.
11-07-17, 12:12 PM
#6
Senior Member
Since I don't use one, and probably never will, because I have no interest in building wheels, does the calibration of the tool matter? Are you measuring specific spoke tension, using what scale? Or do you just need to verify the tension difference between the spokes?
BTW, Nice polish job on the frame.
BTW, Nice polish job on the frame.
11-07-17, 12:12 PM
#7
Senior Member
Join Date: Aug 2005
Location: Pittsburgh, PA
Posts: 33,656
Bikes: '96 Litespeed Catalyst, '05 Litespeed Firenze, '06 Litespeed Tuscany, '20 Surly Midnight Special, All are 3x10. It is hilly around here!
Mentioned: 39 Post(s)
Tagged: 0 Thread(s)
Quoted: 2026 Post(s)
Likes: 0
Liked 1,096 Times
in
742 Posts
Interesting calibration technique, using a stress gauge to measure the spoke tension and then calibrating the deflection caused by an an "unknown" force (the spring) as a function of the known spoke load. I don't think many of us have access to a load measuring device like yours but I suppose known weights could be hung from a spoke and accomplish the same thing.
11-07-17, 02:35 PM
#8
Senior Member
Thread Starter
Join Date: Feb 2016
Location: Olympic Peninsula, WA
Posts: 645
Bikes: '8? Ciocc Mockba 80, '82 Ron Cooper, '84 Allez, '86 Tommasini Racing, '86? Klein Quantum, '87 Ciocc Designer 84, '95 Trek 5500, '98 Litespeed Classic, '98 S-Works Mtb
Mentioned: 34 Post(s)
Tagged: 0 Thread(s)
Quoted: 226 Post(s)
Liked 309 Times
in
122 Posts
Kevin.... I will take some side view and back view pics later today that will show you more detail.
11-07-17, 02:36 PM
#9
Senior Member

Join Date: Sep 2010
Location: Roswell, GA
Posts: 8,319
Bikes: '93 Trek 750, '92 Schwinn Crisscross, '93 Mongoose Alta
Mentioned: 30 Post(s)
Tagged: 0 Thread(s)
Quoted: 1438 Post(s)
Liked 1,092 Times
in
723 Posts
Interesting calibration technique, using a stress gauge to measure the spoke tension and then calibrating the deflection caused by an an "unknown" force (the spring) as a function of the known spoke load. I don't think many of us have access to a load measuring device like yours but I suppose known weights could be hung from a spoke and accomplish the same thing.
11-07-17, 02:46 PM
#10
Senior Member
Thread Starter
Join Date: Feb 2016
Location: Olympic Peninsula, WA
Posts: 645
Bikes: '8? Ciocc Mockba 80, '82 Ron Cooper, '84 Allez, '86 Tommasini Racing, '86? Klein Quantum, '87 Ciocc Designer 84, '95 Trek 5500, '98 Litespeed Classic, '98 S-Works Mtb
Mentioned: 34 Post(s)
Tagged: 0 Thread(s)
Quoted: 226 Post(s)
Liked 309 Times
in
122 Posts
Interesting calibration technique, using a stress gauge to measure the spoke tension and then calibrating the deflection caused by an an "unknown" force (the spring) as a function of the known spoke load. I don't think many of us have access to a load measuring device like yours but I suppose known weights could be hung from a spoke and accomplish the same thing.
11-07-17, 06:41 PM
#11
Senior member

Join Date: Oct 2004
Location: Oakville Ontario
Posts: 8,117
Mentioned: 25 Post(s)
Tagged: 0 Thread(s)
Quoted: 943 Post(s)
Liked 658 Times
in
371 Posts
Hillrider.... You are spot on. The loading force is unknown. I experimented with different springs to produce a range of deflection that I could observe on the dial indicator. For each spoke gauge, I measured and recorded deflection in 5 kg increments from 50 kg to 140 kg. As an example, a 2 mm spoke deflects 0.0285" at 95 kg tension and 0.0275" at 100 kg. My "load measuring device" is an inexpensive digital scale I purchased on eBay for another project. Not shown on my earlier pics....the top side of the scale is attached to an eyebolt with fine thread. To increase the load, I turned a nut on the eyebolt. Simple, and very repeatable.

Last edited by Dan Burkhart; 07-11-21 at 07:14 PM.
11-07-17, 07:03 PM
#13
Senior Member
Thread Starter
Join Date: Feb 2016
Location: Olympic Peninsula, WA
Posts: 645
Bikes: '8? Ciocc Mockba 80, '82 Ron Cooper, '84 Allez, '86 Tommasini Racing, '86? Klein Quantum, '87 Ciocc Designer 84, '95 Trek 5500, '98 Litespeed Classic, '98 S-Works Mtb
Mentioned: 34 Post(s)
Tagged: 0 Thread(s)
Quoted: 226 Post(s)
Liked 309 Times
in
122 Posts
For Kevin and any others interested in more details....
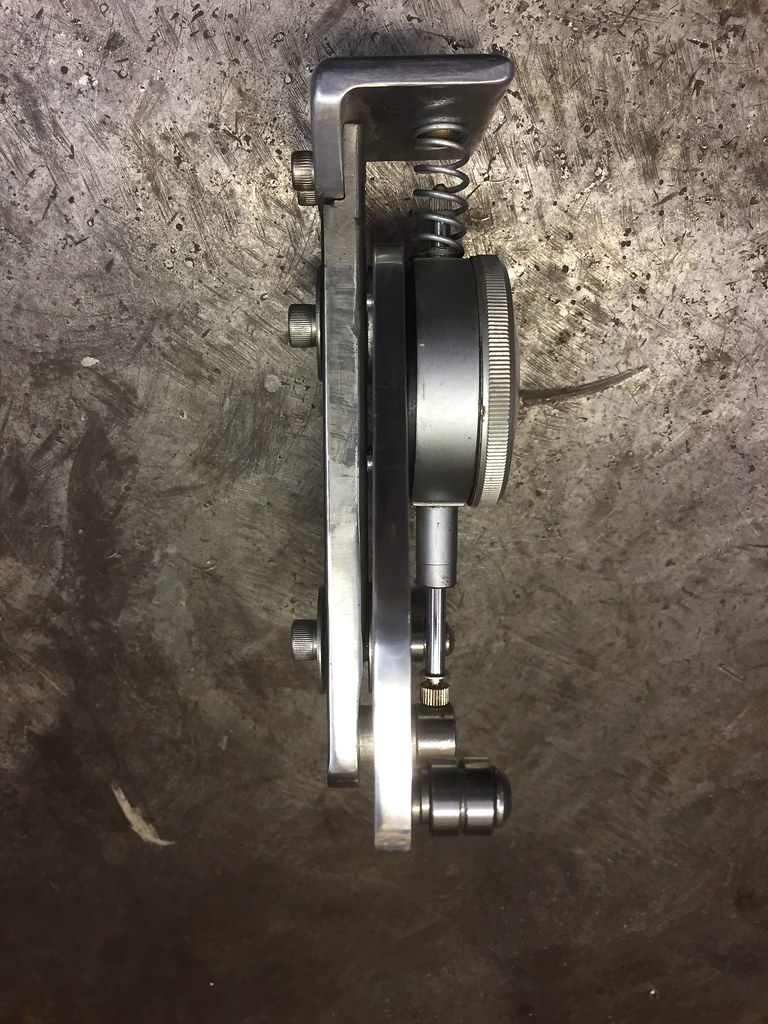
Side view:
Back view - assembled:
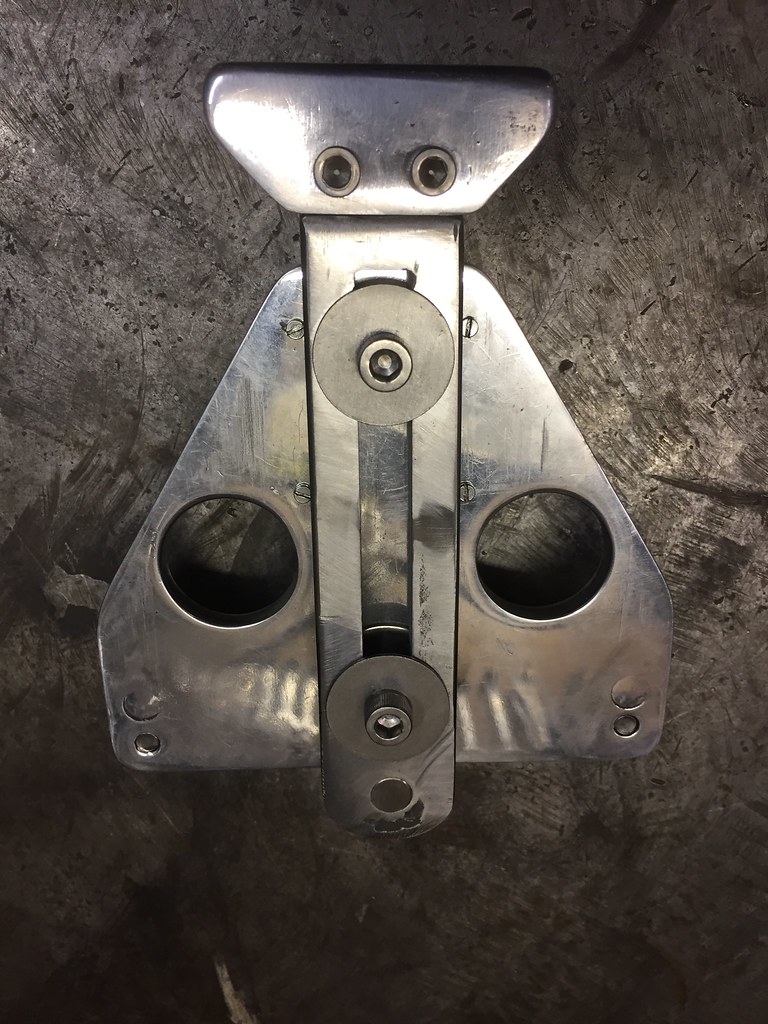
Slide details:
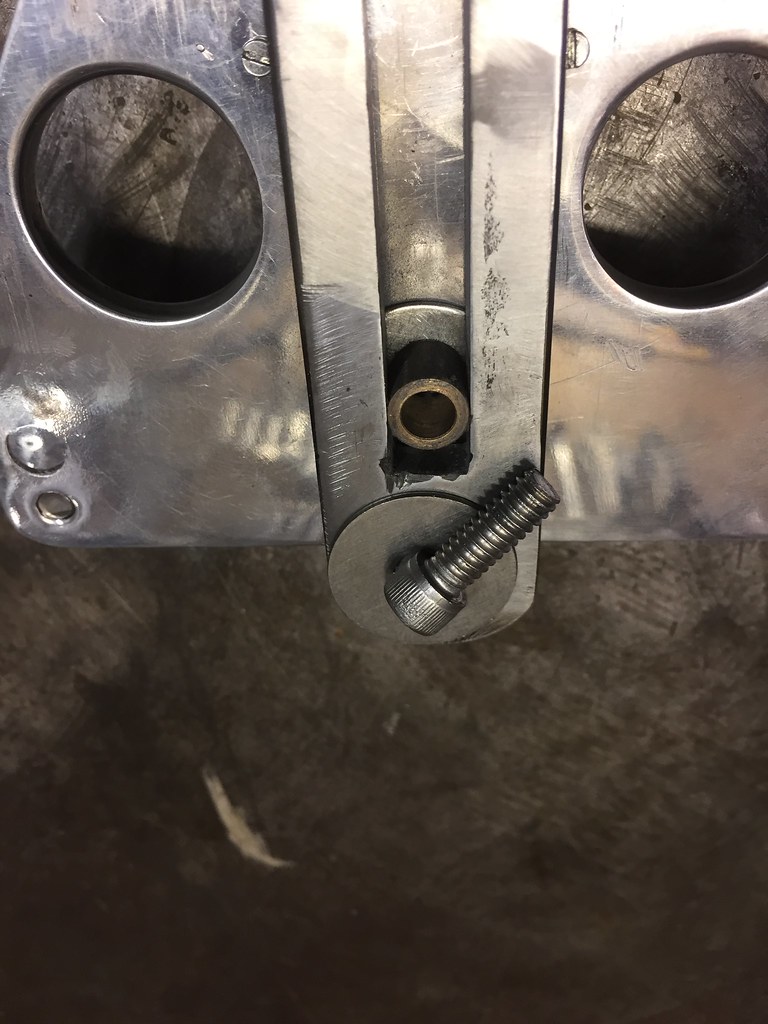
The slide rails were 5/16" key stock. There are two guides. Each has a fender washer on each side of the key stock, with the convex side of the washer facing the slide, and a small bronze bushing that separates the washers such that there is clearance for the slide to slip through them.
Side view:
Back view - assembled:
Slide details:
The slide rails were 5/16" key stock. There are two guides. Each has a fender washer on each side of the key stock, with the convex side of the washer facing the slide, and a small bronze bushing that separates the washers such that there is clearance for the slide to slip through them.
11-07-17, 07:51 PM
#14
Senior Member
Join Date: Feb 2012
Location: Rochester, NY
Posts: 18,063
Bikes: Stewart S&S coupled sport tourer, Stewart Sunday light, Stewart Commuting, Stewart Touring, Co Motion Tandem, Stewart 3-Spd, Stewart Track, Fuji Finest, Mongoose Tomac ATB, GT Bravado ATB, JCP Folder, Stewart 650B ATB
Mentioned: 0 Post(s)
Tagged: 0 Thread(s)
Quoted: 4197 Post(s)
Liked 3,849 Times
in
2,300 Posts
Besides the cool factor in making one's own tools what I am drawn to is the hand finishing that this tool has had. I am glad to see some still use their hands and make their own ****. Andy
11-07-17, 10:15 PM
#15
Senior Member
Join Date: Aug 2005
Location: Pittsburgh, PA
Posts: 33,656
Bikes: '96 Litespeed Catalyst, '05 Litespeed Firenze, '06 Litespeed Tuscany, '20 Surly Midnight Special, All are 3x10. It is hilly around here!
Mentioned: 39 Post(s)
Tagged: 0 Thread(s)
Quoted: 2026 Post(s)
Likes: 0
Liked 1,096 Times
in
742 Posts
My "load measuring device" is an inexpensive digital scale I purchased on eBay for another project. Not shown on my earlier pics....the top side of the scale is attached to an eyebolt with fine thread. To increase the load, I turned a nut on the eyebolt. Simple, and very repeatable.
11-07-17, 11:00 PM
#16
Senior Member
Thread Starter
Join Date: Feb 2016
Location: Olympic Peninsula, WA
Posts: 645
Bikes: '8? Ciocc Mockba 80, '82 Ron Cooper, '84 Allez, '86 Tommasini Racing, '86? Klein Quantum, '87 Ciocc Designer 84, '95 Trek 5500, '98 Litespeed Classic, '98 S-Works Mtb
Mentioned: 34 Post(s)
Tagged: 0 Thread(s)
Quoted: 226 Post(s)
Liked 309 Times
in
122 Posts
Very clever. It looked far more sophisticated (and expensive) in the picture until you explained what it was. I'll bet you could do a nice business calibrating other wheelbuilder's commercial spoke tension gauges sort of the way other companies get paid to calibrate torque wrenches.
Dean
11-08-17, 06:39 AM
#17
Don't make me sing!
Join Date: Aug 2012
Location: Western PA
Posts: 1,022
Bikes: 2013 Specialized Crosstrail Elite, 1986 Centurion Elite RS, Diamondback hardtail MTB, '70s Fuji Special Road Racer, 2012 Raleigh Revenio 2.0, 1992 Trek 1000
Mentioned: 2 Post(s)
Tagged: 0 Thread(s)
Quoted: 308 Post(s)
Liked 0 Times
in
0 Posts
For Kevin and any others interested in more details....
Side view:
Back view - assembled:
Slide details:
The slide rails were 5/16" key stock. There are two guides. Each has a fender washer on each side of the key stock, with the convex side of the washer facing the slide, and a small bronze bushing that separates the washers such that there is clearance for the slide to slip through them.
Very cool! Thanks! I thought it was made from aluminum, but you went old school with steel. Very "Pittsburgh" of you! I like that. This will be one of my winter projects, and I'll post my version, when it's done.
Thanks, again, for sharing.
11-08-17, 07:16 AM
#18
Always Learning

Join Date: Jun 2017
Location: Palm Bay, Fl.
Posts: 166
Bikes: Very Upgraded Denali 63.5cm
Mentioned: 0 Post(s)
Tagged: 0 Thread(s)
Quoted: 86 Post(s)
Likes: 0
Liked 0 Times
in
0 Posts
Wow
Now that is what I'd call 'Art'. You have quite a mind for design and skill in fabrication. Wonderful to see such a fine piece.
I have a band saw band (blade) tensiometer dial indicator that works on the same principle. If I had your talent I'd adapt it to spokes.
I have a band saw band (blade) tensiometer dial indicator that works on the same principle. If I had your talent I'd adapt it to spokes.
11-09-17, 04:12 PM
#19
Senior member
Join Date: Oct 2004
Location: Oakville Ontario
Posts: 8,117
Mentioned: 25 Post(s)
Tagged: 0 Thread(s)
Quoted: 943 Post(s)
Liked 658 Times
in
371 Posts
If you want to add a bit of decorative flair to your home built tools, you can give it a jewelled finish with a wooden dowel in a drill press.

11-10-17, 07:35 AM
#20
Senior Member
Great looking tool, all around. I'm always on the lookout for dial gauges at flea markets, so this could be a cool project, for sure.
Dan, I always wondered how they made the jewel effect on (softer) metals, looks neat. That's almost sacrilege to do that to a pair of Uticas, though...of the 7-8 different brands floating around my box, from Mac, Snap-on, Wera, etc, the Utica pliers have the best finish, with the deepest luster, even with the complicated shapes.
Good candidate for jeweling, though
11-10-17, 03:56 PM
#21
Senior member
Join Date: Oct 2004
Location: Oakville Ontario
Posts: 8,117
Mentioned: 25 Post(s)
Tagged: 0 Thread(s)
Quoted: 943 Post(s)
Liked 658 Times
in
371 Posts
Great looking tool, all around. I'm always on the lookout for dial gauges at flea markets, so this could be a cool project, for sure.
Dan, I always wondered how they made the jewel effect on (softer) metals, looks neat. That's almost sacrilege to do that to a pair of Uticas, though...of the 7-8 different brands floating around my box, from Mac, Snap-on, Wera, etc, the Utica pliers have the best finish, with the deepest luster, even with the complicated shapes.
Good candidate for jeweling, though
Dan, I always wondered how they made the jewel effect on (softer) metals, looks neat. That's almost sacrilege to do that to a pair of Uticas, though...of the 7-8 different brands floating around my box, from Mac, Snap-on, Wera, etc, the Utica pliers have the best finish, with the deepest luster, even with the complicated shapes.
Good candidate for jeweling, though
Oh, and that wasn't my work in the photo. I grabbed that off the net.
Last edited by Dan Burkhart; 11-10-17 at 03:59 PM.
11-10-17, 04:33 PM
#22
Senior Member
Join Date: Aug 2005
Location: Pittsburgh, PA
Posts: 33,656
Bikes: '96 Litespeed Catalyst, '05 Litespeed Firenze, '06 Litespeed Tuscany, '20 Surly Midnight Special, All are 3x10. It is hilly around here!
Mentioned: 39 Post(s)
Tagged: 0 Thread(s)
Quoted: 2026 Post(s)
Likes: 0
Liked 1,096 Times
in
742 Posts
A company named Cratex sells abrasive rods in various diameters just for this use and other companies make holding fixtures to assure even rows of the swirls.
11-10-17, 09:16 PM
#23
Senior member
Join Date: Oct 2004
Location: Oakville Ontario
Posts: 8,117
Mentioned: 25 Post(s)
Tagged: 0 Thread(s)
Quoted: 943 Post(s)
Liked 658 Times
in
371 Posts
https://www.cratex.com/Products/Rubb...ives/Jewelling
11-12-17, 08:12 PM
#24
Full Member

I wonder if you could use a digital tire gauge instead of a dial guage. These things are almost free on ebay.

Thread
Thread Starter
Forum
Replies
Last Post
Speedub.Nate
Bicycle Mechanics
30
03-20-18 02:44 PM
aerodynamic
Bicycle Mechanics
5
04-14-12 04:54 PM
