


Toeing in cantilever brakes
 06-18-20, 02:42 PM
#1

Senior Member
Thread Starter
Join Date: Jun 2018
Location: NW Ohio
Posts: 1,142
Bikes: 1983 Univega Super Strada, 1986 Panasonic DX5000, 1984 Fuji Team 85 Univega Gran Turismo, 1984 Lotus Unique, 1987 Centurion Expert, 1987 Centurion Ironman Master,
Mentioned: 14 Post(s)
Tagged: 0 Thread(s)
Quoted: 677 Post(s)
Liked 460 Times
in
182 Posts
Toeing in cantilever brakes
I put some cool stop pads on Miyata 615 and they vastly improved braking but now my brakes squeal like a stuck hog..I can't figure out how to toe then in
 06-18-20, 03:19 PM
#2
Senior Member

Join Date: Sep 2015
Location: Madison, WI
Posts: 2,701
Mentioned: 52 Post(s)
Tagged: 0 Thread(s)
Quoted: 1136 Post(s)
Liked 650 Times
in
336 Posts
There are two methods...
1. The proper way with post mount brakes: file a deeper divot into the eye-bolt washer under the brake pad, on the side facing the wheel. The deeper the divot filed, the more the brake pad will toe when tightened.
2. Bend the brake pad posts. Might break. Not recommended.
1. The proper way with post mount brakes: file a deeper divot into the eye-bolt washer under the brake pad, on the side facing the wheel. The deeper the divot filed, the more the brake pad will toe when tightened.
2. Bend the brake pad posts. Might break. Not recommended.
06-18-20, 03:48 PM
#3
Senior Member
Join Date: Feb 2020
Posts: 2,820
Mentioned: 49 Post(s)
Tagged: 0 Thread(s)
Quoted: 1106 Post(s)
Likes: 0
Liked 1,328 Times
in
784 Posts
Brake squeal is a result of the stick-slip frequency of the pad/rim interface being sympathetically resonant with some part of the brake structure.
You can attempt to change the resonance point by stiffening up the structure (loosening it may work but is not recommended for other more important considerations).
You can attempt to change the stick-slip frequency by altering the contact surface - toe-ing in may do this, but more usually what's done is to just put up with it until the pads and rim surface wears.
Likes For oneclick:
06-18-20, 03:54 PM
#4
Senior Member
There are two methods...
1. The proper way with post mount brakes: file a deeper divot into the eye-bolt washer under the brake pad, on the side facing the wheel. The deeper the divot filed, the more the brake pad will toe when tightened.
2. Bend the brake pad posts. Might break. Not recommended.
1. The proper way with post mount brakes: file a deeper divot into the eye-bolt washer under the brake pad, on the side facing the wheel. The deeper the divot filed, the more the brake pad will toe when tightened.
2. Bend the brake pad posts. Might break. Not recommended.
There is a 3rd way. Sand the toe in into the pad. There's enough meat on these. Oftentimes just a very shallow sanding of the back 1/3 of the pad or so is enough.
Salmon pads work great in the wet, but they are prone to squealing, they just are. Sorry salmon fans. You may need to use all the tricks in the book to quiet them, but I've never run into any that couldn't be quieted. You may want to take the brakes apart to clean and regrease the posts etc. Toe-in and sanding the rims are the main techniques mechanics used BITD. I realize people are afraid of sanding rims now. Oh well.
06-18-20, 04:07 PM
#5
Senior Member
Join Date: Sep 2015
Location: Madison, WI
Posts: 2,701
Mentioned: 52 Post(s)
Tagged: 0 Thread(s)
Quoted: 1136 Post(s)
Liked 650 Times
in
336 Posts
Yep, stick with #1 ...
There is a 3rd way. Sand the toe in into the pad. There's enough meat on these. Oftentimes just a very shallow sanding of the back 1/3 of the pad or so is enough.
Salmon pads work great in the wet, but they are prone to squealing, they just are. Sorry salmon fans. You may need to use all the tricks in the book to quiet them, but I've never run into any that couldn't be quieted. You may want to take the brakes apart to clean and regrease the posts etc. Toe-in and sanding the rims are the main techniques mechanics used BITD. I realize people are afraid of sanding rims now. Oh well.
I have used red Scotchbrite to clean muck off rims, followed by a wipe with alcohol. I find that sometimes brake noise is due to grease or oil on the rim.
06-18-20, 04:10 PM
#6

Disraeli Gears

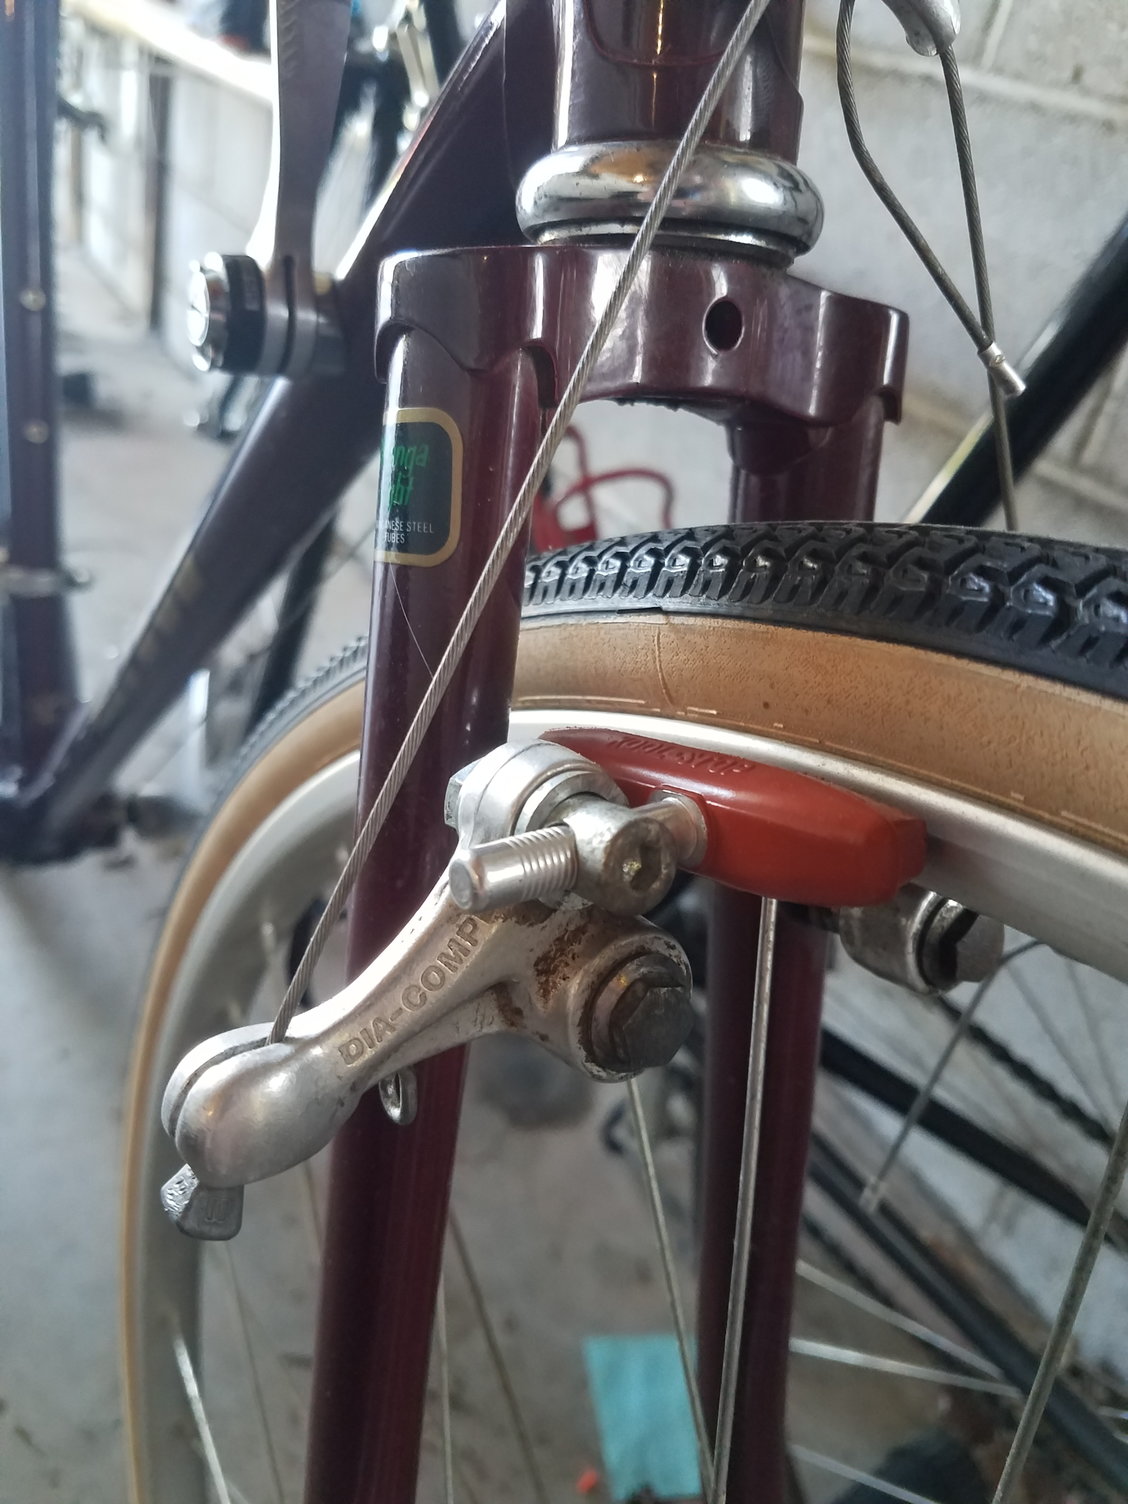
I don't know if your Dia-Compe cantilever shoe shafts and shoe-to-arm studs have the same diameters as those on Mafac (French) centerpulls (7 mm and 10 mm respectively) but if they do, then you can buy seating washers for them that are pre-toed (using grooves of unequal depth, as TenGrainBread recommends above -- from ReneHerseCycles.com (Jan Heine's outfit). But it seems to me that it would be simple enough to do this carefully with a rat-tail file.
My experience with Kool-Stop shoes like those pictured is that the rear of them (that is, the end that the rim surface meets first as it turns) have a bit of a "lip" curling toward the rim, which is intended to enforce a bit of toe-in by reducing the surface area of the rear of the shoe, and let the front end do the real work -- but that's based on shoes that have the threaded studs (like for a Weinmann centerpull, or the cantilever brakes designed for a similar shoe, and Kool-Stop provides them with sets of convex/concave washers to make toe-in easy.
I have just refurbished an ATB, replacing the original canti brakes (Shimano, I think, with shoes like yours) with a set of Tektro Oryx brakes that use the threaded-stud type of shoe. They seem to work really well, and came with (non-Kool-Stop) shoes that have the concave/convex washers. I found these to be very satisfactory.
06-18-20, 04:34 PM
#7
Senior Member
Brain fart. These are Dia Compe 983. I think they may actually have adjustable toe-in. There was or may be a convex or concave washer at the back of the brake post attachment bolt. 981 had one. If you loosen it, you will be able to change the position of the pad - ie, toe it in. TRY THIS FIRST!
Loosen the bolt and see if pads will shift angle.
I adjusted 5 zillion of these BITD, but that was a long time ago now. Hard to keep them all straight.
Loosen the bolt and see if pads will shift angle.
I adjusted 5 zillion of these BITD, but that was a long time ago now. Hard to keep them all straight.
Last edited by Salamandrine; 06-18-20 at 04:38 PM.
06-18-20, 05:30 PM
#8
Extraordinary Magnitude

Join Date: Aug 2009
Location: Waukesha WI
Posts: 13,648
Bikes: 1978 Trek TX700; 1978/79 Trek 736; 1984 Specialized Stumpjumper Sport; 1984 Schwinn Voyageur SP; 1985 Trek 620; 1985 Trek 720; 1986 Trek 400 Elance; 1987 Schwinn High Sierra; 1990 Miyata 1000LT
Mentioned: 84 Post(s)
Tagged: 0 Thread(s)
Quoted: 2608 Post(s)
Liked 1,703 Times
in
937 Posts
One thing Shimano really got right was the toe-in adjustment on the cantilever brakes-
Even after Dia Compe got a good system- the Shimano adjustment is better.
Sorry I can't be of substantive help...
Even after Dia Compe got a good system- the Shimano adjustment is better.
Sorry I can't be of substantive help...
__________________
*Recipient of the 2006 Time Magazine "Person Of The Year" Award*
Commence to jigglin� huh?!?!
"But hey, always love to hear from opinionated amateurs." -says some guy to Mr. Marshall.
Commence to jigglin� huh?!?!
"But hey, always love to hear from opinionated amateurs." -says some guy to Mr. Marshall.
06-18-20, 06:15 PM
#9
Old fart

Join Date: Nov 2004
Location: Appleton WI
Posts: 24,790
Bikes: Several, mostly not name brands.
Mentioned: 153 Post(s)
Tagged: 0 Thread(s)
Quoted: 3590 Post(s)
Liked 3,400 Times
in
1,934 Posts
There are tools to facilitate setting toe-in; some people just use a piece of cardboard under the leading edge of the pad to set the angle. I just hold the pad in place while tightening. You can stick an Allen key into the socket to help keep the angle you want while tightening the nut.
06-18-20, 06:42 PM
#10
Senior Member

Thanks for that confirmation. Sorry I missed it in my first post. Forgot that these 2nd generation DC brakes had toe in adjustment.
IMO it will be easier to use the adjustment feature if the mechanism is taken apart and cleaned, and a light film of grease put on everything. I bet it's all a bit corroded and sticky now.
06-18-20, 07:03 PM
#11
Senior Member

Join Date: Feb 2008
Location: Peoria, IL
Posts: 4,476
Mentioned: 86 Post(s)
Tagged: 0 Thread(s)
Quoted: 1829 Post(s)
Liked 3,376 Times
in
1,580 Posts
this reminds me a lot of my SunTour XCD canti's... the bike was new, the rims were new, and the Koolstop pads were new! Beautiful, but all of that newness led to lots of noise!
Eventually, the rims got roughened up from riding in the rain, so the pads didn't stick to them so much.
Also, the pad material got harder and less sticky as they aged. Getting filthy from riding in the rain probably helped too.
Other than this sort of break-in period, I do like to file a bit of material off of the back half of the pads. This is especially useful for brakes with no toe-in adjustment.
Steve in Peoria
06-18-20, 11:55 PM
#12
Hoards Thumbshifters

Join Date: Jul 2010
Location: Signal Mountain, TN
Posts: 1,157
Bikes: '23 Black Mtn MC, '87 Bruce Gordon Chinook, '08 Jamis Aurora, '86 Trek 560, '97 Mongoose Rockadile, & '91 Trek 750
Mentioned: 11 Post(s)
Tagged: 0 Thread(s)
Quoted: 246 Post(s)
Liked 338 Times
in
193 Posts
Those brakes actually have spherical washers where the pad posts attach. Those allow you to set toe-in by loosening the nut holding the post, re-positioning the pad for the toe-in, and then tightening the nut to hold it in place.
There are tools to facilitate setting toe-in; some people just use a piece of cardboard under the leading edge of the pad to set the angle. I just hold the pad in place while tightening. You can stick an Allen key into the socket to help keep the angle you want while tightening the nut.
There are tools to facilitate setting toe-in; some people just use a piece of cardboard under the leading edge of the pad to set the angle. I just hold the pad in place while tightening. You can stick an Allen key into the socket to help keep the angle you want while tightening the nut.
06-19-20, 10:40 AM
#13
Senior Member
Join Date: Nov 2008
Location: South Jersey
Posts: 1,959
Bikes: Too many Bicycles to list
Mentioned: 10 Post(s)
Tagged: 0 Thread(s)
Quoted: 90 Post(s)
Liked 137 Times
in
45 Posts
Those brakes actually have spherical washers where the pad posts attach. Those allow you to set toe-in by loosening the nut holding the post, re-positioning the pad for the toe-in, and then tightening the nut to hold it in place.
There are tools to facilitate setting toe-in; some people just use a piece of cardboard under the leading edge of the pad to set the angle. I just hold the pad in place while tightening. You can stick an Allen key into the socket to help keep the angle you want while tightening the nut.
There are tools to facilitate setting toe-in; some people just use a piece of cardboard under the leading edge of the pad to set the angle. I just hold the pad in place while tightening. You can stick an Allen key into the socket to help keep the angle you want while tightening the nut.
Glenn
06-19-20, 12:02 PM
#14
Senior Member
Join Date: Jan 2004
Location: Madison, WI USA
Posts: 6,157
Mentioned: 50 Post(s)
Tagged: 0 Thread(s)
Quoted: 2363 Post(s)
Liked 1,749 Times
in
1,191 Posts
(But yes, credit card thickness seems to be about right. Who doesn't have an old Blockbuster Video rental card in a drawer somwhere?)
06-19-20, 01:17 PM
#15
Senior Member
With those big soft salmon pads on vintage cantilevers, I'd be inclined to go a little more aggressive with the toe in. A credit card thickness is only ~ .030". First guess would be around a penny thick.
I've always done it by eye, and used as much as needed and not more. On these vintage calipers, inserting an object of known thickness and tightening the pad down flat rarely works as well as it can with modern pads. The pads will tend to shift around as they are tightened.
Toe in alone is not usually enough.
06-19-20, 03:04 PM
#16
Me duelen las nalgas
Join Date: Aug 2015
Location: Texas
Posts: 13,513
Bikes: Centurion Ironman, Trek 5900, Univega Via Carisma, Globe Carmel
Mentioned: 199 Post(s)
Tagged: 0 Thread(s)
Quoted: 4560 Post(s)
Liked 2,802 Times
in
1,800 Posts
If those are Kool Stop Eagle 2 (Eagle Claw) pads, they're easy to toe-in. Just mash the pad flat against the rim, align, and crank the locking bolt. Done. The wedge tip aligns the toe-in.
If there's any squealing just bomb down a hill while riding the brake -- the slight wear and glazing will stop the squealing. I do that during/after wet rides due to rain or puddles. It'll squeal briefly until I've braked a couple of times.
As someone else noted it's mostly due to a resonance/vibration quirk and some setups will squeal very little, if at all. When I switched my Univega from the original plain aluminum low profile single wall rims to slightly higher profile double wall rims, there was little or no squealing. It just coincidentally changed the resonance that caused some squealing with the original wheels.
The tricky part with most canti brakes is setting the distance and angle so the pads are square against the rim when closed. It'll look way off when the brakes are open, but that's normal. I usually wrap some cord or bungee around the brake levers to hold 'em partially closed while making those adjustments.
With other pads that don't have the wedge/plow tip of some Kool Stops, ditto the tricks for creating a little gap: zip tie, rubber band, credit card, penny, whatever. I use zip ties.
06-19-20, 03:11 PM
#17
Senior Member
Thread Starter
Join Date: Jun 2018
Location: NW Ohio
Posts: 1,142
Bikes: 1983 Univega Super Strada, 1986 Panasonic DX5000, 1984 Fuji Team 85 Univega Gran Turismo, 1984 Lotus Unique, 1987 Centurion Expert, 1987 Centurion Ironman Master,
Mentioned: 14 Post(s)
Tagged: 0 Thread(s)
Quoted: 677 Post(s)
Liked 460 Times
in
182 Posts
Thanks guys
06-19-20, 07:28 PM
#18
Bike Butcher of Portland

Join Date: Jul 2014
Location: Portland, OR
Posts: 11,639
Bikes: It's complicated.
Mentioned: 1299 Post(s)
Tagged: 0 Thread(s)
Quoted: 4682 Post(s)
Liked 5,801 Times
in
2,285 Posts
I don't know if your Dia-Compe cantilever shoe shafts and shoe-to-arm studs have the same diameters as those on Mafac (French) centerpulls (7 mm and 10 mm respectively) but if they do, then you can buy seating washers for them that are pre-toed (using grooves of unequal depth, as TenGrainBread recommends above -- from ReneHerseCycles.com (Jan Heine's outfit). But it seems to me that it would be simple enough to do this carefully with a rat-tail file.
__________________
If someone tells you that you have enough bicycles and you don't need any more, stop talking to them. You don't need that kind of negativity in your life.
If someone tells you that you have enough bicycles and you don't need any more, stop talking to them. You don't need that kind of negativity in your life.
06-20-20, 11:13 AM
#19
Senior Member
Last ditch when toe-in does not work——reverse the process. Do toe-out instead. Can’t explain that but it has worked and the brakes function just as well.
