


120mm OLD respacing
 07-05-20, 09:53 AM
#1

Senior Member
Thread Starter
Join Date: Jan 2019
Location: Toledo Ohio
Posts: 1,493
Bikes: 1964 Huffy Sportsman, 1972 Fuji Newest, 1973 Schwinn Super Sport (3), 1982 Trek 412, 1983 Trek 700, 1989 Miyata 1000LT, 1991 Bianchi Boardwalk, plus others
Mentioned: 21 Post(s)
Tagged: 0 Thread(s)
Quoted: 582 Post(s)
Liked 697 Times
in
393 Posts
120mm OLD respacing
Looking for a bit of advice on spacing on my old Frejus. I am in the process of changing out the rear derailleur and freewheel to something this old guy can handle. Stock of course is 120mm axle. Frame is closer to 121.5-122mm. I need close to 2mm on the DS for the slightly thicker freewheel body on a Shimano 14-28 five speed freewheel and for the locknut on a vintage suntour 7 RD.
How much "off" would I be and would it really be noticeable to just space the DS. I have a 1.8mm washer that will do the trick. Would I even notice the dish? Conversely, I could easily put another of the same washers on the other side and spring the frame ever so slightly; less than 2mm.
Just wondering which way to go. Of course, I am saving all the old parts.
 07-05-20, 10:04 AM
#2
Senior Member

Join Date: Jun 2018
Location: The Urban Shores Of Michigami
Posts: 1,748
Bikes: ........................................ .....Holdsworth "Special"..... .......Falcon "Special".......... .........Miyata 912........... ........................................
Mentioned: 11 Post(s)
Tagged: 0 Thread(s)
Quoted: 702 Post(s)
Liked 671 Times
in
419 Posts
@sd5782, ideally, the front wheel and rear wheel track in line with each other. Keeping the rear wheel centered on the head and seat tube and having the dropouts parallel with each other is a good start.

Likes For branko_76:
07-05-20, 10:54 AM
#3
Senior Member
Thread Starter
Join Date: Jan 2019
Location: Toledo Ohio
Posts: 1,493
Bikes: 1964 Huffy Sportsman, 1972 Fuji Newest, 1973 Schwinn Super Sport (3), 1982 Trek 412, 1983 Trek 700, 1989 Miyata 1000LT, 1991 Bianchi Boardwalk, plus others
Mentioned: 21 Post(s)
Tagged: 0 Thread(s)
Quoted: 582 Post(s)
Liked 697 Times
in
393 Posts
Understandable of course, and that jig and measuring is great too. I believe I saw a string method before too. I kinda wondered how much a mm or two would be noticed if at all for a casual rider going less than 30 mph.
Rear dropout spacing already almost 122mm, so when closing skewer is it assumed the 2mm difference would be taken up evenly from both sides? One could measure with no wheel mounted, and then locked in at 122 I guess to see, but that is probably greater precision than I could measure.
Perhaps I will look into Sheldon site for string method, but would have to take off fender too. I may just try one DS spacer and be happy dropouts aren’t spread or compressed. Recentering the axle then would then leave an equal axle protrusion of maybe 3.5-4mm.
07-05-20, 11:53 AM
#4
se�or miembro

Join Date: Dec 2018
Location: Pac NW
Posts: 6,600
Bikes: '70s - '80s Campagnolo
Mentioned: 92 Post(s)
Tagged: 0 Thread(s)
Quoted: 3864 Post(s)
Liked 6,450 Times
in
3,190 Posts
Just respace (cold set) the frame normally. There are two basic home methods. Sheldon uses a 2x4. The new youtube guys use a long bolt in the dropouts and a series of nuts and washers. (I think this method is easier.) Pick one and go for it. Use Sheldon's string test to make sure the frame is straight. And yes, you'll have to redish the wheel.
Last edited by SurferRosa; 07-05-20 at 11:57 AM.
07-05-20, 01:39 PM
#5
Senior Member
Join Date: Jan 2017
Location: Berea, KY
Posts: 1,135
Mentioned: 19 Post(s)
Tagged: 0 Thread(s)
Quoted: 360 Post(s)
Liked 323 Times
in
186 Posts
If you don't want to respace, just add the spacer and take it to a shop to get it redished and trued.
__________________
Andy
Andy
Likes For beicster:
07-05-20, 02:59 PM
#6

Disraeli Gears

Minor redishing is (I have heard, never done it), on a true wheel, often accomplished simply by tightening the drive-side spokes uniformly. It doesn't take much to move the rim over.
07-05-20, 04:51 PM
#7
Senior Member
Thread Starter
Join Date: Jan 2019
Location: Toledo Ohio
Posts: 1,493
Bikes: 1964 Huffy Sportsman, 1972 Fuji Newest, 1973 Schwinn Super Sport (3), 1982 Trek 412, 1983 Trek 700, 1989 Miyata 1000LT, 1991 Bianchi Boardwalk, plus others
Mentioned: 21 Post(s)
Tagged: 0 Thread(s)
Quoted: 582 Post(s)
Liked 697 Times
in
393 Posts
Looked at the Sheldon string measuring method with string going from dropouts to headtube and measuring string at seat tube. I did that and interestingly it was off just a bit and adding the 1.8 mm spacer to the drive side actually evened things out. That is also about the amount that the dropouts were over the nominal120mm. Lucky coincidence I guess as that suited what I was trying to accomplish anyhow.
Back kinda to the rest of the question as to how noticeable the ride is when it is off just a wee bit. I know I rode my old Supersport for decades with the dish off from trying to true it and not knowing any better about 30 years ago as a youngster. Perhaps a heavy bike on old Kendas doesn’t show minor stuff, or I don’t/didn’t have a feel for it. I know just a bit more now and am also willing to learn more too. Of course, an old Schwinn in the flatlands here is a whole different story than flying down a mountain at 40mph on a bit more of a premium bike.
Back kinda to the rest of the question as to how noticeable the ride is when it is off just a wee bit. I know I rode my old Supersport for decades with the dish off from trying to true it and not knowing any better about 30 years ago as a youngster. Perhaps a heavy bike on old Kendas doesn’t show minor stuff, or I don’t/didn’t have a feel for it. I know just a bit more now and am also willing to learn more too. Of course, an old Schwinn in the flatlands here is a whole different story than flying down a mountain at 40mph on a bit more of a premium bike.
07-05-20, 05:07 PM
#8
aka Tom Reingold

Join Date: Jan 2009
Location: New York, NY, and High Falls, NY, USA
Posts: 40,496
Bikes: 1962 Rudge Sports, 1971 Raleigh Super Course, 1971 Raleigh Pro Track, 1974 Raleigh International, 1975 Viscount Fixie, 1982 McLean, 1996 Lemond (Ti), 2002 Burley Zydeco tandem
Mentioned: 511 Post(s)
Tagged: 0 Thread(s)
Quoted: 7345 Post(s)
Liked 2,447 Times
in
1,428 Posts
@sd5782, it's possible you'll notice, but it's not probable.
__________________
Tom Reingold, tom@noglider.com
New York City and High Falls, NY
Blogs: The Experienced Cyclist; noglider's ride blog
�When man invented the bicycle he reached the peak of his attainments.� � Elizabeth West, US author
Please email me rather than PM'ing me. Thanks.
Tom Reingold, tom@noglider.com
New York City and High Falls, NY
Blogs: The Experienced Cyclist; noglider's ride blog
�When man invented the bicycle he reached the peak of his attainments.� � Elizabeth West, US author
Please email me rather than PM'ing me. Thanks.
07-05-20, 06:39 PM
#9
Senior Member
Join Date: Jun 2018
Location: The Urban Shores Of Michigami
Posts: 1,748
Bikes: ........................................ .....Holdsworth "Special"..... .......Falcon "Special".......... .........Miyata 912........... ........................................
Mentioned: 11 Post(s)
Tagged: 0 Thread(s)
Quoted: 702 Post(s)
Liked 671 Times
in
419 Posts
Looked at the Sheldon string measuring method with string going from dropouts to headtube and measuring string at seat tube. I did that and interestingly it was off just a bit and adding the 1.8 mm spacer to the drive side actually evened things out. That is also about the amount that the dropouts were over the nominal120mm. Lucky coincidence I guess as that suited what I was trying to accomplish anyhow.
Originally Posted by sd5782;2 1571058
Back kinda to the rest of the question as to how noticeable the ride is when it is off just a wee bit. I know I rode my old Supersport for decades with the dish off from trying to true it and not knowing any better about 30 years ago as a youngster. Perhaps a heavy bike on old Kendas doesn’t show minor stuff, or I don’t/didn’t have a feel for it. I know just a bit more now and am also willing to learn more too. Of course, an old Schwinn in the flatlands here is a whole different story than flying down a mountain at 40mph on a bit more of a premium bike.
Last edited by branko_76; 07-05-20 at 06:48 PM.
07-05-20, 06:53 PM
#10
Senior Member
Looked at the Sheldon string measuring method with string going from dropouts to headtube and measuring string at seat tube. I did that and interestingly it was off just a bit and adding the 1.8 mm spacer to the drive side actually evened things out. That is also about the amount that the dropouts were over the nominal120mm. Lucky coincidence I guess as that suited what I was trying to accomplish anyhow.
Back kinda to the rest of the question as to how noticeable the ride is when it is off just a wee bit. I know I rode my old Supersport for decades with the dish off from trying to true it and not knowing any better about 30 years ago as a youngster. Perhaps a heavy bike on old Kendas doesn�t show minor stuff, or I don�t/didn�t have a feel for it. I know just a bit more now and am also willing to learn more too. Of course, an old Schwinn in the flatlands here is a whole different story than flying down a mountain at 40mph on a bit more of a premium bike.
Back kinda to the rest of the question as to how noticeable the ride is when it is off just a wee bit. I know I rode my old Supersport for decades with the dish off from trying to true it and not knowing any better about 30 years ago as a youngster. Perhaps a heavy bike on old Kendas doesn�t show minor stuff, or I don�t/didn�t have a feel for it. I know just a bit more now and am also willing to learn more too. Of course, an old Schwinn in the flatlands here is a whole different story than flying down a mountain at 40mph on a bit more of a premium bike.
07-05-20, 06:56 PM
#11
Friendship is Magic

Join Date: Nov 2010
Location: Sacramento, CA
Posts: 22,983
Bikes: old ones
Mentioned: 304 Post(s)
Tagged: 0 Thread(s)
Quoted: 26381 Post(s)
Liked 10,358 Times
in
7,194 Posts
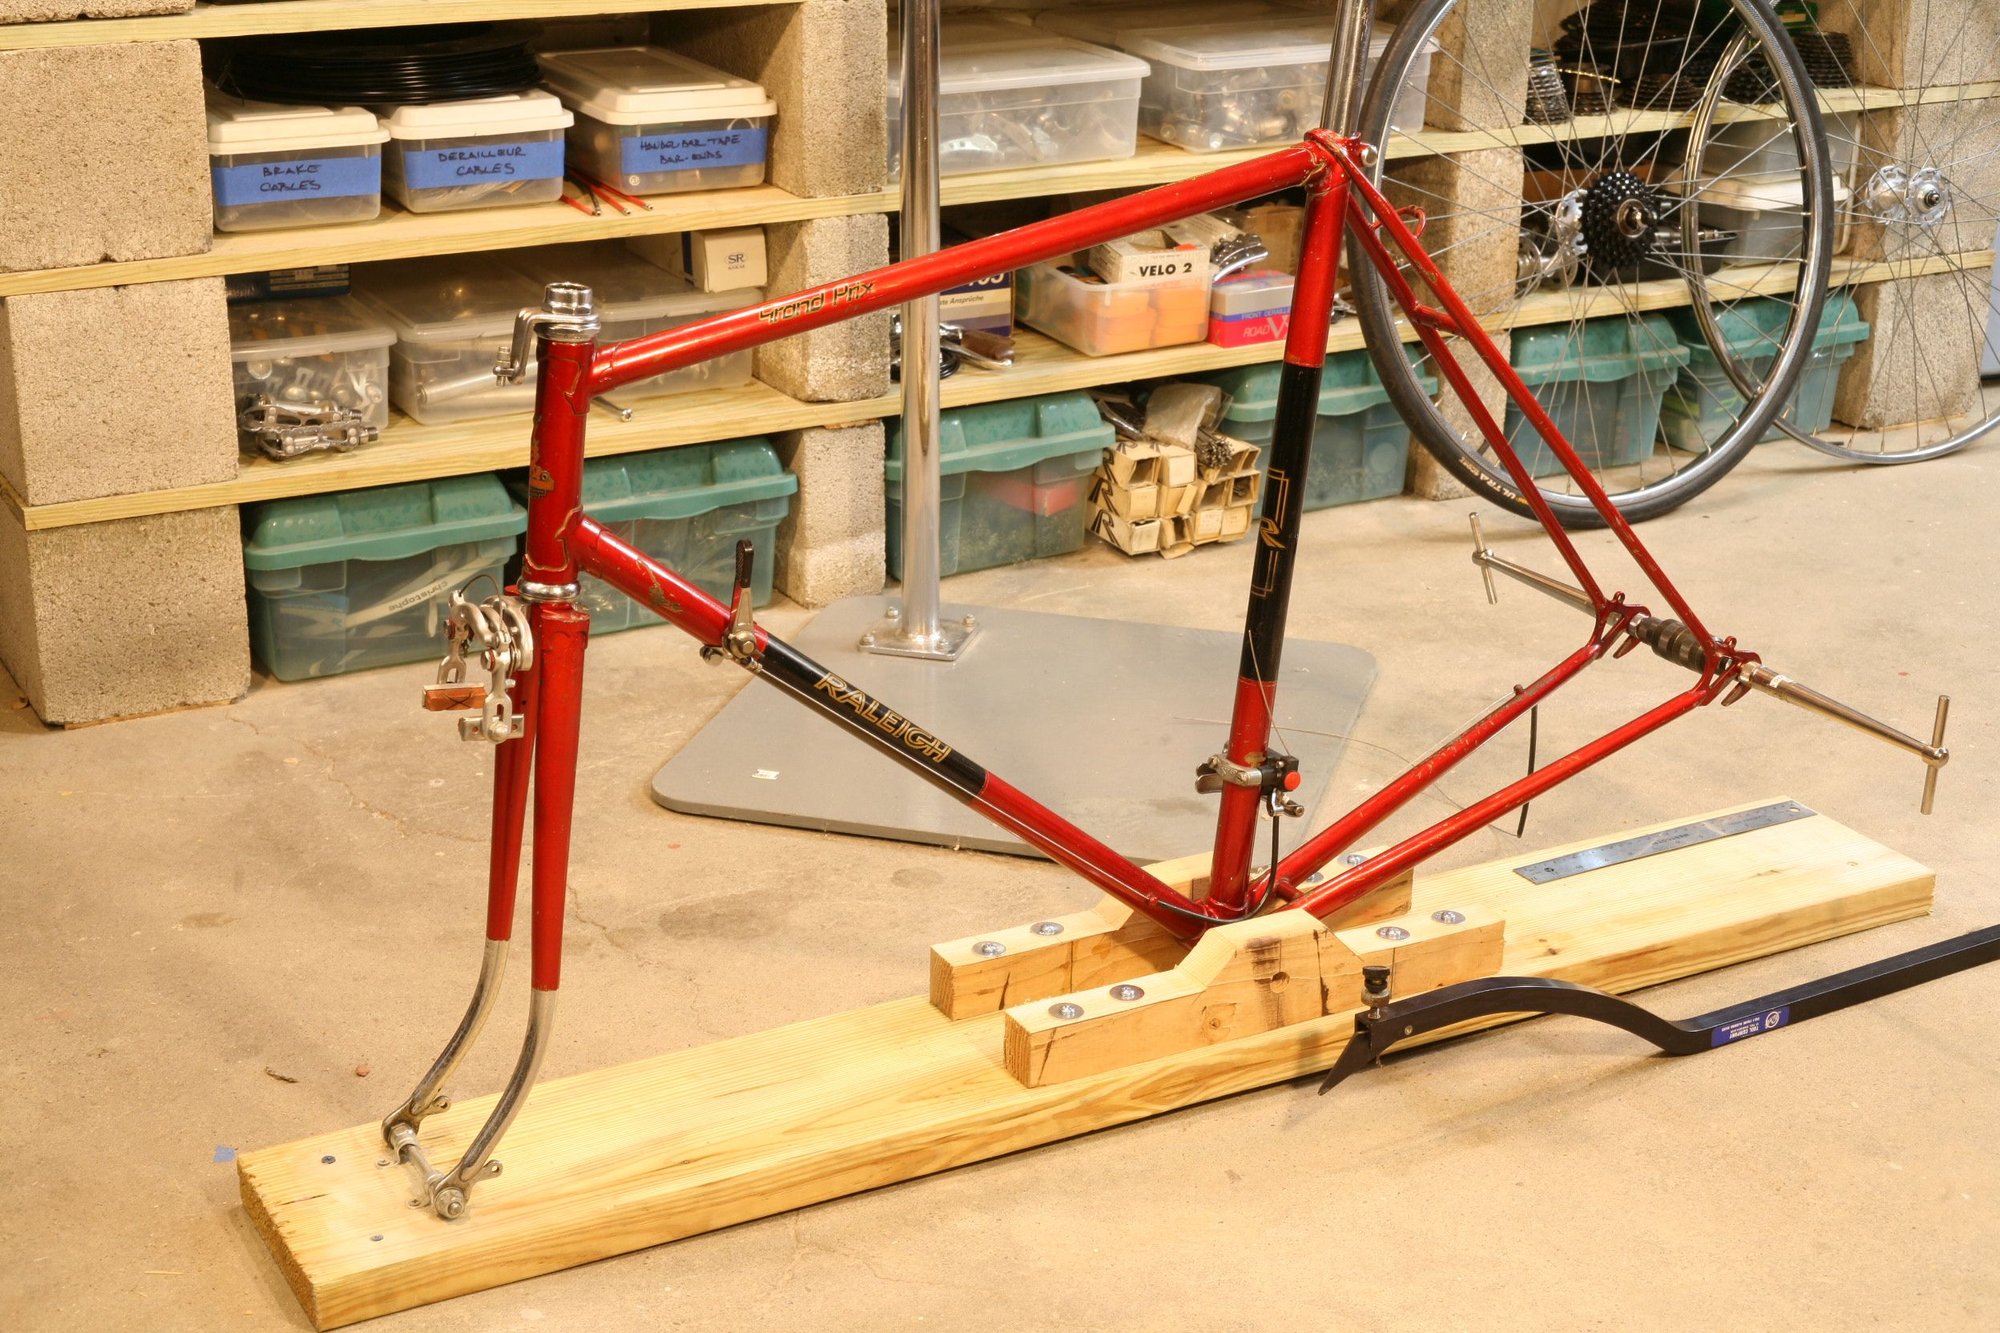
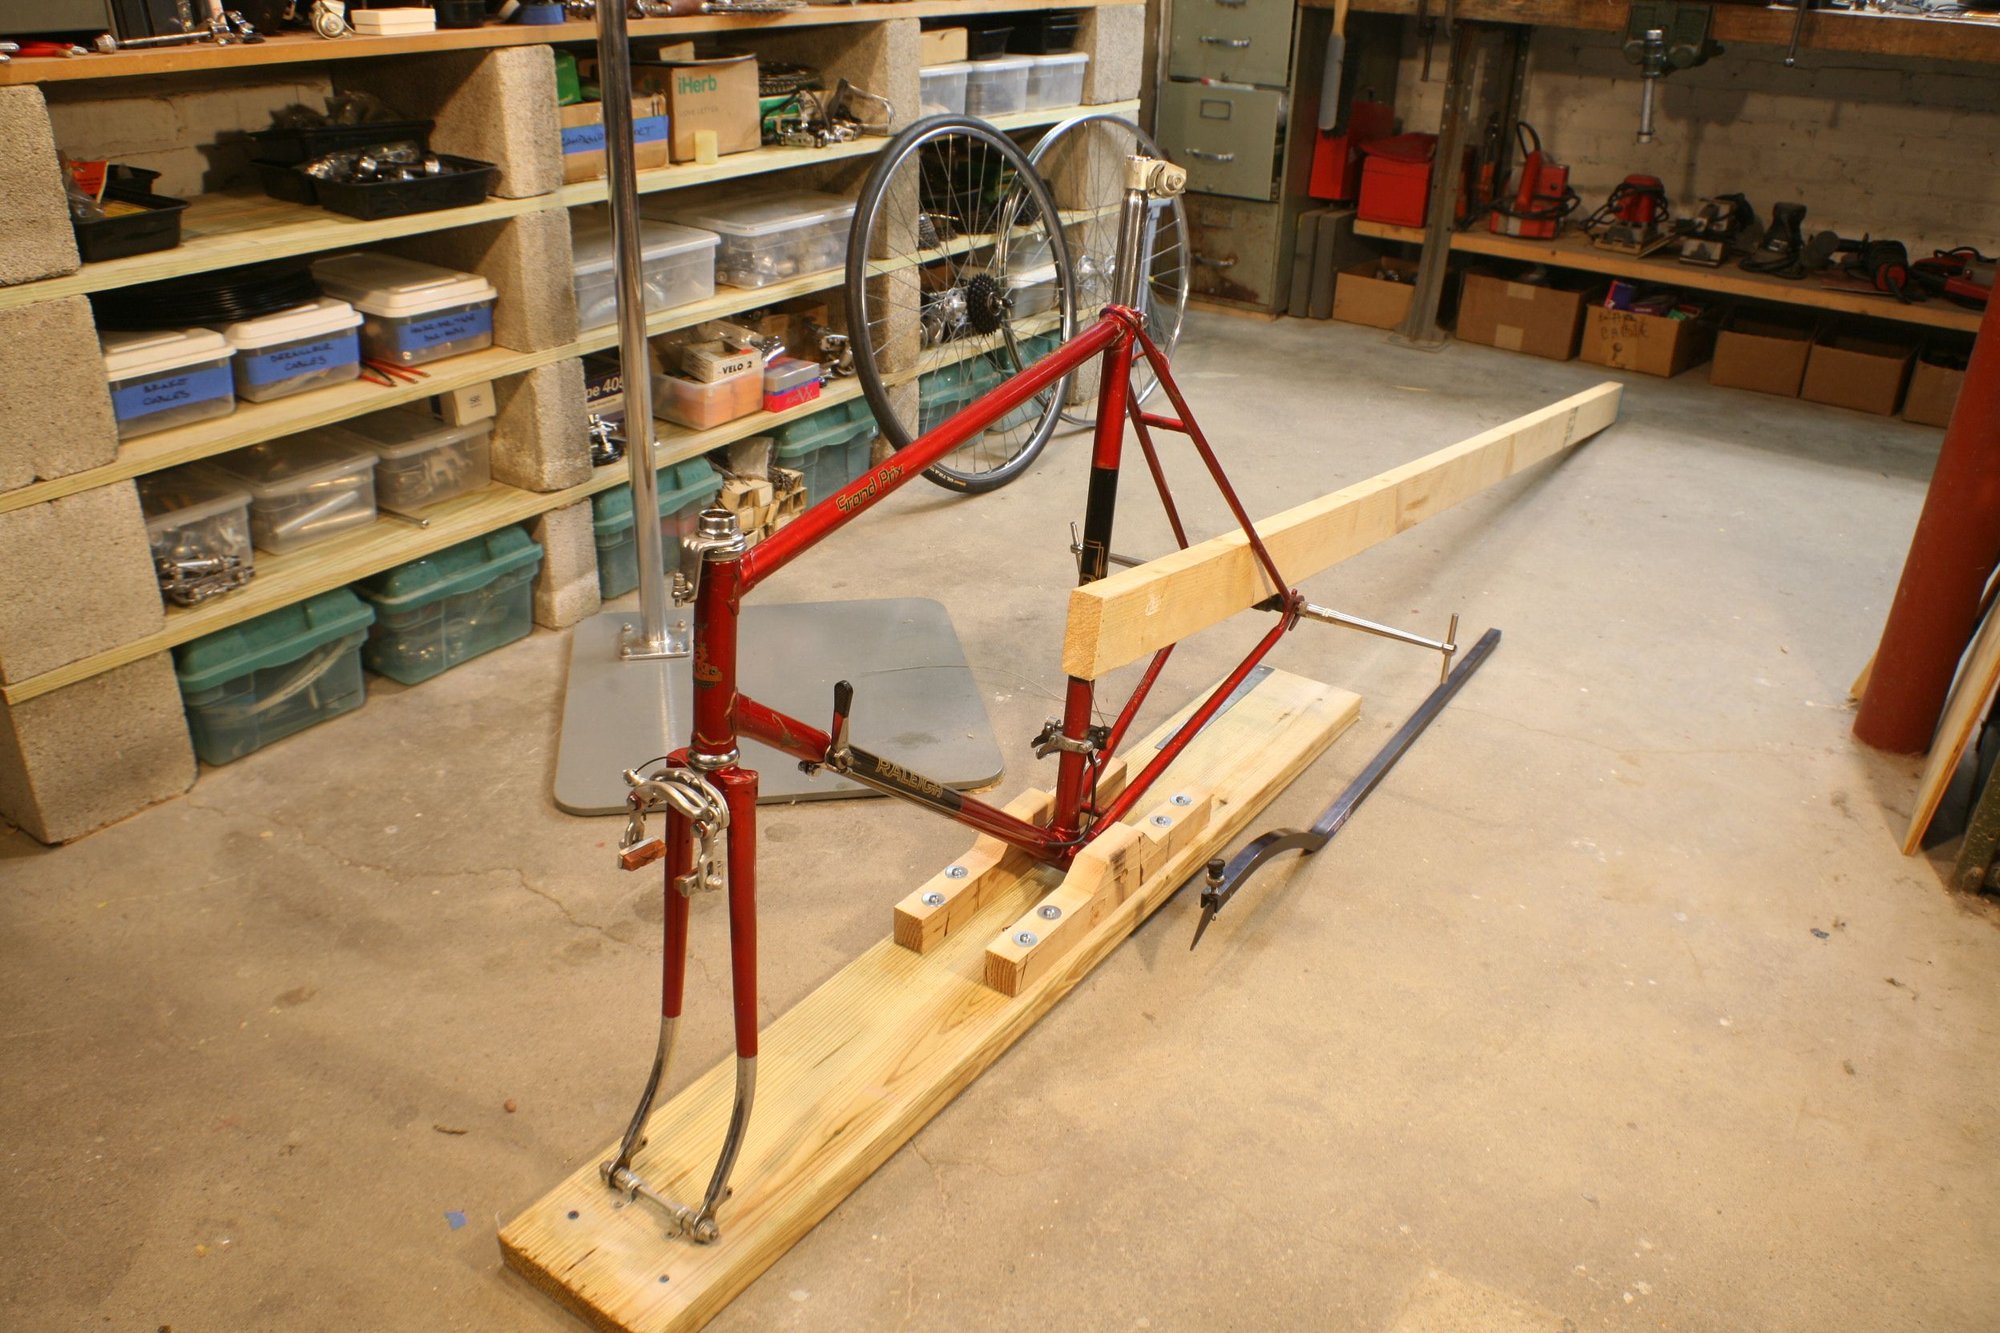
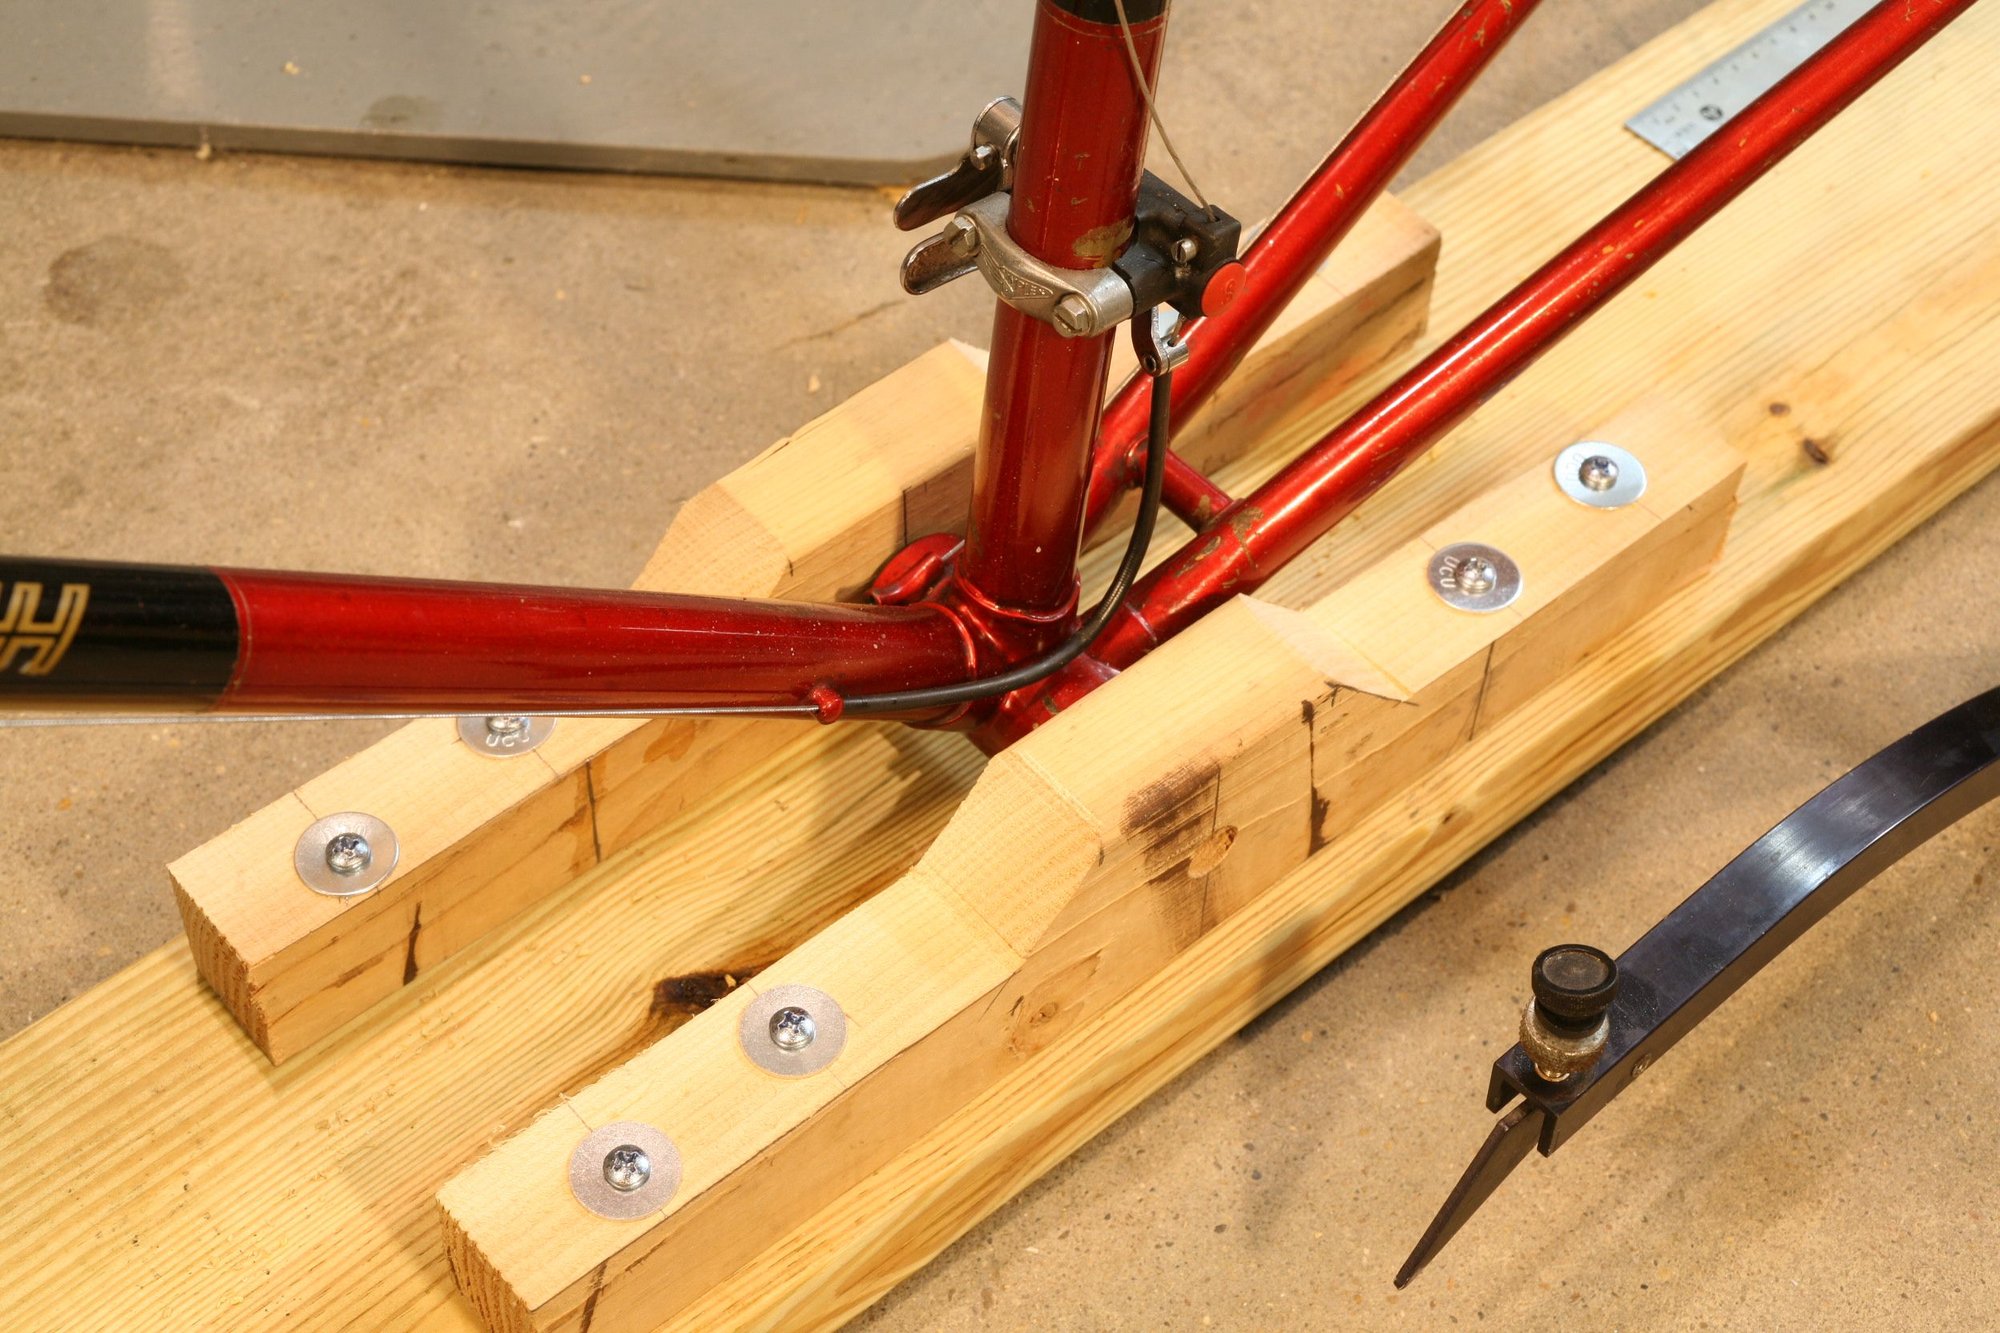
...to do this with any hope of accuracy, you really need to have the frame up where you can see it and work on it easily, and at least the BB ought to be out.
Both wheels will, of course, be removed. It's a lot easier to do on a bare frame, without the fork flopping around as an extra hassle. Here are pictures I took recently on a current project.
...you probably won't notice. Try it and see. You can always sting it up later if it's already built up.
Both wheels will, of course, be removed. It's a lot easier to do on a bare frame, without the fork flopping around as an extra hassle. Here are pictures I took recently on a current project.
...you probably won't notice. Try it and see. You can always sting it up later if it's already built up.
 07-05-20, 07:13 PM
#12
Friendship is Magic
Join Date: Nov 2010
Location: Sacramento, CA
Posts: 22,983
Bikes: old ones
Mentioned: 304 Post(s)
Tagged: 0 Thread(s)
Quoted: 26381 Post(s)
Liked 10,358 Times
in
7,194 Posts
Just respace (cold set) the frame normally. There are two basic home methods. Sheldon uses a 2x4. The new youtube guys use a long bolt in the dropouts and a series of nuts and washers. (I think this method is easier.) Pick one and go for it. Use Sheldon's string test to make sure the frame is straight. And yes, you'll have to redish the wheel.
But it's a lot easier to do with a lever arm with an adjustable set of hooks, modeled after the one Park makes and sells. You can make an acceptable substitute that will work with a piece of wood and a vinyl covered hook that bolts through it. Pad the other end with something to protect the paint. If you want to go fancy, you can wrap the handle end.

Likes For 3alarmer:
07-05-20, 07:17 PM
#13
Senior Member
Thread Starter
Join Date: Jan 2019
Location: Toledo Ohio
Posts: 1,493
Bikes: 1964 Huffy Sportsman, 1972 Fuji Newest, 1973 Schwinn Super Sport (3), 1982 Trek 412, 1983 Trek 700, 1989 Miyata 1000LT, 1991 Bianchi Boardwalk, plus others
Mentioned: 21 Post(s)
Tagged: 0 Thread(s)
Quoted: 582 Post(s)
Liked 697 Times
in
393 Posts
Thanks all. Kind of what I was thinking. Fun to learn stuff, but that opens up other cans of worms. Sometimes ignorance is bliss. Actually bike was up in stand with wheel and RD off. String around headtube to rear dropouts. Just a slight variance to one side. Spacer added which brought that side out which should have kept the centerline of the wheel the same as it was. Not real precise, but was reassuring to see it looking as it should. Now to set up the slightly less vintage RD to handle the 28 tooth freewheel. Still will be 5 speed vintage, but hopefully better shifting than the campy Gran Sport. Vintage is nice, and I have read posts of others having luck with the Gran Sport, but I haven’t.
07-05-20, 08:02 PM
#14
Friendship is Magic
Join Date: Nov 2010
Location: Sacramento, CA
Posts: 22,983
Bikes: old ones
Mentioned: 304 Post(s)
Tagged: 0 Thread(s)
Quoted: 26381 Post(s)
Liked 10,358 Times
in
7,194 Posts
Thanks all. Kind of what I was thinking. Fun to learn stuff, but that opens up other cans of worms. Sometimes ignorance is bliss. Actually bike was up in stand with wheel and RD off. String around headtube to rear dropouts. Just a slight variance to one side. Spacer added which brought that side out which should have kept the centerline of the wheel the same as it was. Not real precise, but was reassuring to see it looking as it should. Now to set up the slightly less vintage RD to handle the 28 tooth freewheel. Still will be 5 speed vintage, but hopefully better shifting than the campy Gran Sport. Vintage is nice, and I have read posts of others having luck with the Gran Sport, but I haven’t.
You can do a double check on where your wheel is running in the rear triangle relative to center plane by simply running a long straightedge along the head tube/seat tube line on one side or the other. See where it lands on the rim (works better with tyre off). Then do it on the other side. Compare results.
You can even eyeball it (roughly) with the wheel in the frame, and the bike in a stand turned upside down. You want your rear wheel/tyre to look like it's centered relative to the seat tube, when viewed with one eye open, square on and centered to the bike. That's how I usually set the adjuster screws in the dropouts, when a bike has them.


