


Frankenparts: Tell us about your DIY'd components made from non-original parts
 12-01-14, 01:17 PM
#1
Senior Member
Thread Starter

Frankenparts: Tell us about your DIY'd components made from non-original parts
This is a tangent of "Show us your Frankenbikes". So rather than bikes made with a hodgepodge of components, how about components themselves hybridized from a hodgepodge of parts?
I love it when a component is made using bits of two or more different ones to arrive at something new, whether to gain a new functionality or just out of budget constraints. Things like RD parallelograms with non-original cages, and MAFAC brakes with upgraded pivot bushings... those sorts of DIY mods come to mind. Or lacing 40H hubs to 36H rims.
Recently I pulled my winter commuter out of hibernation and gave it a pre-season go-over. I realized my TA French-threaded BB had bitten the dust (one too many sandy salty winters, I suppose, had resulted in very pitted spindle races). I could have replaced the spindle with another sourced from eBay, thus restoring the component to its properly matched configuration. But I didn't feel like spending eBay prices for just a new spindle, and I didn't like the idea of a non-sealed BB for winter duty, anyway. Maintaining the provenance of the component was not important to me. So I looked in my parts bins and found a set of Phil mounting rings for French BBs and an OMAS spindle-- the same length as the TA, and milled for cartridge bearings. Perfect! Now I just had to source the bearings. I ended up sourcing a pair of Enduro sealed cartridges for $15, shipped. So now I have a Phil/Enduro/OMAS chimeric BB, and it's smoother than the TA ever was. And better sealed!
Tell us about your DIY'd and cobbled components. Pics highly encouraged.
Last edited by southpawboston; 12-01-14 at 01:25 PM.
 12-01-14, 01:25 PM
#2
Senior Member
Join Date: Nov 2005
Posts: 1,704
Mentioned: 0 Post(s)
Tagged: 0 Thread(s)
Quoted: 1 Post(s)
Likes: 0
Liked 2 Times
in
2 Posts
Shimano eight speed cassette cogs, Shimano 7 speed spacers and last two cogs. Fulcrum 5 for shimano freehub. Campagnolo Record 8 speed Brifters and RD. Shimergo !
12-01-14, 01:56 PM
#3
Banned
Join Date: Aug 2013
Posts: 6,480
Mentioned: 93 Post(s)
Tagged: 0 Thread(s)
Quoted: 1361 Post(s)
Likes: 0
Liked 423 Times
in
282 Posts
Thanks to the help from fellow BF/CR members, this thing went thru some transformation to make it work. Running a 3x3x2 that also uses the original 1/2x1/8 pitch chain. After some punishing miles, I had to re-tweak adjust everything but it's now been super reliable bulletproof. I finally acquired a correct rear wingnut for the shift side yet I have to drill and tap for the non-drive side (anyone have Whitworth thread taps?).


12-01-14, 02:53 PM
#4

aka Tom Reingold

Join Date: Jan 2009
Location: New York, NY, and High Falls, NY, USA
Posts: 40,503
Bikes: 1962 Rudge Sports, 1971 Raleigh Super Course, 1971 Raleigh Pro Track, 1974 Raleigh International, 1975 Viscount Fixie, 1982 McLean, 1996 Lemond (Ti), 2002 Burley Zydeco tandem
Mentioned: 511 Post(s)
Tagged: 0 Thread(s)
Quoted: 7348 Post(s)
Liked 2,467 Times
in
1,434 Posts
I've made derailleurs out of two different model derailleurs, both not working. No pictures to provide.
I made this expander seatpost out of a stem and a seatpost.
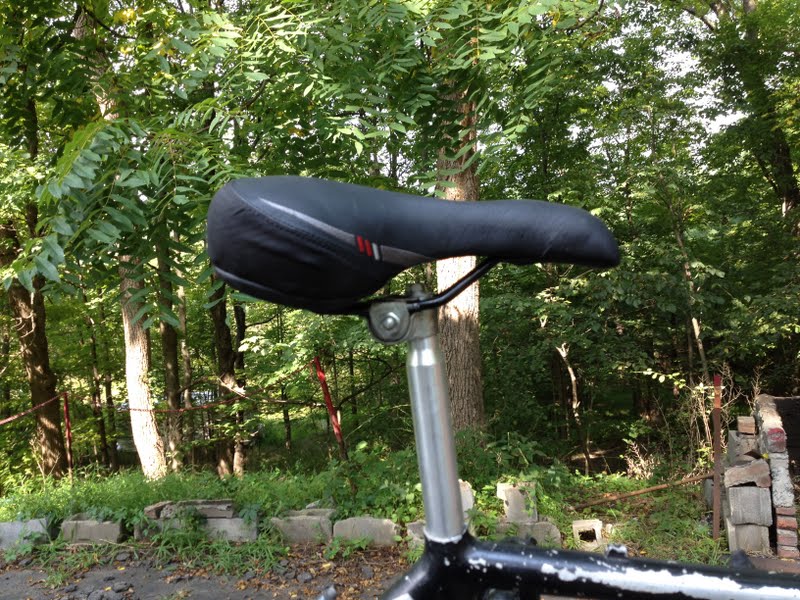
I made this expander seatpost out of a stem and a seatpost.
__________________
Tom Reingold, tom@noglider.com
New York City and High Falls, NY
Blogs: The Experienced Cyclist; noglider's ride blog
�When man invented the bicycle he reached the peak of his attainments.� � Elizabeth West, US author
Please email me rather than PM'ing me. Thanks.
Tom Reingold, tom@noglider.com
New York City and High Falls, NY
Blogs: The Experienced Cyclist; noglider's ride blog
�When man invented the bicycle he reached the peak of his attainments.� � Elizabeth West, US author
Please email me rather than PM'ing me. Thanks.
12-01-14, 03:19 PM
#5
Senior Member
Thread Starter
@Fred Smedley @crank_addict @noglider, good ones! The seat post wedge expander trick is interesting, hadn't seen that before!
12-01-14, 03:20 PM
#6
is just a real cool dude

Join Date: Aug 2010
Location: The Thumb, MI
Posts: 3,165
Mentioned: 12 Post(s)
Tagged: 0 Thread(s)
Quoted: 31 Post(s)
Likes: 0
Liked 32 Times
in
14 Posts
There's a couple folks here that have my long cages I made for NR/SR derailleus. Jimmueller sure likes to show his off on his Masi GC. I've got one left from about a dozen I made. Also made some chainring adapters for 50.4 bcd crank arms. I've got a NR rear derailleur that's got the cages and ti bolts from a SR if that counts on my Guerciotti? Lol.
 12-01-14, 03:24 PM
#8
aka Tom Reingold
Join Date: Jan 2009
Location: New York, NY, and High Falls, NY, USA
Posts: 40,503
Bikes: 1962 Rudge Sports, 1971 Raleigh Super Course, 1971 Raleigh Pro Track, 1974 Raleigh International, 1975 Viscount Fixie, 1982 McLean, 1996 Lemond (Ti), 2002 Burley Zydeco tandem
Mentioned: 511 Post(s)
Tagged: 0 Thread(s)
Quoted: 7348 Post(s)
Liked 2,467 Times
in
1,434 Posts
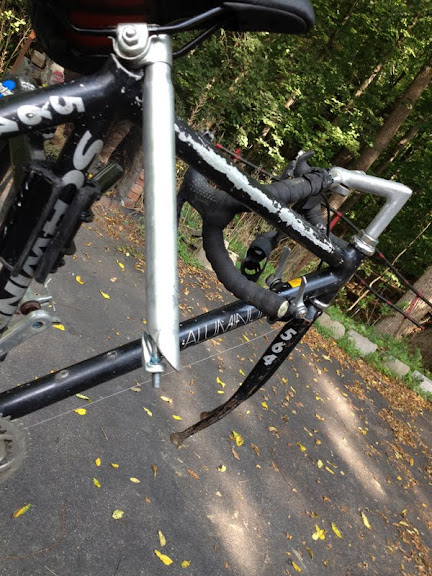
I had to make that seatpost, because the bike originally came with one. But the seatpost was absent when the bike was picked from the trash. Here is the bike as I built it. I also had to straighten the fork.
I've made a few frankencomponents, but I can't remember any others at the moment.

I've made a few frankencomponents, but I can't remember any others at the moment.
__________________
Tom Reingold, tom@noglider.com
New York City and High Falls, NY
Blogs: The Experienced Cyclist; noglider's ride blog
�When man invented the bicycle he reached the peak of his attainments.� � Elizabeth West, US author
Please email me rather than PM'ing me. Thanks.
Tom Reingold, tom@noglider.com
New York City and High Falls, NY
Blogs: The Experienced Cyclist; noglider's ride blog
�When man invented the bicycle he reached the peak of his attainments.� � Elizabeth West, US author
Please email me rather than PM'ing me. Thanks.
12-01-14, 03:31 PM
#9
Banned
Sort of like 3rd post , A S-A 3 speed , triple cluster in place of the 1, and a triple crank For a 3 cubed, 27 speed.
did this as a kid in the early 60's , shifterd the 2 Huret Derailleurs and the 3 speed hub with downtube shifters ..
A-D Puch-JC Higgins bike ..
Studded Tire Bike began as a old MTB frame with a broken Dropout . put it together from Bits and Pieces.
did this as a kid in the early 60's , shifterd the 2 Huret Derailleurs and the 3 speed hub with downtube shifters ..
A-D Puch-JC Higgins bike ..
Studded Tire Bike began as a old MTB frame with a broken Dropout . put it together from Bits and Pieces.
Last edited by fietsbob; 12-01-14 at 03:35 PM.
12-01-14, 03:33 PM
#10
Senior Member
Thread Starter
I had an RD-7402 that I would really have liked to do this to. From which RD was this cage originally? Early XT? 105? I'm guessing the max cog is still limited to 26T, but this just give you more chain wrap for a larger front chainring difference.
12-01-14, 03:43 PM
#11
Banned.
Join Date: May 2010
Location: Snohomish, WA.
Posts: 2,866
Mentioned: 33 Post(s)
Tagged: 0 Thread(s)
Quoted: 469 Post(s)
Liked 2,443 Times
in
646 Posts
 12-01-14, 03:48 PM
#12
Senior Member
Join Date: Nov 2005
Location: NW Ohio
Posts: 3,419
Bikes: 1984 Miyata 310, 1986 Schwinn Sierra, 2011 Jamis Quest, 1980 Peugeot TH8 Tandem, 1992 Performance Parabola, 1987 Ross Mt. Hood, 1988 Schwinn LeTour, 1988 Trek 400T, 1981 Fuji S12-S LTD, 197? FW Evans
Mentioned: 24 Post(s)
Tagged: 0 Thread(s)
Quoted: 531 Post(s)
Liked 1,004 Times
in
514 Posts
I took apart a set of stem shifters to use the cable stops on the downtube bosses on my wife's bike, so that I could mount thumb shifters on the North Road bars.
12-01-14, 04:06 PM
#13
Senior Member
Thread Starter
Yes, I believe that should work with a larger max cog. How did you replace the parallelogram pivots?
12-01-14, 04:13 PM
#14
Banned.
Join Date: May 2010
Location: Snohomish, WA.
Posts: 2,866
Mentioned: 33 Post(s)
Tagged: 0 Thread(s)
Quoted: 469 Post(s)
Liked 2,443 Times
in
646 Posts
I didn't build this piece, southpaw. I acquired it second hand(as stated in my original post). I haven't taken it apart, so I dont know what was involved in the change to the long cage. I really need to mount it up on something and give it a go. It would probably work nicely with some retrofriction shifters, a compact chainset, and a 7 speed freewheel.
Last edited by Roger M; 12-01-14 at 04:18 PM.
12-01-14, 04:30 PM
#15
Ride, Wrench, Swap, Race

Join Date: Jan 2010
Location: Northern California
Posts: 9,193
Bikes: Cheltenham-Pedersen racer, Boulder F/S Paris-Roubaix, Varsity racer, '52 Christophe, '62 Continental, '92 Merckx, '75 Limongi, '76 Presto, '72 Gitane SC, '71 Schwinn SS, etc.
Mentioned: 132 Post(s)
Tagged: 0 Thread(s)
Quoted: 1565 Post(s)
Liked 1,295 Times
in
865 Posts
I first saw a 74xx long-caged derailer on a tandem, and it had both original D-A knuckles (8s, i.e. no bolt showing at the "A" pivot).
The owner told me it was an XTR cage, and he was running D-A STI levers and 12-32t XTR cogset in the hillclimb tt.
The owner told me it was an XTR cage, and he was running D-A STI levers and 12-32t XTR cogset in the hillclimb tt.
12-01-14, 04:37 PM
#16
Banned
Un screw the Bolt that holds the derailleur Pulley cage , there is a spring on that one to wrap up the chain Slack .
I got a Nashbar shipped Short cage Olympus Campag MTB RD, then thru LBS, got the spare Long Cage ..
this was a while ago before either were discontinued completely as they are Now.
Ditto the Long Cage Mavic 803 parts to put on the short cage 851 SSC rear D.
I got a Nashbar shipped Short cage Olympus Campag MTB RD, then thru LBS, got the spare Long Cage ..
this was a while ago before either were discontinued completely as they are Now.
Ditto the Long Cage Mavic 803 parts to put on the short cage 851 SSC rear D.
12-01-14, 06:35 PM
#17
Rides Majestic
Join Date: Jan 2013
Location: Westfield, MA
Posts: 1,339
Bikes: 1983 Univega Gran Turismo, 1970 Schwinn Super Sport, 2001 Univega Modo Vincere, Self-Built Nashbar Touring, 1974 Peugeot U08, 1974 Atala Grand Prix, 1986 Ross Mt. Hood, 80's Maruishi MT-18
Mentioned: 0 Post(s)
Tagged: 0 Thread(s)
Quoted: 3 Post(s)
Likes: 0
Liked 7 Times
in
6 Posts
How about some nice stem shifters? I know some of you will say "nice stem shifters" is an oxymoron, but they can be cool on a townie. Find some of these crappy stem shifters ($3 in a used bin at a LBS).

Remove the plastic levers and put on any nice Shimano indexed down tube shifters in their place, and voila, nice stem shifters.


Remove the plastic levers and put on any nice Shimano indexed down tube shifters in their place, and voila, nice stem shifters.
 12-01-14, 07:28 PM
#18
What??? Only 2 wheels?

Join Date: Apr 2010
Location: Boston-ish, MA
Posts: 13,434
Bikes: 72 Peugeot UO-8, 82 Peugeot TH8, 87 Bianchi Brava, 76? Masi Grand Criterium, 74 Motobecane Champion Team, 86 & 77 Gazelle champion mondial, 81? Grandis, 82? Tommasini, 83 Peugeot PF10
Mentioned: 189 Post(s)
Tagged: 0 Thread(s)
Quoted: 1222 Post(s)
Liked 645 Times
in
232 Posts
 Plus it attracts attention every so often! I wonder how many of the others are currently in service. (Note, there is only one "e" in jimmuller, the second one.)
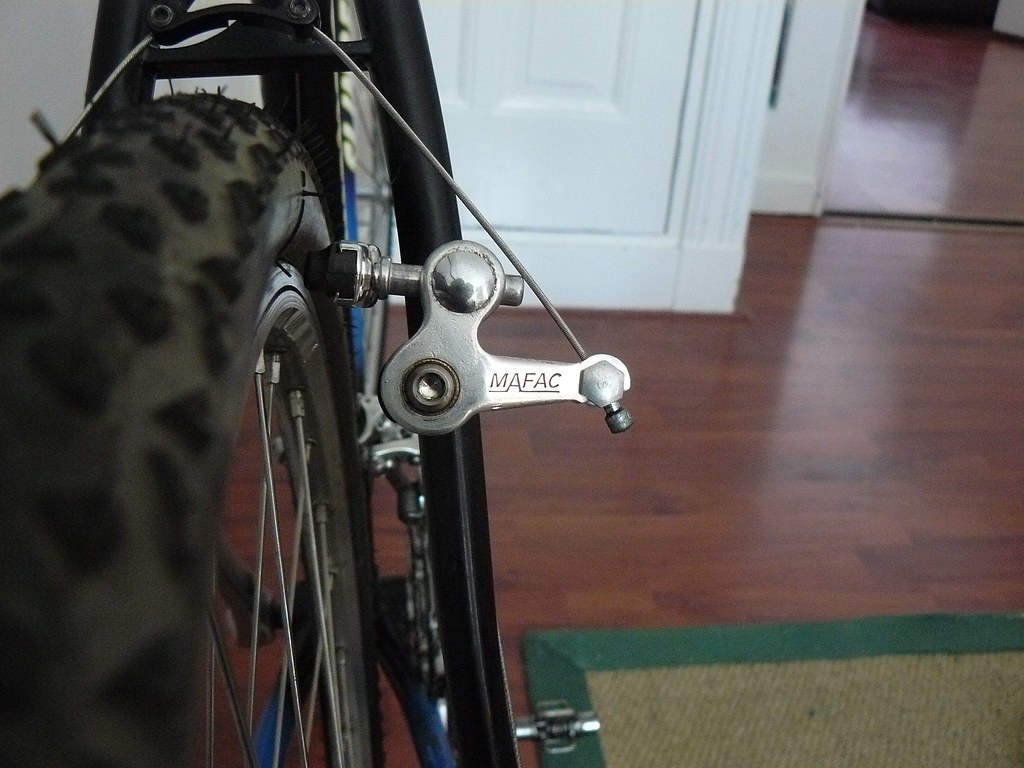
I've Frankened up a few parts here and there. When I built up our tandem one of the brake return springs was AWOL. Try finding a return spring for Mafac cantilevers. So I forced a Shimano spring into service. With sufficient persuasion by pliers and curse words it finally submitted and has performed nicely for over 5000 miles.
Another Frankenization was a cable guide for the tandem's BB. I cut down a Shimano clamp to provide a housing stop.
BF member @top506 gave me a set of nice metal Simplex shift levers to replace the tandem's plastic ones. They work nicely and feel great (though the plastic ones worked and probably bothered him more than they bothered me). However the screws had a different thread pitch. So I had to swap the screws and tightening wings. Okay, so that's not such a big deal but it did require mixing pieces not intended for each other.
__________________
Real cyclists use toe clips.
With great bikes comes great responsibility.
jimmuller
Real cyclists use toe clips.
With great bikes comes great responsibility.
jimmuller
12-01-14, 08:00 PM
#19
Full Member

Join Date: Dec 2012
Location: Eastern Washington
Posts: 440
Bikes: 1978 Raleigh Competition-1974 Raleigh Folder-1983 Austro Daimler-198? Fuji Monterey-Surly LHT-Surly Karate Monkey-Surly Cross Check
Mentioned: 0 Post(s)
Tagged: 0 Thread(s)
Quoted: 43 Post(s)
Liked 97 Times
in
54 Posts
How about this custom Huret drop out adapter. This allows me to use a Suntour Cyclone derailleur on my Motobecane Grand Jubile that has Huret drop outs in the rear. I didn't invent this. I'm not that smart. Here is the link to the guy who thought this up. Bronze Gears: Huret Dropout Adapter Mine is pretty ugly but it is hidden behind the derailleur so no big deal.
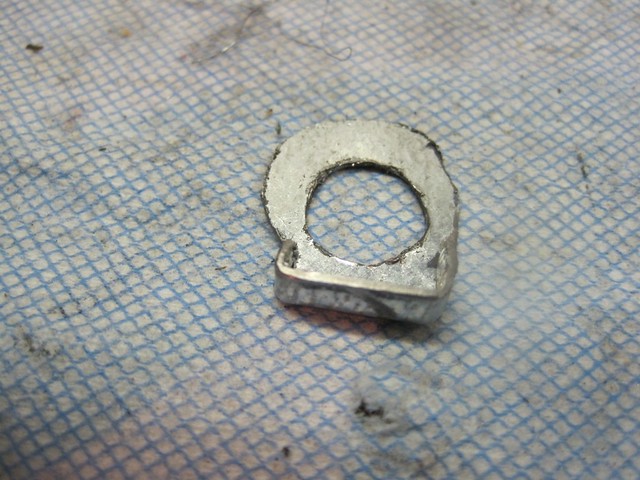 Custom Huret Dropout Adapter by FatSwede, on Flickr
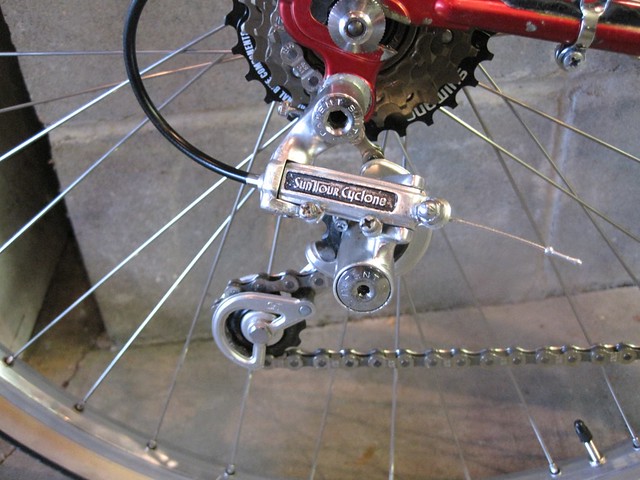 Suntour Cyclone RD by FatSwede, on Flickr
Custom Huret Dropout Adapter by FatSwede, on FlickrSuntour Cyclone RD by FatSwede, on Flickr
12-01-14, 08:01 PM
#20
Senior Member

Join Date: Apr 2006
Location: Washington County, Vermont, USA
Posts: 3,778
Bikes: 1966 Dawes Double Blue, 1976 Raleigh Gran Sport, 1975 Raleigh Sprite 27, 1980 Univega Viva Sport, 1971 Gitane Tour de France, 1984 Lotus Classique, 1976 Motobecane Grand Record
Mentioned: 77 Post(s)
Tagged: 0 Thread(s)
Quoted: 765 Post(s)
Liked 660 Times
in
351 Posts
This isn't really a frankencomponent because it's all Suntour, but I recently made a two-speed freewheel for a winter "doublespeed" (some would call it a "dinglespeed," but that word rubs me the wrong way for some reason) out of a five-speed Suntour Perfect body, of which I have many. I put three spacers on the cog-less body, followed by a splined 26-tooth cog, which then fills top spot of the splined part of the body. That's followed by a half-thickness spacer and a threaded 18-tooth cog with built-in spacer.
I haven't road-tested it yet--waiting for a seatpost the right size--but it works well on the stand with a 42-34 combo in front. No derailleur so you have to loosen the rear wheel and manually move the chain from the 42-18 combo to the 34-26. Both total 60 teeth, so the same chain length works for both. The high ratio should work most of the time, but I'll need the low one to get up the 3/4-mile-long hill to my house and some other long hills around here.
You could do something similar with a cassette hub, of course, but this lets you use a stronger 120 OLD wheel. No need to redish or respace the wheel, either, because the two cogs are almost exactly in the center of the freewheel body. The chainline is perfect with the same spindle that came with the 120-spaced frame.
Sorry, no pictures yet. I'll post some once I've had a chance to take the bike out on the road.
__________________
www.redclovercomponents.com
"Progress might have been all right once, but it has gone on too long."
--Ogden Nash
www.redclovercomponents.com
"Progress might have been all right once, but it has gone on too long."
--Ogden Nash
12-01-14, 08:33 PM
#21
Phyllo-buster

Join Date: Jan 2010
Location: Nova Scotia
Posts: 8,847
Bikes: roadsters, club bikes, fixed and classic
Mentioned: 133 Post(s)
Tagged: 0 Thread(s)
Quoted: 2298 Post(s)
Liked 2,054 Times
in
1,254 Posts
Wow...pics of the rest of the bike?
Thanks to the help from fellow BF/CR members, this thing went thru some transformation to make it work. Running a 3x3x2 that also uses the original 1/2x1/8 pitch chain. After some punishing miles, I had to re-tweak adjust everything but it's now been super reliable bulletproof. I finally acquired a correct rear wingnut for the shift side yet I have to drill and tap for the non-drive side (anyone have Whitworth thread taps?).
12-01-14, 11:55 PM
#22
Full Member
Not so vintage however the frame has some history, 1985 Marinoni, Marinoni Special and I didn't want a bunch of carbon parts on it.
On the SR front derailleur, I purchased a used 11 speed entire unit with the customarily beat up and damaged carbon/Al. reinforced cage and some slight white logo blemishes, otherwise perfect for next to nothing.
I am not fond of the Campagnolo FD carbon/Al cages, seen way to many of them damaged through routine use. So rather than purchase an expensive SR replacement cage, I purchased a new Veloce front derailleur for well under the cost of a replacement SR cage. On wear components I will gladly exchange/accept the minimal weight penalty for reliability.
The SR cage attachment pins and the Veloce cage attachment rivet/pins are the same diameter 4.0mm and the attachment spacing is almost equal, the slight difference being cage material thickness. Circular SS metric shim is available through McMaster Carr, 4.0mm ID, 8.0mm OD in various thickness starting at 0.1mm, 0.5mm thick, part number 98089A330 if required.
On the Veloce FD I drilled out the cage attachment pivot pins/rivets peened heads, pulled the pins and removed the cage. On the SR FD I popped the C-clips on the cage attachment pins, pulled the pins, removed the cage.
The SR FD reassemble required some wrestling with the springs, pushing the attachment pins through the lined up actuating arms, springs, shims and cage attachment holes, snap the C-clips back on the pins and your done.
Oh, and there was some minor additional dabs of Phil waterproof grease in there also the derailleur is perfectly activated through some Simplex SLJ 6311 down tube shift levers.
Last edited by m_sasso; 12-02-14 at 12:06 AM.

 12-02-14, 06:35 AM
#24
Senior Member
Thread Starter
Not so vintage however the frame has some history, 1985 Marinoni, Marinoni Special and I didn't want a bunch of carbon parts on it.
On the SR front derailleur, I purchased a used 11 speed entire unit with the customarily beat up and damaged carbon/Al. reinforced cage and some slight white logo blemishes, otherwise perfect for next to nothing.
I am not fond of the Campagnolo FD carbon/Al cages, seen way to many of them damaged through routine use. So rather than purchase an expensive SR replacement cage, I purchased a new Veloce front derailleur for well under the cost of a replacement SR cage. On wear components I will gladly exchange/accept the minimal weight penalty for reliability.
The SR cage attachment pins and the Veloce cage attachment rivet/pins are the same diameter 4.0mm and the attachment spacing is almost equal, the slight difference being cage material thickness. Circular SS metric shim is available through McMaster Carr, 4.0mm ID, 8.0mm OD in various thickness starting at 0.1mm, 0.5mm thick, part number 98089A330 if required.
On the Veloce FD I drilled out the cage attachment pivot pins/rivets peened heads, pulled the pins and removed the cage. On the SR FD I popped the C-clips on the cage attachment pins, pulled the pins, removed the cage.
The SR FD reassemble required some wrestling with the springs, pushing the attachment pins through the lined up actuating arms, springs, shims and cage attachment holes, snap the C-clips back on the pins and your done.
Oh, and there was some minor additional dabs of Phil waterproof grease in there also the derailleur is perfectly activated through some Simplex SLJ 6311 down tube shift levers.
12-02-14, 06:46 AM
#25

multimodal commuter

Join Date: Nov 2006
Location: NJ, NYC, LI
Posts: 19,808
Bikes: 1940s Fothergill, 1959 Allegro Special, 1963? Claud Butler Olympic Sprint, Lambert 'Clubman', 1974 Fuji "the Ace", 1976 Holdsworth 650b conversion rando bike, 1983 Trek 720 tourer, 1984 Counterpoint Opus II, 1993 Basso Gap, 2010 Downtube 8h, and...
Mentioned: 584 Post(s)
Tagged: 0 Thread(s)
Quoted: 1908 Post(s)
Liked 574 Times
in
339 Posts
I made this quadrant-style shifter to operate the Trivelox derailleur I got for my Fothergill.
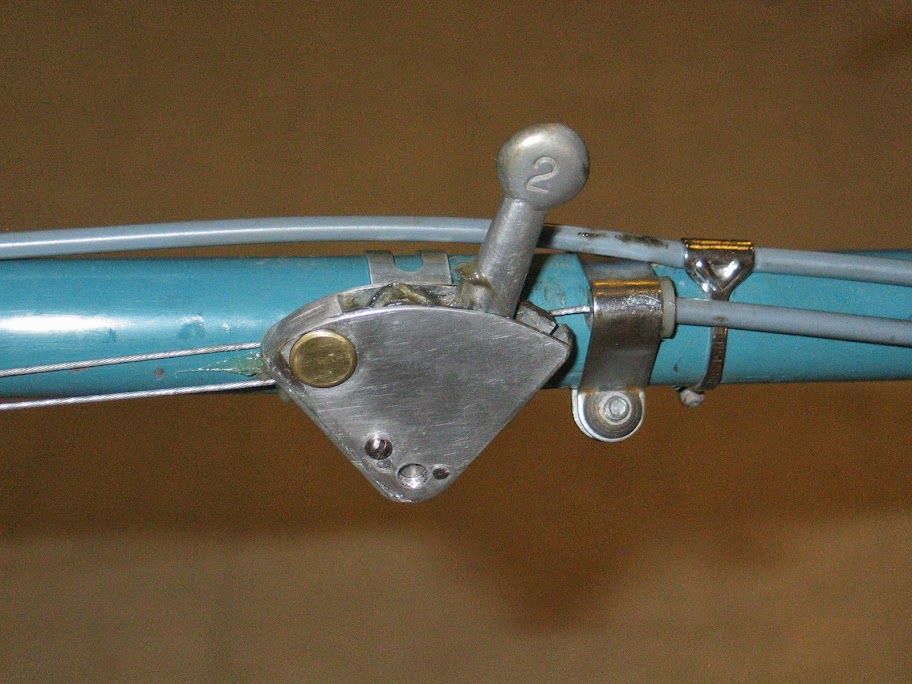
The lever is cut from 1/4" bar stock aluminum. The side plates are from some scrap aluminum I found. The mounting clamp involves a steel coaster brake band and part of a clamp that came on a razor scooter or something like that.
It works well; the lever is a simple toggle, it just has two positions and there is nothing holding it except cable tension, which makes for very light action. In the photo you can also see the fulcum for a three speed hub; had I been clever, I would have incorporated that role into the mounting clamp for the shifter. I mean to correct that oversight one of these days....
__________________
www.rhmsaddles.com.
www.rhmsaddles.com.