


Fuji S10-S rear hub. Diagram?
 08-30-19, 11:52 AM
#1
Junior Member
Thread Starter
Join Date: Aug 2019
Posts: 5
Mentioned: 0 Post(s)
Tagged: 0 Thread(s)
Quoted: 2 Post(s)
Likes: 0
Liked 1 Time
in
1 Post
Fuji S10-S rear hub. Diagram?
Hey guys, first post here, stumbled across the forum while looking for some information on my new to me bike. Picked up a ‘77 S10-S the other day for a steal as a restoration/finally growing up a little and having gears on my bike (been riding bmx and my single speed for years and years now). Initially I was going to swap the 700c wheels from my single speed over, swap the cassette onto those and off I go. Still might down the road, but ran into some spacing issues with both the axle and the brake, and since I plan on doing this on a tight budget, it was cheaper for me to just throw new tires and tubes on the original wheels than to replace the brakes.
Here is my dilemma. When I completely disassembled the rear hub, had everything set out nicely on my work desk in the order they came off for easy reassembly. I usually take pictures but since I had it all set out, I didn’t think to do that. I didn’t plan on my dogs running into my desk and sending parts all over the floor. I was wondering if anyone has any pictures or the diagram of the rear hub so I make sure I get the order of all of the nuts and spacers on correctly.
I appreciate any help, not really looking forward to trying to get the spacing back to where it was, but hey, thats how you learn, then I get to learn about derailleurs and shifters and all sorts of other parts that are foreign to me.
 08-30-19, 12:29 PM
#2

Senior Member

Join Date: Sep 2005
Location: Oakland, CA
Posts: 3,265
Bikes: '82 Univega Competizione, '72 Motobecane Grand Record, '83 Mercian KOM Touring, '85 Univega Alpina Uno, '76 Eisentraut Limited
Mentioned: 57 Post(s)
Tagged: 0 Thread(s)
Quoted: 1088 Post(s)
Liked 1,205 Times
in
701 Posts
Hey guys, first post here, stumbled across the forum while looking for some information on my new to me bike. Picked up a ‘77 S10-S the other day for a steal as a restoration/finally growing up a little and having gears on my bike (been riding bmx and my single speed for years and years now). Initially I was going to swap the 700c wheels from my single speed over, swap the cassette onto those and off I go. Still might down the road, but ran into some spacing issues with both the axle and the brake, and since I plan on doing this on a tight budget, it was cheaper for me to just throw new tires and tubes on the original wheels than to replace the brakes.
Here is my dilemma. When I completely disassembled the rear hub, had everything set out nicely on my work desk in the order they came off for easy reassembly. I usually take pictures but since I had it all set out, I didn’t think to do that. I didn’t plan on my dogs running into my desk and sending parts all over the floor. I was wondering if anyone has any pictures or the diagram of the rear hub so I make sure I get the order of all of the nuts and spacers on correctly.
I appreciate any help, not really looking forward to trying to get the spacing back to where it was, but hey, thats how you learn, then I get to learn about derailleurs and shifters and all sorts of other parts that are foreign to me.
Here is my dilemma. When I completely disassembled the rear hub, had everything set out nicely on my work desk in the order they came off for easy reassembly. I usually take pictures but since I had it all set out, I didn’t think to do that. I didn’t plan on my dogs running into my desk and sending parts all over the floor. I was wondering if anyone has any pictures or the diagram of the rear hub so I make sure I get the order of all of the nuts and spacers on correctly.
I appreciate any help, not really looking forward to trying to get the spacing back to where it was, but hey, thats how you learn, then I get to learn about derailleurs and shifters and all sorts of other parts that are foreign to me.
08-30-19, 12:46 PM
#3
seńor miembro

Join Date: Dec 2018
Location: Pac NW
Posts: 6,602
Bikes: '70s - '80s Campagnolo
Mentioned: 92 Post(s)
Tagged: 0 Thread(s)
Quoted: 3869 Post(s)
Liked 6,461 Times
in
3,194 Posts
You'll have a cone and locknut on each side. Measure them to ensure they're both the same lengh. If they are, it doesn't matter which cone and locknut goes on each side. If one is wider, it often goes on the drive side.
If you have a wide spacer, it almost always goes on the drive side.
Now you should just have a few washers left to place. So try to put one on the non drive side (between cone and locknut) and the rest on the drive side. You'll just have to try it to see if that works for the freewheel spacing.
Sequence of washers between cone and locknut doesn't matter. No washers go outside the locknut.
Use two stacks of cd jewel cases to check dish while you're at it. Sheldon can help ya here.
08-31-19, 08:29 AM
#4
Senior Member
Join Date: Apr 2012
Location: Middle Earth (aka IA)
Posts: 20,433
Bikes: A bunch of old bikes and a few new ones
Mentioned: 178 Post(s)
Tagged: 0 Thread(s)
Quoted: 5888 Post(s)
Liked 3,471 Times
in
2,079 Posts
Here you go,
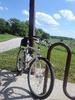
Nice bike but you'll need to upload some pics
Nothing wrong with the 27 inch 120 mm alloy rear wheels that came stock on the Fuji. Panaracer, Schwalbe, Continental, and Michelin all make good 27 inch tires.
Nice bike but you'll need to upload some pics
Nothing wrong with the 27 inch 120 mm alloy rear wheels that came stock on the Fuji. Panaracer, Schwalbe, Continental, and Michelin all make good 27 inch tires.
08-31-19, 12:47 PM
#5
Bianchi Goddess

Join Date: Apr 2009
Location: Shady Pines Retirement Fort Wayne, In
Posts: 27,846
Bikes: Too many to list here check my signature.
Mentioned: 192 Post(s)
Tagged: 2 Thread(s)
Quoted: 2926 Post(s)
Liked 2,921 Times
in
1,489 Posts
In the future just disassemble from the non drive side!

__________________
“One morning you wake up, the girl is gone, the bikes are gone, all that's left behind is a pair of old tires and a tube of tubular glue, all squeezed out"
Sugar "Kane" Kowalczyk
“One morning you wake up, the girl is gone, the bikes are gone, all that's left behind is a pair of old tires and a tube of tubular glue, all squeezed out"
Sugar "Kane" Kowalczyk
Likes For Bianchigirll:
08-31-19, 01:00 PM
#6
Senior Member
Join Date: May 2011
Location: Seattle WA
Posts: 2,841
Bikes: 2009 Handsome Devil, 1987 Trek 520 Cirrus, 1978 Motobecane Grand Touring, 1987 Nishiki Cresta GT, 1989 Specialized Allez Former bikes; 1986 Miyata Trail Runner, 1979 Miyata 912, 2011 VO Rando, 1999 Cannondale R800, 1986 Schwinn Passage
Mentioned: 72 Post(s)
Tagged: 0 Thread(s)
Quoted: 796 Post(s)
Liked 522 Times
in
367 Posts
09-01-19, 06:45 AM
#7
Old fart

Join Date: Nov 2004
Location: Appleton WI
Posts: 24,779
Bikes: Several, mostly not name brands.
Mentioned: 153 Post(s)
Tagged: 0 Thread(s)
Quoted: 3583 Post(s)
Liked 3,395 Times
in
1,929 Posts
09-01-19, 09:14 AM
#8
seńor miembro
Join Date: Dec 2018
Location: Pac NW
Posts: 6,602
Bikes: '70s - '80s Campagnolo
Mentioned: 92 Post(s)
Tagged: 0 Thread(s)
Quoted: 3869 Post(s)
Liked 6,461 Times
in
3,194 Posts
If it's the first time I've overhauled the hub, I like to clean/inspect everything and make sure nothing is seized. Moving opposing cones/locknuts independently also helps me adjust a hub.
09-03-19, 05:30 PM
#9
Junior Member
Thread Starter
Join Date: Aug 2019
Posts: 5
Mentioned: 0 Post(s)
Tagged: 0 Thread(s)
Quoted: 2 Post(s)
Likes: 0
Liked 1 Time
in
1 Post
Thanks for all of the help guys, was able to get it cleaned up, regreased and back together.
A cheap set of tires and tubes were able to get me out on a test ride today. I need to do some research into the derailleur setup and how to make adjustments, it didn’t always want to shift through all of the gears, and it seems like there is a lot of slack in the cable at times. Little steps. As soon as I’m able to I’ll post some pictures of it and the progress I’ve made since then.
A cheap set of tires and tubes were able to get me out on a test ride today. I need to do some research into the derailleur setup and how to make adjustments, it didn’t always want to shift through all of the gears, and it seems like there is a lot of slack in the cable at times. Little steps. As soon as I’m able to I’ll post some pictures of it and the progress I’ve made since then.

