


1981 Trek 950 build
 03-16-24, 03:45 PM
#1

Senior Member
Thread Starter
Join Date: May 2019
Location: Bloomington, IN
Posts: 2,950
Bikes: Paramount, Faggin, Ochsner, Ciocc, Basso
Mentioned: 117 Post(s)
Tagged: 0 Thread(s)
Quoted: 1303 Post(s)
Liked 1,912 Times
in
1,142 Posts
1981 Trek 950 build
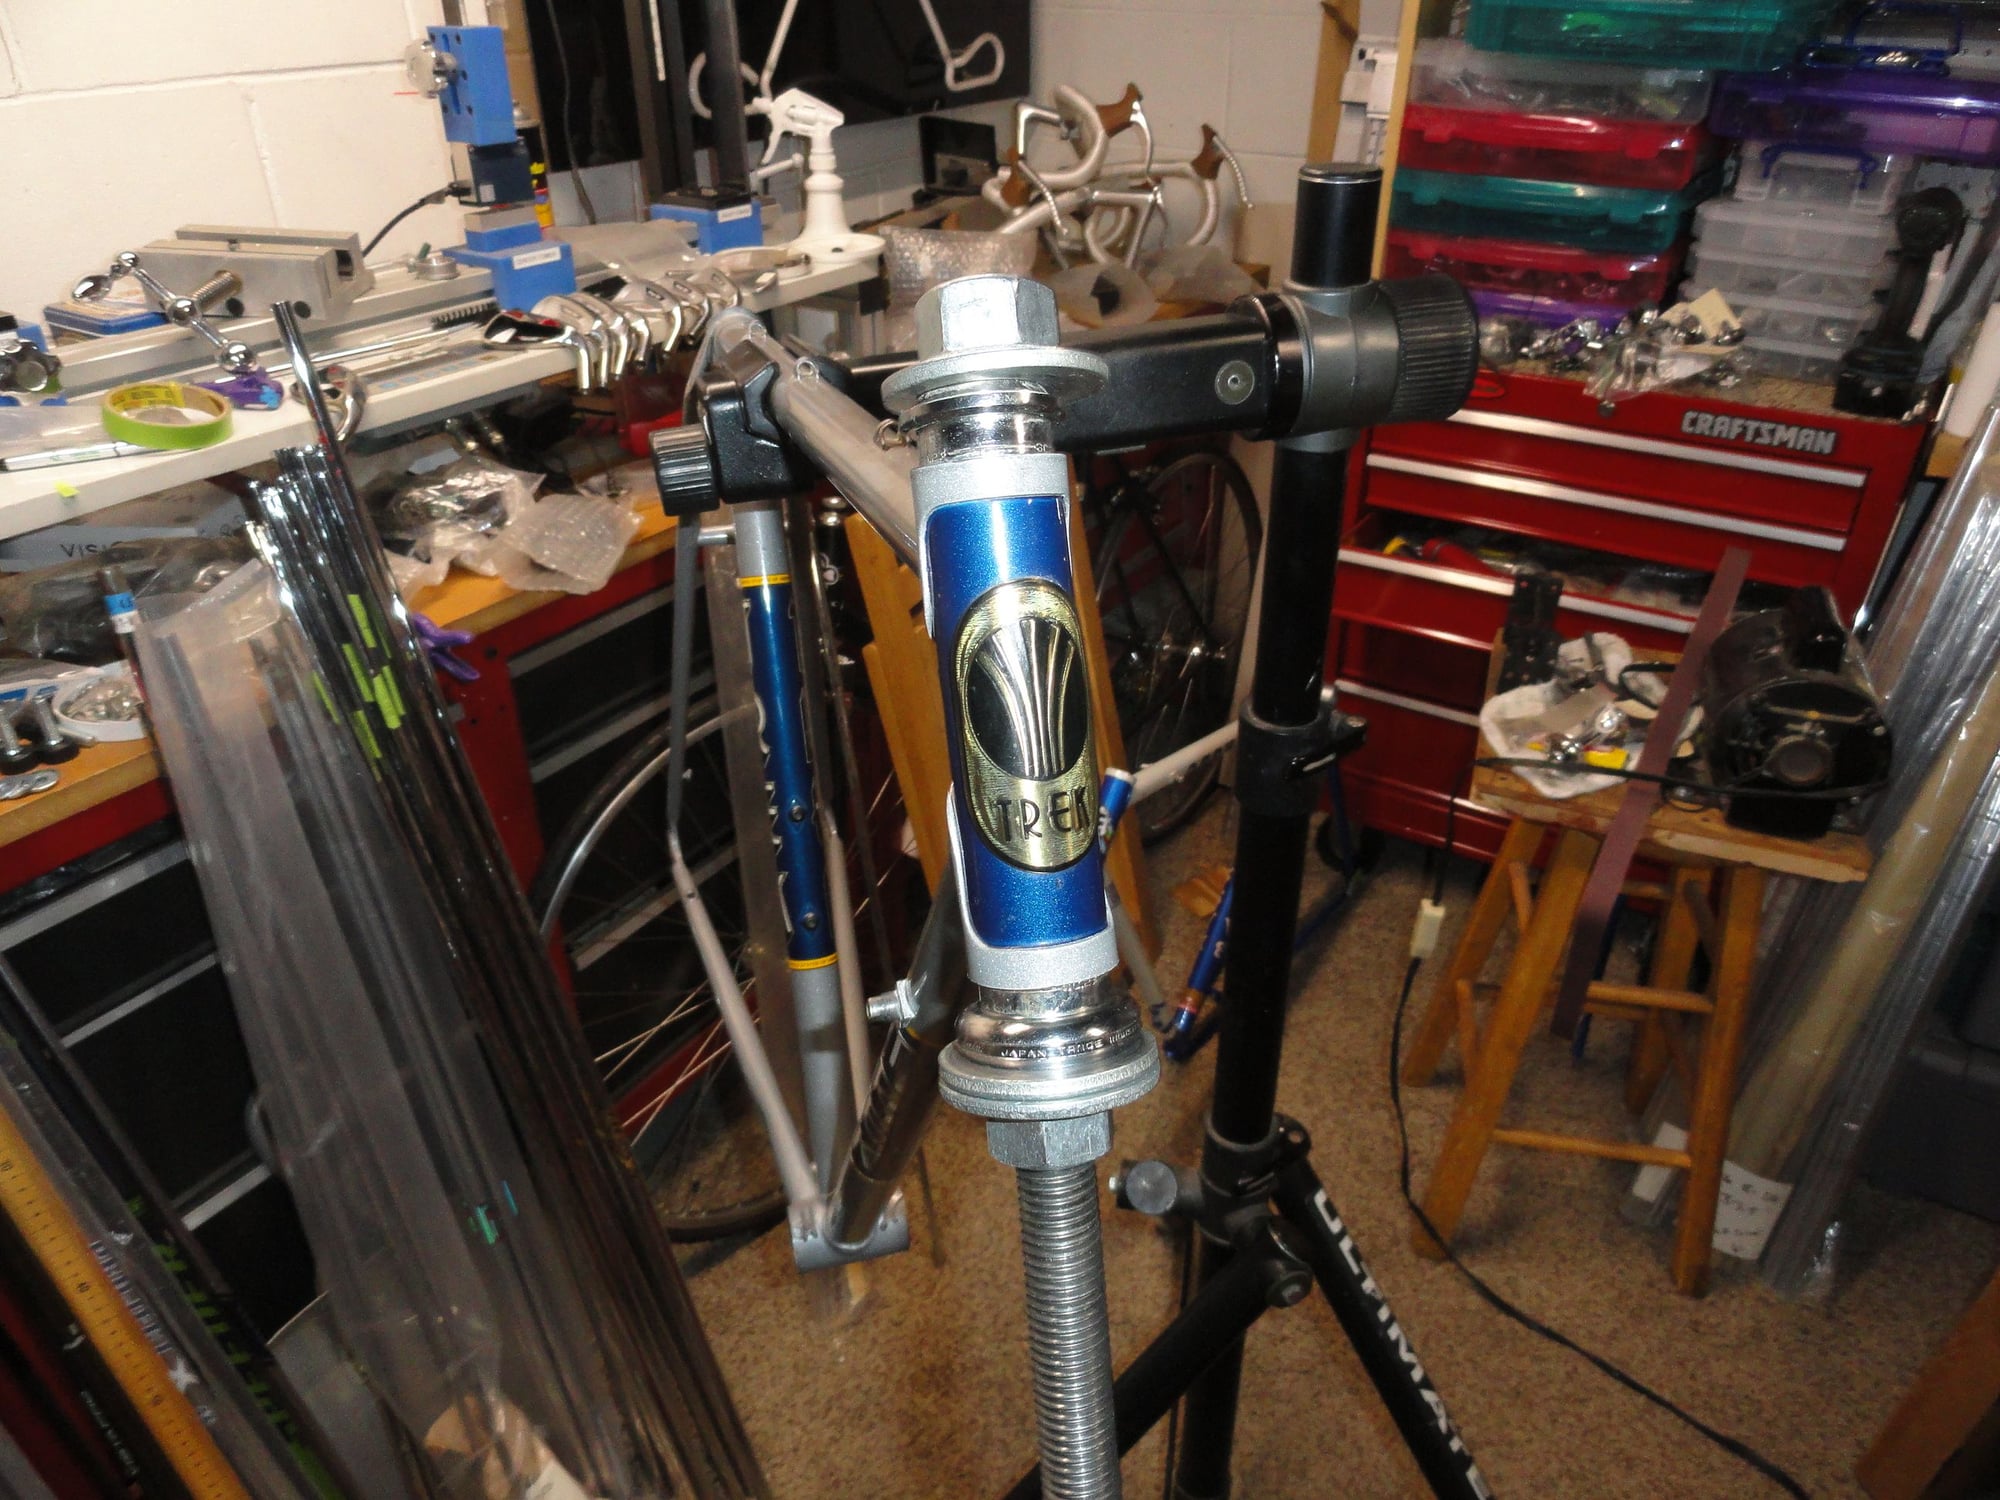
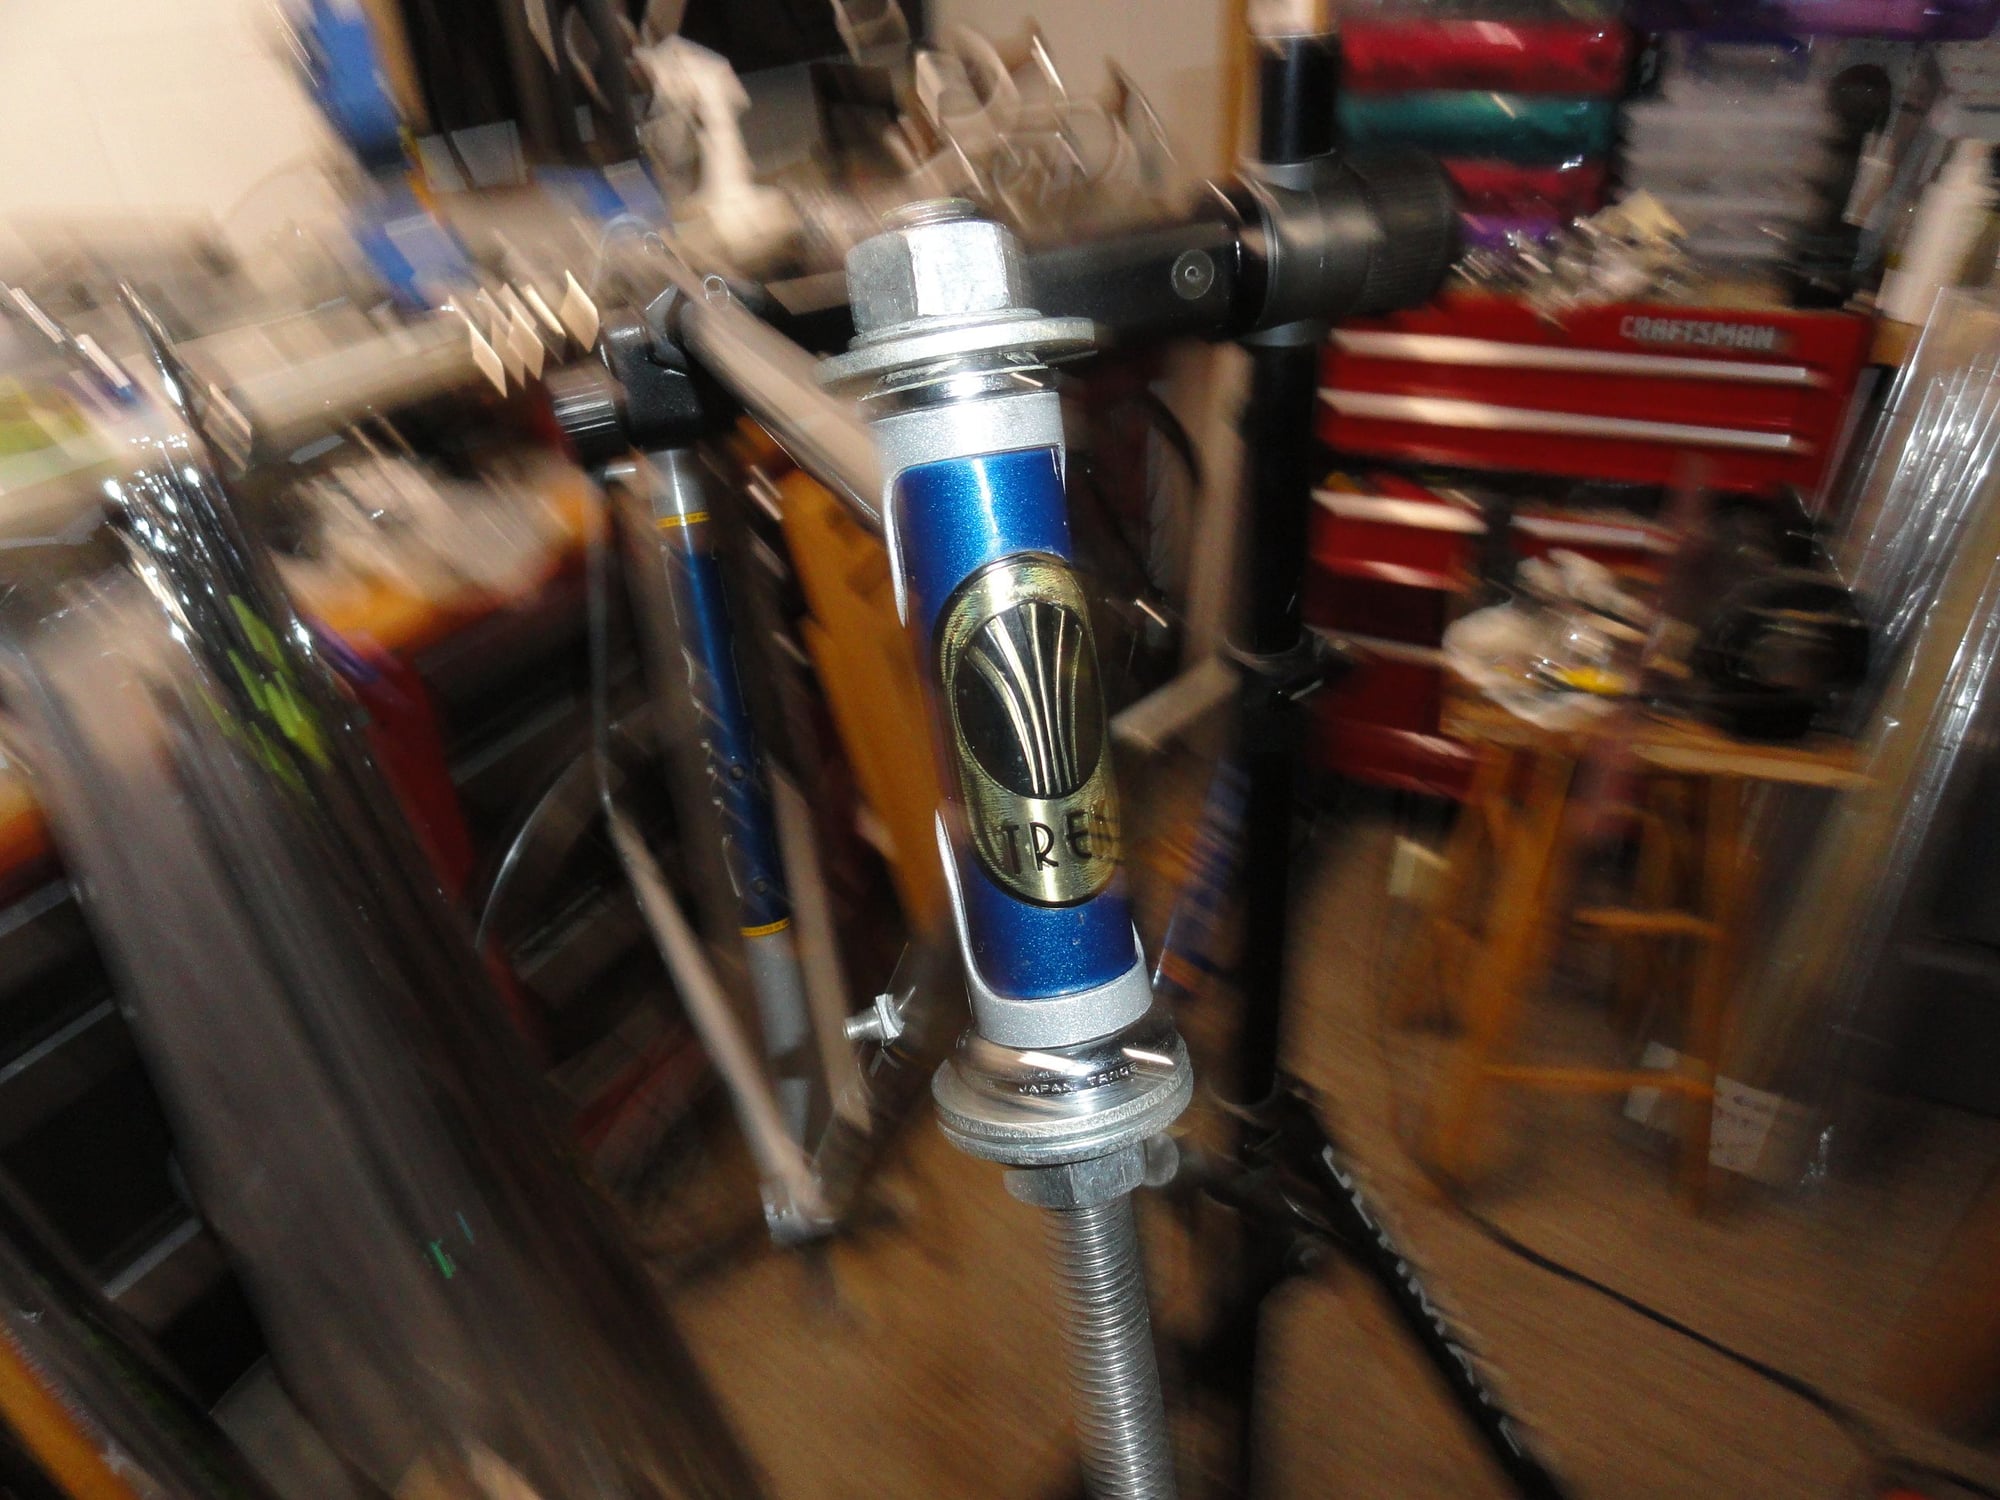
I think it is time for a thread dedicated to my latest acquisition instead of just mentioning it in others. I had not been looking for another bike, but AdventureManCO sent this frame to me after he used it as a donor bike for his Huffiente. I have decided to put it back to a standard build for a1981 Trek. When I sent the too tall for me Raleigh to the east coast, I was left with the NR group so I'm thinking this will be an easy build. A few pictures:
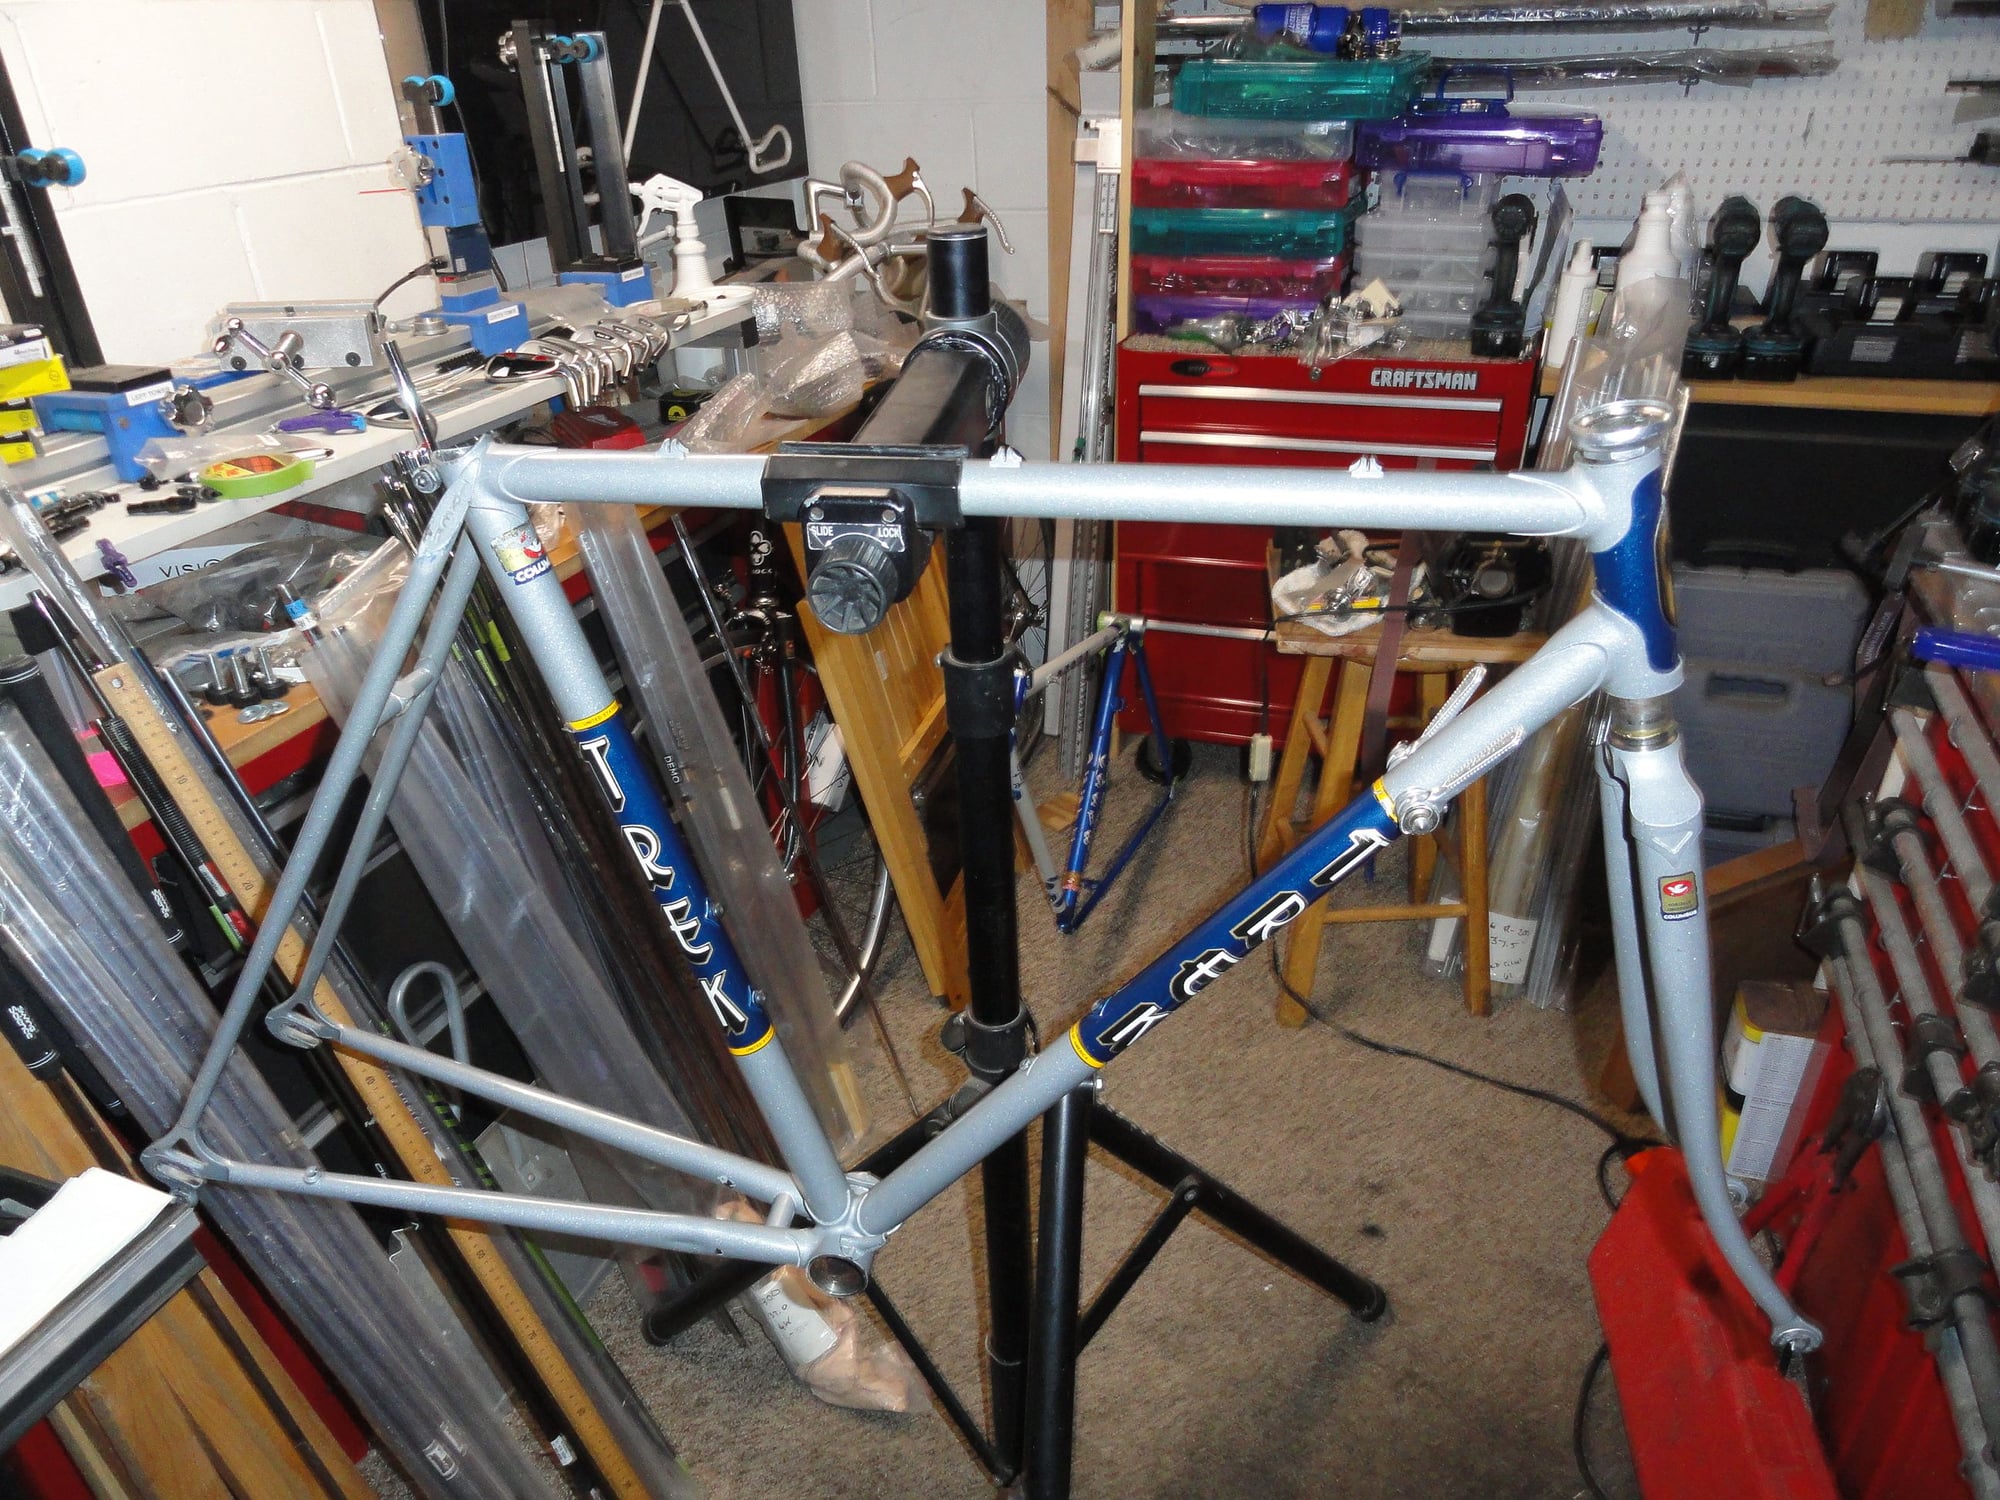
The frame after a bit of cleaning up.

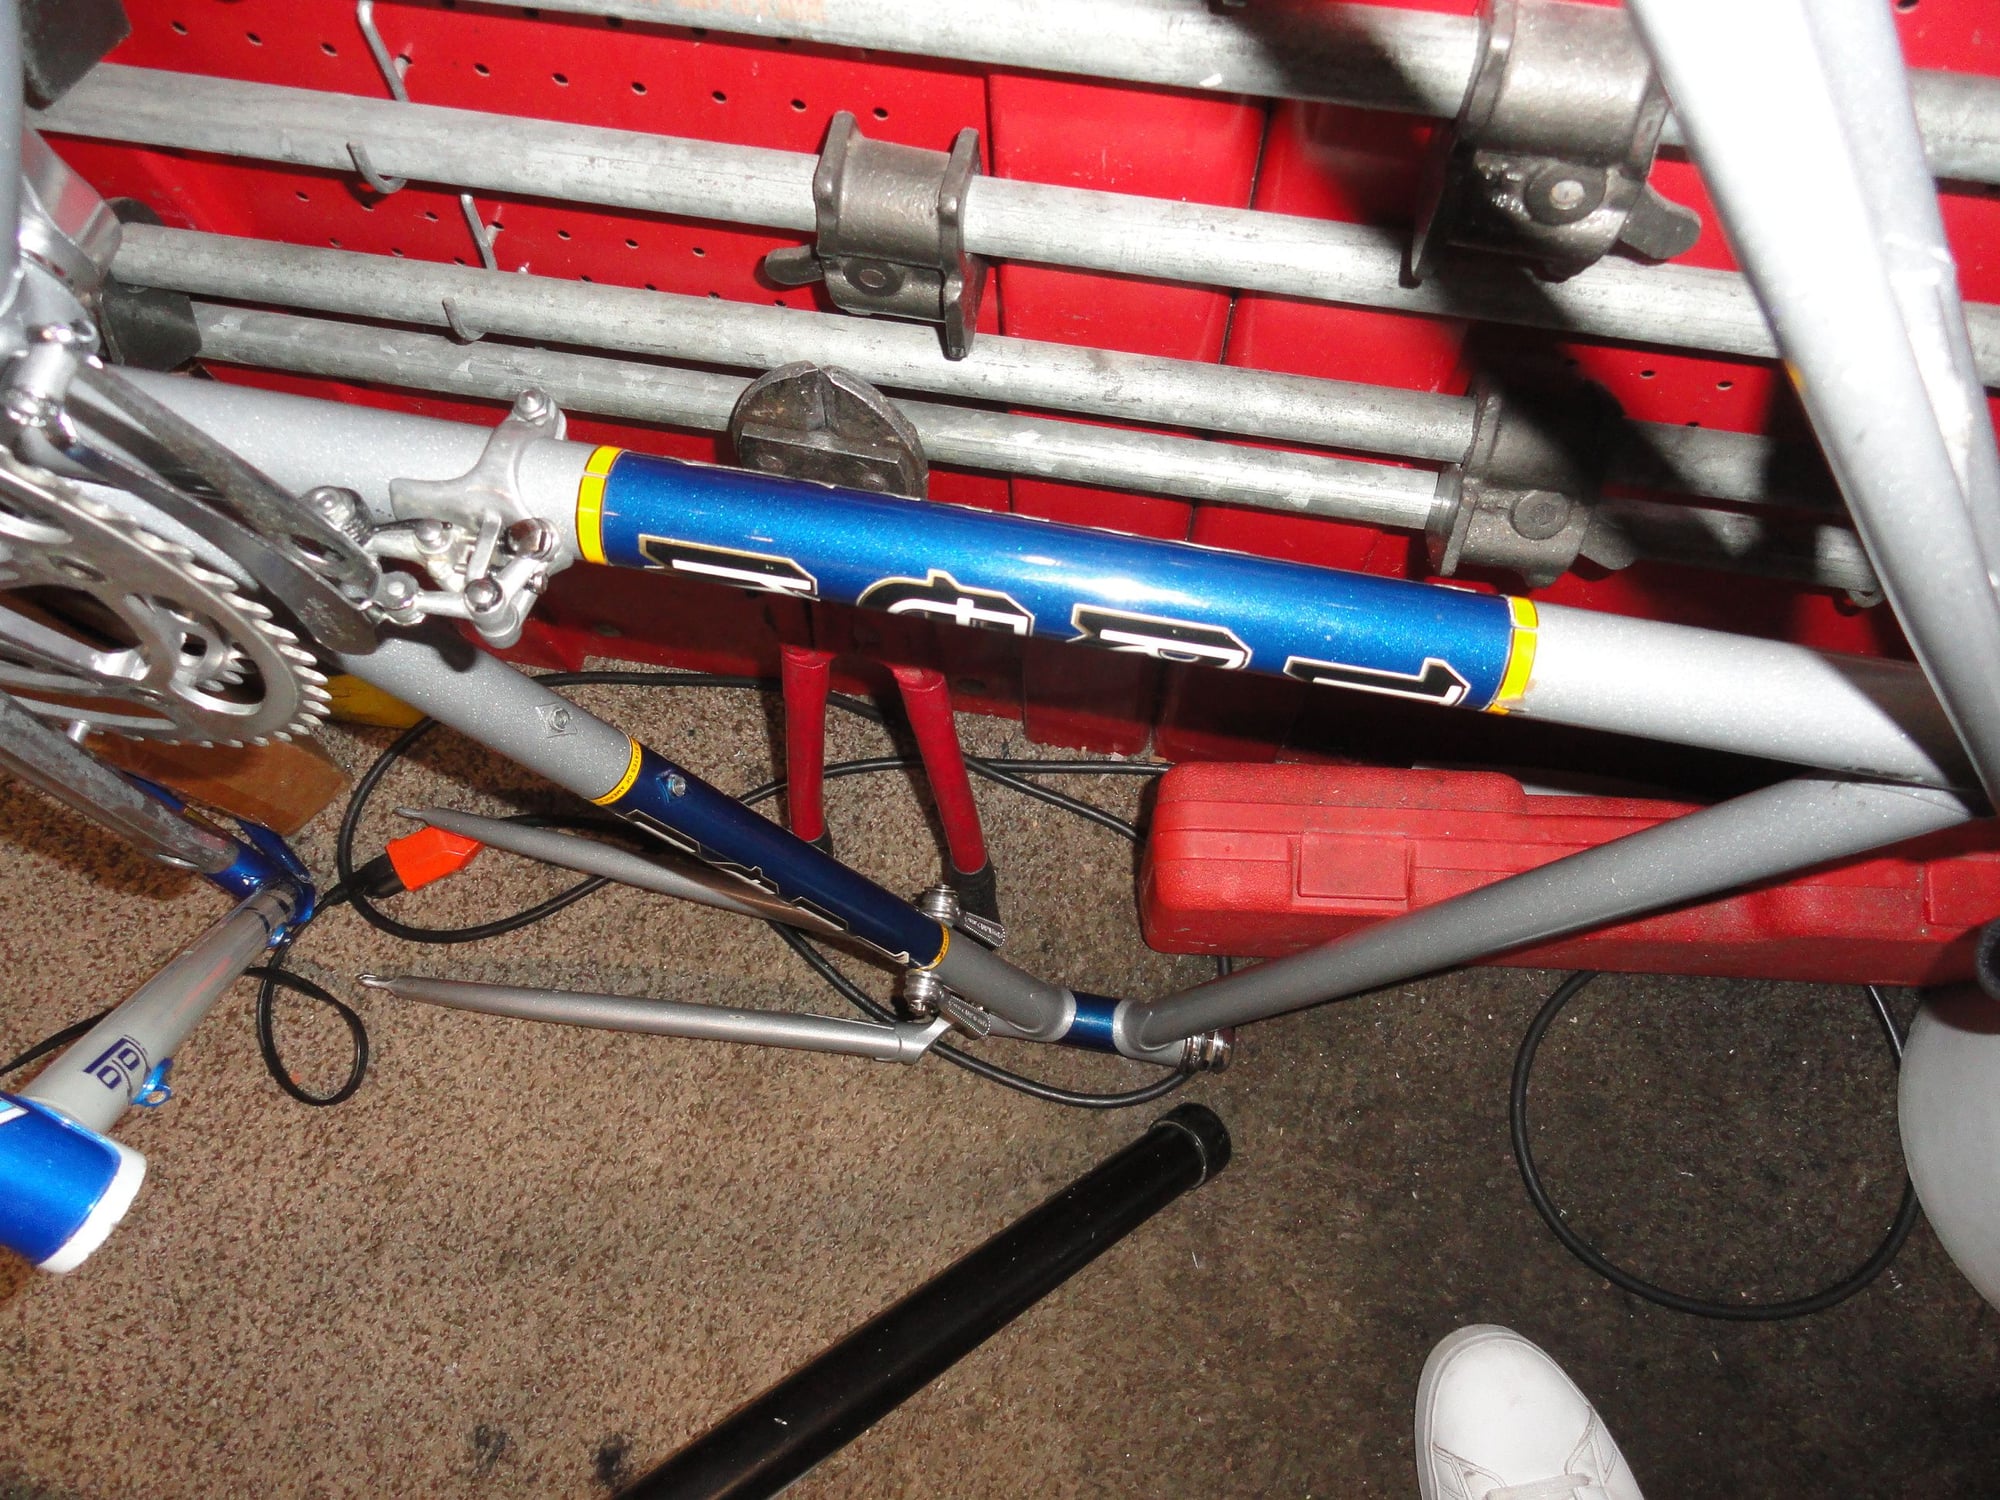
The identifying marks indicating the model and tubing type.
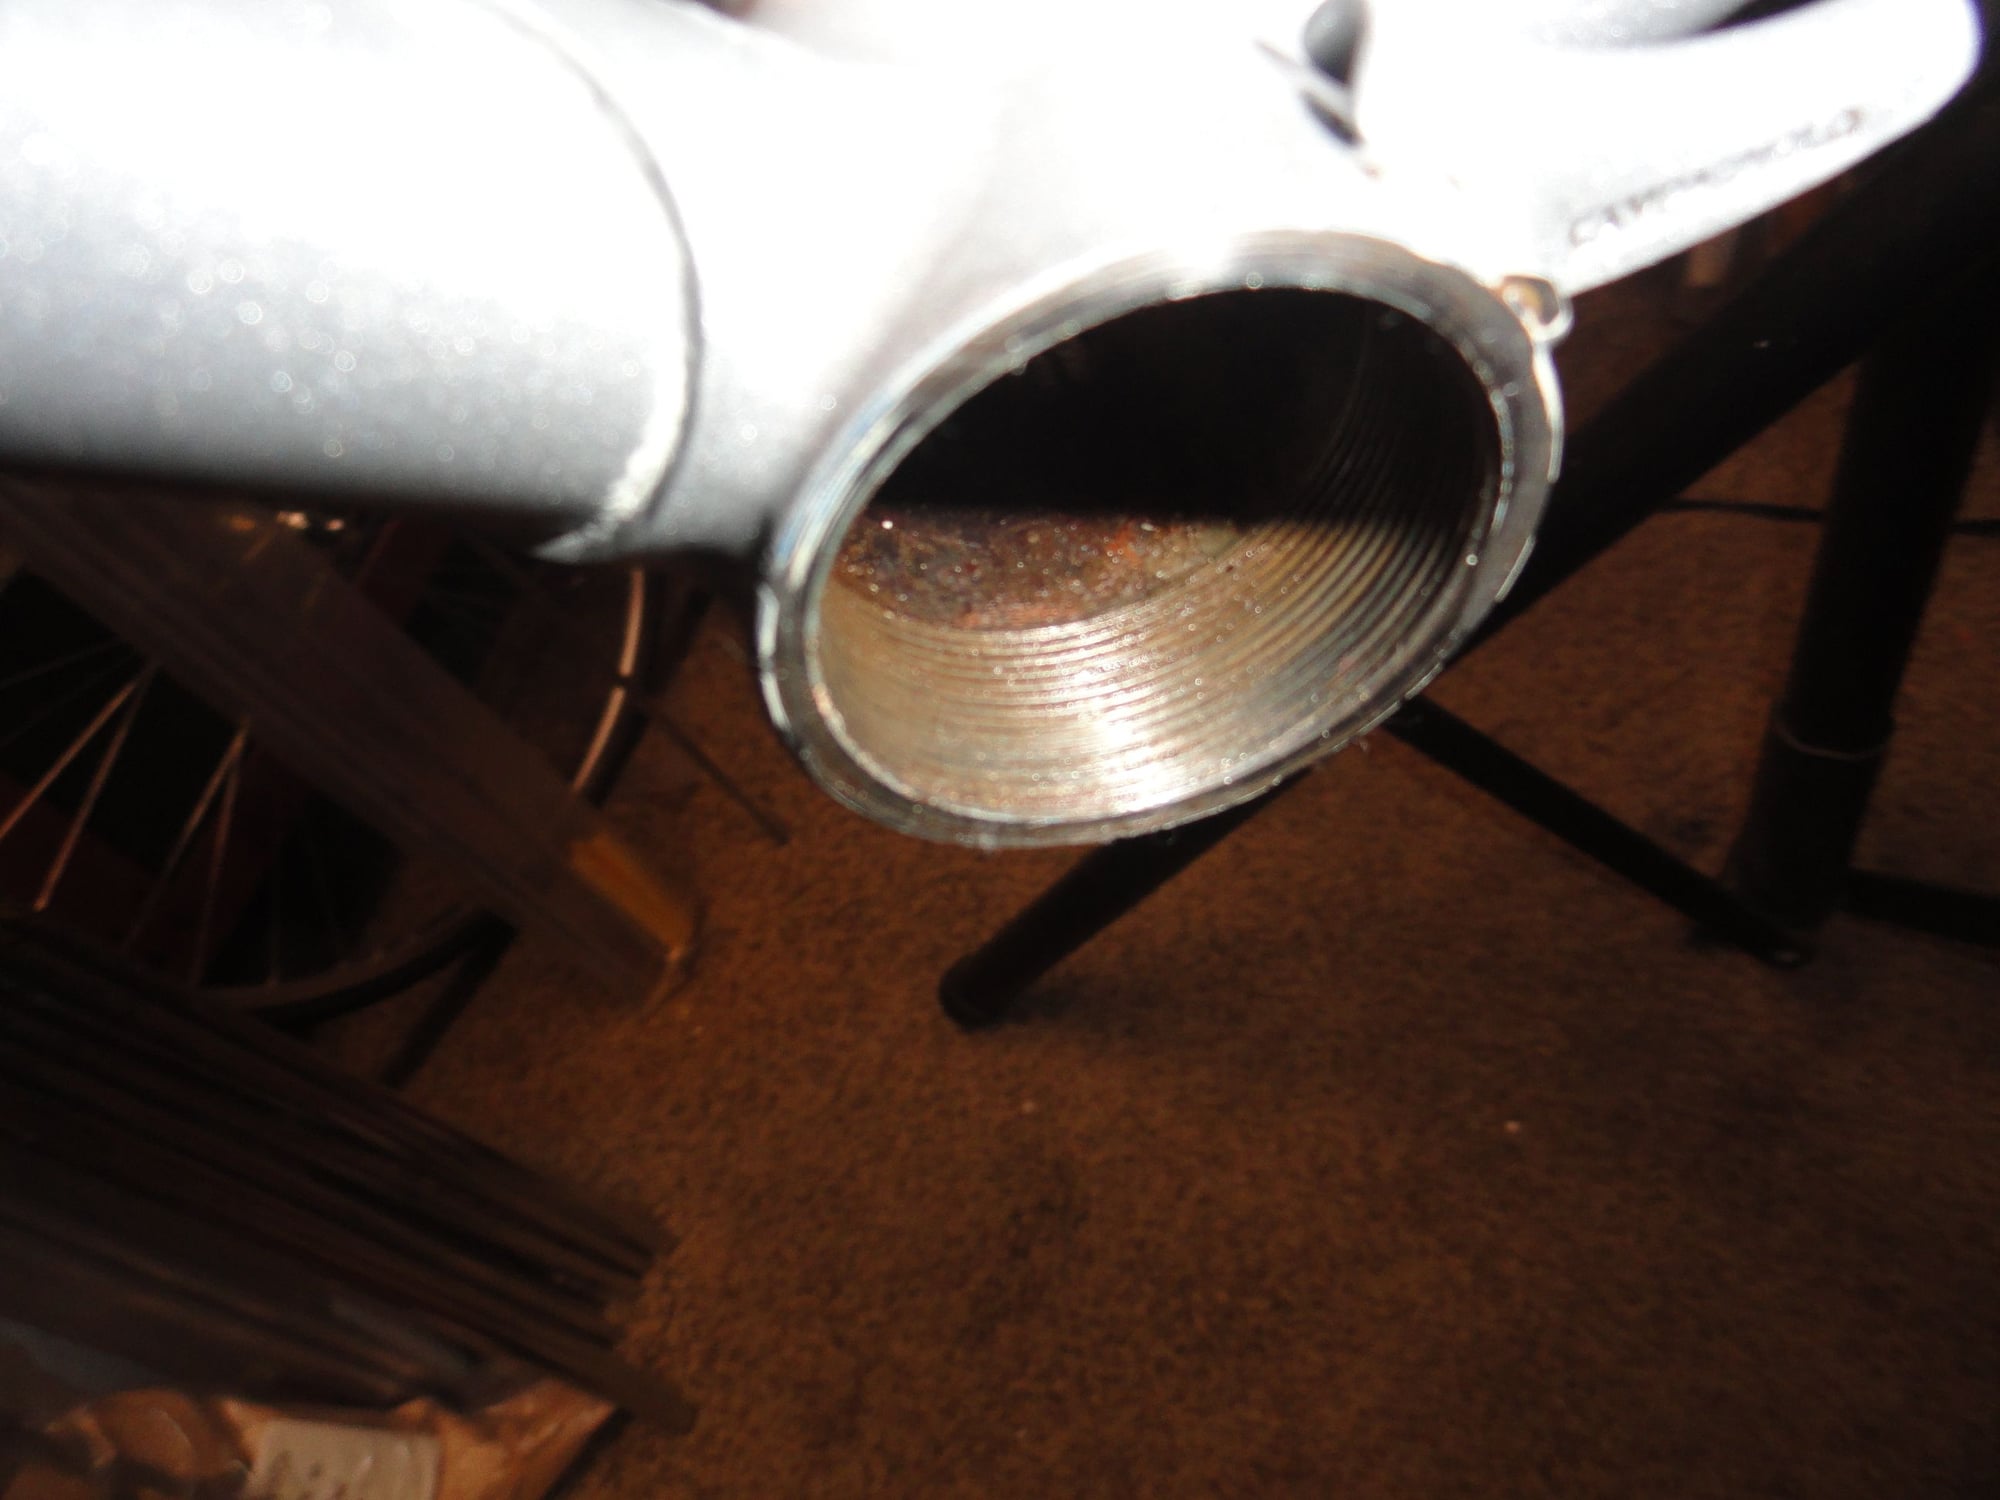
Cleaned a chased the DO threads.
Same for the Bottom bracket.
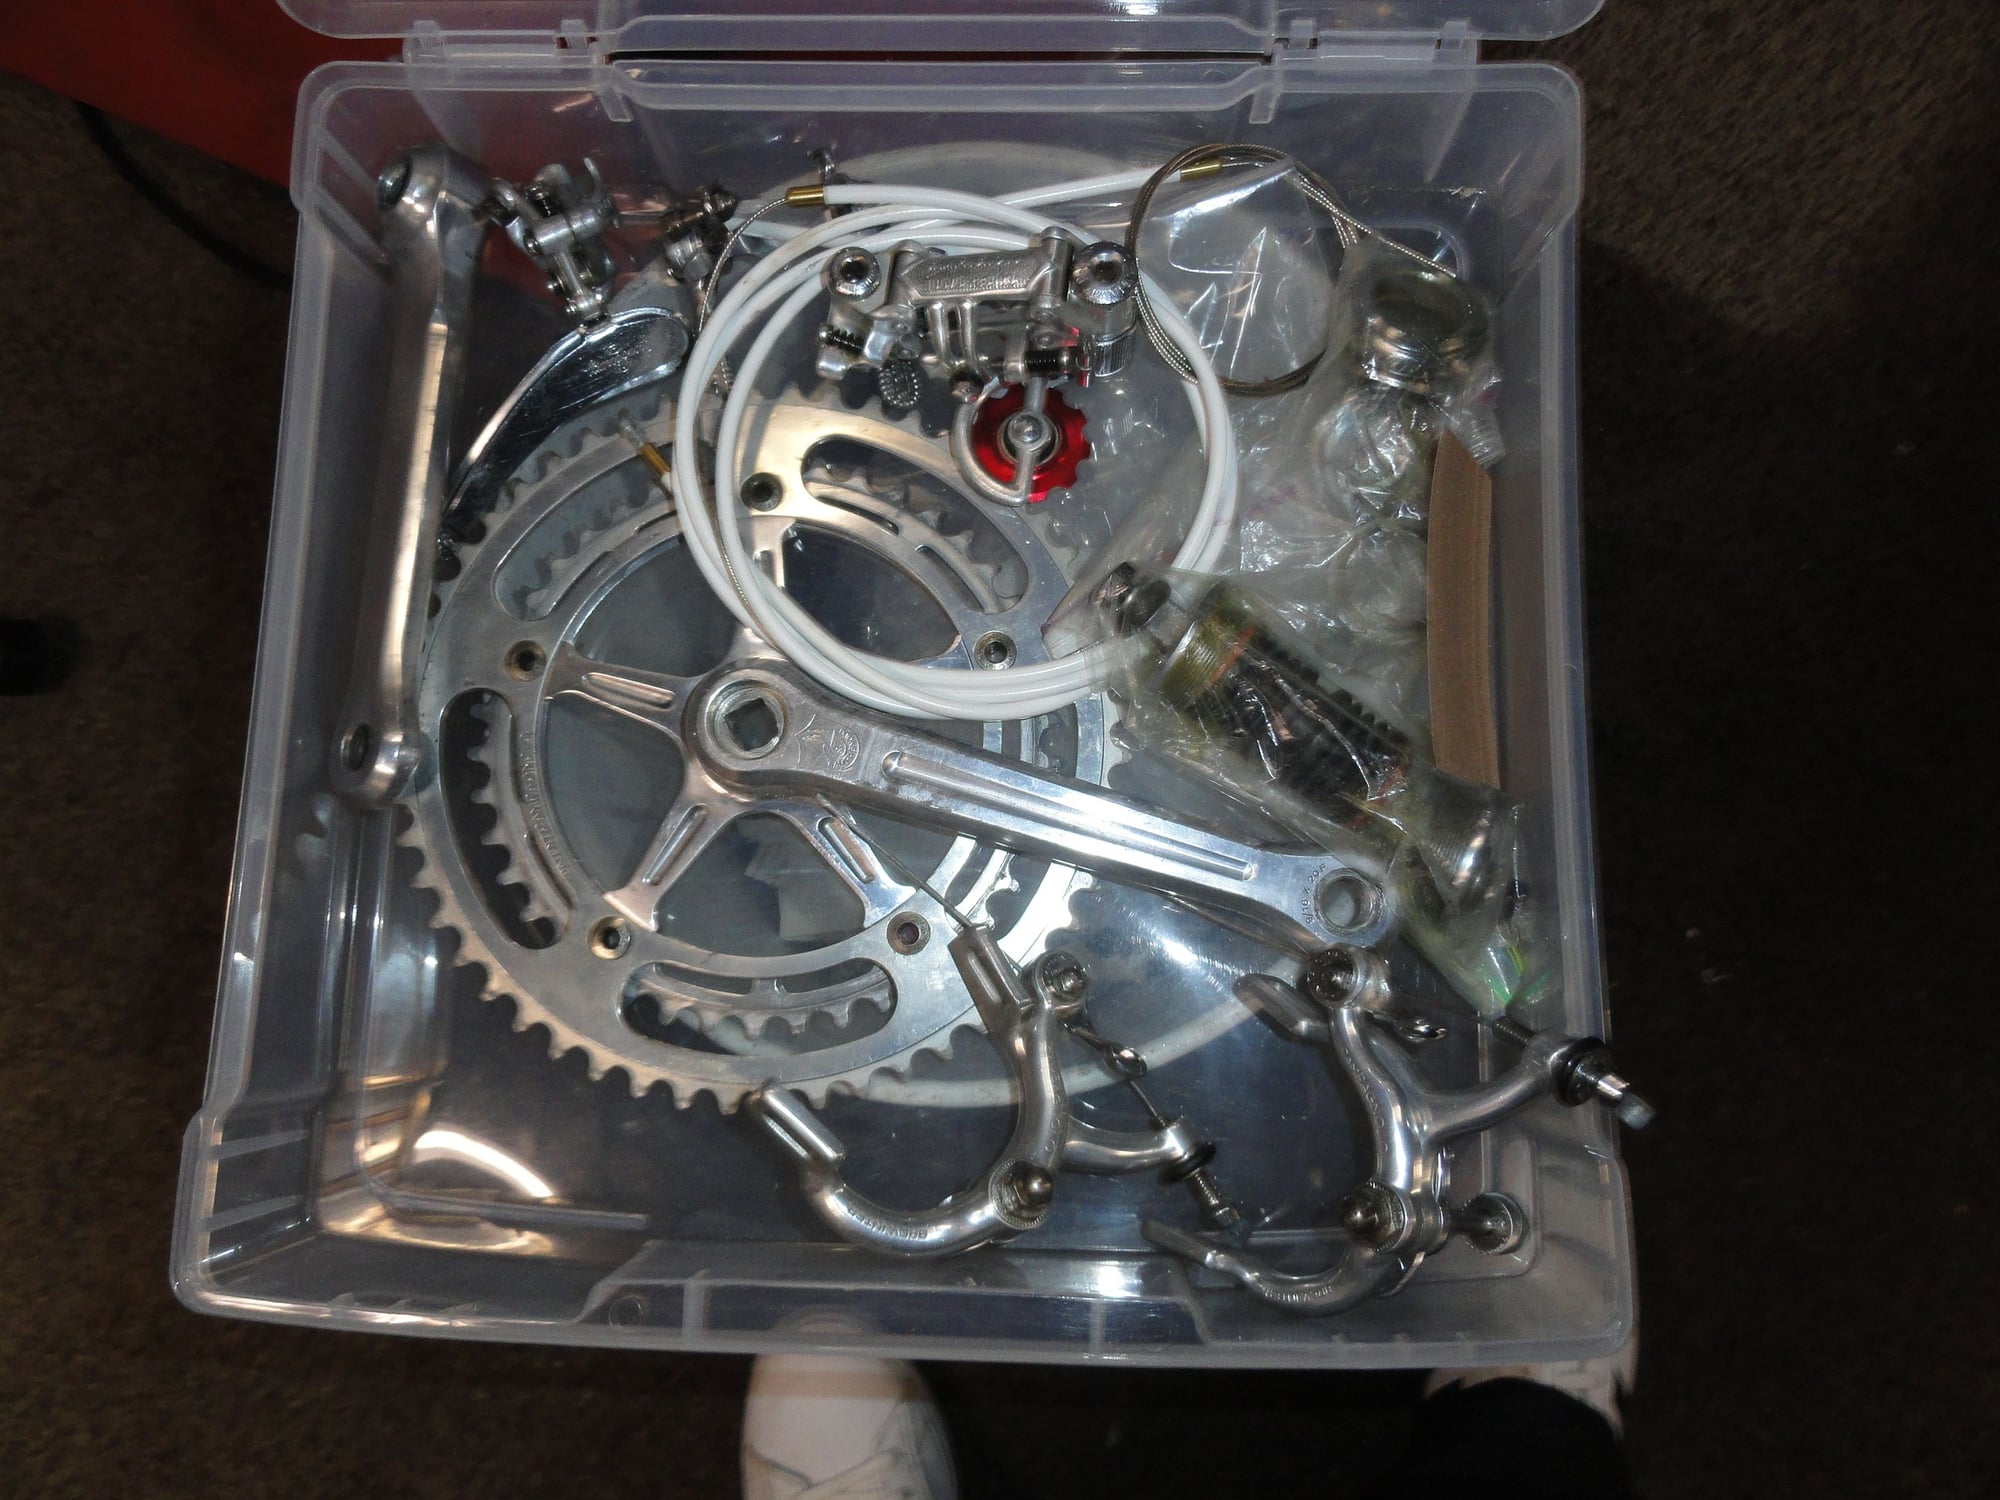
The group that will go on the frame.

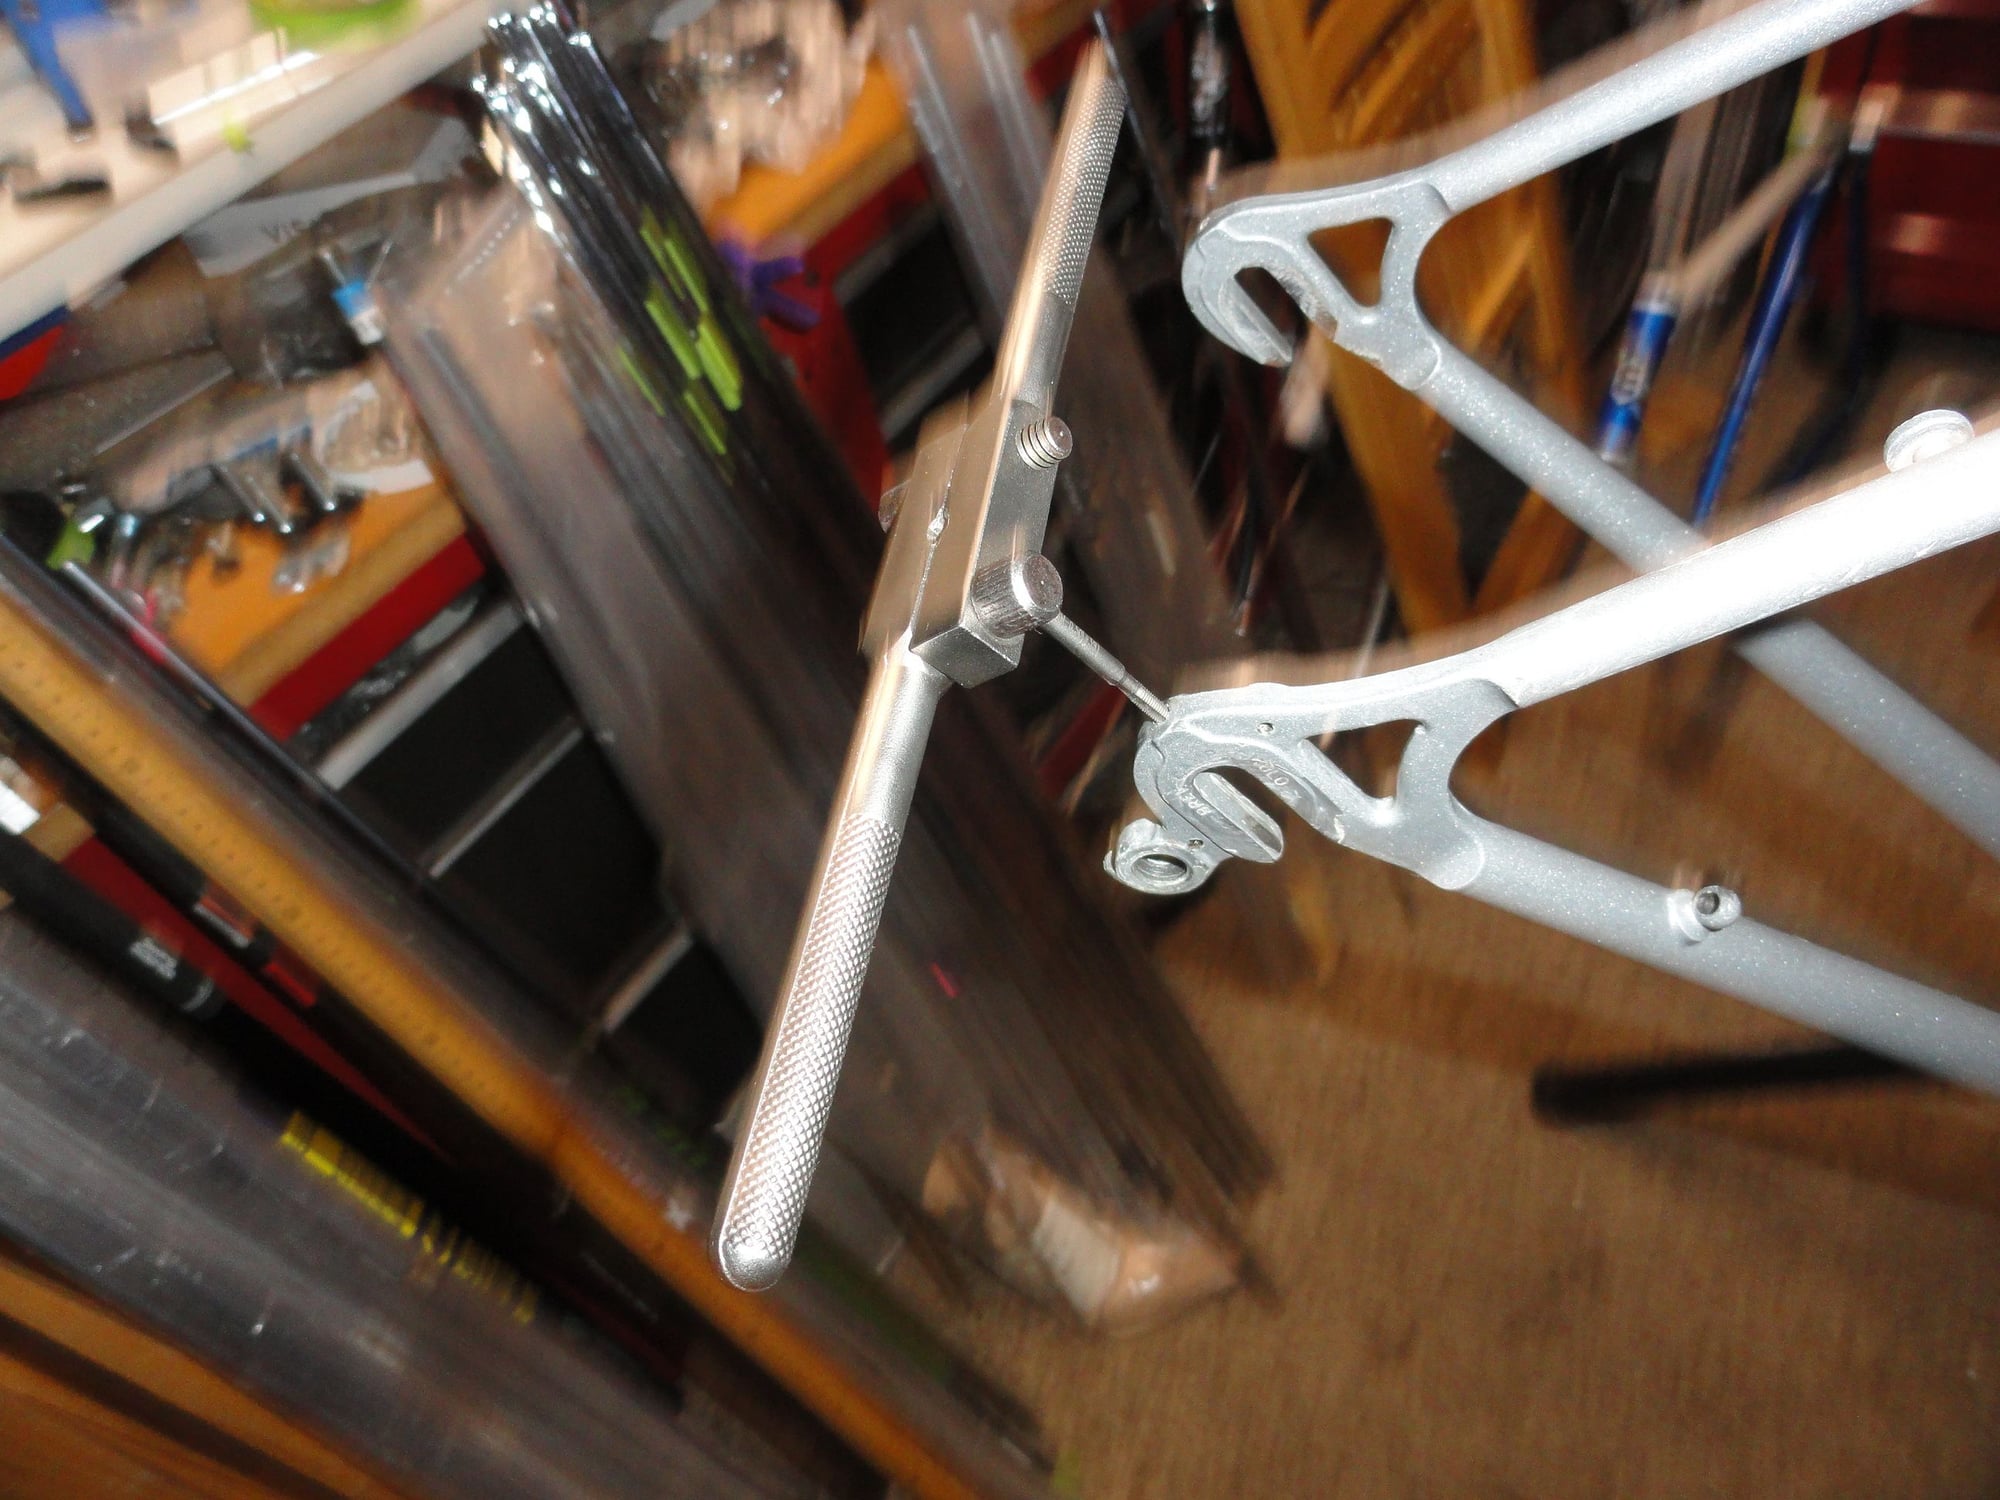
The crown race setter ready to go to work.
More to come as time permits. I had to stop this AM to go be a Golf Professional for a couple of hours. Smiles, MH
The frame after a bit of cleaning up.
The identifying marks indicating the model and tubing type.
Cleaned a chased the DO threads.
Same for the Bottom bracket.
The group that will go on the frame.
The crown race setter ready to go to work.
More to come as time permits. I had to stop this AM to go be a Golf Professional for a couple of hours. Smiles, MH

Likes For Mad Honk:
 03-16-24, 05:45 PM
#3
Senior Member
Thread Starter
Join Date: May 2019
Location: Bloomington, IN
Posts: 2,950
Bikes: Paramount, Faggin, Ochsner, Ciocc, Basso
Mentioned: 117 Post(s)
Tagged: 0 Thread(s)
Quoted: 1303 Post(s)
Liked 1,912 Times
in
1,142 Posts
Lamont,
If you have questions or want more pictures lemme know. I can post things like thread sizes for drop out screws, and other frame items. The tap size today for the DO adjustors is 3X.5 and is probably the smallest one you need for a bike frame. I am hoping my posts help younger mechanics out. Smiles, MH
If you have questions or want more pictures lemme know. I can post things like thread sizes for drop out screws, and other frame items. The tap size today for the DO adjustors is 3X.5 and is probably the smallest one you need for a bike frame. I am hoping my posts help younger mechanics out. Smiles, MH
03-16-24, 06:44 PM
#4

Senior Member

Join Date: Apr 2005
Location: Ann Arbor, MI
Posts: 16,880
Bikes: 1980 Masi, 1984 Mondonico, 1984 Trek 610, 1980 Woodrup Giro, 2005 Mondonico Futura Leggera ELOS, 1967 PX10E, 1971 Peugeot UO-8
Mentioned: 49 Post(s)
Tagged: 0 Thread(s)
Quoted: 1858 Post(s)
Liked 664 Times
in
506 Posts
Wow, what COOL PROJECT! Yes it might not take too long! Having built a NR or two, I wonder it your cartridge BB will work aout as well as sloring the correct Campagnolo BB cups and spindle. T'm sure the Trek frame can accept either genre of component. On my Masi, rebuilt with its original chainset and BB, it went together with perfect minimum Q factor and even left-right spacing.
Overall I haven't liked the ride of my '80s Treks compared to Italians of similar vintage and my Woodrup, though I have had good rides. But if any one was going to compare, this is it!
Best of luck!!! It's certainly the best Trek I have seen!
Otoh, I might get my 720 frame aligned and painted, and then build it up! I haven't tried one of these yet!
03-16-24, 06:47 PM
#5
Full Member
Join Date: May 2022
Location: Dixiana, AL
Posts: 250
Bikes: 1993 Diamond Back Sorrento, 1965 Schwinn Racer 3-speed, 1987 Schwinn High Sierra, 1990 Specialized Sirrus, 2020 Specialized Sirrus 3.0, 2013 Giant Seek 1
Mentioned: 3 Post(s)
Tagged: 0 Thread(s)
Quoted: 87 Post(s)
Liked 776 Times
in
199 Posts
What did you use to chase the threads in the bottom bracket?
03-16-24, 07:04 PM
#6
Senior Member

Join Date: Jan 2015
Location: Los Angeles
Posts: 4,707
Bikes: 82 Medici, 2011 Richard Sachs, 2011 Milwaukee Road
Mentioned: 55 Post(s)
Tagged: 0 Thread(s)
Quoted: 1952 Post(s)
Liked 2,013 Times
in
1,112 Posts
I don’t think I’ve ever seen such nicely done rear dropout brazing on a Trek. ❤️
__________________
I don't do: disks, tubeless, e-shifting, or bead head nymphs.
I don't do: disks, tubeless, e-shifting, or bead head nymphs.
Likes For Classtime:
03-16-24, 08:10 PM
#7
The Huffmeister

Join Date: Jul 2008
Location: The Le Grande HQ
Posts: 2,741
Bikes: '79 Trek 938, '86 Jim Merz Allez SE, '90 Miyata 1000, '68 PX-10, '80 PXN-10, '73 Super Course, '87 Guerciotti, '83 Trek 600, '80 Huffy Le Grande
Mentioned: 45 Post(s)
Tagged: 0 Thread(s)
Quoted: 1226 Post(s)
Liked 3,555 Times
in
1,410 Posts
You and I were both tapping/chasing threads on bike projects today.
My first was a failure, but I learned something, so try #2 will be coming up soon. Yours looks successful from the get-go, cheers!
My first was a failure, but I learned something, so try #2 will be coming up soon. Yours looks successful from the get-go, cheers!
__________________
There were 135 Confentes, but only one...Huffente!

There were 135 Confentes, but only one...Huffente!
03-16-24, 08:14 PM
#8
Senior Member
Thread Starter
Join Date: May 2019
Location: Bloomington, IN
Posts: 2,950
Bikes: Paramount, Faggin, Ochsner, Ciocc, Basso
Mentioned: 117 Post(s)
Tagged: 0 Thread(s)
Quoted: 1303 Post(s)
Liked 1,912 Times
in
1,142 Posts
Zookster,
I have and use Var tools for the specialty tools here. I used them at the Bicycle Garage when I worked there (1978-1986) and they have been a staple for me. They are available through Mel Pinto imports and are the best I have used. Maybe Campy is better but these have done me a solid for 35 years. Smiles, MH
Var bottom bracket taps for both sides, they are designed to align the BB cups when cutting the threads. If you are just chasing the threads they are the best.
03-16-24, 08:17 PM
#9
Old fart

Join Date: Nov 2004
Location: Appleton WI
Posts: 24,790
Bikes: Several, mostly not name brands.
Mentioned: 153 Post(s)
Tagged: 0 Thread(s)
Quoted: 3590 Post(s)
Liked 3,401 Times
in
1,935 Posts
Likes For JohnDThompson:
03-16-24, 08:27 PM
#10
Senior Member
Thread Starter
Join Date: May 2019
Location: Bloomington, IN
Posts: 2,950
Bikes: Paramount, Faggin, Ochsner, Ciocc, Basso
Mentioned: 117 Post(s)
Tagged: 0 Thread(s)
Quoted: 1303 Post(s)
Liked 1,912 Times
in
1,142 Posts
I was wondering when you would chime in on this one! I suspect that may even be your signature 950 on the steering tube. I am pretty stoked about this build as it has a lot of the boxes checked for the best of the best that came out of the Trek facility. I thought the 770 team bike was the best I had from Trek, but this might be just a bit better knowing who made it and that it was the top of the line at the time. Smiles, MH
03-17-24, 05:09 AM
#11
Senior Member
Join Date: Nov 2013
Location: Near Pottstown, PA: 30 miles NW of Philadelphia
Posts: 2,186
Bikes: 2 Trek Mtn, Cannondale R600 road, 6 vintage road bikes
Mentioned: 83 Post(s)
Tagged: 0 Thread(s)
Quoted: 472 Post(s)
Liked 1,028 Times
in
404 Posts
Gosh, what a Pro! I have one of those taps, just for chasing DO threads. It�s so delicate I made a round �tap handle� from a 1� diameter dowel, about 1� long with the tap inserted into the cross section�s center. Just enough torque to chase threads but not enough weight to break the tap. Your full size tap handle took my breath away. 😗
03-17-24, 10:46 AM
#12
Senior Member
Thread Starter
Join Date: May 2019
Location: Bloomington, IN
Posts: 2,950
Bikes: Paramount, Faggin, Ochsner, Ciocc, Basso
Mentioned: 117 Post(s)
Tagged: 0 Thread(s)
Quoted: 1303 Post(s)
Liked 1,912 Times
in
1,142 Posts
Prowler,
It is not a full sized tap handle but one that I acquired somewhere. It appears to be made for smaller taps and is only about six inches long. Easy enough for most of the taps needed for bike work. Smiles, MH
It is not a full sized tap handle but one that I acquired somewhere. It appears to be made for smaller taps and is only about six inches long. Easy enough for most of the taps needed for bike work. Smiles, MH
03-17-24, 12:16 PM
#13
Senior Member
Thread Starter
Join Date: May 2019
Location: Bloomington, IN
Posts: 2,950
Bikes: Paramount, Faggin, Ochsner, Ciocc, Basso
Mentioned: 117 Post(s)
Tagged: 0 Thread(s)
Quoted: 1303 Post(s)
Liked 1,912 Times
in
1,142 Posts
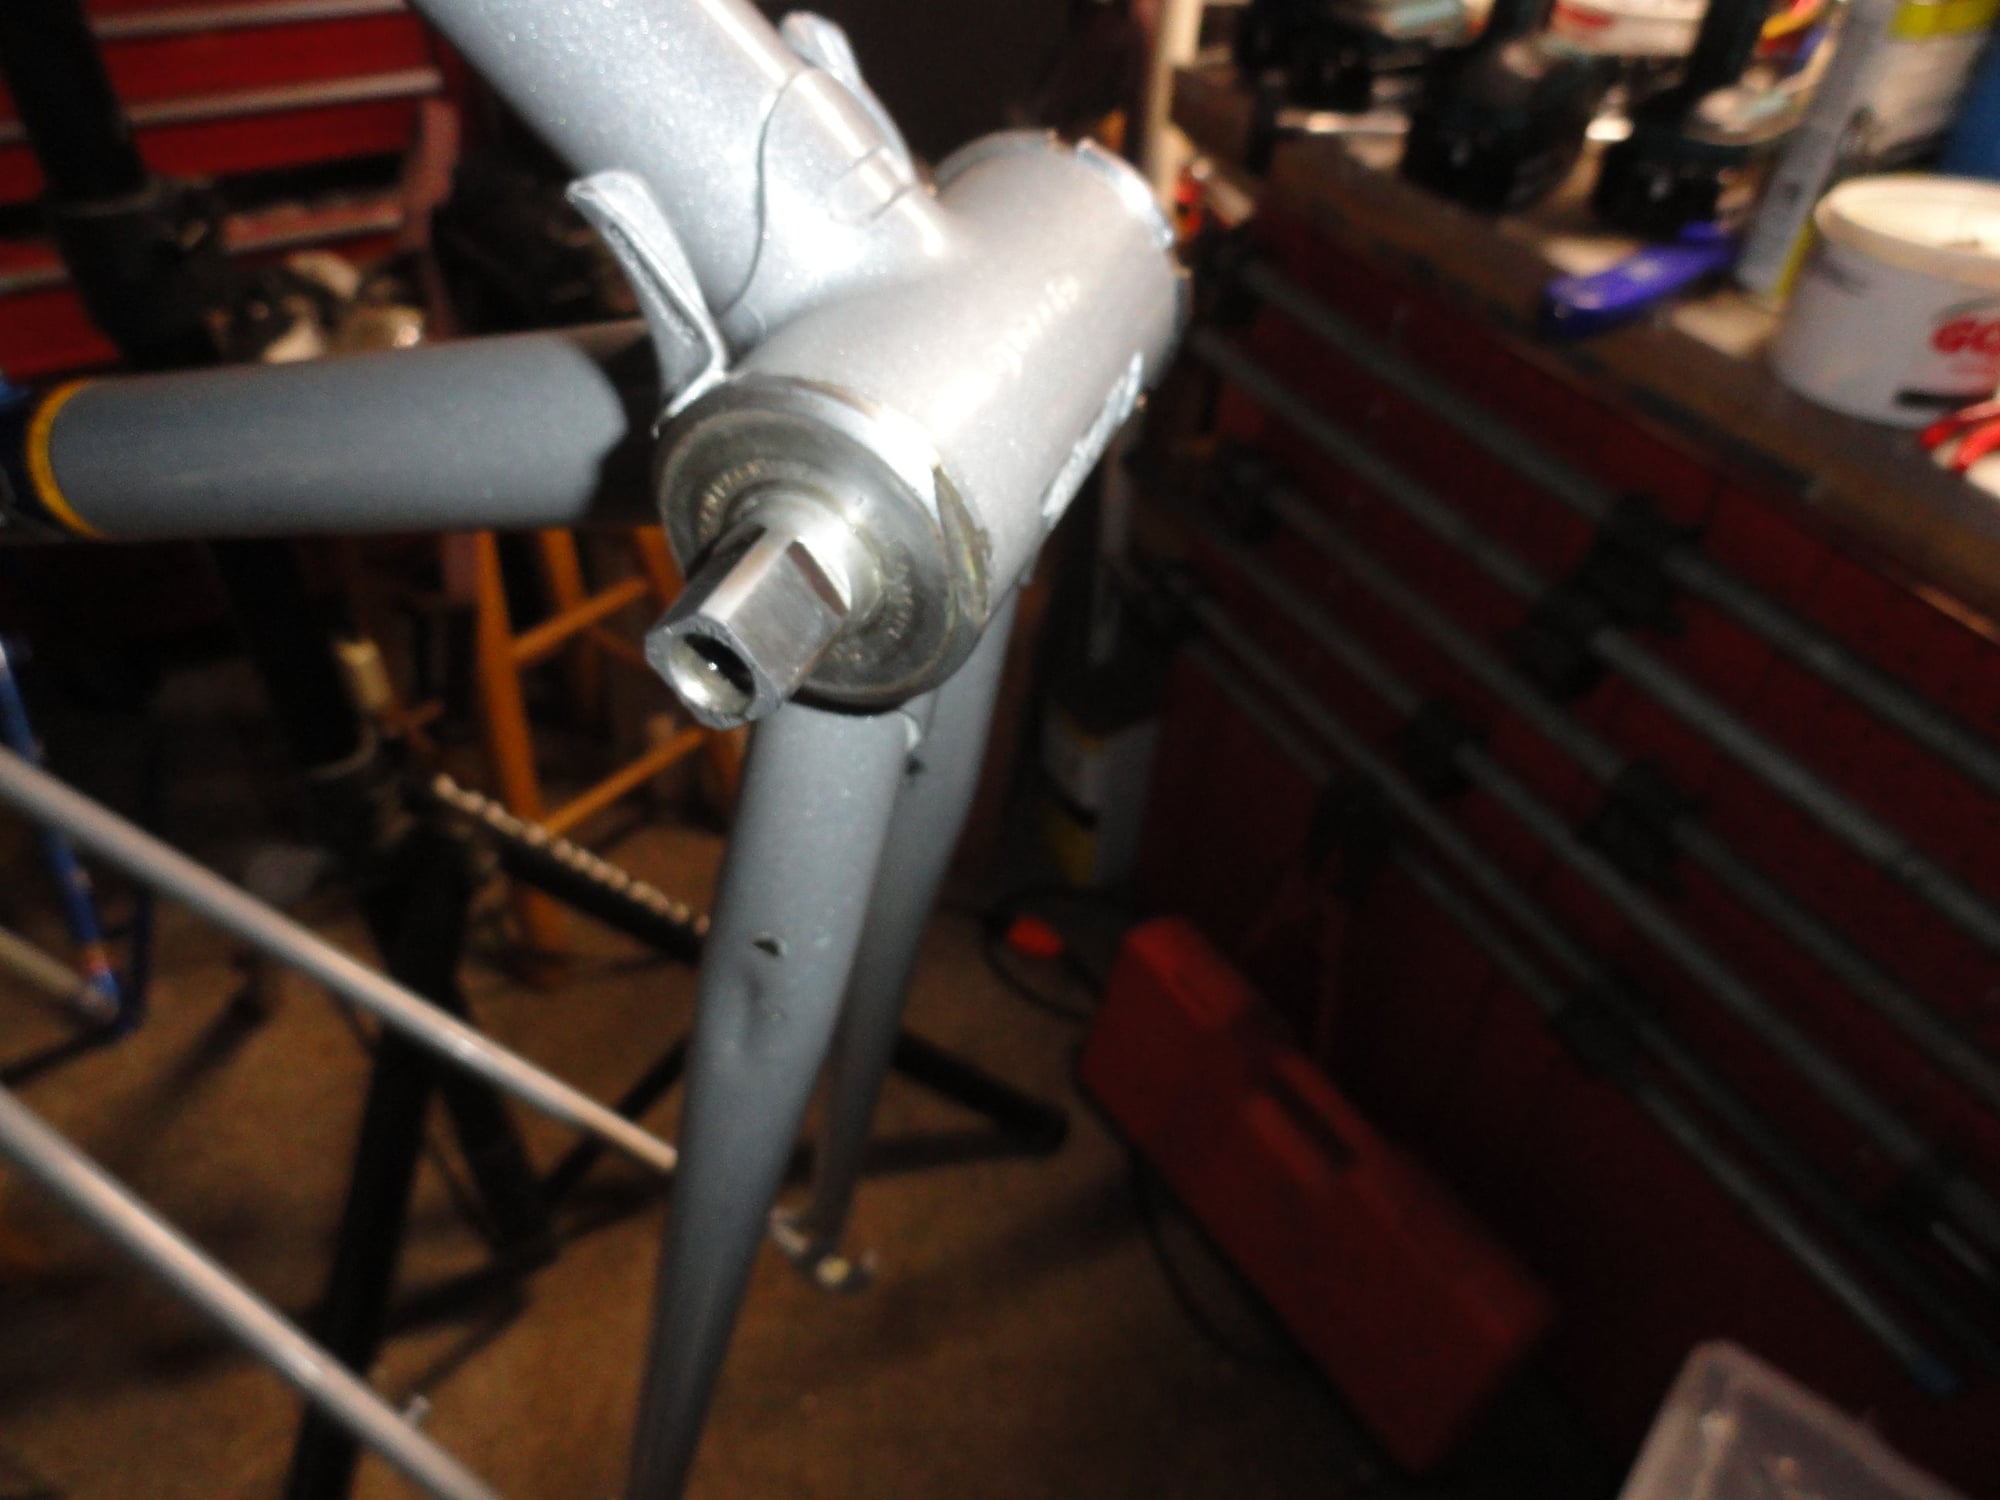
A bit more progress this morning with the headset install. so I need to shout out to jdawginsc , because I keep showing him some junkyard tools and how inexpensive and effective they are. My HS press has been with me for over 35 years and it has done hundreds of headset installs. some pictures of the work:
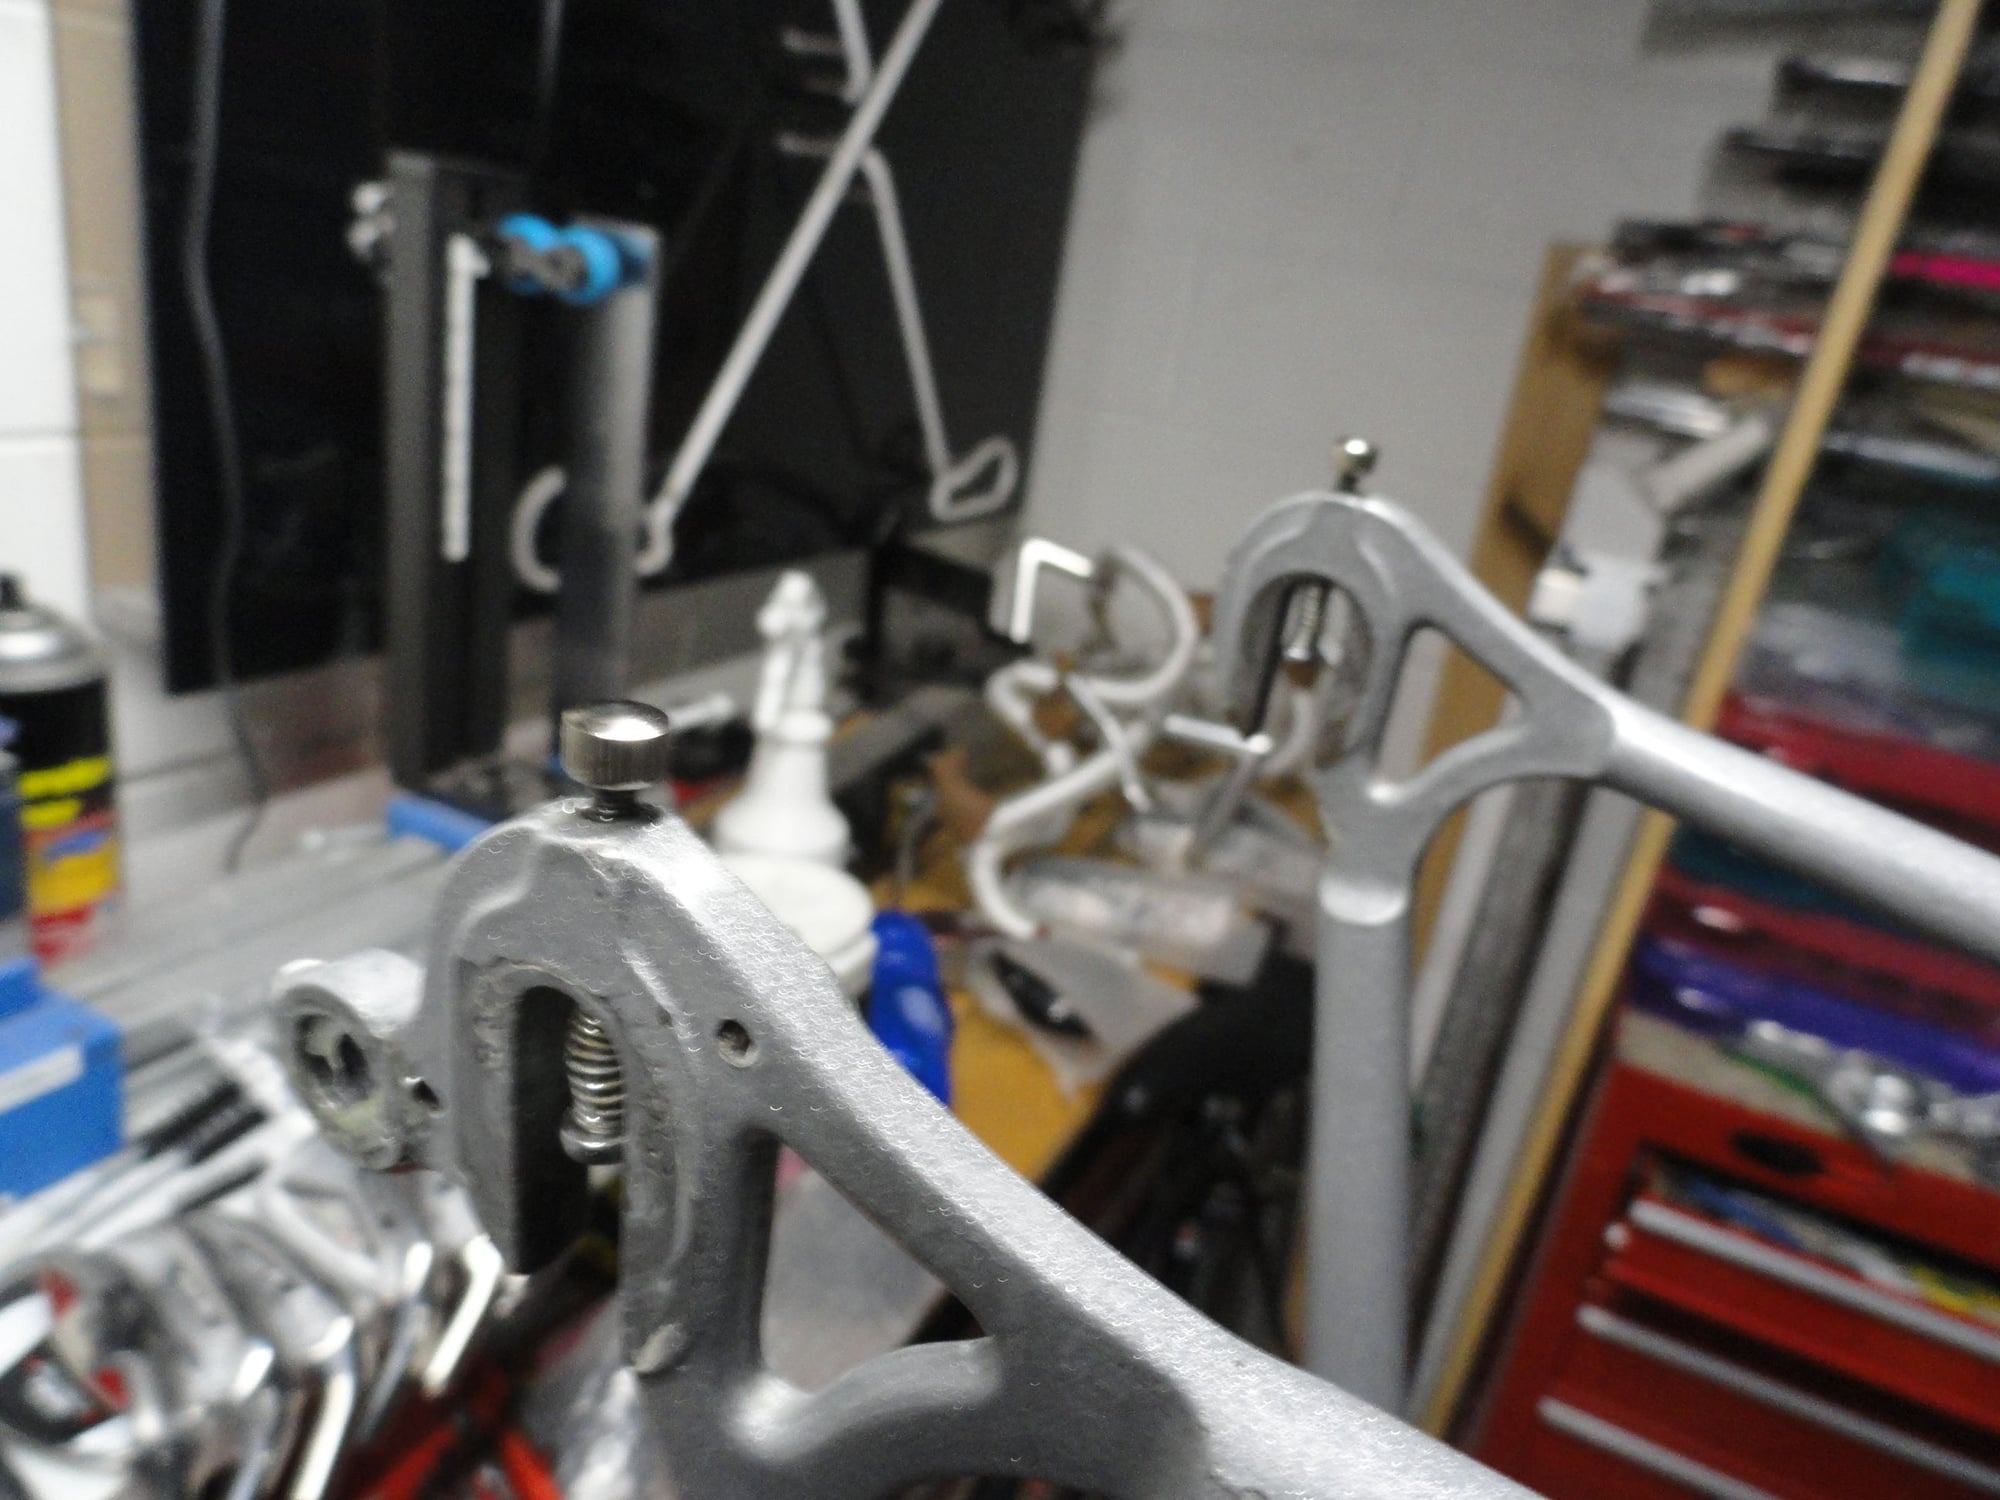
Driving on the crown race with the VAR tool.
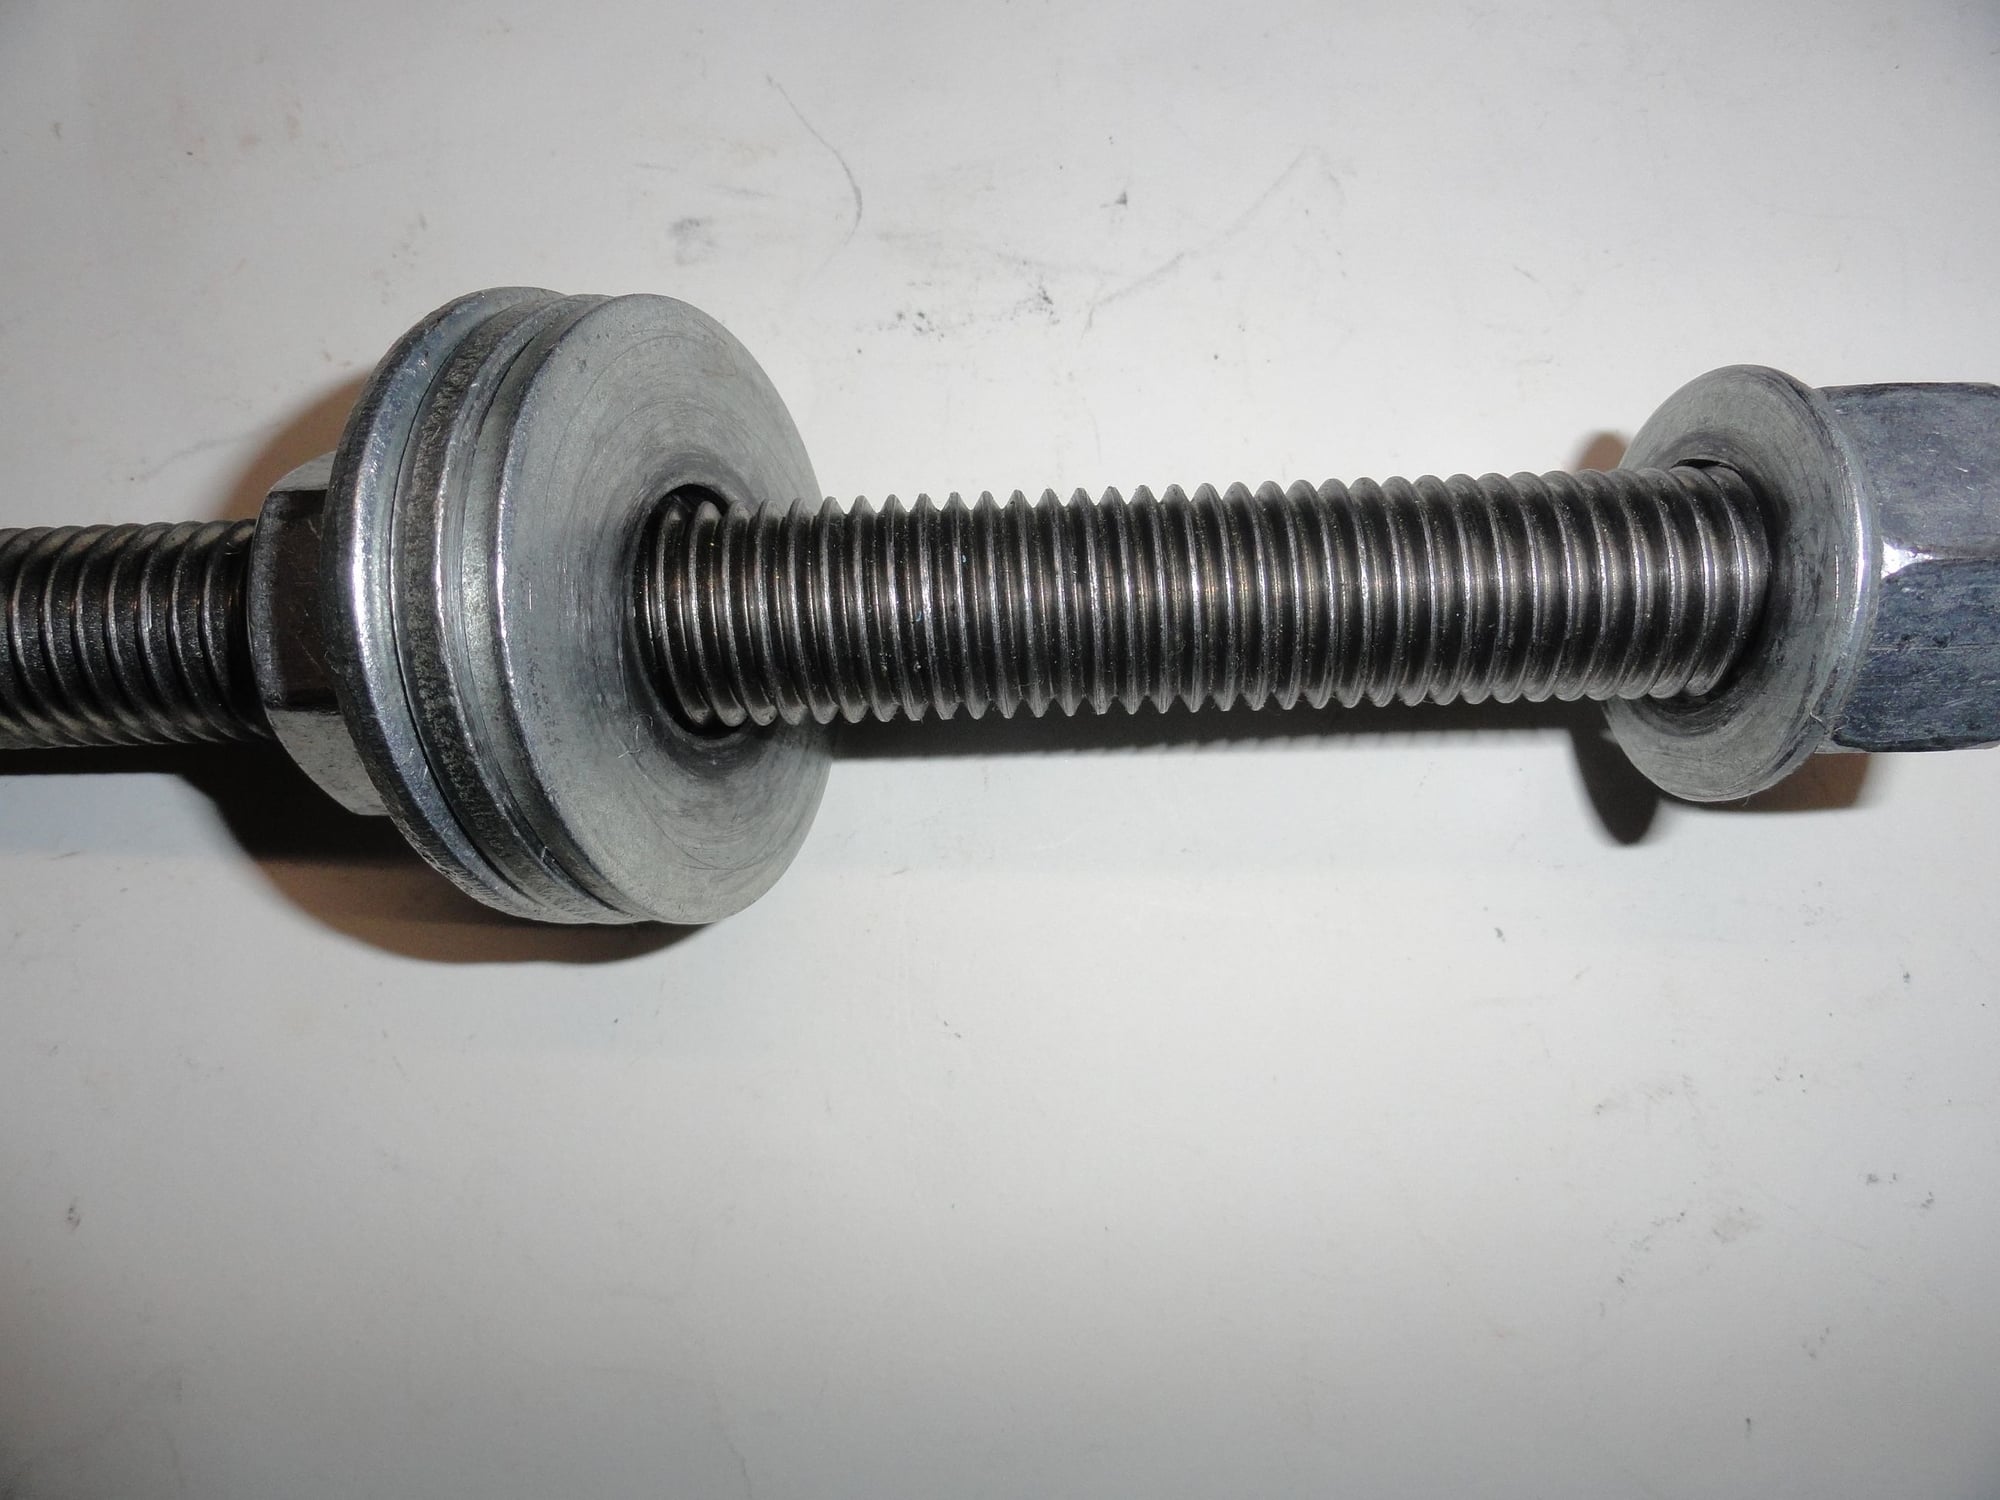
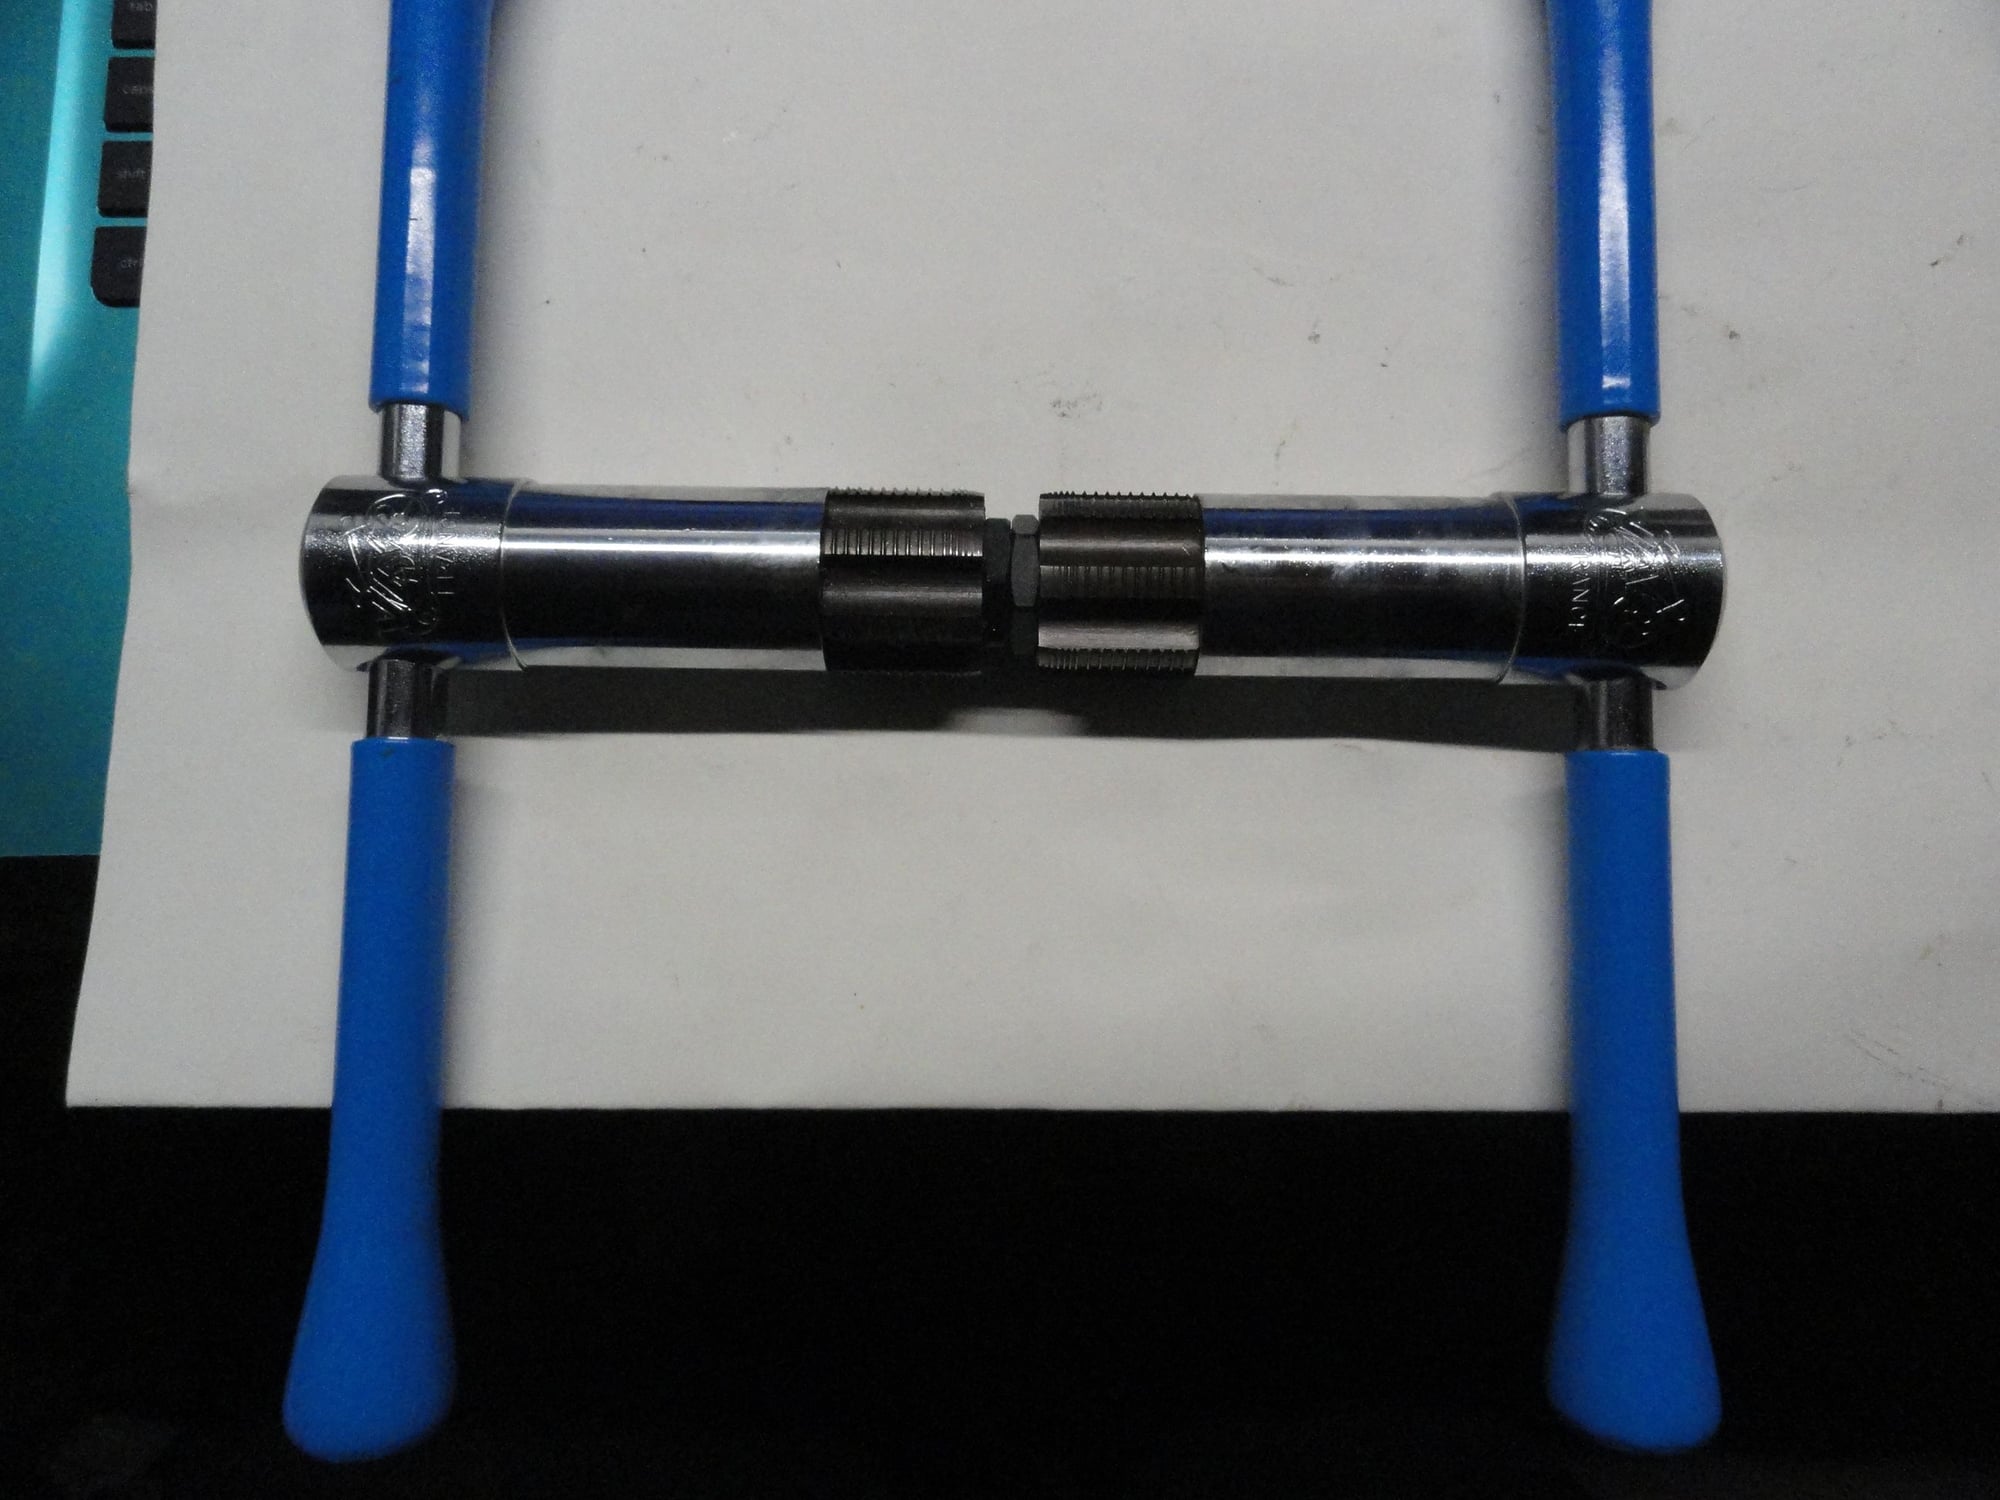
My HS press, the important part. A length of all thread stock, some washers, and two nuts.
A bit of lubrication prior to the install.
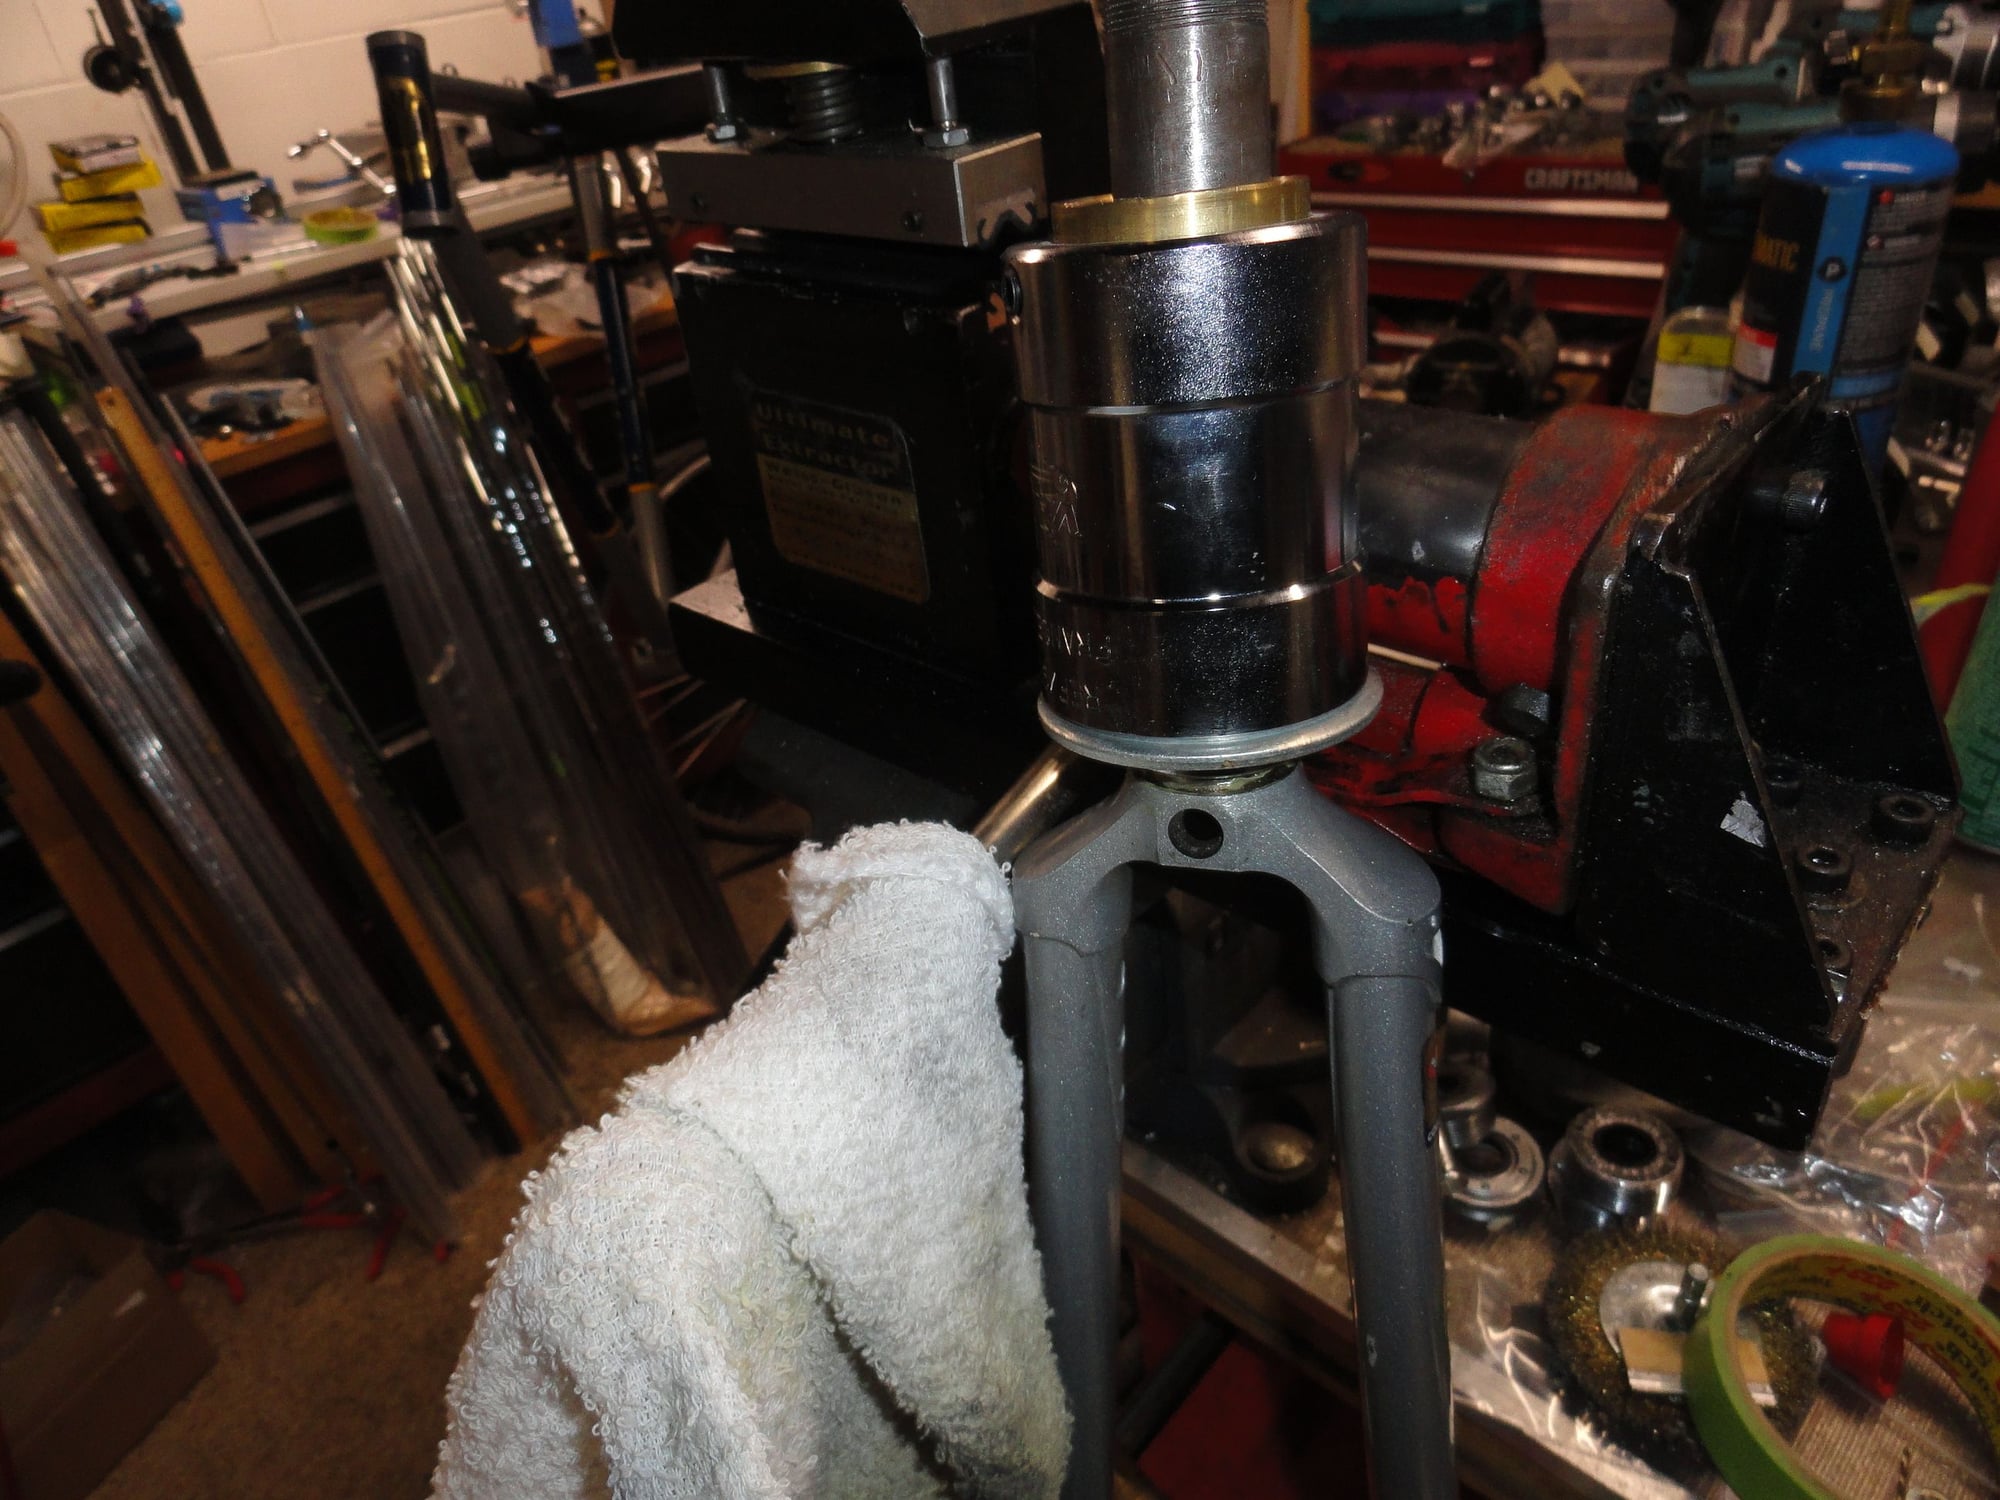
The races and the press in place on the frame.

The not so business part of the HS press. These two are ancient tools from my toolbox, they have been in the box over 40 years.
The press in action and the races are fully seated. I took extra care to showcase the HS brand name under the head badge.

The stack height wound up being just a bit to short so, it was to the spare parts drawer to find another HS spacer. Everything is in place and ready for use.
Smiles, MH
Driving on the crown race with the VAR tool.
My HS press, the important part. A length of all thread stock, some washers, and two nuts.
A bit of lubrication prior to the install.
The races and the press in place on the frame.
The not so business part of the HS press. These two are ancient tools from my toolbox, they have been in the box over 40 years.
The press in action and the races are fully seated. I took extra care to showcase the HS brand name under the head badge.
The stack height wound up being just a bit to short so, it was to the spare parts drawer to find another HS spacer. Everything is in place and ready for use.
Smiles, MH
Likes For Mad Honk:
03-17-24, 02:13 PM
#14
Edumacator
Join Date: Jan 2018
Location: Goose Creek, SC
Posts: 6,812
Bikes: '87 Crestdale, '87 Basso Gap, '92 Rossin Performance EL-OS, 1990 VanTuyl, 1980s Losa, 1985 Trek 670, 1982 AD SLE, 1987 PX10, etc...
Mentioned: 59 Post(s)
Tagged: 0 Thread(s)
Quoted: 2440 Post(s)
Liked 3,131 Times
in
1,970 Posts
Tange Levin! My favorite headset. Virtually indestructible.
__________________
1987 Crest Cannondale, 1987 Basso Gap, 1992 Rossin Performance EL, 1990ish Van Tuyl, 1985 Trek 670, 1982 AD SLE, 2003 Pinarello Surprise, 1990ish MBK Atlantique, 1987 Peugeot Competition, 1987 Nishiki Tri-A, 1981 Faggin, 1996 Cannondale M500, 1984 Mercian, 1982 AD SuperLeicht, 1985 Massi (model unknown), 1988 Daccordi Griffe , 1989 Fauxsin MTB, 1981 Ciocc Mockba, 1992 Bianchi Giro, 1977 Colnago Super
1987 Crest Cannondale, 1987 Basso Gap, 1992 Rossin Performance EL, 1990ish Van Tuyl, 1985 Trek 670, 1982 AD SLE, 2003 Pinarello Surprise, 1990ish MBK Atlantique, 1987 Peugeot Competition, 1987 Nishiki Tri-A, 1981 Faggin, 1996 Cannondale M500, 1984 Mercian, 1982 AD SuperLeicht, 1985 Massi (model unknown), 1988 Daccordi Griffe , 1989 Fauxsin MTB, 1981 Ciocc Mockba, 1992 Bianchi Giro, 1977 Colnago Super
03-17-24, 04:07 PM
#15
Senior Member
Thread Starter
Join Date: May 2019
Location: Bloomington, IN
Posts: 2,950
Bikes: Paramount, Faggin, Ochsner, Ciocc, Basso
Mentioned: 117 Post(s)
Tagged: 0 Thread(s)
Quoted: 1303 Post(s)
Liked 1,912 Times
in
1,142 Posts
jdawginsc,
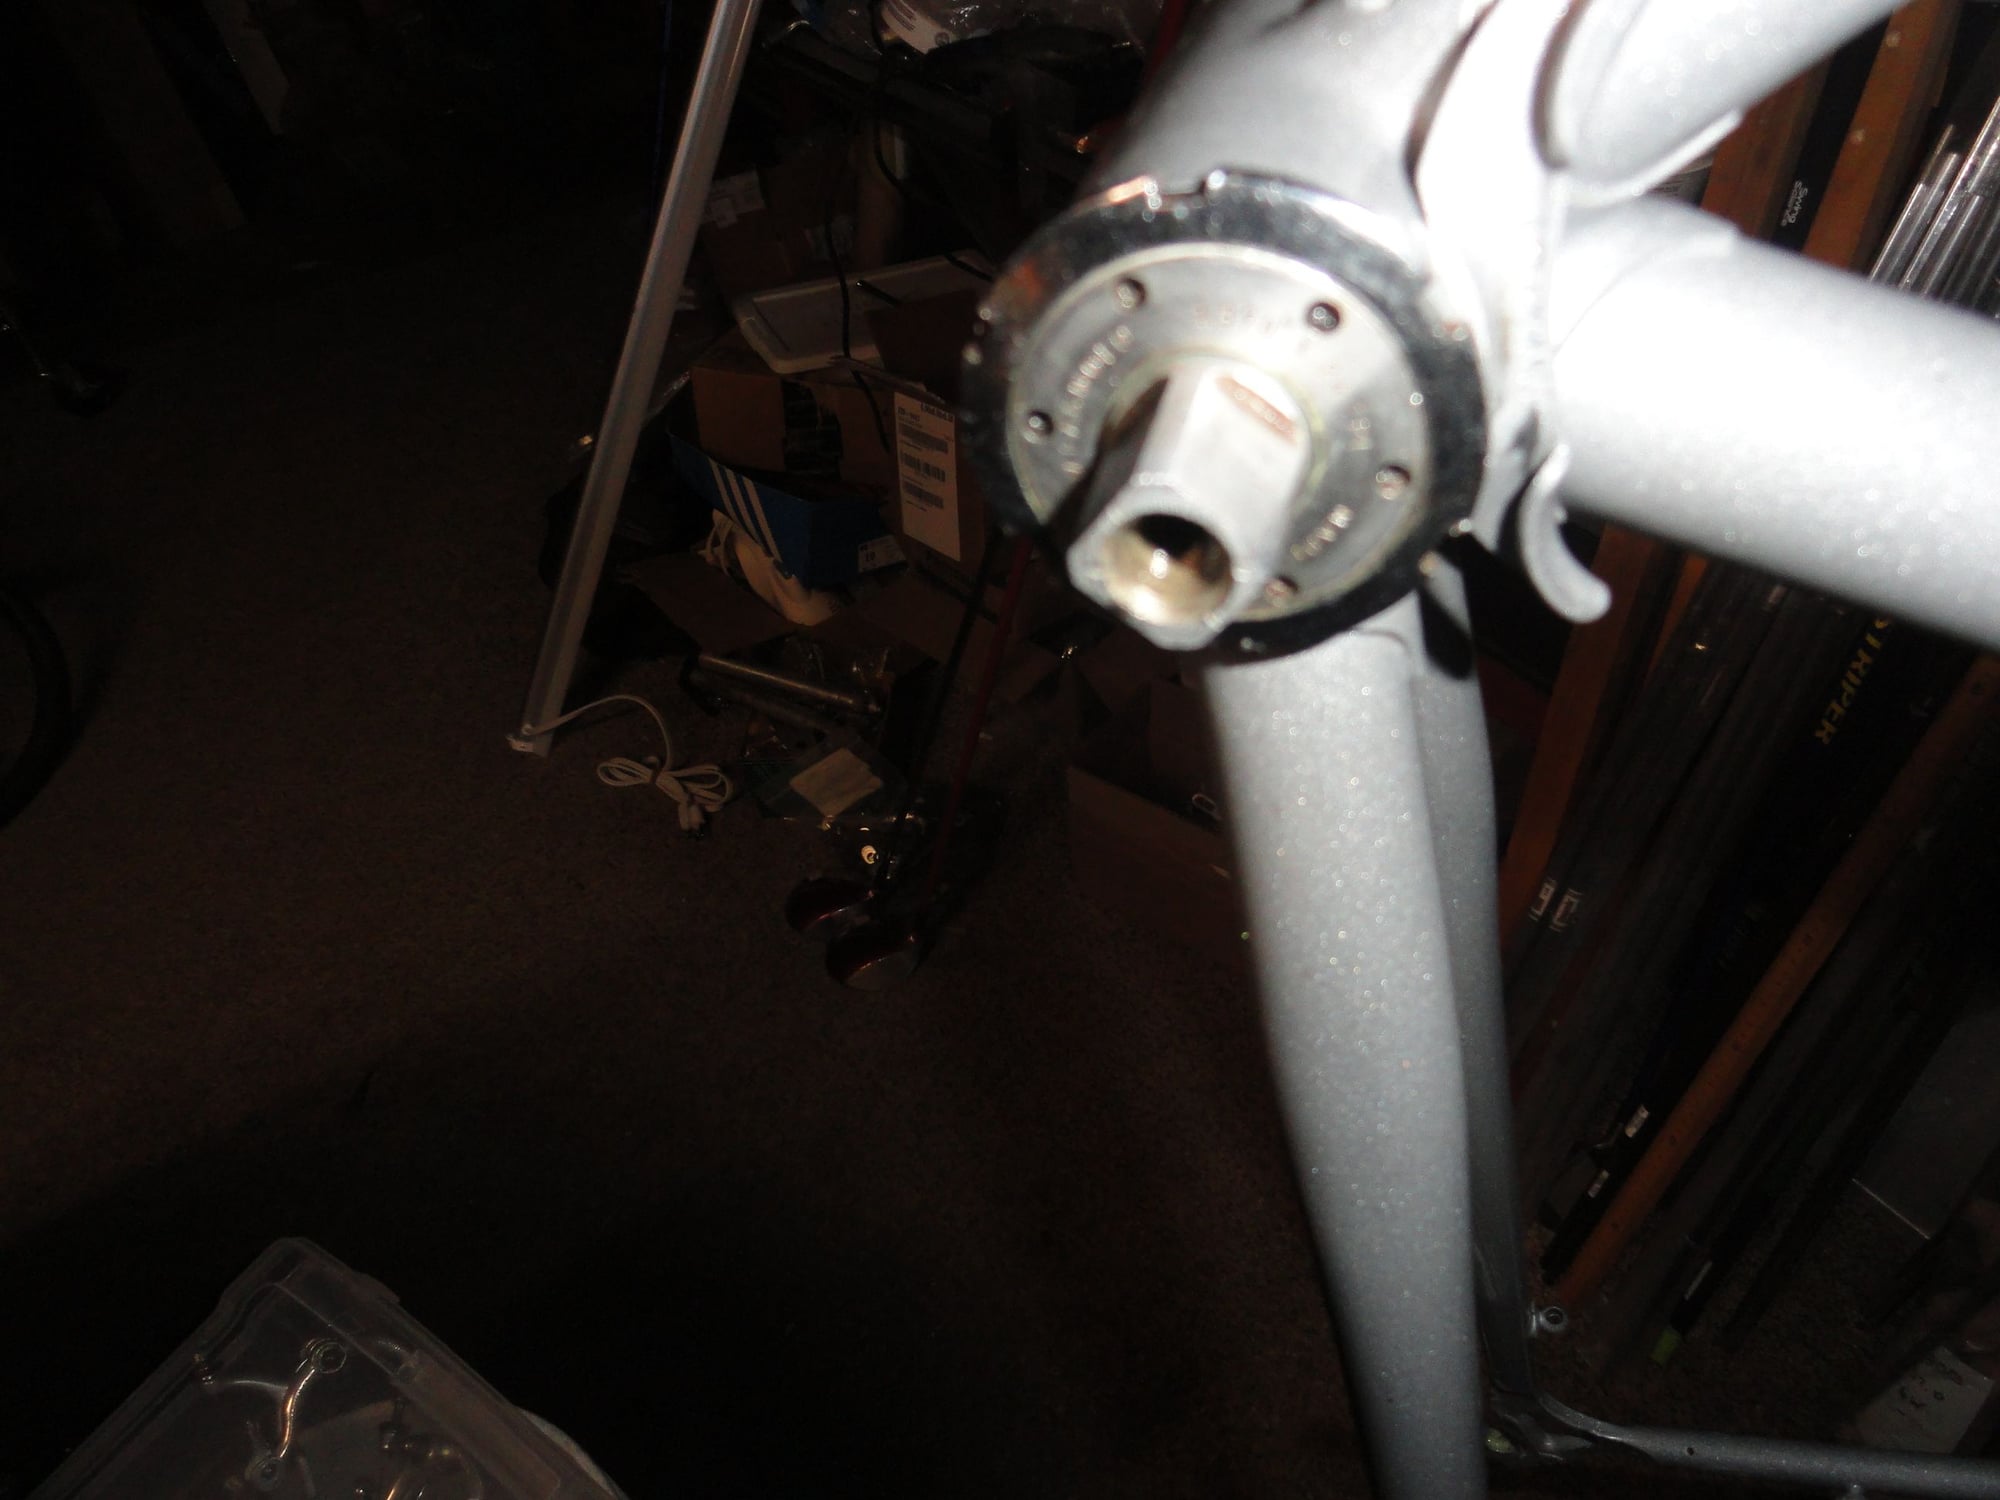
This bottom bracket install is for you. So this afternoon I got back to the build. A NR BB goes in the frame. So I start with the fixed cup and then proceed with the rest of the install, spindle, adjustable cup and lock ring. A few of the tools I used:

Use the proper tool for the job? Naaw! Let's try the junkyard method.
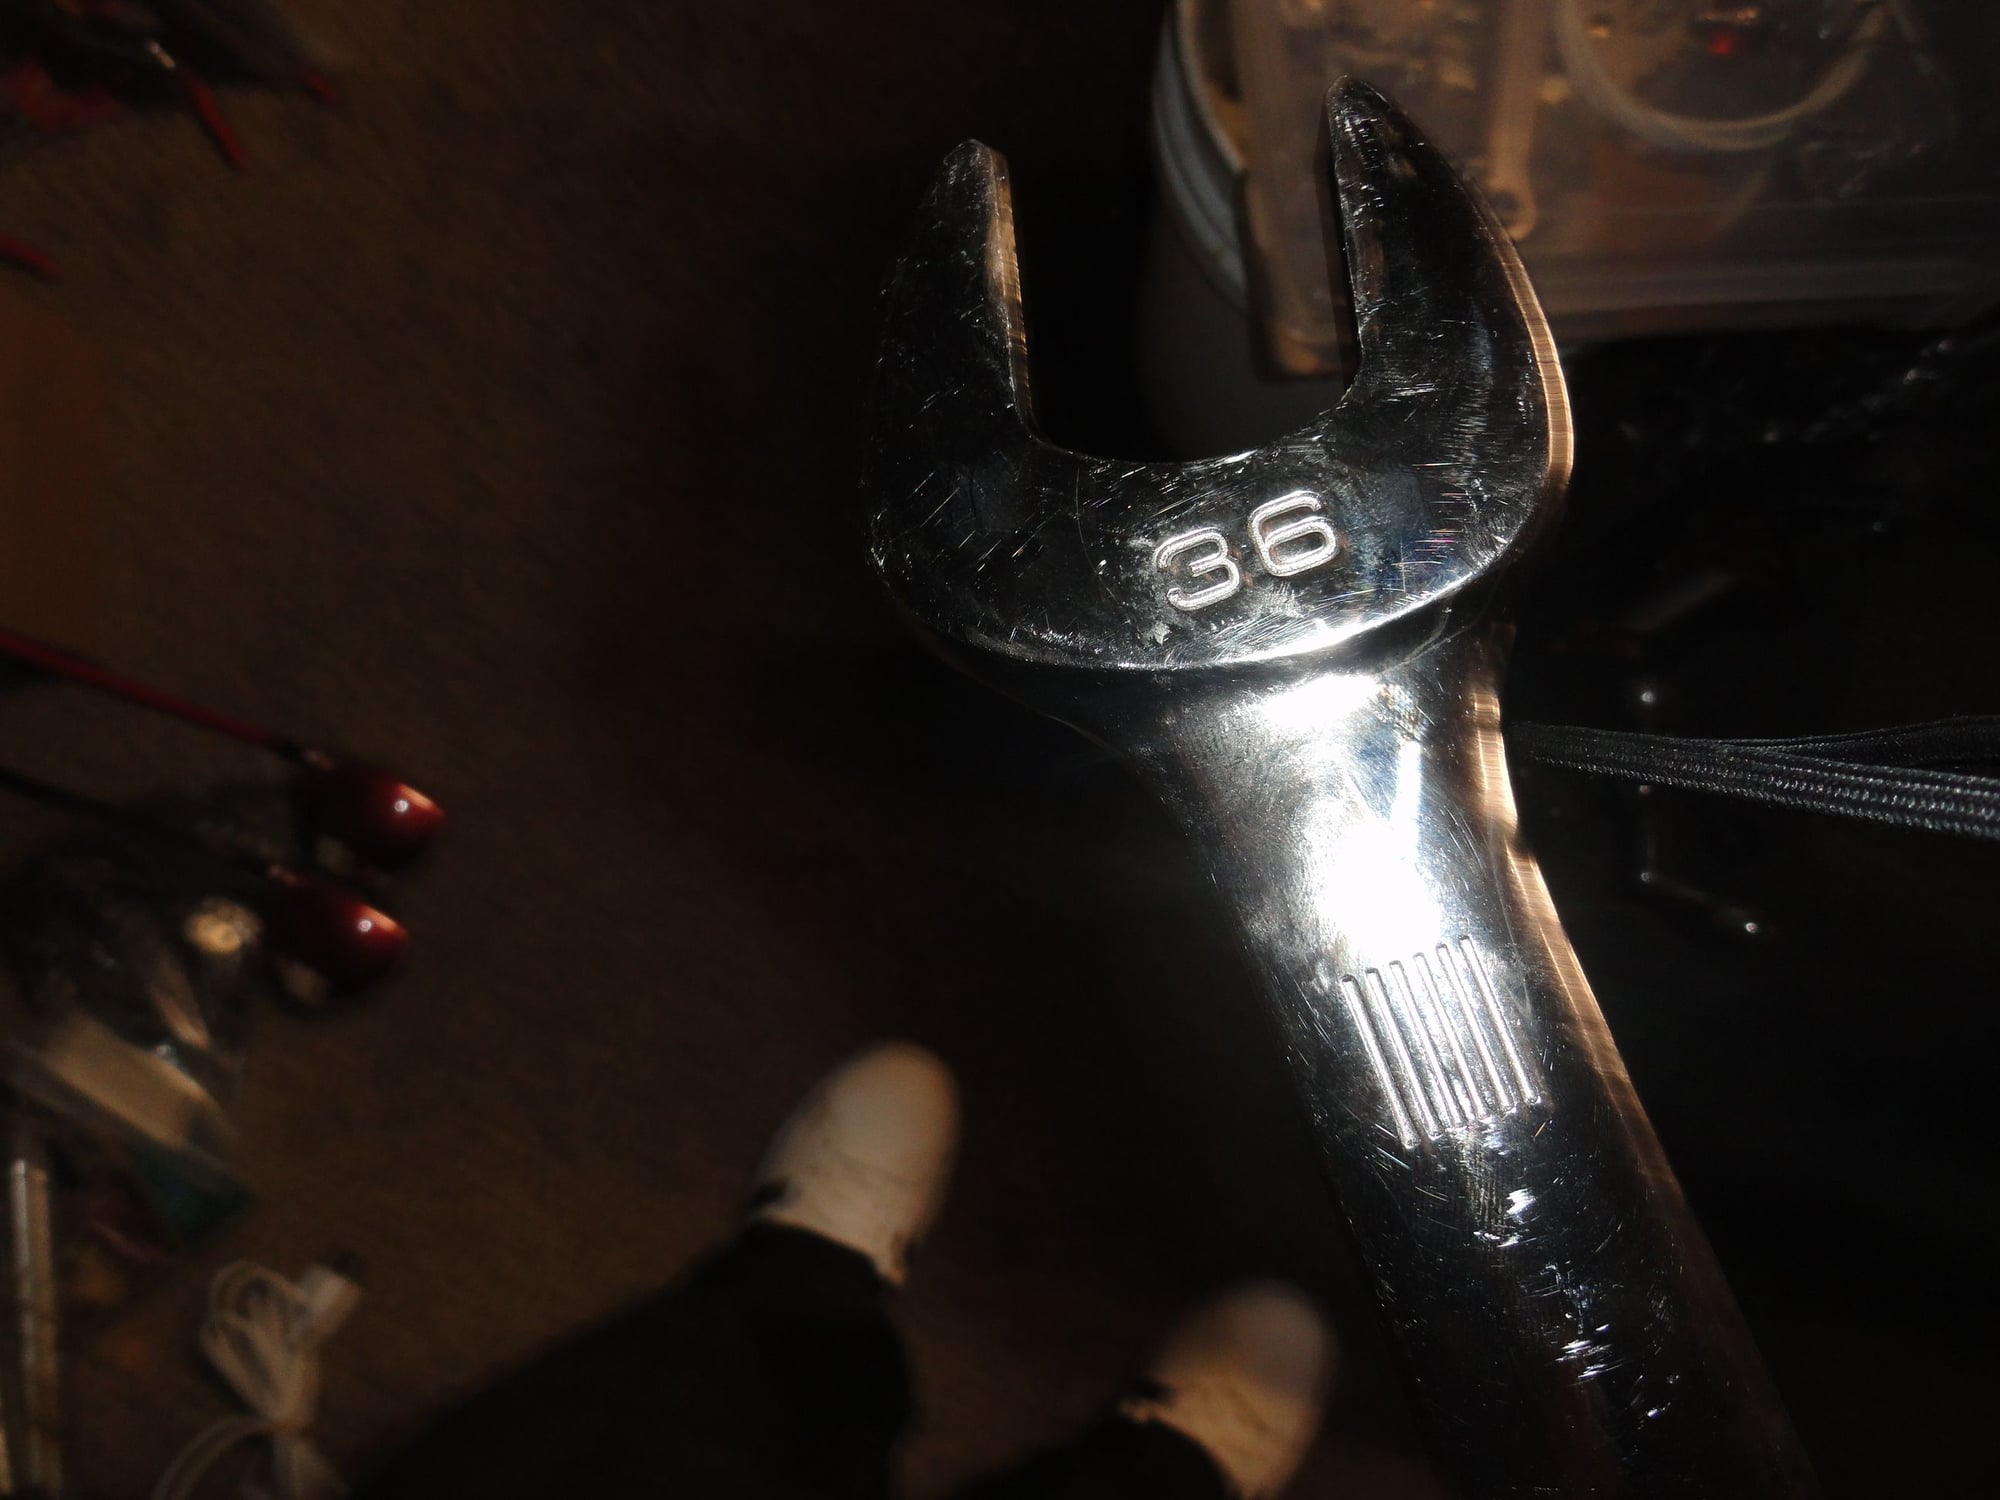
A cheap 36mm wrench from a discount store should work just fine besides it is 18" long and has plenty of leverage for locking things down.
So the drive side is locked down. (sorry for the full picture of the completed BB, I lost the build pictures in the transfer to this thread)
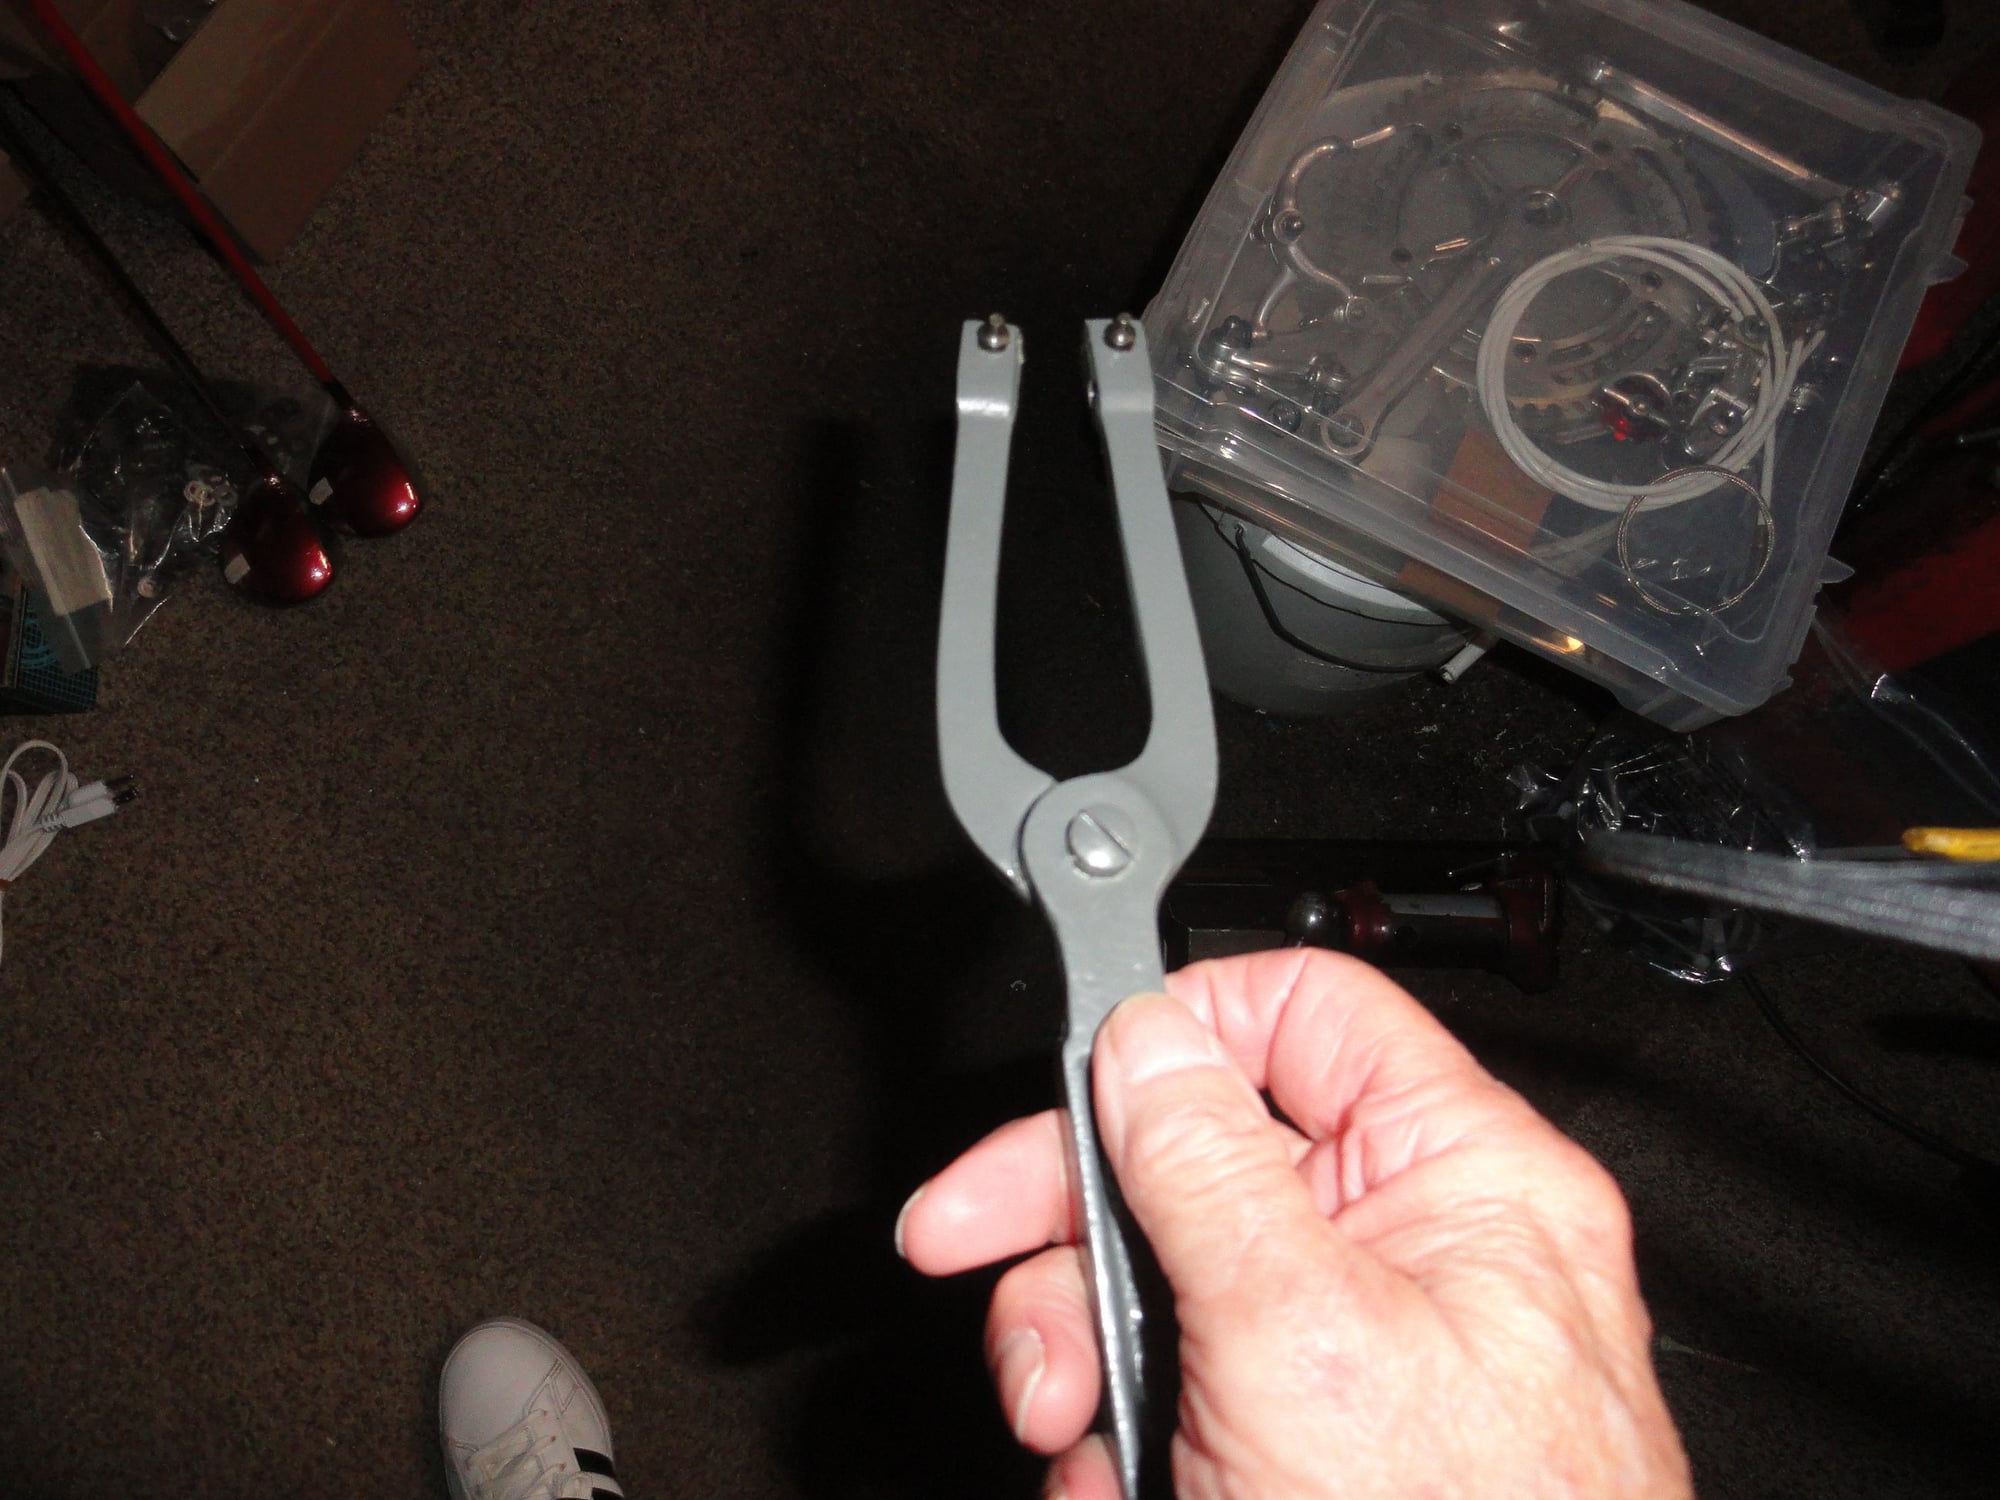
Adjustable cup gets the high dollar tool treatment, the VAR is really good at micro adjustments.
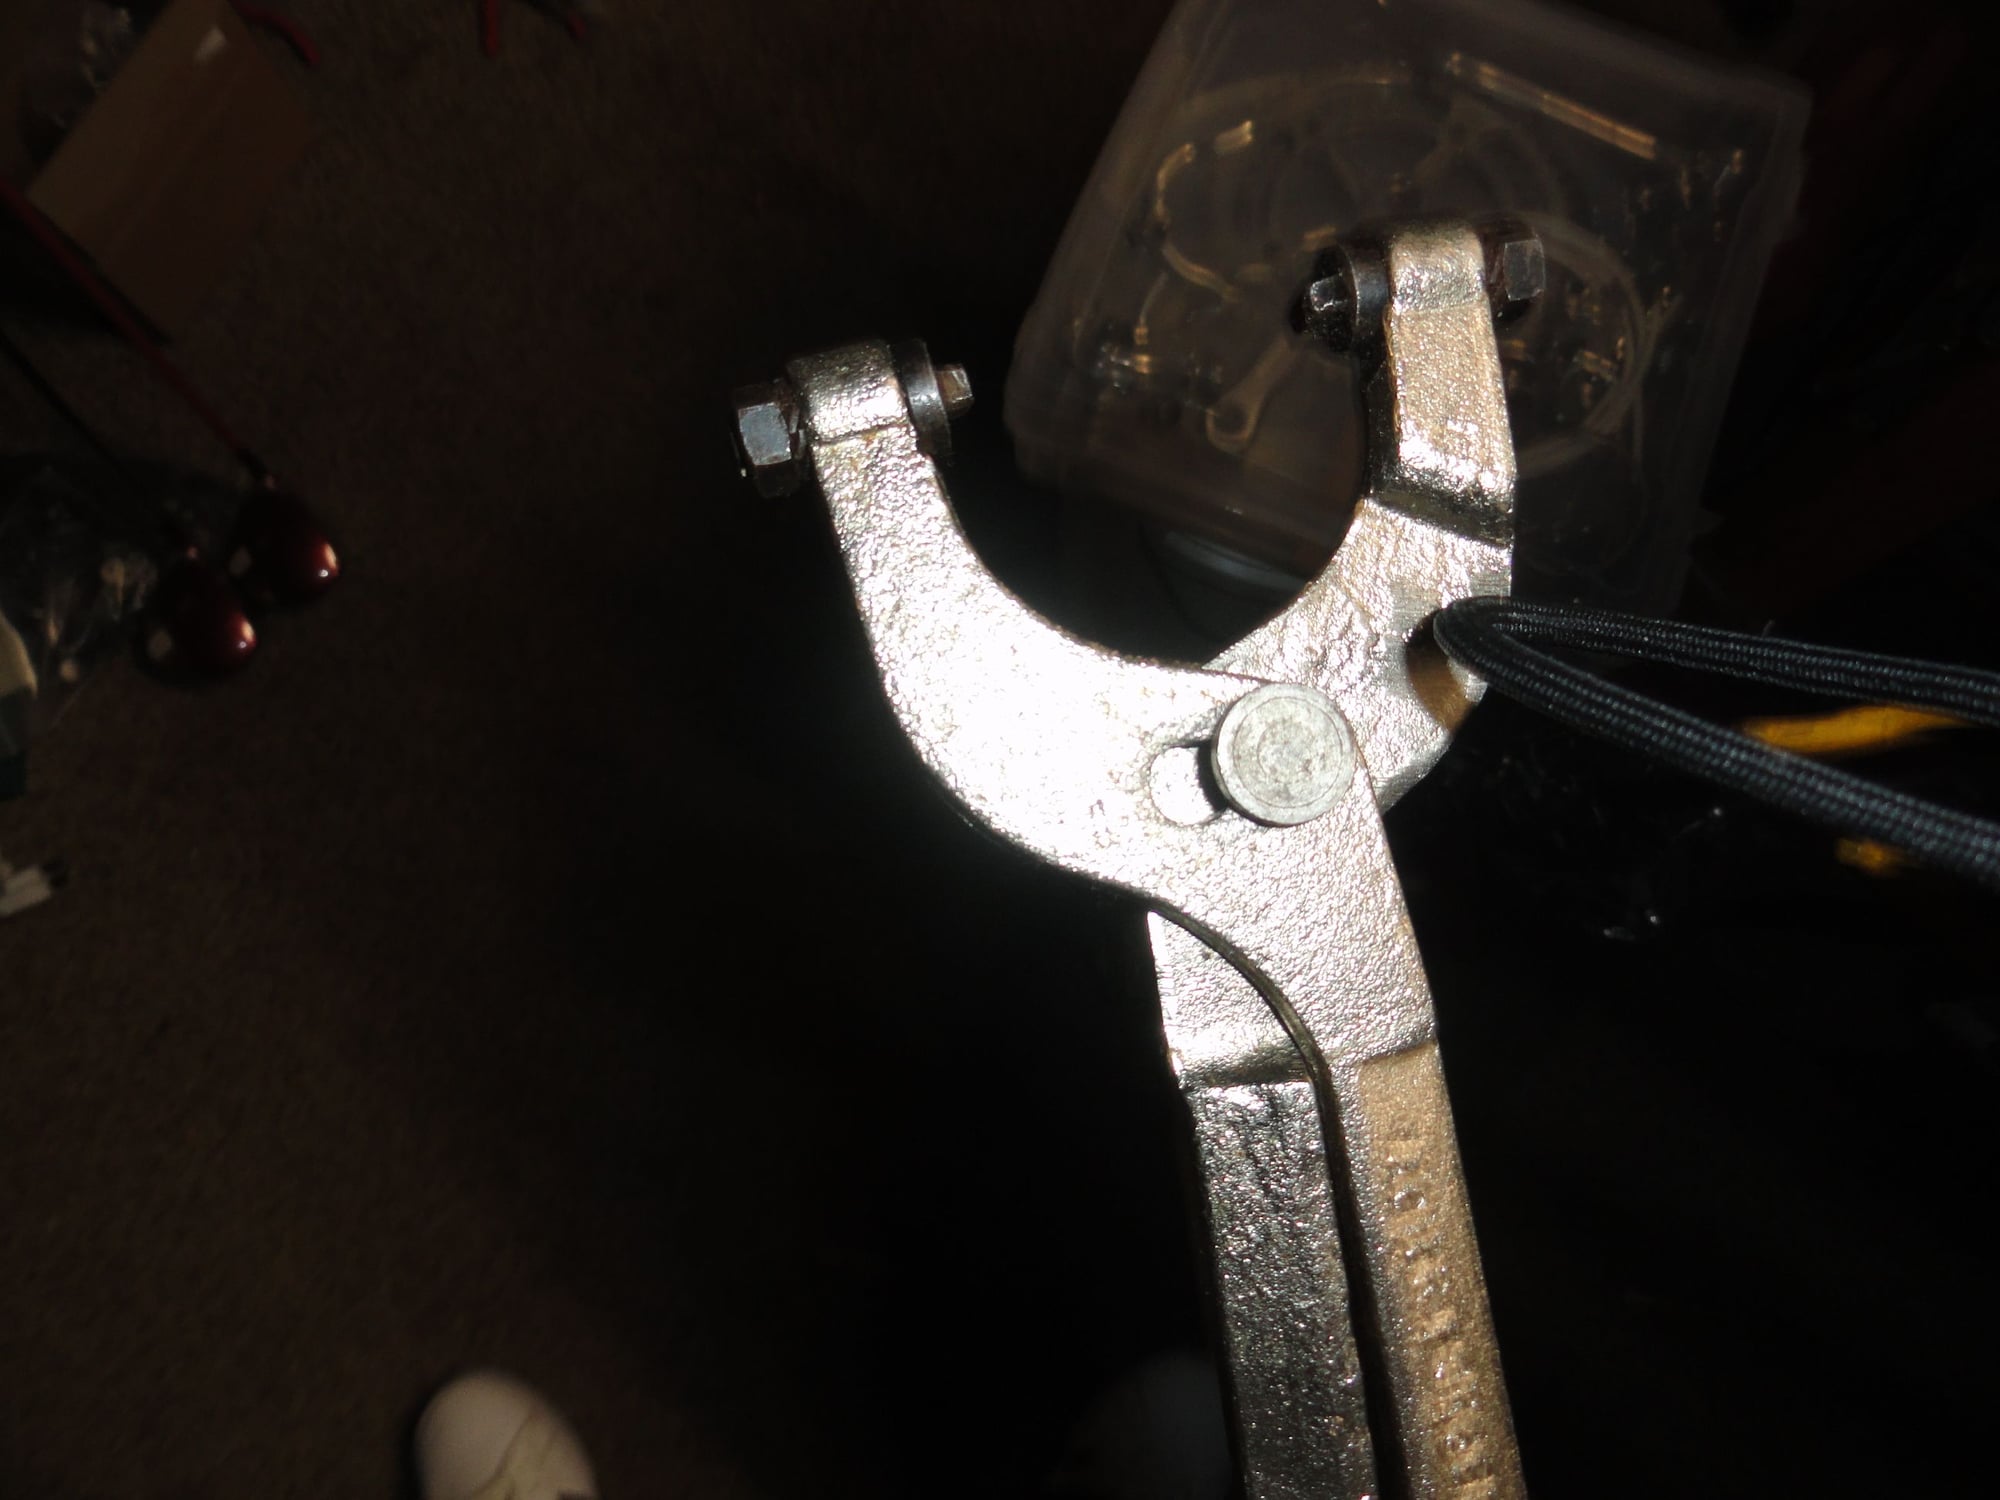
And the VAR lock ring pliers for the ring. A Hozan rock ring wrench only catches one of the spaces in the ring where the VAR catches both sides.
All done and ready to move on to the crank parts.
Smiles, MH
This bottom bracket install is for you. So this afternoon I got back to the build. A NR BB goes in the frame. So I start with the fixed cup and then proceed with the rest of the install, spindle, adjustable cup and lock ring. A few of the tools I used:
Use the proper tool for the job? Naaw! Let's try the junkyard method.
A cheap 36mm wrench from a discount store should work just fine besides it is 18" long and has plenty of leverage for locking things down.
So the drive side is locked down. (sorry for the full picture of the completed BB, I lost the build pictures in the transfer to this thread)
Adjustable cup gets the high dollar tool treatment, the VAR is really good at micro adjustments.
And the VAR lock ring pliers for the ring. A Hozan rock ring wrench only catches one of the spaces in the ring where the VAR catches both sides.
All done and ready to move on to the crank parts.
Smiles, MH
Last edited by Mad Honk; 03-20-24 at 05:13 PM.
Likes For Mad Honk:
04-07-24, 09:20 AM
#16
Senior Member
Thread Starter
Join Date: May 2019
Location: Bloomington, IN
Posts: 2,950
Bikes: Paramount, Faggin, Ochsner, Ciocc, Basso
Mentioned: 117 Post(s)
Tagged: 0 Thread(s)
Quoted: 1303 Post(s)
Liked 1,912 Times
in
1,142 Posts
After four days of being a Golf Coach, I am home and now able to do some work on this one. A few pics of today's progress:
A decision on the DO adjuster screws, finally settled on the ledge screws which are bit longer and fit a little bit better.
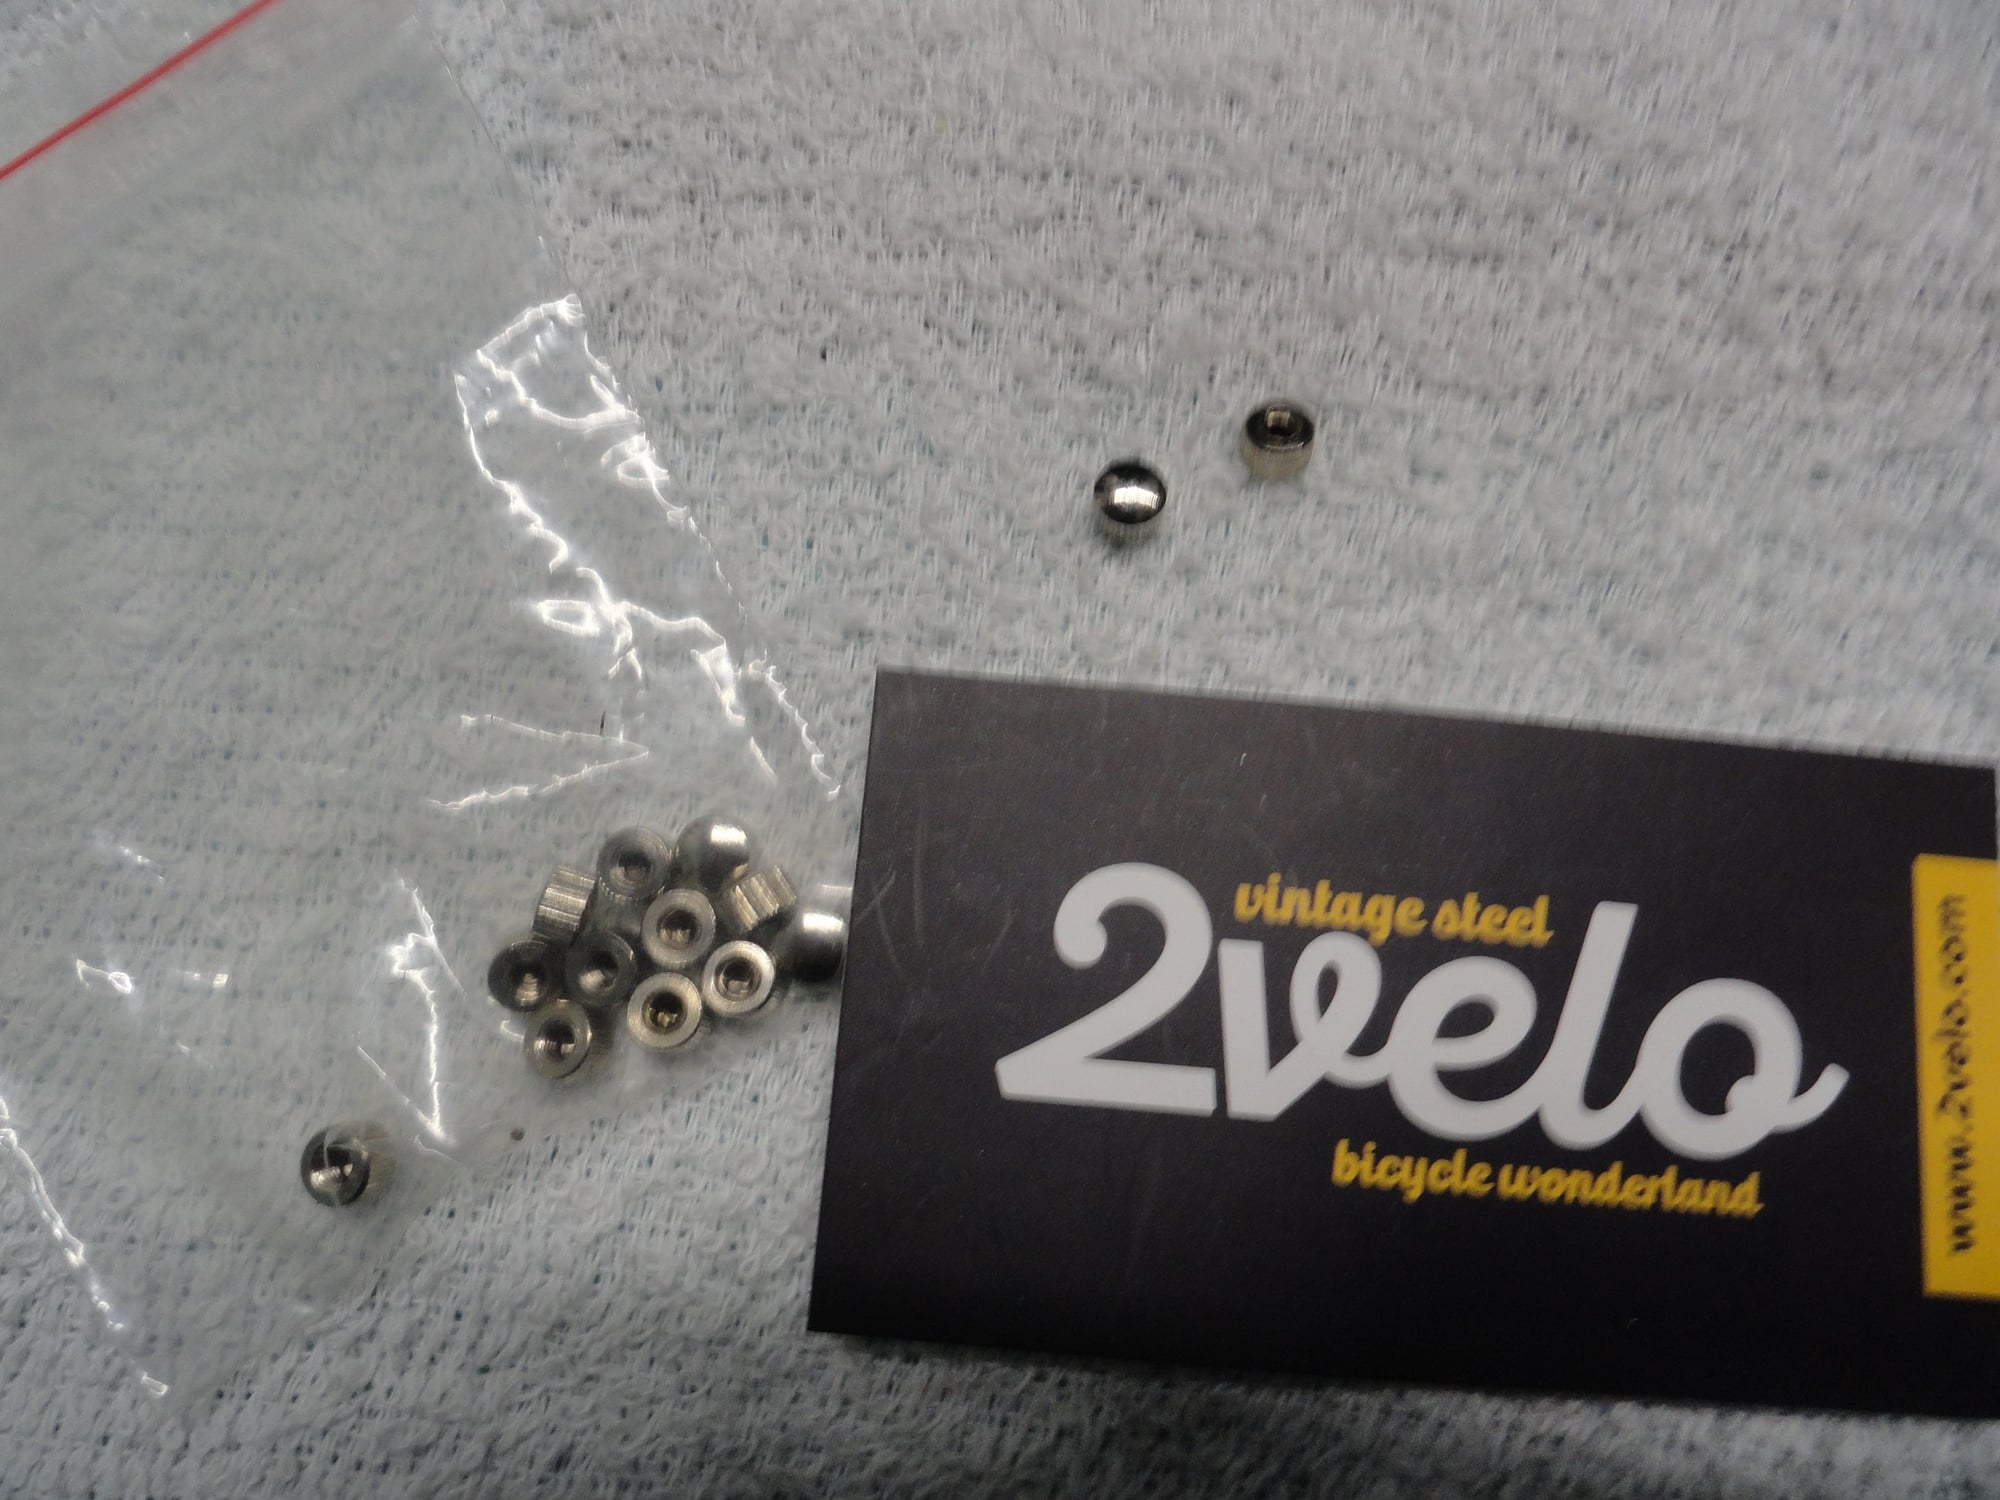
I wound up breaking into the stash for some adjuster nuts. Shameless plug for the supplier.
How they look installed.
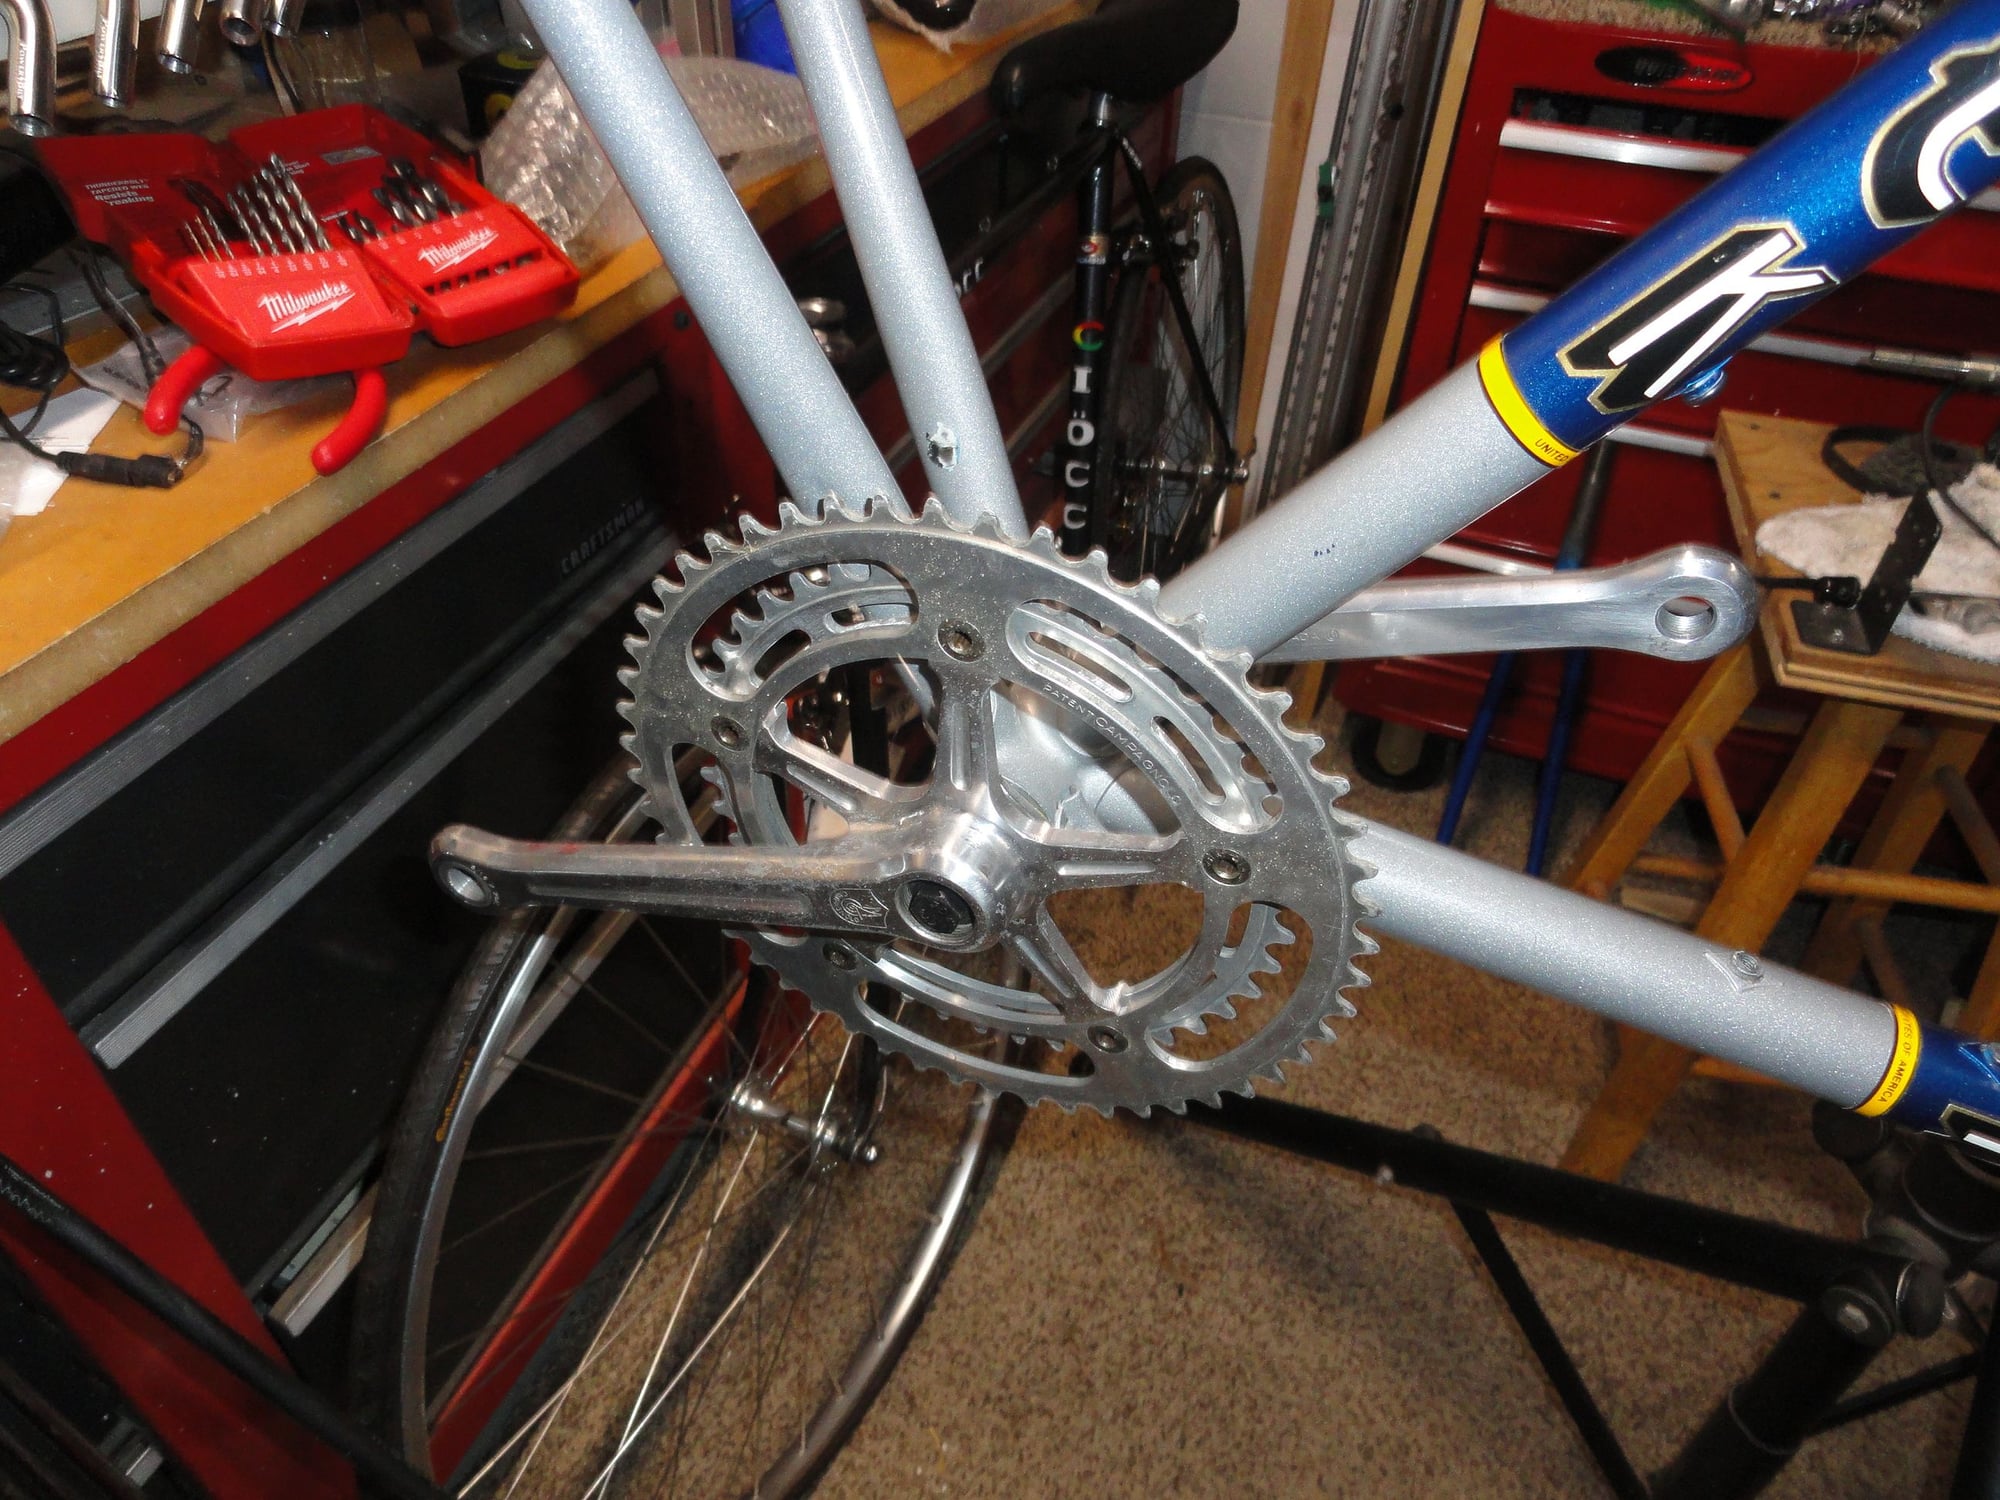
I added the crank arms and there is a slight clearance issue but they fit with a nice Q.
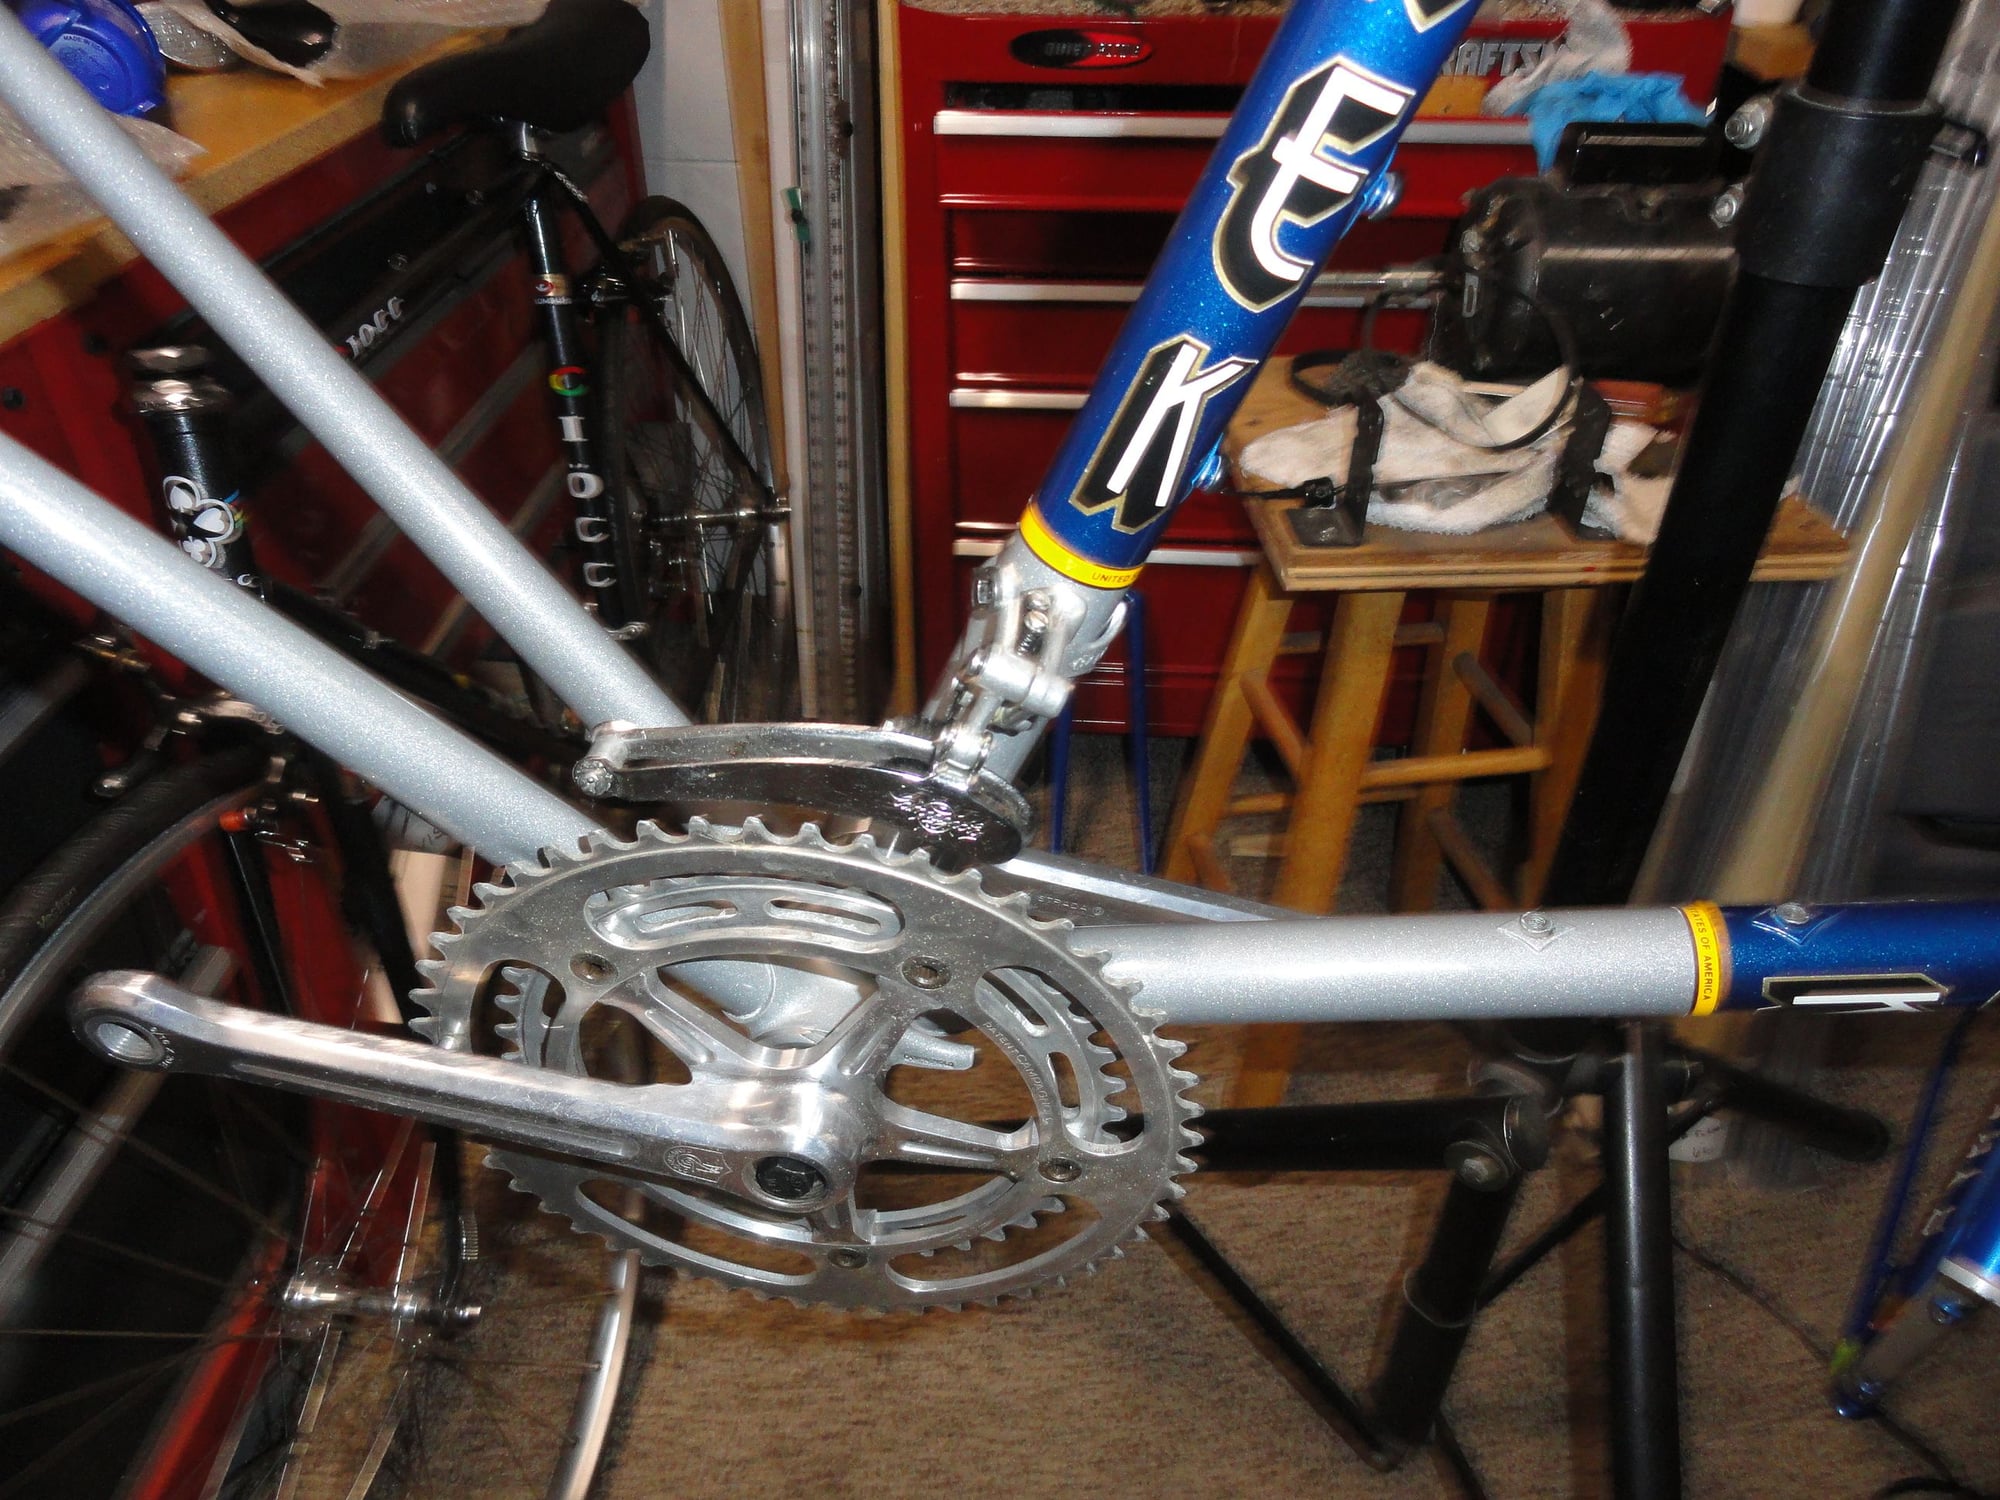
Added the FD and all seems OK.
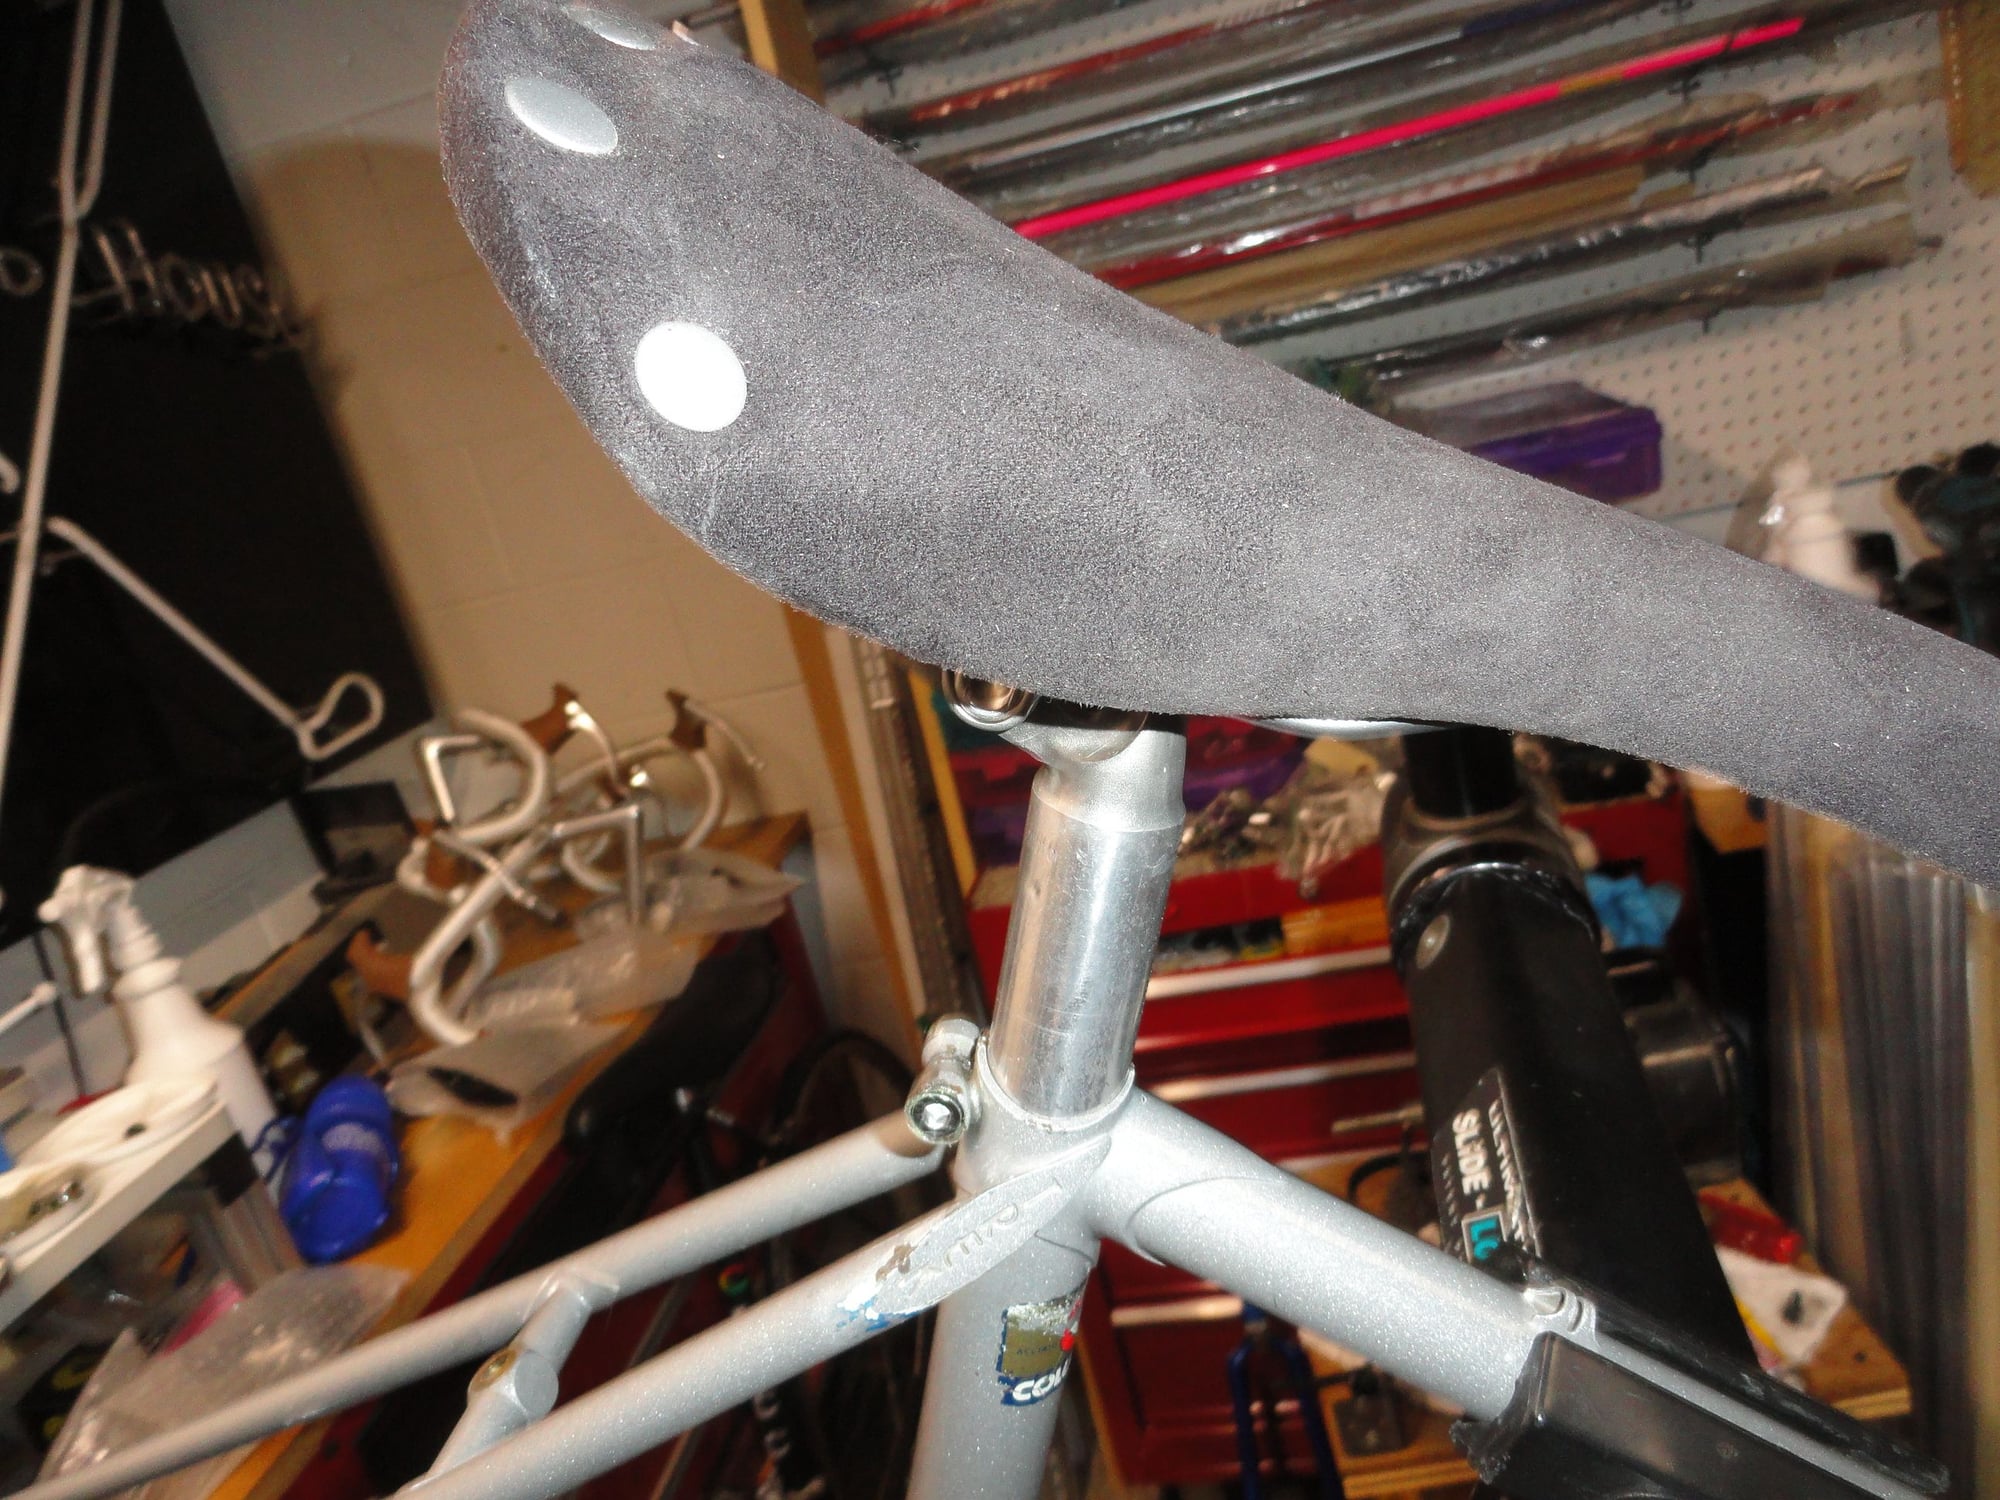
Also added seat post with saddle from a previous build. The cinch bolt was changed from black steel to chrome and shortened for less overhang, and the item was as should be for 1981 is SAE.
Smiles, MH
A decision on the DO adjuster screws, finally settled on the ledge screws which are bit longer and fit a little bit better.
I wound up breaking into the stash for some adjuster nuts. Shameless plug for the supplier.
How they look installed.
I added the crank arms and there is a slight clearance issue but they fit with a nice Q.
Added the FD and all seems OK.
Also added seat post with saddle from a previous build. The cinch bolt was changed from black steel to chrome and shortened for less overhang, and the item was as should be for 1981 is SAE.
Smiles, MH
Last edited by Mad Honk; 04-07-24 at 04:00 PM.
Likes For Mad Honk:
04-09-24, 03:25 PM
#17
Senior Member
Thread Starter
Join Date: May 2019
Location: Bloomington, IN
Posts: 2,950
Bikes: Paramount, Faggin, Ochsner, Ciocc, Basso
Mentioned: 117 Post(s)
Tagged: 0 Thread(s)
Quoted: 1303 Post(s)
Liked 1,912 Times
in
1,142 Posts
Well folks,
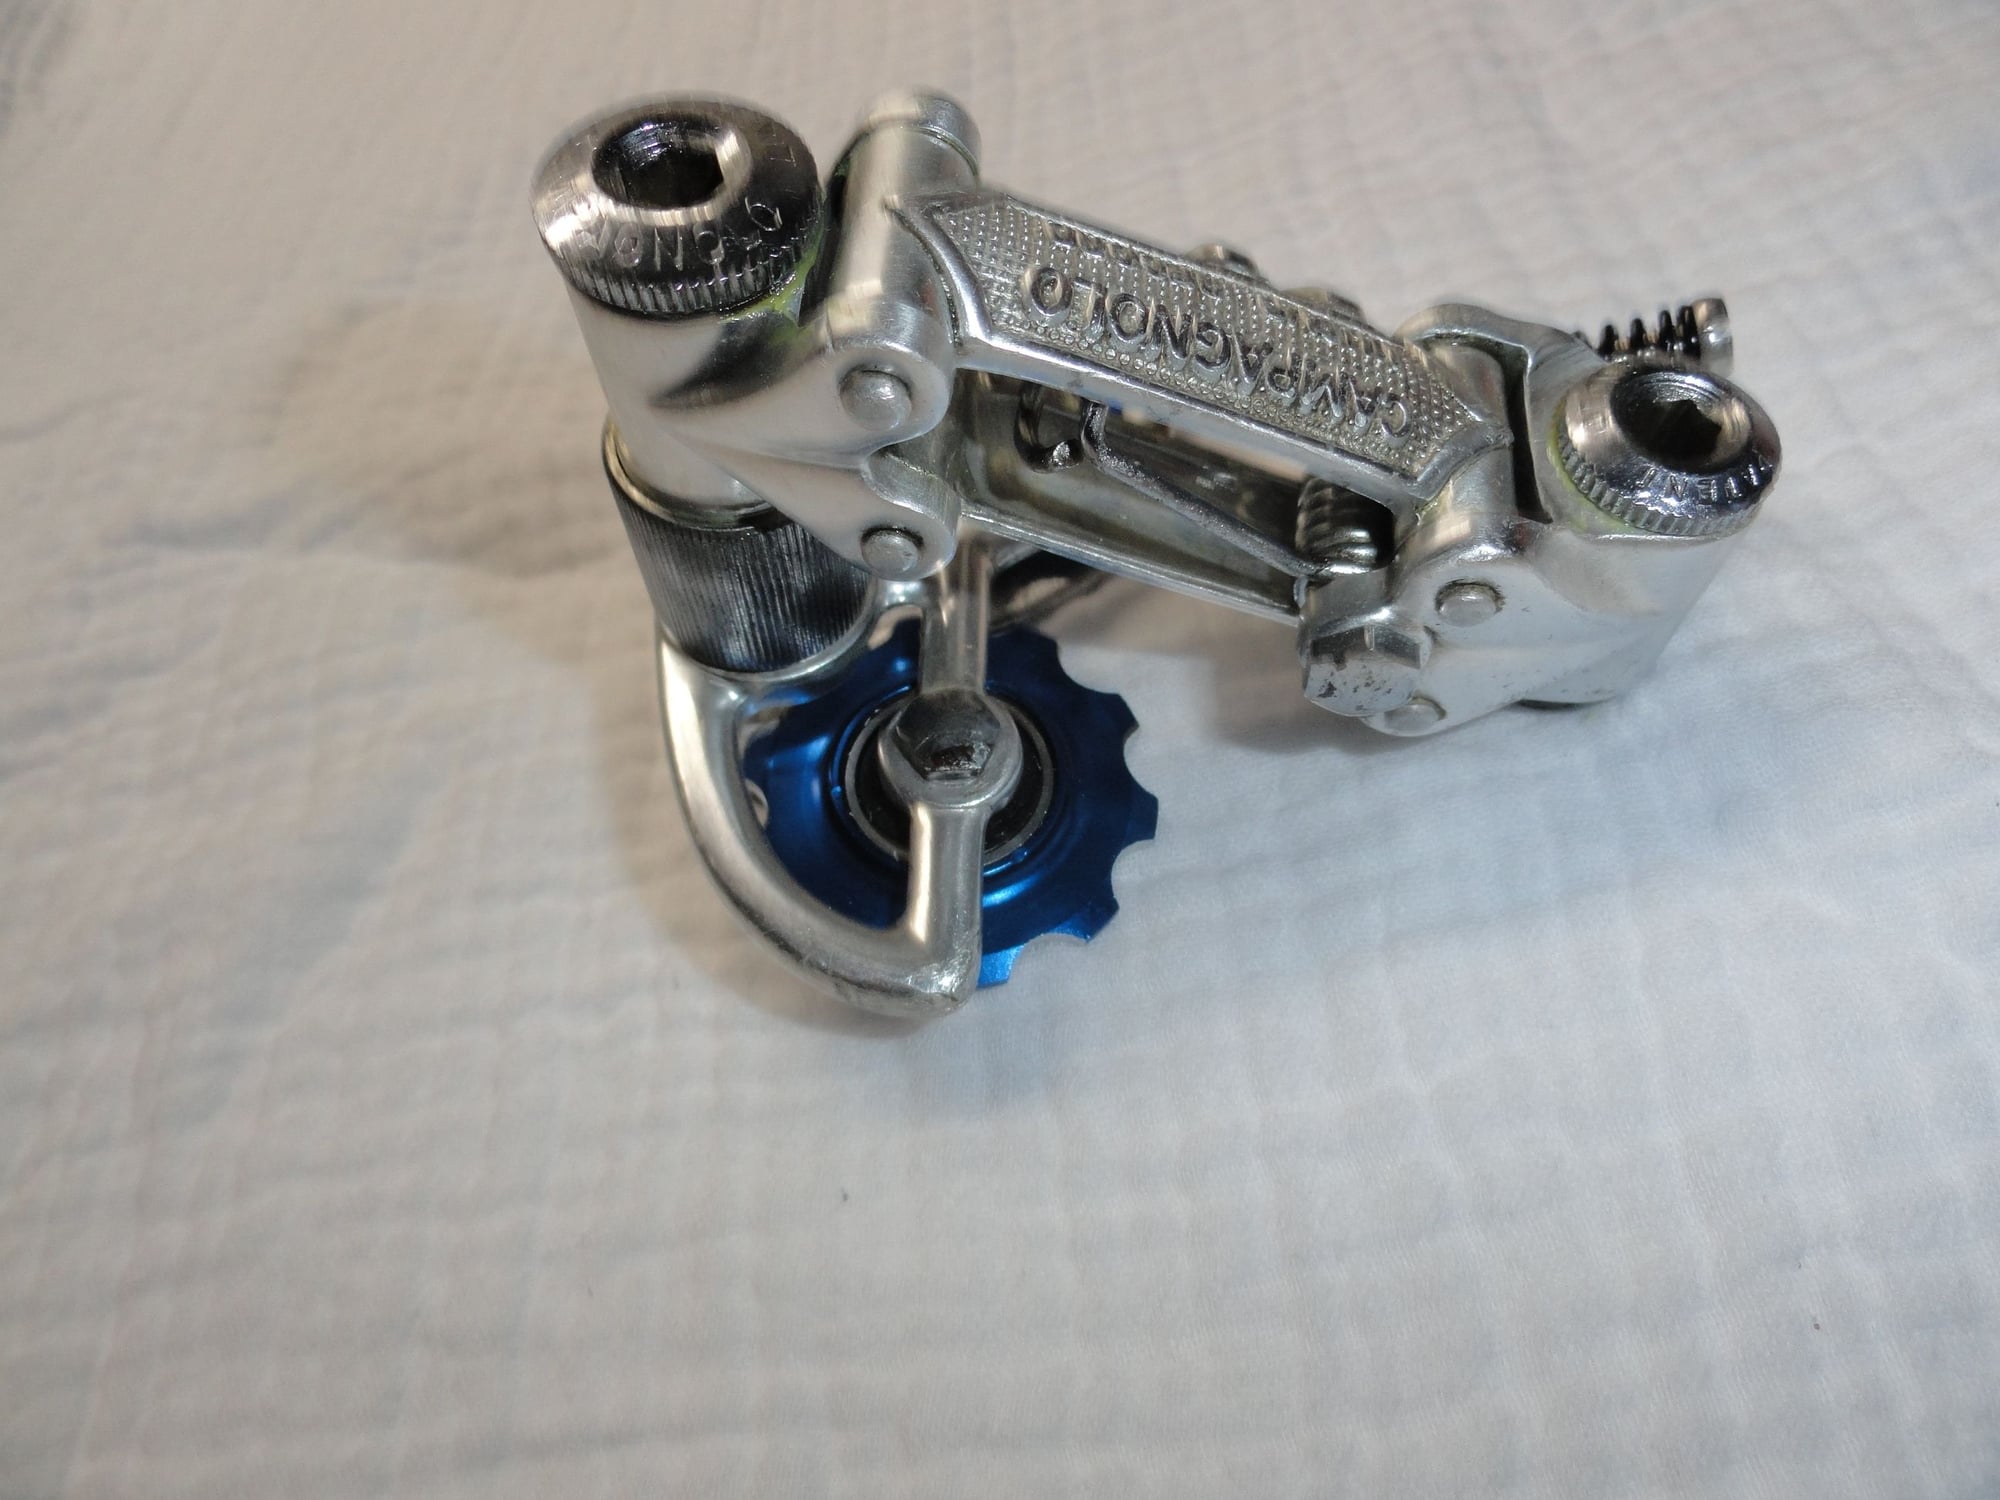
I think a case of Cranio-Rectalitis has attacked me! I started worrying about the close clearance on the chainrings to chain stay, and wound up changing to a different bottom bracket likely post CPSC and got about 2mm more clearance. And next up was the non-matching jockey wheels on the rear derailleur, so an overhaul is in order to correct the issue. I went to the stash of neglected NR parts and found this example of what should be a bit more matchy-matchy when finished. Pics:

The red wheels are supposed to go faster, but they just kinda clash with the blue and silver of the frame.
Blue panel on silver frame, so I think I can change a few parts out and get to something more appropriate.
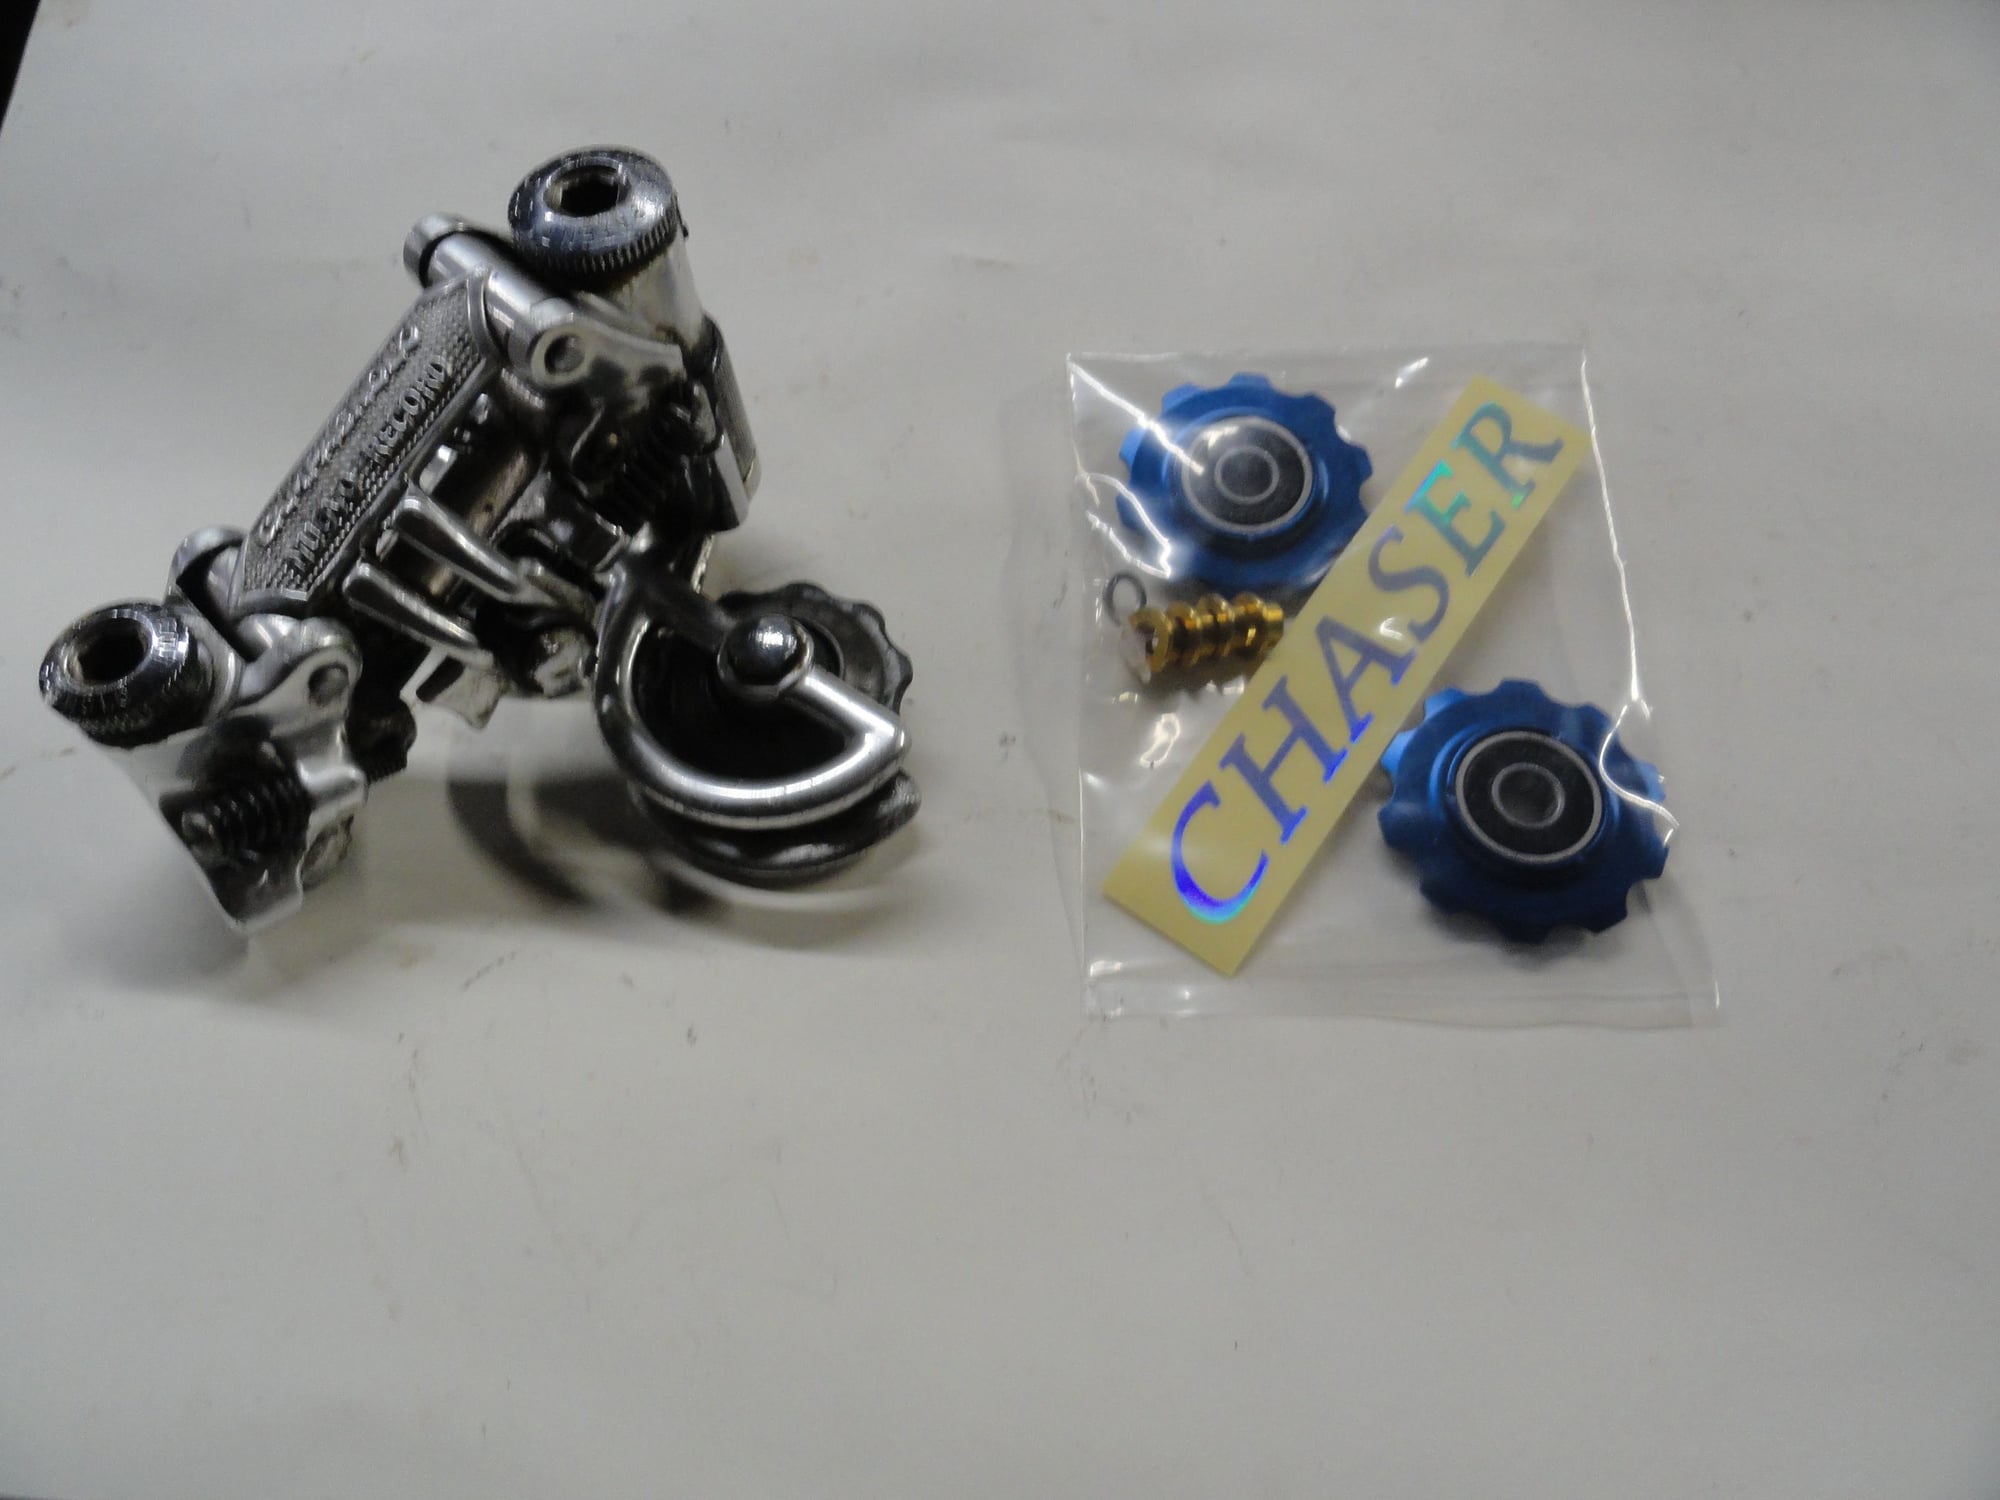
Another NR that needs overhauling, and the eventual jockeys that should fit the paint scheme a bit better.
Smiles, MH
I think a case of Cranio-Rectalitis has attacked me! I started worrying about the close clearance on the chainrings to chain stay, and wound up changing to a different bottom bracket likely post CPSC and got about 2mm more clearance. And next up was the non-matching jockey wheels on the rear derailleur, so an overhaul is in order to correct the issue. I went to the stash of neglected NR parts and found this example of what should be a bit more matchy-matchy when finished. Pics:
The red wheels are supposed to go faster, but they just kinda clash with the blue and silver of the frame.
Blue panel on silver frame, so I think I can change a few parts out and get to something more appropriate.
Another NR that needs overhauling, and the eventual jockeys that should fit the paint scheme a bit better.
Smiles, MH
04-09-24, 04:45 PM
#18
Senior Member
Thread Starter
Join Date: May 2019
Location: Bloomington, IN
Posts: 2,950
Bikes: Paramount, Faggin, Ochsner, Ciocc, Basso
Mentioned: 117 Post(s)
Tagged: 0 Thread(s)
Quoted: 1303 Post(s)
Liked 1,912 Times
in
1,142 Posts
Wow!
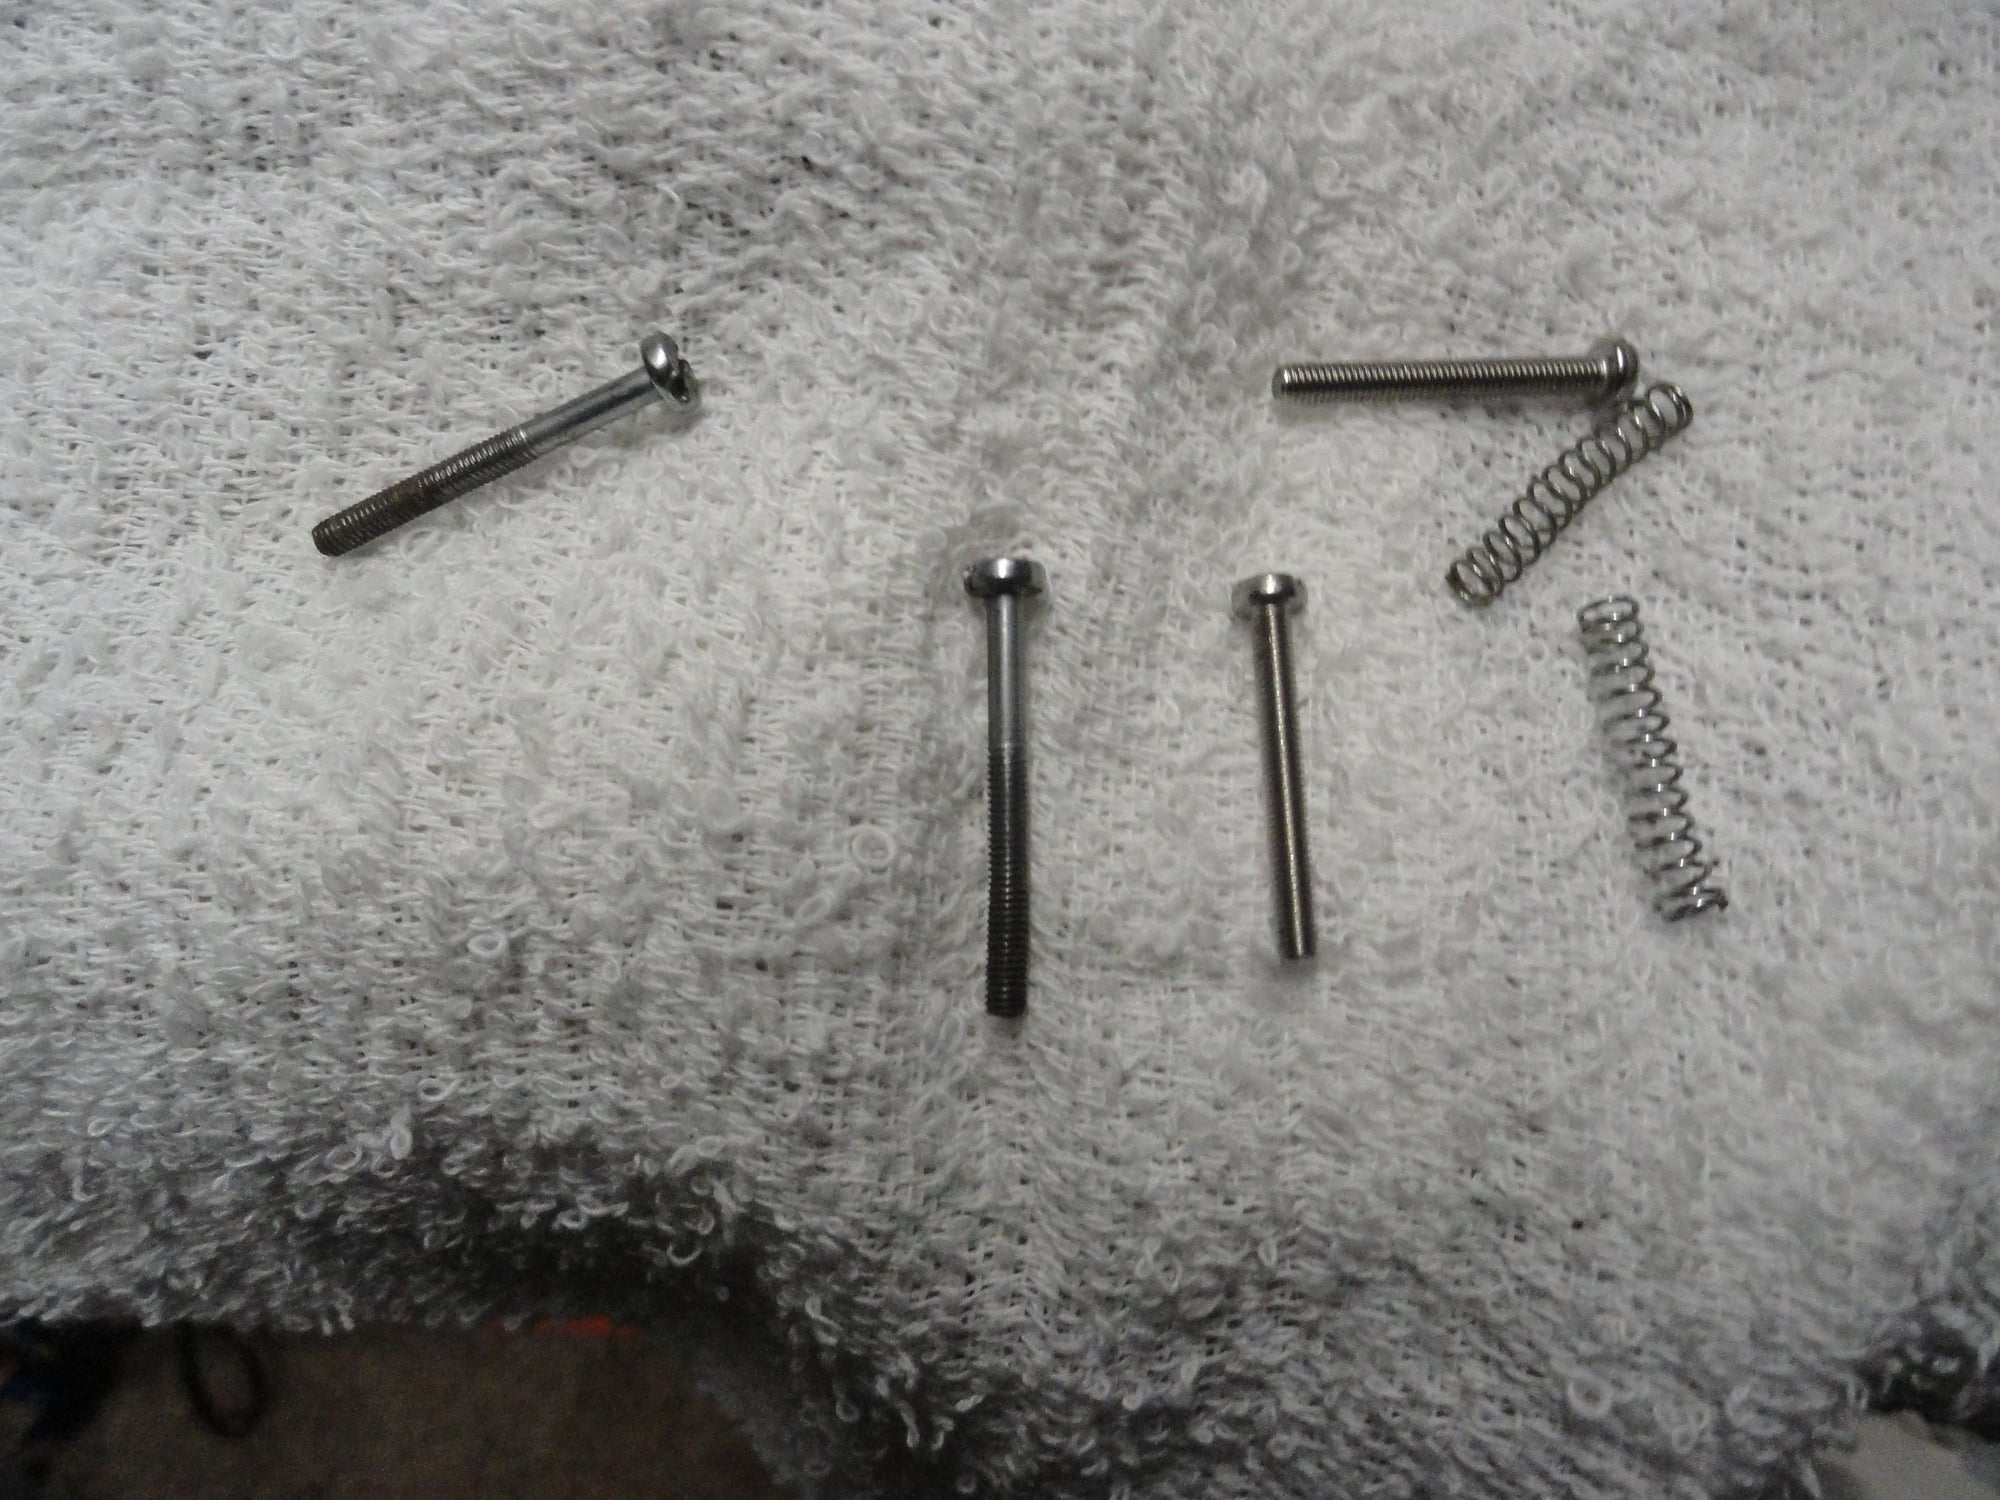
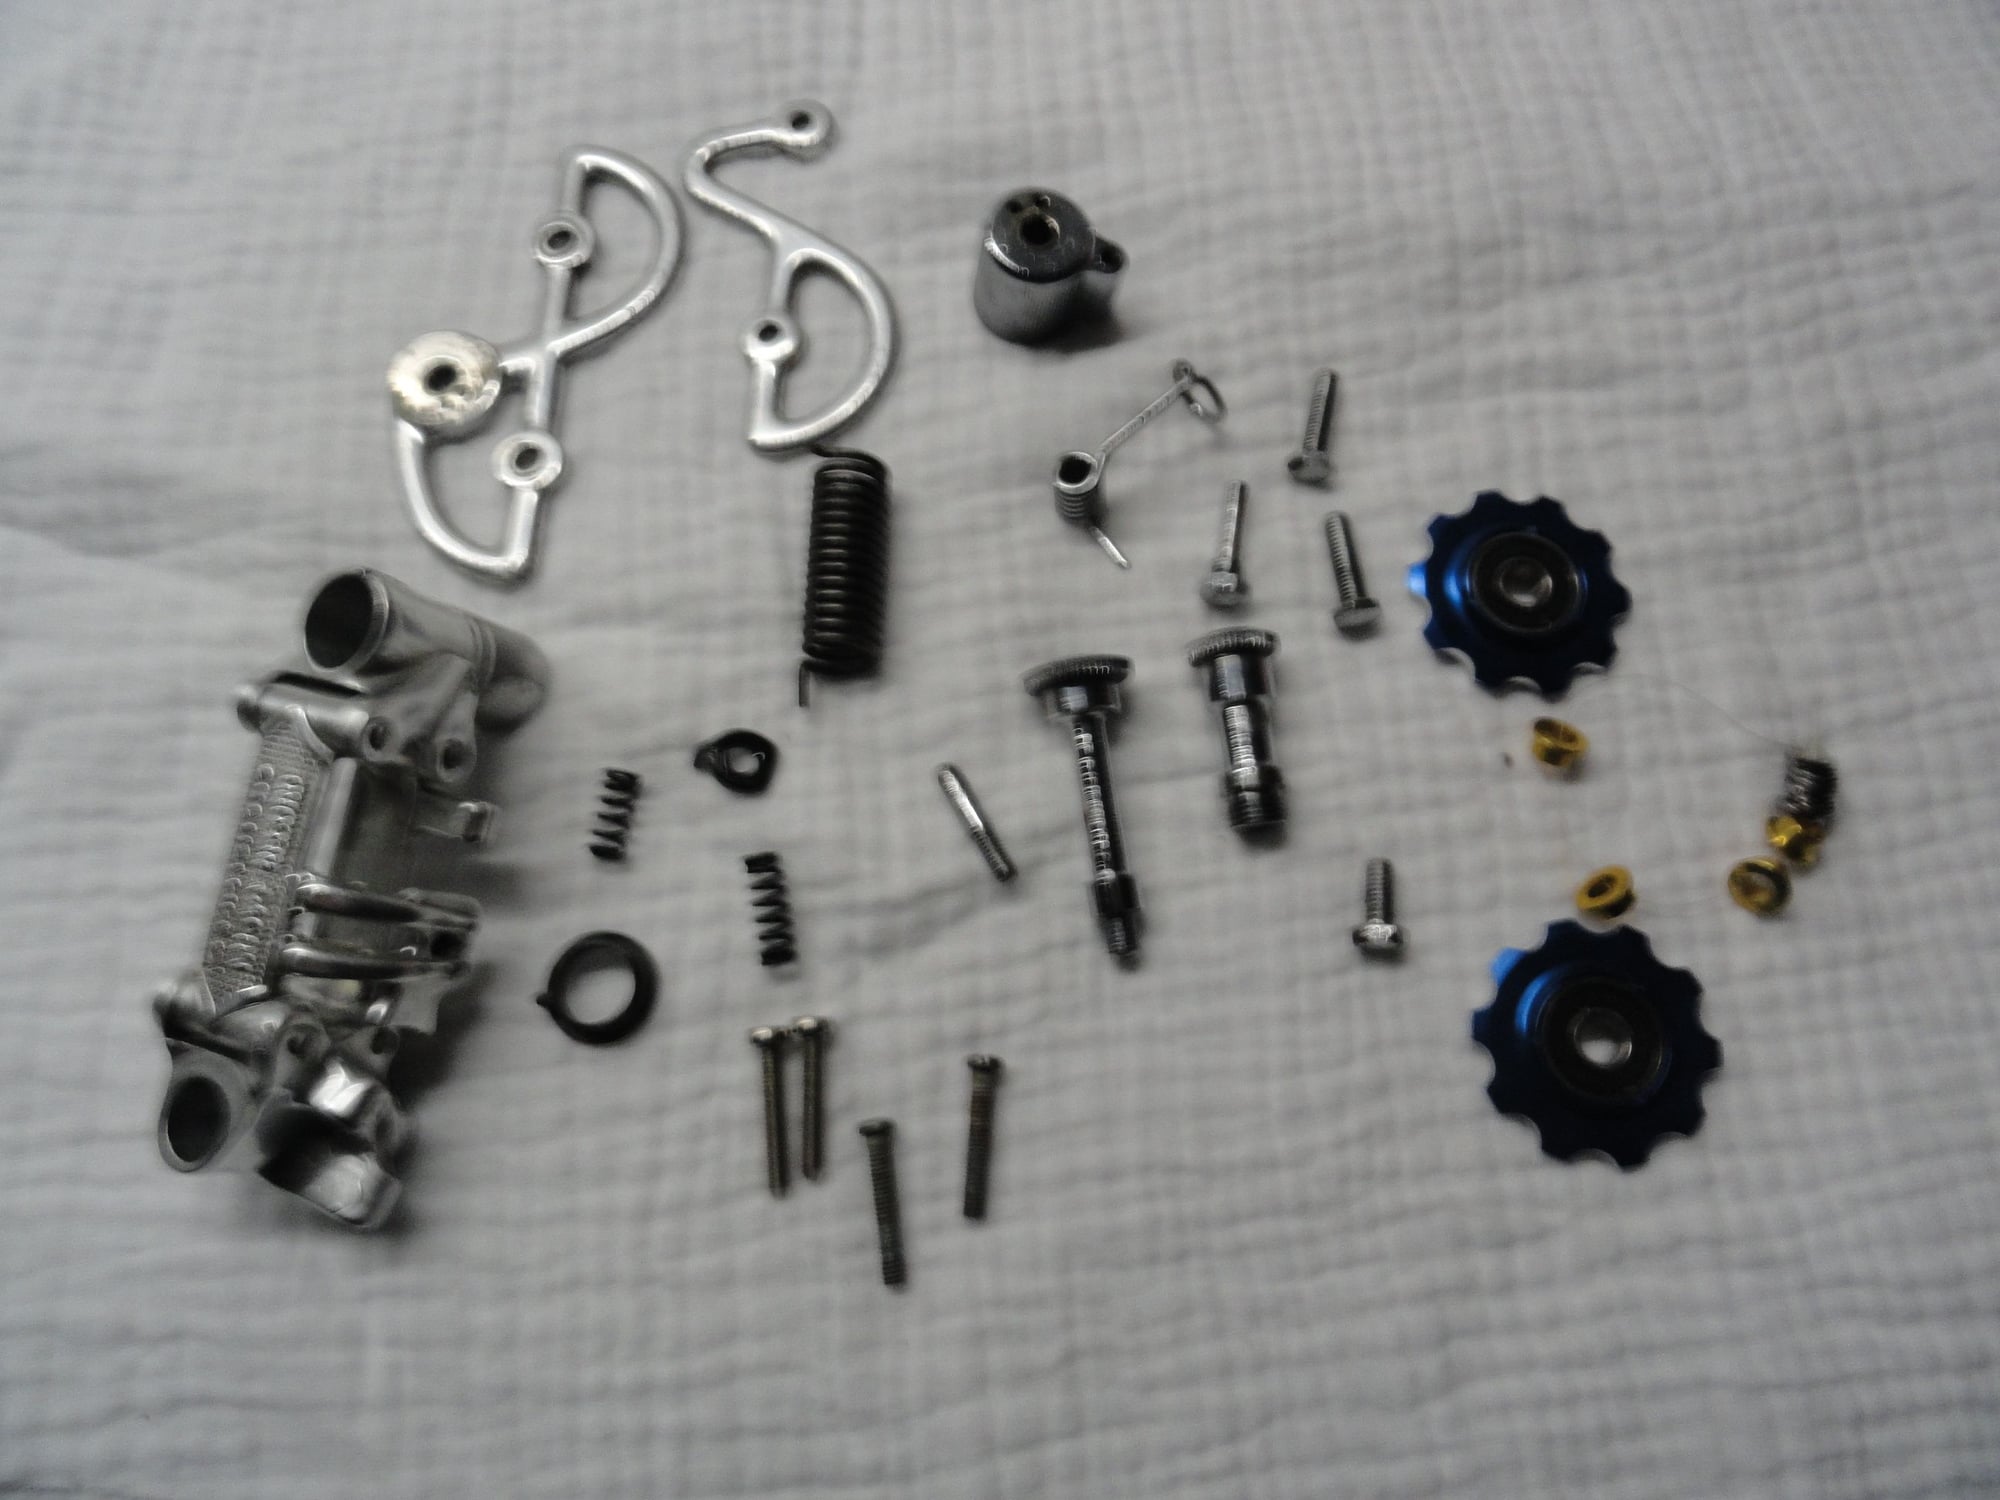
How filthy can one derailleur get? This one looks like it had a bath in black moly lube and dirt. Degraded aluminum bits and grease that really needed some cleaning. I have the parts out of the solvent and a few items are going to get some protective paint before going back together. The adjustor screws will be replaced with stainless steel since they get a lot of dirt and water contamination.
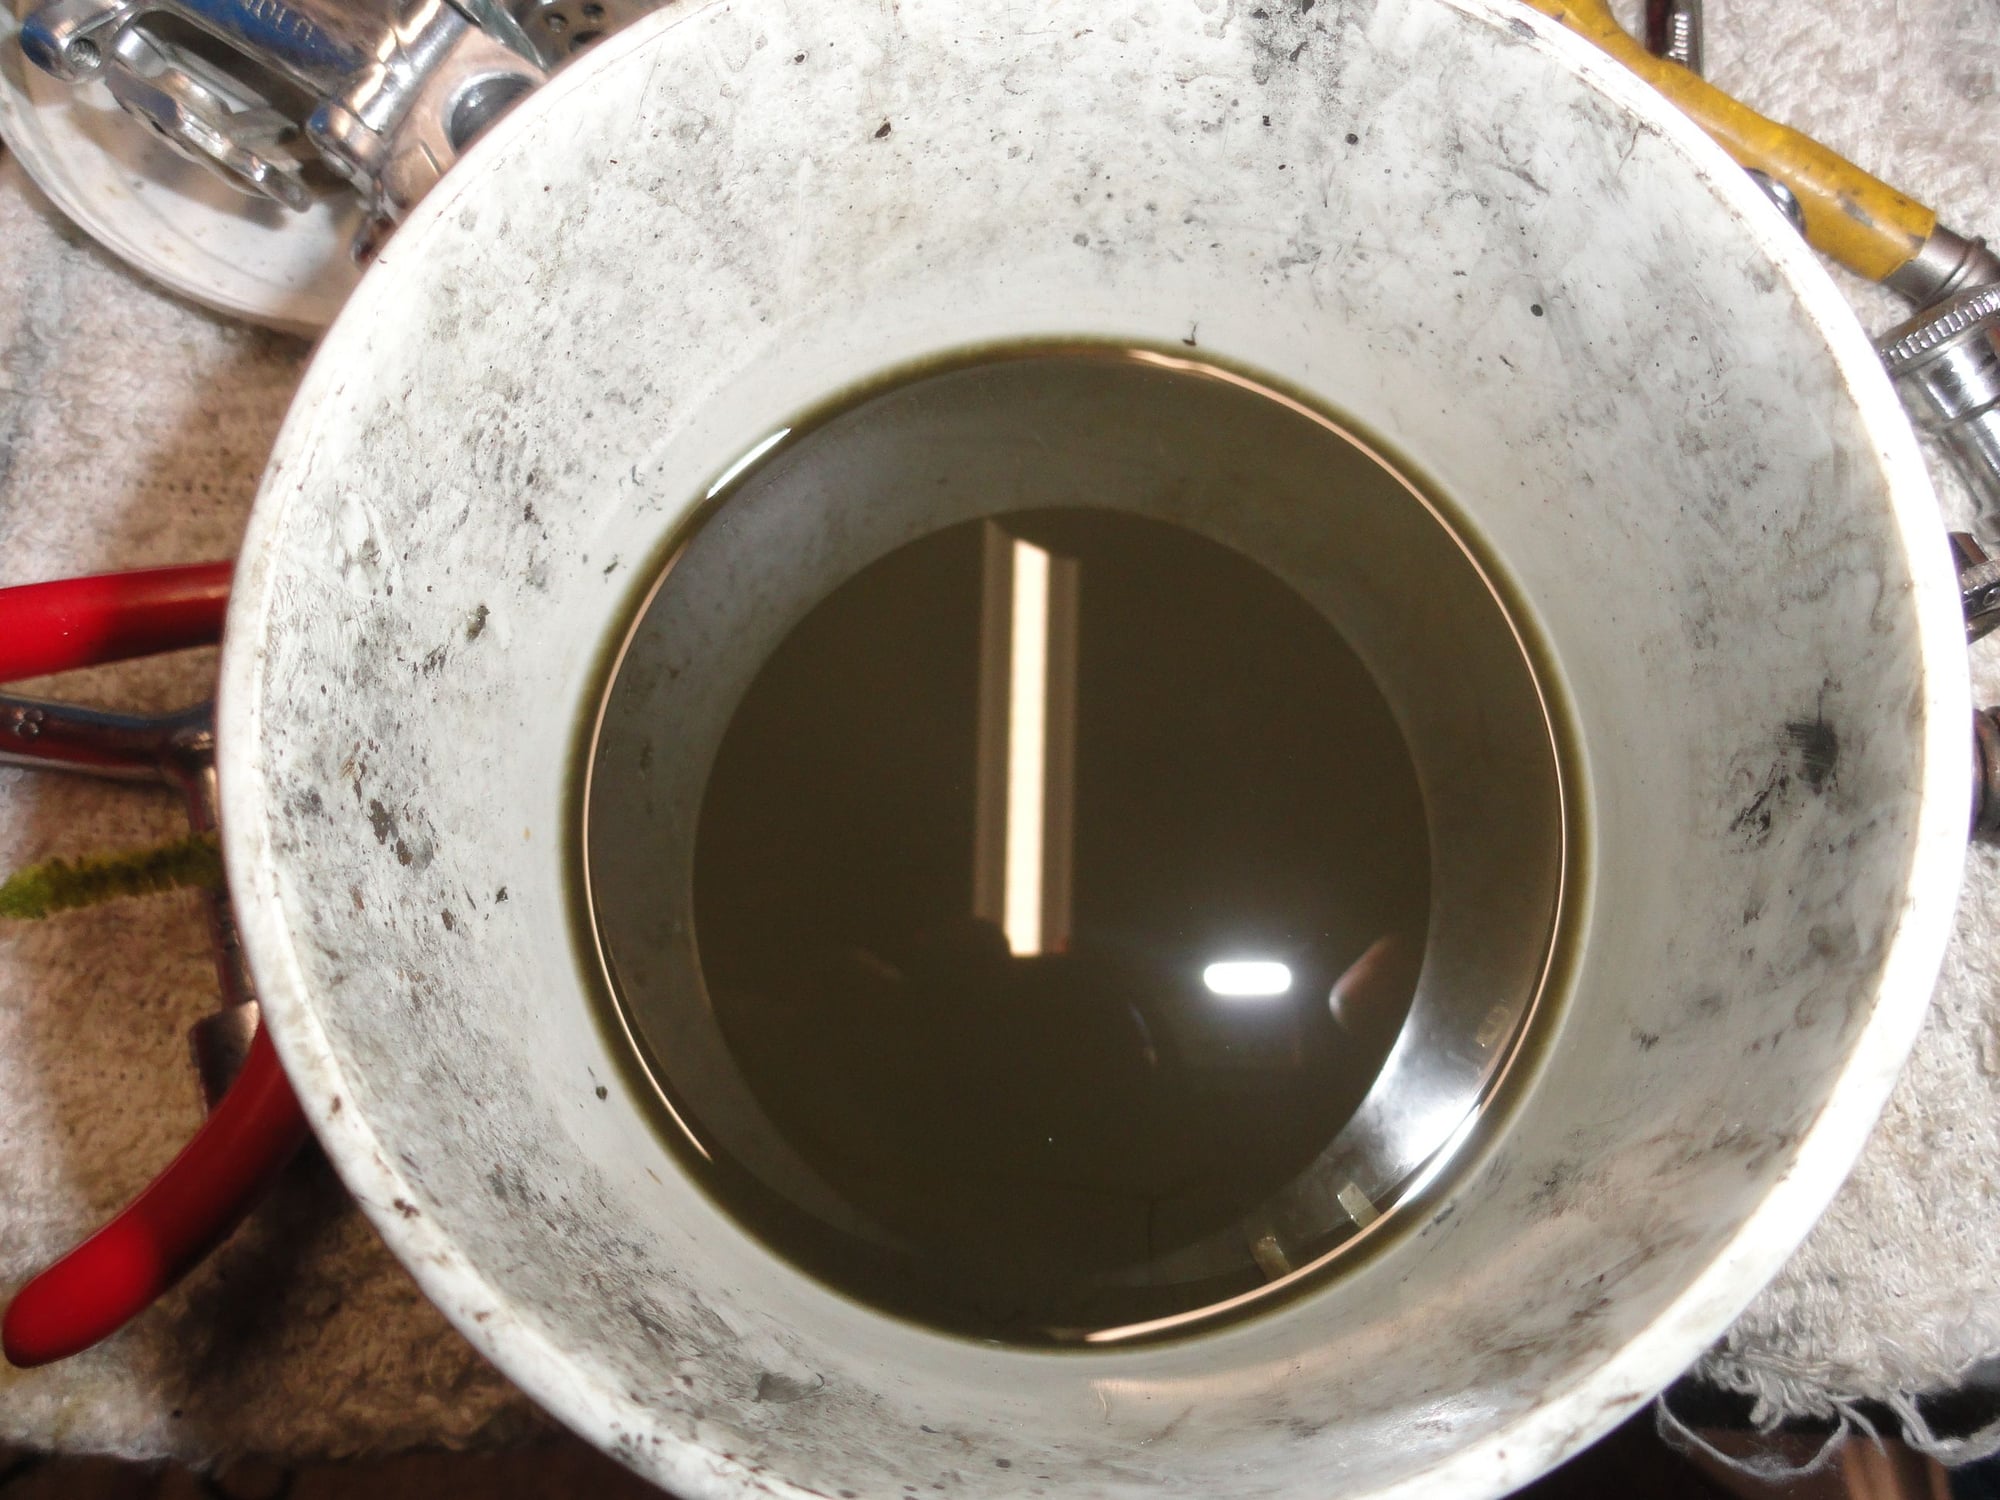
The cleaning solvent after a first wash. Notice how black the solvent is from the dirt and degraded aluminum that was on the derailleur. A second wash and some cleaning and parts will get a clear coat to protect the finish.
After the parts are clear coated and new screws sourced I will post some pictures of the re-assembly. Smiles, MH
How filthy can one derailleur get? This one looks like it had a bath in black moly lube and dirt. Degraded aluminum bits and grease that really needed some cleaning. I have the parts out of the solvent and a few items are going to get some protective paint before going back together. The adjustor screws will be replaced with stainless steel since they get a lot of dirt and water contamination.
The cleaning solvent after a first wash. Notice how black the solvent is from the dirt and degraded aluminum that was on the derailleur. A second wash and some cleaning and parts will get a clear coat to protect the finish.
After the parts are clear coated and new screws sourced I will post some pictures of the re-assembly. Smiles, MH
Likes For Mad Honk:
04-10-24, 10:47 AM
#19
Senior Member
Thread Starter
Join Date: May 2019
Location: Bloomington, IN
Posts: 2,950
Bikes: Paramount, Faggin, Ochsner, Ciocc, Basso
Mentioned: 117 Post(s)
Tagged: 0 Thread(s)
Quoted: 1303 Post(s)
Liked 1,912 Times
in
1,142 Posts
A new day for this build. The RD is cleaned and ready for re-assembly and after about an hour it will be ready to be back on a bike and ready for a few thousand miles. Pics:
Everything has been cleaned and ready for service again. Note the new stainless screws for the adjustors, and the Chaser Tech sealed bearing pulleys.
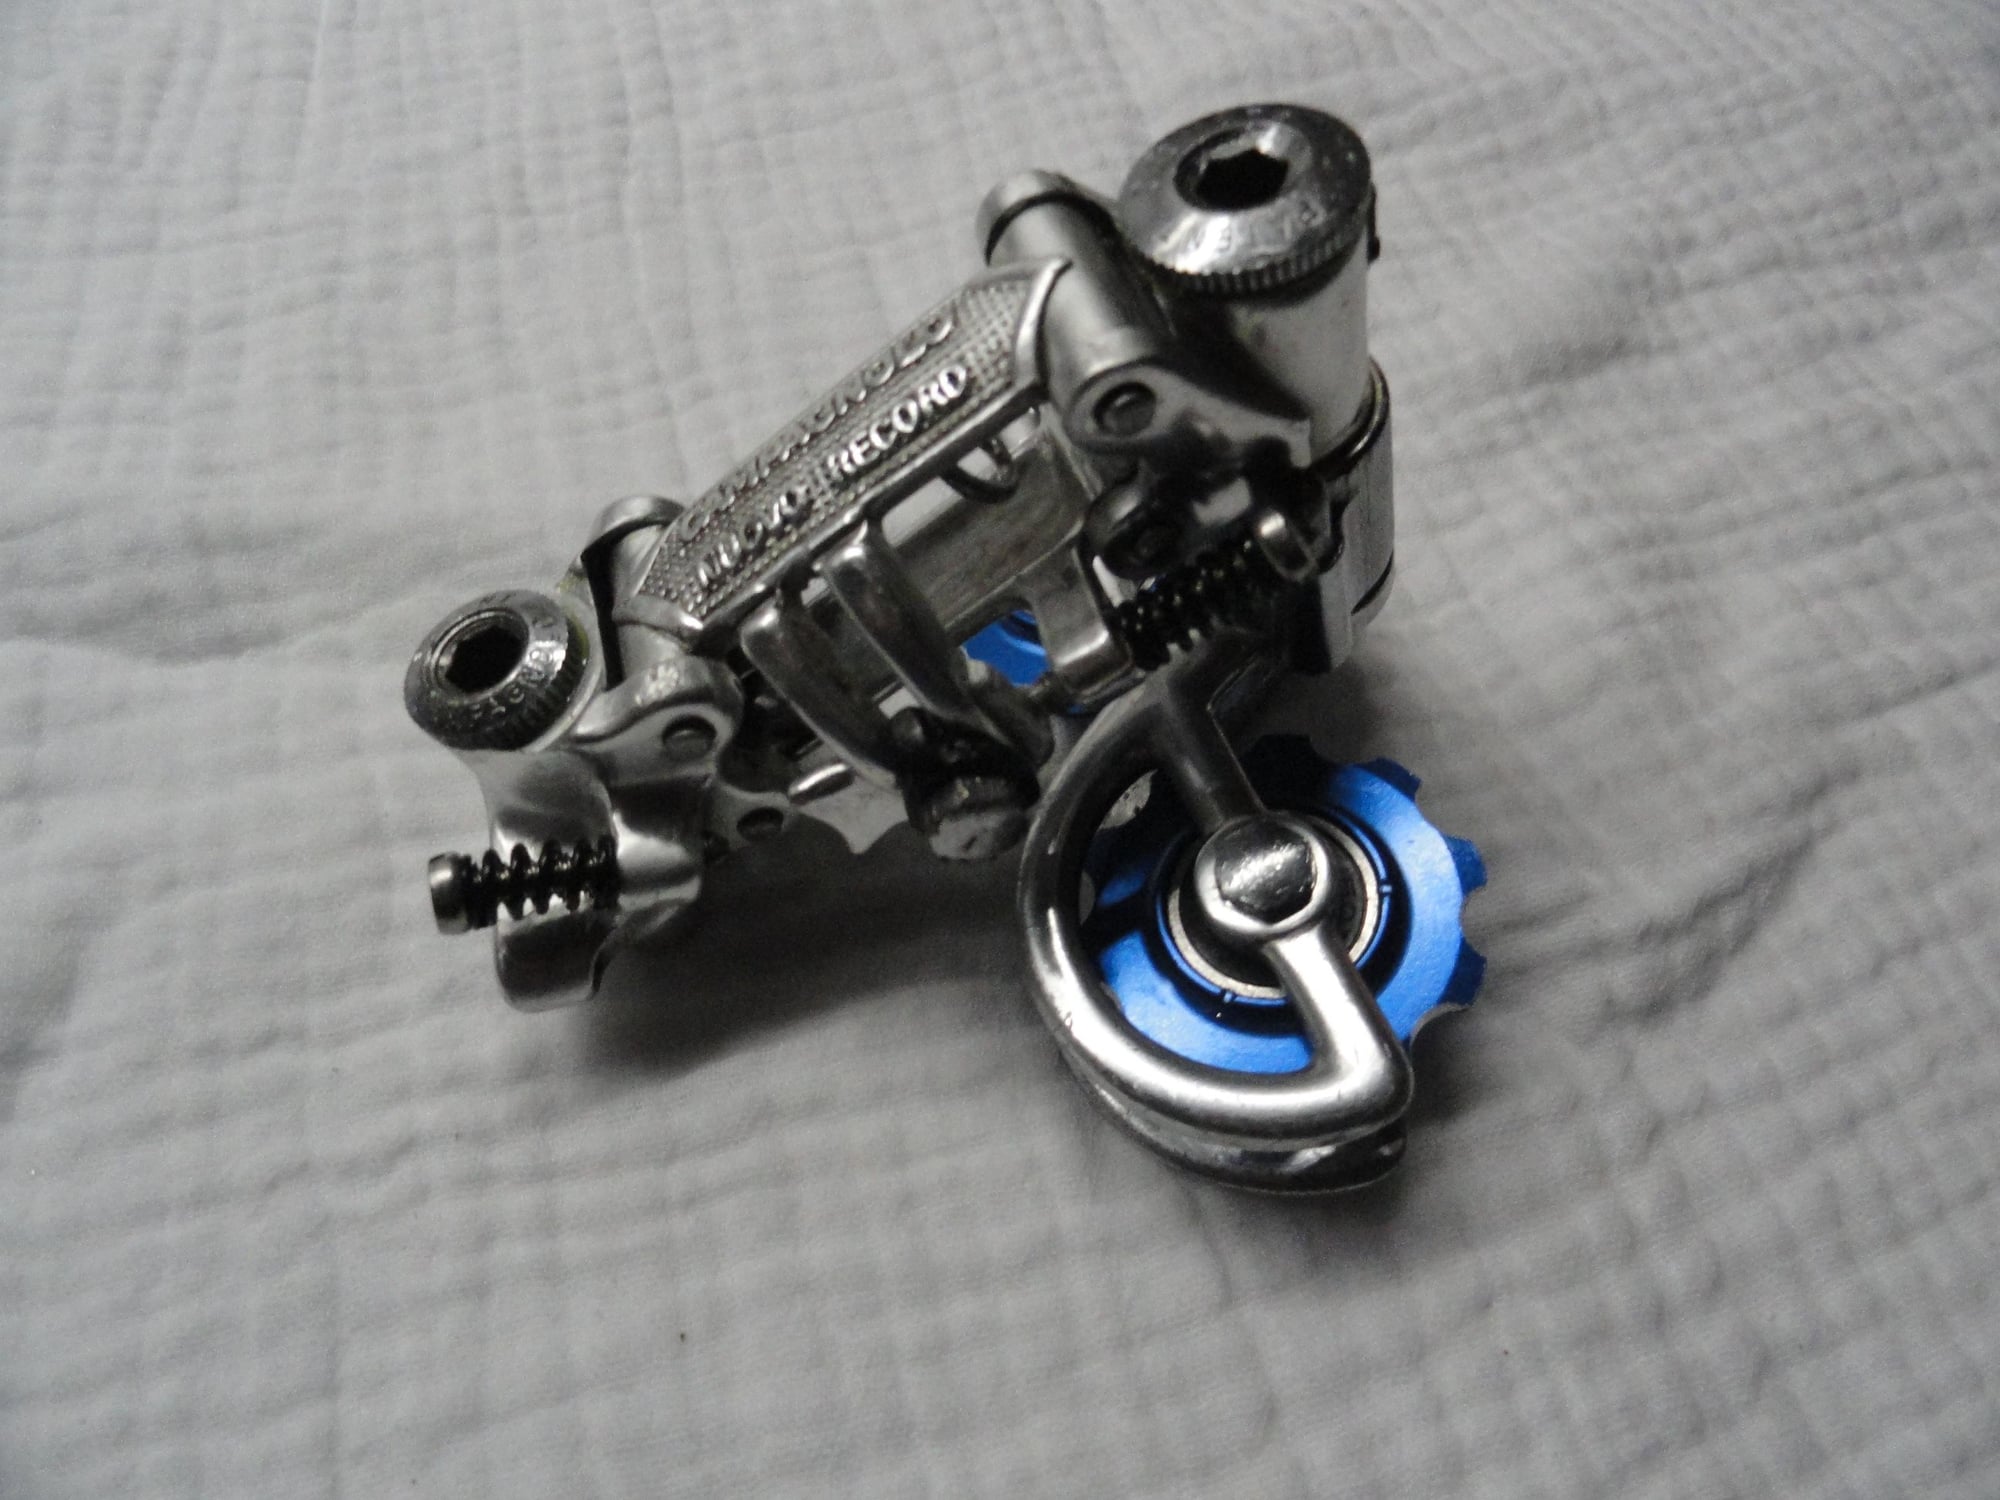
Back together and now ready to go on the 950.
Another view of the RD in the cleaned condition with refurbished screws and pulleys.
Next up; some brake caliper rebuild action to go from bolt through posts to recessed. Smiles, MH
Everything has been cleaned and ready for service again. Note the new stainless screws for the adjustors, and the Chaser Tech sealed bearing pulleys.
Back together and now ready to go on the 950.
Another view of the RD in the cleaned condition with refurbished screws and pulleys.
Next up; some brake caliper rebuild action to go from bolt through posts to recessed. Smiles, MH
04-10-24, 02:08 PM
#20
Senior Member
Thread Starter
Join Date: May 2019
Location: Bloomington, IN
Posts: 2,950
Bikes: Paramount, Faggin, Ochsner, Ciocc, Basso
Mentioned: 117 Post(s)
Tagged: 0 Thread(s)
Quoted: 1303 Post(s)
Liked 1,912 Times
in
1,142 Posts
Lamont,
If you have questions or want more pictures lemme know. I can post things like thread sizes for drop out screws, and other frame items. The tap size today for the DO adjustors is 3X.5 and is probably the smallest one you need for a bike frame. I am hoping my posts help younger mechanics out. Smiles, MH
If you have questions or want more pictures lemme know. I can post things like thread sizes for drop out screws, and other frame items. The tap size today for the DO adjustors is 3X.5 and is probably the smallest one you need for a bike frame. I am hoping my posts help younger mechanics out. Smiles, MH
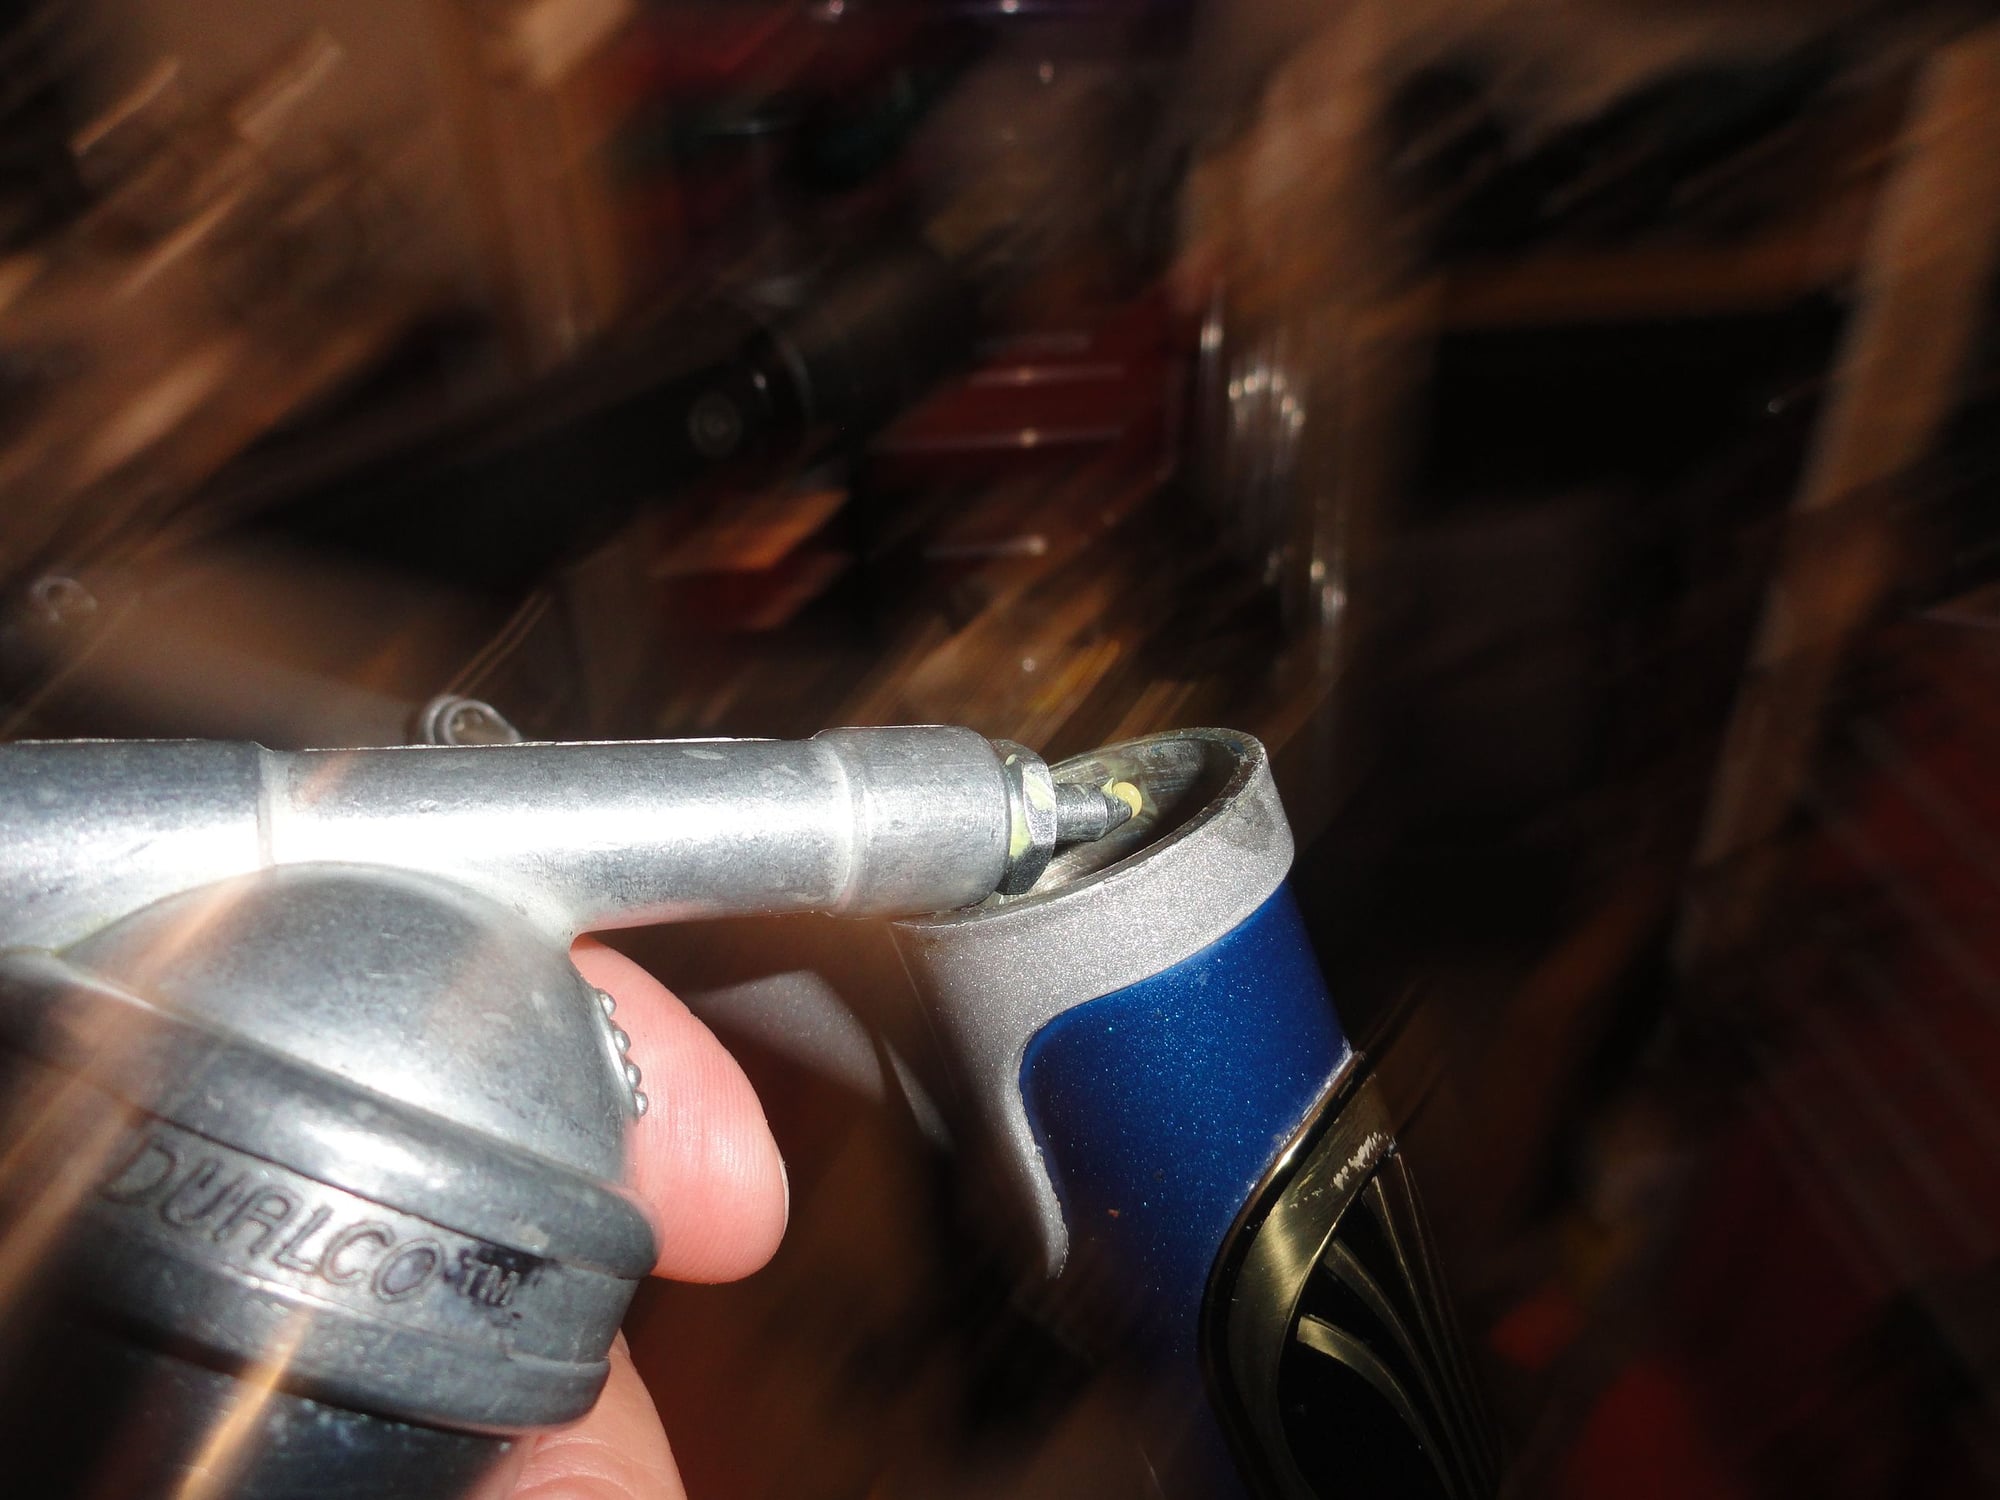
The threads on the NR adjusters are 4mm X.7mm I used the same hand held tap wrench to chase the threads in the derailleur body. The body is aluminum so it can deform a bit during use, so I like to clean the threads before re-assembly. Smiles, MH
Last edited by Mad Honk; 04-10-24 at 05:07 PM.
04-12-24, 04:58 PM
#21
Senior Member
Thread Starter
Join Date: May 2019
Location: Bloomington, IN
Posts: 2,950
Bikes: Paramount, Faggin, Ochsner, Ciocc, Basso
Mentioned: 117 Post(s)
Tagged: 0 Thread(s)
Quoted: 1303 Post(s)
Liked 1,912 Times
in
1,142 Posts
Well folks,
This one went off the rails when I grabbed a rear wheel to fit in to check brake caliper clearance. The wheel was off a Raleigh that had a smaller over lock nut dimension that this frame needs. So it is off to the hub box to find a replacement, A suitable hub in 36 hole is located, cleaned and polished and here are the pictures of the hub before and after:
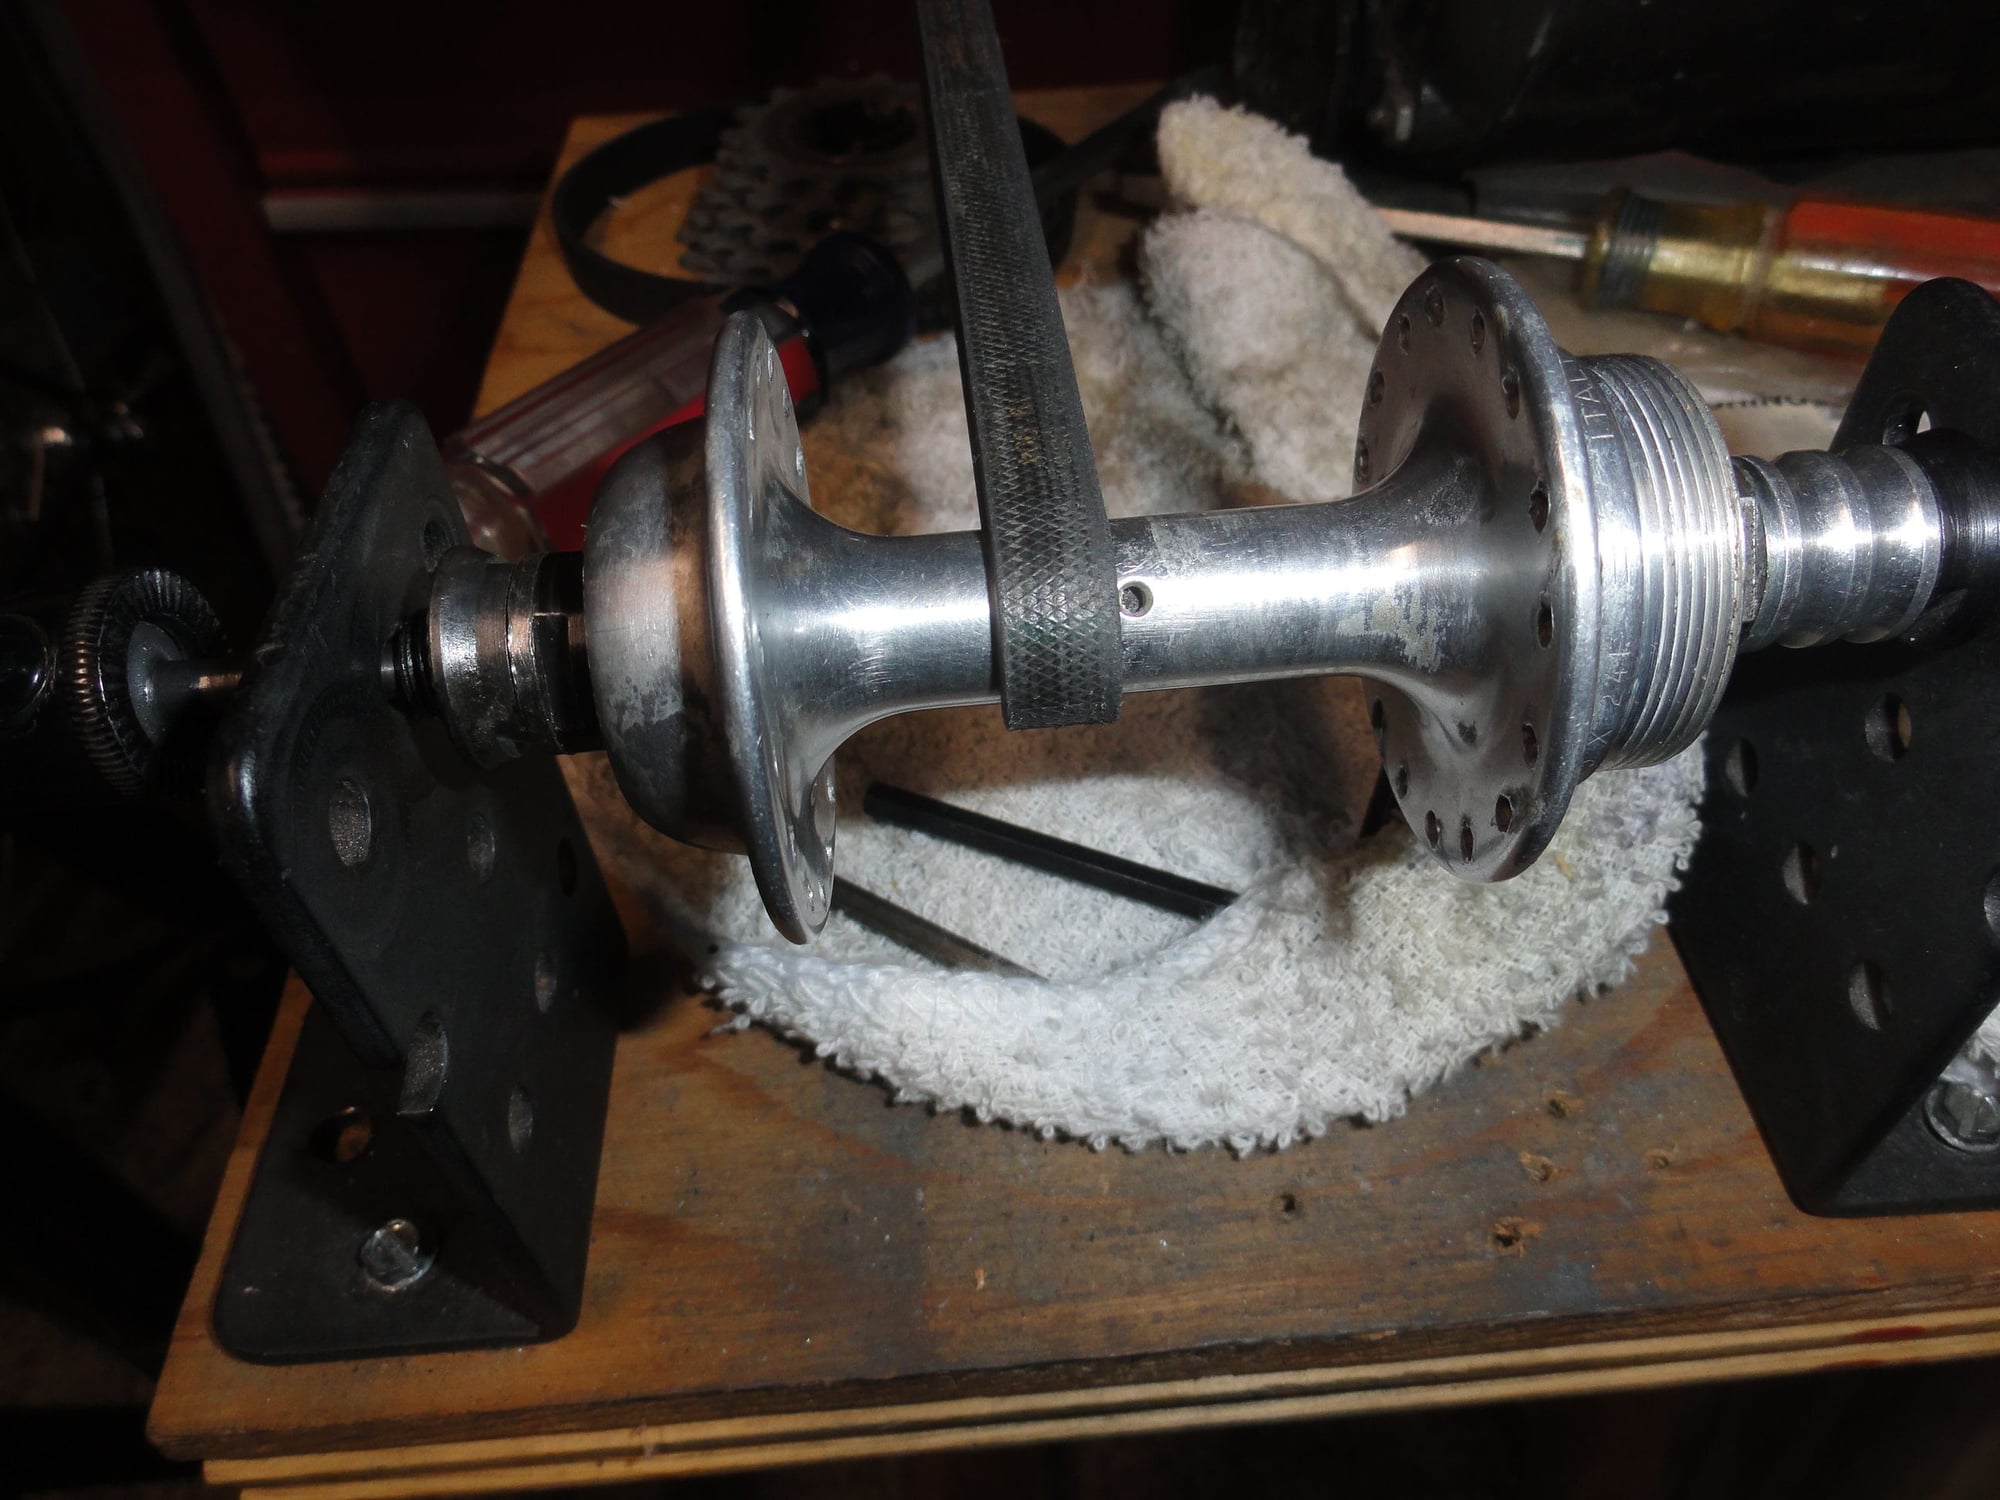
The hub in the polishing mechanism. It is a 1/2 hp motor with a vacuum cleaner belt that wraps around the hub shell. note the oxidized aluminum on the shell.
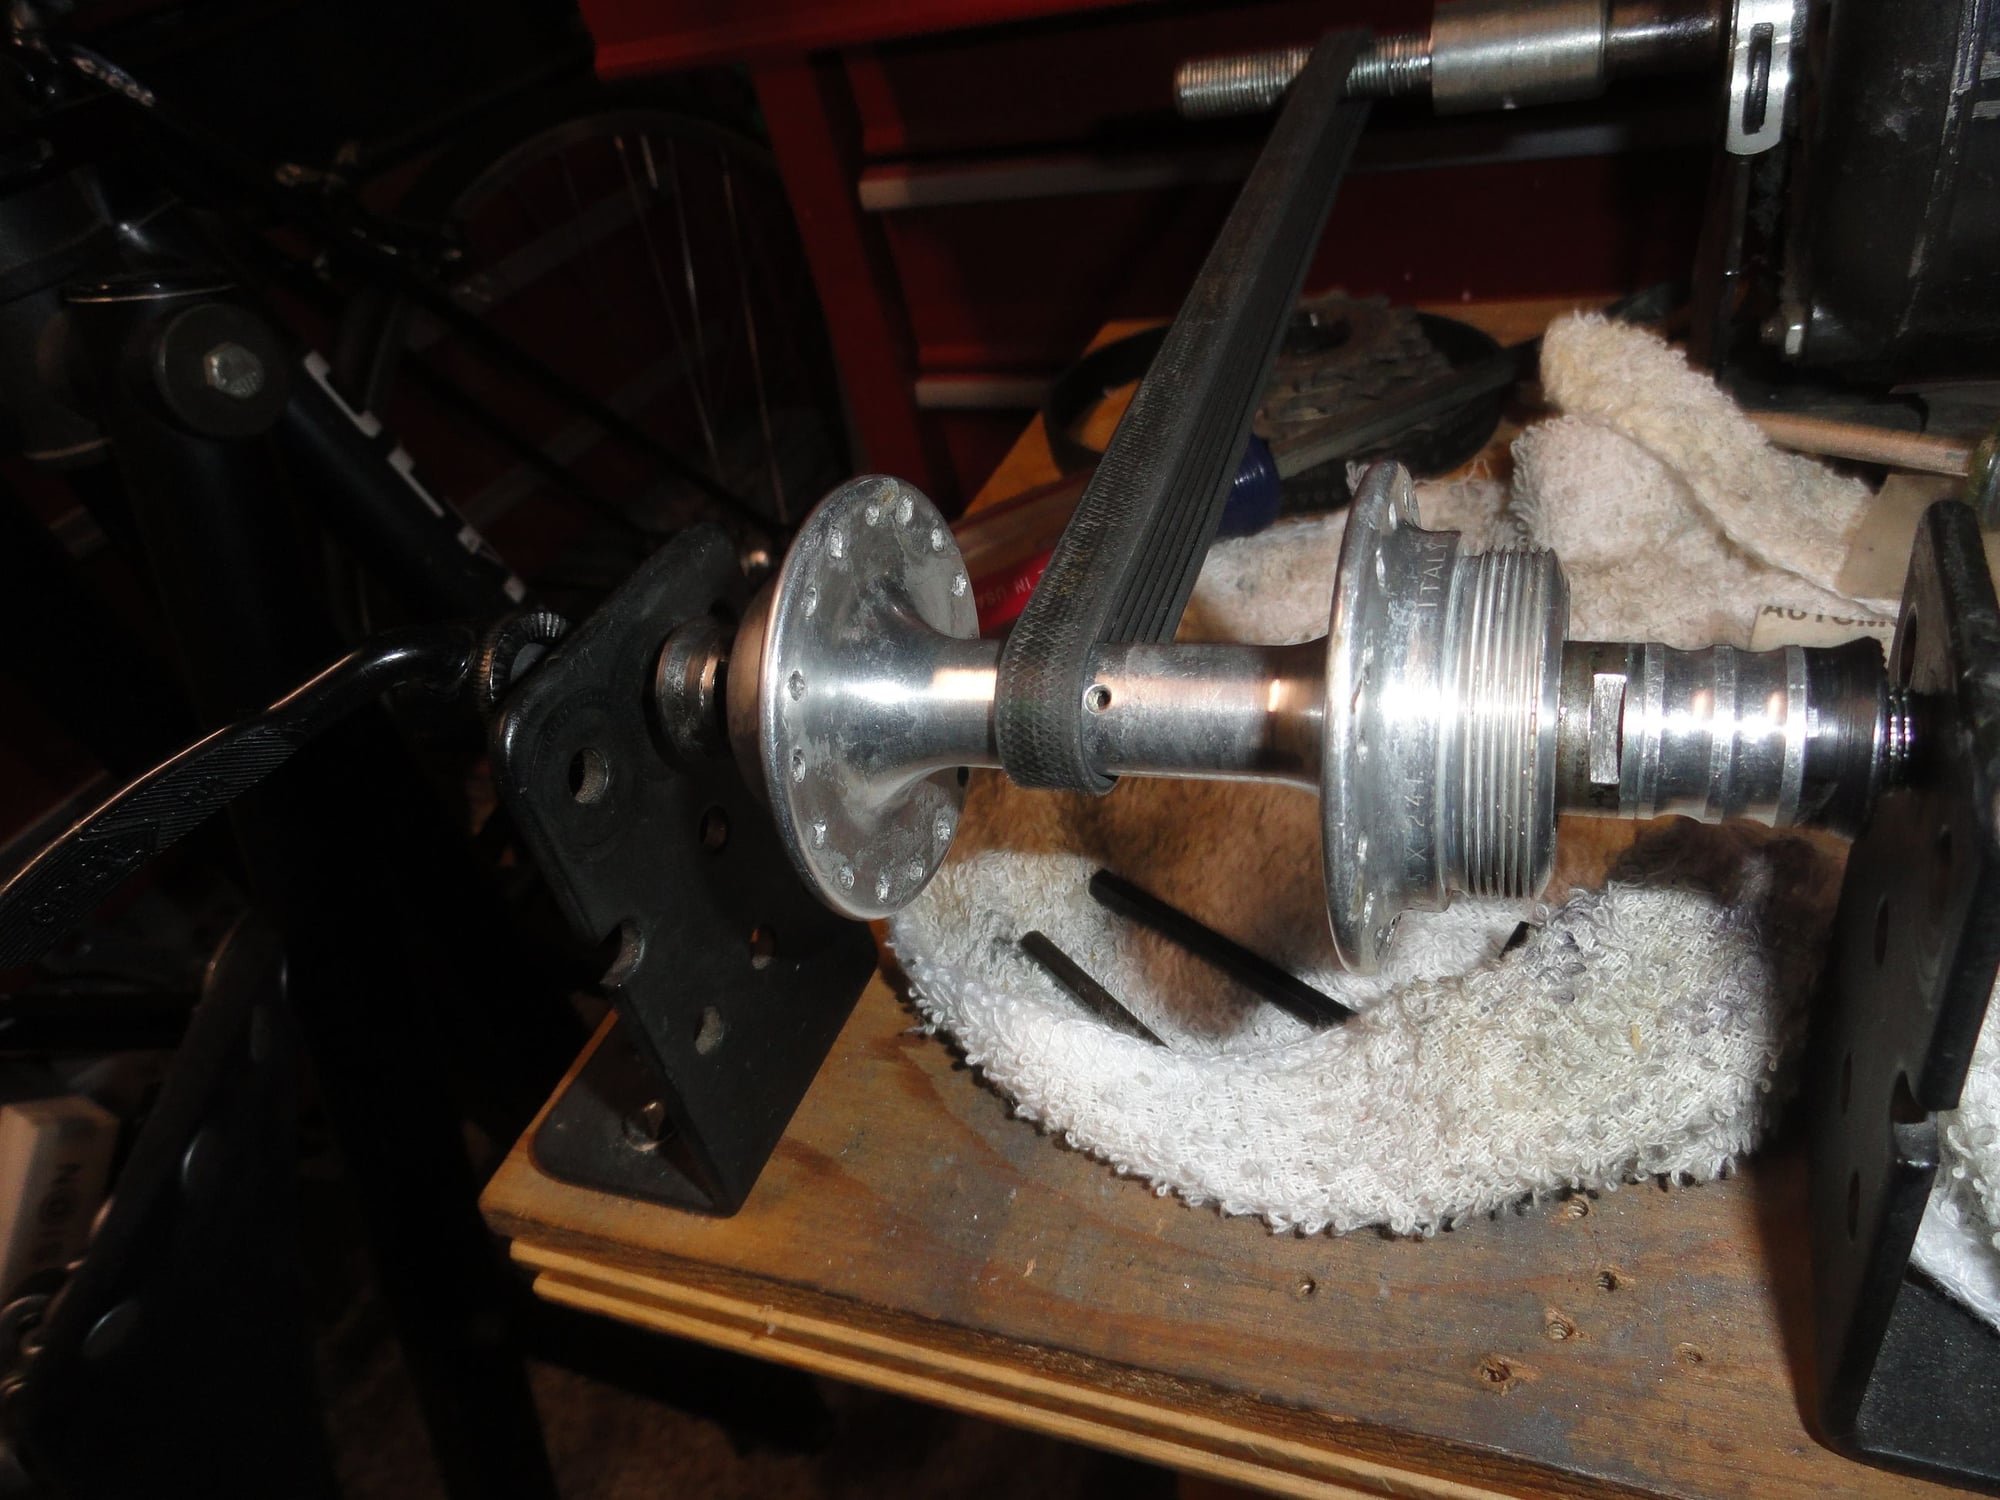
Ready to start the work, and the oxidizing is on both sides of the shell.
During the polishing to get to a mirror finish.
The shell polishes up pretty nicely.
And the finished product. Ready to be laced into a wheel.
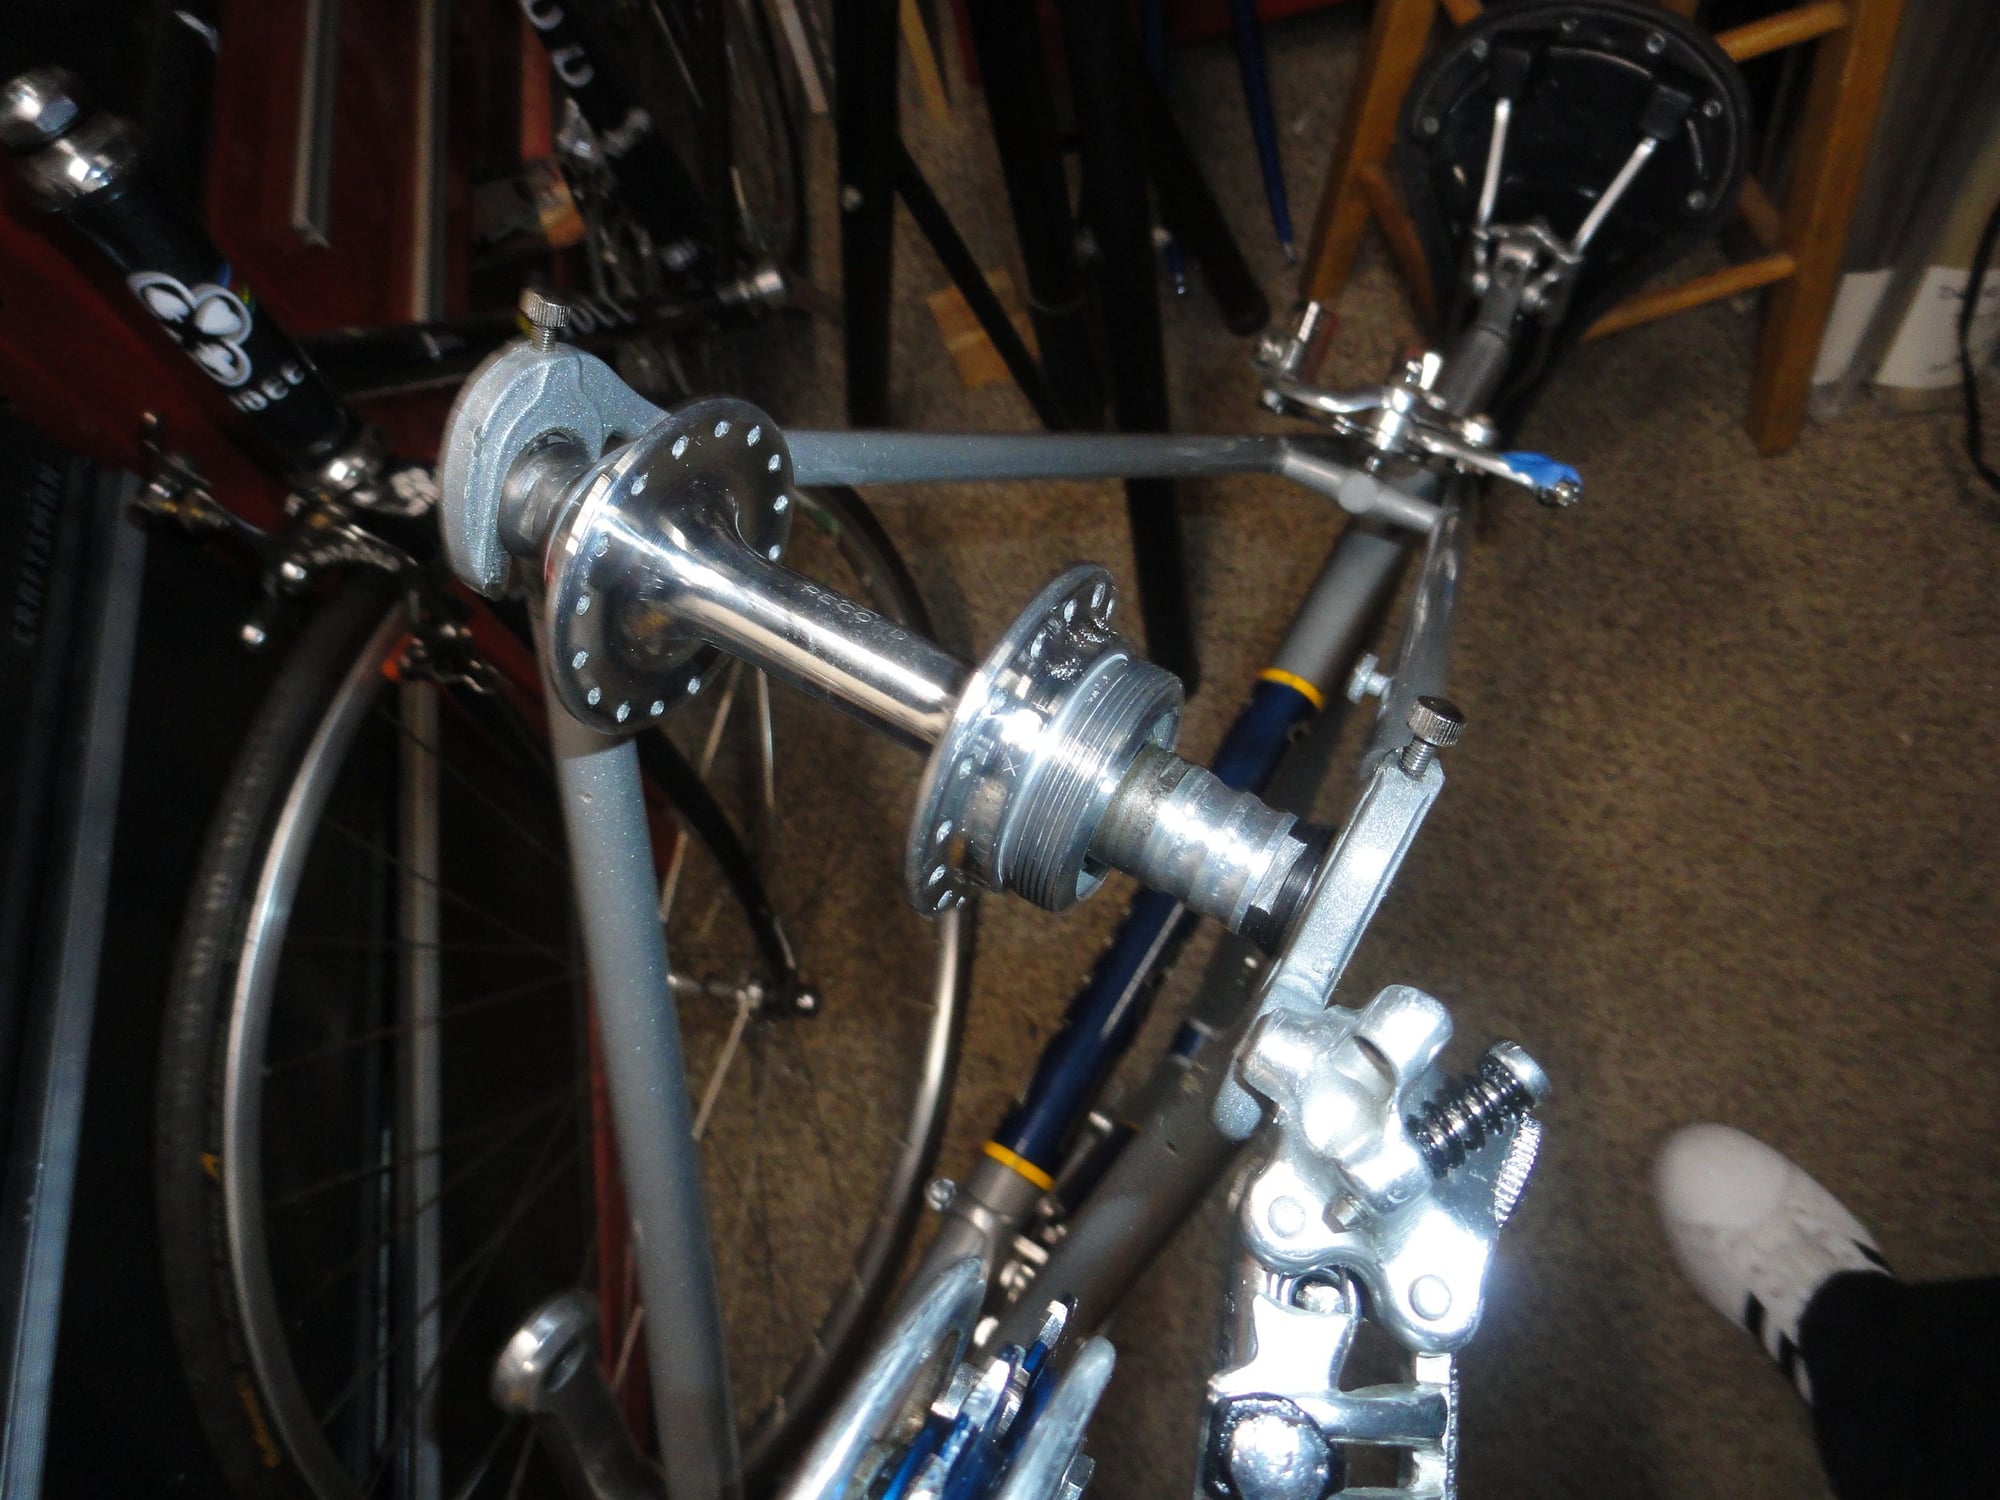
Checking the clearance for a perfect fit in the frame.
Smiles, MH
This one went off the rails when I grabbed a rear wheel to fit in to check brake caliper clearance. The wheel was off a Raleigh that had a smaller over lock nut dimension that this frame needs. So it is off to the hub box to find a replacement, A suitable hub in 36 hole is located, cleaned and polished and here are the pictures of the hub before and after:
The hub in the polishing mechanism. It is a 1/2 hp motor with a vacuum cleaner belt that wraps around the hub shell. note the oxidized aluminum on the shell.
Ready to start the work, and the oxidizing is on both sides of the shell.
During the polishing to get to a mirror finish.
The shell polishes up pretty nicely.
And the finished product. Ready to be laced into a wheel.
Checking the clearance for a perfect fit in the frame.
Smiles, MH
Likes For Mad Honk:
04-12-24, 05:07 PM
#22
Senior Member
Thread Starter
Join Date: May 2019
Location: Bloomington, IN
Posts: 2,950
Bikes: Paramount, Faggin, Ochsner, Ciocc, Basso
Mentioned: 117 Post(s)
Tagged: 0 Thread(s)
Quoted: 1303 Post(s)
Liked 1,912 Times
in
1,142 Posts
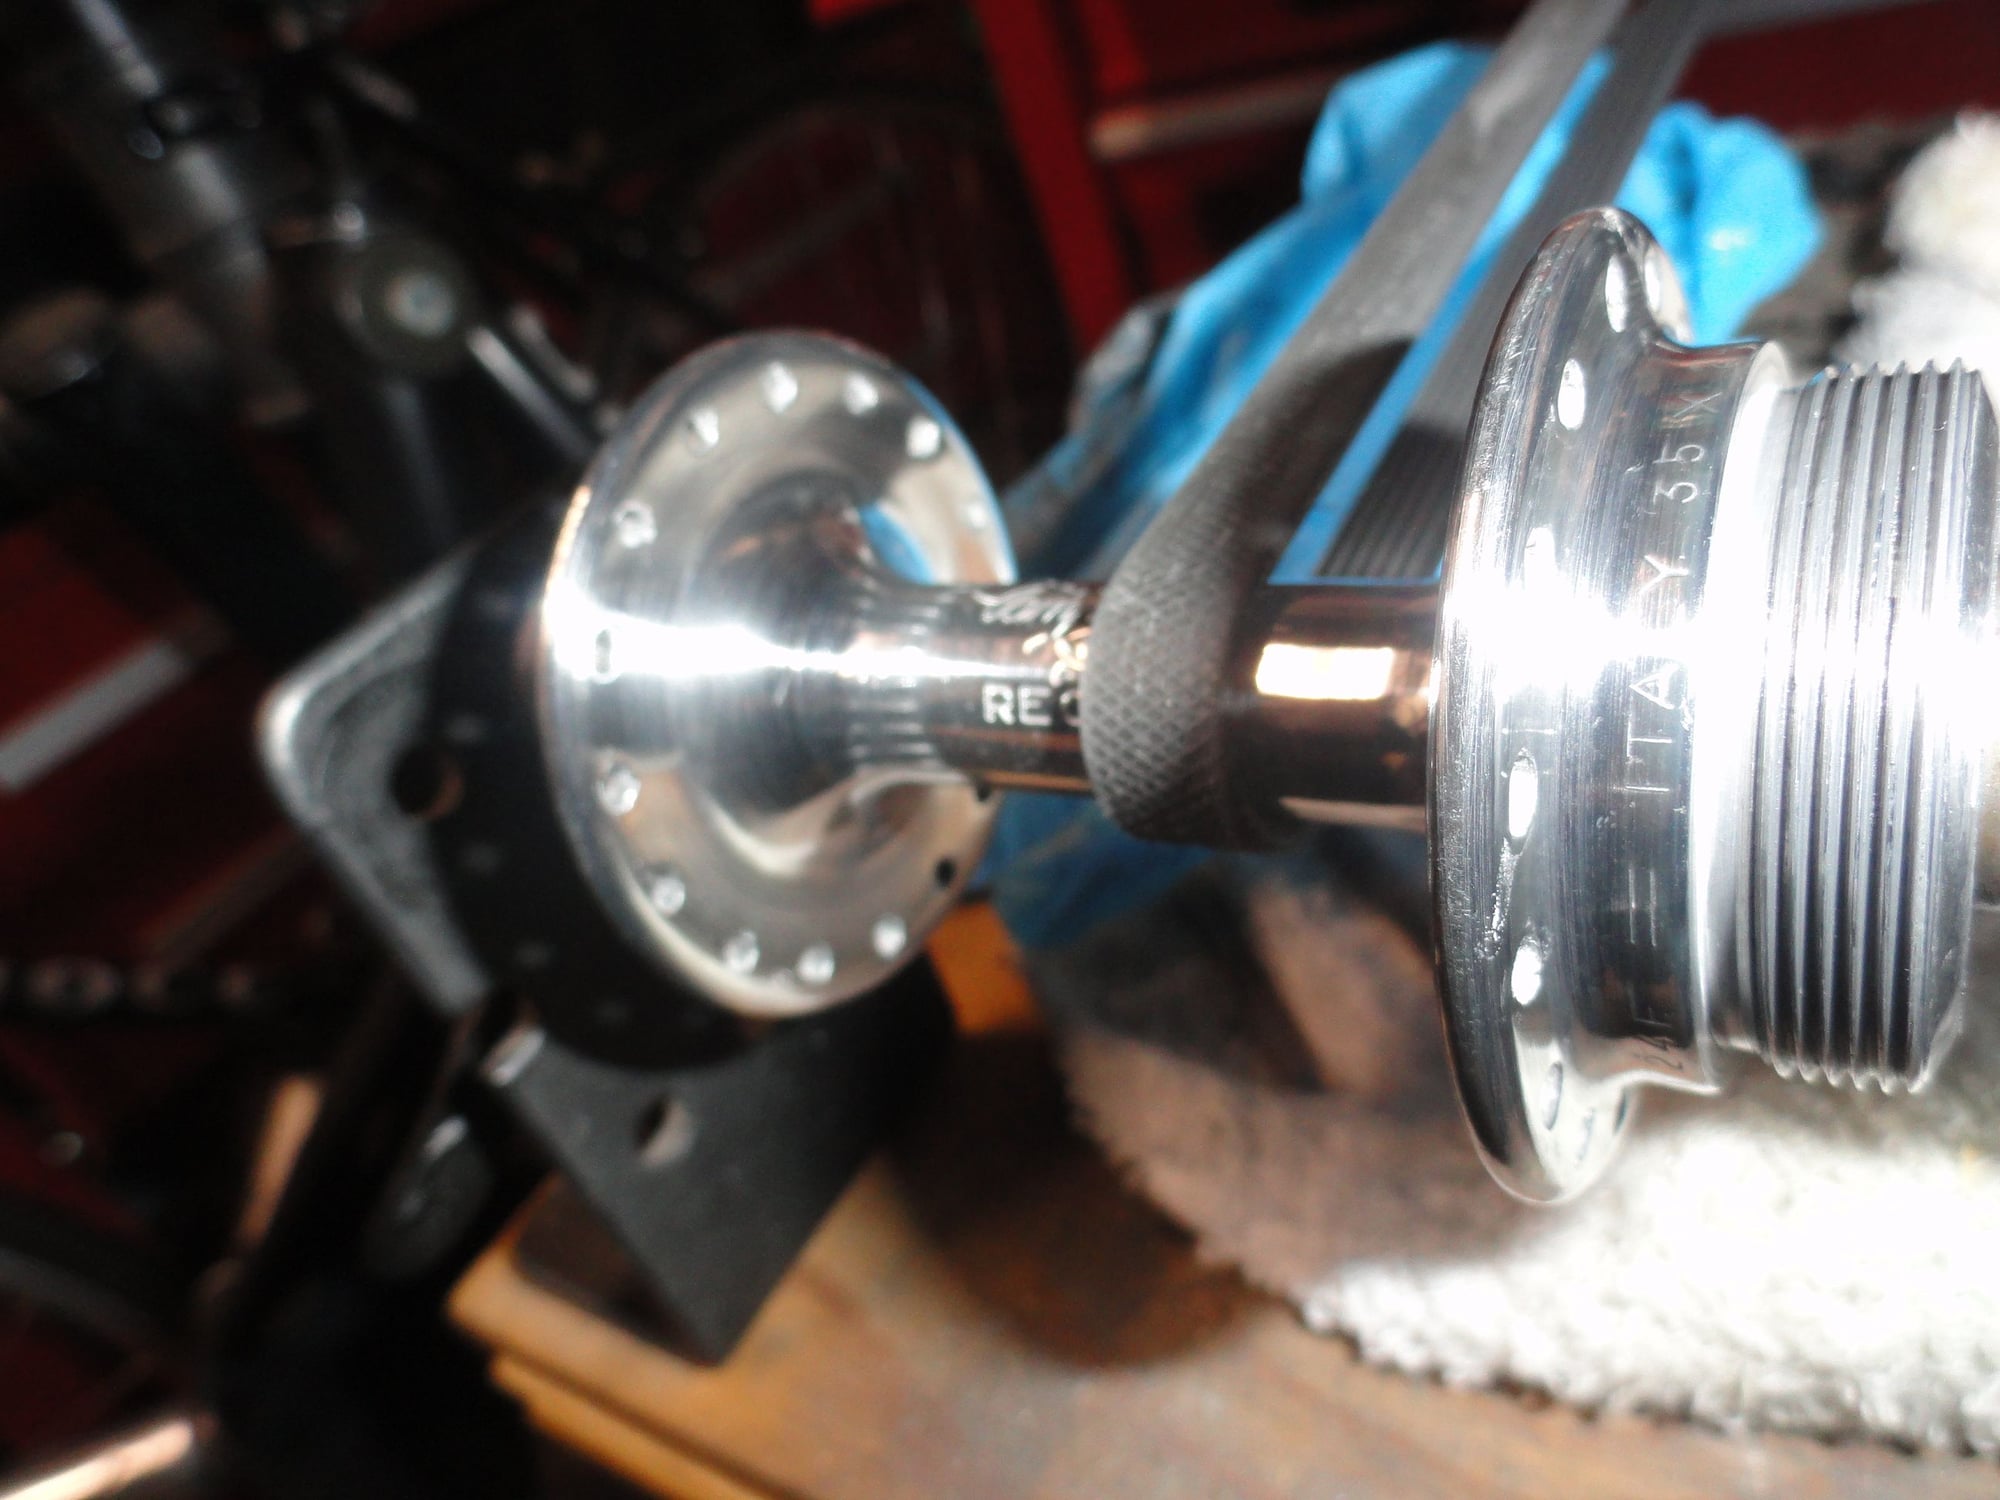
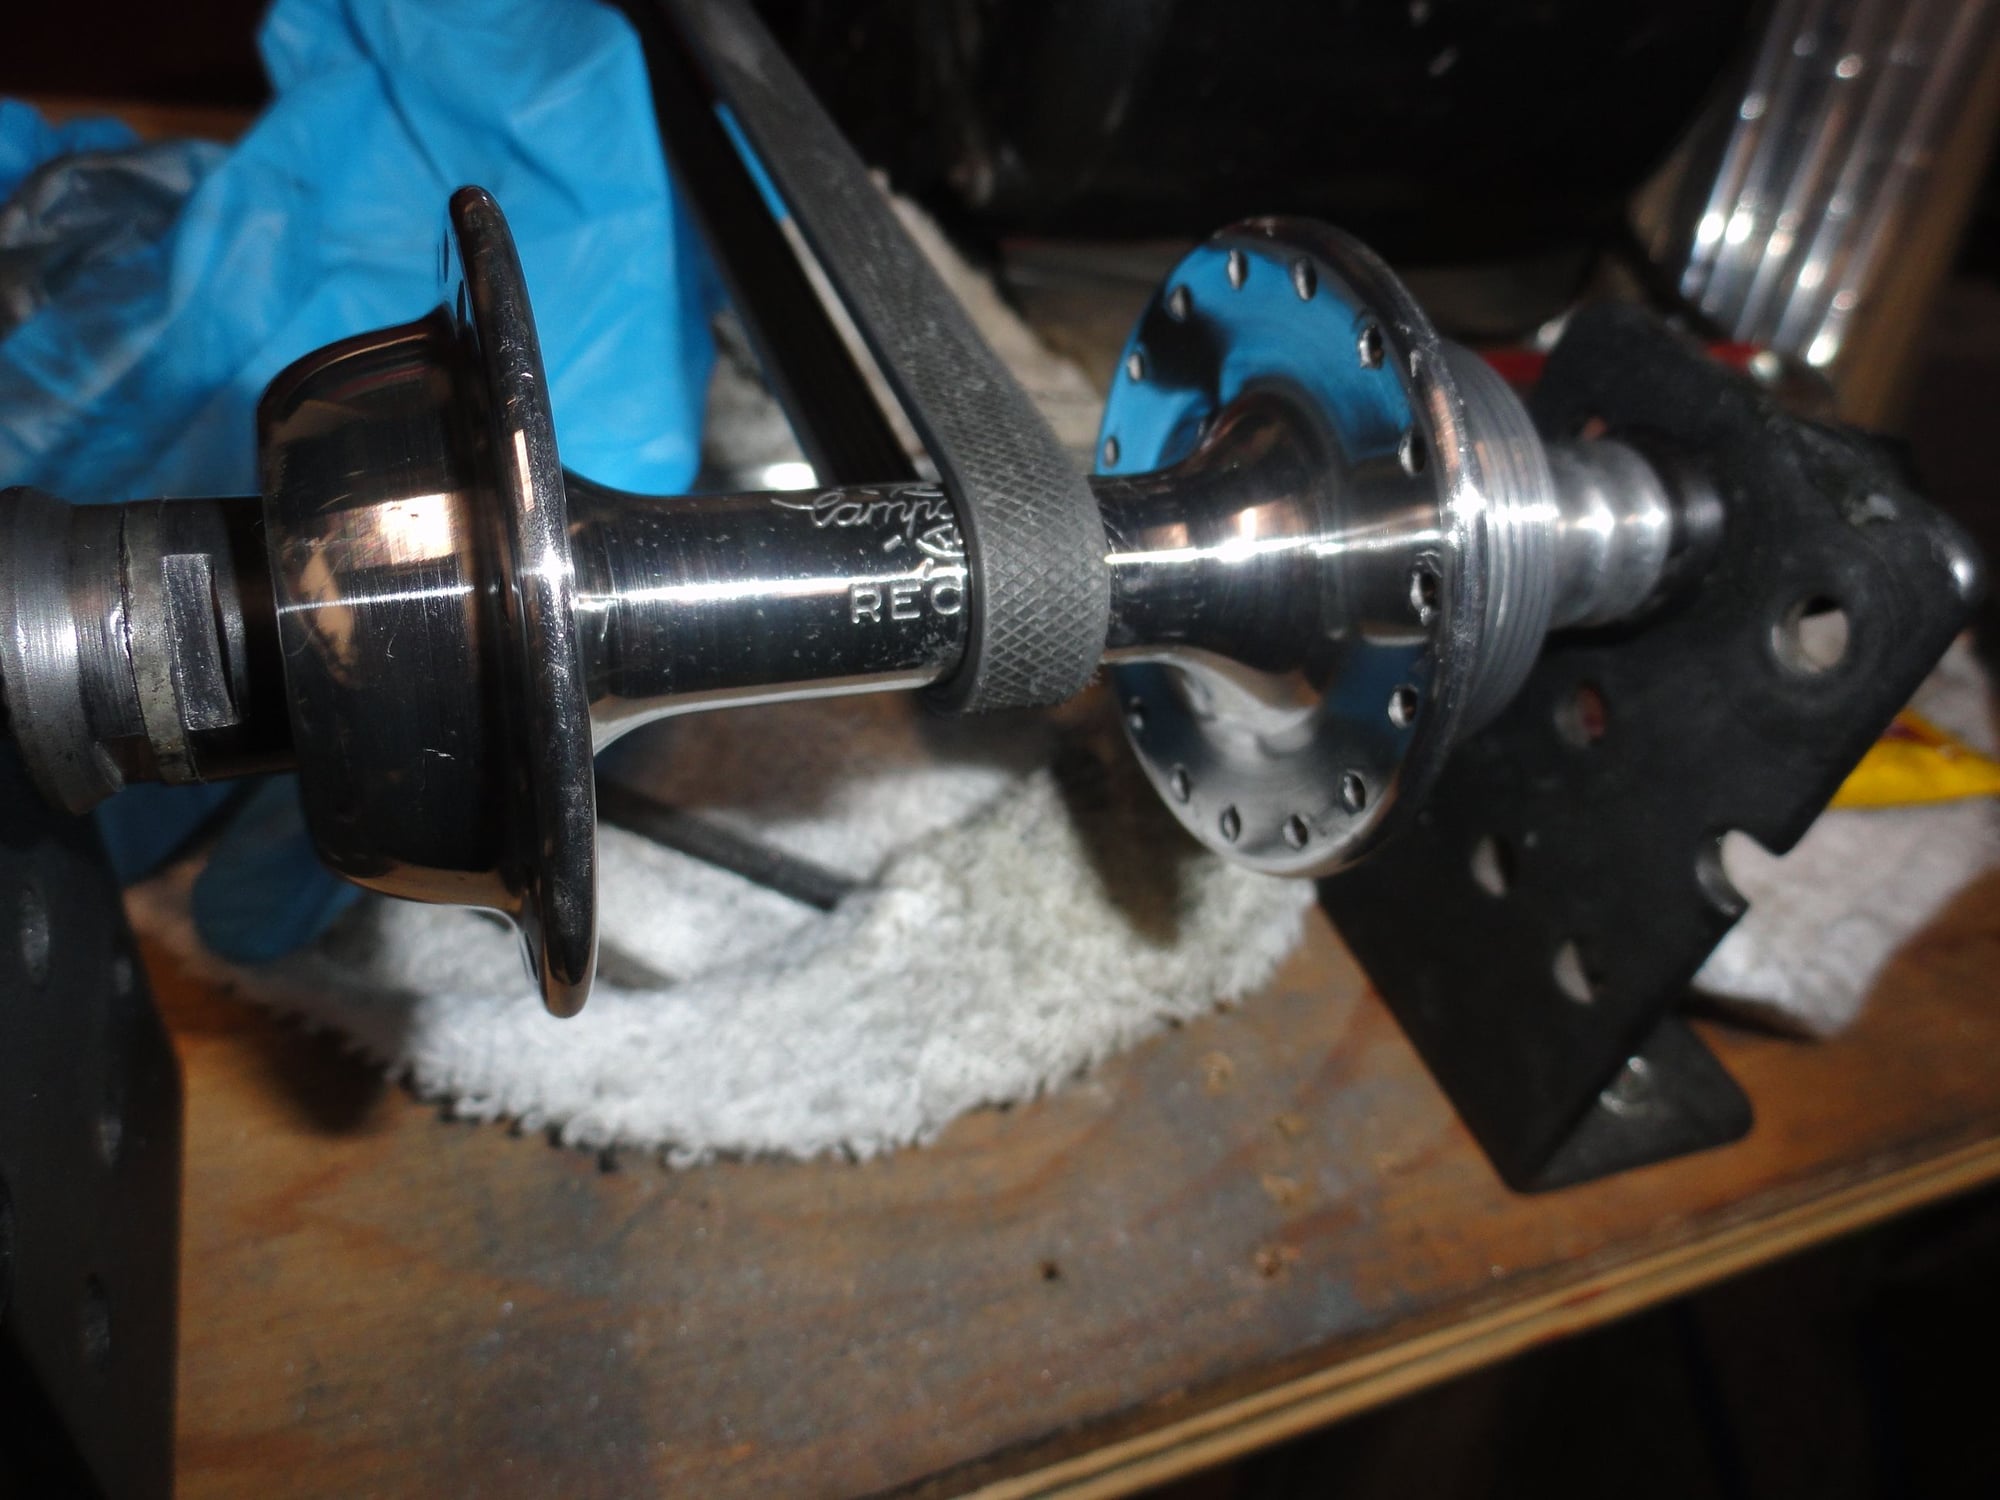
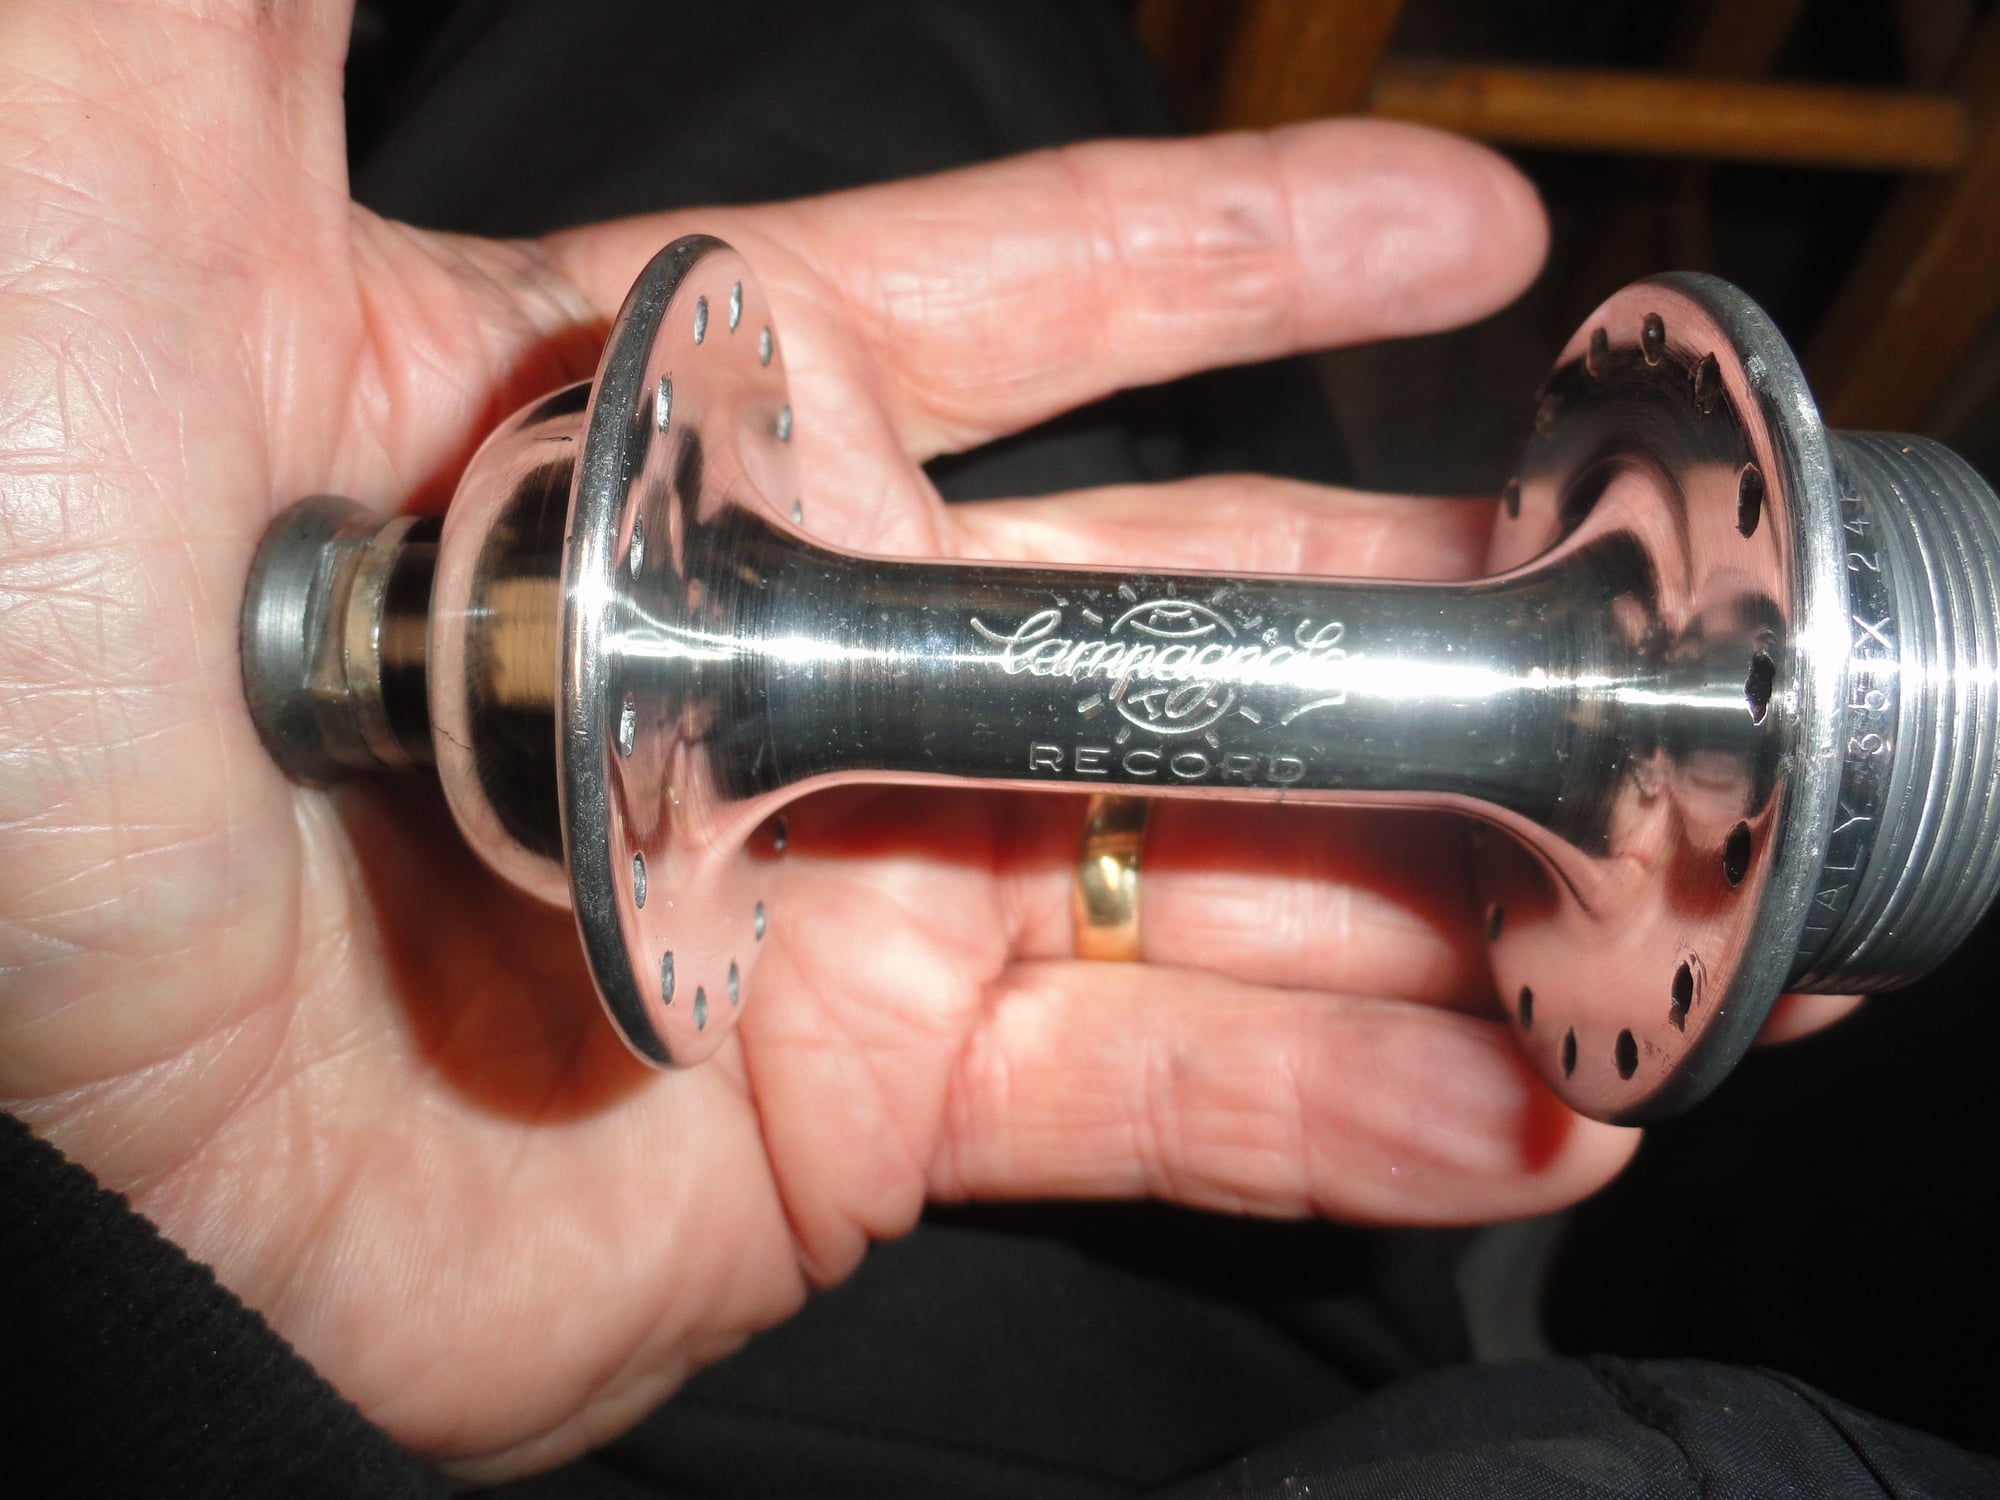
Up until now everything seems to be alright. WRONG! I noticed when the hub was in my hand there is a problem with the hub I polished! If you will look closely the hub is marked 35mm which fits to an Italian freewheel. Argh! So back to the hub stash to find an English FW compatible shell to mount. I have found one, but it is just a time setback for the build. Now to clean another shell and get ready for a wheel build. I am planning to use the MA40 rim, with DT 2.0 spokes for a pretty stout wheel. So I have a wheel teardown in my future and then a re-build. Smiles, MH
04-15-24, 06:36 PM
#23
Senior Member
Thread Starter
Join Date: May 2019
Location: Bloomington, IN
Posts: 2,950
Bikes: Paramount, Faggin, Ochsner, Ciocc, Basso
Mentioned: 117 Post(s)
Tagged: 0 Thread(s)
Quoted: 1303 Post(s)
Liked 1,912 Times
in
1,142 Posts
Back at this build today and the parts have been cleaned and a new wheel is in the works. The MA-40 rim was pretty rough, a lot of rust around the grommets so a bit of time with the wire wheel to clean that part and I used two wire bits to clean the inside sections of the grommets. The spokes were Wheelsmith, so I know it is not one I had built. But I am going to re-use them, along with new nipples from DT. The plan is to have a proper wheel in this frame at the end of the day. The parts:
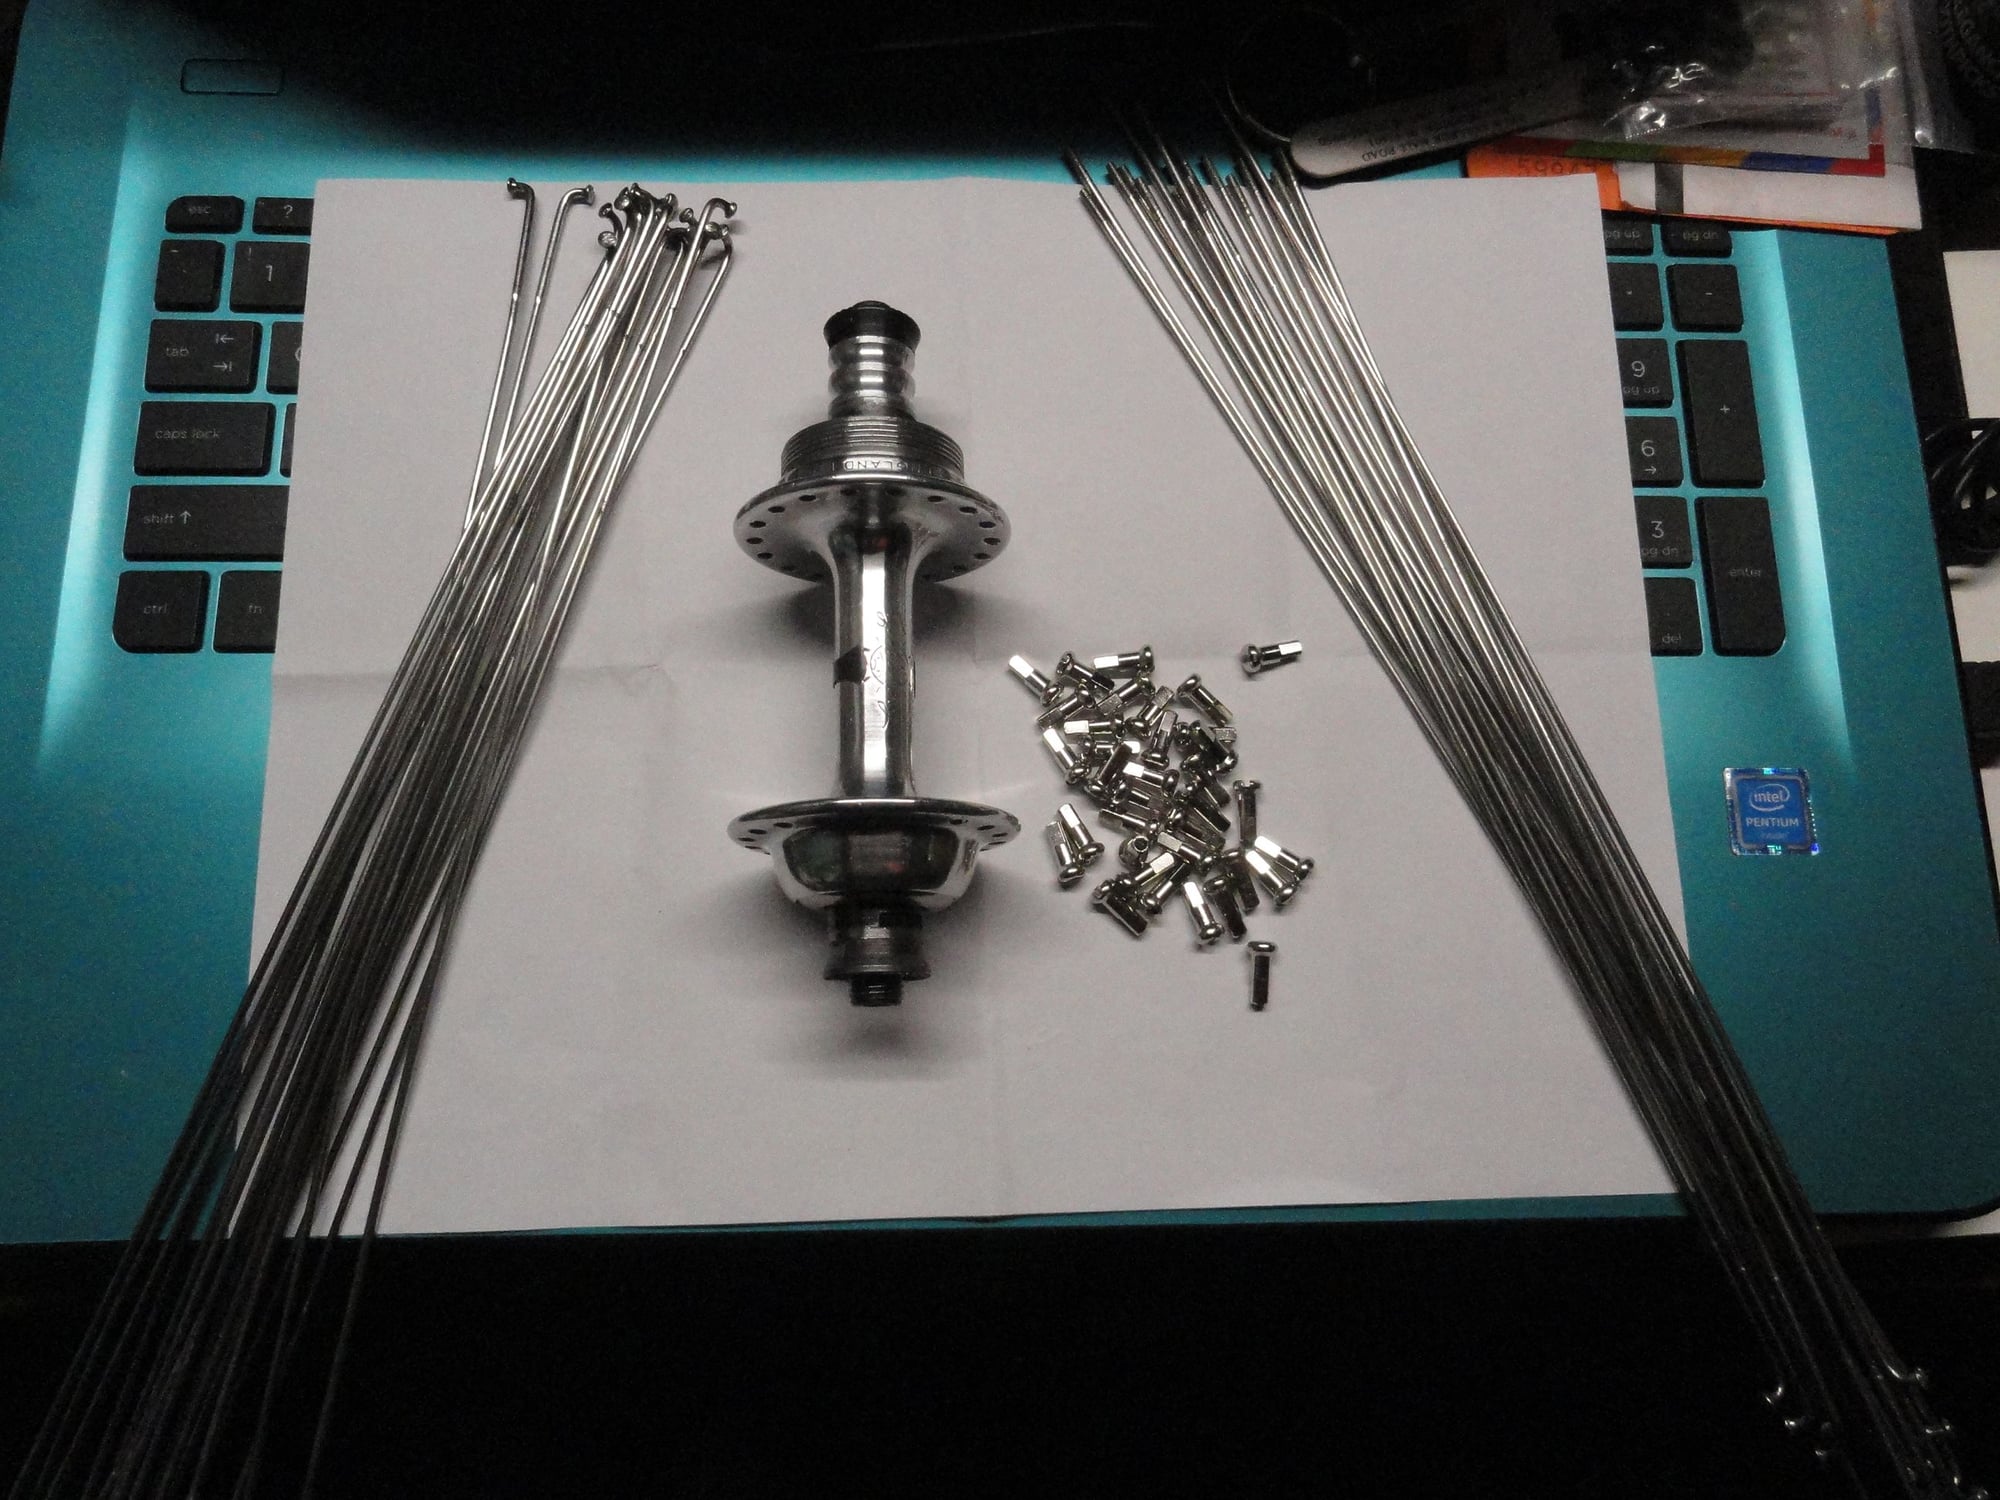
used spokes, used hub, and new spoke nipples, the rim is not pictured but will be on display after the build.
Smiles, MH
used spokes, used hub, and new spoke nipples, the rim is not pictured but will be on display after the build.
Smiles, MH
Likes For Mad Honk:
04-15-24, 07:27 PM
#24
Senior Member
Thread Starter
Join Date: May 2019
Location: Bloomington, IN
Posts: 2,950
Bikes: Paramount, Faggin, Ochsner, Ciocc, Basso
Mentioned: 117 Post(s)
Tagged: 0 Thread(s)
Quoted: 1303 Post(s)
Liked 1,912 Times
in
1,142 Posts
A few minutes later and we are on our way to a fresh new wheel for the 950. Smiles, MH
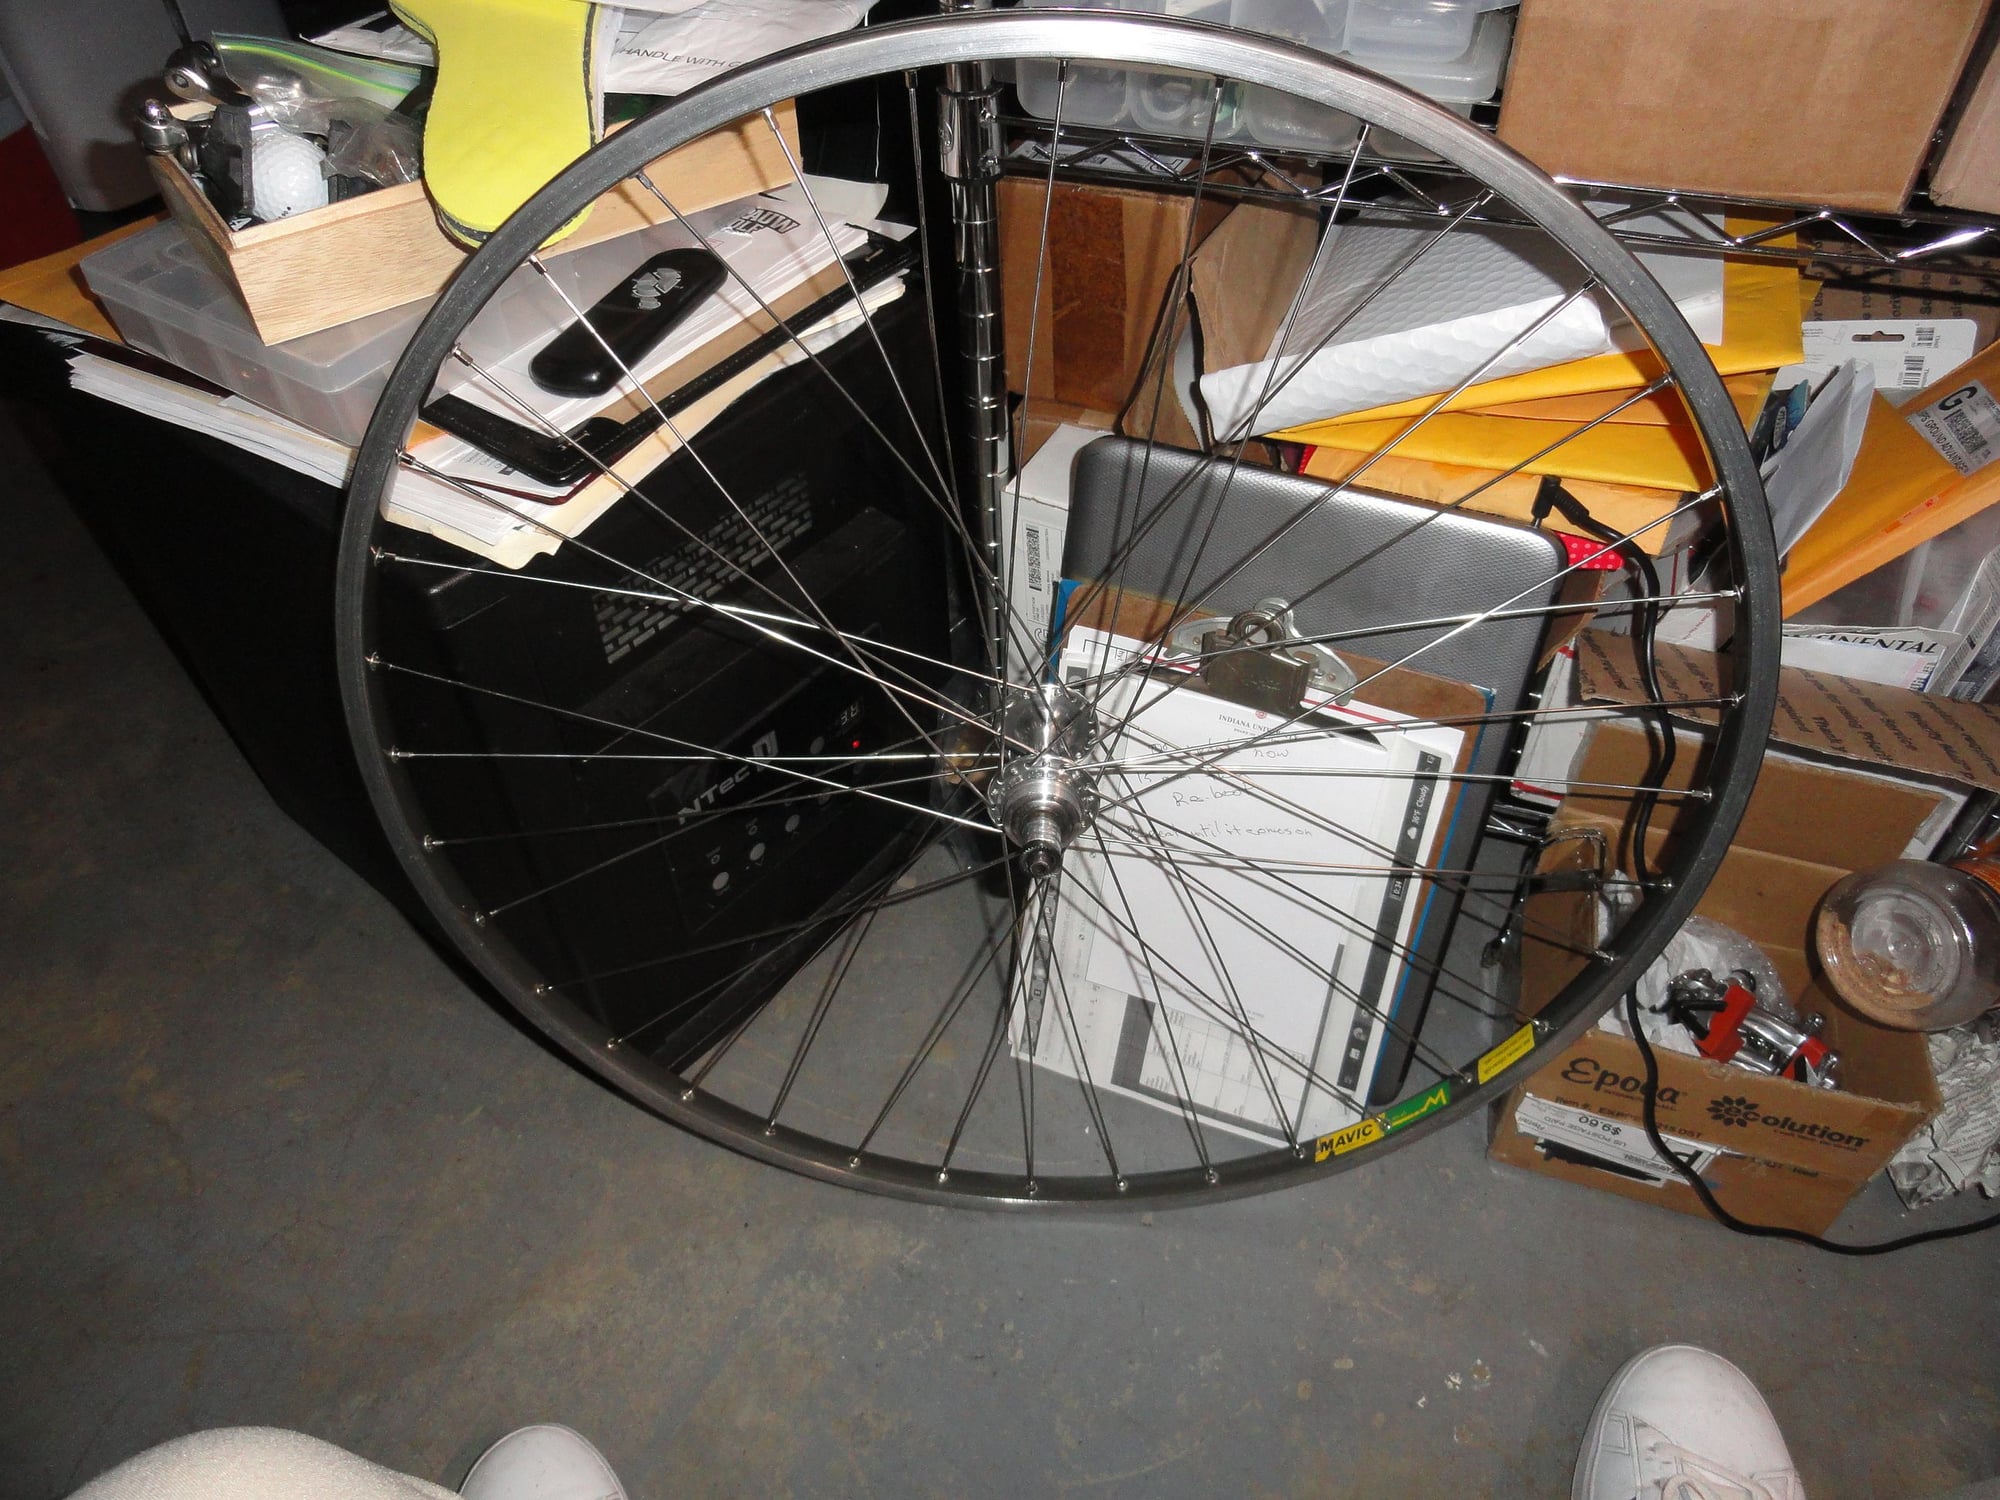
All laced up. I started and found out halfway that the rim was on facing the left side of the bike, so I had to restart turning the rim around for a right facing logo for the wheel.
I'll true it tomorrow and replace the rim tape and tire.
All laced up. I started and found out halfway that the rim was on facing the left side of the bike, so I had to restart turning the rim around for a right facing logo for the wheel.
I'll true it tomorrow and replace the rim tape and tire.
Likes For Mad Honk:
04-16-24, 07:19 PM
#25
Senior Member
Thread Starter
Join Date: May 2019
Location: Bloomington, IN
Posts: 2,950
Bikes: Paramount, Faggin, Ochsner, Ciocc, Basso
Mentioned: 117 Post(s)
Tagged: 0 Thread(s)
Quoted: 1303 Post(s)
Liked 1,912 Times
in
1,142 Posts
So today was a bit of wheel finish work and now I can get to the business of checking the brake reach for the frame. The wheel after the trueing and cleaning the rim strip adding new adhesive and then the tire & tube. Smiles, MH
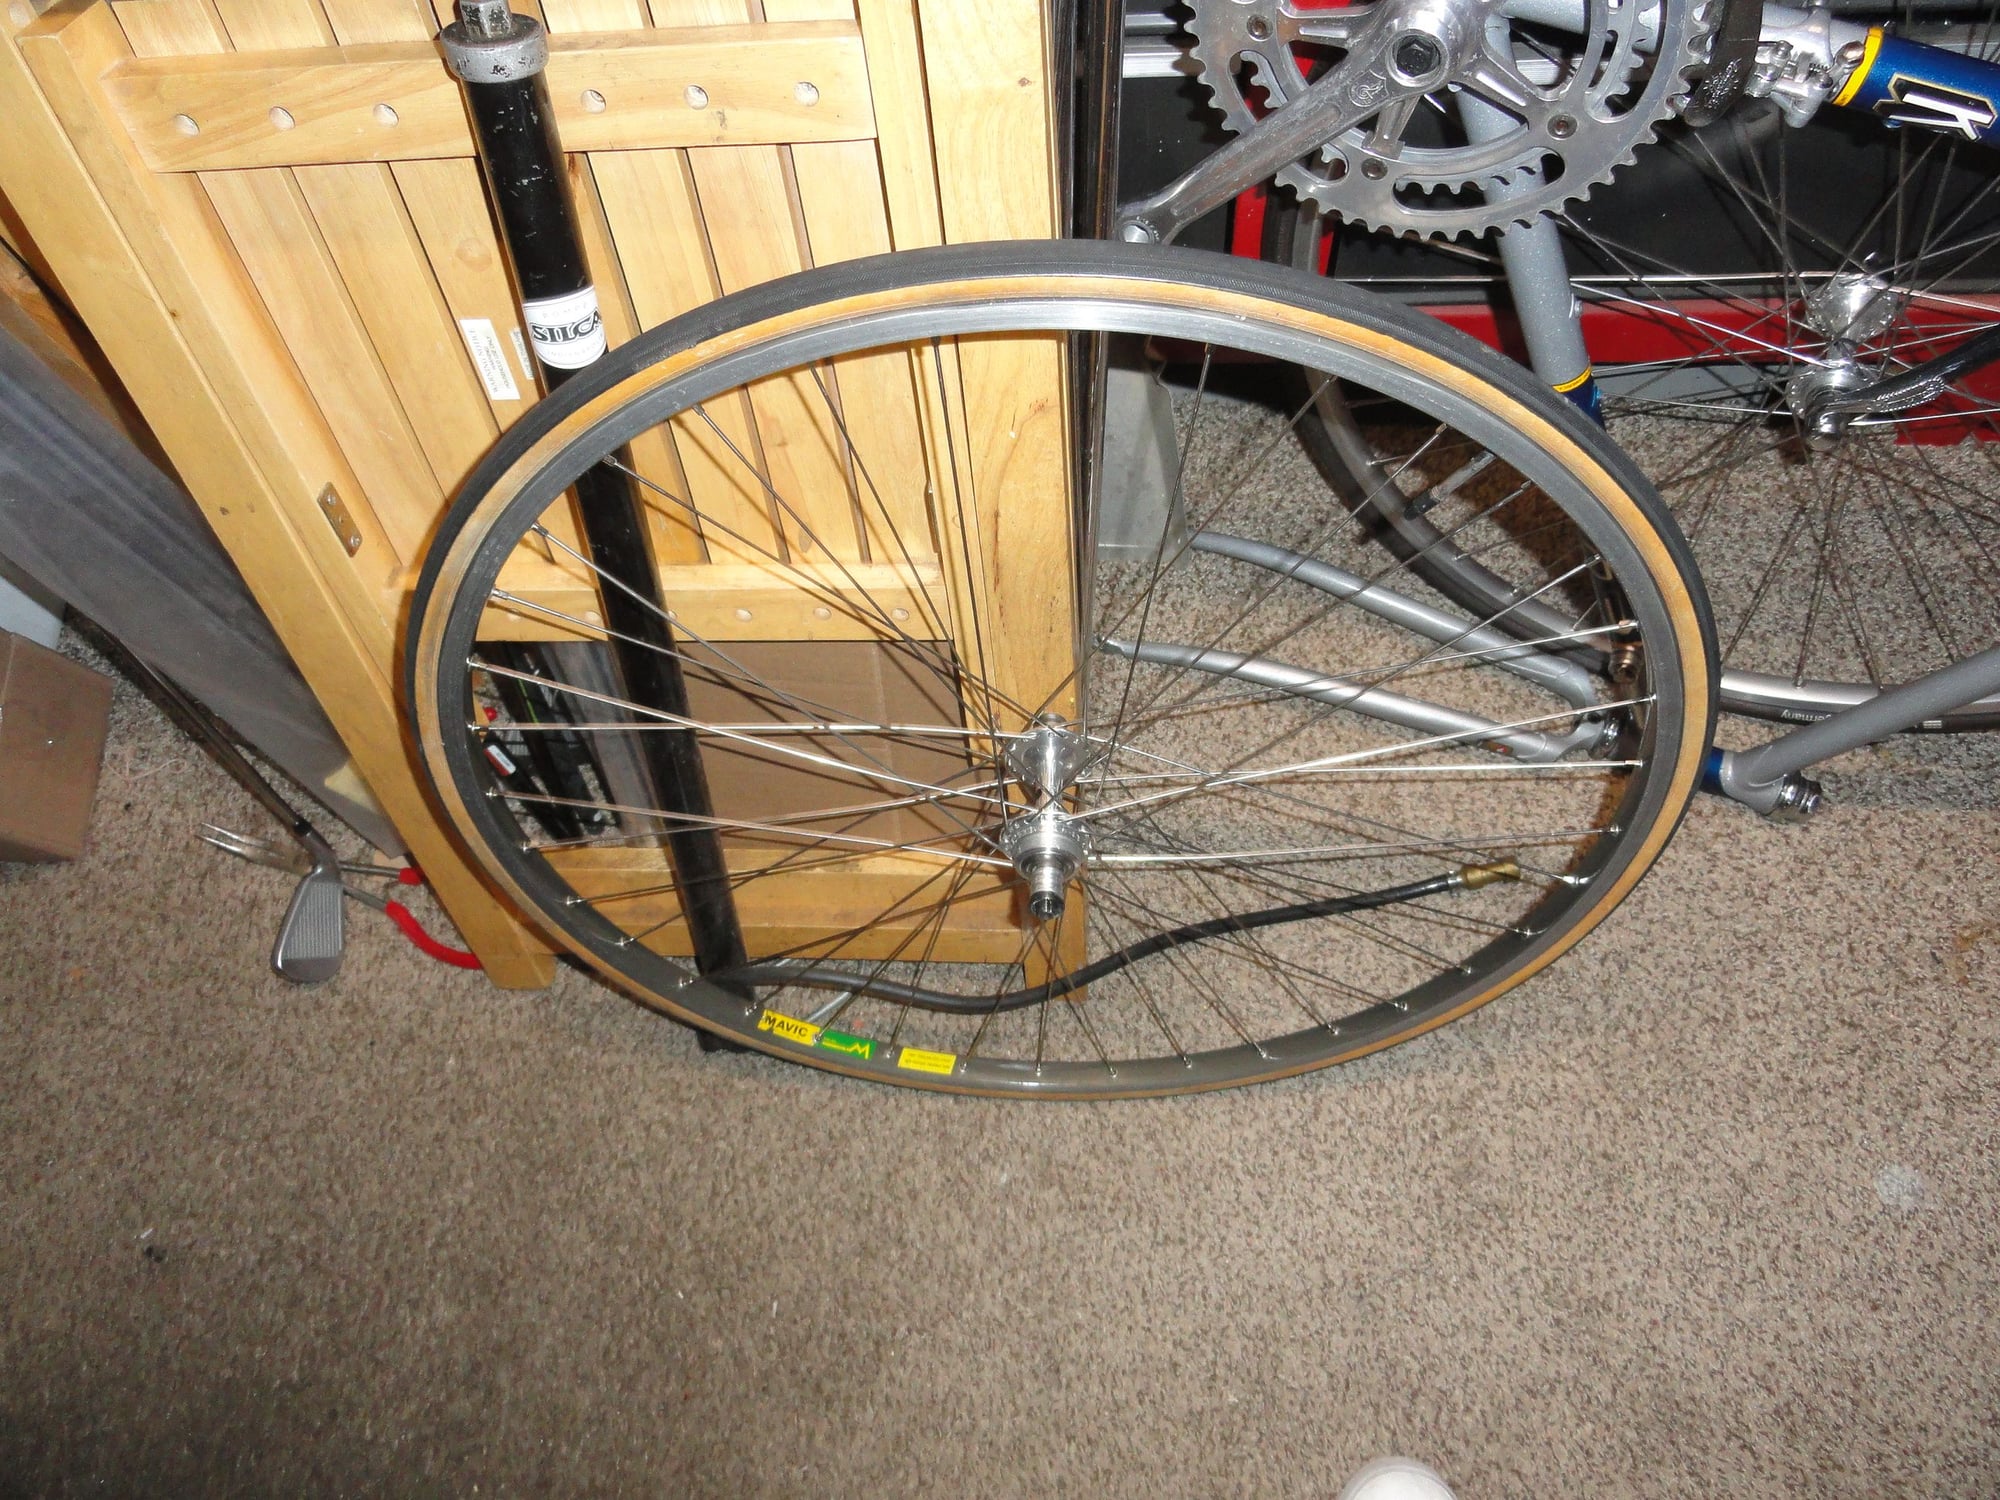
It was only a three day delay to find parts and build a new wheel that fits the frame.
It was only a three day delay to find parts and build a new wheel that fits the frame.
Likes For Mad Honk:
