


Fitting cotter pins
 08-28-20, 09:34 PM
#76

Senior Member

Join Date: Apr 2005
Location: Ann Arbor, MI
Posts: 16,869
Bikes: 1980 Masi, 1984 Mondonico, 1984 Trek 610, 1980 Woodrup Giro, 2005 Mondonico Futura Leggera ELOS, 1967 PX10E, 1971 Peugeot UO-8
Mentioned: 49 Post(s)
Tagged: 0 Thread(s)
Quoted: 1854 Post(s)
Liked 663 Times
in
505 Posts
That sounds at least as slick as many of my projects. Will guess 50 or 60 hours have now been spent on this single cotter pin. Which is why all these posts do not seem wholly unreasonable. Though it would be quicker to drive to Atlanta and watch Francophile do it.
It is 9.0. Thanks anyway. The Bates you saw has Stronglight cranks with English market 9.5. Did just check those and the nuts are very solid. The Bates is due for a BB grease, may never happen.
The bike I am playing with has a 74mm BB which is why I�ve not thrown in the towel yet. May yet be easier to cut the BB shell and put in a loose Campagnolo. The huge advantage of Campagnolo was it was always intended for race mechanics in a hurry, thus it was totally serviceable by most owners. Bike shops could make mistakes but they had to try.
 08-28-20, 09:47 PM
#77
Senior Member
Join Date: Apr 2005
Location: Ann Arbor, MI
Posts: 16,869
Bikes: 1980 Masi, 1984 Mondonico, 1984 Trek 610, 1980 Woodrup Giro, 2005 Mondonico Futura Leggera ELOS, 1967 PX10E, 1971 Peugeot UO-8
Mentioned: 49 Post(s)
Tagged: 0 Thread(s)
Quoted: 1854 Post(s)
Liked 663 Times
in
505 Posts
One last point: Bikesmithdesigns.com, run by Mark Stonich, sells a 9.0 mm cotter intended for French cranks. Check it out.
Likes For Road Fan:
08-29-20, 09:39 AM
#78
Senior Member
Thread Starter
I wouldn't call it slick, it was about 25 hours of work! But I didn't solve the problem you have, I removed the cotter, not installed it.
What Chicago shops have you been to with this problem? My childhood LBS is still there, Gary's Bike Shop on North Clark between Granville and Devon avenue. The owner when I was a kid is long deceased, but his BSA racing bike is still on the wall and his daughter was running the store. It started in 1948 and I knew it since about 1962. It still looks like 1948. There's a decent chance they know this problem. Likewise Roberts Cycles on North Clark near Pratt or Morse. I worked there very briefly in the late '60s. The current owner learned from the guy who I worked for - I should have stayed and "studied."
In what was called Newtown there is still Cycle Smithy - store is old but I don't know about the staff. Same for Turin Cycle Coop, on either Damen or Sheridan somewhere in the Montrose or Irving Park Road area. Up north (Northbrook?) is George Garner Cyclery, and in Lake Forest there might still be Kiddle's. Plus there are the Kozy shops, though I don't know them very well.
Asked the owner of one of those shops, a businessman, not a mechanic, who he would recommend for the job in Chicago area. His first response was �No one. All dead.� Thinking a minute he came up with owner of one of the shops that had already failed. Just don�t want to name names on a post like this. A difficult proposition getting hold of this guy.
Well, talked to him yesterday. We are getting together Monday. Hopefully. His quick take was doing the job by filing and fitting was not something most people could teach themselves and I had no chance. He�s going to show me some of the basics of filing but finish with the Var. Was upset that his best mechanic had messed up the job. Said that mechanic was best new wrench he had employed in decades, he just can�t be hiring mechanics over 70.
Longterm either I learn this or maybe quit riding. Shop I am going to Monday is definitely in extra innings and closing the door has been discussed. I have a real reason for steel cranks, it is not an aesthetic thing only. I have never liked wide cranks. About ten years back injured my left knee. Simply cannot ride any modern crank. Under 145 only. Below 135 the knee not only likes it, it heals and gets stronger. That means steel only. Not even full custom fabricated cranks would be as good as old cranks. Campy 1049 is widest I can handle. TA and Stronglight 49 better. Or preferably steel.
08-29-20, 10:42 AM
#79
Senior Member
Thread Starter
This isn't necessarily true. You have a round hole with a wall that is perpendicular to the crank arm and will never change. That uncut side of the cotter is forced to cradle flush against the wall of that round hole in the crank arm. This makes the angle of the cut side exceptionally important, it's the one thing you can change assuming the diameter of your cotter matches the diameter of the hole in the crank. This is also why it's critical to use the correct diameter of cotter respective to your crank arm.
Essentially, the uncut side must be able to snugly fit flush in the round while the cut side marries nicely to the flat face of the spindle. You cannot change the uncut side of the cotter, and this is why getting the correct diameter of cotter is fairly critical. The only part you have control over is A) ensuring the filed side of the cotter is able to marry to the flat of the spindle while B) the diameter of the cotter is able to cradle snugly to the diameter of the hole in your crank, and C) you wiggle the crank arm to settle the cotter nicely before you press it in with enough force it firmly wedges into place to a level that's greater than the force your legs can crank it out.
Oh - and actually - you also need to be thoughtful about which side the NUT is on. But I've not found nor seen evidence to say definitively which way the nut should go. I make sure the blunt end of the cotter is UP when the crank arm for that side is forward, just so there's less risk if it snagging clothing..
I know this probably makes it sound complicated but there's a notable amount of wiggle room available to screw up. If you respect the cotter diameter, respect the face, and jostle the crank enough to settle it altogether before pressing with adequate force, you should have no problem for hundreds or thousands of miles.
Let me ask you something: What crank are you using? Have you taken a well-calibrated digital caliper to the hole in the crankarm? Have you taken a digital caliper to the cotter? Are the outer diameter of the spindle and the inner diameter of the crankarm the same within a fraction? Just asking the obvious, because this shouldn't technically be this difficult unless you're using the wrong diameter cotter, or this crank wasn't intended for that spindle. It's the only thing making sense to me, as a masochistic MF who actually gets off on working with cottered cranks.
The total difference between possible different cuts on a cotter pin is likely in the range of one degree of angle. We are talking about minutes and seconds of angle. This is just a strange beast.
There is no possibility of observing how the faces fit. It all happens inside a dark hole. Some information is available by feel. Somebody can interpret that, I can�t. Posters keep claiming information can be had from Sharpie marks. No idea what they are seeing. I do see gouges and can see how something should come from that. Somebody upthread says it is possible to feel high spots that would not even be 0.001� through the file. Not my sensorium and it frankly sounds miraculous. But maybe some humans can do that, dunno.
The crank is a French Simplex, early 60s. The spindle is unmarked old English. The reason for English is the bike has a 74mm BB shell. Crank was originally fitted at Yellow Jersey and spindle came from their old stock. When a spindle that might work was located I queried whether the difference between a 5/8 and a 15.5 spindle (about 0.015�) would make any difference. Tim�s instant response was no difference. Andy checked how the parts fit and said they were indeed a very good match. And similar substitutions were done routinely. If anything the spindle to crank bore fit would be closer than normal. Could that make a difference? It is not a tight fit, crank freely goes on spindle.
I have been through a batch of cotters and am only using those that are 8.9+mm. Does true 9.0 even exist. My luthier friend has mic�d the two holes in the crank arm and declared them both quite round, not oval.
The luthier does not want to take over and do the job. First because he thinks I should do it. He has more confidence in that than I do. Also says it is one eightball historical wedge clamp and he would need significant trial and error before solving puzzle. This is a guy who gets flown around the planet solving mechanical puzzles no one else can. Also said I need to find mechanics with historical knowledge, because this has been solved before. I am trying.
Speaking of historical have now examined two pairs of historic pins that work and work very well. They are old pins and quality pins and are staying in the bikes they are on. Both sets simply click in and out of position and require no hammering, either direction. Both sets look like old scrap metal, no precision evident, a sort of flat spot in middle of wedge but mostly very very rough. And they work.
See my post to Road Fan. There may be a local solution. Not yet counting chickens before they hatch.
Again, thank you for your input and persistence.
08-29-20, 11:44 AM
#80
Senior Member

Join Date: Jun 2006
Location: NW Burbs, Chicago
Posts: 12,048
Mentioned: 201 Post(s)
Tagged: 0 Thread(s)
Quoted: 3011 Post(s)
Liked 3,788 Times
in
1,405 Posts
Oferchristsakes.
Do the opposite of the Sharpie. Put wet paint on the flat face of your spindle. Put in cotter with only finger pressure. Take cotter out. Use francophiles nifty illustration to guide your filling where paint sticks to the cotter.
If you can't figure it out after that, give up. Pay a guy. Say thank you when they are done. Give them a tip. A big tip. Go ride the friggin bike and don't post about it anymore.
Likes For iab:
08-29-20, 12:08 PM
#81
Senior Member
Thread Starter
Oferchristsakes.
Do the opposite of the Sharpie. Put wet paint on the flat face of your spindle. Put in cotter with only finger pressure. Take cotter out. Use francophiles nifty illustration to guide your filling where paint sticks to the cotter.
If you can't figure it out after that, give up. Pay a guy. Say thank you when they are done. Give them a tip. A big tip. Go ride the friggin bike and don't post about it anymore.
Do the opposite of the Sharpie. Put wet paint on the flat face of your spindle. Put in cotter with only finger pressure. Take cotter out. Use francophiles nifty illustration to guide your filling where paint sticks to the cotter.
If you can't figure it out after that, give up. Pay a guy. Say thank you when they are done. Give them a tip. A big tip. Go ride the friggin bike and don't post about it anymore.
Crank spindle is not a brush and cotter pin is not a canvas. What happens is a big smear of paint.
I am sure it is all obvious and simple for you. Good for you.
08-29-20, 01:06 PM
#82

Passista
Join Date: Jul 2005
Posts: 7,596
Bikes: 1998 Pinarello Asolo, 1992 KHS Monta�a pro, 1980 Raleigh DL-1, IGH Hybrid, IGH Utility
Mentioned: 5 Post(s)
Tagged: 0 Thread(s)
Quoted: 866 Post(s)
Liked 720 Times
in
395 Posts
I have paid a guy to do it. I paid two different guys to do it. When they failed is when the DIY attempt started.
Crank spindle is not a brush and cotter pin is not a canvas. What happens is a big smear of paint.
I am sure it is all obvious and simple for you. Good for you.
Crank spindle is not a brush and cotter pin is not a canvas. What happens is a big smear of paint.
I am sure it is all obvious and simple for you. Good for you.
Likes For Reynolds:
08-29-20, 01:34 PM
#83
Senior Member
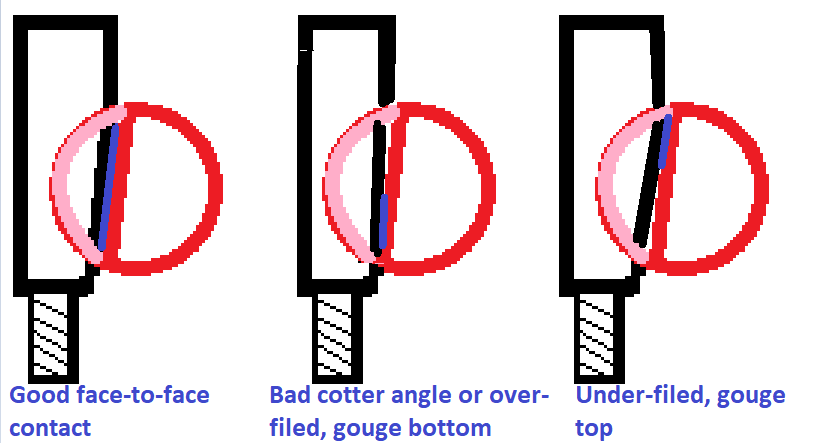
If cotter pins required filing, the typical method BITD was to copy the original cotter pin that was just taken out, and usually had a mangled threaded end. Confirm dims with calipers. They are somewhat ductile and therefore crazy precision fitting isn't typically necessary. Of course more precision is always better. @francophile's illustration shows what you want.
My preferred tool was a VAR cotter press. IMO and IME hammers suck for this, to be blunt about it. I still don't get some old timers who prefer or preferred to use a hammer. BTW, I've done a lot. I got stuck with all of the cottered cranks when I was a 15/16 year old shop apprentice. No one else wanted to do them.
Likes For Salamandrine:
08-29-20, 02:57 PM
#84
Senior Member
Join Date: Apr 2005
Location: Ann Arbor, MI
Posts: 16,869
Bikes: 1980 Masi, 1984 Mondonico, 1984 Trek 610, 1980 Woodrup Giro, 2005 Mondonico Futura Leggera ELOS, 1967 PX10E, 1971 Peugeot UO-8
Mentioned: 49 Post(s)
Tagged: 0 Thread(s)
Quoted: 1854 Post(s)
Liked 663 Times
in
505 Posts
I know of Gary�s, should get to know them. All others are very familiar. Two of the shops on your list have done the job - this job, this crank - and made a mess of it. That was the point at which I decided it would be better if I could do it myself.
Asked the owner of one of those shops, a businessman, not a mechanic, who he would recommend for the job in Chicago area. His first response was �No one. All dead.� Thinking a minute he came up with owner of one of the shops that had already failed. Just don�t want to name names on a post like this. A difficult proposition getting hold of this guy.
Well, talked to him yesterday. We are getting together Monday. Hopefully. His quick take was doing the job by filing and fitting was not something most people could teach themselves and I had no chance. He�s going to show me some of the basics of filing but finish with the Var. Was upset that his best mechanic had messed up the job. Said that mechanic was best new wrench he had employed in decades, he just can�t be hiring mechanics over 70.
Longterm either I learn this or maybe quit riding. Shop I am going to Monday is definitely in extra innings and closing the door has been discussed. I have a real reason for steel cranks, it is not an aesthetic thing only. I have never liked wide cranks. About ten years back injured my left knee. Simply cannot ride any modern crank. Under 145 only. Below 135 the knee not only likes it, it heals and gets stronger. That means steel only. Not even full custom fabricated cranks would be as good as old cranks. Campy 1049 is widest I can handle. TA and Stronglight 49 better. Or preferably steel.
I have trouble in this seeing exactly what the difficulty is. Why is this cotter different from all other cotters?
Another thing to consider is, can you find a TA or Stronglight vintage BB to fit your frame? If so you just need relax into the ease of modern square taper aluminum cotterless chainset luxury. That's essentially what I'm doing with my Rudge. My BB shell is 71 mm wide and the original Raleigh BB cups are 1. available in the vintage market, 2. available in the used market, 3, a correct fit to the diameter of the TA 344 and 314 BB spindles, and 4. the only thing you can use if your Old Brit frame used Old Brit threading. So I have a spindle for a single-ring solution and one for a double-ring solution, if I can figure out a chain tensioner. Then with the Sturmey Archer 3 speed through 5-speed IGH options, I can do vintage multigear shifting in 2x3 through 2x5. All with a single rear sprocket. Right now i'm setting it up for 1x3, since I don't see a good way to attach a chain tensioner, yet.
Open to ideas!!
08-29-20, 04:03 PM
#85
Senior Member
Thread Starter
Wastyn family shop? Sportif Importers out west on Lawrence Avenue? Where is Mark Mattei? a bunch of vintage motorcycists (Vincent Owners' Club) recommended I look him up regarding my 1952 Rudge and some questions.
I have trouble in this seeing exactly what the difficulty is. Why is this cotter different from all other cotters?
Another thing to consider is, can you find a TA or Stronglight vintage BB to fit your frame? If so you just need relax into the ease of modern square taper aluminum cotterless chainset luxury. That's essentially what I'm doing with my Rudge. My BB shell is 71 mm wide and the original Raleigh BB cups are 1. available in the vintage market, 2. available in the used market, 3, a correct fit to the diameter of the TA 344 and 314 BB spindles, and 4. the only thing you can use if your Old Brit frame used Old Brit threading. So I have a spindle for a single-ring solution and one for a double-ring solution, if I can figure out a chain tensioner. Then with the Sturmey Archer 3 speed through 5-speed IGH options, I can do vintage multigear shifting in 2x3 through 2x5. All with a single rear sprocket. Right now i'm setting it up for 1x3, since I don't see a good way to attach a chain tensioner, yet.
Open to ideas!!
No love lost twixt me & Zordani. Will not say more.
You want to see Mark�s Black Prince. The fiberglass is far better than original, they did a good job of making it look old. You want to see all of his Vincents.
BB is standard Brit threads, 74mm wide. Cutting it down would be an even bigger job than most wide Raleigh BB. It�s just odd. Eastman from Delhi. Not New Delhi, old Delhi.
Bike plain looks good in steel. Even with wide spindle the Q is 134mm. Had a Sugino XD for 14 years, the steel was a huge improvement.
Simplest chain tensioner is a derailleur that doesn�t do anything else. In recent years have seen lots of aftermarket tensioners, mostly from places now out of business, there must be inventory somewhere.
08-29-20, 04:08 PM
#86
blahblahblah chrome moly

Join Date: Apr 2009
Location: Seattle
Posts: 1,985
Mentioned: 92 Post(s)
Tagged: 0 Thread(s)
Quoted: 1172 Post(s)
Liked 2,567 Times
in
1,072 Posts
I just file them very flat (file not rocking, keep it "planar"), to a depth that allows the cotter to go in the right amount. Angle hardly matters at all IMHO as long as they're the same right and left. Obviously choose the right diameter, and hopefully high quality steel, but not much else matters.
Did I read that right, 63rickert says he doesn't have a vise? Then I am stumped, can't imagine how you can have any hope of success without a vise. Maybe I could McGuyver something if I didn't have access to one, but luckily I have never faced that challenge. A good solid vise that doesn't wiggle or shudder when you file is a must to get a proper shape.
I have a VAR 07 press but still will often just hammer them, since I know it works and my hammer is closer to reach for. I know some hammering tricks and I don't ruin cotters by hammering them. I think of the VAR as a mass-production tool, when you need to assemble 1000 UO-8s a day at the Peugeot factory. Probably for someone with less hammering experience, the VAR is safer, but for me I don't see any downside to the hammer.
I could probably think of more tips if I put my mind to it but I'll just add this one: file them on the deep side, so more of the thread is sticking out, because then the part of the flat that engages the spindle is wider, more metal in contact. Angle on the shallow side helps there too. Downside of filing deep is you risk filing too deep -- if all the threaded part sticks out and the nut can't tighten anymore, then you need to toss that one and start over. I shoot for just short of that.
For extracting tight cotters, the one tip that helps more than anything else is heat. Don't use heat as a last resort, use it first and always. An adequate Chinese heat gun can be had for under $20, and you'll find other uses for it too, like shrinking heat-shrink tubing, or force-drying things that have been washed with water-based detergent so they don't sit around rusting until they dry naturally.
Mark B in Seattle
Last edited by bulgie; 08-29-20 at 04:11 PM. Reason: censorship
08-29-20, 04:17 PM
#87
Senior Member
I just file them very flat (file not rocking, keep it "planar"), to a depth that allows the cotter to go in the right amount. Angle hardly matters at all IMHO as long as they're the same right and left. Obviously choose the right diameter, and hopefully high quality steel, but not much else matters.
The important things are 1) that they go in the right amount, and 2) that both left and right are exactly the same, or else the crankarms won't be 180 degrees, oh and 3) that the bevel is perfectly flat and not twisted.
08-29-20, 04:21 PM
#88
Passista
Join Date: Jul 2005
Posts: 7,596
Bikes: 1998 Pinarello Asolo, 1992 KHS Monta�a pro, 1980 Raleigh DL-1, IGH Hybrid, IGH Utility
Mentioned: 5 Post(s)
Tagged: 0 Thread(s)
Quoted: 866 Post(s)
Liked 720 Times
in
395 Posts
Now that you point it out, that's right. The angle self corrects. I don't think I've done a cottered crank repair since about 1990, if not longer. Getting a bit fuzzy.
The important things are 1) that they go in the right amount, and 2) that both left and right are exactly the same, or else the crankarms won't be 180 degrees, oh and 3) that the bevel is perfectly flat and not twisted.
The important things are 1) that they go in the right amount, and 2) that both left and right are exactly the same, or else the crankarms won't be 180 degrees, oh and 3) that the bevel is perfectly flat and not twisted.
08-29-20, 04:22 PM
#89
blahblahblah chrome moly
Join Date: Apr 2009
Location: Seattle
Posts: 1,985
Mentioned: 92 Post(s)
Tagged: 0 Thread(s)
Quoted: 1172 Post(s)
Liked 2,567 Times
in
1,072 Posts
OK maybe I'm wrong about filing deeper giving you a wider area of contact. I thought about it after posting my previous one and now I'm thinking that was bogus -- the geometry of the crank arm (where the hole is), and how deep the flat is on the spindle, determine how wide the contact area is. Am I still not thinking it through?
But there is still one slight advantage to filing deeper so more of the threaded end sticks out -- then less of the opposite end sticks out to catch on your pants leg! Yes I know I should be using trouser clips but I've been known to jump on without them for a short hop. Extra threaded length sticking out can be cut off with a hacksaw, so just a minimum amount protrudes past the nut. Lighter weight that way too!
-mb
08-29-20, 04:41 PM
#90
blahblahblah chrome moly
Join Date: Apr 2009
Location: Seattle
Posts: 1,985
Mentioned: 92 Post(s)
Tagged: 0 Thread(s)
Quoted: 1172 Post(s)
Liked 2,567 Times
in
1,072 Posts
I have heard it said the reason for bracing the crank was to prevent damage to the bearings, but that's not true, you can't hurt the bearings by hammering cotters. The brace is to prevent the "impulse" (brief maximum force) from the hammer blow from being dissipated.
I have a punch with a concave end, so it stays centered on the cotter. Actually my punch is another old cottered spindle that was retired due to having pitted cones. It has decorative concavities at both ends, and they mate up well with the sort of domed ends on most cotters. If you hold the punch in a vise-grip pliers, then your hand is not in the path of the hammer swing, which for most people is what's keeping them from swinging the whammer-jammer as hard as they ought.
-mb
08-29-20, 04:58 PM
#91
Senior Member
Join Date: Aug 2013
Posts: 2,321
Mentioned: 35 Post(s)
Tagged: 0 Thread(s)
Quoted: 767 Post(s)
Liked 1,898 Times
in
889 Posts
To summarize: the OP is trying to match angles with one pin still installed. He hasn't compared the two pins, and has apparently been riding his bike around with one crank arm. He has no frame of reference, and has been given LOADS of good information about how to proceed. Also, it's not that he has no vise, but that he can't figure out how to use one without destroying it.
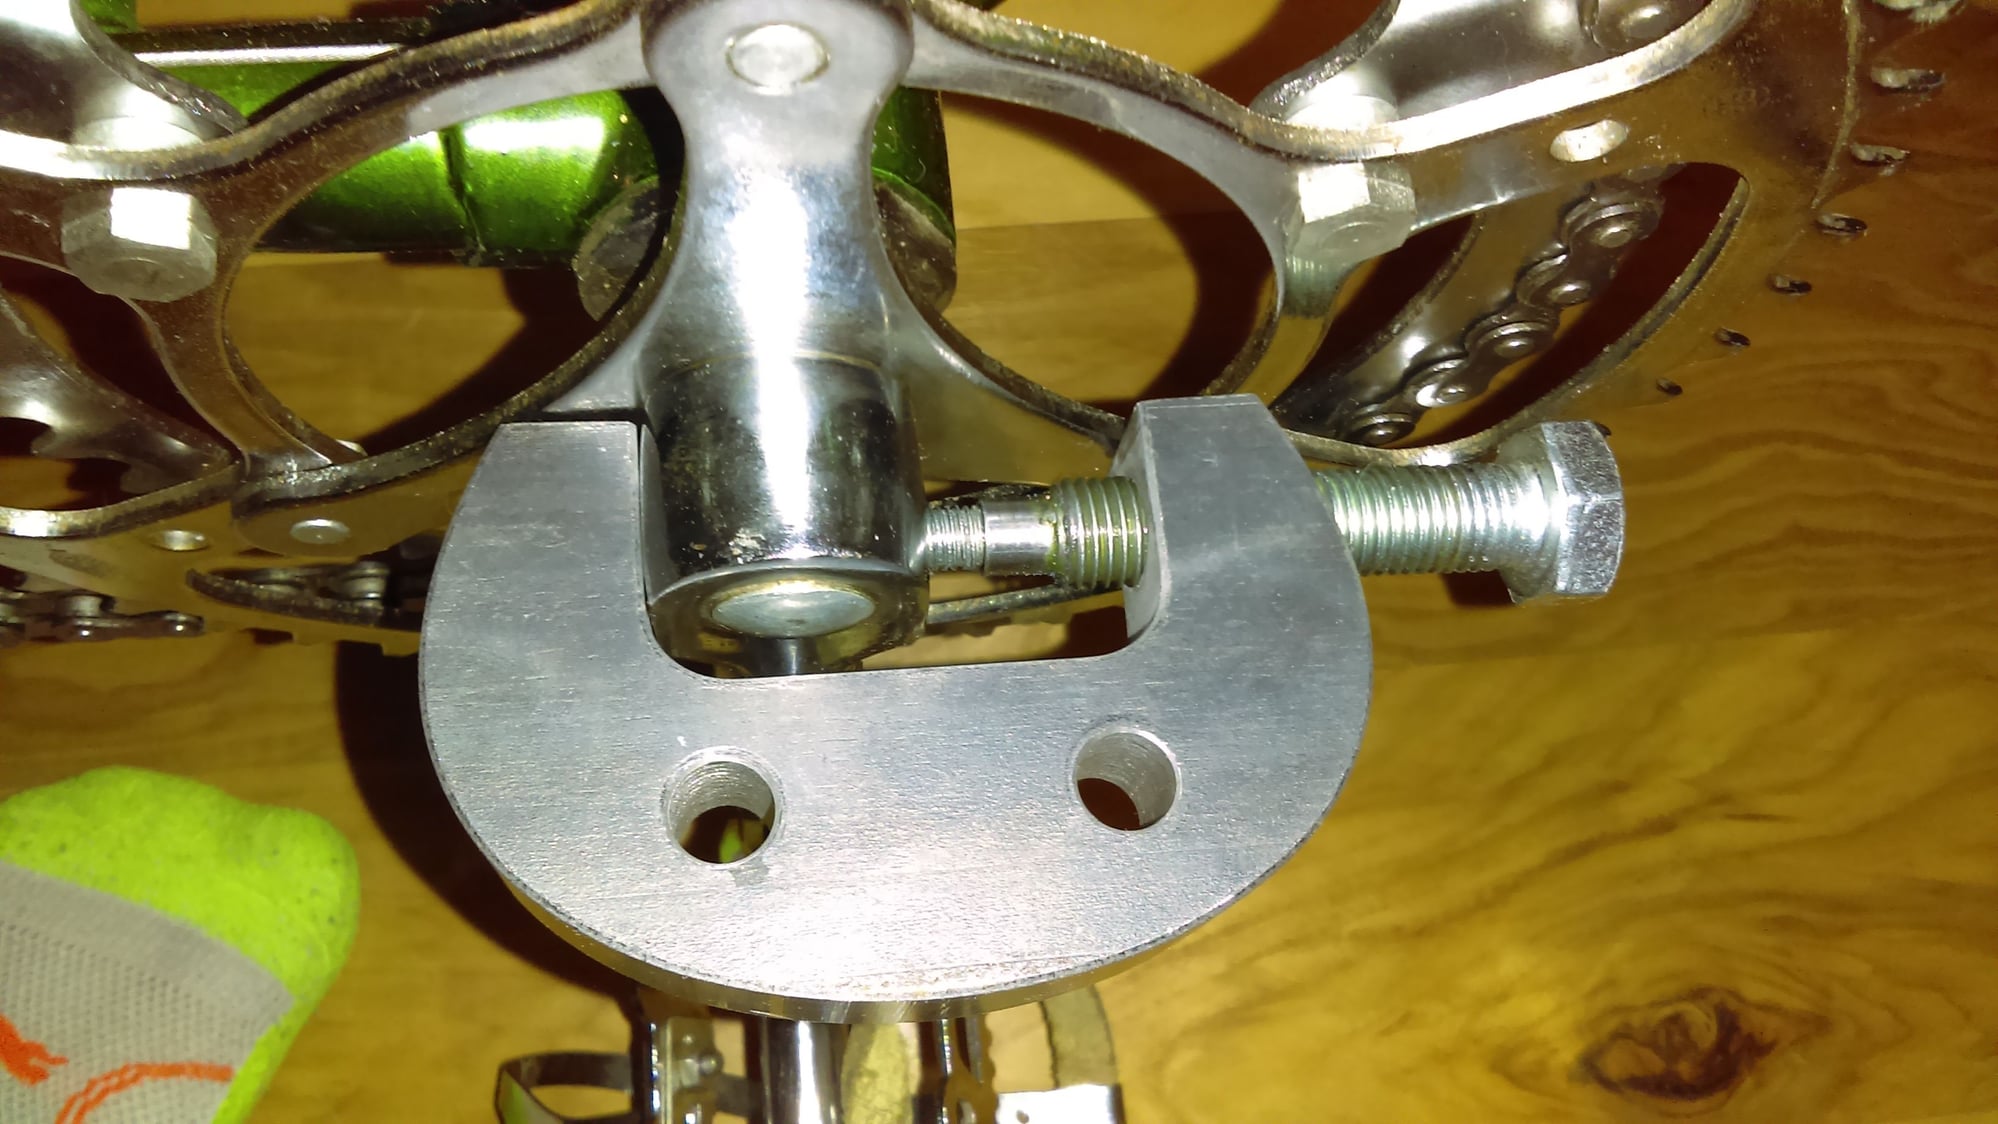
Cotter press ^^
Pin out ^^
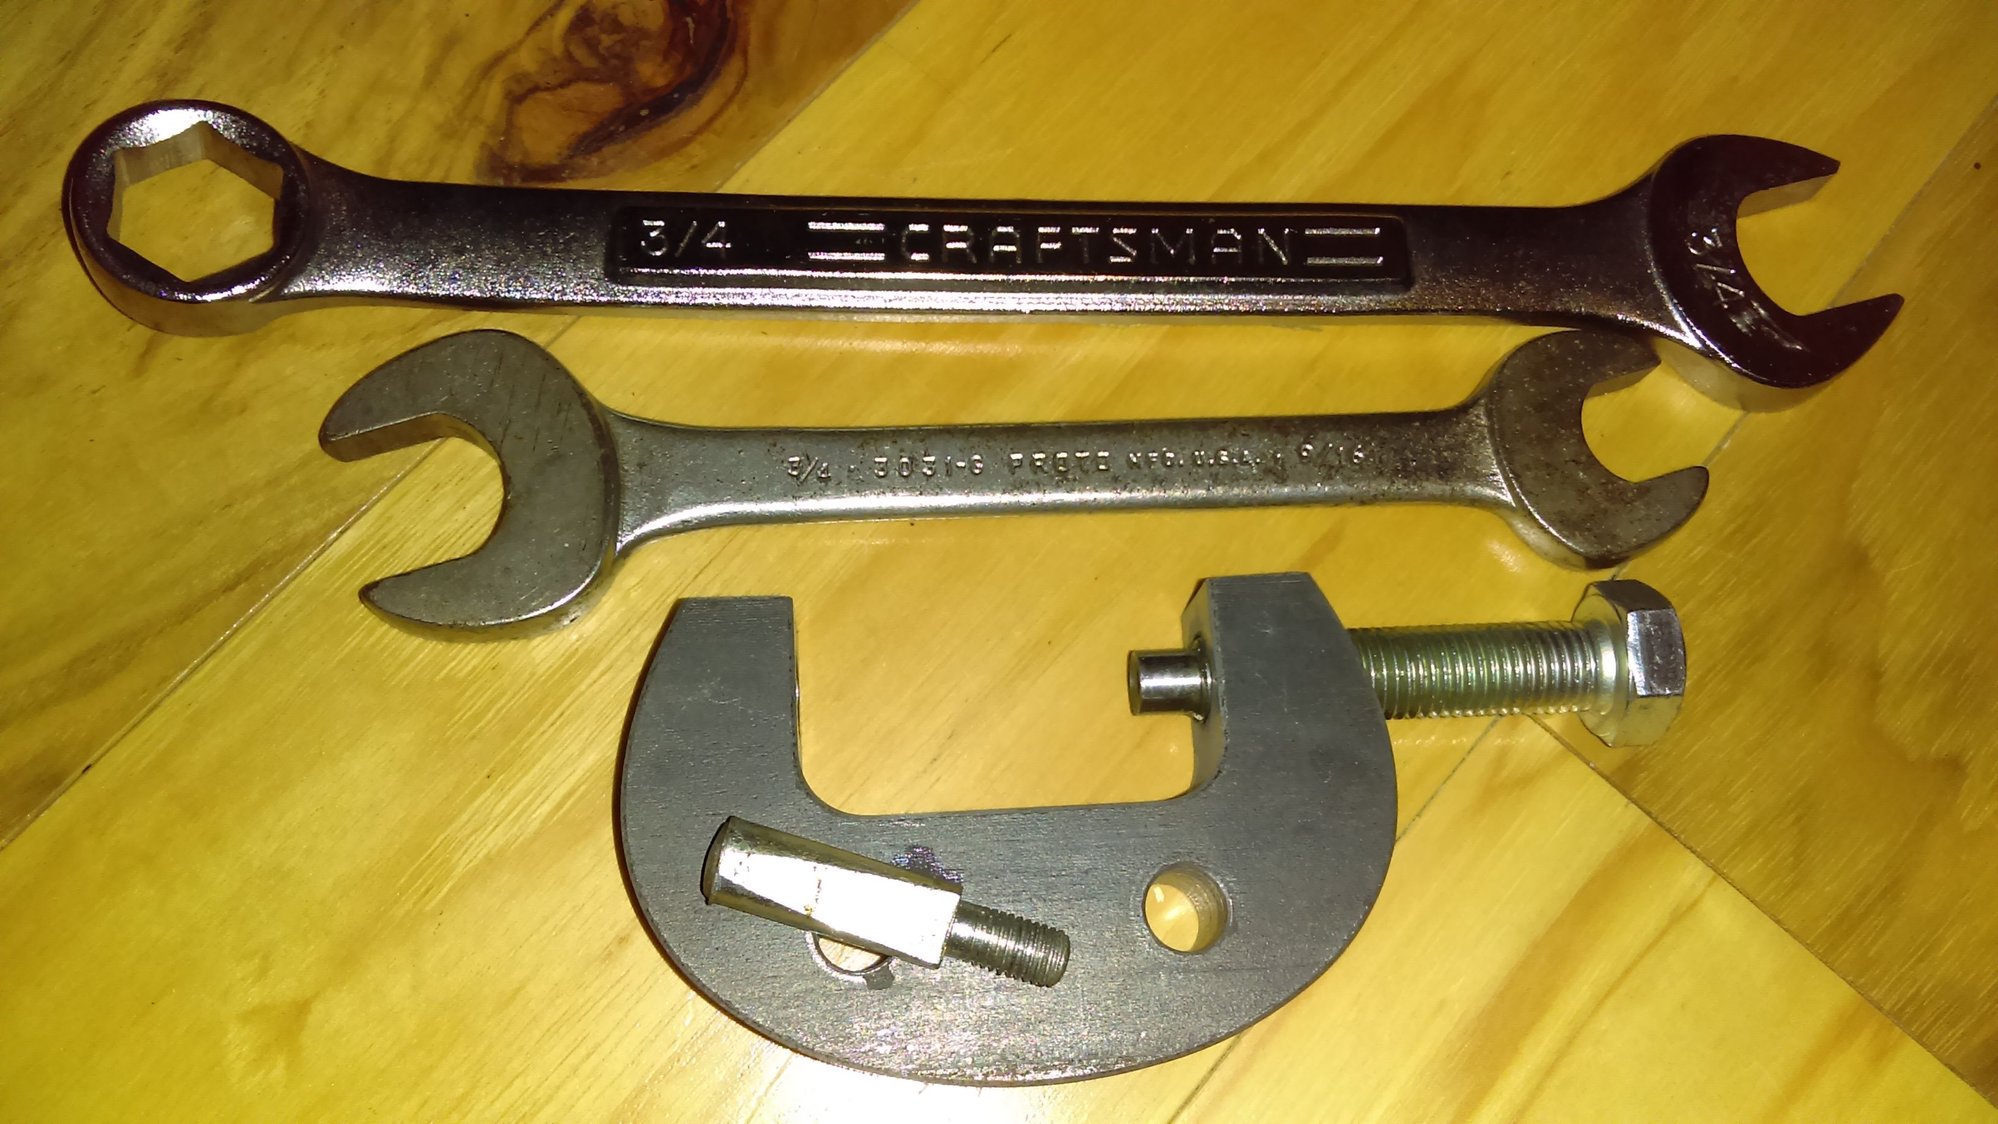
Required tools ^^
Reverse to install. Cotters that won't move get penetrating oil and/or heat. Sometimes the threaded stems do deform. Use two new matched pins in that case. Always grease the pin before installing so you can get it out again without destroying it. Retighten after first ride (meaning press in with press or strong supported hammer shot) and after, say, 100 mile or so.
Cotter press ^^
Pin out ^^
Required tools ^^
Reverse to install. Cotters that won't move get penetrating oil and/or heat. Sometimes the threaded stems do deform. Use two new matched pins in that case. Always grease the pin before installing so you can get it out again without destroying it. Retighten after first ride (meaning press in with press or strong supported hammer shot) and after, say, 100 mile or so.
Last edited by BFisher; 08-29-20 at 05:10 PM.
Likes For BFisher:
08-29-20, 07:27 PM
#93
Senior Member
Join Date: Jun 2006
Location: NW Burbs, Chicago
Posts: 12,048
Mentioned: 201 Post(s)
Tagged: 0 Thread(s)
Quoted: 3011 Post(s)
Liked 3,788 Times
in
1,405 Posts
I have paid a guy to do it. I paid two different guys to do it. When they failed is when the DIY attempt started.
Crank spindle is not a brush and cotter pin is not a canvas. What happens is a big smear of paint.
I am sure it is all obvious and simple for you. Good for you.
Crank spindle is not a brush and cotter pin is not a canvas. What happens is a big smear of paint.
I am sure it is all obvious and simple for you. Good for you.
Likes For iab:
08-29-20, 08:44 PM
#94
Senior Member
Join Date: Jun 2018
Location: The Urban Shores Of Michigami
Posts: 1,748
Bikes: ........................................ .....Holdsworth "Special"..... .......Falcon "Special".......... .........Miyata 912........... ........................................
Mentioned: 11 Post(s)
Tagged: 0 Thread(s)
Quoted: 702 Post(s)
Liked 671 Times
in
419 Posts
...........The luthier does not want to take over and do the job. First because he thinks I should do it. He has more confidence in that than I do. Also says it is one eightball historical wedge clamp and he would need significant trial and error before solving puzzle. This is a guy who gets flown around the planet solving mechanical puzzles no one else can. Also said I need to find mechanics with historical knowledge, because this has been solved before. I am trying..........
 08-30-20, 08:50 AM
#95
Senior Member
Join Date: Jun 2018
Location: The Urban Shores Of Michigami
Posts: 1,748
Bikes: ........................................ .....Holdsworth "Special"..... .......Falcon "Special".......... .........Miyata 912........... ........................................
Mentioned: 11 Post(s)
Tagged: 0 Thread(s)
Quoted: 702 Post(s)
Liked 671 Times
in
419 Posts
I've been thinking about these sketches. It seems to me the angle of the pin is irrelevant, assuming the angle is not extreme.
In sketches #2 and #3, the pins are only contacting the spindle at the extreme ends. When the pin is pressed into the crank arm, it forces the spindle to rotate providing full contact.
In sketches #2 and #3, the pins are only contacting the spindle at the extreme ends. When the pin is pressed into the crank arm, it forces the spindle to rotate providing full contact.
 08-30-20, 10:38 AM
#96
PM me your cotters

Join Date: Jun 2015
Location: ATL
Posts: 3,241
Mentioned: 80 Post(s)
Tagged: 0 Thread(s)
Quoted: 1137 Post(s)
Liked 588 Times
in
420 Posts
I've been thinking about these sketches. It seems to me the angle of the pin is irrelevant, assuming the angle is not extreme.
In sketches #2 and #3, the pins are only contacting the spindle at the extreme ends. When the pin is pressed into the crank arm, it forces the spindle to rotate providing full contact.
In sketches #2 and #3, the pins are only contacting the spindle at the extreme ends. When the pin is pressed into the crank arm, it forces the spindle to rotate providing full contact.
If you take a digital caliper to a spindle, you'll also find the flat isn't entirely uniform on the spindle either, there's upwards of 0.25mm variation in the spindle face surface IME. I took a caliper to a couple I have in my drawer to check before replying, for sanity's sake, and based on an inquiry in a post I believe you made and deleted previously. That lack of uniformity is one of a few reasons cotters need to be softer.
I assure you - and @ bulgie, maybe your experience is different - if you take a cotter like the # 1 I'd pictured earlier in the thread and try to hammer or press it into a crank that requires facing like the # 4 cotter, it's not going in all the way, and when it's pressed or hammered, it'll gouge like hell and work its way out prematurely.
For the record, I can't recall ever seeing gouging near the threaded side, I don't even know if it's technically possible, a cotter would likely slip too far in at the over-face required, but theoretically I believe it's what should happen. The sole purpose of my 5-minute picture which is super-poorly drawn, is to highlight the importance of angle, and express how you can "read" a cotter for newbies. It's basically what was taught to me decades ago, and it worked great for me to grasp it - YMMV
Going back to the original point, I think the majority of us who don't mind working w/cotters agree on what is critical and/or fact:
-
- You should use the correct diameter cotter
- The filed surface ideally needs to be uniformly flat
- The surface needs to be filed enough the cotter passes through to expose adequate threads
- The cotter is softer metal, so ultimate precision is not a big deal, but a fast, extreme pressure is critical
- You should never use the nut on the threaded end to "pull in" the cotter, the threads will strip before enough pressure is exerted
-
- Getting at least one old cotter intact and use it as a facing template is ideal
- Under-filing, steep angles are usually a recipe for failure, but over-filing is equally bad
- If you're starting from scratch with no old reference cotter, or previous cotters weren't faced right, press in and remove the new cotter \at least once to look for gouges and re-face as necessary
- The job is possible with a hammer, newbies or blind & lazy people like me can get more success w/less damage out of a cantilever-style press (ala VAR 07) or a crank-down press (ala Bikesmith
However, that said, I'm totally confident I can complete my entire process of cotter install in 5 minutes or less without having the older cotter as template, and it will stay in until the next BB service, regardless how many thousands of miles get ridden, I've done it more times than I can count. The exact process and logic I use in my process is in this thread - take it or leave it - the general concepts and cues I adhere to are above. They may not be true, but it illustrates my personal experience.
As with anything I say, it's mostly true, I'm human so it may contain errors, try it, apply it, and take away what you will. If I'm wrong, you can prove it, and I can replicate it, I'll totally admit my mistake.
PS - My drawings usually suck, don't read into them too far. I'm not an artist, and it's worse when I'm limited to what Microsoft Paint is capable of doing.
__________________
███████████████
███████████████
Last edited by francophile; 08-30-20 at 10:48 AM. Reason: Grammar fix, linked earlier thread
08-30-20, 10:58 AM
#97
Senior Member
Join Date: Aug 2013
Posts: 2,321
Mentioned: 35 Post(s)
Tagged: 0 Thread(s)
Quoted: 767 Post(s)
Liked 1,898 Times
in
889 Posts
@francophile, your descriptions make sense to me, as do the suggestions by everyone else who has tried to help by posting experiences and knowledge. It was said that this is a hard place to learn anything, but I would strongly disagree. Even though I can make cottered cranks work for me, I learned a thing or two from all of the shared info. The OP needs an in-person helper who understands how these parts work. They may not be a luthier, but I'm sure they could manage.
Likes For BFisher:
08-30-20, 11:00 AM
#98
PM me your cotters
Join Date: Jun 2015
Location: ATL
Posts: 3,241
Mentioned: 80 Post(s)
Tagged: 0 Thread(s)
Quoted: 1137 Post(s)
Liked 588 Times
in
420 Posts
IMO and IME hammers suck for this, to be blunt about it. I still don't get some old timers who prefer or preferred to use a hammer. BTW, I've done a lot. I got stuck with all of the cottered cranks when I was a 15/16 year old shop apprentice. No one else wanted to do them.
tl;dr - there's a reason I don't build skyscrapers and houses: ME + Hammer = Impending Damage. For me, a press is far more accurate. Everyone has their preference.
__________________
███████████████
███████████████
08-31-20, 04:29 PM
#99
Senior Member
Thread Starter
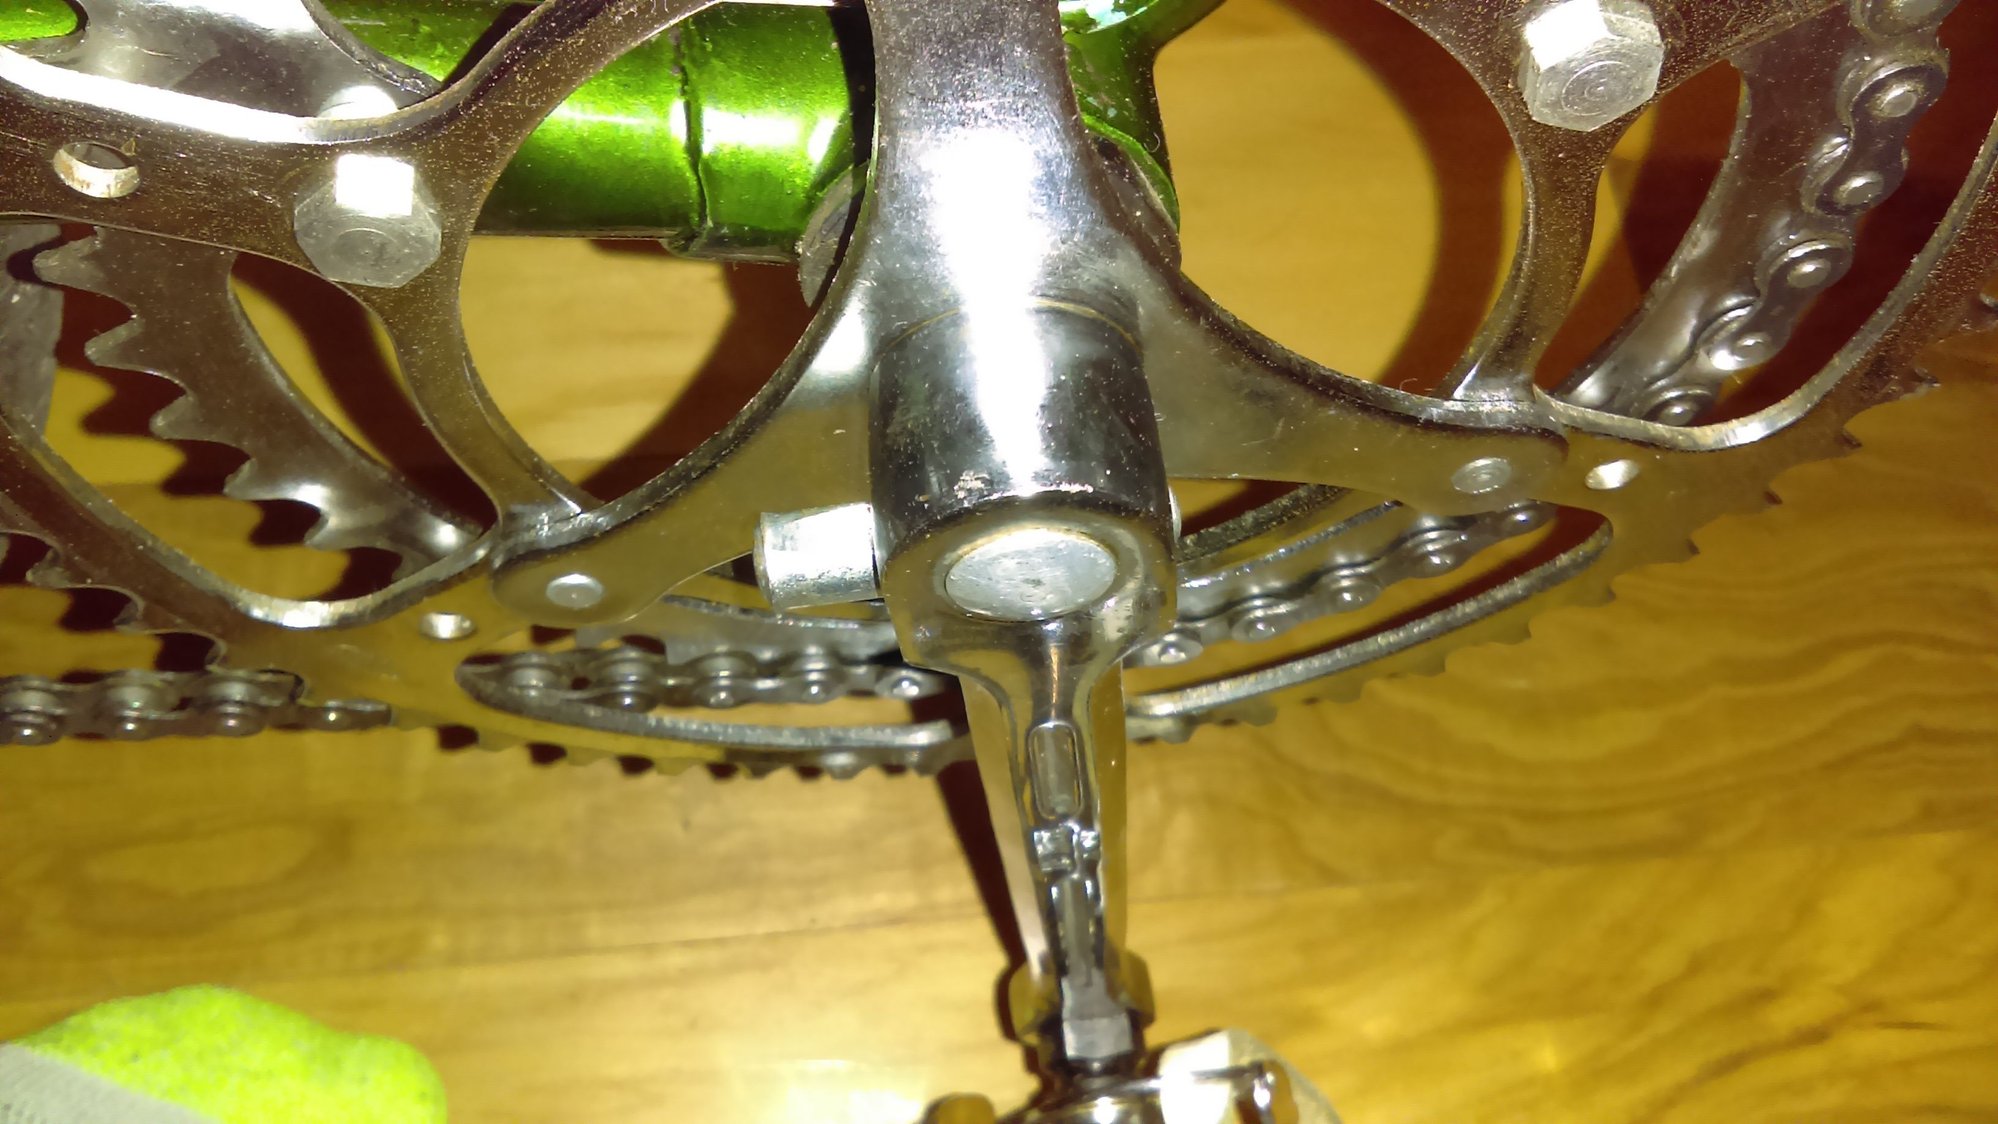
The crank is on the bike. It sits at 180 degrees without bothering the right crank. Found the mechanic who could do it. Many here would know him, he does not like being on forums. So that shall remain blank. Pressed in with a Var press and a pin I had partially filed. Raw pin did not press well and that was likely the problem for recent LBS installation failures.
There was another problem. Crank arm was a loose fit on spindle. This is exactly the sort of thing that would not be recognized by someone who does not do it every day. If the crank had not already worked 20 months the mechanic would not have done the job. It is not worn or ovalized. Purchased as shiny NOS. It was a French crank with 14x1.25 pedal threads. It is installed on a 5/8 English spindle which is 0.015” bigger than a French spindle. And still fits loose. Very likely the crank sat in storage for 55 years because someone knew that.
The man who did the job only has fifty years shop experience. He works seven days and very rarely takes a break. He has never filed a pin to fit. Has used Var since beginning. He has two cute cotter pin holders, they are only used when the raw cotter does not want to go in. When he does file he only follows the same plane already in the pin, and only cuts far enough to make the Var work smoother.
Along the way did meet two much older mechanics. At ages 77 and 81 they are no longer hands on. They had some colorful language for 1970s shop hands. Both began before there were presses, both said Mel Pinto and Var ended cotter fitting. The old way to do it was a bench grinder. Only recent Euro immigrants touched a file and they all switched to grinder quick. If the cut was too deep the pin was tossed and you tried again. Final fitting was done with a four pound sledge hammer. If there was a choice in who was to do cotter work it went to the one least reluctant to swing the big hammer.
Well fitted cotters did exist. Many OEM cotters came out easy and went back in same. Those were prized. Raleigh and Peugeot made cotters that fit their own cranks well and always worked easy. A handful of ace mechanics could make cotters fit smooth. Racers sought out those mechanics. Otherwise most customers were better off with Raleigh. The secrets of the old aces are gone. The two old mechanics were very unimpressed with the idea of endless fitting. The aces who could do the impressive jobs did it with a grinder like anyone else and did it fast.
08-31-20, 04:56 PM
#100
aka Tom Reingold

Join Date: Jan 2009
Location: New York, NY, and High Falls, NY, USA
Posts: 40,498
Bikes: 1962 Rudge Sports, 1971 Raleigh Super Course, 1971 Raleigh Pro Track, 1974 Raleigh International, 1975 Viscount Fixie, 1982 McLean, 1996 Lemond (Ti), 2002 Burley Zydeco tandem
Mentioned: 511 Post(s)
Tagged: 0 Thread(s)
Quoted: 7346 Post(s)
Liked 2,453 Times
in
1,430 Posts
I'm glad the story has a happy ending, and is an interesting one, too.
__________________
Tom Reingold, tom@noglider.com
New York City and High Falls, NY
Blogs: The Experienced Cyclist; noglider's ride blog
�When man invented the bicycle he reached the peak of his attainments.� � Elizabeth West, US author
Please email me rather than PM'ing me. Thanks.
Tom Reingold, tom@noglider.com
New York City and High Falls, NY
Blogs: The Experienced Cyclist; noglider's ride blog
�When man invented the bicycle he reached the peak of his attainments.� � Elizabeth West, US author
Please email me rather than PM'ing me. Thanks.