


Lejeune project complete
 07-15-20, 06:42 PM
#1

Senior Member
Thread Starter

Join Date: Apr 2006
Location: Washington County, Vermont, USA
Posts: 3,776
Bikes: 1966 Dawes Double Blue, 1976 Raleigh Gran Sport, 1975 Raleigh Sprite 27, 1980 Univega Viva Sport, 1971 Gitane Tour de France, 1984 Lotus Classique, 1976 Motobecane Grand Record
Mentioned: 77 Post(s)
Tagged: 0 Thread(s)
Quoted: 764 Post(s)
Liked 656 Times
in
348 Posts
Lejeune project complete
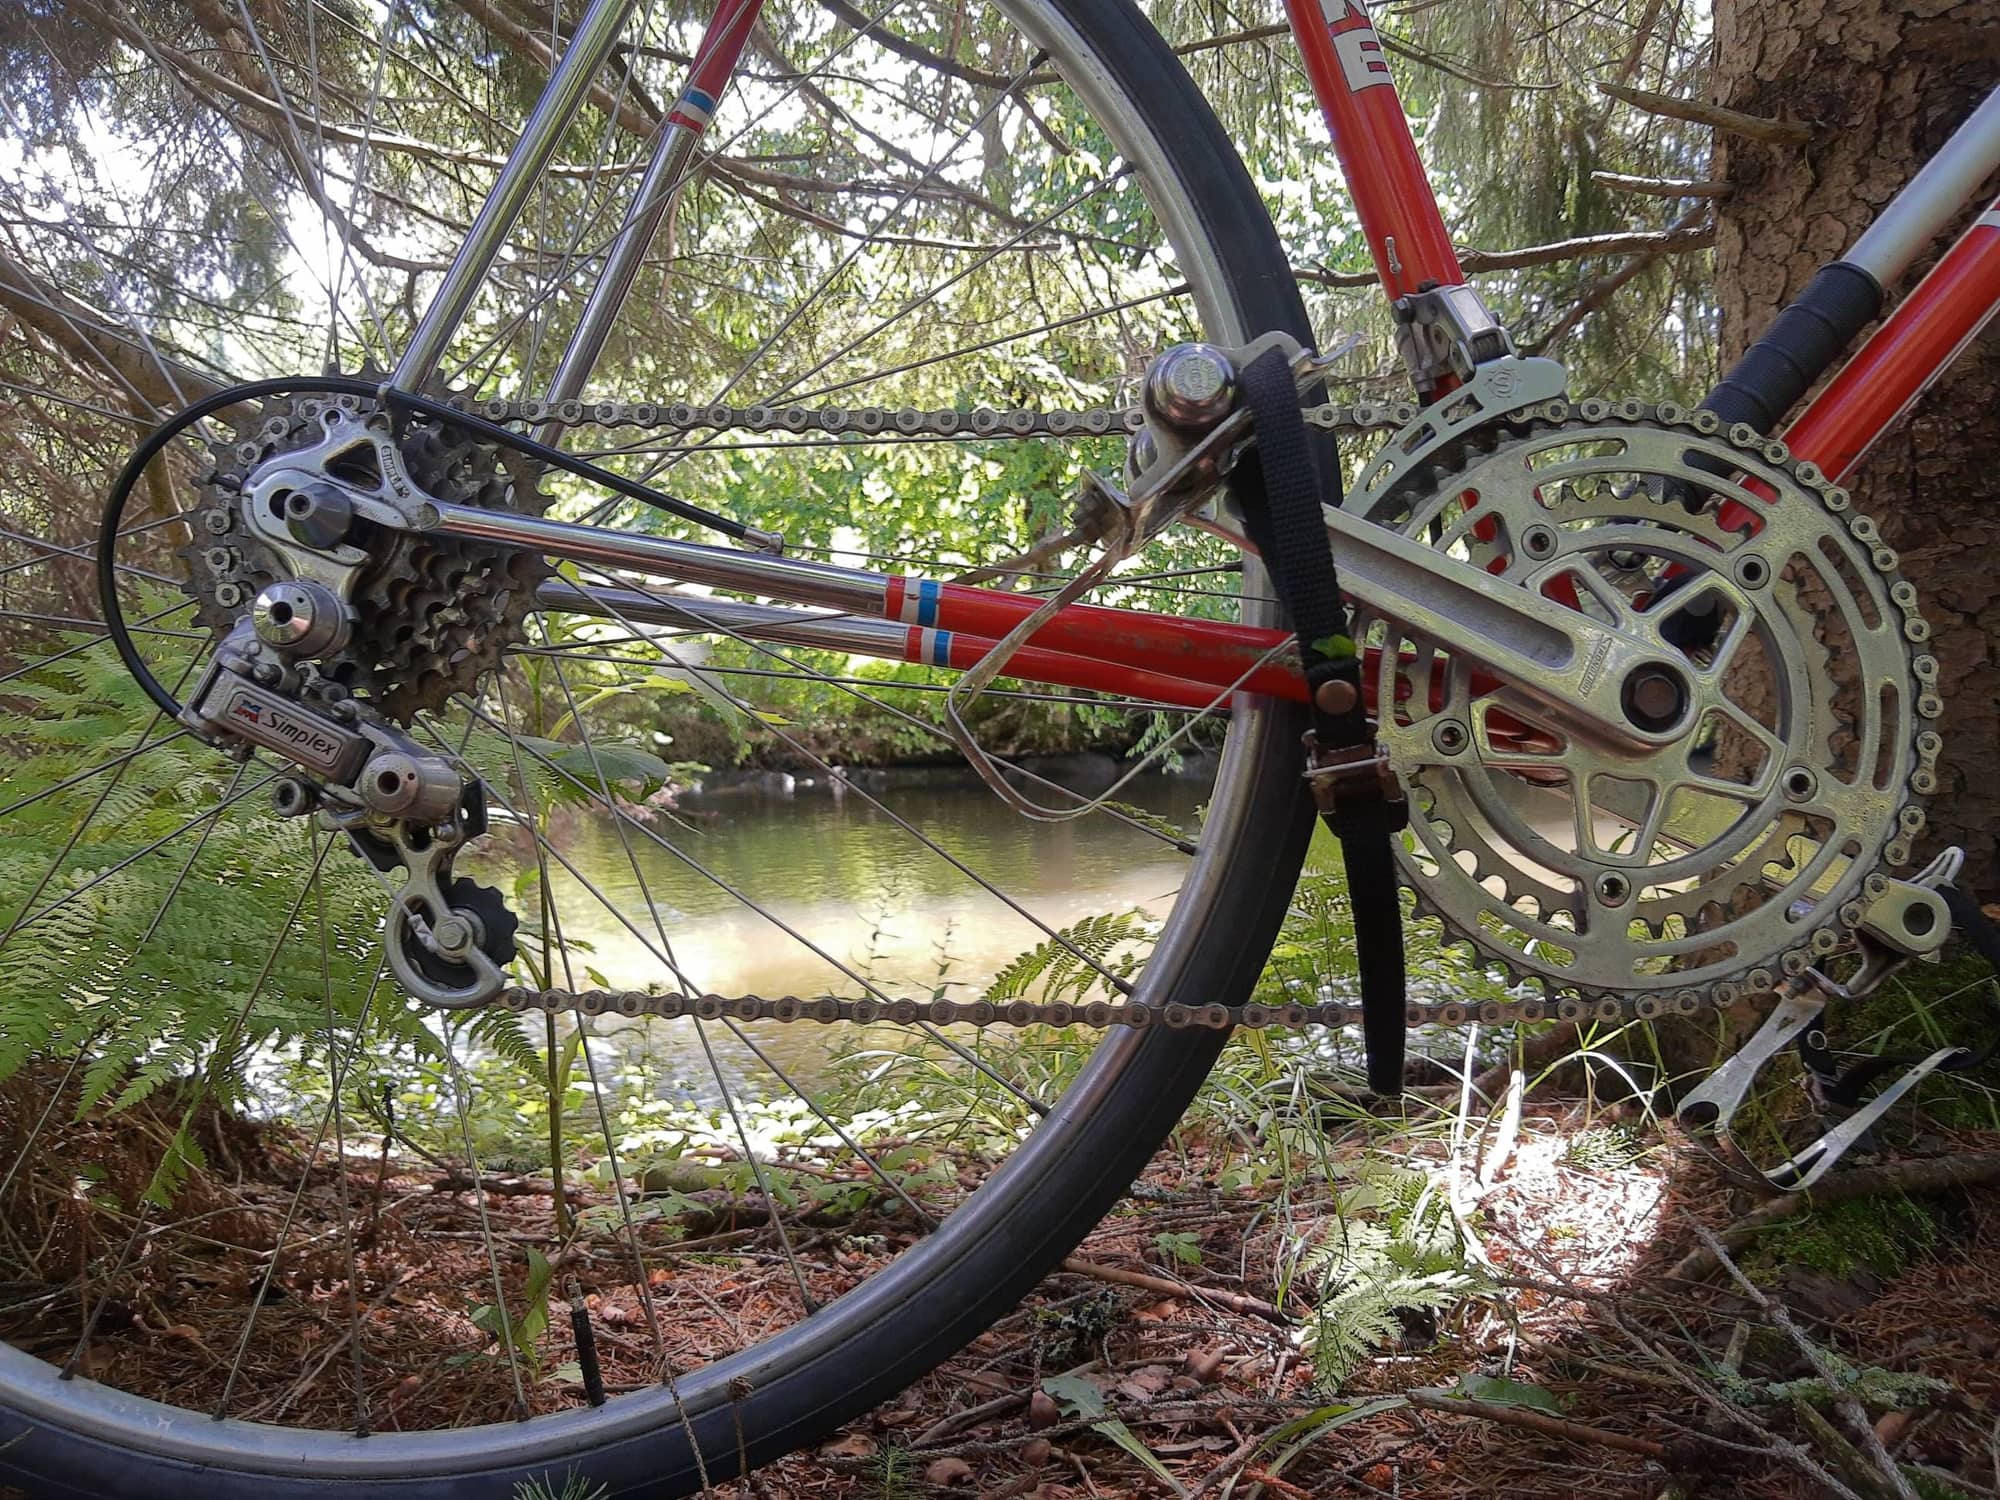
I took the newly built-up Lejeune out for a ride this afternoon. I obtained the frame from BF member big chainring, and the tubular rims from Andy_K. The rest of the components came out of my parts bin or off my Gitane TdF, which I partially cannibalized for the occasion. The frame is beautiful--full Reyolds 531 with willow-leaf caps on the seatstay ends. It also has what I regard as the perfect amount of patina--some evident wear on the waterslide decals, and a few tasteful paint scratches (including some evidence of long ago chain suck), but not a particle of rust. The chrome is about perfect, and the paint has a lovely shine to it.
It rides very nicely--corners well and has no tendency to wander off-line when going straight. The gratuitous drivetrain photo is to show that a Simplex SX610 shifts onto a 32 tooth cog with no issues, somewhat to my surprise. (This is the "T" model, with the pivot at one end of the cage.)
My only concern about this bike is that it's really too good for me, at least in terms of cosmetics. Most of my bikes came to me in substantially rougher-looking shape. This will have to be my good-weather rig, I guess.
__________________
www.redclovercomponents.com
"Progress might have been all right once, but it has gone on too long."
--Ogden Nash
www.redclovercomponents.com
"Progress might have been all right once, but it has gone on too long."
--Ogden Nash

Likes For jonwvara:
07-15-20, 06:45 PM
#2
Senior Member
Is this a red or orange frame? Either, it’s sure is Purdy!
Hoping you beautiful days for a very long summer!
Hoping you beautiful days for a very long summer!
07-15-20, 08:02 PM
#3
Senior Member
Thread Starter
Join Date: Apr 2006
Location: Washington County, Vermont, USA
Posts: 3,776
Bikes: 1966 Dawes Double Blue, 1976 Raleigh Gran Sport, 1975 Raleigh Sprite 27, 1980 Univega Viva Sport, 1971 Gitane Tour de France, 1984 Lotus Classique, 1976 Motobecane Grand Record
Mentioned: 77 Post(s)
Tagged: 0 Thread(s)
Quoted: 764 Post(s)
Liked 656 Times
in
348 Posts
It's clearly red, but toward the orange end of red. It's been nice here lately, but I haven't been able to ride much for a while as a result of a nasty cut on my shin (gardening accident, don't ask). But I'm back in action as of today.
__________________
www.redclovercomponents.com
"Progress might have been all right once, but it has gone on too long."
--Ogden Nash
www.redclovercomponents.com
"Progress might have been all right once, but it has gone on too long."
--Ogden Nash
07-15-20, 08:12 PM
#4
se�or miembro

Join Date: Dec 2018
Location: Pac NW
Posts: 6,602
Bikes: '70s - '80s Campagnolo
Mentioned: 92 Post(s)
Tagged: 0 Thread(s)
Quoted: 3870 Post(s)
Liked 6,461 Times
in
3,194 Posts
Great looking frame and setting for the photo. 
Is that a Motob�cane logo on the rear mech? Pretty rare. I think I'd cross the stem with both brake cables, so the rear enters its nds housing stop from that side of the head tube.
Is that a Motob�cane logo on the rear mech? Pretty rare. I think I'd cross the stem with both brake cables, so the rear enters its nds housing stop from that side of the head tube.
07-15-20, 09:52 PM
#5
If I own it, I ride it

Join Date: Nov 2005
Location: Cardinal Country
Posts: 5,579
Bikes: Lejeune(14), Raleigh, Raysport, Jan De Reus, Gazelle, Masi, B. Carr�(4), Springfield, Greg Lemond, Andre Bertin, Schwinn Paramount
Mentioned: 55 Post(s)
Tagged: 0 Thread(s)
Quoted: 591 Post(s)
Likes: 0
Liked 662 Times
in
311 Posts
You're hooked now.
07-16-20, 12:08 AM
#6
Senior Member

Join Date: Nov 2011
Location: Port Angeles, WA
Posts: 7,922
Bikes: A green one, "Ragleigh," or something.
Mentioned: 194 Post(s)
Tagged: 0 Thread(s)
Quoted: 1627 Post(s)
Liked 630 Times
in
356 Posts
__________________
● 1971 Grandis SL ● 1972 Lambert Grand Prix frankenbike ● 1972 Raleigh Super Course fixie ● 1973 Nishiki Semi-Pro ● 1979 Motobecane Grand Jubile ●1980 Apollo "Legnano" ● 1984 Peugeot Vagabond ● 1985 Shogun Prairie Breaker ● 1986 Merckx Super Corsa ● 1987 Schwinn Tempo ● 1988 Schwinn Voyageur ● 1989 Bottechia Team ADR replica ● 1990 Cannondale ST600 ● 1993 Technium RT600 ● 1996 Kona Lava Dome ●
● 1971 Grandis SL ● 1972 Lambert Grand Prix frankenbike ● 1972 Raleigh Super Course fixie ● 1973 Nishiki Semi-Pro ● 1979 Motobecane Grand Jubile ●1980 Apollo "Legnano" ● 1984 Peugeot Vagabond ● 1985 Shogun Prairie Breaker ● 1986 Merckx Super Corsa ● 1987 Schwinn Tempo ● 1988 Schwinn Voyageur ● 1989 Bottechia Team ADR replica ● 1990 Cannondale ST600 ● 1993 Technium RT600 ● 1996 Kona Lava Dome ●
07-16-20, 05:06 AM
#7
Senior Member
Thread Starter
Join Date: Apr 2006
Location: Washington County, Vermont, USA
Posts: 3,776
Bikes: 1966 Dawes Double Blue, 1976 Raleigh Gran Sport, 1975 Raleigh Sprite 27, 1980 Univega Viva Sport, 1971 Gitane Tour de France, 1984 Lotus Classique, 1976 Motobecane Grand Record
Mentioned: 77 Post(s)
Tagged: 0 Thread(s)
Quoted: 764 Post(s)
Liked 656 Times
in
348 Posts
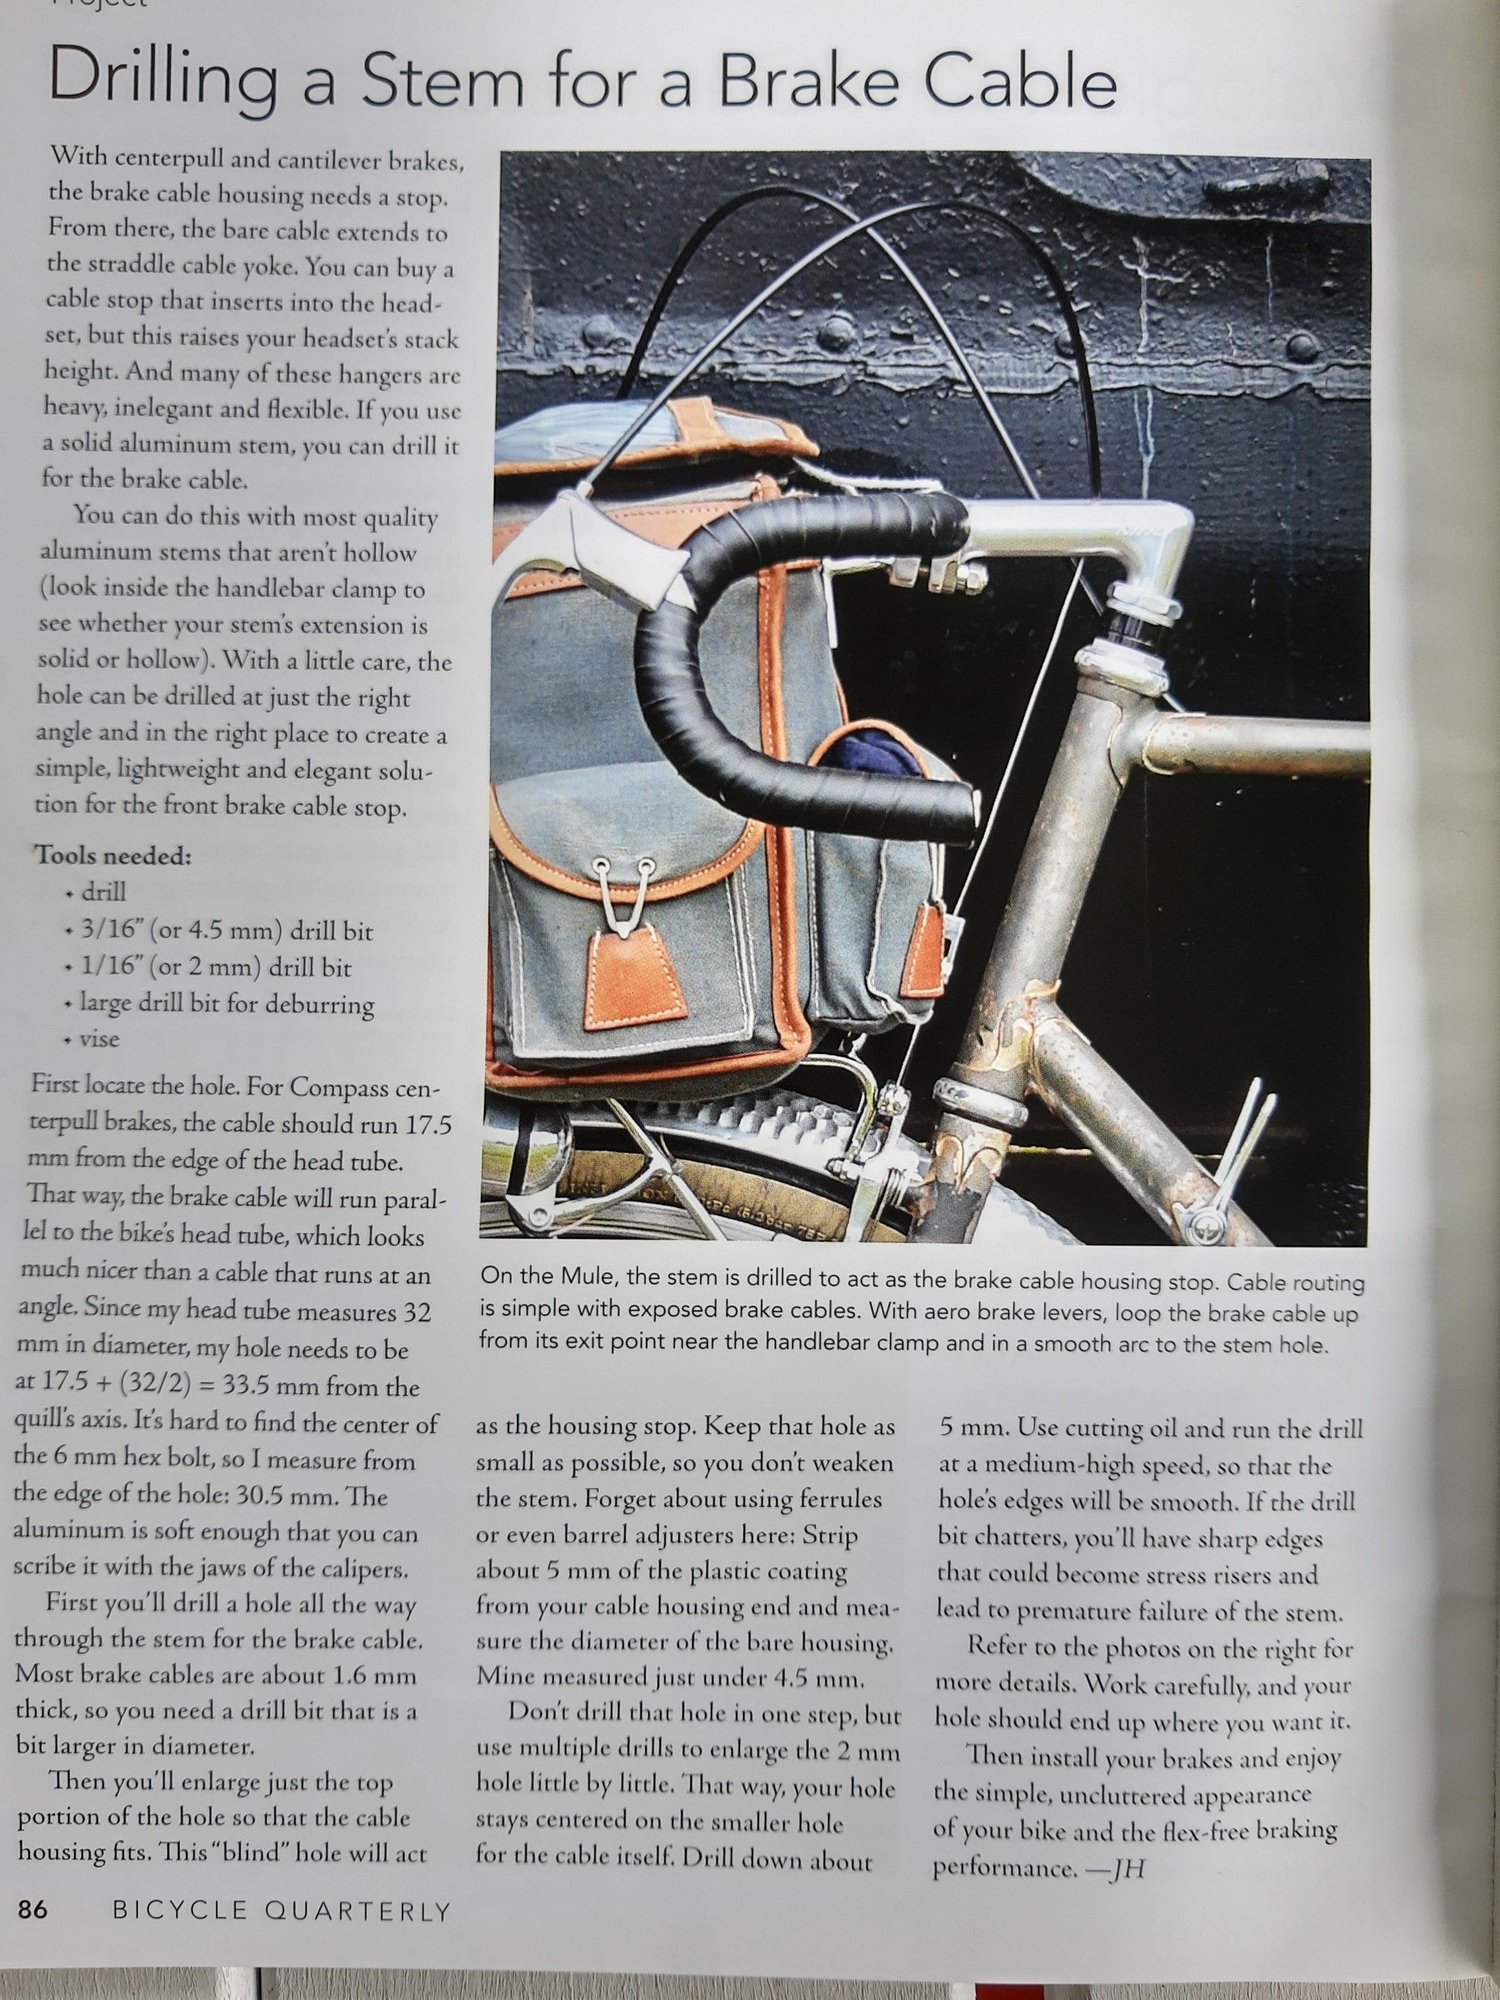
I'll take up your suggestion on the cable routing. It doesn't show up well in the photo, but I drilled the stem to serve as a cable stop instead of using the usual headset-mounted Mafac hanger. The French headset that came with the frame--and is about the right age to be original--had less than half a turn of engagement for the locknut with the hanger in place, so I removed it to create more space. Drilling the stem would have seemed iffy to me, but in Jan Heine's tutorial on doing so--in BQ #51--he notes that he showed the drilled stem to Mr. A. Yoshikawa, the president of Nitto, who deemed it safe. That's good enough for me. Eliminating the flex from the usual hanger gives the brake a much stiffer feel, which I like.
__________________
www.redclovercomponents.com
"Progress might have been all right once, but it has gone on too long."
--Ogden Nash
www.redclovercomponents.com
"Progress might have been all right once, but it has gone on too long."
--Ogden Nash
07-16-20, 05:39 AM
#8
Senior Member
Looks Great! Well done.
07-16-20, 07:18 AM
#9
Senior Member

Join Date: Apr 2012
Location: Middle Earth (aka IA)
Posts: 20,433
Bikes: A bunch of old bikes and a few new ones
Mentioned: 178 Post(s)
Tagged: 0 Thread(s)
Quoted: 5888 Post(s)
Liked 3,471 Times
in
2,079 Posts
Great looking bike and I like the build. Those are Lyotard Berthet platform pedals? I have a Mercier 300 I need to build up and I plan on using those pedals. I have a Moto branded simplex rear derailleur as well.
07-16-20, 09:05 AM
#10

Senior Member
Join Date: Jun 2006
Posts: 20,305
Mentioned: 130 Post(s)
Tagged: 0 Thread(s)
Quoted: 3464 Post(s)
Liked 2,827 Times
in
1,995 Posts
Assembled Well.
not a fan of all black tires but with the black elsewhere it all balances out.
not a fan of all black tires but with the black elsewhere it all balances out.
07-16-20, 11:36 AM
#11
se�or miembro
Join Date: Dec 2018
Location: Pac NW
Posts: 6,602
Bikes: '70s - '80s Campagnolo
Mentioned: 92 Post(s)
Tagged: 0 Thread(s)
Quoted: 3870 Post(s)
Liked 6,461 Times
in
3,194 Posts
07-16-20, 12:58 PM
#12
Junior Member

Join Date: Sep 2019
Location: Minnesota
Posts: 87
Bikes: Raleigh Mojave 4.0, Panasonic DX1000
Mentioned: 1 Post(s)
Tagged: 0 Thread(s)
Quoted: 46 Post(s)
Liked 22 Times
in
15 Posts
Beautiful color on that bike. It makes me want to pick up a vintage for my first road bike.
Enjoy
Enjoy
07-16-20, 01:28 PM
#13
If I own it, I ride it
Join Date: Nov 2005
Location: Cardinal Country
Posts: 5,579
Bikes: Lejeune(14), Raleigh, Raysport, Jan De Reus, Gazelle, Masi, B. Carr�(4), Springfield, Greg Lemond, Andre Bertin, Schwinn Paramount
Mentioned: 55 Post(s)
Tagged: 0 Thread(s)
Quoted: 591 Post(s)
Likes: 0
Liked 662 Times
in
311 Posts
Good eye! Yes, it's the Motobecane logo, though the derailleur is still Simplex branded. Thanks for not pointing out that the tire labels are on the non-drive side. I was so hyped up over my first-ever mounting of a set of tubulars that I forgot all about label placement. I'm lucky they at least ended up on the same side.
I'll take up your suggestion on the cable routing. It doesn't show up well in the photo, but I drilled the stem to serve as a cable stop instead of using the usual headset-mounted Mafac hanger. The French headset that came with the frame--and is about the right age to be original--had less than half a turn of engagement for the locknut with the hanger in place, so I removed it to create more space. Drilling the stem would have seemed iffy to me, but in Jan Heine's tutorial on doing so--in BQ #51--he notes that he showed the drilled stem to Mr. A. Yoshikawa, the president of Nitto, who deemed it safe. That's good enough for me. Eliminating the flex from the usual hanger gives the brake a much stiffer feel, which I like.
I'll take up your suggestion on the cable routing. It doesn't show up well in the photo, but I drilled the stem to serve as a cable stop instead of using the usual headset-mounted Mafac hanger. The French headset that came with the frame--and is about the right age to be original--had less than half a turn of engagement for the locknut with the hanger in place, so I removed it to create more space. Drilling the stem would have seemed iffy to me, but in Jan Heine's tutorial on doing so--in BQ #51--he notes that he showed the drilled stem to Mr. A. Yoshikawa, the president of Nitto, who deemed it safe. That's good enough for me. Eliminating the flex from the usual hanger gives the brake a much stiffer feel, which I like.
07-16-20, 01:52 PM
#14
Senior Member

Join Date: Sep 2013
Location: Chicago
Posts: 1,082
Bikes: '72 Peugeot PX-10 '78 Motobecane Le Champion '83 Motobecane Grand Jubile '85 Trek 830 '88 Merckx Team ADR Corsa Extra
Mentioned: 5 Post(s)
Tagged: 0 Thread(s)
Quoted: 471 Post(s)
Liked 1,213 Times
in
651 Posts
Great job with the build. I coveted that frame when Big Chainring had it for sale. Enjoy that thing.
07-16-20, 02:17 PM
#15
aka Tom Reingold

Join Date: Jan 2009
Location: New York, NY, and High Falls, NY, USA
Posts: 40,498
Bikes: 1962 Rudge Sports, 1971 Raleigh Super Course, 1971 Raleigh Pro Track, 1974 Raleigh International, 1975 Viscount Fixie, 1982 McLean, 1996 Lemond (Ti), 2002 Burley Zydeco tandem
Mentioned: 511 Post(s)
Tagged: 0 Thread(s)
Quoted: 7346 Post(s)
Liked 2,452 Times
in
1,430 Posts
Damn, that's awfully nice. I remember admiring those bikes back when they were sold. I saw quite a few in Central Park.
__________________
Tom Reingold, tom@noglider.com
New York City and High Falls, NY
Blogs: The Experienced Cyclist; noglider's ride blog
�When man invented the bicycle he reached the peak of his attainments.� � Elizabeth West, US author
Please email me rather than PM'ing me. Thanks.
Tom Reingold, tom@noglider.com
New York City and High Falls, NY
Blogs: The Experienced Cyclist; noglider's ride blog
�When man invented the bicycle he reached the peak of his attainments.� � Elizabeth West, US author
Please email me rather than PM'ing me. Thanks.
07-16-20, 04:35 PM
#16
Senior Member
Thread Starter
Join Date: Apr 2006
Location: Washington County, Vermont, USA
Posts: 3,776
Bikes: 1966 Dawes Double Blue, 1976 Raleigh Gran Sport, 1975 Raleigh Sprite 27, 1980 Univega Viva Sport, 1971 Gitane Tour de France, 1984 Lotus Classique, 1976 Motobecane Grand Record
Mentioned: 77 Post(s)
Tagged: 0 Thread(s)
Quoted: 764 Post(s)
Liked 656 Times
in
348 Posts
The key things, I thought, were starting the hole in the right place so it's centered from side to side in the stem extension, and along its length so the cable runs parallel to the headset between the stem and brake. Heine's directions about how to measure for that are useful. The only change I made was to the drill bit sizes. The author says to use a 1/16 or 2mm bit to make the through-hole for the cable. I found that a 1/16 was too small--the cable I had didn't quite fit--so I upped it to a 5/64, which is just a couple of thousandths (of an inch, sorry, mixing units) smaller that 2mm. I also found that a 5/32 was the right size for the shallow counterbore that accepts the stripped end of the housing--it gave a nice non-sloppy fit. The suggested bit size would have been a bit big for the cable I used. I would check the hole with a block of wood or whatever before drilling the actual stem--different brands of cable housing probably differ slightly in size.
When drilling the cable hole, it really helps to clamp the stem in a vise as suggested, so the quill is vertical. That way you just have to eyeball the drill bit so it's vertical, which is a lot easier than drilling at an angle.
It would not be hard to make a simple plywood fixture that would let you do all this with a drill press, but the cheap old Sears press in my shop didn't have the capacity for it. Attacking an expensive (by my standards) piece of hardware with a hand drill was a little unnerving, but it came out fine.

__________________
www.redclovercomponents.com
"Progress might have been all right once, but it has gone on too long."
--Ogden Nash
www.redclovercomponents.com
"Progress might have been all right once, but it has gone on too long."
--Ogden Nash
07-16-20, 05:18 PM
#17
Senior Member
This tutorial is so damn timely I can’t believe my good fortune!! Beautiful build job.
