


1987 Schwinn Tempo seat post removal
 04-23-20, 04:39 PM
#1

Senior Member
Thread Starter
Join Date: Mar 2016
Location: North of Boston
Posts: 898
Bikes: 1973 Schwinn Sports Tourer plus a " few" more :)
Mentioned: 4 Post(s)
Tagged: 0 Thread(s)
Quoted: 211 Post(s)
Liked 199 Times
in
147 Posts
1987 Schwinn Tempo seat post removal
Hi,
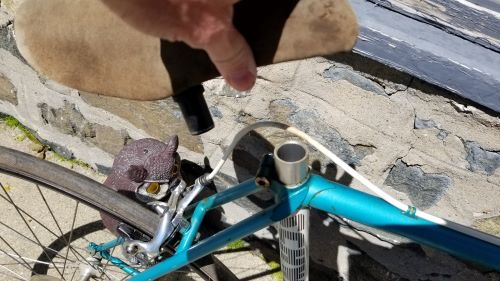
Picked up a Schwinn Tempo today and the seat post is stuck bad.
I sprayed rust off and spread open with a screw driver the binder bolt area to spray.
Went I went to use the seat as leverage , the seat came right off. I have never seen this .
Please see pic.
Any and all help is appreciated
Thank you
Picked up a Schwinn Tempo today and the seat post is stuck bad.
I sprayed rust off and spread open with a screw driver the binder bolt area to spray.
Went I went to use the seat as leverage , the seat came right off. I have never seen this .
Please see pic.
Any and all help is appreciated
Thank you
 04-23-20, 04:52 PM
#2
se�or miembro

Join Date: Dec 2018
Location: Pac NW
Posts: 6,624
Bikes: '70s - '80s Campagnolo
Mentioned: 92 Post(s)
Tagged: 0 Thread(s)
Quoted: 3888 Post(s)
Liked 6,486 Times
in
3,210 Posts
This is a big topic here, and there are plenty of threads you can search for information. Also check the youtube vids.
I've had good luck soaking the area with an equal mix of automatic transmission fluid (atf) and acetone. Let it soak a week. Try removal. Repeat.
I've had good luck soaking the area with an equal mix of automatic transmission fluid (atf) and acetone. Let it soak a week. Try removal. Repeat.
04-23-20, 05:13 PM
#3
Senior Member
Join Date: Jan 2004
Location: Madison, WI USA
Posts: 6,154
Mentioned: 50 Post(s)
Tagged: 0 Thread(s)
Quoted: 2363 Post(s)
Liked 1,749 Times
in
1,191 Posts
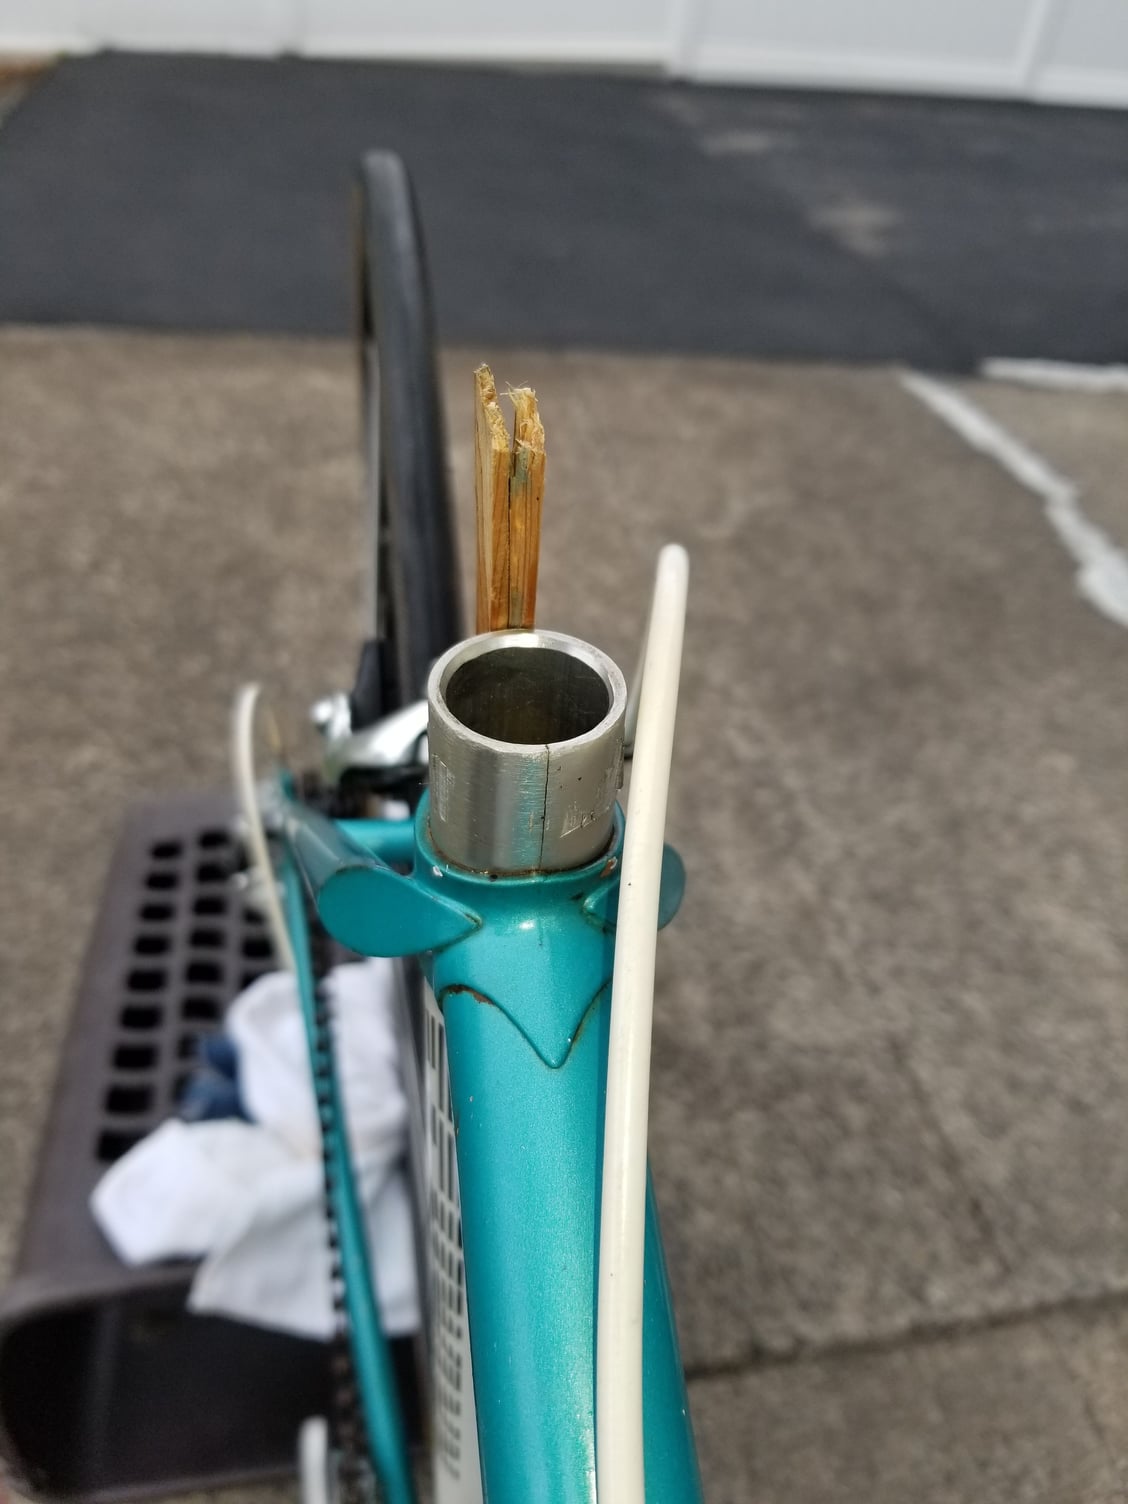
It wasn't just the saddle that came off, it was the top portion of the seat post. Seat posts are usually press fit together between the main pipe and the top, and that's where yours has come apart. So there's a chance that, if you can remove the post intact from the frame, you could reassemble it. I had a seat post come apart once in a similar way, and I probably shouldn't be propagating this idea, but I "fixed" it by slathering JB Weld in the are where the two parts fit togehter. So far it's held up.
Best way to get any chemical persuasion in is to remove the bottom bracket, turn the bike upside down, and pour it in through the bottom of the seat tube. Then leave it upside down for several days. But first plug the top, either with tape or the like, or with the top portion of the seat post.
Final option, which may be worth considering since the seat post is now in two pieces - try one of the many destructive methods. RJ the Bike Guy (on youtube) recently posted a video showing a destructive method of removing the post by using an impact wrench on the pipe portion. Another option is to slice outward through the pipe with a hacksaw; just use caution as you get closer to the outside. RJ has several rather unorthodox options; just go to his channel and search on "stuck seat post".
 04-23-20, 07:58 PM
#4
spondylitis.org

Join Date: Mar 2013
Location: Fleetwood, PA, USA
Posts: 1,003
Bikes: '84 Colnago Super; '90 Bridgestone MB-1; '81 Trek 930; '01 Cinelli Supercorsa; '62 Ideor Asso; '87 Tommasini Super Prestige; '13 Lynskey R2300; '84 Serotta Nova Special; '94 Litespeed Catalyst; etc.
Mentioned: 10 Post(s)
Tagged: 0 Thread(s)
Quoted: 121 Post(s)
Liked 97 Times
in
63 Posts
https://sheldonbrown.com/stuck-seatposts.html
The key is to get the seatpost rotating.
Given what you have there you might try this approach -
1) Replace the seat and micro adjust top back into the seatpost tube.
2) Drill two holes in the top of the seatpost and through the stub end of the micro adjust assembly.
3) Remove the micro adjust and seat, then slather in JBWeld. Replace, then secure with two bolts and nuts through the holes you drilled in step 2. Allow the epoxy to cure.
4) Remove the seatpost binder bolt; set aside. Pry open the wings of the seatpost clamp (gently), using a flat screwdriver.
5) Apply penetrating oil (Kroil, PB Blaster, etc) between the seatpost and the seat tube. Do this repeatedly, until you are certain that the lubricant is getting between seatpost and seat tube. (Might take repeated applications over a period of hours. Time is your friend.)
6) After the soaking is done, lightly pry apart the seatpost clamp wings again.
7) Set the bike up so that you can easily apply twisting leverage to the seat. Try rotating the seat back and forth. If the penetrant has been effective you should hear or feel a pop, and the seatpost should begin to turn.
8) If the seatpost still won't turn, try using vinegar with a little dish soap as a penetrant. Apply as you did for the penetrating oil and let sit for hours. Repeat step 7.
If the above methods are unsuccessful, you might need to visit your local machine shop to have them take the aluminum out on a drill press.
Pry-out may be an option if you have mad fabrication skills -
04-23-20, 09:07 PM
#5
Senior Member
Join Date: Jan 2004
Location: Madison, WI USA
Posts: 6,154
Mentioned: 50 Post(s)
Tagged: 0 Thread(s)
Quoted: 2363 Post(s)
Liked 1,749 Times
in
1,191 Posts
^^^^^ Micro-adjust part of the seat post is already out of the picture, as the OP's photo illustrates. But the above will work, generally, and will of course be destructive.
04-24-20, 07:03 AM
#6
Senior Member
Thread Starter
Join Date: Mar 2016
Location: North of Boston
Posts: 898
Bikes: 1973 Schwinn Sports Tourer plus a " few" more :)
Mentioned: 4 Post(s)
Tagged: 0 Thread(s)
Quoted: 211 Post(s)
Liked 199 Times
in
147 Posts
Thank you all for the great advice.
I know time is my friend, but sometimes I get too excited and want it done now
I will be patient and put " rust off " oil everyday and let it soak.
I will also spread the binder bolt area " slightly" to make sure it goes down.
Thank you again, and I'll keep all posted
I know time is my friend, but sometimes I get too excited and want it done now
I will be patient and put " rust off " oil everyday and let it soak.
I will also spread the binder bolt area " slightly" to make sure it goes down.
Thank you again, and I'll keep all posted
04-24-20, 07:24 AM
#7
SE Wis
Join Date: Apr 2005
Location: Milwaukee, WI
Posts: 10,515
Bikes: '68 Raleigh Sprite, '02 Raleigh C500, '84 Raleigh Gran Prix, '91 Trek 400, 2013 Novara Randonee, 1990 Trek 970
Mentioned: 40 Post(s)
Tagged: 0 Thread(s)
Quoted: 2747 Post(s)
Liked 3,398 Times
in
2,057 Posts
For reattachment of the top part of the post to use as additionl leverage you could reinsert, drill, and pin. I have a couple old seat posts that are pressed and pinned with thin roll pins there.
04-24-20, 10:26 AM
#8
Senior Member
Thread Starter
Join Date: Mar 2016
Location: North of Boston
Posts: 898
Bikes: 1973 Schwinn Sports Tourer plus a " few" more :)
Mentioned: 4 Post(s)
Tagged: 0 Thread(s)
Quoted: 211 Post(s)
Liked 199 Times
in
147 Posts
Thanks dedhed and all who have chimed in
Great advice.
I will spray the post every morning and let soak overnight.
Will attempt again in a few days
Great advice.
I will spray the post every morning and let soak overnight.
Will attempt again in a few days
04-26-20, 07:03 AM
#9
Senior Member
Thread Starter
Join Date: Mar 2016
Location: North of Boston
Posts: 898
Bikes: 1973 Schwinn Sports Tourer plus a " few" more :)
Mentioned: 4 Post(s)
Tagged: 0 Thread(s)
Quoted: 211 Post(s)
Liked 199 Times
in
147 Posts
Update !!
Sprayed PB Blaster 3 to 4 times during the day. And , as you can see, wedged it open a little
And sprayed inside the seat tube a lot. Turned the bike upside down and moved the bike around to let the solution get on all sides as it is running out the top.
Let soak that way for a few hours
Hit the post several times with a hammer using a piece of 2 x 4 to protect the post.
And tried to twist around with water pump pliers.
Now the post is cracked
But that is ok. I figured I would need to replace it.
Anyone have any other advice / solutions ?
I was thinking of drilling 4 holes in the post and then putting 2 steel rods through to make an X to have leverage twisting
Appreciate any and all the great help so far
Likes For bikemike73:
04-26-20, 08:33 AM
#10
aka: Dr. Cannondale
Join Date: Jul 2009
Posts: 7,734
Mentioned: 234 Post(s)
Tagged: 0 Thread(s)
Quoted: 2155 Post(s)
Liked 3,404 Times
in
1,205 Posts
Drill it and twist it. I�d go with twolarge holes and a stout twisting rod rather than four smaller holes.
Worst case it will break off and you�ll have to cut it out with a hacksaw blade. But you knew that already, so...
Meanwhile, in the end you�ll have an 87 Tempo frameset and there�s not much better in the world than that.
Worst case it will break off and you�ll have to cut it out with a hacksaw blade. But you knew that already, so...
Meanwhile, in the end you�ll have an 87 Tempo frameset and there�s not much better in the world than that.
__________________
Hard at work in the Secret Underground Laboratory...
Hard at work in the Secret Underground Laboratory...
04-26-20, 09:02 AM
#11
Senior Member
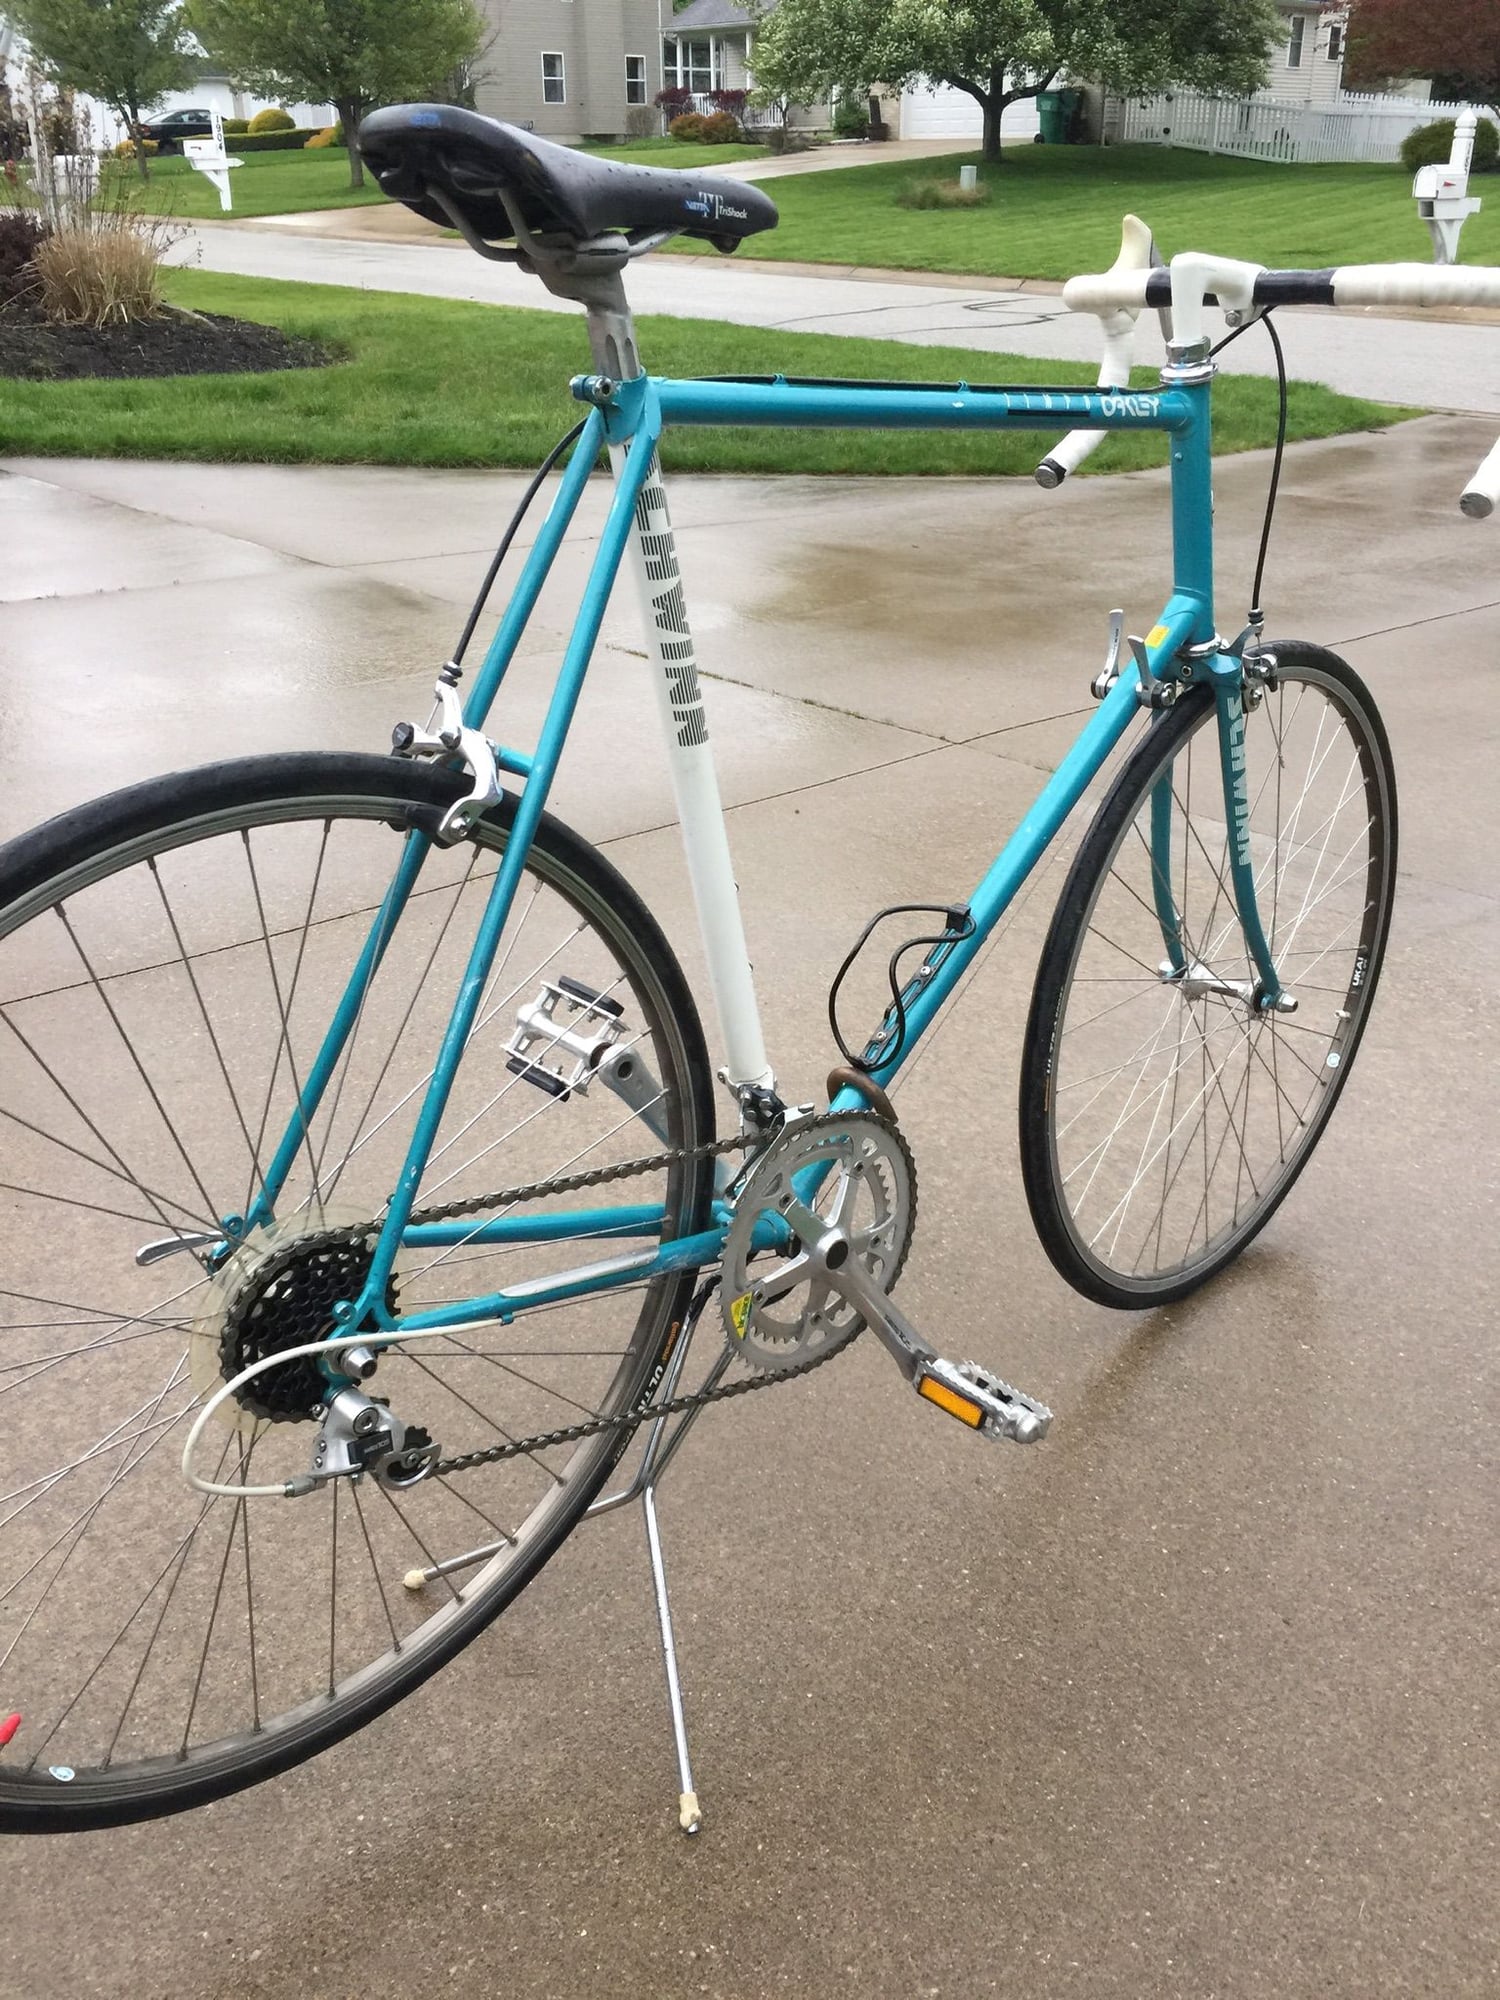
Looks like Tempo is is good shape other than that stuck post. Ive used boiling water on stuck seat post with good results. Here�s a pic of my 87 to keep you motivated. Kevin.
04-26-20, 09:19 AM
#12
SE Wis
Join Date: Apr 2005
Location: Milwaukee, WI
Posts: 10,515
Bikes: '68 Raleigh Sprite, '02 Raleigh C500, '84 Raleigh Gran Prix, '91 Trek 400, 2013 Novara Randonee, 1990 Trek 970
Mentioned: 40 Post(s)
Tagged: 0 Thread(s)
Quoted: 2747 Post(s)
Liked 3,398 Times
in
2,057 Posts
Does it appear the crack goes all the way down? You may be able to use that crack to fold the OD into the center to release it.
Likes For dedhed:
04-26-20, 10:07 AM
#13
Senior Member
Join Date: Jan 2004
Location: Madison, WI USA
Posts: 6,154
Mentioned: 50 Post(s)
Tagged: 0 Thread(s)
Quoted: 2363 Post(s)
Liked 1,749 Times
in
1,191 Posts
Do you have an impact, even an electric one? RJ has a twist (pun slightly intended) on your drill/turn idea, using an impact gun -
.
04-26-20, 01:06 PM
#14
Senior Member
Join Date: Feb 2010
Location: Bloomington/Normal IL
Posts: 1,062
Mentioned: 15 Post(s)
Tagged: 0 Thread(s)
Quoted: 152 Post(s)
Liked 237 Times
in
139 Posts
Drill it and twist it. I�d go with twolarge holes and a stout twisting rod rather than four smaller holes.
Worst case it will break off and you�ll have to cut it out with a hacksaw blade. But you knew that already, so...
Meanwhile, in the end you�ll have an 87 Tempo frameset and there�s not much better in the world than that.
Worst case it will break off and you�ll have to cut it out with a hacksaw blade. But you knew that already, so...
Meanwhile, in the end you�ll have an 87 Tempo frameset and there�s not much better in the world than that.
04-26-20, 05:04 PM
#15
Senior Member
Thread Starter
Join Date: Mar 2016
Location: North of Boston
Posts: 898
Bikes: 1973 Schwinn Sports Tourer plus a " few" more :)
Mentioned: 4 Post(s)
Tagged: 0 Thread(s)
Quoted: 211 Post(s)
Liked 199 Times
in
147 Posts
Thanks again for all the great responses and info.
I have an impact gun and an electric drill.
Many good ideas.
I'll keep you posted
Thank you again
much appreciated !
I have an impact gun and an electric drill.
Many good ideas.
I'll keep you posted
Thank you again
much appreciated !
Last edited by bikemike73; 04-27-20 at 12:34 PM.
04-26-20, 09:15 PM
#16
Senior Member

Join Date: Mar 2014
Location: City of Angels
Posts: 4,870
Bikes: A few too many
Mentioned: 42 Post(s)
Tagged: 1 Thread(s)
Quoted: 1364 Post(s)
Liked 2,181 Times
in
1,183 Posts
Be careful wedging the seat post clamp open...it can crack and above all be patient,
Good Luck, Ben
Last edited by xiaoman1; 04-26-20 at 09:21 PM.
04-27-20, 04:57 AM
#17
spondylitis.org
Join Date: Mar 2013
Location: Fleetwood, PA, USA
Posts: 1,003
Bikes: '84 Colnago Super; '90 Bridgestone MB-1; '81 Trek 930; '01 Cinelli Supercorsa; '62 Ideor Asso; '87 Tommasini Super Prestige; '13 Lynskey R2300; '84 Serotta Nova Special; '94 Litespeed Catalyst; etc.
Mentioned: 10 Post(s)
Tagged: 0 Thread(s)
Quoted: 121 Post(s)
Liked 97 Times
in
63 Posts
Last resort: (consider your paint to be toast if you need to go this route)
04-27-20, 07:08 AM
#18
Senior Member
Thread Starter
Join Date: Mar 2016
Location: North of Boston
Posts: 898
Bikes: 1973 Schwinn Sports Tourer plus a " few" more :)
Mentioned: 4 Post(s)
Tagged: 0 Thread(s)
Quoted: 211 Post(s)
Liked 199 Times
in
147 Posts
I found an impact gun. One that used used to take tires off cars etc. Air powered
I think I will try drilling 2 holes and trying to twist it out with a steel rod like above have suggested
If that does not work, I will try what RJ the bike guy with the impact gun
I will keep all posted.
Keep the great ideas coming
MUCH appreciated !!
I think I will try drilling 2 holes and trying to twist it out with a steel rod like above have suggested
If that does not work, I will try what RJ the bike guy with the impact gun
I will keep all posted.
Keep the great ideas coming
MUCH appreciated !!
Last edited by bikemike73; 04-27-20 at 07:14 AM.
04-27-20, 07:59 AM
#19
Senior Member

Join Date: Jun 2008
Location: Louisville, KY
Posts: 13,447
Mentioned: 33 Post(s)
Tagged: 0 Thread(s)
Quoted: 4236 Post(s)
Liked 2,949 Times
in
1,808 Posts
Good luck!


Likes For Mr. 66:
04-27-20, 12:40 PM
#21
Senior Member
Thread Starter
Join Date: Mar 2016
Location: North of Boston
Posts: 898
Bikes: 1973 Schwinn Sports Tourer plus a " few" more :)
Mentioned: 4 Post(s)
Tagged: 0 Thread(s)
Quoted: 211 Post(s)
Liked 199 Times
in
147 Posts
So Mr 66
You used it like a slide hammer correct ?
Where did you get the parts to make your beautiful tool ??
Looks about 4 feet long.
Did you use any solution like PB Blaster ?
Appreciate your help and this " new" method.................at least for me it's new
You used it like a slide hammer correct ?
Where did you get the parts to make your beautiful tool ??
Looks about 4 feet long.
Did you use any solution like PB Blaster ?
Appreciate your help and this " new" method.................at least for me it's new
04-27-20, 12:54 PM
#22
Senior Member
Join Date: Jan 2004
Location: Madison, WI USA
Posts: 6,154
Mentioned: 50 Post(s)
Tagged: 0 Thread(s)
Quoted: 2363 Post(s)
Liked 1,749 Times
in
1,191 Posts
I believe RJ the Bike Guy also has a video on the slide hammer method. It's all hardware store stuff, maybe 3 feet of threaded rod ("all-thread"), nuts/socket/washer on one end, weight/washer/nuts on the other. A socket can be used as the sliding weight as well, if you find a heavy enough one.
BTW, using any twisting method, be prudent. I don't know the exact wall thickness of that tubing, but as you know, it's no gas-pipe Schwinn. There's a thread somewhere here in C&V, or maybe in Mechanics, depicting a nice late '80s Trek frame with a seat tube kinked/twisted by a high-leverage twist effort to remove a stuck seat post.
One method I've wanted to try (I happen to have an SR Laprade seat post stuck in an '86-ish Tempo frame) was some sort of moderate twisting force, but maintained over time. Some way of holding the frame in one position, then turning a lever attached to the post and holding it in position. My hypothesis is, I've seen sustained force like that work on things like press-fit steering ball joints in motor vehicles. I have a screw-type ball joint separator that often works best simply by cranking down on the screw, and just walking away from it, and several minutes later you hear it POP. I imagine the force is somehow working over time to separate the bond between the two parts, and I wonder if the same could be applied in a case like this. I just haven't figured out a way to set it up.
04-27-20, 01:20 PM
#23
Senior Member
Thread Starter
Join Date: Mar 2016
Location: North of Boston
Posts: 898
Bikes: 1973 Schwinn Sports Tourer plus a " few" more :)
Mentioned: 4 Post(s)
Tagged: 0 Thread(s)
Quoted: 211 Post(s)
Liked 199 Times
in
147 Posts
Hey madpogue
That's a great analogy with the ball joints !!!
I do like the idea of a slide hammer type tool.
Seems less stressful for the frame. And I think you need 2 people to do this.
One to hold the frame down and one to work the tool. Of course one could straddle the bike and put a cushion on the cross bar to prevent any bodily damage
Thank you again for all your help.
Lets both please keep in touch since we share the same frame and seat post issue...BUT if your seat is attached you can use it as leverage( could twist the seat though) ?
