


Cannondale headset bearing cap size question
 02-23-21, 09:59 AM
#1
Senior Member
Thread Starter
Join Date: Mar 2006
Location: Chicago, IL, USA
Posts: 2,888
Mentioned: 3 Post(s)
Tagged: 0 Thread(s)
Quoted: 1463 Post(s)
Liked 1,487 Times
in
871 Posts
Cannondale headset bearing cap size question
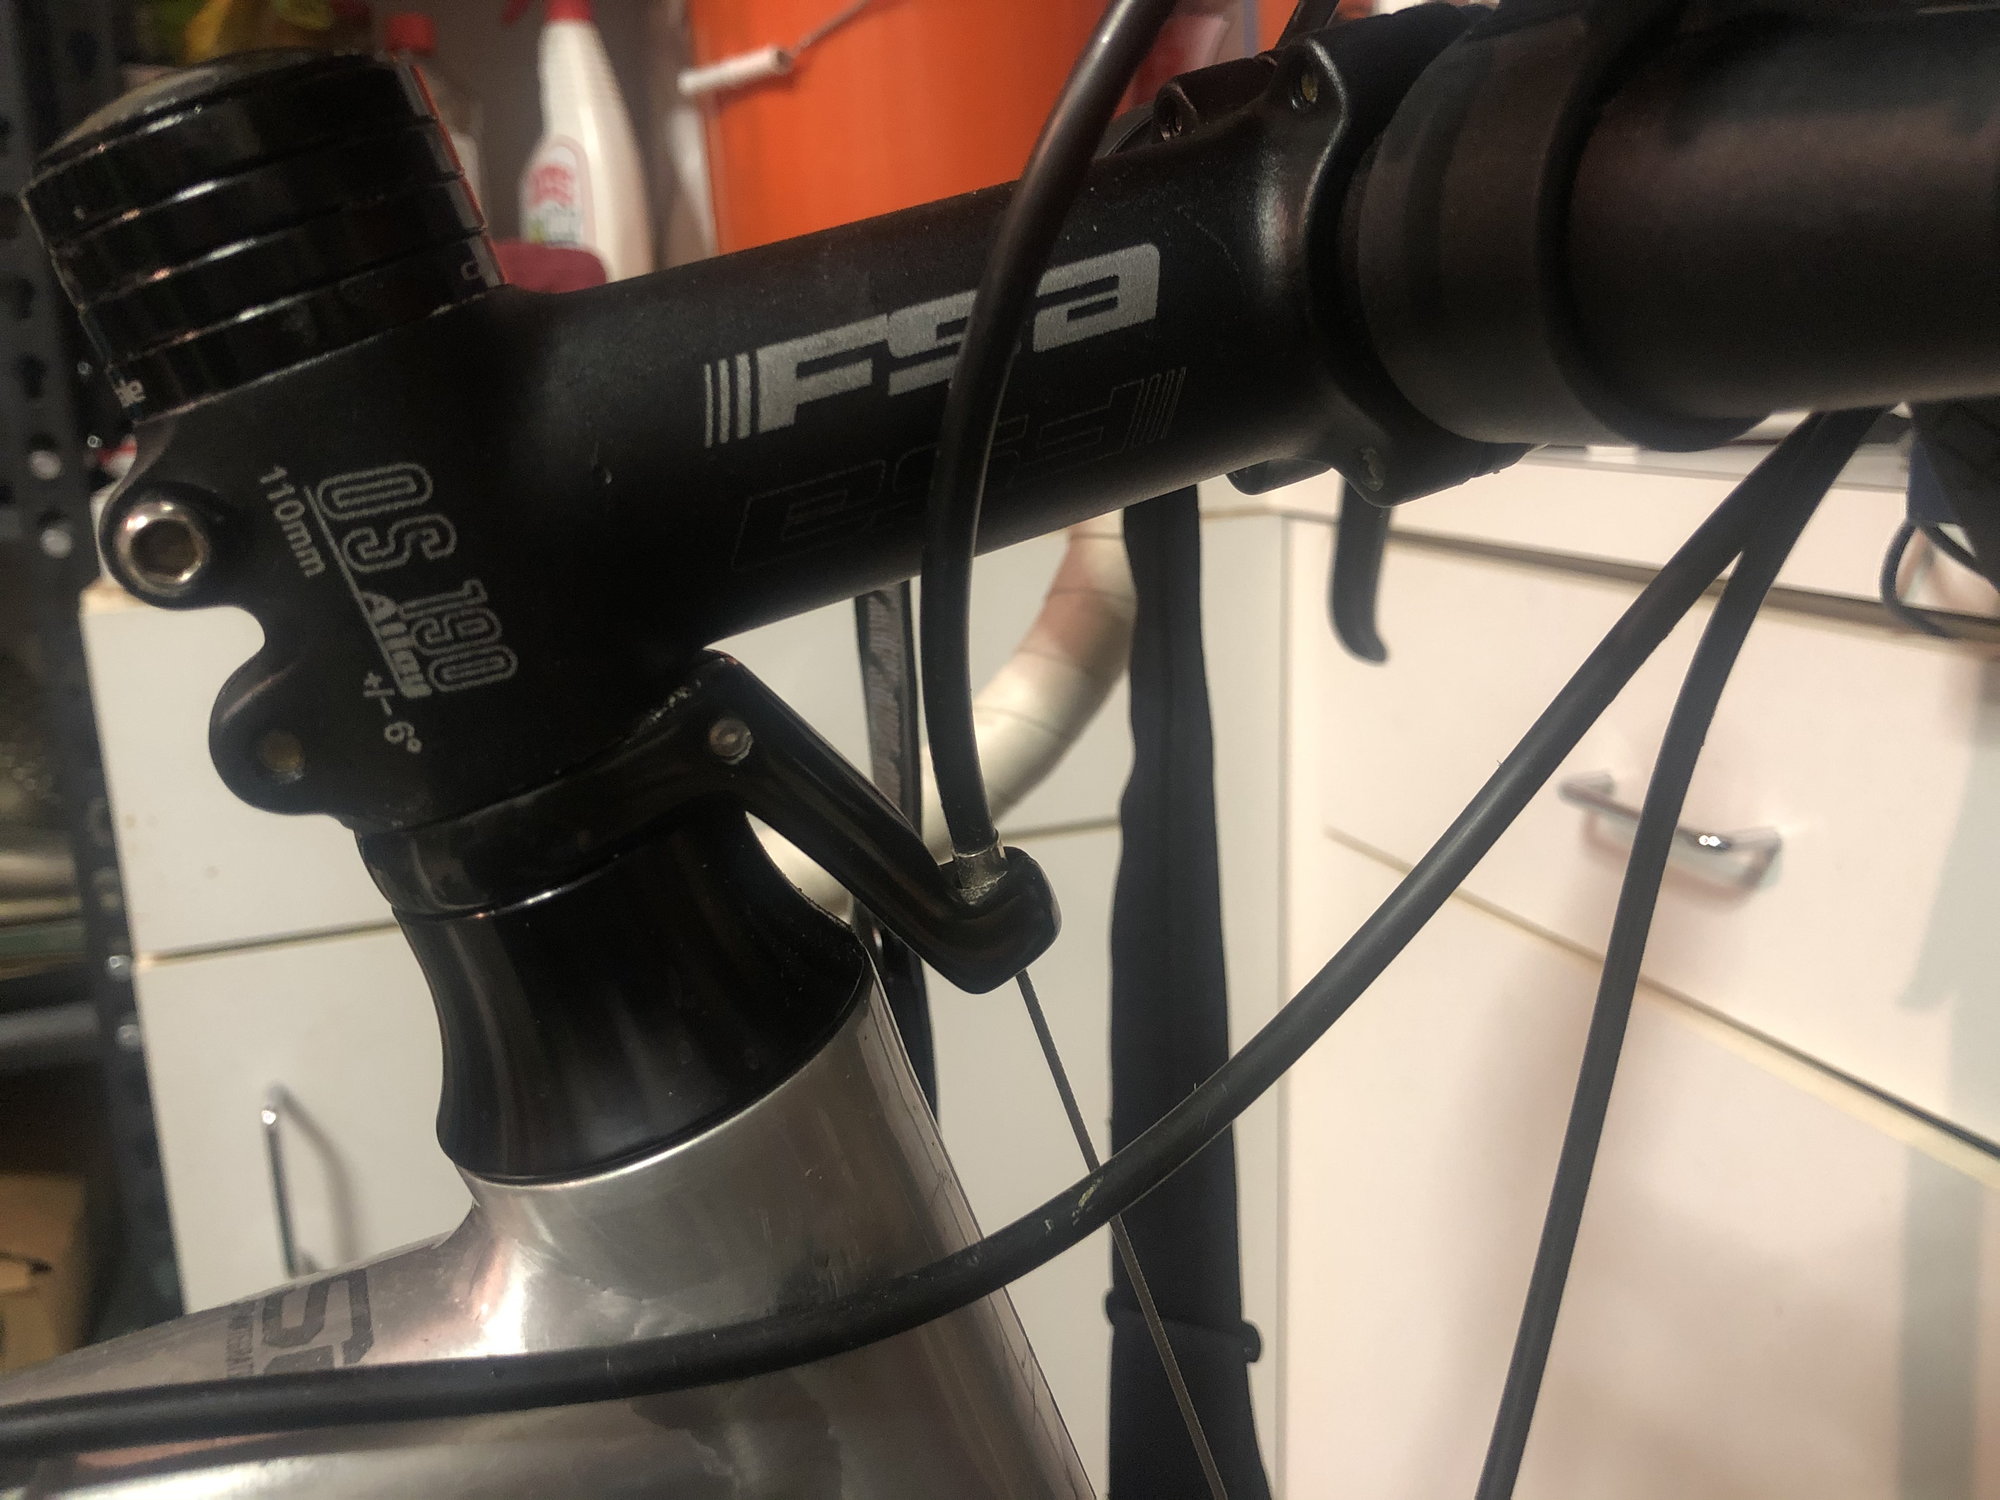
I have an older (2014) Cannondale CAADX that has a 1 1/8" steerer tube/headset. It has a very tall tapered spacer below the stem and I'm hoping to find a lower profile version of this so that I can lower the stem a bit more.
I think there are lower profile tapered spacers available, but I'm not sure exactly what I need to buy.
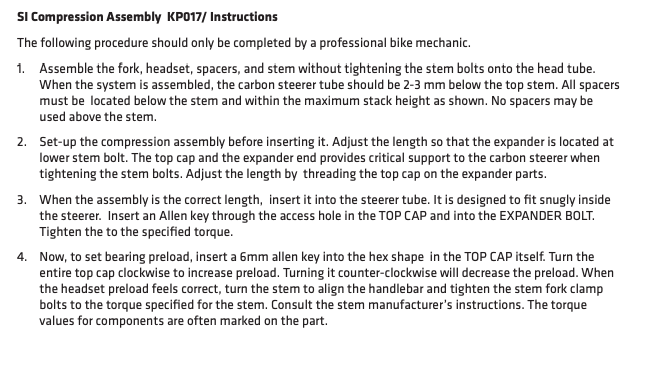
When I google the headset, I find this info: SI Headset KB002
It lists "25mm Alloy top cap" which I'm assuming is the tapered piece that covers the headset bearing. Does anyone know if there is a 10 or 15mm version of this part, and where I could purchase online? I am assuming I can just pull the old one off and slip a new shorter one on, correct? When I google "headset top cap" or "bearing cover cap" I'm just getting lots of options for the cap up on top of the stem.
Photo below:
I think there are lower profile tapered spacers available, but I'm not sure exactly what I need to buy.
When I google the headset, I find this info: SI Headset KB002
It lists "25mm Alloy top cap" which I'm assuming is the tapered piece that covers the headset bearing. Does anyone know if there is a 10 or 15mm version of this part, and where I could purchase online? I am assuming I can just pull the old one off and slip a new shorter one on, correct? When I google "headset top cap" or "bearing cover cap" I'm just getting lots of options for the cap up on top of the stem.
Photo below:
 02-23-21, 10:31 AM
#2
Senior Member
Join Date: Jan 2009
Location: San Diego, CA
Posts: 3,685
Mentioned: 10 Post(s)
Tagged: 0 Thread(s)
Quoted: 841 Post(s)
Liked 1,066 Times
in
748 Posts
Here's just one example. I have no experience with this brand so can't comment on quality. Scroll to bottom of the page if you want slightly taller versions. 1-1/8" OMNI Racer WORLDS LIGHTEST Integrated Headset Conical Carbon Spacer 10mm | eBay Yes it's difficult to find the proper search term but I had the best luck with this. "Integrated Headset Conical Carbon Spacer" or leave out the Carbon if you prefer.
Last edited by Crankycrank; 02-23-21 at 10:34 AM.
Likes For Crankycrank:
02-23-21, 11:07 AM
#3
Senior Member
Thread Starter
Join Date: Mar 2006
Location: Chicago, IL, USA
Posts: 2,888
Mentioned: 3 Post(s)
Tagged: 0 Thread(s)
Quoted: 1463 Post(s)
Liked 1,487 Times
in
871 Posts
Ah... conical spacer. Thank you!
Also, carbon is 8 grams. I bet alloy is at least 12. Carbon it is!
Also, carbon is 8 grams. I bet alloy is at least 12. Carbon it is!
 02-23-21, 04:20 PM
#5
Senior Member
Thread Starter
Join Date: Mar 2006
Location: Chicago, IL, USA
Posts: 2,888
Mentioned: 3 Post(s)
Tagged: 0 Thread(s)
Quoted: 1463 Post(s)
Liked 1,487 Times
in
871 Posts
This particular bike has a carbon fork w/ alloy steerer tube, but my other Cannondale bike has a carbon steerer tube. The shop just adjusted the fit and lowered that stem a bit, and it now has a single spacer above the stem. I'm wondering if I need to bring it back in and have them cut it down, even though it's only 5mm.
02-23-21, 10:25 PM
#7
Senior Member
Join Date: Apr 2007
Posts: 6,783
Mentioned: 10 Post(s)
Tagged: 0 Thread(s)
Quoted: 1114 Post(s)
Liked 1,209 Times
in
766 Posts
Is this specific to carbon steerer tubes?
This particular bike has a carbon fork w/ alloy steerer tube, but my other Cannondale bike has a carbon steerer tube. The shop just adjusted the fit and lowered that stem a bit, and it now has a single spacer above the stem. I'm wondering if I need to bring it back in and have them cut it down, even though it's only 5mm.
This particular bike has a carbon fork w/ alloy steerer tube, but my other Cannondale bike has a carbon steerer tube. The shop just adjusted the fit and lowered that stem a bit, and it now has a single spacer above the stem. I'm wondering if I need to bring it back in and have them cut it down, even though it's only 5mm.
 02-24-21, 02:14 AM
#8
Senior Member
Join Date: Feb 2020
Posts: 302
Mentioned: 0 Post(s)
Tagged: 0 Thread(s)
Quoted: 164 Post(s)
Likes: 0
Liked 44 Times
in
41 Posts
most carbon forks have a compression plug , but my caad 10 has a strange one , so all i can say is if it has the plug then you can slam it by cutting , but if it has the weirdo one you might want to just let the shop look it to see if it can be removed , and if you really want to swap that spacer out it will need to be able to space the bearings , i dont know why you wanna slam a cx bike , but hey GOOD LUCK !!!!
02-24-21, 08:20 AM
#9
Senior Member
Thread Starter
Join Date: Mar 2006
Location: Chicago, IL, USA
Posts: 2,888
Mentioned: 3 Post(s)
Tagged: 0 Thread(s)
Quoted: 1463 Post(s)
Liked 1,487 Times
in
871 Posts
most carbon forks have a compression plug , but my caad 10 has a strange one , so all i can say is if it has the plug then you can slam it by cutting , but if it has the weirdo one you might want to just let the shop look it to see if it can be removed , and if you really want to swap that spacer out it will need to be able to space the bearings , i dont know why you wanna slam a cx bike , but hey GOOD LUCK !!!!
This bike has an alloy steerer tube, and a "star nut". I've never cut a steer tube, but I'm fairly confident I can pull the star nut out, cut the tube, and re-install. I suppose I could bring the fork into a shop and ask them to cut it for me.
I think a shorter conical spacer seems like the only way to lower the stem, but I'm open to other suggestions if you think that won't work? I'm not sure what you mean by "space the bearings".
I ordered the spacer that the other poster linked above. The one I bought is listed as 10mm height, with a 46mm outside diameter at the bottom. This seems to match the size of the conical spacer I'm replacing, it's just a 10mm height vs 20mm. This seems like a pretty simple job, but maybe I'm missing something? It's really not that big of a deal if the stem is slightly higher on this bike than the other so if it seems like a can of worms I'm opening, I'll just leave it as-is. (I still need to cut the stem regardless).
02-24-21, 09:23 AM
#10
Senior Member
Join Date: Jan 2009
Location: San Diego, CA
Posts: 3,685
Mentioned: 10 Post(s)
Tagged: 0 Thread(s)
Quoted: 841 Post(s)
Liked 1,066 Times
in
748 Posts
Depending on how much you're going to cut you may not have to lower the star nut but if you do all you need to do is tap it down further, no removal necessary.
Likes For Crankycrank:
02-25-21, 02:31 PM
#11
Senior Member
Join Date: Apr 2007
Posts: 6,783
Mentioned: 10 Post(s)
Tagged: 0 Thread(s)
Quoted: 1114 Post(s)
Liked 1,209 Times
in
766 Posts
In the unlikely event the new star nut position would have to be above the old one, I don't believe one can actually pull it out to make it shallower. It's designed not to pull out, but I think the usual method is to tap it down out of the way, and then install a new star nut above it. Or use a longer bolt. But if you're shortening the steerer tube, like quoted above, I doubt that will be an issue.
And I want to add that cutting a steer tube is really an easy DIY, not need to get a shop involved if you know how to use a hack saw. It doesn't even have to be a full-size, high quality hack saw. Just beware you need to cut it accurately and not too short - do a "dry" or practice assembly first to make sure, even if you "know" it's exactly a 10mm (or whatever) change.
It needs to be cut as square as possible. I put masking tape on it, and mark a full circle around the tube, then just cut slowly and carefully, adjusting to stay on the line all around the tube. I've also used a miter box I have which sort of accommodates a hack saw, but found that just doing it carefully by hand works fine. You can also use a file to square up the cut if there's minor high spots. But really, "perfectly square" is good, but not essential. The cut surface just needs to transmit pressure from the top cap, through the stem and spacers to the star nut to temporarily preload the bearings until you tighten the stem. It doesn't need to be perfect to do that.
Carbon or metal, I then take a flat file and dress the burrs and sharp edges off the outside edge of the cut, and use a round file to do the same on the inside edge.
Last edited by Camilo; 02-25-21 at 02:38 PM.
Likes For Camilo:
02-26-21, 09:01 AM
#12
Senior Member
Thread Starter
Join Date: Mar 2006
Location: Chicago, IL, USA
Posts: 2,888
Mentioned: 3 Post(s)
Tagged: 0 Thread(s)
Quoted: 1463 Post(s)
Liked 1,487 Times
in
871 Posts
Agree with this.
In the unlikely event the new star nut position would have to be above the old one, I don't believe one can actually pull it out to make it shallower. It's designed not to pull out, but I think the usual method is to tap it down out of the way, and then install a new star nut above it. Or use a longer bolt. But if you're shortening the steerer tube, like quoted above, I doubt that will be an issue.
And I want to add that cutting a steer tube is really an easy DIY, not need to get a shop involved if you know how to use a hack saw. It doesn't even have to be a full-size, high quality hack saw. Just beware you need to cut it accurately and not too short - do a "dry" or practice assembly first to make sure, even if you "know" it's exactly a 10mm (or whatever) change.
It needs to be cut as square as possible. I put masking tape on it, and mark a full circle around the tube, then just cut slowly and carefully, adjusting to stay on the line all around the tube. I've also used a miter box I have which sort of accommodates a hack saw, but found that just doing it carefully by hand works fine. You can also use a file to square up the cut if there's minor high spots. But really, "perfectly square" is good, but not essential. The cut surface just needs to transmit pressure from the top cap, through the stem and spacers to the star nut to temporarily preload the bearings until you tighten the stem. It doesn't need to be perfect to do that.
Carbon or metal, I then take a flat file and dress the burrs and sharp edges off the outside edge of the cut, and use a round file to do the same on the inside edge.
Likes For msu2001la:
03-03-21, 06:27 PM
#13
Senior Member
Join Date: Apr 2007
Posts: 6,783
Mentioned: 10 Post(s)
Tagged: 0 Thread(s)
Quoted: 1114 Post(s)
Liked 1,209 Times
in
766 Posts
Thanks for the tips. I'm going to run the stem in the new position for a little while on the trainer just to make sure I'm good on the adjustment before cutting. I was wondering if I needed to buy one of those guides that Park Tool sells for this, but reading your description I think I'll see if I can just do it without.
03-04-21, 08:40 AM
#14
Senior Member
Thread Starter
Join Date: Mar 2006
Location: Chicago, IL, USA
Posts: 2,888
Mentioned: 3 Post(s)
Tagged: 0 Thread(s)
Quoted: 1463 Post(s)
Liked 1,487 Times
in
871 Posts
I have the new conical spacer on, but I cannot seem to get the headset adjusted to be smooth. In order to get the steering smooth, the pre-load has to be really loose.
I'm wondering if I have the seal installed incorrectly on top of the bearing (which is a sealed cartridge style bearing, by the way). The new conical spacer came with it's own rubber seal, but it looked a lot thinner than the one that came off with the old conical spacer. The new spacer also came with several very thin clear plastic washers which I didn't know what to do with and left off.
I'm going to take the whole thing apart again today and maybe clean and re-grease and see if that helps.
03-05-21, 11:37 PM
#15
Senior Member
Join Date: Apr 2007
Posts: 6,783
Mentioned: 10 Post(s)
Tagged: 0 Thread(s)
Quoted: 1114 Post(s)
Liked 1,209 Times
in
766 Posts
Post pictures of the original parts and how they looked installed. Also post pictures of the new parts and how you installed them. It might be obvious to someone what's going on.
