


What have you been wrenching on lately?
 01-15-24, 11:19 PM
#7251

The Huffmeister

Join Date: Jul 2008
Location: The Le Grande HQ
Posts: 2,739
Bikes: '79 Trek 938, '86 Jim Merz Allez SE, '90 Miyata 1000, '68 PX-10, '80 PXN-10, '73 Super Course, '87 Guerciotti, '83 Trek 600, '80 Huffy Le Grande
Mentioned: 45 Post(s)
Tagged: 0 Thread(s)
Quoted: 1226 Post(s)
Liked 3,554 Times
in
1,410 Posts
More dumbness w/ the Huffente!
Took off the Campy cranks to test BB spindle lengths and such, and two interesting things happened...
#1:
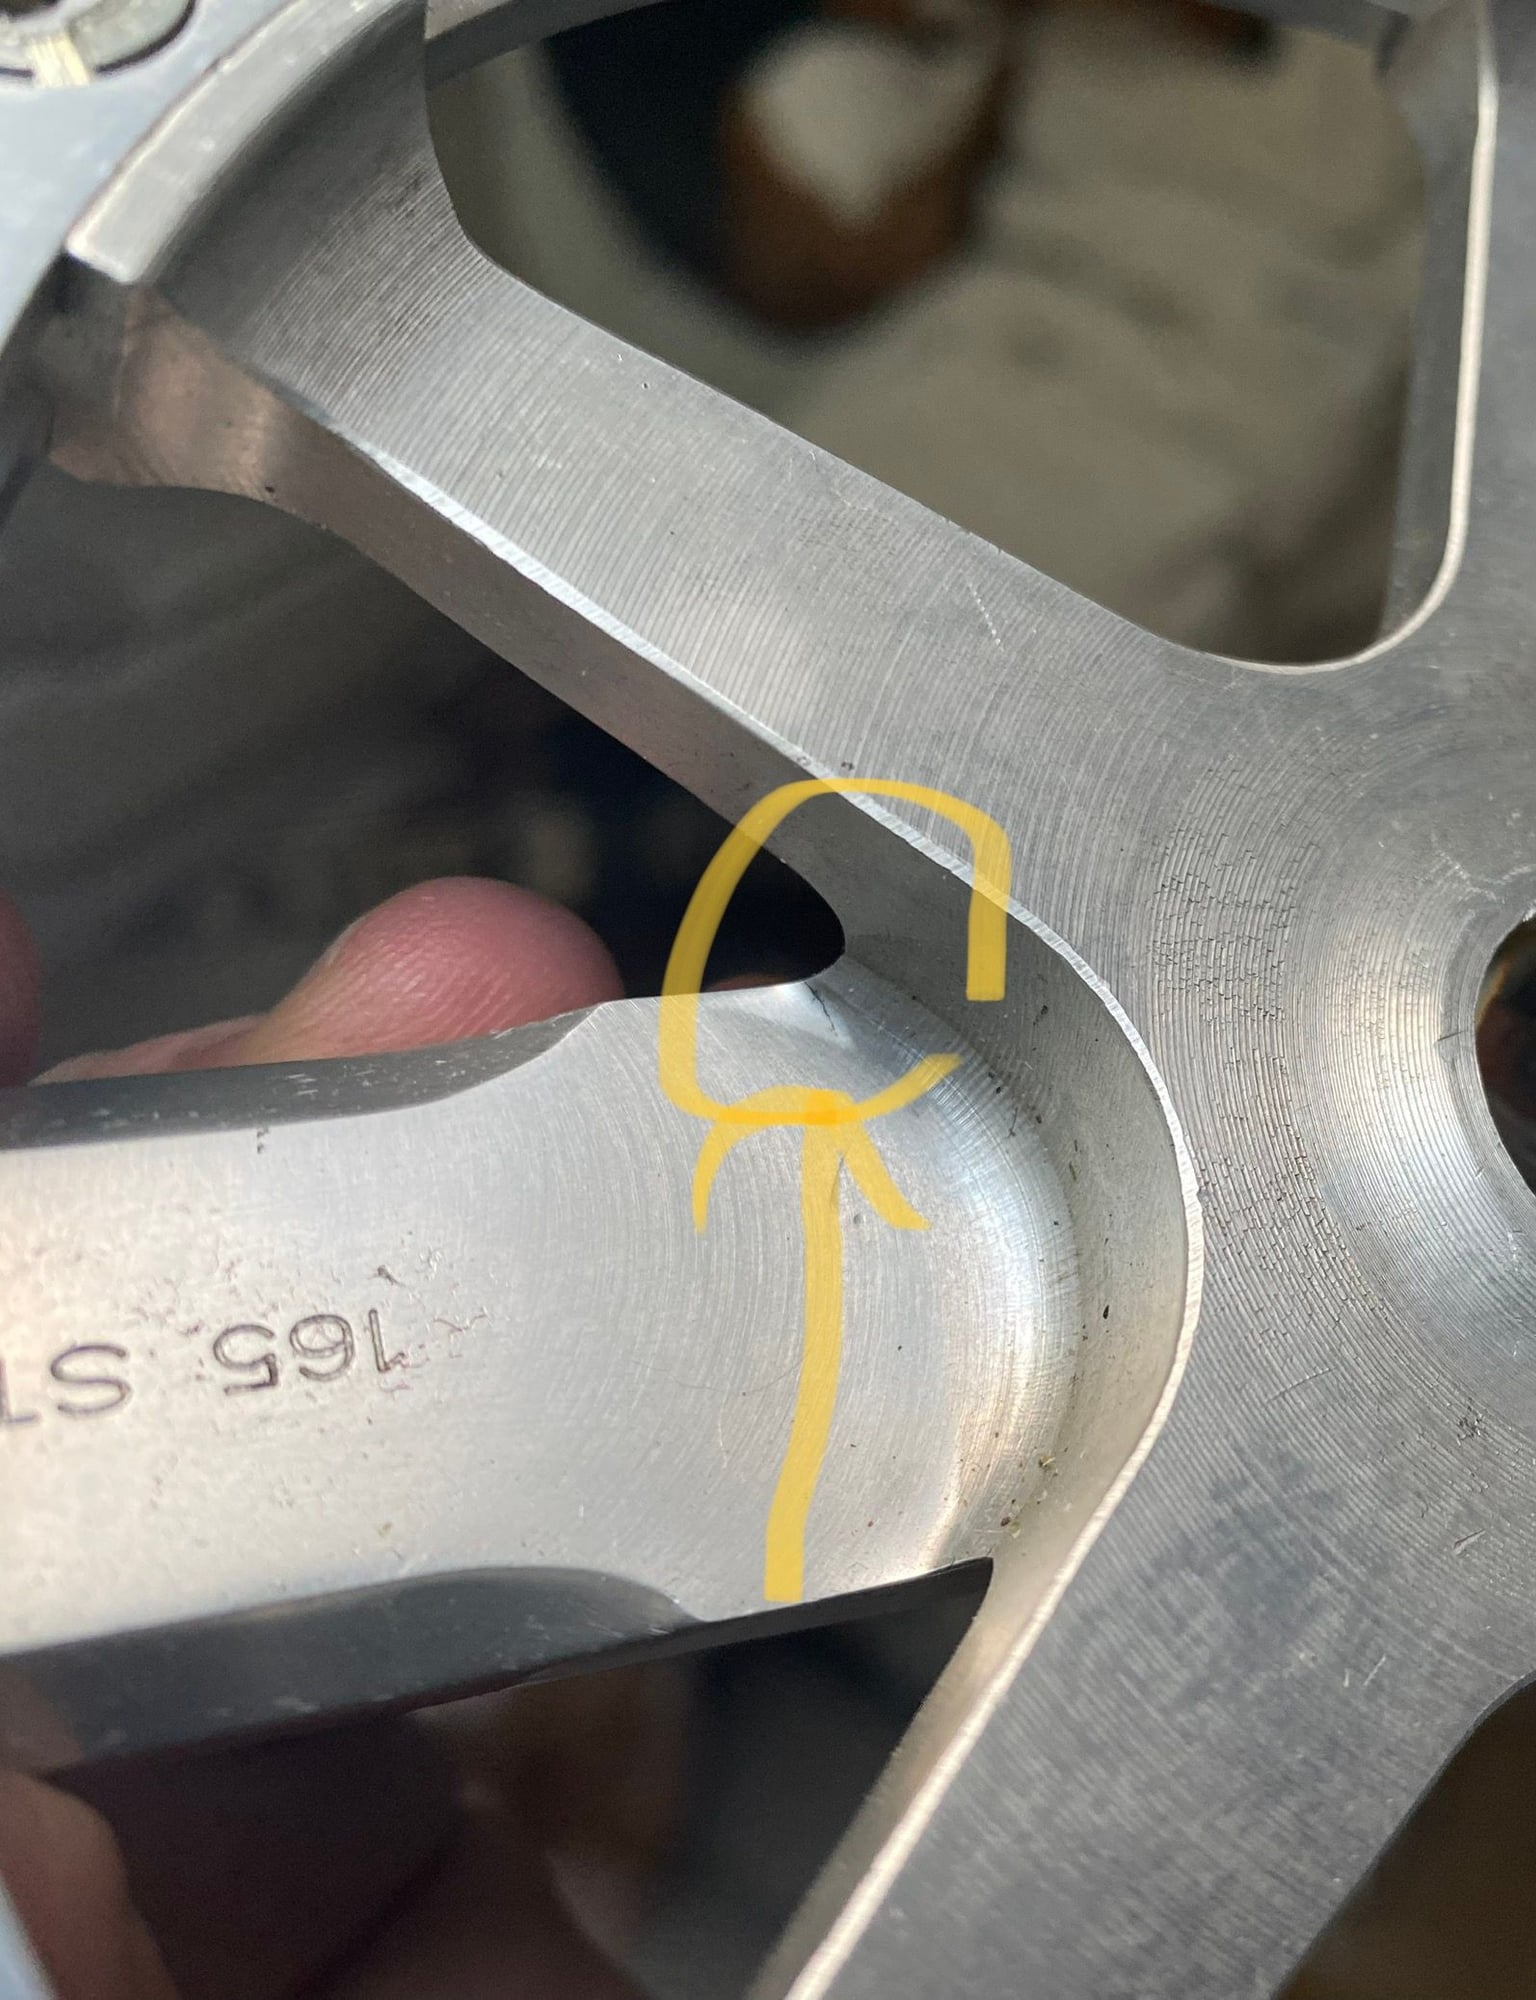
#2:
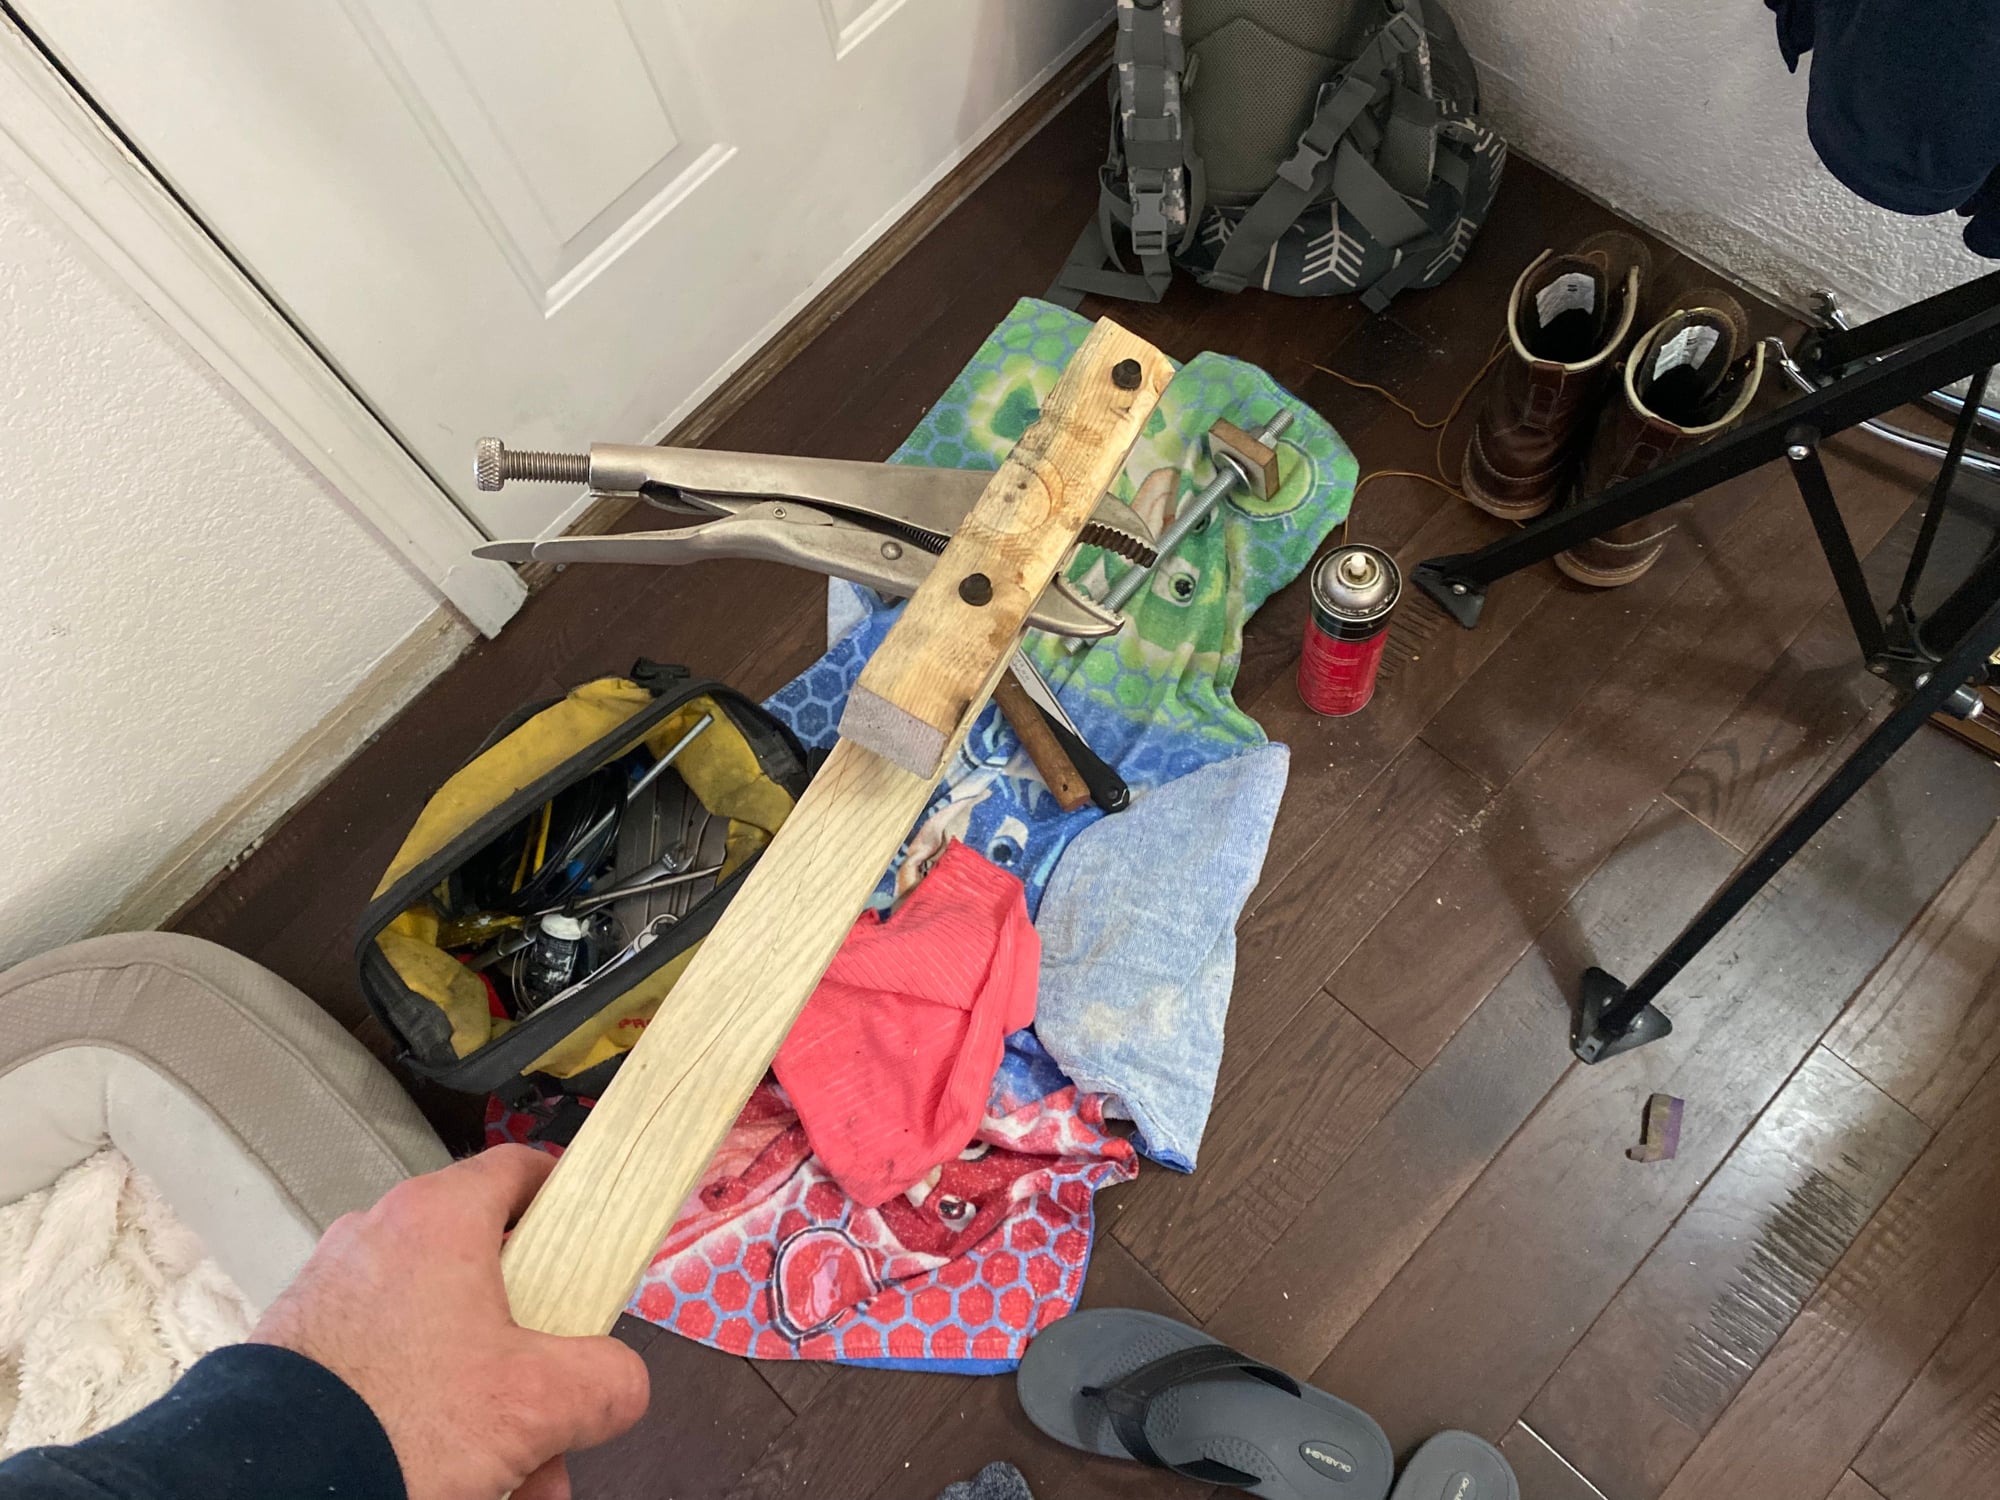
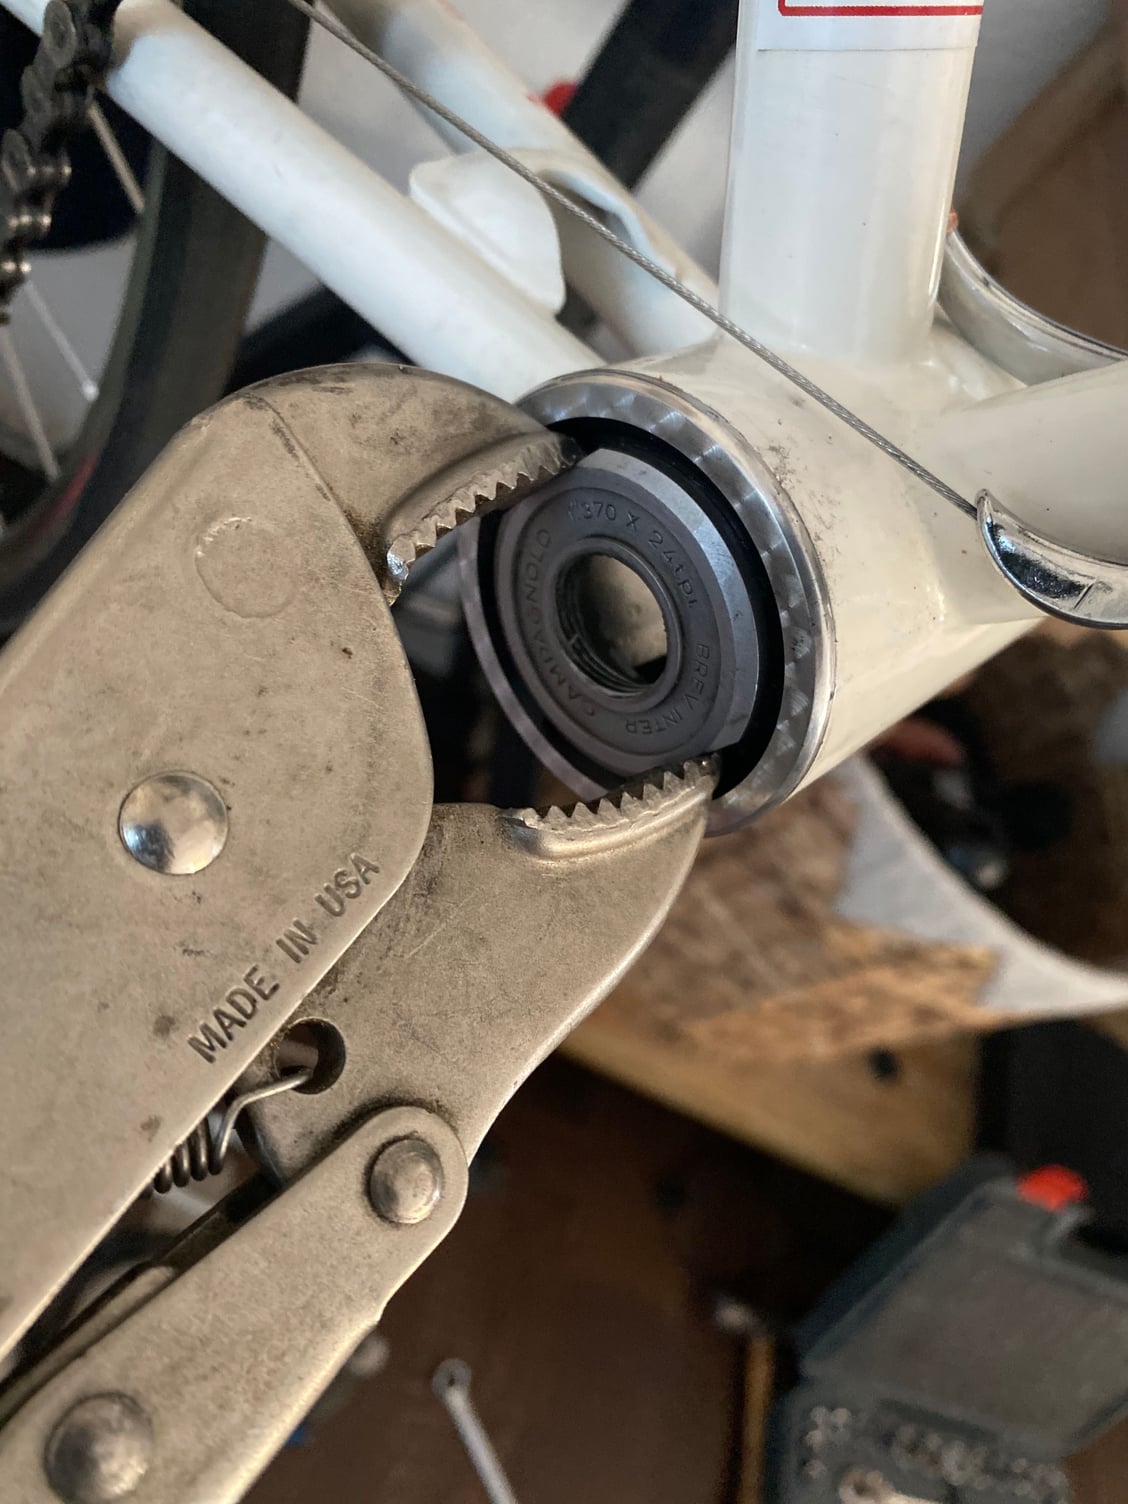
I know, I know...drive side cups are fun. Well, I'm here to tell you they are 10 times more fun when you have no way to get a wrench on them to actually take them off! What these pictures don�t show is 1.5 hrs of other attempts, including the whole �impact wrench compressed all-thread clamp� around the open hole of the cup. Nope.
I�ve been playing around with all sorts of new ideas on the bike.
Campy junk
Took off the Campy cranks to test BB spindle lengths and such, and two interesting things happened...
#1:
#2:
I know, I know...drive side cups are fun. Well, I'm here to tell you they are 10 times more fun when you have no way to get a wrench on them to actually take them off! What these pictures don�t show is 1.5 hrs of other attempts, including the whole �impact wrench compressed all-thread clamp� around the open hole of the cup. Nope.
I�ve been playing around with all sorts of new ideas on the bike.
Campy junk
Last edited by AdventureManCO; 01-15-24 at 11:27 PM.

Likes For AdventureManCO:
01-16-24, 03:57 AM
#7252
Edumacator
Join Date: Jan 2018
Location: Goose Creek, SC
Posts: 6,810
Bikes: '87 Crestdale, '87 Basso Gap, '92 Rossin Performance EL-OS, 1990 VanTuyl, 1980s Losa, 1985 Trek 670, 1982 AD SLE, 1987 PX10, etc...
Mentioned: 59 Post(s)
Tagged: 0 Thread(s)
Quoted: 2440 Post(s)
Liked 3,130 Times
in
1,969 Posts
More dumbness w/ the Huffente!
Took off the Campy cranks to test BB spindle lengths and such, and two interesting things happened...
#1:
#2:
I know, I know...drive side cups are fun. Well, I'm here to tell you they are 10 times more fun when you have no way to get a wrench on them to actually take them off! What these pictures don�t show is 1.5 hrs of other attempts, including the whole �impact wrench compressed all-thread clamp� around the open hole of the cup. Nope.
I�ve been playing around with all sorts of new ideas on the bike.
Campy junk
Last edited by jdawginsc; 01-16-24 at 08:30 AM.
 01-16-24, 06:01 AM
#7253
Full Member
Join Date: Jun 2020
Posts: 458
Bikes: 91 Ritchey Ultra, 1992 Specialized Stumpjumper, 1990 Klein Rascal, 97 Trek OCLV9700, 90 Minnelli Eclipse, 95 Marin Bear Valley SE, 1991 Breezer Lightning Flash 1991 Diamondback Axis 1992 Stumpjumper Comp 1983 Stumpjumper Sport
Mentioned: 2 Post(s)
Tagged: 0 Thread(s)
Quoted: 101 Post(s)
Liked 646 Times
in
236 Posts
Rear hub is an Atom Drum brake😎
01-16-24, 05:25 PM
#7254
Learning To Fly
@cjefferds, who will be riding that Raleigh?[/QUOTE]
Haha, you got me there. It�s pretty much relegated to porch decor but I will ride it .5 miles to the nearest craft brewery on occasion. Will likely bring it to the local bike swap next month in hopes of finding it a new home.
Haha, you got me there. It�s pretty much relegated to porch decor but I will ride it .5 miles to the nearest craft brewery on occasion. Will likely bring it to the local bike swap next month in hopes of finding it a new home.
01-16-24, 05:44 PM
#7255
Senior Member

Join Date: May 2021
Location: London
Posts: 564
Bikes: Motobecane C41, Matsu$hita Nashonaru
Mentioned: 7 Post(s)
Tagged: 0 Thread(s)
Quoted: 215 Post(s)
Liked 436 Times
in
253 Posts
More dumbness w/ the Huffente!
I know, I know...drive side cups are fun. Well, I'm here to tell you they are 10 times more fun when you have no way to get a wrench on them to actually take them off! What these pictures don�t show is 1.5 hrs of other attempts, including the whole �impact wrench compressed all-thread clamp� around the open hole of the cup. Nope.
Campy junk
01-16-24, 05:49 PM
#7256
Senior Member
Join Date: Jul 2007
Location: South shore, L.I., NY
Posts: 6,885
Bikes: Flyxii FR322, Cannondale Topstone, Miyata City Liner, Specialized Chisel, Specialized Epic Evo
Mentioned: 18 Post(s)
Tagged: 0 Thread(s)
Quoted: 3242 Post(s)
Liked 2,086 Times
in
1,181 Posts
I thought electronic systems required no maintenance ?.
My 2 Di2 systems have run for years with nothing.
Seems the B screw on the SRAM Eagle AXS rear derailer resets itself, backing out of the derailer and causing shifting issues. I experienced this on a ride this week, some posts on mtbr.com had some kind folks tell me where to start looking, sure enough the noise was nuts when I stuck the bike on the repair stand and sure enough the B screw was not set correctly.. Easy fix though and I've set B screws on many derailers so know what to do. All good in less then 5 minutes.
Only other thing I've worked on was converting my Spec. HT to Race Face carbon wheels, with a good deal from my local shop, getting the existing tires to seat was a PITA and I am glad I invested in a Presta inflator that works on my air compressor. Took a few tries to get the bead to seat. I suck at dealing with tubeless and is why my road bikes all have tubes.
01-16-24, 06:48 PM
#7257
The Huffmeister
Join Date: Jul 2008
Location: The Le Grande HQ
Posts: 2,739
Bikes: '79 Trek 938, '86 Jim Merz Allez SE, '90 Miyata 1000, '68 PX-10, '80 PXN-10, '73 Super Course, '87 Guerciotti, '83 Trek 600, '80 Huffy Le Grande
Mentioned: 45 Post(s)
Tagged: 0 Thread(s)
Quoted: 1226 Post(s)
Liked 3,554 Times
in
1,410 Posts
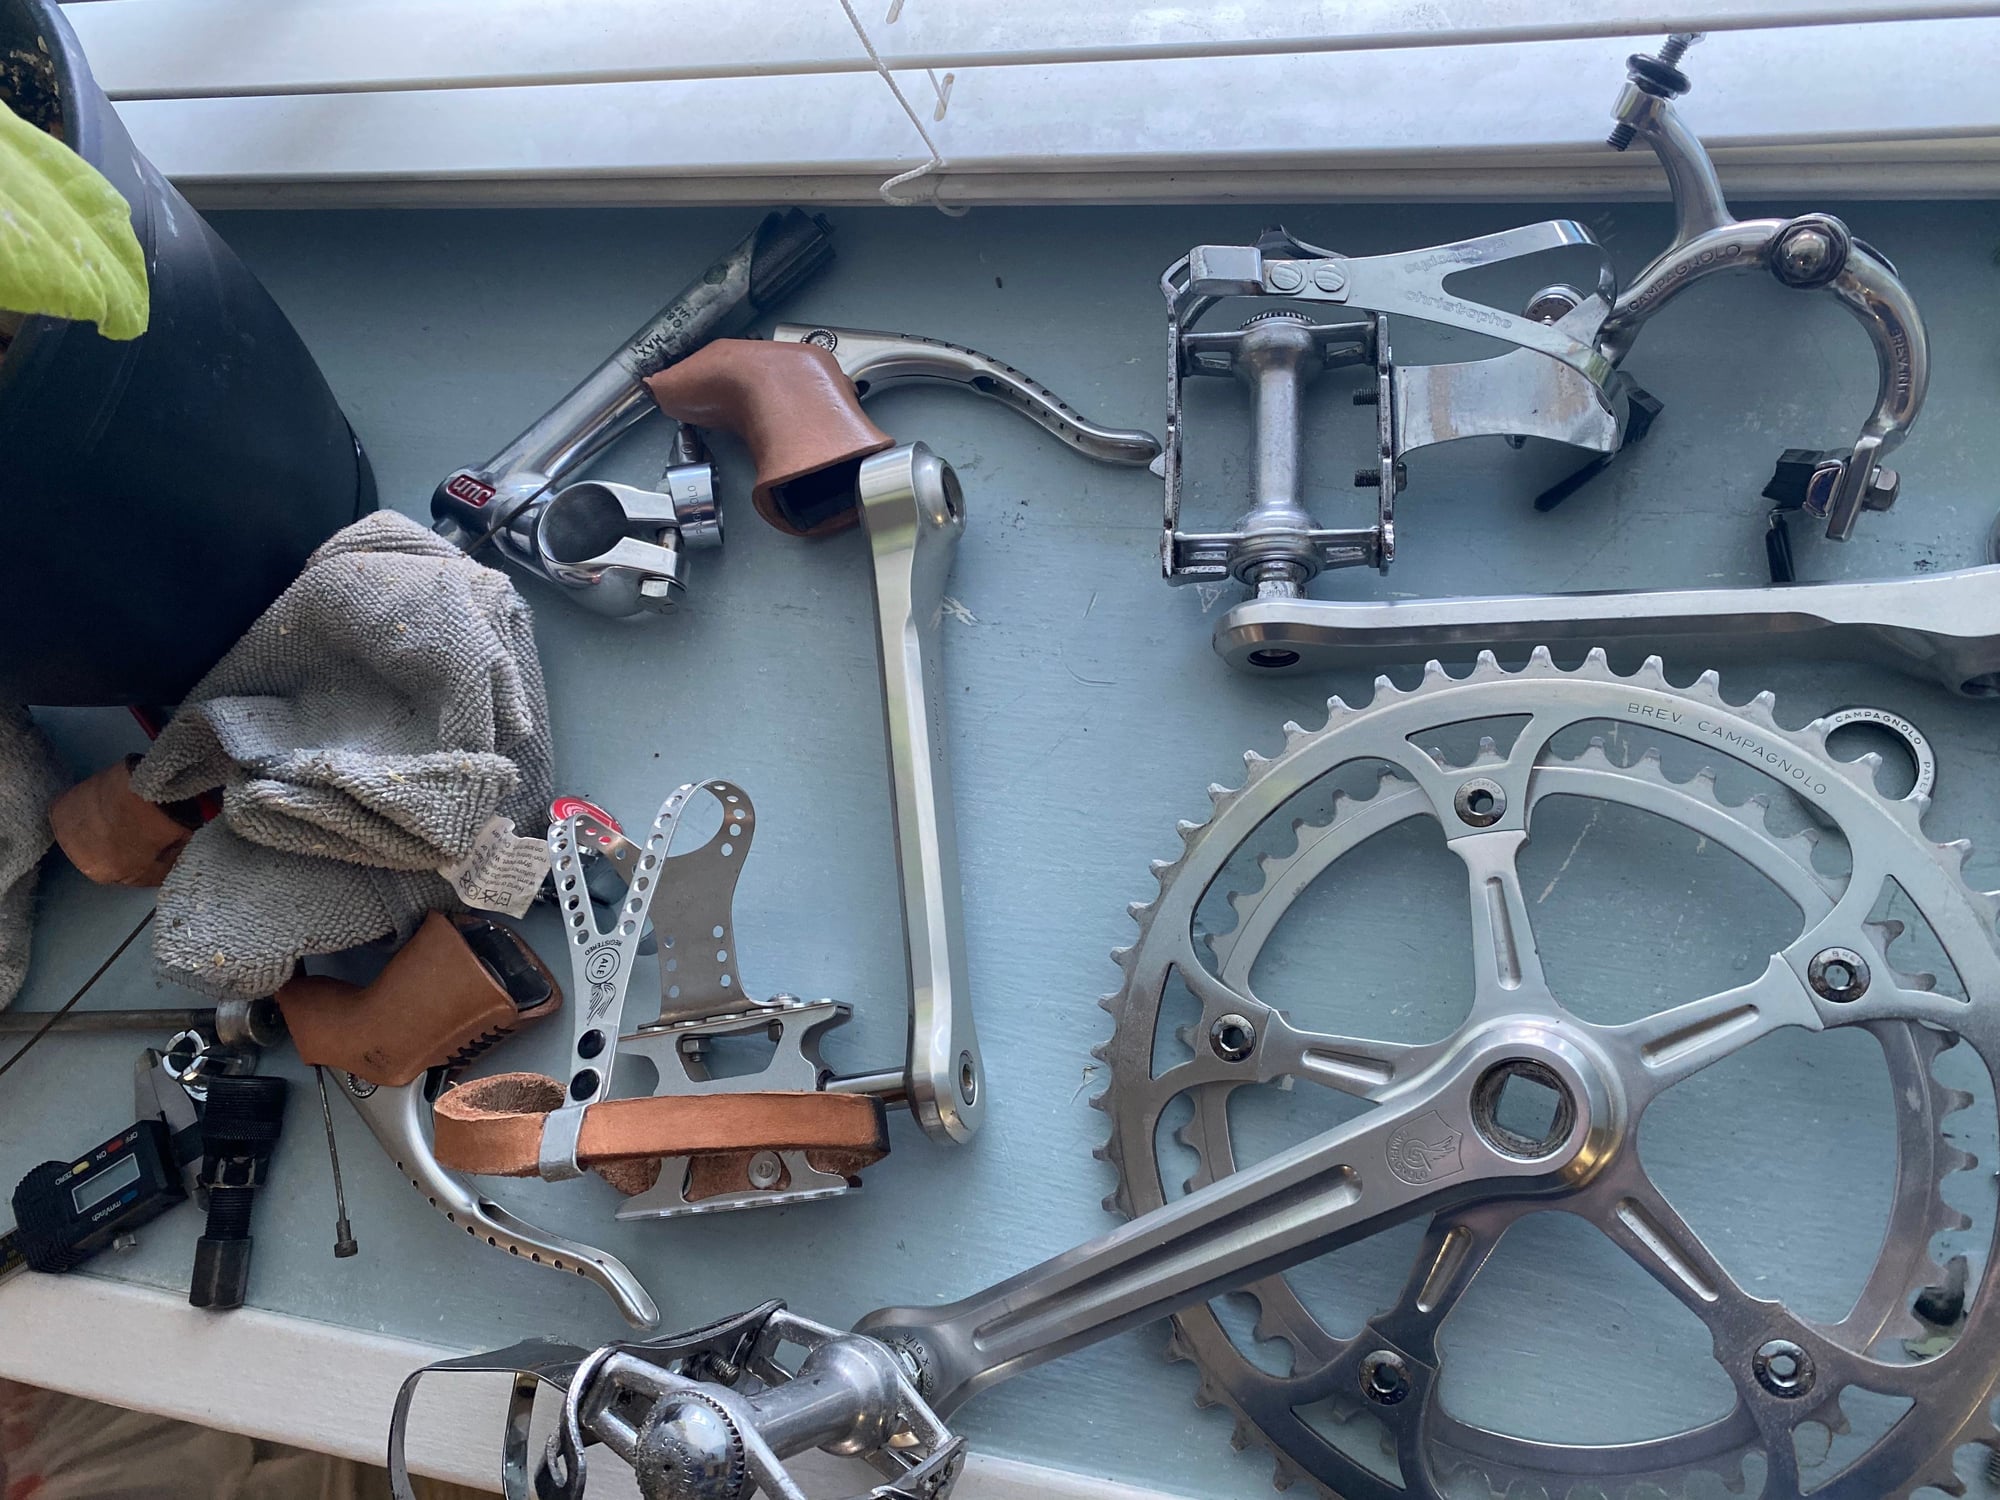
litepro/ace ti pedals. If you want light, that�s them. Around 150-160g per pair I believe. Not a huge amount of foot contact, so there�s that.
the drillium toe clips are Italian �Ale� brand with a touch of Drillium Dude - who did the work and gave them to me, all for free. Jeff is a class act and missed around here.
__________________
There were 135 Confentes, but only one...Huffente!

There were 135 Confentes, but only one...Huffente!
Likes For AdventureManCO:
01-16-24, 06:51 PM
#7258
The Huffmeister
Join Date: Jul 2008
Location: The Le Grande HQ
Posts: 2,739
Bikes: '79 Trek 938, '86 Jim Merz Allez SE, '90 Miyata 1000, '68 PX-10, '80 PXN-10, '73 Super Course, '87 Guerciotti, '83 Trek 600, '80 Huffy Le Grande
Mentioned: 45 Post(s)
Tagged: 0 Thread(s)
Quoted: 1226 Post(s)
Liked 3,554 Times
in
1,410 Posts
I find that steel spring washers on a thick bolt and nut solution is quite efficient. Then again, have a few DS cups stuck permanently on this "tool", at least until I have a ccess to a decent bench vice. But certainly it got the cups off. Probably wouldn't use it on anything fancy, unless I really had no other choice (which once I didn't have).
Now it is off and I doubt it is going on again,
as it becomes a liable technical issue should I need to have an expedient removal away from home. Too difficult. The cup came out nearly unscathed but I doubt I could replicate that too many more times.
01-17-24, 02:15 PM
#7259
Senior Member
Join Date: May 2021
Location: London
Posts: 564
Bikes: Motobecane C41, Matsu$hita Nashonaru
Mentioned: 7 Post(s)
Tagged: 0 Thread(s)
Quoted: 215 Post(s)
Liked 436 Times
in
253 Posts
What you are describing sounds like how I first got the DS cup on, and what I first went to for getting it off, unsuccessfully.
Now it is off and I doubt it is going on again,
as it becomes a liable technical issue should I need to have an expedient removal away from home. Too difficult. The cup came out nearly unscathed but I doubt I could replicate that too many more times.
Now it is off and I doubt it is going on again,
as it becomes a liable technical issue should I need to have an expedient removal away from home. Too difficult. The cup came out nearly unscathed but I doubt I could replicate that too many more times.
 That was also the moment when I decided I should actually get a proper wrench for vintage cups. Not sure if that would have helped with that particular one I managed to damage. And not like I would carry a BB cup wrench with me (of any variety, including a splined one) on my daily commute. Going somewhere further afield, yeah, I can totally see your point. I don't like saying that, but some things have improved in cycling technology (and plenty went the wrong way, so there's that).
Today's update on wrenching:
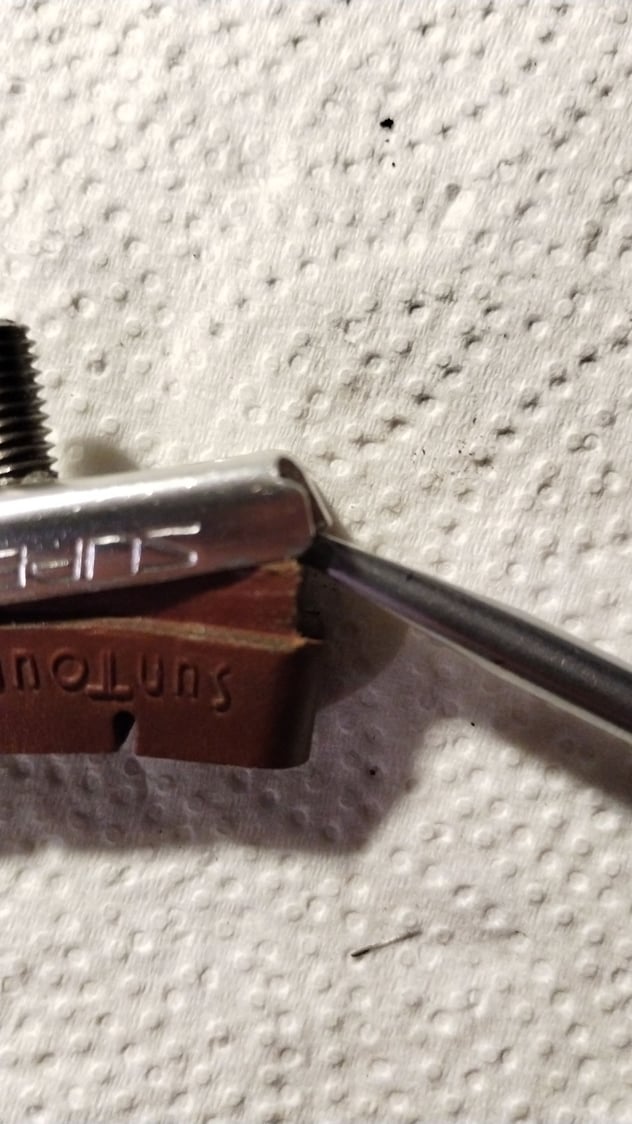
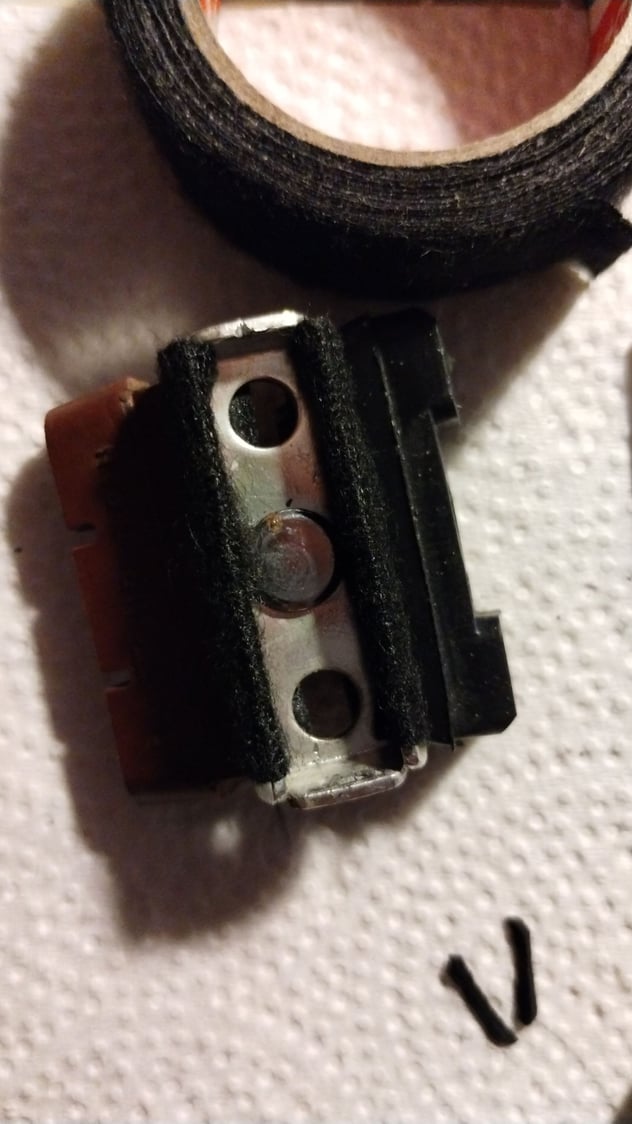
I'm thinking about finally replacing pads on Suntour Superbe brakes and wasn't quite interested in spending over 30 quid on a set of 4 pieces of rubber (that's the lowest price in the UK). Don't get me wrong, I like Koolstop pads, they are good, but I've been also using other brands and frankly, I can't see any difference I'd be able to measure. After a bit of research I found the Jawire blocks below and they are a match. I can't say whether they will be better than the original Superbe pads I still use, but I'm certainly hoping they will be a bit more quiet. And also, they were something like 6 times cheaper than Koolstops. And, on the bright side, I add a few more washers and domed nuts to the stash.
It took some convincing to get them out of the holders, but hopefully sometime next week I will find time to get them installed.
Last edited by VintageSteelEU; 01-17-24 at 06:14 PM.
Likes For VintageSteelEU:
01-19-24, 03:30 AM
#7260
Full Member
Join Date: Jan 2022
Posts: 476
Mentioned: 6 Post(s)
Tagged: 0 Thread(s)
Quoted: 253 Post(s)
Liked 223 Times
in
118 Posts
Cups I had problems with were either Italian threading or they were sitting on a bicycle for a very long time and probably were overtightened in the first place. The one that hurt the most was Superbe DS cup. Had to be removed, but didn't manage to do that without damaging the cup. That got replaced with Sugino, which is basically the same thing, but I was rather annoyed with myself for not being able to restore the bicycle to its original Superbe purity That was also the moment when I decided I should actually get a proper wrench for vintage cups. Not sure if that would have helped with that particular one I managed to damage. And not like I would carry a BB cup wrench with me (of any variety, including a splined one) on my daily commute. Going somewhere further afield, yeah, I can totally see your point. I don't like saying that, but some things have improved in cycling technology (and plenty went the wrong way, so there's that).
Today's update on wrenching:
I'm thinking about finally replacing pads on Suntour Superbe brakes and wasn't quite interested in spending over 30 quid on a set of 4 pieces of rubber (that's the lowest price in the UK). Don't get me wrong, I like Koolstop pads, they are good, but I've been also using other brands and frankly, I can't see any difference I'd be able to measure. After a bit of research I found the Jawire blocks below and they are a match. I can't say whether they will be better than the original Superbe pads I still use, but I'm certainly hoping they will be a bit more quiet. And also, they were something like 6 times cheaper than Koolstops. And, on the bright side, I add a few more washers and domed nuts to the stash.
It took some convincing to get them out of the holders, but hopefully sometime next week I will find time to get them installed.
That was also the moment when I decided I should actually get a proper wrench for vintage cups. Not sure if that would have helped with that particular one I managed to damage. And not like I would carry a BB cup wrench with me (of any variety, including a splined one) on my daily commute. Going somewhere further afield, yeah, I can totally see your point. I don't like saying that, but some things have improved in cycling technology (and plenty went the wrong way, so there's that).Today's update on wrenching:
I'm thinking about finally replacing pads on Suntour Superbe brakes and wasn't quite interested in spending over 30 quid on a set of 4 pieces of rubber (that's the lowest price in the UK). Don't get me wrong, I like Koolstop pads, they are good, but I've been also using other brands and frankly, I can't see any difference I'd be able to measure. After a bit of research I found the Jawire blocks below and they are a match. I can't say whether they will be better than the original Superbe pads I still use, but I'm certainly hoping they will be a bit more quiet. And also, they were something like 6 times cheaper than Koolstops. And, on the bright side, I add a few more washers and domed nuts to the stash.
It took some convincing to get them out of the holders, but hopefully sometime next week I will find time to get them installed.
Those are Jagwire brake pads? Could you maybe provide a link to the modell?
01-19-24, 04:06 PM
#7261
Full Member
Join Date: Jun 2020
Posts: 458
Bikes: 91 Ritchey Ultra, 1992 Specialized Stumpjumper, 1990 Klein Rascal, 97 Trek OCLV9700, 90 Minnelli Eclipse, 95 Marin Bear Valley SE, 1991 Breezer Lightning Flash 1991 Diamondback Axis 1992 Stumpjumper Comp 1983 Stumpjumper Sport
Mentioned: 2 Post(s)
Tagged: 0 Thread(s)
Quoted: 101 Post(s)
Liked 646 Times
in
236 Posts
Rebuilt the Suntour Mountech rear derailleur last night and glad to say everything working well. This restoration is now complete.
Likes For victorm:
01-19-24, 05:37 PM
#7262
Senior Member
Join Date: May 2019
Location: Bloomington, IN
Posts: 2,950
Bikes: Paramount, Faggin, Ochsner, Ciocc, Basso
Mentioned: 117 Post(s)
Tagged: 0 Thread(s)
Quoted: 1303 Post(s)
Liked 1,912 Times
in
1,142 Posts
Seems like it was handlebar week in MH land. I got busy and finished three bar setups for a few bikes that have not been finished because I waited on the the bars. So it is a bit of breathing room on builds for a while. I used three different lengths of stem and same size and drop of bars. It will allow me to fine tune ride positions while not making changes other than stem position for best fit. Some of today's work:
The underlay of Benotto tape which protects the bars from any adhesive if I use any build up with foam tape. In this setup I am using the underlay wrap for build up to get to size.
First round of finish tape on 1/4th of the finished look. The total job will require one package of root beer underlay, and two packages of white.

Finished today's set after a couple of hours of wrap time.
It is a good thing I am not working in a shop environment trying to hit book times for this job. Smiles, MH
The underlay of Benotto tape which protects the bars from any adhesive if I use any build up with foam tape. In this setup I am using the underlay wrap for build up to get to size.
First round of finish tape on 1/4th of the finished look. The total job will require one package of root beer underlay, and two packages of white.
Finished today's set after a couple of hours of wrap time.
It is a good thing I am not working in a shop environment trying to hit book times for this job. Smiles, MH
01-19-24, 07:15 PM
#7263
Senior Member
Join Date: May 2021
Location: London
Posts: 564
Bikes: Motobecane C41, Matsu$hita Nashonaru
Mentioned: 7 Post(s)
Tagged: 0 Thread(s)
Quoted: 215 Post(s)
Liked 436 Times
in
253 Posts
Please let me know how the install goes - I have a set of 70' DA Brake pad holders with the same issue (as in, i cannot get them out, or swap the pads) and would love to hear your experience with them.
Those are Jagwire brake pads? Could you maybe provide a link to the modell?
Those are Jagwire brake pads? Could you maybe provide a link to the modell?
The Suntour Superbe pad holders have round cutouts in them, so the plan is to force the current pad out by driving something through that hole. Then try to gently pry the sides apart enough to squeeze the new pad in. I haven't seen the Suntour pads out of the holder yet, so my next steps will depend on what it looks like and what the exact measurements are, but I might cut small bevels in the new pads to make forcing them in with pliers a bit easier. Other tools to potentially use are: 1. liquid soap / dishwashing liquid to lubricate the pad 2. heat gun, to warm the pad holder a bit. 3. piece of fabric to protect the pad holder surface from being marked by the pliers. We'll see what works best. Maybe no additional measures will be necessary (slim chance, knowing life
). I know I will prep the surface of the new pads with sandpaper. And if everything goes well, I might try their efficiency on Sunday, weather permitting.I have another set of Superbe calipers on the way and those come without original pads (but with the wings / tyre guides and complete otherwise, which is great). For those I am probably going to use Weinmann pad holders, because they are lightweight (vintage Weinmann pad holders were made of aluminium) and also have holes in them, so will look similar to original Suntour pads. They are also very common and much cheaper than Suntour pad holders, so less of a problem if I mess something up.
Likes For MrGastrognome:
01-20-24, 02:36 PM
#7265
1991 PBP Anciens
Join Date: Nov 2009
Location: Elburn, Illannoy
Posts: 625
Bikes: 1954 Robin Hood, 1964 Dunelt, 1968 Raleigh Superbe, 1969 Robin Hood, 197? Gitane, 1973 Raleigh SuperCourse, 1981 Miyata 710, 1990 Miyata 600GT, 2007 Rivendell Bleriot
Mentioned: 1 Post(s)
Tagged: 0 Thread(s)
Quoted: 65 Post(s)
Liked 305 Times
in
117 Posts
I managed to get a bit more done on the future Lake Pepin Ol' Fart Scandihoovian bike.

I got the original fork in the mail last week and junked the headset for a Ritchey that's been sitting in a box for a couple of decades. It had a $9.99 price tag on it, if that tells you anything. I picked up the handlebar in the used parts bin at my now not so local LBS. The stem is a POS SR that's not staying.
The rear hub is a Sachs H3111 3 speed coaster brake hub. This is the first Sachs 3 speed I've ever set up. Lemme tells ya, it took a while. I've done SA hubs for decades and can do them by feel. It was probably because the Germans knew what a tolerance was and it had to be exact.
This build is going to slow down a bit. Mrs.Bikamper had surgery for the big C yesterday. It was successful but with recovery and upcoming radiation treatments, I have more important things to do. I'll also be taking a pass on this year's 3ST. I promised to take my youngest gearhead grandson to see flat track motorcycle racing at the local speedway and it happens to be the same weekend.
Likes For bikamper:
 01-20-24, 04:53 PM
#7267
Cantilever believer

Join Date: Nov 2021
Location: Phoenix, AZ
Posts: 1,565
Mentioned: 5 Post(s)
Tagged: 0 Thread(s)
Quoted: 536 Post(s)
Liked 1,839 Times
in
832 Posts
I'm not saying I'm way way wayyy behind on bike work (and riding), but I'm just now getting around to taking the Christmas lights off the chrome cruiser.

And getting a couple signs assembled for tomorrow's San Tan Century.

And getting a couple signs assembled for tomorrow's San Tan Century.
__________________
Richard C. Moeur, PE - Phoenix AZ, USA
https://www.richardcmoeur.com/bikestuf.html
Richard C. Moeur, PE - Phoenix AZ, USA
https://www.richardcmoeur.com/bikestuf.html
01-20-24, 07:23 PM
#7268
Senior Member
Join Date: May 2021
Location: London
Posts: 564
Bikes: Motobecane C41, Matsu$hita Nashonaru
Mentioned: 7 Post(s)
Tagged: 0 Thread(s)
Quoted: 215 Post(s)
Liked 436 Times
in
253 Posts
The whole day full of bicycle mintenance. Most of it not on my bicycles though. Started in the morning by replacing old Weinmann 720's with dual pivot Tektros with long enough reach on an old Raleigh turned into a fixie with a homemade bullhorn bars with aero road brake levers. That's a weird one. Tried Miche Performance calipers before (these are essentially Tektro R315 rebadged as Miche) with 57mm reach. Perfectly fine in front, just a tad short at the rear. But I had a slightly mismatched pair of R559 (57mm reach for the front and 73mm reach for the rear). Well, guess what? Brake pads on the rear caliper have to be at 53mm position (which of course leaves lots of caliper arm below). So not sure why 57mm wasn't enough on the Miche brakes. Can't say I find it esthetically pleasing, but at least the pads reach the rim wall correctly. And I don't feel like filing any calipers to modify the reach, so I guess it is what it is and the brakes will stay on the bike.
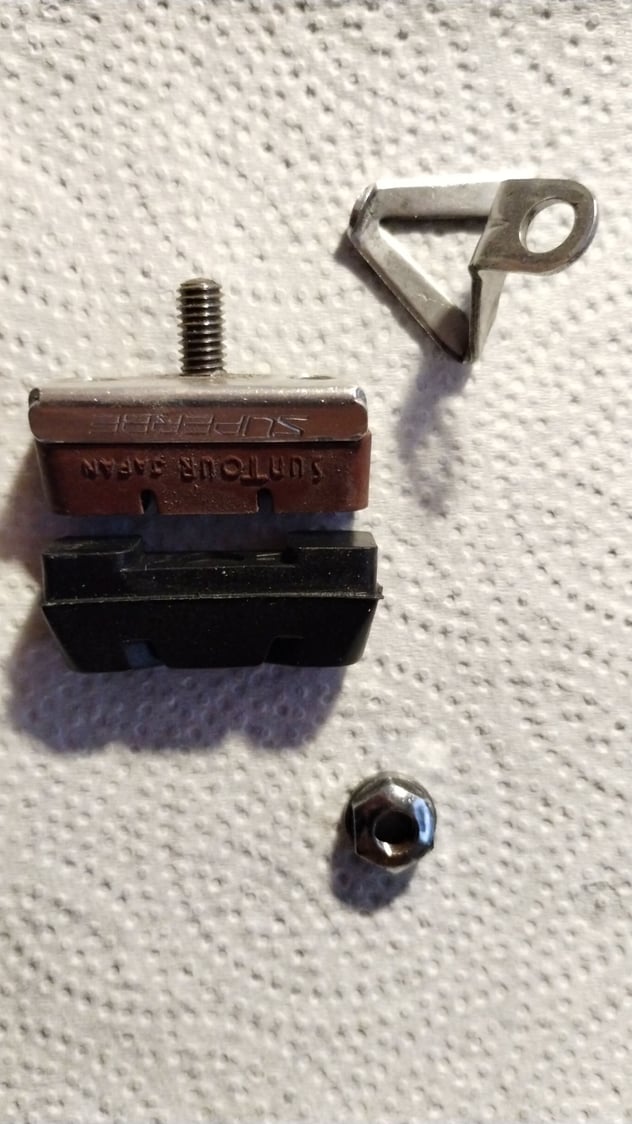
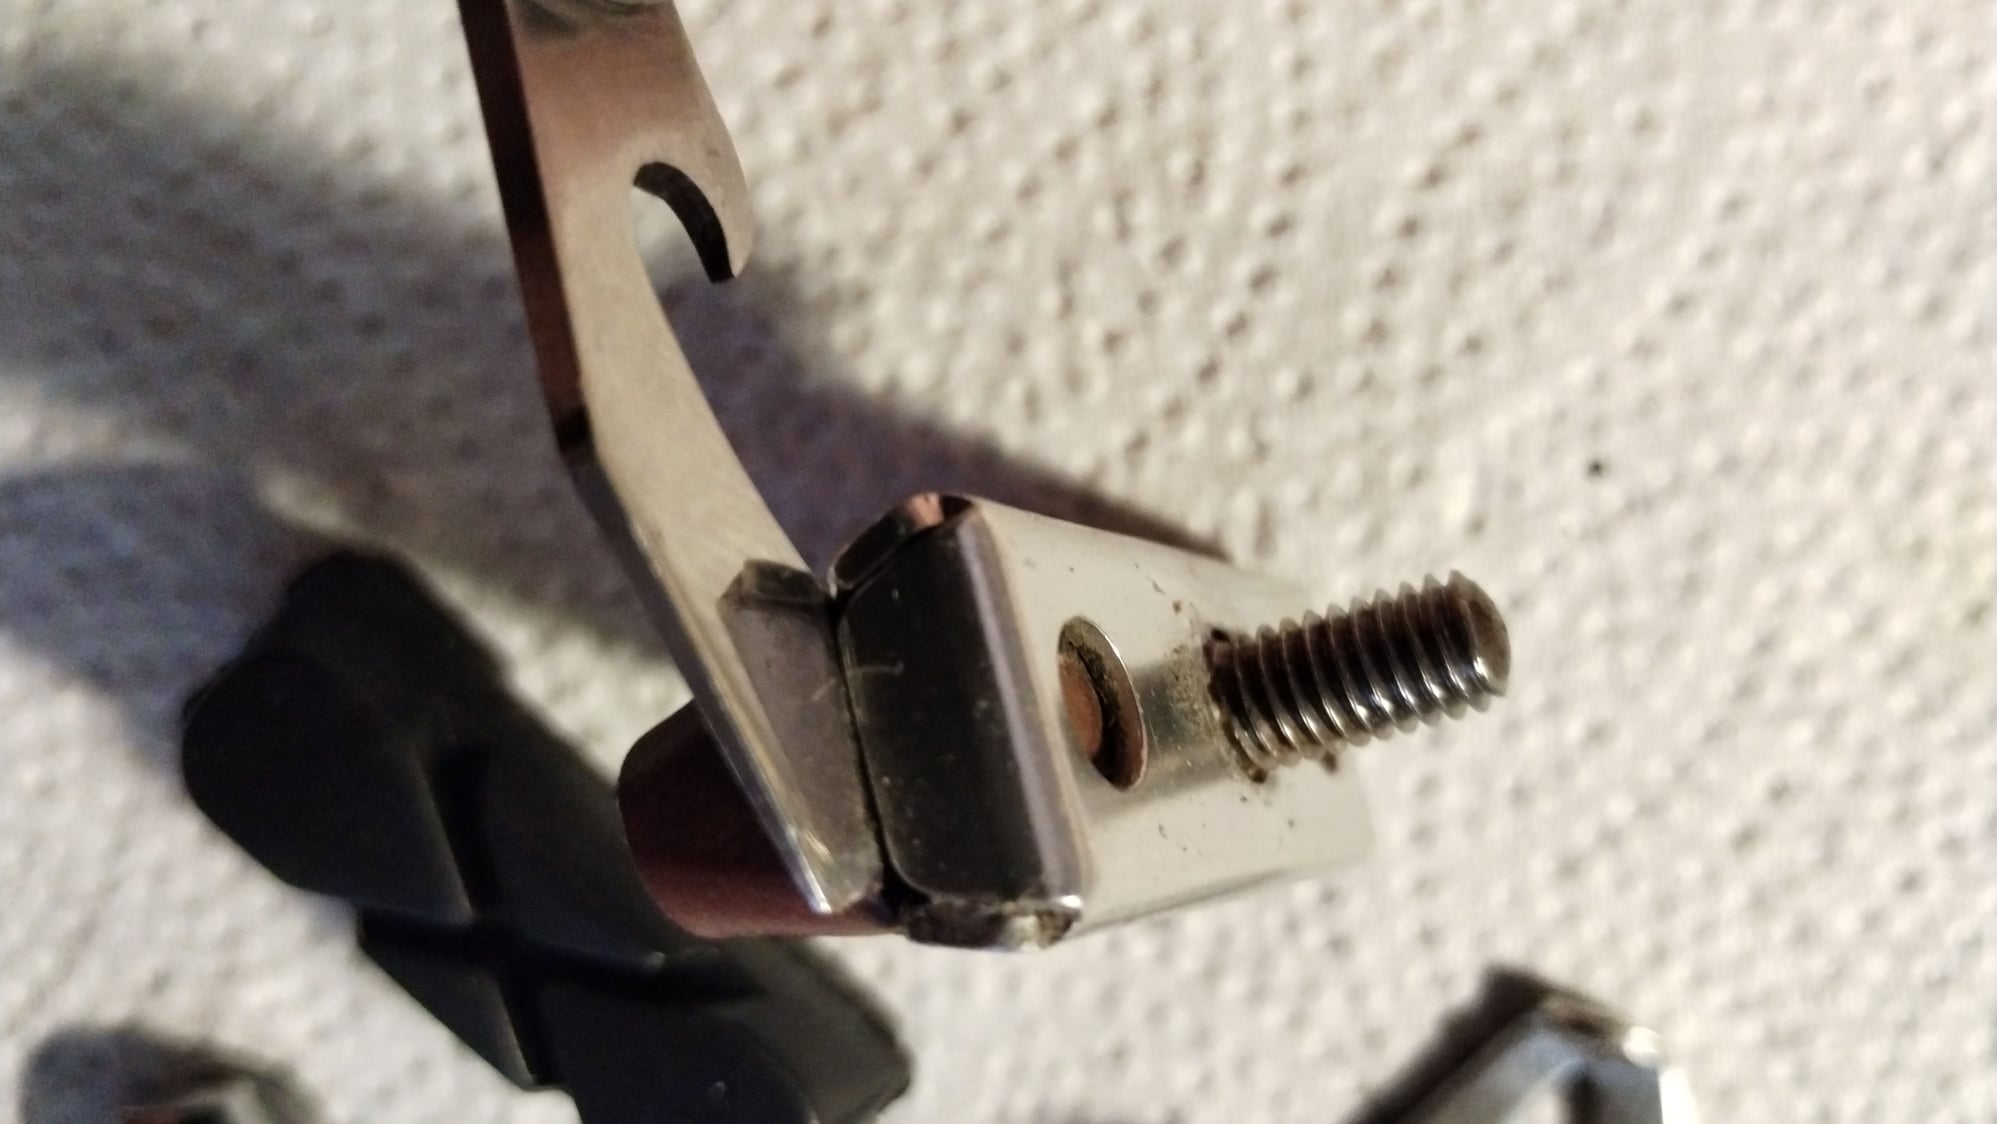
With the calipers secured on the frame, I got into adjusting the length of brake cable outers to fit the new calipers. Pulled the inner cable from the left one and then had a look at the right one and found this:
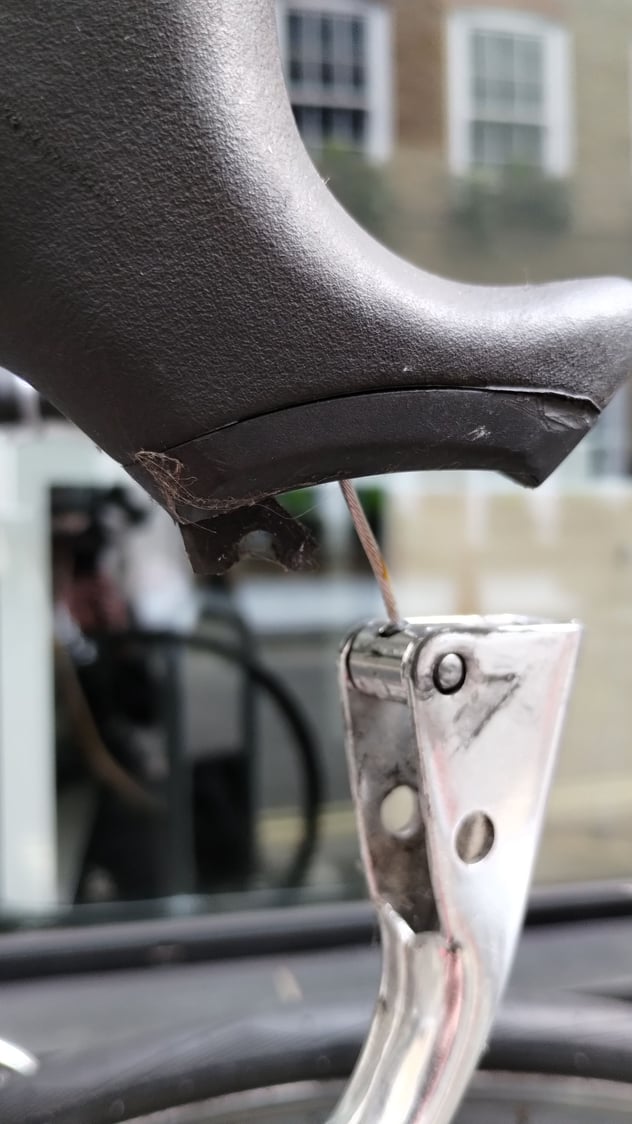
Who on Earth makes a lever pivot point out of plastic? Well, Alhonga does for sure. Whoever they are. So that fixie has no brakes for now (it's a freewheel rear hub variety). New Tiagra BL-R400 levers have been ordered and will be installed when they arrive. I'm not quite sure how to wrap handlebar tape on a sawn-off bulhorn handlebars, so I guess I will learn something new.
Later in the afternoon I fixed my friend's bicycle. The bottom bracket was crunchy and the spindle had lots of play. After opening it I found the cause: several bearing balls got out of the bearing cage somehow. Thankfully cups and cones OK, so that got cleaned, regreased with a fresh blob of Red & Tacky and loose balls were fitted instead. But of course, that would be too easy if that was it. When working on the bicycle I thought the RD looks a bit funny. So when I was done with the BB, I grabbed derailleur hanger adjusting tool and sure enough, the hanger was totally out of whack. Someone must have reversed into that bicycle or kicked it maybe (it lives in the street and people are weird)? I had to align that and now all is good. To revisit in a couple of months.
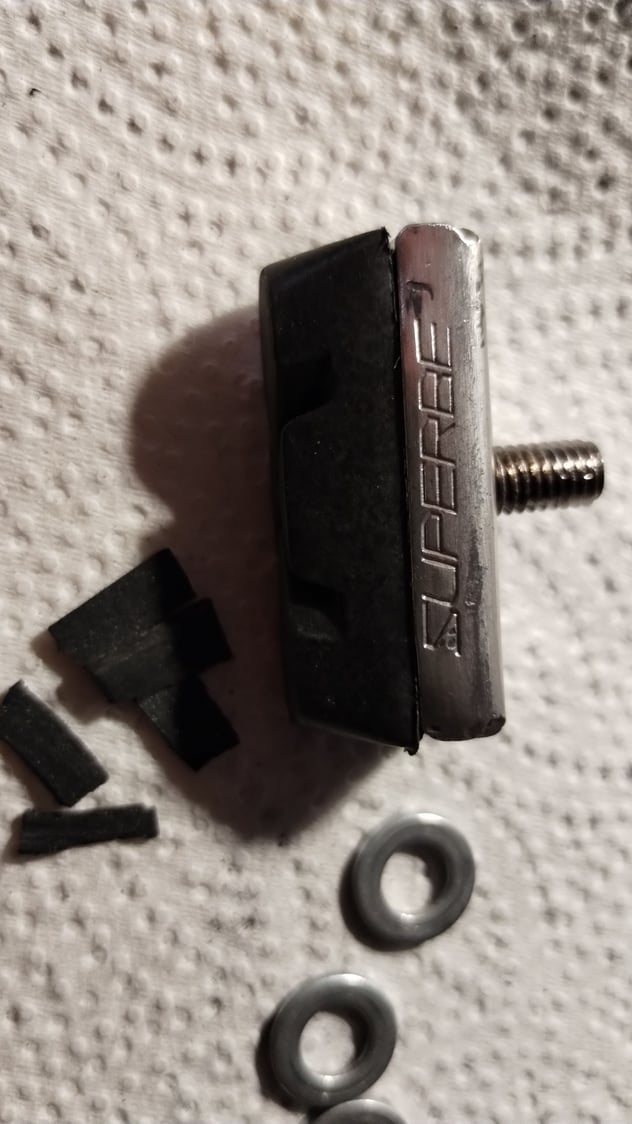
After all the repairs throughout the day I had some time left in the evening, so decided to get on with the Superbe brake pads. In short, the pads I got are close enough fit, but there are some differences compared with original Suntour pads: 1. the base of the Jagwire pad is a bit longer. 39.5 vs 36.5 on Superbe pads. So actually Fibrax pads made for Weinmann brakes, might be a better match. Need to check if have any of those left and measure them. This means I had to modify the base and cut it to measure. Not a big deal, but worth keeping in mind. 2. Jagwire pads are a bit shorter than Suntour ones when measured at the rim-facing surface. They are also a tad wider (the breaking surface, the base is actually minimally narrower). Which is not the best thing when it comes to the Ambrosio rims I have on the bicycle, because the breaking surface isn't very wide. Should be still OK and then I will be switching to Excellight rims on this bike, so perhaps those have slightly wider braking surface. 3. Jagwire ones have a deep indent in the middle to accomodate the holder's bolt. This section is much shallower on Suntour pads. Not much of a problem, but I decided to put a few layers of Tesa tape to minimise that indent on Jagwire pads and make sure the bolt doesn't move around too much.
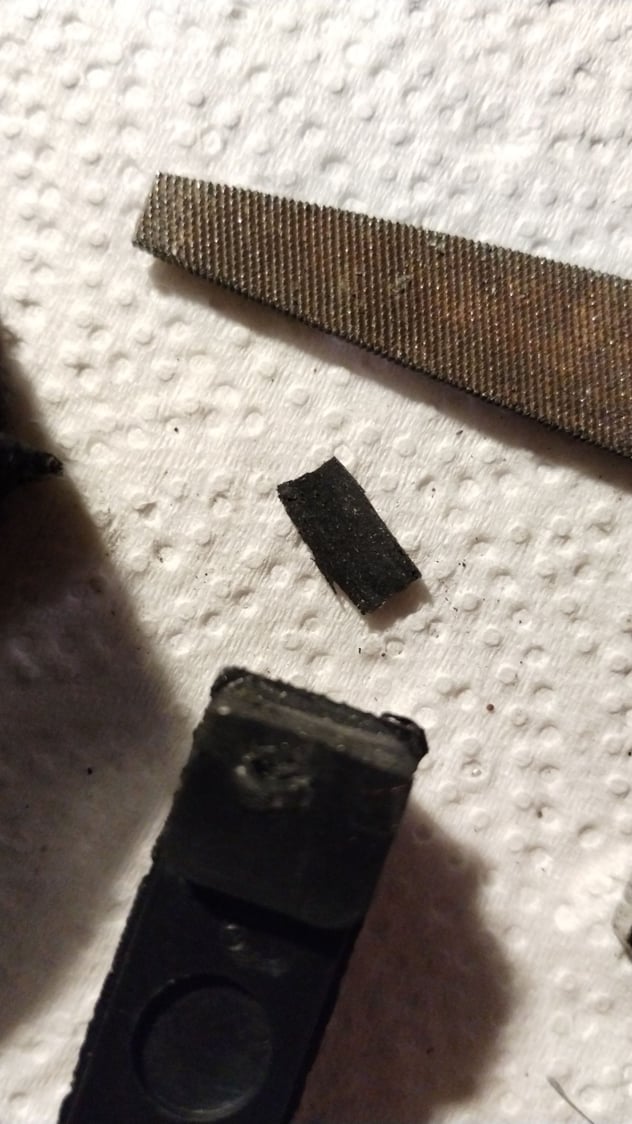
I've managed to replace one pad for now. That's what I had time for today, will do the rest tomorrow. The idea of pushing the old pad out of the pad holder didn't work. Had to go about it the old fashioned way: by prying the walls apart. I used a highly sophisticated set of tools here: 1. A bottle cap remover on my pocket knife. Because the end part of it was the perfect size for the job, it's very thin and made of decent steel, so doesn't deform or bend. 2. Standard flat headed screwdriver to have enough leverage and thin enough to get purchase underneath / at the very bottom of the Suntour pad.
The next step was comparing the two pads and modifying the Jagwire ones. In hindsight, probably it would be better if I cut the excess at a tint bit of an angle to make sure the walls can be pushed in a bit more. After cutting the excess rubber on both sides of the pad base to bring the base of the pad to c.a. 36.5mm, I went in there with a smal file to make sure everything is as even as I can make it. Then it was time to pry the pad holder's wall open a bit more. I covered that in Tesa tape and used just standard pliers for that. Still managed to make some marks on the aluminium and that's something I will eventually have to take care of when I have some fine grade sandpaper.
The new pad after making some adjustments to it, went in without problems. All I had to do afterwards was to close the walls with pliers. I would have preferred to use bench vice for this task, but I don't have access to one, so pliers it was. For the short sides I used a few gentle taps with a hammer (after placing the other short end on a few layers of thick rubber and covering the surface with fabric tape). The I sanded down the pad surface a bit. All seems to be fine (except for the need of polishing the holder at some point), but will have to test it when I have replaced all pads and the weather is nice enough to go for a ride.
I think what I'm going to do in the future will be digging out some alu pad holders for Weinmann brakes and turn them into "vintage cartridges" by cutting off one of the short holder walls, so I can just slide a new pad in without prying all the walls apart.
Two pads compared
Getting the old pad out
Screwdriver to the rescue
Covering the holder's walls with cloth tape
Modifications

More modifications of the new pad
New pad in, ready to get secured
With the calipers secured on the frame, I got into adjusting the length of brake cable outers to fit the new calipers. Pulled the inner cable from the left one and then had a look at the right one and found this:
Who on Earth makes a lever pivot point out of plastic? Well, Alhonga does for sure. Whoever they are. So that fixie has no brakes for now (it's a freewheel rear hub variety). New Tiagra BL-R400 levers have been ordered and will be installed when they arrive. I'm not quite sure how to wrap handlebar tape on a sawn-off bulhorn handlebars, so I guess I will learn something new.
Later in the afternoon I fixed my friend's bicycle. The bottom bracket was crunchy and the spindle had lots of play. After opening it I found the cause: several bearing balls got out of the bearing cage somehow. Thankfully cups and cones OK, so that got cleaned, regreased with a fresh blob of Red & Tacky and loose balls were fitted instead. But of course, that would be too easy if that was it. When working on the bicycle I thought the RD looks a bit funny. So when I was done with the BB, I grabbed derailleur hanger adjusting tool and sure enough, the hanger was totally out of whack. Someone must have reversed into that bicycle or kicked it maybe (it lives in the street and people are weird)? I had to align that and now all is good. To revisit in a couple of months.
Please let me know how the install goes - I have a set of 70' DA Brake pad holders with the same issue (as in, i cannot get them out, or swap the pads) and would love to hear your experience with them.
Those are Jagwire brake pads? Could you maybe provide a link to the modell?
Those are Jagwire brake pads? Could you maybe provide a link to the modell?
I've managed to replace one pad for now. That's what I had time for today, will do the rest tomorrow. The idea of pushing the old pad out of the pad holder didn't work. Had to go about it the old fashioned way: by prying the walls apart. I used a highly sophisticated set of tools here: 1. A bottle cap remover on my pocket knife. Because the end part of it was the perfect size for the job, it's very thin and made of decent steel, so doesn't deform or bend. 2. Standard flat headed screwdriver to have enough leverage and thin enough to get purchase underneath / at the very bottom of the Suntour pad.
The next step was comparing the two pads and modifying the Jagwire ones. In hindsight, probably it would be better if I cut the excess at a tint bit of an angle to make sure the walls can be pushed in a bit more. After cutting the excess rubber on both sides of the pad base to bring the base of the pad to c.a. 36.5mm, I went in there with a smal file to make sure everything is as even as I can make it. Then it was time to pry the pad holder's wall open a bit more. I covered that in Tesa tape and used just standard pliers for that. Still managed to make some marks on the aluminium and that's something I will eventually have to take care of when I have some fine grade sandpaper.
The new pad after making some adjustments to it, went in without problems. All I had to do afterwards was to close the walls with pliers. I would have preferred to use bench vice for this task, but I don't have access to one, so pliers it was. For the short sides I used a few gentle taps with a hammer (after placing the other short end on a few layers of thick rubber and covering the surface with fabric tape). The I sanded down the pad surface a bit. All seems to be fine (except for the need of polishing the holder at some point), but will have to test it when I have replaced all pads and the weather is nice enough to go for a ride.
I think what I'm going to do in the future will be digging out some alu pad holders for Weinmann brakes and turn them into "vintage cartridges" by cutting off one of the short holder walls, so I can just slide a new pad in without prying all the walls apart.
Two pads compared
Getting the old pad out
Screwdriver to the rescue
Covering the holder's walls with cloth tape
Modifications
More modifications of the new pad
New pad in, ready to get secured
Last edited by VintageSteelEU; 01-20-24 at 07:30 PM.
Likes For VintageSteelEU:
01-21-24, 08:00 AM
#7269
1991 PBP Anciens
Join Date: Nov 2009
Location: Elburn, Illannoy
Posts: 625
Bikes: 1954 Robin Hood, 1964 Dunelt, 1968 Raleigh Superbe, 1969 Robin Hood, 197? Gitane, 1973 Raleigh SuperCourse, 1981 Miyata 710, 1990 Miyata 600GT, 2007 Rivendell Bleriot
Mentioned: 1 Post(s)
Tagged: 0 Thread(s)
Quoted: 65 Post(s)
Liked 305 Times
in
117 Posts

Likes For Mr. 66:
01-22-24, 11:18 AM
#7271
Deraill this!
Join Date: Jun 2019
Location: Central Ohio
Posts: 620
Bikes: 18 Cdale Quick 1, 94 S-Works M2, 98 730 Multitrak, and a few others
Mentioned: 4 Post(s)
Tagged: 0 Thread(s)
Quoted: 143 Post(s)
Liked 433 Times
in
251 Posts
Put this one up on the stand for some love. I picked it up locally for my daughter but found a better option for here. After stripping it to a bare frame, it�s going back together with parts from multiple bikes. Quill stem adapter in place upgraded the stem and bars. Saddle and pedals from my wife�s Verve. Cleaned up the original wheel set and mounted the Contis that came on another wheel set I picked up. It�ll will receive a new chain and freewheel.
01-22-24, 11:22 AM
#7272
Deraill this!
Join Date: Jun 2019
Location: Central Ohio
Posts: 620
Bikes: 18 Cdale Quick 1, 94 S-Works M2, 98 730 Multitrak, and a few others
Mentioned: 4 Post(s)
Tagged: 0 Thread(s)
Quoted: 143 Post(s)
Liked 433 Times
in
251 Posts
Put this one up on the stand for some love. I picked it up locally for my daughter but found a better option for her. After stripping it to a bare frame and a good cleaning, it’s going back together with parts from multiple bikes. Quill stem adapter in place with upgraded the stem and bars. Saddle and pedals from my wife’s Verve. Cleaned up the original wheel set and mounted the Contis borrowed from another wheel.
Last edited by Trav1s; 01-22-24 at 11:30 AM.
01-22-24, 11:30 AM
#7273
Bianchi Goddess

Join Date: Apr 2009
Location: Shady Pines Retirement Fort Wayne, In
Posts: 27,858
Bikes: Too many to list here check my signature.
Mentioned: 192 Post(s)
Tagged: 2 Thread(s)
Quoted: 2930 Post(s)
Liked 2,927 Times
in
1,492 Posts
I might have missed this eleswhere @AdventureManCO but what are we looking at? Is thst some sort of machined adaptor for a BB shell that normally has pressed bearings like a early Klien or Merlin? Huffente? Is that a slur aimed at the bike or a brand?
__________________
�One morning you wake up, the girl is gone, the bikes are gone, all that's left behind is a pair of old tires and a tube of tubular glue, all squeezed out"
Sugar "Kane" Kowalczyk
�One morning you wake up, the girl is gone, the bikes are gone, all that's left behind is a pair of old tires and a tube of tubular glue, all squeezed out"
Sugar "Kane" Kowalczyk
Last edited by Bianchigirll; 01-22-24 at 11:51 AM.
01-22-24, 11:50 AM
#7274
Bianchi Goddess
Join Date: Apr 2009
Location: Shady Pines Retirement Fort Wayne, In
Posts: 27,858
Bikes: Too many to list here check my signature.
Mentioned: 192 Post(s)
Tagged: 2 Thread(s)
Quoted: 2930 Post(s)
Liked 2,927 Times
in
1,492 Posts
So I've been in a funk the last few weeks, or months maybe, but I'm determined to try and accomplish some small maintenance bits. I tried once again to install these fabulous, ESGE I believe, "Shorty Fenders" on something and I thought the Colorful Cornelo with the Victory brakes would be a great place to try (probably for like the 847th time) and to no avail. Whilst there is room for the brake to operate, there there simple isn't the vertical clearance to allow it. 
So instead I decided to put these beautiful Bespoke "Flint Catchers" on that I bought years ago and never used. I think these were from RootBoy yes?
I forgot to take a pic before adding them so a clipped this pic from a interweb search, it belongs to someone here.
Feeling good about accomplishing this task I moved on and things almost went down hill fast. You all might remember the great V Brake fiasco from last year involving the '86 Volpe? Well I'm still not happy with the Shipmano AT-50 cantilever despite new pads. So a few Months ago I bought some Tekter BR549 Linemaner lever to swap in place of the Campanutella levers currently in use. Hopefully this will rectify the issue.
Shortly after removing the bartape I remembered "OH right the barends OY!" Well fortunately I could generate just enough slack to slip them from their happy home and get the job done.
So now the new levers are on and seem better but it hasn't been above 32 here in like weeks so I'm not able to test ride.

If you're interested you read all the gory details on both projects over on my BianchiGirll World of Bianchi facistbook page. https://www.facebook.com/trinabrady102/ Stand by for even more maddening projects.
So instead I decided to put these beautiful Bespoke "Flint Catchers" on that I bought years ago and never used. I think these were from RootBoy yes?
I forgot to take a pic before adding them so a clipped this pic from a interweb search, it belongs to someone here.
Feeling good about accomplishing this task I moved on and things almost went down hill fast. You all might remember the great V Brake fiasco from last year involving the '86 Volpe? Well I'm still not happy with the Shipmano AT-50 cantilever despite new pads. So a few Months ago I bought some Tekter BR549 Linemaner lever to swap in place of the Campanutella levers currently in use. Hopefully this will rectify the issue.
Shortly after removing the bartape I remembered "OH right the barends OY!" Well fortunately I could generate just enough slack to slip them from their happy home and get the job done.
So now the new levers are on and seem better but it hasn't been above 32 here in like weeks so I'm not able to test ride.
If you're interested you read all the gory details on both projects over on my BianchiGirll World of Bianchi facistbook page. https://www.facebook.com/trinabrady102/ Stand by for even more maddening projects.
__________________
�One morning you wake up, the girl is gone, the bikes are gone, all that's left behind is a pair of old tires and a tube of tubular glue, all squeezed out"
Sugar "Kane" Kowalczyk
�One morning you wake up, the girl is gone, the bikes are gone, all that's left behind is a pair of old tires and a tube of tubular glue, all squeezed out"
Sugar "Kane" Kowalczyk
Likes For Bianchigirll:
01-22-24, 12:55 PM
#7275
Senior Member
Join Date: May 2021
Location: London
Posts: 564
Bikes: Motobecane C41, Matsu$hita Nashonaru
Mentioned: 7 Post(s)
Tagged: 0 Thread(s)
Quoted: 215 Post(s)
Liked 436 Times
in
253 Posts
So I've been in a funk the last few weeks, or months maybe, but I'm determined to try and accomplish some small maintenance bits. I tried once again to install these fabulous, ESGE I believe, "Shorty Fenders" on something and I thought the Colorful Cornelo with the Victory brakes would be a great place to try (probably for like the 847th time) and to no avail. Whilst there is room for the brake to operate, there there simple isn't the vertical clearance to allow it.
So instead I decided to put these beautiful Bespoke "Flint Catchers" on that I bought years ago and never used. I think these were from RootBoy yes?
I forgot to take a pic before adding them so a clipped this pic from a interweb search, it belongs to someone here.
Feeling good about accomplishing this task I moved on and things almost went down hill fast. You all might remember the great V Brake fiasco from last year involving the '86 Volpe? Well I'm still not happy with the Shipmano AT-50 cantilever despite new pads. So a few Months ago I bought some Tekter BR549 Linemaner lever to swap in place of the Campanutella levers currently in use. Hopefully this will rectify the issue.
Shortly after removing the bartape I remembered "OH right the barends OY!" Well fortunately I could generate just enough slack to slip them from their happy home and get the job done.
So now the new levers are on and seem better but it hasn't been above 32 here in like weeks so I'm not able to test ride.
If you're interested you read all the gory details on both projects over on my BianchiGirll World of Bianchi facistbook page. https://www.facebook.com/trinabrady102/ Stand by for even more maddening projects.