


Tightening issues with 7 speed hub
 05-31-19, 11:52 AM
#1

WGB
Thread Starter
Join Date: Jul 2017
Location: Niagara Region
Posts: 2,917
Bikes: Panasonic PT-4500
Mentioned: 46 Post(s)
Tagged: 0 Thread(s)
Quoted: 1799 Post(s)
Liked 2,334 Times
in
1,378 Posts
Tightening issues with 7 speed hub
This a weird issue. at least for me
I acquired a wrecked Trek 420. Wheel set seemed nice. Front wheel no issues. I stripped and rebuilt both rims but noted that the rear cones were worn and need to be replaced. I assembled the cannot get to that sweet spot were wheel turns smooth and nuts are tight. If I focused on getting it smooth, the nuts would be loose. Focus on the nuts and the wheels turned rough.
I asked the mechanics at the co-op and they said it needs new cones and depending on how bad the inside of the hub is, it may be the hub is worn out and that even if it's just the cones, it won't be smooth until cones installed at best.
I figured I'd put the cassette back on so I didn't loose the parts. Cassette parts were scrubbed and re-oiled and when I reassemble the cassette on the hub, all is fine until I tighten the spacer. Cassette spins smooth until that point and then seizes up.
Mechanics think that when I tighten the locking ring on the cassette, it compresses the hub a tiny bit and then the worn cones somehow bite causing the cassette to seize. Alternatively it simply needs to be soaked in oil. To be fair the Co-op was overwhelmed last night so not enough time for them to investigate properly.
Anybody had similar issues???
 05-31-19, 01:08 PM
#2
working on my sandal tan

Join Date: Aug 2011
Location: CID
Posts: 22,629
Bikes: 1991 Bianchi Eros, 1964 Armstrong, 1988 Diamondback Ascent, 1988 Bianchi Premio, 1987 Bianchi Sport SX, 1980s Raleigh mixte (hers), All-City Space Horse (hers)
Mentioned: 98 Post(s)
Tagged: 0 Thread(s)
Quoted: 3871 Post(s)
Liked 2,568 Times
in
1,579 Posts
The cassette and lockring only attach to the outer shell of the freehub body, so in theory it should have no effect on the wheel bearings. Any chance that the freehub dust cap is crooked or that you have the wrong lockring? That's the only way I could see the lockring causing the hub to seize up.
BTW, the cassette never needs to be oiled, just the chain.
BTW, the cassette never needs to be oiled, just the chain.
Likes For ThermionicScott:
05-31-19, 08:09 PM
#3
WGB
Thread Starter
Join Date: Jul 2017
Location: Niagara Region
Posts: 2,917
Bikes: Panasonic PT-4500
Mentioned: 46 Post(s)
Tagged: 0 Thread(s)
Quoted: 1799 Post(s)
Liked 2,334 Times
in
1,378 Posts
I assembled it 3 times and mechanic at least once so don't think its miss-assembled. Perhaps the hub could somehow be damaged?? If cassette hub is damaged can it be replaced as a stand alone item or do I have to replace the entire wheel hub as a complete unit?
05-31-19, 08:42 PM
#4
Senior Member
Join Date: Jun 2018
Posts: 257
Mentioned: 6 Post(s)
Tagged: 0 Thread(s)
Quoted: 76 Post(s)
Likes: 0
Liked 19 Times
in
15 Posts
I replaced a hub that looked just like that on a old 7 speed 105 hub with one from a Tiagra 4500 hub. I also used the axle and DS cone and dust seal from the Tiagra hub.
https://www.amazon.com/SHIMANO-FH-45.../dp/B001GSODPS
I can't see how the lockring being tightened could bind stuff up unless for some reason it is hitting the cone. Interesting problem.
https://www.amazon.com/SHIMANO-FH-45.../dp/B001GSODPS
I can't see how the lockring being tightened could bind stuff up unless for some reason it is hitting the cone. Interesting problem.
Last edited by 88Tempo; 06-06-19 at 07:08 AM.
06-01-19, 03:19 AM
#5
Senior Member
The cassette lockring is probably pushing against the dustcap. Which is pushing against the drive-side bearings.
You've likely installed the dustcap backwards.
You've likely installed the dustcap backwards.
06-01-19, 06:36 AM
#6
WGB
Thread Starter
Join Date: Jul 2017
Location: Niagara Region
Posts: 2,917
Bikes: Panasonic PT-4500
Mentioned: 46 Post(s)
Tagged: 0 Thread(s)
Quoted: 1799 Post(s)
Liked 2,334 Times
in
1,378 Posts
Ok, will strip axle out and reassemble. Was going to buy new cones anyway so will start with that.
06-01-19, 06:51 AM
#7
aka: Dr. Cannondale
Join Date: Jul 2009
Posts: 7,729
Mentioned: 234 Post(s)
Tagged: 0 Thread(s)
Quoted: 2152 Post(s)
Liked 3,402 Times
in
1,203 Posts
It is also possible that the whatever is on the back side of the cassette (spacer, rivet, etc.) is being jammed against the hub face when the lock ring is tightened.
That will effectively lock up the cassette and prevent freewheeling.
Perhaps check to ensure that an extra spacer has not been installed, or that one that is relieved for rivet heads is properly placed. Some 7 speed spacers also must be placed in a particular way because they have locating pins on one side; if these are not inserted properly during assembly they will increase the width of the cassette assembly and produce the result you describe.
__________________
Hard at work in the Secret Underground Laboratory...
Hard at work in the Secret Underground Laboratory...
06-01-19, 05:00 PM
#8
Senior Member
You should be able to see if the cups are pitted and need replacing. The freehub body shouldn't have any effect on the cassette freewheeling. How many balls did you install when you put the hub back together? It needs 9- 1/4" balls on each side.
06-04-19, 10:53 AM
#9
WGB
Thread Starter
Join Date: Jul 2017
Location: Niagara Region
Posts: 2,917
Bikes: Panasonic PT-4500
Mentioned: 46 Post(s)
Tagged: 0 Thread(s)
Quoted: 1799 Post(s)
Liked 2,334 Times
in
1,378 Posts
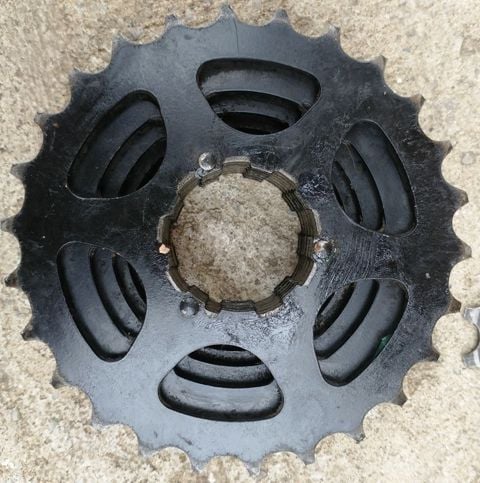
I stripped it all back down and now the axle turns as it should.
This time, the hub spins freely before adding the hyperglide cassette. However when I try to reassemble the cassette onto the hub body the parts all fit together but the lock ring doesn't engage and screw in.
As far as I know I have the correct parts and (ignoring the hub) there are only four pieces to a hyperglide cassette.
1) main cassette body with integral sprockets
2) spacer
3) loose sprocket
4) lock ring
I didn't photo the empty hub
Photo 1 shows main cassette body on hub with spacer added

Photo 2 shows main cassette body on hub with spacer added and now the loose sprocket which also seems engaged.

Photo 3 shows main cassette body on hub with spacer and loose sprocket engaged but lock ring sits on top and doesn't engage.

Anyone have any ideas what I have done wrong?? It's a 50 minute drive to the co-op to correct what seems to be a small issue but I just can't seem to find what it is that is preventing it from re-assemblying.
This time, the hub spins freely before adding the hyperglide cassette. However when I try to reassemble the cassette onto the hub body the parts all fit together but the lock ring doesn't engage and screw in.
As far as I know I have the correct parts and (ignoring the hub) there are only four pieces to a hyperglide cassette.
1) main cassette body with integral sprockets
2) spacer
3) loose sprocket
4) lock ring
I didn't photo the empty hub
Photo 1 shows main cassette body on hub with spacer added
Photo 2 shows main cassette body on hub with spacer added and now the loose sprocket which also seems engaged.
Photo 3 shows main cassette body on hub with spacer and loose sprocket engaged but lock ring sits on top and doesn't engage.
Anyone have any ideas what I have done wrong?? It's a 50 minute drive to the co-op to correct what seems to be a small issue but I just can't seem to find what it is that is preventing it from re-assemblying.
06-04-19, 11:35 AM
#10
aka: Dr. Cannondale
Join Date: Jul 2009
Posts: 7,729
Mentioned: 234 Post(s)
Tagged: 0 Thread(s)
Quoted: 2152 Post(s)
Liked 3,402 Times
in
1,203 Posts
Pic of the back side of the cassette, please.
__________________
Hard at work in the Secret Underground Laboratory...
Hard at work in the Secret Underground Laboratory...
06-04-19, 11:40 AM
#11
Really Old Senior Member

Did you reassemble the fiber spacers "indexed"?
IF you have loose cogs, sometimes the spacers can get "dimples" extruded. If not reassembled in the same orientation, they can become small "high spots" that will increase their apparent thickness.
Make sure all the little "triangles" etc. line up.
Possibly you've stripped the lock ring?
IF you have loose cogs, sometimes the spacers can get "dimples" extruded. If not reassembled in the same orientation, they can become small "high spots" that will increase their apparent thickness.
Make sure all the little "triangles" etc. line up.
Possibly you've stripped the lock ring?
06-04-19, 12:35 PM
#12
working on my sandal tan
Join Date: Aug 2011
Location: CID
Posts: 22,629
Bikes: 1991 Bianchi Eros, 1964 Armstrong, 1988 Diamondback Ascent, 1988 Bianchi Premio, 1987 Bianchi Sport SX, 1980s Raleigh mixte (hers), All-City Space Horse (hers)
Mentioned: 98 Post(s)
Tagged: 0 Thread(s)
Quoted: 3871 Post(s)
Liked 2,568 Times
in
1,579 Posts
I stripped it all back down and now the axle turns as it should.
This time, the hub spins freely before adding the hyperglide cassette. However when I try to reassemble the cassette onto the hub body the parts all fit together but the lock ring doesn't engage and screw in.
As far as I know I have the correct parts and (ignoring the hub) there are only four pieces to a hyperglide cassette.
1) main cassette body with integral sprockets
2) spacer
3) loose sprocket
4) lock ring
I didn't photo the empty hub
Photo 1 shows main cassette body on hub with spacer added
Photo 2 shows main cassette body on hub with spacer added and now the loose sprocket which also seems engaged.
Photo 3 shows main cassette body on hub with spacer and loose sprocket engaged but lock ring sits on top and doesn't engage.
Anyone have any ideas what I have done wrong?? It's a 50 minute drive to the co-op to correct what seems to be a small issue but I just can't seem to find what it is that is preventing it from re-assemblying.
Pro tip: once you do have the dustcap in the right way and have made sure it's concentric with the rest of the hub, just leave it in place when you repack the hub bearings. I had to learn that lesson the annoying way, too.

__________________
RUSA #7498
Originally Posted by noglider
People in this forum are not typical.
Last edited by ThermionicScott; 06-04-19 at 12:42 PM.
06-04-19, 02:14 PM
#13
WGB
Thread Starter
Join Date: Jul 2017
Location: Niagara Region
Posts: 2,917
Bikes: Panasonic PT-4500
Mentioned: 46 Post(s)
Tagged: 0 Thread(s)
Quoted: 1799 Post(s)
Liked 2,334 Times
in
1,378 Posts
Rccardr - back of Cassette
Bill Kapaun
Did you reassemble the fiber spacers "indexed"? No fiber spacers with this cassette that I know of (none on it when I stripped it originally to clean it and I looked at images of the new sets and the only images I found for the Hyperglide 7 speed only showed cassette, single spacer, loose sprocket and lock ring)
IF you have loose cogs, sometimes the spacers can get "dimples" extruded. If not reassembled in the same orientation, they can become small "high spots" that will increase their apparent thickness.
Make sure all the little "triangles" etc. line up. I assembled it with either side up and no dimples on either side.

Possibly you've stripped the lock ring?
Threads are still in excellent condition
Thermionic Scott
Looks like the dustcap is in backward.
Here is a better shot. Both caps are in right. I have included the NDS dust cap as well - just because they are different styles of cap with the NDS having Shimano engraved on it.
.

Therm
Bill Kapaun
Did you reassemble the fiber spacers "indexed"? No fiber spacers with this cassette that I know of (none on it when I stripped it originally to clean it and I looked at images of the new sets and the only images I found for the Hyperglide 7 speed only showed cassette, single spacer, loose sprocket and lock ring)
IF you have loose cogs, sometimes the spacers can get "dimples" extruded. If not reassembled in the same orientation, they can become small "high spots" that will increase their apparent thickness.
Make sure all the little "triangles" etc. line up. I assembled it with either side up and no dimples on either side.
Possibly you've stripped the lock ring?
Threads are still in excellent condition
Thermionic Scott
Looks like the dustcap is in backward.
Here is a better shot. Both caps are in right. I have included the NDS dust cap as well - just because they are different styles of cap with the NDS having Shimano engraved on it.
.
Therm
06-04-19, 04:45 PM
#14
Old fart

Join Date: Nov 2004
Location: Appleton WI
Posts: 24,782
Bikes: Several, mostly not name brands.
Mentioned: 153 Post(s)
Tagged: 0 Thread(s)
Quoted: 3587 Post(s)
Liked 3,398 Times
in
1,932 Posts
You've likely installed the dustcap backwards.
06-04-19, 04:50 PM
#15
Really Old Senior Member
Last edited by Bill Kapaun; 06-04-19 at 05:10 PM.
06-04-19, 06:21 PM
#16
Senior Member
Join Date: Jun 2018
Posts: 257
Mentioned: 6 Post(s)
Tagged: 0 Thread(s)
Quoted: 76 Post(s)
Likes: 0
Liked 19 Times
in
15 Posts
Rccardr - back of Cassette
Bill Kapaun
Did you reassemble the fiber spacers "indexed"? No fiber spacers with this cassette that I know of (none on it when I stripped it originally to clean it and I looked at images of the new sets and the only images I found for the Hyperglide 7 speed only showed cassette, single spacer, loose sprocket and lock ring)
IF you have loose cogs, sometimes the spacers can get "dimples" extruded. If not reassembled in the same orientation, they can become small "high spots" that will increase their apparent thickness.
Make sure all the little "triangles" etc. line up. I assembled it with either side up and no dimples on either side.
Possibly you've stripped the lock ring?
Threads are still in excellent condition
Thermionic Scott
Looks like the dustcap is in backward.
Here is a better shot. Both caps are in right. I have included the NDS dust cap as well - just because they are different styles of cap with the NDS having Shimano engraved on it.
.
Therm
06-04-19, 06:40 PM
#17
Senior Member
The hub is a Hyperglide/Uniglide compatible version. It takes a lockring to tighten the cassette. From the last pics it is glaringly obvious that tightening the lockring will push up against the drive-side bearings. As per my earlier speculation, the dustcap is installed backwards.
06-04-19, 06:51 PM
#18
WGB
Thread Starter
Join Date: Jul 2017
Location: Niagara Region
Posts: 2,917
Bikes: Panasonic PT-4500
Mentioned: 46 Post(s)
Tagged: 0 Thread(s)
Quoted: 1799 Post(s)
Liked 2,334 Times
in
1,378 Posts
Dave - As per my earlier speculation, the dustcap is installed backwards
Just so I am not confused. Are you talking about the cap on top of the hub that protects the Dside wheel bearings??
Just so I am not confused. Are you talking about the cap on top of the hub that protects the Dside wheel bearings??
Last edited by WGB; 06-04-19 at 08:09 PM.
06-04-19, 07:38 PM
#19
aka: Dr. Cannondale
Join Date: Jul 2009
Posts: 7,729
Mentioned: 234 Post(s)
Tagged: 0 Thread(s)
Quoted: 2152 Post(s)
Liked 3,402 Times
in
1,203 Posts
Dave is correct, there's no way that lock ring will engage the freehub threads.
__________________
Hard at work in the Secret Underground Laboratory...
Hard at work in the Secret Underground Laboratory...
06-04-19, 08:05 PM
#20
WGB
Thread Starter
Join Date: Jul 2017
Location: Niagara Region
Posts: 2,917
Bikes: Panasonic PT-4500
Mentioned: 46 Post(s)
Tagged: 0 Thread(s)
Quoted: 1799 Post(s)
Liked 2,334 Times
in
1,378 Posts
Dave - As per my earlier speculation, the dust cap is installed backwards
Is the cap in the correct position or should it somehow be in deeper into the hub?
Is the cap in the correct position or should it somehow be in deeper into the hub?
06-04-19, 08:23 PM
#21
Senior Member
Join Date: Jun 2018
Posts: 257
Mentioned: 6 Post(s)
Tagged: 0 Thread(s)
Quoted: 76 Post(s)
Likes: 0
Liked 19 Times
in
15 Posts
I don't know if you removed that dust cap (looks like you did), but if you go back and look at the picture in your first post it looks like the dustcap is in about the correct depth.
06-04-19, 10:51 PM
#22
Senior Member
Yes, the driveside dust cap. Obviously. How could the orientation of the non-driveside dust cap have any connection to the tightening of the cassette lockring?
A superficial glance at the pics is enough to indicate that the drive side parts are messed up.
Even if you'd never disassembled bike hub before, a quick mental evaluation of the dimensions and forces involved would indicate the proper orientation of the parts.
A superficial glance at the pics is enough to indicate that the drive side parts are messed up.
Even if you'd never disassembled bike hub before, a quick mental evaluation of the dimensions and forces involved would indicate the proper orientation of the parts.
Last edited by Dave Mayer; 06-04-19 at 10:55 PM.
06-05-19, 07:56 AM
#23
WGB
Thread Starter
Join Date: Jul 2017
Location: Niagara Region
Posts: 2,917
Bikes: Panasonic PT-4500
Mentioned: 46 Post(s)
Tagged: 0 Thread(s)
Quoted: 1799 Post(s)
Liked 2,334 Times
in
1,378 Posts
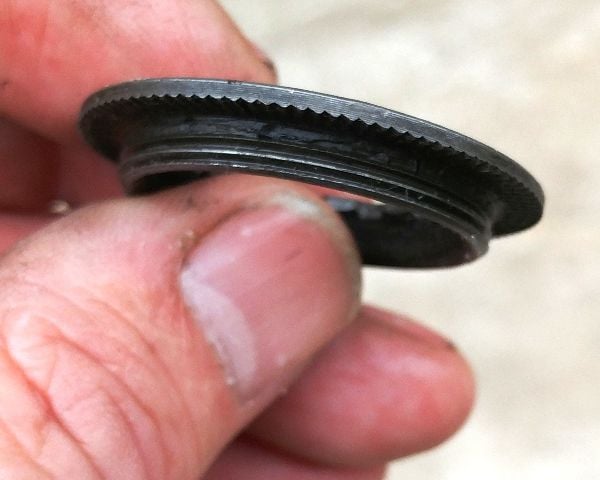
Dave - I was confused by your saying the dust cap was installed backwards. It has to be right side up because the reverse side has grooves for the ball bearings. There must be an issue, either within the hub or with the dust cap or both, because now the cap won't enter the hub any further. Having said that, last night when I was staring at the photos and the hub as it was now assembled I realized suddenly what 88tempo said about the dust cap depth position and had a smack your head moment.
88tempo - It's same hub just that in 2nd photo dust cap no longer in as far because it stopped where it's at in the hub. But you hit it exactly! Since the dust cap isn't in deep enough the lock ring is nowhere near the threads and can't screw onto the cassette. I will start again and since I need new cones anyway I will also splurge for a new dust cap.
Thank you all.
WGB
Last edited by WGB; 06-05-19 at 11:23 AM.
06-05-19, 11:22 AM
#24
WGB
Thread Starter
Join Date: Jul 2017
Location: Niagara Region
Posts: 2,917
Bikes: Panasonic PT-4500
Mentioned: 46 Post(s)
Tagged: 0 Thread(s)
Quoted: 1799 Post(s)
Liked 2,334 Times
in
1,378 Posts
I tried one last time and the dust cap went in far enough that it all worked.
It was in right side up, just not in deep enough. 1st shot is the top of the cap

2nd shot is the bottom

3rd shot is the bad boy back together the way it should be (and no issues with the cassette fitting or spinning) and on the Signature (and yes I know miss-matched tires).

Thank you again and yes, I really should have seen that. I guess mechanic didn't see it at the co-op because he was just to busy to really look that night.
It was in right side up, just not in deep enough. 1st shot is the top of the cap
2nd shot is the bottom
3rd shot is the bad boy back together the way it should be (and no issues with the cassette fitting or spinning) and on the Signature (and yes I know miss-matched tires).
Thank you again and yes, I really should have seen that. I guess mechanic didn't see it at the co-op because he was just to busy to really look that night.
Last edited by WGB; 06-05-19 at 11:28 AM.
06-05-19, 11:27 AM
#25
WGB
Thread Starter
Join Date: Jul 2017
Location: Niagara Region
Posts: 2,917
Bikes: Panasonic PT-4500
Mentioned: 46 Post(s)
Tagged: 0 Thread(s)
Quoted: 1799 Post(s)
Liked 2,334 Times
in
1,378 Posts
accidental double post