


What would you do? TT to ST tube diameters
 08-07-20, 07:22 AM
#26
Member
Thread Starter
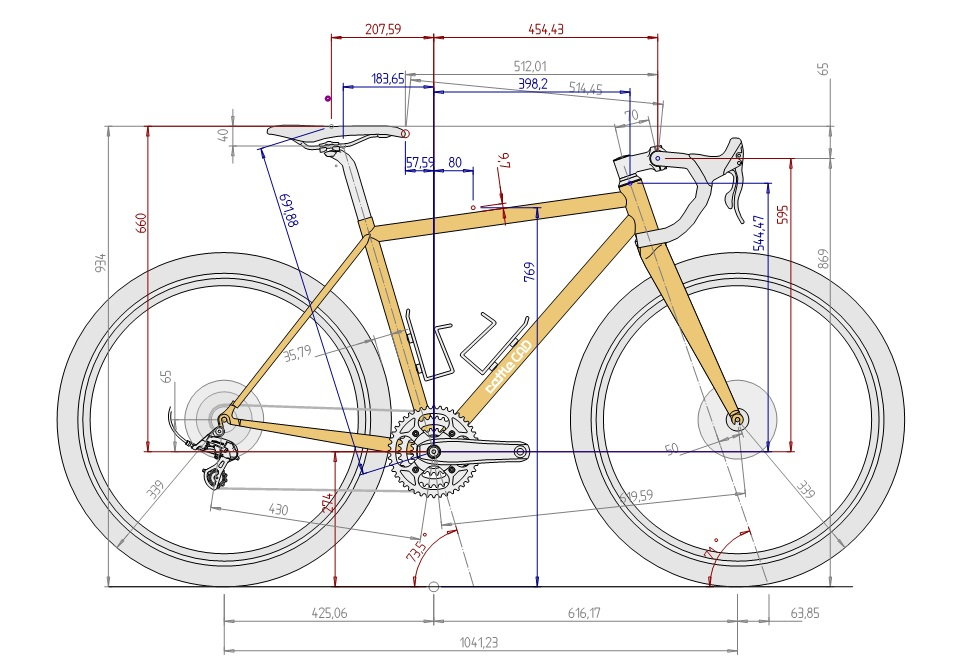
Ah, right. I see what you mean with the standover height. Great catch. That's been fixed now.
Measuring for the saddle height it should be close to what would be appropriate for me around 690 actually but this being the first time I'm doing this and not having a proper bike fit done might mean I'm off so time will tell... I can always go for a straight seat post if the rails won't give enough room for adjustments. Heh =) Thanks for the feedback.
Measuring for the saddle height it should be close to what would be appropriate for me around 690 actually but this being the first time I'm doing this and not having a proper bike fit done might mean I'm off so time will tell... I can always go for a straight seat post if the rails won't give enough room for adjustments. Heh =) Thanks for the feedback.

Likes For Aldatroid:
08-07-20, 07:24 AM
#27
Member
Thread Starter
This is the latest iteration. Small adjustments as you can see but fun to be inching closer and closer to something that hopefully feels solid.
Likes For Aldatroid:
08-08-20, 10:15 AM
#28

Senior Member
Join Date: Aug 2012
Location: Seattle
Posts: 507
Mentioned: 0 Post(s)
Tagged: 0 Thread(s)
Quoted: 103 Post(s)
Liked 144 Times
in
88 Posts
That does look better. I would look at the BB height to gain a bit more standover clearance. Pedaling through corners offroad (or even on the road with big squishy tires) is pretty rare I think. The measurement isn't listed but I'm assuming the crank length is 170mm. If so, I think you could safely drop the BB 5-10mm and get a bit more standover. Unless you're bashing over logs and rocks, you won't need the extra clearance. It looks like 65mm is a desired h-bar drop so, you would then shorten the HT to get them back down where you want them. This would make the whole thing a bit lighter as well.
08-08-20, 12:47 PM
#29
Member
Thread Starter
That does look better. I would look at the BB height to gain a bit more standover clearance. Pedaling through corners offroad (or even on the road with big squishy tires) is pretty rare I think. The measurement isn't listed but I'm assuming the crank length is 170mm. If so, I think you could safely drop the BB 5-10mm and get a bit more standover. Unless you're bashing over logs and rocks, you won't need the extra clearance. It looks like 65mm is a desired h-bar drop so, you would then shorten the HT to get them back down where you want them. This would make the whole thing a bit lighter as well.
One potential "issue" is that I already have a HT which is 120mm which have the slightly larger outside diameter at the ends of the tube. Like the typical Paragon Machine works HT. I could probably shave of 5mm on each side at least and by doing that I would be able to drop the BB 5mm and achieve 65mm h-bar drop. Or just get a new HT =)
08-08-20, 05:52 PM
#30
Senior Member
Join Date: Feb 2012
Location: Rochester, NY
Posts: 18,056
Bikes: Stewart S&S coupled sport tourer, Stewart Sunday light, Stewart Commuting, Stewart Touring, Co Motion Tandem, Stewart 3-Spd, Stewart Track, Fuji Finest, Mongoose Tomac ATB, GT Bravado ATB, JCP Folder, Stewart 650B ATB
Mentioned: 0 Post(s)
Tagged: 0 Thread(s)
Quoted: 4195 Post(s)
Liked 3,837 Times
in
2,295 Posts
Hey! Ah, yes, I wouldn't mind a lower center of gravity actually and I actually noticed an error in the drawing by going over these numbers. The true h-bar drop is actually 60mm in that version an I'm not really attached to that number and can only reference the bikes I currently own and they are around that number, usually slightly longer drop. For this bike I'm looking for a relaxed and comfortable position so I guess it's fine to have a shorter drop. But yeah, I'm not really familiar with what's considered small or large drop etc.
One potential "issue" is that I already have a HT which is 120mm which have the slightly larger outside diameter at the ends of the tube. Like the typical Paragon Machine works HT. I could probably shave of 5mm on each side at least and by doing that I would be able to drop the BB 5mm and achieve 65mm h-bar drop. Or just get a new HT =)
One potential "issue" is that I already have a HT which is 120mm which have the slightly larger outside diameter at the ends of the tube. Like the typical Paragon Machine works HT. I could probably shave of 5mm on each side at least and by doing that I would be able to drop the BB 5mm and achieve 65mm h-bar drop. Or just get a new HT =)
__________________
AndrewRStewart
AndrewRStewart
Likes For Andrew R Stewart:
08-09-20, 02:00 AM
#31
Senior Member
Join Date: Aug 2012
Location: Seattle
Posts: 507
Mentioned: 0 Post(s)
Tagged: 0 Thread(s)
Quoted: 103 Post(s)
Liked 144 Times
in
88 Posts
Lowering the BB won't materially lower your CoG. That's way up at your hips so, bringing that down 10mm won't make any difference you could feel. The goal is gain standover and not have the bike any higher than necessary. It will also lengthen your DT/CS's which will provide a bit (tiny bit) of extra compliance - again, not enough to feel probably.
If you aren't specifically aiming for 65mm bar drop, then use the 120mm HT. You seem to have pretty low stack headset so, no room to be gained there. On a gravel/all road bike you're better with a bit less bar drop - little less weight on the front end is better for the loose stuff and it is just a bit more comfortable.
If you aren't specifically aiming for 65mm bar drop, then use the 120mm HT. You seem to have pretty low stack headset so, no room to be gained there. On a gravel/all road bike you're better with a bit less bar drop - little less weight on the front end is better for the loose stuff and it is just a bit more comfortable.
__________________
https://www.flickr.com/photos/54319503@N05/
https://www.draper-cycles.com
https://www.flickr.com/photos/54319503@N05/
https://www.draper-cycles.com
Likes For duanedr:
08-09-20, 02:11 AM
#32
Member
Thread Starter
Awesome. Thanks for the feedback and info guys!
If there isn�t anything else obvious I should look at I think I�ll start to properly prep this design for manufacturing and see how it feels to ride.
If there isn�t anything else obvious I should look at I think I�ll start to properly prep this design for manufacturing and see how it feels to ride.
08-11-20, 09:39 AM
#33
Senior Member
Join Date: Aug 2012
Location: Seattle
Posts: 507
Mentioned: 0 Post(s)
Tagged: 0 Thread(s)
Quoted: 103 Post(s)
Liked 144 Times
in
88 Posts
Assuming you get pretty close to your angles and it's relatively straight, it's going to be the best riding bike ever ATYO! Post progress as you go!
__________________
https://www.flickr.com/photos/54319503@N05/
https://www.draper-cycles.com
https://www.flickr.com/photos/54319503@N05/
https://www.draper-cycles.com
08-11-20, 12:27 PM
#34
Member
Thread Starter
08-12-20, 12:49 PM
#35
Member
Thread Starter
Hiya! I have a couple new questions  going through the Paterek manual again and searching the forums but it�s not obvious to me exactly what to do.
While checking the tubes for straightness I'm guessing that I should orient the convex side upwards for the TT and DT? For the ST maybe it doesn't matter that much if its forward or towards the back?
Also, which side of the tube, in regards to butts of different lengths after mitering, would you orient towards the HT? It�s only my DT that has a marked short side actually, the TT has butts of the same length so I�ll try to make them even I guess. ST is pretty straight forward, only one side will accept a 27.2 seatpost so that should be up
Thanks!
going through the Paterek manual again and searching the forums but it�s not obvious to me exactly what to do. While checking the tubes for straightness I'm guessing that I should orient the convex side upwards for the TT and DT? For the ST maybe it doesn't matter that much if its forward or towards the back?
Also, which side of the tube, in regards to butts of different lengths after mitering, would you orient towards the HT? It�s only my DT that has a marked short side actually, the TT has butts of the same length so I�ll try to make them even I guess. ST is pretty straight forward, only one side will accept a 27.2 seatpost so that should be up
Thanks!
08-12-20, 01:28 PM
#36
Senior Member
Join Date: Jan 2013
Location: South Jersey
Posts: 2,262
Mentioned: 18 Post(s)
Tagged: 0 Thread(s)
Quoted: 713 Post(s)
Liked 796 Times
in
473 Posts
I try to leave the long butt at the head tube end. A failure at the head tube has more potential for injury than any other joint..
08-12-20, 01:36 PM
#37


Randomhead
Join Date: Aug 2008
Location: Happy Valley, Pennsylvania
Posts: 24,385
Mentioned: 0 Post(s)
Tagged: 0 Thread(s)
Quoted: 4 Post(s)
Liked 3,686 Times
in
2,509 Posts
I like to have the bow in the vertical plane, obviously. I don't think it matters if it's up or down. Last couple sets of Columbus tubing I had were so close to straight it was really hard to pick a bowed direction, so I just marked a centerline for reference.
,
Do you have a way of measuring the butts? Also, make sure your seat tube takes a seat post with reasonable fit, I apparently got a defective seat tube from Columbus and that bike now has a 27.4mm seat post in it. I don't expect that to ever happen again, but I'm going to check.
,
Do you have a way of measuring the butts? Also, make sure your seat tube takes a seat post with reasonable fit, I apparently got a defective seat tube from Columbus and that bike now has a 27.4mm seat post in it. I don't expect that to ever happen again, but I'm going to check.
08-12-20, 01:51 PM
#38
Member
Thread Starter
Ok thanks for the speedy replies guys!
I haven�t actually inserted a seatpost into the ST but I�ve measured the inside diameter and it looks straight and with no obvious issues inside. I guess reaming would fix minor inconsistencies but good idea to check everything fits before brazing. Thanks
Regarding measuring the butts I have no effective way of measuring them except looking at the technical drawings from the manufacturer, in this case Deda, and marking them up.
08-12-20, 02:08 PM
#39
Randomhead
Join Date: Aug 2008
Location: Happy Valley, Pennsylvania
Posts: 24,385
Mentioned: 0 Post(s)
Tagged: 0 Thread(s)
Quoted: 4 Post(s)
Liked 3,686 Times
in
2,509 Posts
we all have the drawings. A butt checker doesn't have to be that elaborate. I saw one experienced builder that used an indicator on a stand and a bearing brazed to a tube. I think it was Dave Kirk that checks them and marks them by eye. I have tried it, but it's not that easy for me.
The thing about the bad seat tube I got was that it was too big at the top and at some point down the tube it was the right ID. I ended up having to ream that part out. I'm pretty sure the od was too big, so maybe the swaging operation was interrupted somehow
The thing about the bad seat tube I got was that it was too big at the top and at some point down the tube it was the right ID. I ended up having to ream that part out. I'm pretty sure the od was too big, so maybe the swaging operation was interrupted somehow
Likes For unterhausen:
08-12-20, 06:33 PM
#40
Team Beer
Join Date: Apr 2004
Location: Sacramento CA
Posts: 6,339
Bikes: Too Many
Mentioned: 3 Post(s)
Tagged: 0 Thread(s)
Quoted: 114 Post(s)
Liked 159 Times
in
104 Posts
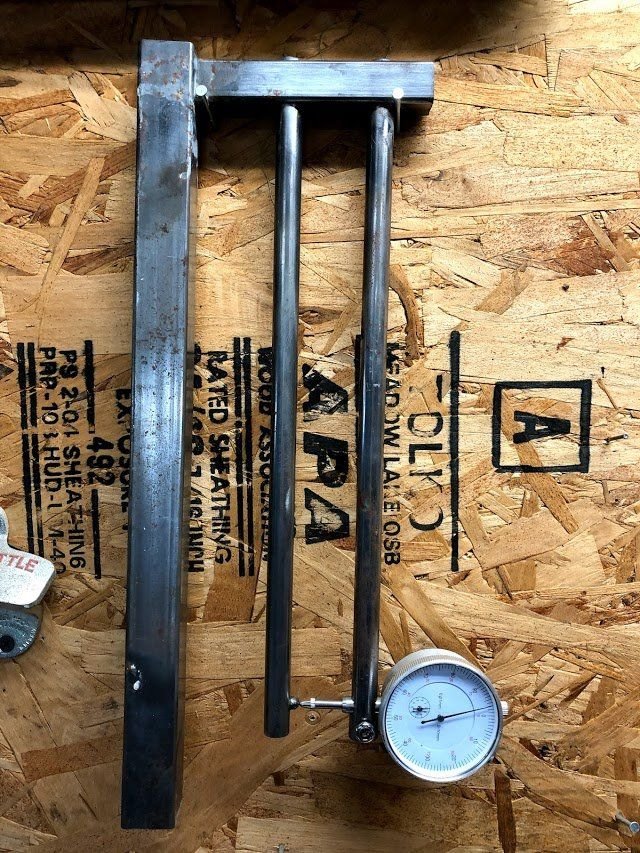
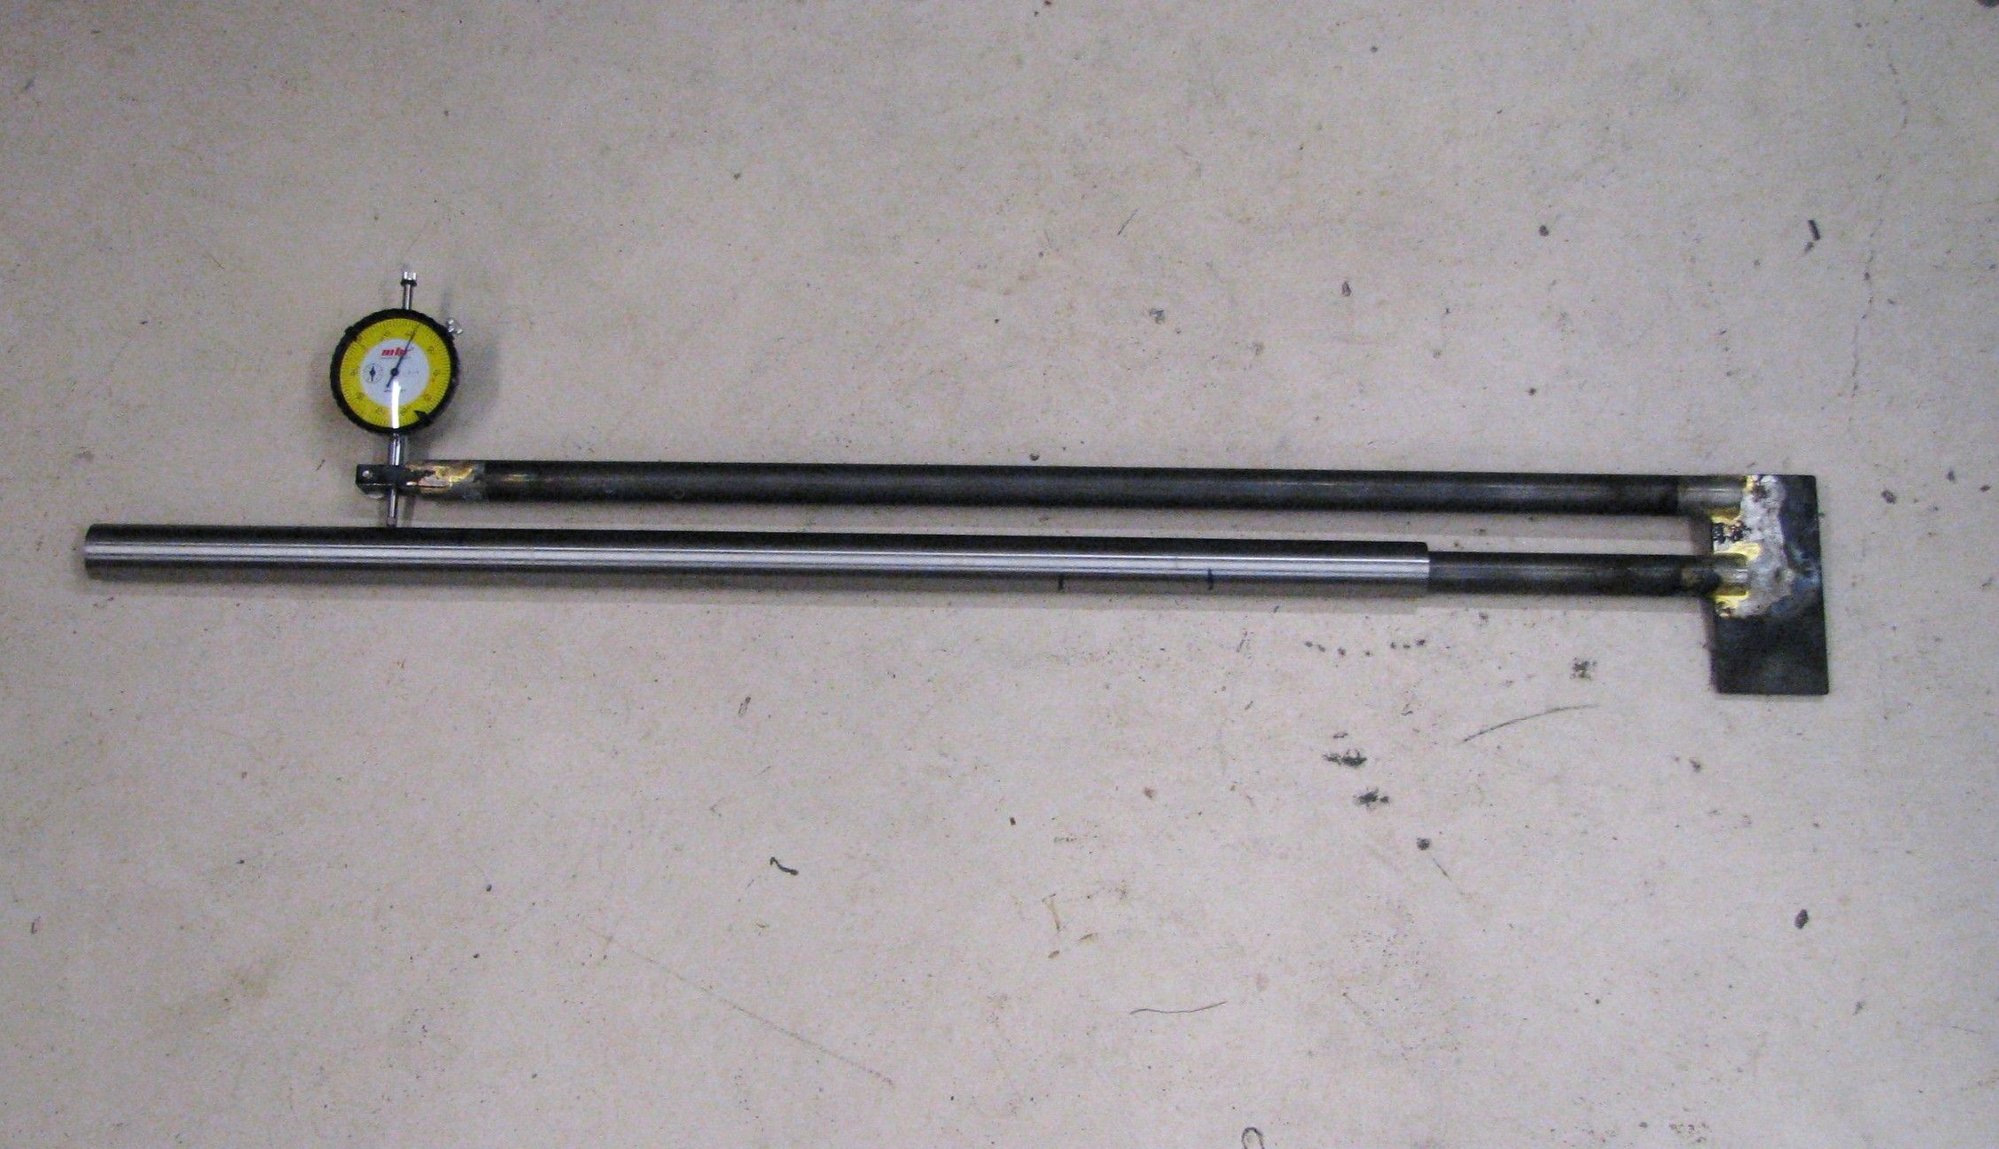
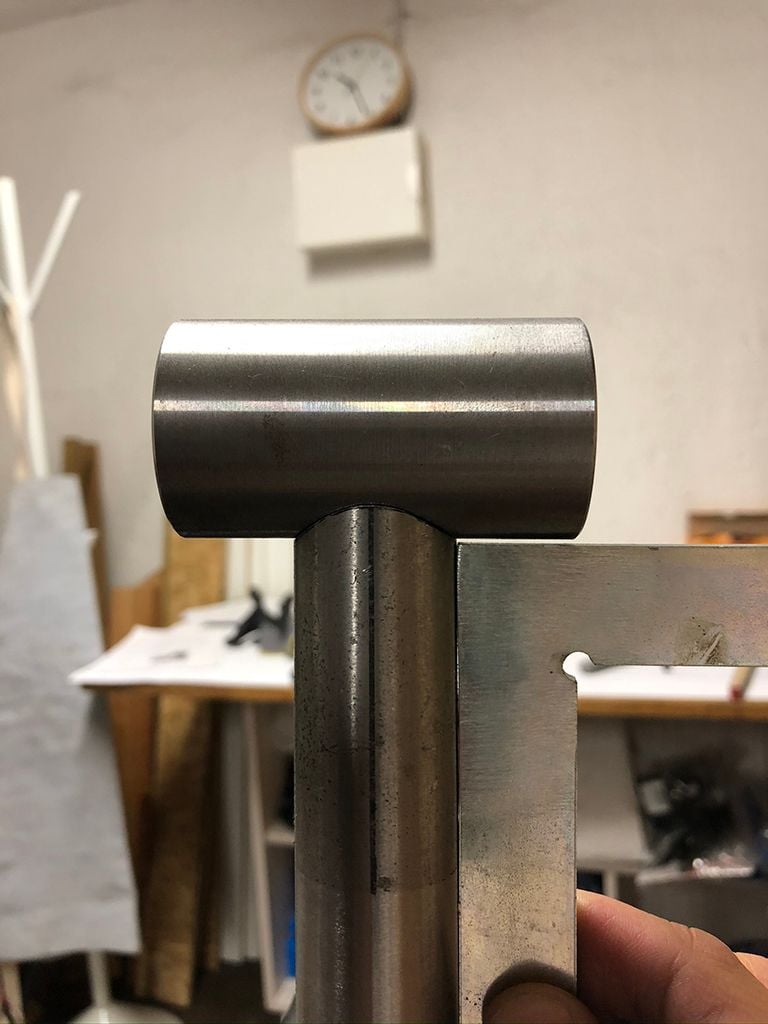
Butt checkers are fairly easy to build. Here is the one that I built.
__________________
I'm not one for fawning over bicycles, but I do believe that our bikes communicate with us, and what this bike is saying is, "You're an idiot." BikeSnobNYC
I'm not one for fawning over bicycles, but I do believe that our bikes communicate with us, and what this bike is saying is, "You're an idiot." BikeSnobNYC
Likes For Cynikal:
08-12-20, 07:50 PM
#41
Senior Member
Join Date: Feb 2012
Location: Rochester, NY
Posts: 18,056
Bikes: Stewart S&S coupled sport tourer, Stewart Sunday light, Stewart Commuting, Stewart Touring, Co Motion Tandem, Stewart 3-Spd, Stewart Track, Fuji Finest, Mongoose Tomac ATB, GT Bravado ATB, JCP Folder, Stewart 650B ATB
Mentioned: 0 Post(s)
Tagged: 0 Thread(s)
Quoted: 4195 Post(s)
Liked 3,837 Times
in
2,295 Posts
Ok thanks for the speedy replies guys!
I haven�t actually inserted a seatpost into the ST but I�ve measured the inside diameter and it looks straight and with no obvious issues inside. I guess reaming would fix minor inconsistencies but good idea to check everything fits before brazing. Thanks
Regarding measuring the butts I have no effective way of measuring them except looking at the technical drawings from the manufacturer, in this case Deda, and marking them up.
I haven�t actually inserted a seatpost into the ST but I�ve measured the inside diameter and it looks straight and with no obvious issues inside. I guess reaming would fix minor inconsistencies but good idea to check everything fits before brazing. Thanks
Regarding measuring the butts I have no effective way of measuring them except looking at the technical drawings from the manufacturer, in this case Deda, and marking them up.
Clean the tube IDs really well, a thin coating of oil can help to increase the reflections of light when looking down through the tube IDs. With care one can see the shift of the reflections along the inner wall where the tube butt starts or stops. Take a rod and place it in the tube and position the end at the reflective change points. Repeat a few times and average for each transition location. Then compare to the tube drawings. Remember nether are likely to be perfectly spot on but both should be pretty close to each other.
Here's my Butt gage efforts, sold the first one long ago. Andy

__________________
AndrewRStewart
AndrewRStewart
08-12-20, 11:52 PM
#42
Member
Thread Starter
Nice! I might try to build myself one of those! I�ll try to sight done the inside of the tube first but I guess a butt gage is a pretty useful tool to have.
08-13-20, 09:55 AM
#43
Randomhead
Join Date: Aug 2008
Location: Happy Valley, Pennsylvania
Posts: 24,385
Mentioned: 0 Post(s)
Tagged: 0 Thread(s)
Quoted: 4 Post(s)
Liked 3,686 Times
in
2,509 Posts
Mine is so ugly there is no way I'm posting a picture of it
08-13-20, 08:51 PM
#44
Senior Member
Join Date: Feb 2012
Location: Rochester, NY
Posts: 18,056
Bikes: Stewart S&S coupled sport tourer, Stewart Sunday light, Stewart Commuting, Stewart Touring, Co Motion Tandem, Stewart 3-Spd, Stewart Track, Fuji Finest, Mongoose Tomac ATB, GT Bravado ATB, JCP Folder, Stewart 650B ATB
Mentioned: 0 Post(s)
Tagged: 0 Thread(s)
Quoted: 4195 Post(s)
Liked 3,837 Times
in
2,295 Posts
Likes For Andrew R Stewart:
08-14-20, 11:03 AM
#46
Senior Member
Join Date: Dec 2019
Posts: 954
Mentioned: 3 Post(s)
Tagged: 0 Thread(s)
Quoted: 321 Post(s)
Liked 263 Times
in
212 Posts
It's also an area some people think you need to reinforce with gussets.
And aesthetically it just feels better balanced to have more metal at that end.
In theory you could cut the tubes at both ends and arrange to end up with equal length butts. Does anyone actually do this?
08-14-20, 01:52 PM
#47
Randomhead
Join Date: Aug 2008
Location: Happy Valley, Pennsylvania
Posts: 24,385
Mentioned: 0 Post(s)
Tagged: 0 Thread(s)
Quoted: 4 Post(s)
Liked 3,686 Times
in
2,509 Posts
If I needed to cut off enough tube that the long end became the short end, I would cut both ends. Not sure that has ever happened to me.
08-14-20, 04:15 PM
#48
Senior Member
Join Date: Jan 2013
Location: South Jersey
Posts: 2,262
Mentioned: 18 Post(s)
Tagged: 0 Thread(s)
Quoted: 713 Post(s)
Liked 796 Times
in
473 Posts
I make a lot of small frames, so it happens to me all the time. A couple of the smaller frames had around 25mm of butt left on the top tube, at the at the seat tube joint.
Likes For dsaul:
08-14-20, 06:27 PM
#49
Senior Member
Join Date: Feb 2012
Location: Rochester, NY
Posts: 18,056
Bikes: Stewart S&S coupled sport tourer, Stewart Sunday light, Stewart Commuting, Stewart Touring, Co Motion Tandem, Stewart 3-Spd, Stewart Track, Fuji Finest, Mongoose Tomac ATB, GT Bravado ATB, JCP Folder, Stewart 650B ATB
Mentioned: 0 Post(s)
Tagged: 0 Thread(s)
Quoted: 4195 Post(s)
Liked 3,837 Times
in
2,295 Posts
Like dsaul I also have built more small frames then big ones. When you're pushing less then a 48cm TT it's common to have nearly no thick butt at either end. Thankfully small people also then to be lighter in weight and apply less power then big riders do. Andy
__________________
AndrewRStewart
AndrewRStewart
08-18-20, 01:46 AM
#50
Member
Thread Starter
Slow but steady progress. I only get a couple of hours in the evening now and then...
So, nothing major has been done but still big step for me. Scale drawing is done except for a detailed rear triangle drawing, not really sure how to approach that but I've checked the chain stays and the should fit OK without too much work. Other than that I've marked up the main triangle tubes and did my first miter on a proper tube! Done a lot of practice pieces before but even so I was a little nervous hitting the ST with the hacksaw and hand file =) I realize I might need a couple more hand files with bigger radius though. It was hard keeping an even and nice looking curve with the one I currently have but I'm fairly happy with the result. No jig or anything either so I'll be following the Paterek manual as much as I can and build something for the rear triangle when I get there.
So, nothing major has been done but still big step for me. Scale drawing is done except for a detailed rear triangle drawing, not really sure how to approach that but I've checked the chain stays and the should fit OK without too much work. Other than that I've marked up the main triangle tubes and did my first miter on a proper tube! Done a lot of practice pieces before but even so I was a little nervous hitting the ST with the hacksaw and hand file =) I realize I might need a couple more hand files with bigger radius though. It was hard keeping an even and nice looking curve with the one I currently have but I'm fairly happy with the result. No jig or anything either so I'll be following the Paterek manual as much as I can and build something for the rear triangle when I get there.
Likes For Aldatroid:

