


Major Rear Derailleur Failure w/ New Chain
 05-25-18, 10:57 PM
#51
Junior Member
Thread Starter
 05-25-18, 11:00 PM
#52
Junior Member
Thread Starter
The probability of the rust being a structural problem is very low. Apparently Bianchi actually distributes celeste touchup paint: https://www.bianchi.com/global/store...tCode=C8810001. I think it'd be reasonable to ask them to get some to touch up your bike. Ride it in the meantime.
05-25-18, 11:17 PM
#53
Occam's Rotor
Join Date: Jul 2013
Posts: 7,248
Mentioned: 61 Post(s)
Tagged: 0 Thread(s)
Quoted: 2366 Post(s)
Liked 2,331 Times
in
1,164 Posts
They sell it in Europe but not the US.
05-26-18, 08:36 AM
#54
Always Learning

Join Date: Jun 2017
Location: Palm Bay, Fl.
Posts: 166
Bikes: Very Upgraded Denali 63.5cm
Mentioned: 0 Post(s)
Tagged: 0 Thread(s)
Quoted: 86 Post(s)
Likes: 0
Liked 0 Times
in
0 Posts
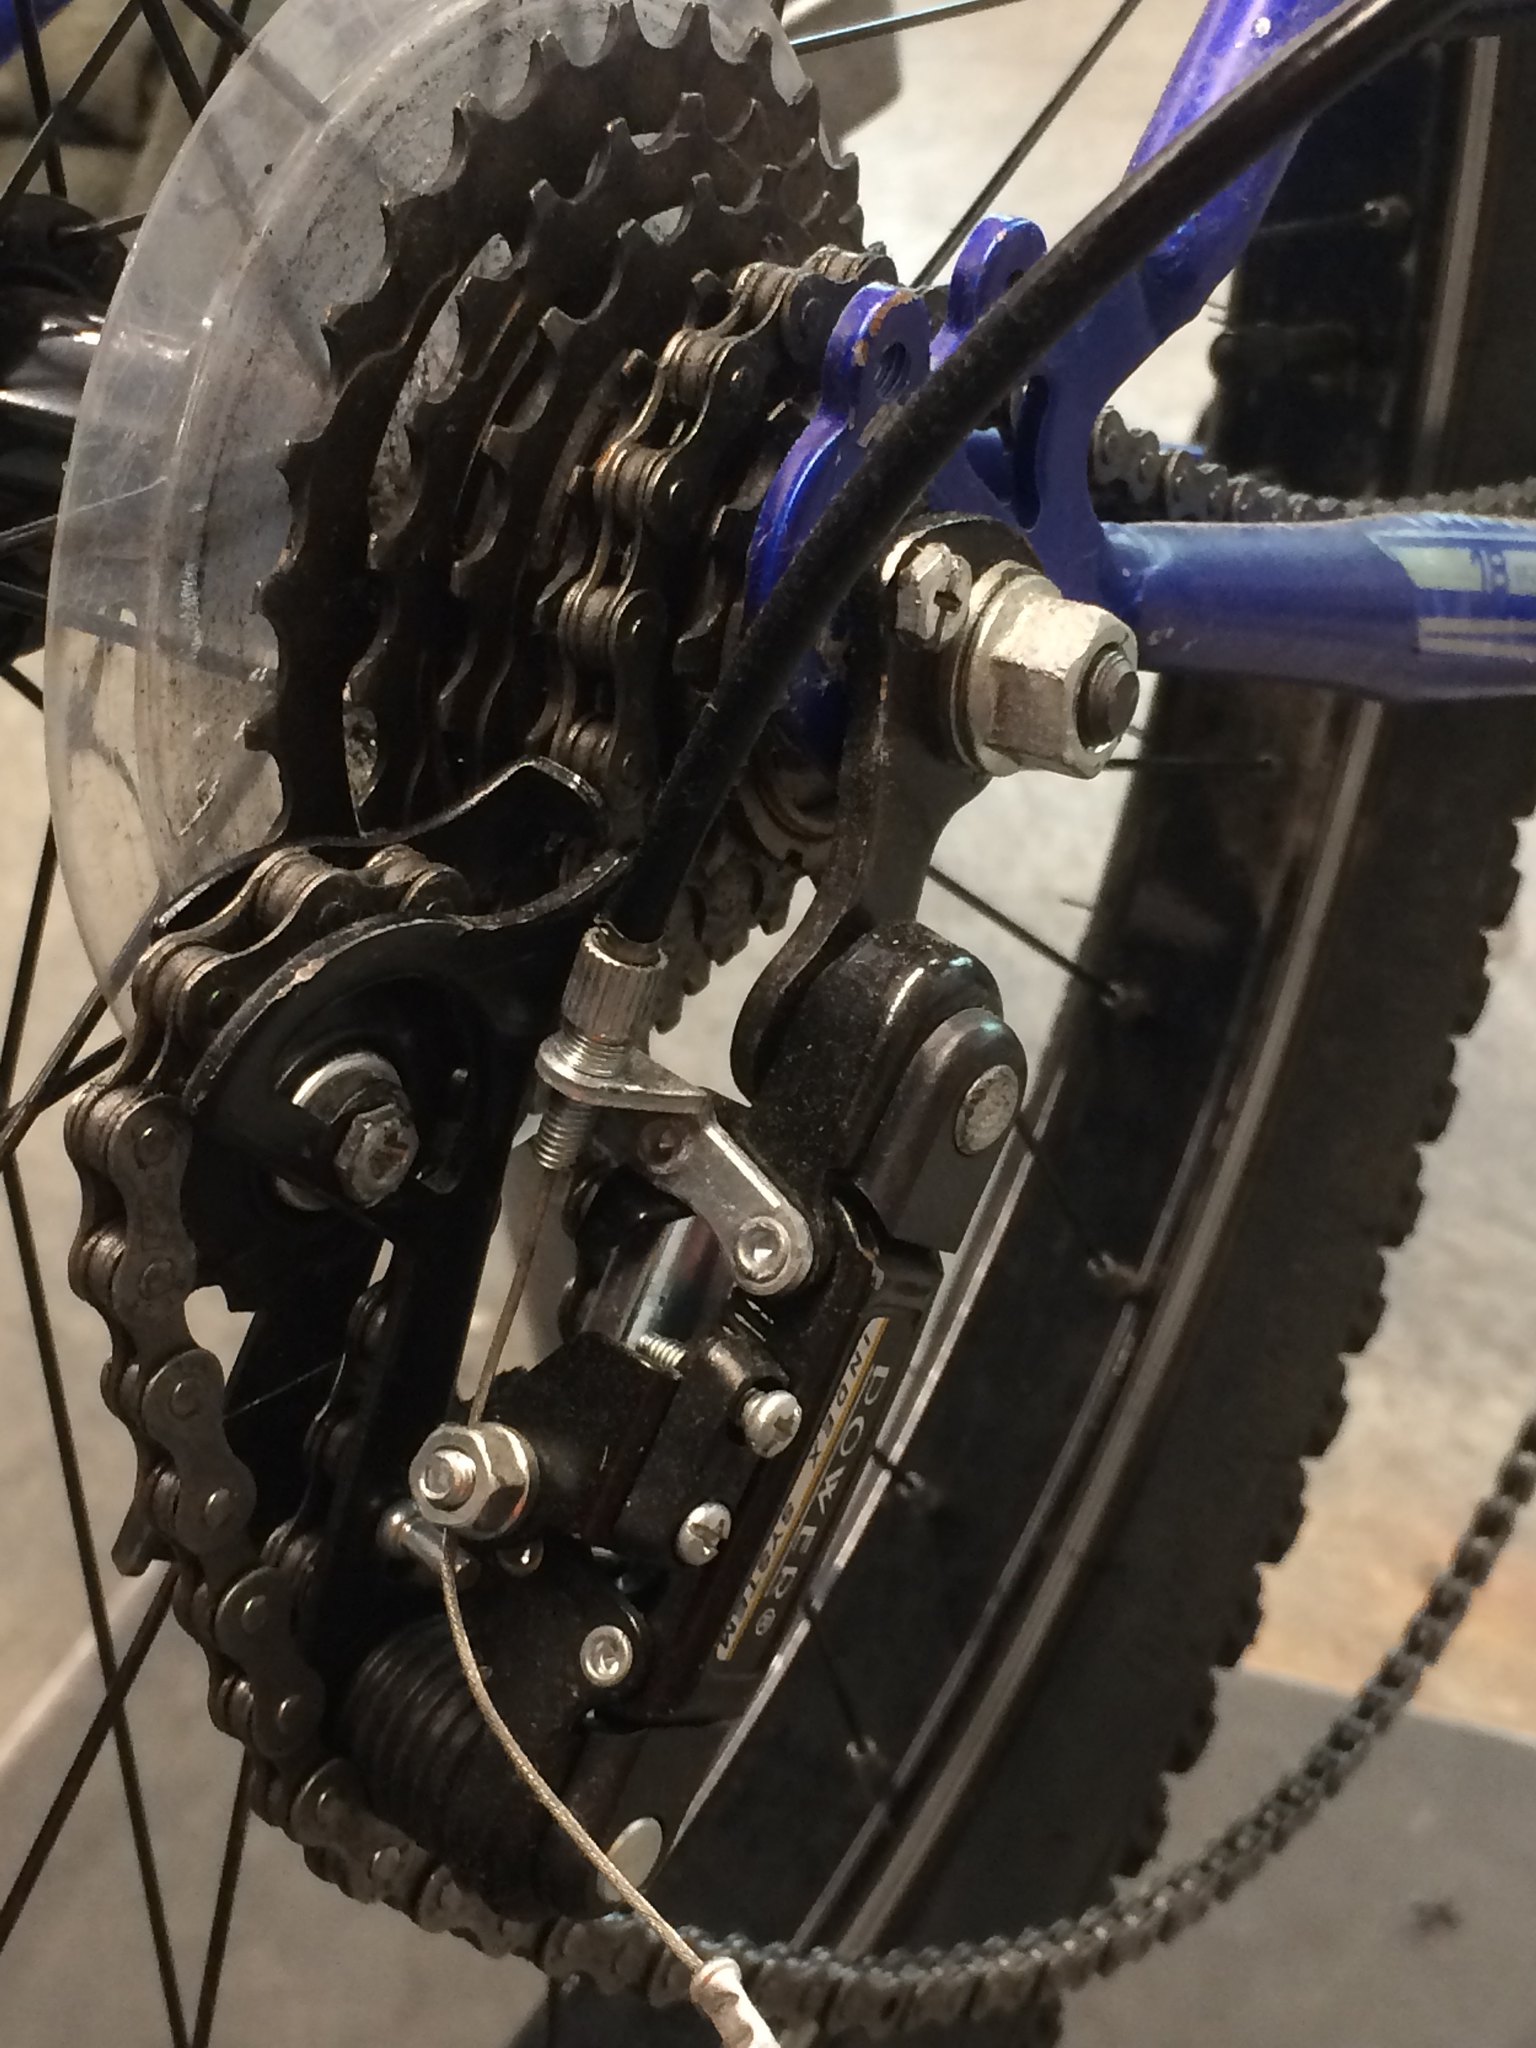
The chain is no where near the wheel so the dork disc did nothing. If the lower part of the derailer had contacted the spokes...not saying it did..., the dork disc wouldn't have prevented that anyway.
It's clear in the second picture that the chain is routed correctly around the tab.
Chainsuck has nothing to do with a cassette. The chain is under tension as it goes over the top of the cassette and can't be "sucked" downward since the chainring is pulling on the chain.
It's not mysterious and is almost predictable. Chainsuck is where the chain sucks up into the frame as the chain leaves the bottom of the chainwheels. The chain holds onto the chainring too long and it gets pulled up. The rear derailer usually has enough tension to pull the chain off the chainwheel but if the chainwheel is damaged, the chain can stick onto the wheel. Even small burrs that develop from a shifting error or poorly adjusted front derailer...like when you hear a "grindy" or "clattery" shift.
I would also disagree that the chain can jam between the lower jockey wheel and the rear derailer cage. There's just not enough room for the chain to jump off the pulley and jam. It would rerail rather than jam.
I do agree that lots of stuff can happen that might not be the mechanics fault.
That may just be an artifact of the derailer twisting around the cassette. The Shimano pin is peened on the front side of the pin so that the force of dragging the derailer up the cassette doesn't pull the chain apart. The back of the pin doesn't need to be peened because there is much less force on the chain when upshifting. The spring on the derailer is enough to make the chain move.
I can't absolve the mechanic entirely but there are other possible causes that have nothing to do with the mechanic. You said you were in the smallest chainring and went to make a shift. The smallest chainring is the one most likely to have chainsuck problems. The chain is under less tension from the rear derailer spring because the chain is effectively "longer" and more slack in the inner ring. The derailer arm is also flatter so it puts less tension on the chain. If the chain catches on the ring and starts to "suck" upward and suddenly releases, the energy goes into the rear derailer which swings that flatter arm upward and allows it to contact the cassette or catch the chain. That pulls the spring on the hanger upwards and the next thing you know the system jams and goes for a wrong way trip around the cassette.
The chain pulling apart is just a result of the having the connecting pin in the wrong place at the wrong time. That wrong way trip around the cassette puts a lot of stress on the chain and can even twist it. It looks like your chain is twisted just above the cassette. That twisting would separate the plate.
Bottom line, I wouldn't be quick to say that it was the mechanics fault. Have you been hearing mysterious chain slapping noise occasionally? It's hard to put into words but, occasionally, the chain will make a slapping noise or you can feel the chain move when you haven't made a shift or it may make the noise after you've shifted. That could be caused by a burr on the rings. Are the rings old? Do you see any signs of the rings having damage...it would show up as a shiny scrape on the ring? All these could have caused the problem. It could still be the chain but it could be other causes as well.
Finally, I hate to be the bearer of bad news but your frame is probably gone. Look at your second picture. The hanger is bent way back behind the axle and the slot for the axle is significantly wider than it should be. You might be able to straighten the hanger but it is more likely to just break off than bend back. And getting the dropout slot back to the width it needs to be would be next to impossible.
05-26-18, 09:44 AM
#55
Junior Member
Thread Starter
05-26-18, 01:25 PM
#56
Junior Member
Thread Starter
I'm happy to report that I was able to squeeze in a 24-mile ride this morning, and my bike's drivetrain performed flawlessly. The rear wheel looks to be perfectly straight, too.
Also, I forgot to mention previously that the mechanic removed (and didn't replace) the dork disk, surely because of the big dent/gash in it from one of the pulleys flipping up into it.
However, at one point on a descent, my rear brakes started making a (new) honking noise when applying very little pressure. At the bottom of that hill I checked the rim, the pads, and the alignment, and everything looked okay. I tightened the pads a tiny bit (though they weren't loose or anything), and I didn't hear that honking sound again on subsequent descents. Still, I'll probably wash the rim and go over the pad surfaces with sandpaper just to make sure there's no contamination or anything.
05-26-18, 01:25 PM
#57
Junior Member
Thread Starter
05-26-18, 03:09 PM
#58

Senior Member
Join Date: Oct 2013
Location: Mich
Posts: 7,349
Bikes: RSO E-tire dropper fixie brifter
Mentioned: 0 Post(s)
Tagged: 0 Thread(s)
Quoted: 6 Post(s)
Liked 2,941 Times
in
1,904 Posts
it should be on the shop to make it look like it did before the incident, or if you authorize it, they procure & supply you with the paint as well as install a new dork disk.
__________________
-Oh Hey!
-Oh Hey!
05-26-18, 03:36 PM
#59
Junior Member
Thread Starter
Yeah, I agree, which is why I'm going to first talk to the shop to see if they're able to get the touch-up paint; if they can't or won't, then I'll worry about finding it myself. (I'm not concerned about the dork disk, though, since I don't know anyone who leaves those on anyway, but I do agree that just on principle they should have put on a new one, or at least offered to.)
05-26-18, 07:18 PM
#60
Senior Member
Join Date: Oct 2013
Location: Mich
Posts: 7,349
Bikes: RSO E-tire dropper fixie brifter
Mentioned: 0 Post(s)
Tagged: 0 Thread(s)
Quoted: 6 Post(s)
Liked 2,941 Times
in
1,904 Posts
Maybe they'll toss you other amenities in place of the d-disk?
__________________
-Oh Hey!
-Oh Hey!
05-26-18, 08:57 PM
#61
Occam's Rotor
Join Date: Jul 2013
Posts: 7,248
Mentioned: 61 Post(s)
Tagged: 0 Thread(s)
Quoted: 2366 Post(s)
Liked 2,331 Times
in
1,164 Posts
Since it is European, shouldn't it be dorc disc?
05-26-18, 09:00 PM
#62
Occam's Rotor
Join Date: Jul 2013
Posts: 7,248
Mentioned: 61 Post(s)
Tagged: 0 Thread(s)
Quoted: 2366 Post(s)
Liked 2,331 Times
in
1,164 Posts
Oh, while I am at it, I should point out that since the dorc disc was damaged, I was right about it possibly saving the wheel, despite arguments to the contrary (which were so persuasive, I found I even began to doubt it myself).
05-26-18, 09:39 PM
#63
Junior Member
Thread Starter
Ha! Or dorc disque?
Oh, I agreed with you from the start - one of the pulleys was pinned to the dork disk, leaving a dent/gash big enough to indicate that had the disk not been there, that pulley would have just kept traveling into the spokes.
Oh, I agreed with you from the start - one of the pulleys was pinned to the dork disk, leaving a dent/gash big enough to indicate that had the disk not been there, that pulley would have just kept traveling into the spokes.
05-26-18, 09:41 PM
#64
Senior Member
Join Date: Oct 2013
Location: Mich
Posts: 7,349
Bikes: RSO E-tire dropper fixie brifter
Mentioned: 0 Post(s)
Tagged: 0 Thread(s)
Quoted: 6 Post(s)
Liked 2,941 Times
in
1,904 Posts
Spoke guard
__________________
-Oh Hey!
-Oh Hey!
05-26-18, 09:48 PM
#65
Occam's Rotor
Join Date: Jul 2013
Posts: 7,248
Mentioned: 61 Post(s)
Tagged: 0 Thread(s)
Quoted: 2366 Post(s)
Liked 2,331 Times
in
1,164 Posts
The chain is no where near the wheel so the dork disc did nothing. If the lower part of the derailer had contacted the spokes...not saying it did..., the dork disc wouldn't have prevented that anyway.
Last edited by Cyclist0108; 05-26-18 at 10:24 PM.
05-27-18, 10:17 AM
#66
Mad bike riding scientist

Join Date: Nov 2004
Location: Denver, CO
Posts: 27,341
Bikes: Some silver ones, a red one, a black and orange one, and a few titanium ones
Mentioned: 152 Post(s)
Tagged: 1 Thread(s)
Quoted: 6200 Post(s)
Liked 4,200 Times
in
2,357 Posts
IMG_2276 by Stuart Black, on Flickr
What caught my eye was this after I had freed up the derailer

IMG_2275 by Stuart Black, on Flickr
Notice the pin separation very similar to what happened with your bike. This was is a similar location as well. There is a lot of twisting and odd forces acting on the chain when one wraps around a derailer. I've seen chains that were twisted 45� or more but this is the first one where I had seen a pin separation like yours. I have the feeling that I just may not have been looking for them. This bike was relatively new...or at least had seen little usage... and a Helmart bike so not of the best quality so adjustments could have been the cause of the derailer twisting around the freewheel. But considering how hard it is to push the pin out of any chain, it was something that surprised me.
__________________
Stuart Black
Plan Epsilon Around Lake Michigan in the era of Covid
Old School�When It Wasn�t Ancient bikepacking
Gold Fever Three days of dirt in Colorado
Pokin' around the Poconos A cold ride around Lake Erie
Dinosaurs in Colorado A mountain bike guide to the Purgatory Canyon dinosaur trackway
Solo Without Pie. The search for pie in the Midwest.
Picking the Scablands. Washington and Oregon, 2005. Pie and spiders on the Columbia River!
Last edited by cyccommute; 05-27-18 at 10:21 AM.
05-30-18, 04:42 PM
#67
Junior Member
Thread Starter
I asked the repair shop if they have Bianchi celeste touch-up paint (they don't), and whether they'd be willing to touch up the bits of exposed steel around the hanger. They seemed kind of reluctant at first, scratched their heads a bit, suggested using nail polish, but then said that because this was totally their fault, I can bring the bike back in and they'll "figure something out." While I appreciate their willingness to do that, their somewhat reticent response made me think I'd be better off touching it up myself. Bianchi sells these touch-up paint sticks, but as mentioned above, they don't sell or ship them to the US, which is kind of surprising, to be honest, given their popularity here. I asked a few local authorized Bianchi dealers, but none of them had any touch-up paint. I managed to find some on eBay, though, so we'll see how that goes.
05-30-18, 05:16 PM
#68
Senior Member
Join Date: Jan 2011
Posts: 2,977
Mentioned: 6 Post(s)
Tagged: 0 Thread(s)
Quoted: 1638 Post(s)
Liked 741 Times
in
495 Posts
Hope it all works out for you!
Most times, if you want something done right, you have to do it yourself, unfortunately.
Most times, if you want something done right, you have to do it yourself, unfortunately.
__________________
nine mile skid on a ten mile ride
nine mile skid on a ten mile ride
05-30-18, 11:10 PM
#69
Senior Member

Join Date: Feb 2015
Location: Mission Viejo
Posts: 5,800
Bikes: 1986 Cannondale SR400 (Flat bar commuter), 1988 Cannondale Criterium XTR, 1992 Serotta T-Max, 1995 Trek 970
Mentioned: 20 Post(s)
Tagged: 0 Thread(s)
Quoted: 1943 Post(s)
Liked 2,163 Times
in
1,322 Posts
You have a couple of options...
https://m.ebay.com/itm/1-Bianchi-Tou...-/262536514280
Keep in mind all Bianchi Celeste greens are not the same.
or a post from 5 years ago (not mine):
"...buy 3 small bottles of model paint. The colours you need are green (grass green), light blue and white. Use a small glass jar with a sealable lid to mix in. Mix equal quantities of the green and light blue to get a 'celeste' with a very similar hue to the actual Bianchi 'celeste'. Then add white carefully, a little at a time, to tone your 'celeste' back to a colour that matches the Bianchi 'celeste' on your bike."
Or you can go to a hobby shop and try your own concoction. I mixed up some model paint to match some chipped areas on a bike of mine and it worked pretty good, much better than nothing. I did a mix based on a small amount (dip a coffee stir in the bottle) of the different colors on a paper plate and used different proportions of each to get it close, poured the approximate amounts into an empty paint bottle. Takes a bit of time, but it worked and was pretty cheap.
John
05-31-18, 09:26 AM
#70
Junior Member
Thread Starter
You have a couple of options...
https://m.ebay.com/itm/1-Bianchi-Tou...-/262536514280
Keep in mind all Bianchi Celeste greens are not the same.
or a post from 5 years ago (not mine):
"...buy 3 small bottles of model paint. The colours you need are green (grass green), light blue and white. Use a small glass jar with a sealable lid to mix in. Mix equal quantities of the green and light blue to get a 'celeste' with a very similar hue to the actual Bianchi 'celeste'. Then add white carefully, a little at a time, to tone your 'celeste' back to a colour that matches the Bianchi 'celeste' on your bike."
Or you can go to a hobby shop and try your own concoction. I mixed up some model paint to match some chipped areas on a bike of mine and it worked pretty good, much better than nothing. I did a mix based on a small amount (dip a coffee stir in the bottle) of the different colors on a paper plate and used different proportions of each to get it close, poured the approximate amounts into an empty paint bottle. Takes a bit of time, but it worked and was pretty cheap.
John
https://m.ebay.com/itm/1-Bianchi-Tou...-/262536514280
Keep in mind all Bianchi Celeste greens are not the same.
or a post from 5 years ago (not mine):
"...buy 3 small bottles of model paint. The colours you need are green (grass green), light blue and white. Use a small glass jar with a sealable lid to mix in. Mix equal quantities of the green and light blue to get a 'celeste' with a very similar hue to the actual Bianchi 'celeste'. Then add white carefully, a little at a time, to tone your 'celeste' back to a colour that matches the Bianchi 'celeste' on your bike."
Or you can go to a hobby shop and try your own concoction. I mixed up some model paint to match some chipped areas on a bike of mine and it worked pretty good, much better than nothing. I did a mix based on a small amount (dip a coffee stir in the bottle) of the different colors on a paper plate and used different proportions of each to get it close, poured the approximate amounts into an empty paint bottle. Takes a bit of time, but it worked and was pretty cheap.
John
05-31-18, 11:38 AM
#71
Senior Member
Join Date: Feb 2015
Location: Mission Viejo
Posts: 5,800
Bikes: 1986 Cannondale SR400 (Flat bar commuter), 1988 Cannondale Criterium XTR, 1992 Serotta T-Max, 1995 Trek 970
Mentioned: 20 Post(s)
Tagged: 0 Thread(s)
Quoted: 1943 Post(s)
Liked 2,163 Times
in
1,322 Posts
06-14-18, 05:00 PM
#72
Junior Member
Thread Starter
Groan... believe it or not, the saga continues:
About a week after I got the bike back, I noticed the rear wheel was slightly off to one side, so it wasn't sitting dead center, but a bit closer to the right. I flipped the wheel and it was still closer to the right side, so I figured it was probably the frame (as opposed to the wheel being out of dish). So, assuming the shop hadn't straightened the frame as precisely as they could have, I took it back to have them fix it.
Several days later, I picked up the bike, and the mechanic said it was actually a combination of the hanger/rear dropout still being a tiny bit off, and the wheel being a bit out of dish, but they fixed it free of charge. The wheel did indeed look dead center. I was in a hurry when I picked it up, so I didn't have time to test ride it, and I brought it back home in the car.
The next day, I took it for a spin only to find that now the rear derailleur is not shifting properly. It absolutely will not shift onto the four smallest cogs, and when it's on the fifth cog from the outside, the derailleur clicks continuously until the chain jumps onto the next smallest cog. But from there, it will not budge to the smaller cogs at all. I also heard a bit of intermittent extraneous derailleur clicking on some of the bigger cogs, too. Rear shifting in general felt a bit tentative. I've attempted to make minor adjustments to rear derailleurs in the past (with varying degrees of success), but I suspect this is beyond my very limited mechanical skill. (Frustrating because the shifting was spot on the previous time I got it back from them.)
Edit: I wonder if this problem has to do with the derailleur needing adjustment, or if the derailleur itself is now out of alignment after the guy adjusted the frame.
So, looks like I will have to take the bike back - yet again - to have this dealt with. I swear, once I get this all resolved, I am never, ever going back to this particular shop again (not even to buy spares or gear - I just don't want to support incompetence).
(On second thought, it might actually be smart to cut my losses and find another shop, and just fork out some money to have someone better do this properly.)
Last edited by Pavol Stromcek; 06-14-18 at 05:13 PM.
06-14-18, 05:13 PM
#73
Senior Member
Join Date: Oct 2013
Location: Mich
Posts: 7,349
Bikes: RSO E-tire dropper fixie brifter
Mentioned: 0 Post(s)
Tagged: 0 Thread(s)
Quoted: 6 Post(s)
Liked 2,941 Times
in
1,904 Posts
send Bianchi an e-mail regarding the experiences you've had. If the shop is certified/authorized in Bianchi products, they might receive current training for servicing those types of bicycles... which seems to be something they lack...
__________________
-Oh Hey!
-Oh Hey!
06-14-18, 05:26 PM
#74
Senior Member
Join Date: Jan 2013
Location: Llano Estacado
Posts: 3,702
Bikes: old clunker
Mentioned: 13 Post(s)
Tagged: 0 Thread(s)
Quoted: 684 Post(s)
Likes: 0
Liked 105 Times
in
83 Posts
Maybe email Bianchi with the details of your saga and ask them to recommend a different authorized dealer to get this finally sorted out.
06-14-18, 05:52 PM
#75
Junior Member
Thread Starter
A cycling buddy of mine actually just highly recommended another authorized Bianchi dealer, which is further away (about 30 mins driving), but he said I should take it to them if I lose all confidence in this other shop's ability to deal with he problem. Maybe that time has come.
Last edited by Pavol Stromcek; 06-14-18 at 06:05 PM.

